
Chapter 6
Animation Principles
This chapter is a continuation of the animation work you began in Chapter 5, “Introduction to Animation.” It introduces you to some new animation fundamentals. We will look at using some animation principles by completing a knife-throwing project.
In this chapter, you will learn to:
- Create anticipation and momentum to make knife throwing appear realistic
Anticipation and Momentum in Knife Throwing
This exercise will give you more experience with Autodesk® 3ds Max® software animation techniques. You will edit more in the Curve Editor and be introduced to some animation principles and concepts, anticipation, momentum, and secondary movement. First, download the project files for this chapter from this book’s companion web page (www.sybex.com/go/3dsmax2015essentials). Set your project folder by choosing Application ⇒ Manage ⇒ Set Project Folder and selecting the c06_Animation Principles project that you downloaded.
Exercise 6.1: Blocking Out the Animation
To begin this exercise, open the c06_ex1_blocking_start.max file in the c06_Animation Principles project folder. When you open the file, you might see a Gamma & LUT Settings Mismatch error dialog; click OK, and then follow these steps.
- Move the time slider to frame 30 and activate the Auto Key button.
- Move the knife to the TARGET object, as shown in Figure 6-1.

Figure 6-1: Move the knife to the target at frame 30.
- Move the time slider to frame 15, where the knife is halfway between its start and the target, and in the Camera001 viewport, move the knife slightly up on the Z-axis, as shown in Figure 6-2, so that the knife moves with a slight arc.

Figure 6-2: Move the knife up slightly at frame 15.
- Click the Time Configuration icon at the bottom of the UI next to the navigation controls. Figure 6-3 shows the Time Configuration dialog box.

Figure 6-3: Change the frame range in the Time Configuration dialog box.
- In the Animation section, change End Time to 30 from 100 and click OK. The time slider will reflect this change immediately.
- Play your animation, and you should see the knife move with a slight ease-out and ease-in toward the target, with a slight arc up in the middle. You are going to move the keyframes from frame 0 to frame 10 so there is a pause before the knife moves toward the target.
- Open the Curve Editor and scroll down in the Controller window until you see the Knife X, Y, and Z Position tracks.
- Hold the Ctrl key and select all three tracks to display their curves (if they are not already selected), as shown in Figure 6-4.
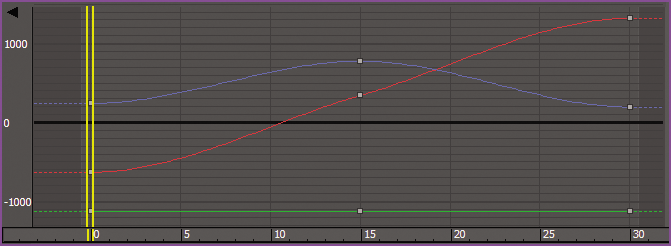
Figure 6-4: The initial curves for the knife
- Drag a selection marquee around the three keyframes at frame 0.
- In the Key Controls toolbar, select and hold the Move Keys tool (
 ) to access the flyout icons, and select the Move Keys Horizontal tool in the flyout (
 ). Use this tool to move the keyframes to frame 10.
 - This will compact the curve, so you need to move the keyframes at frame 15 to the new middle, frame 20.
- Now you can turn off the Auto Key button (N). The finished curve is shown in Figure 6-5.
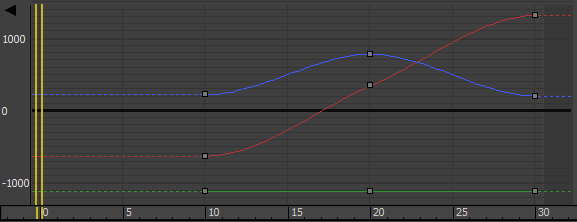
Figure 6-5: Finished curves with the position of the knife starting at frame 10
That’s it for the gross animation (or blocking) of the shot. To check your work, open the c06_ex1_blocking_end.max file in the c06_Animation Principles project folder.
Exercise 6.2: Trajectories
When it comes to animation, it is very helpful to be able to see an object’s trajectory (the path the object is taking over time). To begin this exercise, open the c06_ex2_trajectories_start.max file in the c06_Animation Principles project folder:
- Select the THROW KNIFE object.
- In the command panel, click the Motion icon (
 ).
). - Click Trajectories, as shown in Figure 6-6. The viewports will display a red curve to show you the path of the knife’s motion as it arcs toward the target, as shown in Figure 6-7.

Figure 6-6: Turning on Trajectories for the knife

Figure 6-7: The curve shows the trajectory for the knife’s motion.
- Select the Sub-Object button at the top of the Motion panel. Keys is your only sub-object choice in the pull-down menu to the right of the button.
- Select the middle keyframe and move it up or down to suit your tastes.
- Once you settle on a nice arc for the path of the knife, turn off Trajectories mode by clicking the Parameters button in the Motion panel.
As you can imagine, the Trajectories option can be useful in many situations. It not only gives you a view of your object’s path; it also allows you to edit that path easily and in a visual context, which can be very important. To check your work, open the c06_ex2_trajectories_end.max file in the c06_Animation Principles project folder.
Exercise 6.3: Adding Rotation
Throwing knives in real life is usually a bad idea, but you can throw something else at a target (the inanimate kind) to see how to animate your knife. You’ll find that the object will rotate once or twice before it hits its target. To begin this exercise, open the c06_ex3_rotation_start.max file in the c06_Animation Principles project folder. To add rotation to your knife, follow these steps:
- Select the knife and then press N to activate Auto Key (if it isn’t already active). Move to frame 30, and press E for the Select and Rotate tool.
- In the Camera001 viewport, rotate on the Y-axis about 443 degrees.
- With the knife selected, open the Curve Editor.
- Scroll down to locate the X, Y, and Z Rotation tracks.
- Select the keys at frame 0, and then use the Move Keys Horizontal tool to move the keyframes to frame 10. Figure 6-8 shows the Curve Editor graph for the rotation on the knife.

Figure 6-8: The Curve Editor graph for the rotation on the knife
- Press N to deactivate Auto Key.
- Play the animation, and you will see that the knife’s position and rotation ease in and out. Stop animation (/ is the shortcut key).
- Go back to the Curve Editor; change Move Keys Horizontal back to Move Keys.
- Then select X Position track; then select both keyframes and change them to Linear.
- Now select the Z Position track; you’ll need to finesse this one a bit more than you did the X Position track. You are going to use the handles on the tangents that appear when you select a key. These handles can be adjusted.
- 11. Select the keyframe at frame 10; then center your cursor over the end on the tangent handle and drag using the Move Keys tool. Pull it up so it is even with the curve. Then repeat the same with the keyframe at frame 30. Figure 6-9 illustrates how you want the Z Position animation curve to look. This will give the trajectory a nice arc and a good rate of travel. Now it is time to edit the Rotation keys.
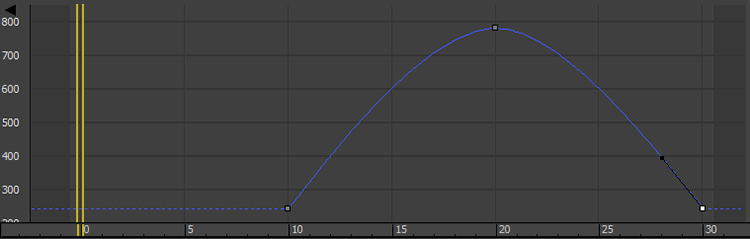
Figure 6-9: Adjust the curve for the knife’s arc through the air.
- The first thing you can do is add a bit of drama to the knife to make the action more exciting. To this end, you can see that the rotation of the knife is too slow.
- Choose the X Rotation track and select its key at frame 30.
- In the Key Entry Type-In, change the value to about –660.
- Adjust the tangent handles to resemble the curve shown in Figure 6-10. The knife will speed up just a bit as it leaves the first rotation keyframe. The speed will be even as it goes into the last keyframe.
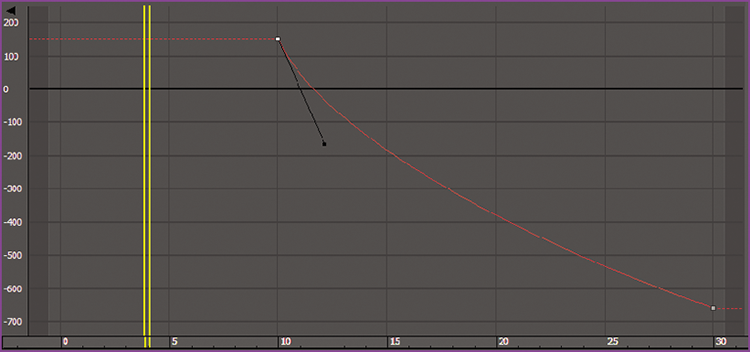
Figure 6-10: Match your curve to this one.
With just a little bit of fast rotation as the knife leaves frame 10, you give the animation more spice. The knife should now have a slightly weightier look than before, when it rotated with an ease-in and ease-out. To check your work, open the c06_ex3_rotation_end.max file in the c06_Animation Principles project folder.
Exercise 6.4: Adding Anticipation
Now let’s animate the knife to create anticipation, as if an invisible hand holding the knife pulled back just before throwing it to get more strength in the throw. This anticipation, although it’s a small detail, adds a level of nuance to the animation that enhances the total effect. To begin this exercise, open the c06_ex4_anticipation_start.max file in the c06_Animation Principles project folder. Follow these steps:
- Move the time slider to frame 0.
- Select the knife, go to the Curve Editor, scroll in the Controller window, and then select the X Rotation track for the knife.
- In the Curve Editor toolbar, click the Add Keys icon (
 ), bring your cursor to frame 0 of the curve, and click to create a keyframe. Doing so creates a key at frame 0 with the same parameters as the next key, as shown in Figure 6-11.
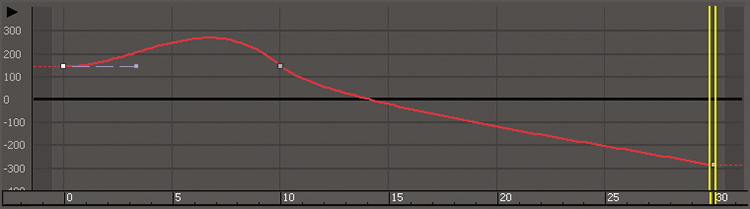
Figure 6-11: Add a key to the beginning to create anticipation for the knife throw.
- Select the Move Keys tool, and select the keyframe at frame 10.
- In the Key Entry Type-In box, change the value of the key at frame 10 to 240. If you play back the animation, it will look weird. The knife will cock back really fast and spin a bit. This is due to the big hump between frames 0 and 10.
- Keep the tangent at frame 0 set to the default, but change the tangent on the key at frame 10 to Linear (
 ). Play the animation. You’ll have a slight bit of anticipation, but the spice will be lost and the knife will look less active and too mechanical.
 - To regain the weight you had in the knife, press Ctrl+Z to undo your change to the tangency on frame 10 and set it back to what you had. You may have to undo more than once.
- Now, select the Move Keys Vertical tool (
 ), which is under the Move Keys tool. Select the keyframe at frame 10, and then select the In tangent handle. This is the tangent handle on the left of the key.
- Press Shift and drag the tangent handle down to create a curve that is similar to the one shown in Figure 6-12.
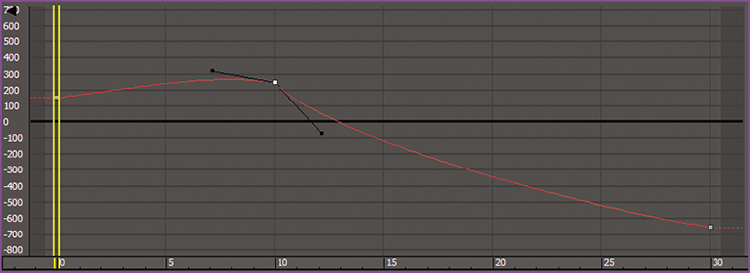
Figure 6-12: To create a believable anticipation for the knife throw, set your curve to resemble this one.
- Play back the animation. It should look much better now.
To check your work, open the c06_ex4_anticipation_end.max file in the c06_Animation Principles project folder.
Exercise 6.5: Following Through
The knife needs more weight. A great way to show that in animation is by adding follow-through; have the knife sink into the target a bit. To begin this exercise, open the c06_ex5_followthrough_start.max file in the c06_Animation Principles project folder.
To add follow-through to your animation, use these steps:
- Click the Time Configuration icon and change End Time to 45 to add 15 frames to your frame range.
- Click OK. Doing so will not affect the animation; it will merely append 15 frames to the current frame range.
- Select the knife and go to frame 30, where it completes its hit on the target.
- In the Curve Editor, select the X Position track of the knife.
- Add a keyframe with the Add Keys tool at frame 35. Select the Move Keys tool, and then select the keyframe at frame 35.
- Note the value of the key in the type-in boxes at the top right of the Curve Editor (not the type-in boxes at the bottom of the main UI). You will want to set the value for the key at frame 35 to about 1330 to sink it farther into the target.
- With these relative values, scrub the animation between frames 30 and 35. You should see the knife’s slight move into the target. The end of your curve should look like the curve in Figure 6-13. You still need to add a little bit of follow-through to the rotation of the knife to make it sink into the target better.

Figure 6-13: Your animation should end like this.
- In the Curve Editor, select the X Rotation track to display its curve.
- Add a key to the curve at frame 35. The value of the key at frame 30 should already be about –660.
- Set the value of the keyframe at frame 35 to about –655. Keep the tangent set at Auto.
- If your values are different, adjust according to what works best in your scene.
Be careful about how much the knife sinks into the target. Although it is important to show the weight of the knife, it is also important to show the weight of the target; you do not want the target to look insubstantial. To check your work, open the c06_ex5_followthrough_end.max file in the c06_Animation Principles project folder.
Exercise 6.6: Transferring Momentum to the Target
To make the momentum work even better for the knife animation, you will have to push back the target as the knife hits it. The trouble is, if you animate the target moving back, the knife will stay in place, floating in the air. You have to animate the knife with the target.
Parent and Child Objects
To animate the knife and target together, the knife has to be linked to the target so that when the target is animated to push back upon impact, the knife will follow precisely because it is stuck in the target. Doing this won’t mess up the existing animation of the knife because the knife will be the child in the hierarchy and will retain its own animation separate from the target. To begin this exercise, open the c06_ex6_momentum_start.max file in the c06_Animation Principles project folder. Just follow these steps:
- Go to frame 35, about when the knife impacts.
- On the far left of the main toolbar, choose the Select and Link tool (
 ).
). - Select the knife and drag it to the target, as shown in Figure 6-14 (left image). Nothing should change until you animate the target object.
- Move the time slider to frame 34 and press the N key to activate the Auto Key tool.

Figure 6-14: Link the knife to the target (left), and then rotate the target in the X-axis (right).
- With the Select and Rotate tool, select the TARGET object and rotate it back about 5 degrees, as shown in Figure 6-14 (right image).
- Go to the Curve Editor, scroll to find the Y Rotation track for the TARGET object, select the keyframe at frame 0, and move it to frame 30.
- Then hold the Shift key, and click and drag the keyframe (which will make a copy of it) to frame 37.
- Change the tangent for the key at frame 30 to Fast and leave the other key tangents alone.
- Add a little wobble to the target to make the animation even more interesting. This can be done easily in the Curve Editor. Use Add Keys to add keys at frames 40 and 44.
- Using the Move Keys Vertical tool, give the key at frame 40 a value of about 1.7. Your curve should resemble the one in Figure 6-15.

Figure 6-15: The target animation curve
- Finally, add a little slide to the target. Using the Select And Move tool, move the time slider to frame 37, and move the target just a bit along the X-axis.
- Go to the Curve Editor, scroll to the X position of the TARGET object, select the keyframe at frame 0, and move it to frame 30 so the move starts when the knife hits the target.
- Change the tangent for frame 30 to Fast and leave the other tangent at Auto. Deactivate Auto Key.
Done! Play your animation. Experiment and change some of the final timings and values of the target’s reaction to the impact to see different weights of the knife and target and how the weight looks to the viewer. To check your work, open the c06_ex6_momentum_end.max file in the c06_Animation Principles project folder.
You can see a sample render of the scene in the c06_knife_animation.mov QuickTime file in the renderoutput folder of the c06_Animation Principles project.