
Lesson Files | iLife08_Book_Files > Lessons > Lesson14 > L14_Homepage Assets iLife08_Book_Files > Lessons > Lesson14 > L14_Other Page Assets |
Time | This lesson takes approximately 3 hours to complete. |
Goals | Create a new website Choose a theme for the site Create a homepage Add text to the homepage Position text, shapes, and images on the page Format and color text Create links to external pages Publish the site Add additional pages to the site Include a Google Map on a page Incorporate an HTML snippet |
Once upon a time, if you wanted to publish something, you took it to the public square and read it out loud in front of the milling throngs. Later, inventions like the printing press, radio, and television made it possible to publish to a much vaster audience, but usually at a cost prohibitive to most people.
It sure would be great if there were an easy and low-cost way to publish and still reach millions of people—like, say, a worldwide web of interconnected computer networks capable of sending text and pictures and sound into hundreds of millions of homes and offices.
Wait a minute—there is! Today, if you want to publish something, you put it together on your Mac using iWeb and click a button to post it on your website. Then you wait for the milling throngs (or million web surfers) to come to you.
If you’re going to build a site and share it with a potential audience of hundreds of millions, it helps to have a plan. A good way to start is by answering these two questions:
What are you trying to say?
Whom are you trying to say it to?
The answers to these questions are connected. You may want to build your site in order to express your opinions, to share your experiences with others, or to sell something—or maybe even all three. In the following exercises, you’ll build a site that combines those three motives: the website for a live-music concert venue, run by people who know the kinds of music they like, and want to share it with others. And the people they want to share it with are people who enjoy listening to the same kinds of music and are willing to pay to hear it performed live. The place is Jammin’ Java, a popular cafe and music club based in Washington, D.C.
Now that you know what you’re going to say, you want to look and sound good saying it—after all, millions may be watching.
iWeb, iLife’s application for creating websites, has many good-looking professionally designed website themes from which you can choose. Each of these site themes provides templates for the various kinds of webpages you might use on your site: welcome pages, information pages, photo pages, podcast pages, blog pages, and blank pages that you can use for purposes that the other iWeb page templates don’t address.

iWeb’s icon
Let’s pick a site theme for Jammin’ Java and start jammin’.
Open the iWeb application.
The iWeb icon is placed in your Dock when you install iLife, but if you don’t find it there, you can find the application in your Applications folder. Upon opening for the first time, iWeb displays a template chooser sheet (if you don’t have a .Mac account, iWeb presents a .Mac sign-up dialog first before presenting the sheet). A list of themes appears in a scrolling list on the left of the sheet, and a pane of webpage template thumbnails for the currently selected theme appears on the right. The Black theme seems a suitable place to start for the site you’re building, a popular coffeehouse that features nighttime entertainment.
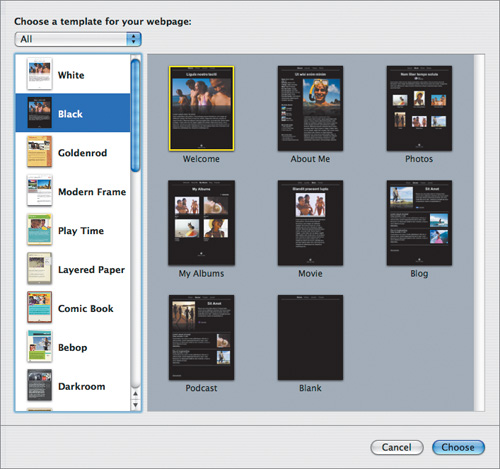
In the theme list, click the Black theme. Next, click the Welcome page thumbnail on the right, and then click Choose.
iWeb displays the Black theme’s Welcome page you chose in the webpage canvas on the right side of the iWeb window. The window’s left side shows the sidebar, which lists the sites and pages you’ve created. Right now, there should be one site, named Site, and one page, named Welcome; you’ll change these names later. Along the bottom of the canvas runs the iWeb toolbar. The page itself contains placeholder text and images that you can modify and supplement as you begin building your page.
Note
You can change a page’s theme any time you wish, and the site you build can comprise pages that use different themes. Use a set of pages that share a common style to help site visitors feel confident that they haven’t accidentally wandered off into a different site as they move between the pages on yours.

The page you just added to the site is the homepage: the first page that visitors to your site see. Your homepage should help visitors find the information they came for as easily as possible. Most visitors to the Jammin’ Java homepage probably want to find out which acts are scheduled to play at the cafe. You’ll add a list of upcoming performances as well as prominent links that visitors can click to visit other pages on your site.
The Welcome page template you’ve selected contains a navigation menu at the top. It currently contains the name of the only page on your site right now: Welcome. As you add pages to your site, the names of those pages appear in this menu so your visitors can click a page name to go to that page. Below the menu is the page’s header, which lets visitors know what page they’re on. It currently reads Welcome to My Site.
First you’re going to customize this page to add the Jammin’ Java banner, and then you’ll modify the header to be more informative and to match the banner design. After that, you’ll add the performance calendar to the page along with some other information that visitors might find useful.
Drag the navigation menu down the page until it’s 156 pixels from the top of the page.
As you drag, a yellow help tag follows your pointer, showing you where the item you’re dragging is currently located on the page. The x coordinate shows how far it is from the left of the page and the y coordinate shows how far it is from the top. As an additional aid, a blue alignment guide appears when the navigation menu you’re dragging is centered between the left and right sides of the page. You’ll see these guides appear when you drag items around the page: They help you line items up with the sides and centers of nearby objects on the page, or with the page’s top and sides.

Notice also that as you drag, all the other objects on the page move down. In iWeb, pages are divided into various regions: the navigation menu region, a header region where the Welcome to My Site header appears, the body region that contains the page’s main contents, and a footer region at the bottom of the page. When you change the size of any of these regions, as you’re doing when you drag the navigation menu down, the other regions move to accommodate the change.
In the Finder, open the Lessons folder that you dragged from the DVD that accompanied this book and find the Lesson14 folder. Then open that folder and open the L14_Homepage Assets folder you find inside.
The items inside the L14_Homepage Assets folder contain the text and images you’ll be adding to the Jammin’ Java homepage.
Drag the homePageHeader.gif file from the folder to iWeb’s webpage canvas, above the navigation menu you just dragged.

The Jammin’ Java banner appears where you dragged it. There are a couple of problems, though: The banner is not big enough, and it isn’t quite where you want it. The banner should be at the top of the page, and it should be as wide as the page’s content area, which happens to be 700 pixels wide. You can fix the banner position and size using the Metrics Inspector window.

In the toolbar at the bottom of the iWeb window, click the Inspector button. In the Inspector window that appears, click the small ruler button that’s third from the right in the Inspector window’s toolbar.
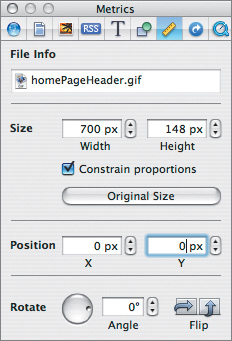
You use the Metrics Inspector to see and change the size, position, and orientation of items on your webpage: Graphics, text boxes, and shapes can all be resized and repositioned precisely the way you want them. The name of the currently selected item, in this case the banner file, appears in the File Info area of the Inspector.
In the Size area of the Metrics Inspector, make sure that “Constrain proportions” is selected, and enter 700 px for the banner’s width. Next enter 0 px in both the X and Y position fields in the Inspector’s position area, and then press Return.
When you finish, the Jammin’ Java banner appears at the right position above the navigation menu and at the right size. Notice that when “Constrain proportions” is selected in the Metrics Inspector, changing one of the dimensions of the selected item changes the other dimension automatically in order to keep the same proportions.

Now that you’ve repositioned the navigation menu and added the Jammin’ Java banner to the page, you’ll add a separator line above the navigation menu to match the one below the menu. This will help distinguish the navigation menu visually as a separate element from the others on the page.
In the webpage canvas’s toolbar, click the Shapes button.
A pop-up menu appears, displaying various shape graphics that you can add to the page.
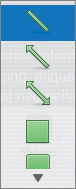
Choose the first item in the Shapes pop-up menu, a straight line.
A line appears selected in the center of the page. You’ll use the Metrics Inspector to change its position and length, and the Graphic Inspector and Colors window to change its color to match the light gray color of the line below the navigation menu.

In the Metrics Inspector’s toolbar, click the Graphics button immediately to the left of the Ruler button.
The Metrics Inspector window becomes a Graphic Inspector window. You use the Graphic Inspector to change various graphical characteristics of objects on a page.
Tip
Rest your pointer over each of the buttons in the Inspector window’s toolbar to see a help tag that explains what Inspector the button represents. From left to right they are the Site Inspector, the Page Inspector, the Photos Inspector, the Blog & Podcast Inspector, the Text Inspector, the Graphic Inspector, the Metrics Inspector, the Link Inspector, and the QuickTime Inspector.
In the center of the Stroke area in the Graphic Inspector, above the Endpoint pop-up menus, click the white-colored button.
This button indicates the current color of the selected graphic item. The button remains highlighted after you click it and a Colors window appears. You use the Colors window to set the colors of things on the page: Text, shapes, borders, and backgrounds can all be set with the Colors window.
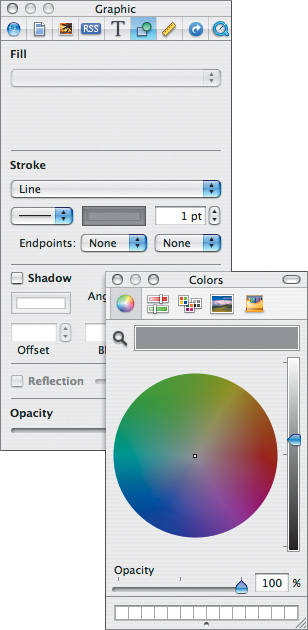
In the Colors window, drag the slider on the right down until just above the midway point.
The color chip at the top of the window shows a medium gray color; the line you added to the page becomes the same shade of gray.
In the Graphic Inspector’s toolbar, click the ruler button again.
The window becomes the Metrics Inspector once more and displays controls suitable for controlling the length and position of a line shape.

Set both the Start and End Y coordinates of the line to 154 pixels, then set the Start X position to 0 pixels and the End X position to 700 pixels, as shown above.
When you finish, the line moves to its new position directly above the navigation menu.

Now you need to adjust the length of the line below the navigation menu to match the one above.
Click the line below the navigation menu to select it, and then set its Start X position to 0 pixels, and its End X position to 700 pixels.
The bottom line now spans the page as well.

Now that you’ve added a banner and separator lines to the navigation menu region, your next step is to change the page’s header to something more appropriate.
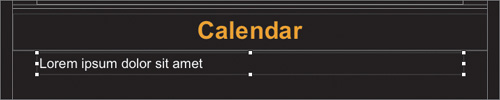
Double-click the Welcome to My Site placeholder text in the header, and type Calendar.
When you double-click a text box containing placeholder text, all the text is selected so you can immediately replace it by typing. Calendar now appears as the new header text for the page.

Select the new header text you just typed.
You need to have the text that’s inside the text object selected for the next steps, which will change its color.
If the Colors window is not open, click Colors to open the window.

Click the magnifying glass near the top right of the Colors window.
Your pointer becomes a magnifying glass cursor. As you move it over the screen, the magnifying glass magnifies the area beneath it.

Position the magnifying glass over one of the colored letters in the Jammin’ Java banner at the top of the page, and then click.
The header text becomes the same color as the text in the Jammin’ Java banner graphic.

Choose File > Save, or press Command-S.
Whenever you finish a chunk of work on your page, as you’ve done here, it’s good practice to save your work.
With the navigation area and header all squared away, it’s time to turn your attention to the stuff that people actually come to this page to see: the main content. This content is a list of the acts scheduled to perform at the cafe.
Note
The real Jammin’ Java cafe has acts scheduled to perform almost every day of the month. For this exercise, however, we’re only going to schedule four acts in order to save you time.
To do this, you’ll create or duplicate a number of text boxes on the page, position them with the Metrics Inspector, and add the appropriate text to them from the files on the DVD that came with this book.
Click the big placeholder photograph on the page and press Delete.
This page will not feature a photograph, so you can reclaim the space the picture placeholder takes up and use it for the page’s text.
Choose View > Show Layout.
This command outlines all the objects on your page with a thin line, so you can see them more clearly. Showing the layout can be very helpful when you work on a page that contains a lot of separate objects.

Click the page’s title text box (the one that contains a single line of text reading Lorem ipsum dolor sit amet) to select the box, and then use the Metrics Inspector to position the box’s top-left corner at these coordinates: X: 35, Y: 269.
The title text box now appears directly below the Calendar header text box.
Click the main text box to select it, use the Metrics Inspector to place the box at X: 147 and Y: 329, and then set its width to 345 pixels and its height to 285 pixels.
The main text box moves and changes shape to match your settings in the Inspector.

Choose Edit > Duplicate.
Another text box appears, slightly offset from the first one. The new text box is selected.
Set the text box’s position to X: 147, Y: 622.
The text boxes no longer overlap and are now positioned in a column on the page.

In the Finder, drag the ActOneText.rtfd file from the L14_Homepage Assets folder onto the first text box in the iWeb window, then drag the ActTwoText.rtfd file from the same folder in the Finder onto the second text box in the iWeb window.
The placeholder text in the two text boxes is replaced by the text in the files you dragged. You now have two acts listed on the page.

Tip
Although you can type and format text quite easily in iWeb, it’s often easier to prepare the text in another program and then just drag the text file into a text box like you’ve done here. This allows you to reuse content you’ve written for other purposes. iWeb can incorporate text saved in RTF format, which can be exported from most word processing programs, including Pages and Microsoft Word. Depending on the program you use, the RTF file can even include images and links: Your Mac’s TextEdit program, for example, can do this.
Set the height of the second text box to 193 pixels, then duplicate it and position the duplicate at X: 147, Y: 823.
Click in the duplicated box you just made so you have an insertion point in the box, choose Edit > Select All, and then press Delete.
The third text box is now empty.
Drag the file ActThreeText.rtfd into the third box, and then set its height to 351 pixels.
Duplicate the text box, position it at X: 147 and Y: 1182, and then delete the text it contains.
Drag the file ActFourText.rtfd into the fourth box, and then set its height to 409 pixels.
You now have four acts listed in text boxes on the Calendar page, all neatly arranged in a vertical column.
Next, you’ll give the text boxes some style and illustrate them with thumbnail pictures of the performers.
First, you’ll modify the appearance of the boxes containing information about upcoming performances at the cafe: Although white text on a black background looks stylish, it can be somewhat hard on the eyes. You’re going to soften the look of these boxes, and, in the process, make them stand out more clearly on the page.
Click any one of the text boxes you just created, and then Shift-click to select the other three.
When you select multiple objects on a page, you can make changes to all of them at once.
Click the graphics button in the Inspector window’s toolbar (it’s the fourth one from the right) to show the Graphic Inspector.
Although the objects you’ve selected are text boxes, they still have some graphic attributes. The attribute you’re going to change is the boxes’ fill color.

In the Fill area of the Graphic Inspector, choose Color Fill from the pop-up menu.
The text boxes immediately become filled with white, because that is the color currently displayed in the Fill area’s color swatch. As a result, the text in the boxes seems to have vanished. Don’t worry, you’re going to fix that right now.

Click the white swatch in the Graphic Inspector’s Fill area.
The Colors window appears. The Graphic Inspector will use the color you select in the Colors window as the fill color for the selected page objects.

Drag the slider on the right side of the Colors window about three-quarters of the way down so that the panel at the top of the window shows a medium-dark gray.
As you drag, the backgrounds of the selected text boxes change to match the color at the slider’s position, and the text becomes visible again.

Your next task is to adorn the calendar entries for each act with small illustrations of the performers.
In the Finder, drag the bencarroll.jpg file from the L14_Homepage Assets folder to the left of the first text box in the iWeb window, then drag the joncarroll.jpg file from the same folder in the Finder to below the first picture in the iWeb window.
Click the first picture you dragged and use the arrow keys on the keyboard to move the picture up until it’s just level with the top of the first text box. Then click the second picture and move it down so there’s a small gap between the first and second picture.
Select both pictures and choose Arrange > Align Objects > Left.
The left sides of the pictures line up.

Drag the king.jpg file to the left of the third text box, then drag the malik.jpg file below the first picture, leaving some space between the two pictures.
Select both pictures and choose Arrange > Align Objects > Left.
Making sure both pictures are selected, drag the pictures slightly up and down until you see a horizontal alignment guide appear, then drag the pictures left and right slightly until you see a vertical guide appear.
iWeb shows the horizontal guide when two pictures are aligned with the center of the text box beside them. You’ll see the vertical guide appear when the centers of the pictures line up with the pictures you placed above.

Drag and drop the fath.jpg file to the left of the second text box, then drag it so that it aligns with the pictures above and below and is also aligned with the center of the second text box.
Drag and drop the files lgc.jpg, godgiven.jpg, tnyce.jpg, and samtim.jpg so that they’re arranged vertically beside the final calendar text box, and then select all four and drag them so that they align with the other pictures you’ve placed.
When you finish, the bottom of the page should resemble the following picture.

By using the alignment guides and the Align commands on the Arrange menu, you can position objects on a page in relation to one another efficiently and accurately.
With the homepage’s main content in place, your final tasks are to replace the title placeholder text with something more meaningful and to add a small sidebar containing the week’s current events.
Double-click the page title and type Appearing in October and then press Return.
The title lets visitors to the page know what all those text boxes and pictures that you’ve been placing are about.

On the iWeb window’s toolbar, click the Text Box button.
A new, empty text box appears in the center of the page, ready for you to type something into it. You’ll probably notice a problem: By default, new objects are always placed in the center of the webpage canvas, which means that your new text box is probably positioned directly over one of the calendar entries, making it very hard to see and manipulate. Fortunately, there’s an easy solution: Use the Metrics Inspector to place it somewhere else.
Using the Metrics Inspector, set the box’s position to X: 513, Y: 314, and set its width to 159 pixels.
The text box is now at the right side of the page, with the top of the box slightly higher than the top of the first calendar entry.
Type THIS WEEK in the text box.
The text appears in white. The text color of new text boxes on a page is controlled by the page template you chose.

Click the frame of the text box to select the box, and then, using the Metrics Inspector, set the text box’s height to 38 pixels.
The box becomes shorter. This box is going to be a label for another box you’ll place below it. But first, you’ll format the text in the box.

In the Inspector window’s toolbar, click the T button to show the Text Inspector and click the center text alignment button in the Inspector’s Coloring and Alignment area. Then drag the Character slider in the Spacing area to the right until it reaches 30%.

The text is now centered and widely spaced in the box. Now you’ll add the text box for which this one is the label.

Click the Text Box button in the iWeb window’s toolbar, then switch to the Metrics Inspector and use it to move the box to X: 513 and Y: 359, giving the box a width of 159 pixels.
A new empty text box appears beneath the label, with the same width as the label’s text box. Don’t worry about the box’s height for now; iWeb will handle that for you.

Drag the ThisWeekText.rtf file from the L14_Homepage Assets folder into the new text box.
The box expands vertically to accommodate the text.

Click the edge of the text box to select it as an object, and then use the Graphic Inspector to give the box a white color fill.
Because the text is also white, it seems to vanish. This problem is easily fixed.
Using the Text Inspector, click the white swatch in the Color & Alignment area of the Inspector, and in the Colors window that appears, drag the slider on the right all the way down.
Voila! The text is now black and visible again. You can use background fills and text colors to create a variety of attractive text layouts.

Note
Because the entire text box was selected, the text color adjustment affected all the text in the box. If you had selected just a portion of the text in the text box, the color change would have affected only the selected text.
The homepage is complete. If you haven’t done so, now would be an excellent time to choose File > Save.
Although you still have some other pages to add to your site, publishing it once you’ve completed the homepage is not a bad idea. It gives you a chance to see how the site looks and works in a web browser, and allows you to tell a few friends about it and have them look and give you feedback for changes and improvements.
Before you publish your site, you have a few loose ends to clean up: the name of the site and of the homepage.
In the iWeb sidebar, double-click the top item, Site.
The name of your site is selected for editing. It needs to be changed to something less generic than the word Site.
Type JamminJava and press Return.
Your site is now renamed.
Double-click the next item, Welcome, then type Calendar and press Return.
You’ve renamed the homepage. Notice that the navigation header on the page now shows Calendar instead of Welcome.

It may look odd to have Calendar in the navigation menu right above the page header, which also reads Calendar, but that’s only because you haven’t yet added any other pages to the site. Once you add pages, their names will appear in the navigation menu as well.
Note
You can move the navigation menu around, but you can’t change its text or appearance. iWeb manages the menu: It uses the names of the site’s pages for the menu’s contents and the webpage template for its visual attributes.
With the loose ends all tied up, you are now ready to publish your site. You can publish either to .Mac or to a folder on your Mac.
Note
Even if you own your own Internet domain, you can still publish your site to your .Mac account and have users visit your site by entering your domain’s address. Choose File > Set Up Personal Domain to have iWeb walk you through the process of setting up .Mac hosting of a personal domain.
By far the easiest way to publish your site is to a .Mac account. If you have a .Mac account, iWeb can send the site there with a single click of a button. iWeb can detect whether you have your Mac configured to use a .Mac account, and displays the .Mac account it detects at the bottom of the iWeb window.
Note
As mentioned elsewhere in this book, a .Mac account costs $99 a year, and in addition to giving you iWeb website publishing, it provides you with 10 gigabytes of online storage, email, software, and a bunch of other features. Most of the iLife programs can make use of a .Mac account. If you don’t have a .Mac account and want to try it out, you can sign up for a free 60-day trial account.
iWeb also keeps track of which pages you’ve published, and which pages you haven’t. It shows the pages and the sites you haven’t published, or have changed since the last time you published, in red in iWeb’s sidebar.
Ready? Let’s publish the Jammin’ Java site:
At the bottom left of the iWeb window, click Publish.

iWeb displays a Content Rights window with a reminder about using copyrighted material.

Click Continue.
iWeb logs into your account, prepares your site for publishing, and then begins sending your site to .Mac. It presents a sheet telling you that the publishing is now taking place. You can continue working while iWeb sends your site to .Mac.
Click OK.
You can see how the publishing process is going by looking in your sidebar: iWeb displays a small round progress indicator as it transfers your site to .Mac.

That’s it: three steps. If you select the two “Don’t show this message again” checkboxes in the two sheets that iWeb displays, it’s only one step the next time you publish.
As soon as your site is published, .Mac lets you know with one more sheet.

You can click OK to dismiss the sheet, click Visit Site Now to open your web browser and view the site, or click Announce to open your email program and send an email message with the site’s address to anyone you want. iWeb even prepares the email for you—all you have to do is supply the addressees.

Note
Once you’ve published your site to .Mac, the Visit button at the bottom of the iWeb window becomes active. You can click it at any time to visit your published site.
So let’s take a look at the site you just published.

It looks almost exactly as it does in the iWeb window. If there are any discrepancies between how iWeb displays the site and how it looks in your browser (and often there will be), trust your browser because that’s what people will be using to view your site. But keep in mind that what looks one way in your browser might look different in another browser on another computer.
If you don’t have a .Mac account, you can still use iWeb to design a site and then publish your site to a folder, which you can then upload to a web server operated by your Internet service provider or other web hosting service.
To publish to a folder, follow these steps:
Choose File > Publish to a Folder.
iWeb presents a sheet that lets you choose where to store the folder containing your site. The sheet also has an optional field where you can specify the address of your site, so that iWeb can set your site up for certain site functions. These functions include providing an RSS feed so that people can subscribe to any blogs on your site using an RSS reader (blogs are explained in a later lesson in this book).

Navigate to the place where you want to store your site folder, optionally provide the site’s URL, and then click Choose.
iWeb presents the same Content Rights window that it shows when you publish to .Mac.
Click Continue.
iWeb saves your site folder and presents a sheet that tells you which features work differently (or not at all) between a site published on .Mac and one published to a folder. In particular, features that rely upon software running on the .Mac servers, such as hit counters and password protection, don’t work for iWeb sites published to a folder.
Note
Some of these features may be available from the Internet service provider that hosts your site, though making them work probably will require additional programming on your part.

Click either button on the sheet to dismiss it.
Clicking the Visit Site Now button opens the site in your Mac’s browser. This is an excellent way to check the appearance of your site in a browser before you actually publish it online, either on .Mac or on another web hosting service.
Your version of the Jammin’ Java site now has one page on it: a calendar of upcoming performances. Now it’s time to add a few more pages to round the site out.
You’ll create the following pages: a Food and Drink page that offers the cafe’s menu, an About page that tells visitors more about Jammin’ Java, a Store page that gives visitors the opportunity to buy recordings, and a Contact page that gives site visitors a way to get in touch with Jammin’ Java’s staff for additional information or services.
The cafe’s Food and Drink page is the first page you’ll make. Although you can start this page by choosing File > New Page and then picking a page theme as you did when you created the homepage, doing so would require you to repeat all the preliminary layout work you did the first time. Because you want the Food and Drink page—and, in fact, most of the other pages on the site—to look similar to the homepage, it’s easier to copy the homepage and then modify it.
Note
Duplicating a well-designed page and modifying it is a very common method for giving a site visual consistency as well as reducing the amount of layout work you have to do as you add pages to the site.
In the sidebar, click the Calendar page, and then choose Edit > Duplicate.
A new page appears in the sidebar: Calendar 2. It’s red, to indicate that the page has not yet been published. Also, the page’s name appears in the navigation menu of the page displayed in iWeb’s webpage canvas.

In the sidebar, double-click the page’s name and rename it Food and Drink.
The new name replaces the name in the navigation menu.

Double-click the page’s header text and replace Calendar with Food and Drink.
Next, you need to get rid of everything on the page that you don’t want to reuse.
Leaving the first calendar entry, the “THIS WEEK” label, and the white box below it alone, click to select each item on the page below the heading, and then press Delete to delete each in turn.
When you finish you have one calendar entry and the week’s event list on the right.
Click the remaining calendar entry object to select it, click inside the entry to place an insertion point in the text, and then choose Edit > Select All and press Delete.
The calendar entry is now a single gray box. This box will become the home of the cafe’s menu.
Using the Metrics Inspector, set the gray box’s width to 498 pixels and its X position to 0.
The gray box becomes wider but retains its right and bottom margins.

The page is now ready for you to add some new content. Before you do, duplicate this stripped-down page so you can use it as the basis for the other pages you’re going to add:
Duplicate the Food and Drink page and rename the duplicate About.
Duplicate the About page and rename the duplicate Store.
Duplicate the Store page and rename the duplicate Contact.
Select the Food and Drink page again in the sidebar.
Now let’s add some content to the Food and Drink page: a graphic label to serve as the header for the cafe’s menu, and the text of the menu itself. You can find these items inside the L14_Other Page Assets folder inside the Lesson14 folder.
Drag the cafe.gif file from the L14_Other Page Assets folder above the empty gray text box on the page, making sure to align the left side of the image with the left side of the box.

Drag the Cafe menu.rtf file inside the gray text box.
The menu text appears inside the gray text box, expanding its length to accommodate the text. It’s now ready for some additional formatting: For example, the entries on the menu are too close together, and the text is too small for older visitors to the site to see it clearly.

If the box is not selected, select it, then choose Format > Font > Bigger.
The text in the box becomes larger.
Click to place an insertion point on the Spinach Artichoke Dip menu entry.
Using the Text Inspector, set the Before Paragraph spacing to 6 pt.
More space appears above that menu entry.
Repeat the spacing adjustment for the second and subsequent menu entries below each menu heading, but not for the prices.
Each menu entry is now separated more distinctly from the ones above and below it.

Tip
Command-selecting in iWeb allows you to make text selections that aren’t contiguous. For example, you can select a character or two in one paragraph and then hold down Command and drag to select a character or two in another paragraph so that you have simultaneous text selections in two places. You can use this technique to select portions of all the menu entries you want to change, and change them all at once with the Text Inspector.
Select the Chili Up! heading in the menu, click the color swatch in the Text Inspector to show the Colors window, and then choose a bright red color in the window’s color wheel.
You can use the slider on the right of the Colors window to adjust how bright the color appears. When you finish, the Chili Up! heading indicates the spicy nature of the items below it.

The next page you’ll build is the About page. Most sites have such a page, which tells the story of the site or the business or owners who run the site. The Jammin’ Java About page provides background about the owners of Jammin’ Java and shares information about the cafe and its goals.
In the iWeb sidebar, choose the About page.
Add the About graphic by dragging about.gif from the L14_Other Page Assets folder and placing it above the empty text box, as you did with the Cafe graphic.

Drag the About.rtf file into the gray text box.
In the L14_Other Page Assets folder, open the file wp-URL.txt (it should open in the TextEdit program on your Mac), select all the text, and choose Edit > Copy.
This file contains the address of an article you want to link to. You’re copying it so you don’t have to type a long address. Copying and pasting web addresses to avoid making typing mistakes is a very common procedure when you build a webpage.

In iWeb, find the section near the beginning of the About text where the reader is asked to check out an article in The Washington Post, and select the words Washington Post—they’re on a separate line.
In the Inspector window, click the second button from the right in the toolbar to show the Link Inspector.
You use the Link Inspector to attach links to text and images on a page in iWeb.
Select the “Enable as a hyperlink” checkbox in the Link Inspector window, and then select the “Open link in new window” checkbox.
iWeb can detect a URL on your Mac’s clipboard and will place it in the URL field of the Link Inspector when the “Enable as a hyperlink” checkbox is selected and some text or image is also selected on the page. If the link address you copied isn’t already in the URL field in the Inspector window, select the text in the URL field, choose Edit > Paste to put the address you copied there, and then press Return.

In the Inspector window, click Format, then click the Rollover color button, and using the Color window’s magnifying glass, choose the yellow-orange color from the page’s About header text.

When you put your pointer over the link you’ve made, the text changes to the rollover color you selected.

Click Use for New Links on Page, and then click Hyperlink.
The same rollover color will be applied to any other text links you make on the page.
At the bottom of the About text, select the phrase brindleybrothers.com, check Enable as a hyperlink in the Inspector, and then type www.brindleybrothers.com into the Inspector’s URL field and press Return.
The selected phrase is now a link.

Change the text of the page’s header to say “About.”
You’ve finished the About page. Save your site and get ready to build a store.
Many websites offer items for purchase, and Jammin’ Java is no exception. In this exercise, you’ll put some CDs up for sale and provide purchase links.
In the iWeb sidebar, choose the Store page.
Add the Store graphic by dragging store.gif from the L14_Other Page Assets folder and placing it above the empty text box, as you did with the Cafe and About graphics.
Drag lb.gif into the empty text box near the left side.
Rather than putting text into the empty gray text box as you’ve done previously, on this page you use the box as a container to hold a number of image and text boxes, such as the album cover you just placed on the page.
In the iWeb toolbar, click Text Box to place a new text box on the page.
Drag lb.rtf into the new text box, then drag the text box to the right of the album cover you just placed.
Drag the handles on the text box to adjust its size so that it spans the gray box from the album cover over to the right side.
You can use the alignment guides to help you position the text box more accurately after you resize it.

Use the Metrics Inspector, or select the gray box and drag its bottom center handle down to make the gray box longer.
You’re going to be adding two more albums to the box, so you need to make room.
Repeat steps 3 through 6 twice to add two more albums below the first, using the files pwtl.gif and pwtl.rtf to supply the image and text for the second album, and fwf.gif and fwf.rtf for the third album.
When you finish, you should have three albums and their descriptions in the gray box. Next, you’re going to provide the e-commerce buttons so that visitors can buy these albums.
In the iWeb toolbar, click Web Widgets, and choose HTML Snippet from the pop-up menu that appears.

A new HTML snippet appears on the page, with an editing panel where you can enter the code that goes into the snippet.
iWeb’s HTML snippet feature allows you to place programming code directly on your page. In this case, you need to add something called a form to the page—when clicked, this link will produce a new page with items to be filled out. You won’t need to write this code, though: It’s already written and stored in text files in your L14_Other Page Assets folder. All you’ll have to do is copy and paste it, as you did with the link URLs earlier.
Open the lb-buy.txt file and copy the text, then paste it into the HTML snippet editing panel.
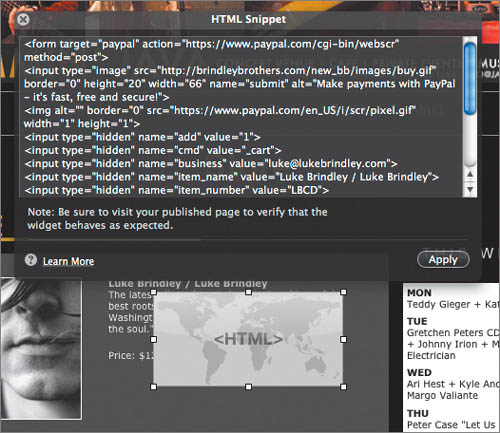
Click Apply in the snippet panel.
The panel closes and the snippet becomes a red Buy button.
Drag the Buy button below the text description of the first album in the store.
Repeat steps 1 through 3 using the text in the lb-itunes.txt file.
This creates a link button that connects the user to the iTunes Store to buy the album.
Position the Buy button and the iTunes button so that they line up beneath the album description text.

Repeat steps 1-6 to create buttons for the remaining two albums, using pwtl-buy.txt and pwtl-itunes.txt for the second album’s Buy and iTunes buttons, and fwf-buy.txt and fwf-itunes.txt for the third album’s Buy and iTunes buttons.
Change the text of the page’s header to say “Store.”
When you finish, you’ll have a completely operational online storefront.

Save your file, and get ready to make yet another page.
Another page common to many websites is a contact page. This page provides a way for site visitors to contact the site creator. If it’s a business site, the contact page often provides instructions for how to get to that location, sometimes even including a map.
The Jammin’ Java contact page you’re about to build provides all of these niceties.
In the iWeb sidebar, choose the Contact page.
Add the Contact graphic by dragging contact.gif from the L14_Other Page Assets folder and placing it above the empty text box, as you did with the Cafe, About, and Store graphics.
Drag the file contact.rtf into the gray text box.
Scroll to the bottom of the page, and drag the bottom center handle on the text box down to provide room for the map, which you’ll add next.
In the iWeb toolbar, click Web Widgets, and choose Google Map from the pop-up menu that appears.
A Google map appears on the page, with a Google Map panel into which you can enter an address for the map to display.

Enter 227 Maple Ave E, Vienna, VA, 22180, USA into the Google Map panel’s address field, and then click Apply.
The map displays the location of Jammin’ Java.
Drag the map into position below the contact text, adjusting the map’s height and width if necessary.
Change the text of the page’s header to say “Contact.”
Keep in mind that the map has to be large enough to show the controls: 400 pixels wide by 300 pixels tall is a reasonable size.

You now have a complete contact page. Again, save your work and, if you like, publish the site.
Jammin’ Java is open for business!