
5. Favorite Twitter® Searches App
Objectives
In this chapter you’ll:
• Enable users to interact with an app via Buttons.
• Use a ScrollView to display objects that do not fit on the screen.
• Create GUI components dynamically in response to user interactions by inflating an XML layout.
• Store key/value pairs of data associated with an app using SharedPreferences.
• Modify key/value pairs of data associated with an app using SharedPreferences.Editor.
• Create AlertDialogs with an AlertDialog.Builder.
• Programmatically open a website in a web browser by using an Intent.
• Programmatically hide the soft keyboard.
• Learn about the file AndroidManifest.xml.
5.2 Test-Driving the Favorite Twitter Searches App
5.4 Building the App’s GUI and Resource Files
5.4.3 Creating the Resource Files
5.4.4 Adding the TableLayout and Components
5.4.5 Creating a TableRow That Displays a Search and an Edit Button
Self-Review Exercises | Answers to Self-Review Exercises | Exercises
5.1. Introduction
The Favorite Twitter Searches app allows users to save their favorite (possibly lengthy) Twitter search strings with easy-to-remember, user-chosen, short tag names. Users can then conveniently follow the tweets on their favorite topics. Twitter search queries can be finely tuned using Twitter’s search operators (dev.twitter.com/docs/using-search)—but more complex queries are lengthy, time consuming and error prone to type on a mobile device. The user’s favorite searches are saved on the device, so they’re immediately available each time the app launches. Figure 5.1(a) shows the app with several saved searches—the user can save many searches and scroll through them in alphabetical order. Search queries and their corresponding tags are entered in the EditTexts at the top of the screen, and the Save Button adds each search to the favorites list. Touching a search Button sends that search to Twitter and displays the search results in the device’s web browser. Figure 5.1(b) shows the result of touching the Google Button, which searches for tweets from Google—specified by the Twitter search from:Google. You can edit the searches using the Edit Buttons to the right of each search Button. This enables you to tweak your searches for better results after you save them as favorites. Touching the Clear Tags Button at the bottom of the screen removes all the searches from the favorites list—a dialog asks the user to confirm this first.

Fig. 5.1. Favorite Twitter Searches app.
5.2. Test-Driving the Favorite Twitter Searches App
Opening and Running the App
Open Eclipse, then import the Favorite Twitter Searches app project. Perform the following steps:
1. Open the Import Dialog. Select File > Import... to open the Import dialog.
2. Import the Favorite Twitter Searches app project. In the Import dialog, expand the General node and select Existing Projects into Workspace, then click Next > to proceed to the Import Projects step. Ensure that Select root directory is selected, then click the Browse... button. In the Browse For Folder dialog, locate the FavoriteTwitterSearches folder in the book’s examples folder, select it and click OK. Click Finish to import the project into Eclipse. The project now appears in the Package Explorer window at the left side of the Eclipse window.
3. Launch the Favorite Twitter Searches app. In Eclipse, right click the FavoriteTwitterSearches project in the Package Explorer window, then select Run As > Android Application from the menu that appears. This will execute Favorite Twitter Searches in the AVD that you created in the Before You Begin section (Fig. 5.2).

Fig. 5.2. Running the Favorite Twitter Searches app.
The top two EditTexts allow you to enter new searches, and the Tagged Searches section displays previously saved searches (in this case, none yet).
Adding a New Favorite Search
Enter from:Google into the top EditText specifying your search subject. Enter Google into the bottom EditText (Fig. 5.3(a)). This will be the short name displayed in the Tagged Searches section. Press the Save Button to save the search and hide the keyboard—a Google Button appears under the Tagged Searches heading (Fig. 5.3(b)). Also, notice that the soft keyboard is dismissed—this app hides the soft keyboard programmatically.

Fig. 5.3. Entering a Twitter search.
Editing a Search
To the right of each search Button is an Edit Button. Touch this to reload your query and tag into the EditTexts at the top of the app for editing. Let’s restrict our search to tweets since April 1, 2011. Add since:2011-04-01 to the end of the query (Fig. 5.4). Touching Save updates the saved search. [Note: If you change the tag name, this will create a new search Button—this is useful if you want to base a new query on a previously saved query.]

Fig. 5.4. Editing a Twitter search.
Viewing Twitter Search Results
To see the search results touch the Google search query Button. This opens the web browser and accesses the Twitter website to obtain and display the search results (Fig. 5.5).
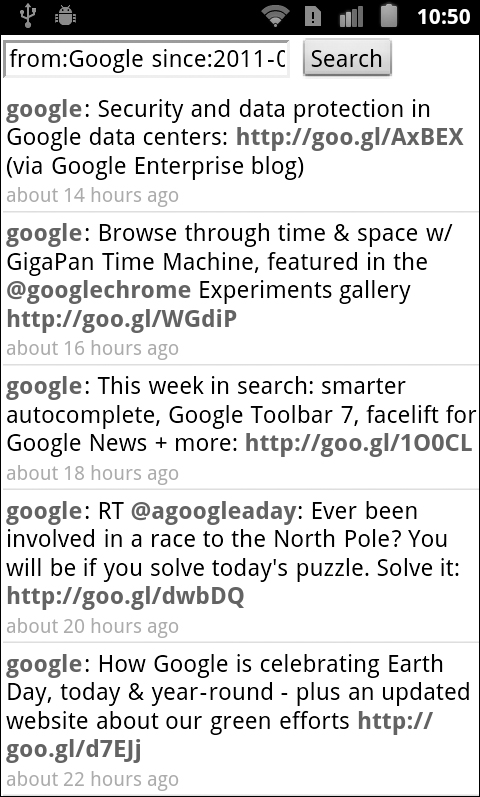
Fig. 5.5. Viewing search results.
5.3. Technologies Overview
This app uses EditText, ScrollView and Button GUI components. A ScrollView is a ViewGroup that can contain other Views (like a layout) and that lets users scroll through content too large to display on the screen. We use a ScrollView to display an arbitrarily large list of saved searches, because the user may have more favorite searches than can fit on the screen. Each search is associated with a Button, which the user can tap to pass the search to the browser.
SharedPreferences
You can have one or more files containing key/value pairs associated with each app. We use this capability to manipulate a file called searches in which we store the pairs of tags and Twitter search queries that the user creates. To read the key/value pairs from this file we’ll use SharedPreferences objects (package android.content). To modify the file’s contents, we’ll use SharedPreferences.Editor objects (package android.content). The keys in the file must be Strings, and the values can be Strings or primitive-type values.
We read in the saved searches in our refreshButtons method, which is called from the Activity’s onCreate method—this is acceptable because the amount of data being loaded is small. When an app is launched, Android creates a main thread called the UI thread which handles the GUI—extensive input/output should not be performed on the UI thread, since that would affect your app’s responsiveness. We’ll show how to deal with this in Chapter 10.
Intents
Intents are typically used to launch activities—they indicate an action to be performed and the data on which that action is to be performed. When the user touches a Button representing a search, we create a URL that contains the Twitter search query. We load the URL into a web browser by creating a new Intent for viewing a URL, then passing that Intent to the startActivity method, which our Activity inherits indirectly from class Context. To view a URL, startActivity launches the device’s web browser to display the content—in this app, the results of a Twitter search.
LayoutInflater
Each new search that the user enters adds another row of Buttons to the user interface—one Button that represents the search and one that allows you to edit that search. We use a LayoutInflater to programmatically create these GUI components from a predefined XML layout. The LayoutInflater inflates an XML layout file, thus creating the components specified in the XML. Then we set the search Button’s text, register event handlers for each Button and attach the new GUI components to the user interface.
AlertDialog
We want the user to enter both a query and a tag before storing a new search—if either EditText is empty, we display a message to the user. We also want the user to confirm that all searches should be deleted when the Clear Tags button is touched. You can display messages and confirmations like these with an AlertDialog. While the dialog is displayed, the user cannot interact with the app—this is known as a modal dialog. As you’ll see, you specify the settings for the dialog with an AlertDialog.Builder object, then use it to create the AlertDialog.
AndroidManifest.xml
The AndroidManifest.xml file is created for you when you create an app using the ADT Plugin in Eclipse. This file specifies settings such as the app’s name, the package name, the target and minimum SDKs, the app’s Activity name(s) and more. We’ll introduce this file at the end of the chapter and show you how to add a new setting to the manifest that prevents the soft keyboard from displaying when the app first loads.
5.4. Building the App’s GUI and Resource Files
In this section, we’ll build the GUI for the Favorite Twitter Searches app. We’ll present the XML that the ADT Plugin generates for the app’s layout. We’ll focus primarily on new GUI features and present the final XML layout, highlighting the key portions of the XML. We’ll also create a second XML layout that will be dynamically inflated to create the tag and Edit Buttons for each search. This will allow the app to load the previously stored searches and adapt at runtime as the user adds or deletes searches.
5.4.1. main.xml TableLayout
As in Chapter 4, this app’s main layout uses a TableLayout (Fig. 5.6)—here we use five rows and two columns. All of the GUI components in row 0 and rows 2–4 span both columns. The TableLayout’s android:stretchColumns attribute is set to “*”, which indicates that all of the table’s columns are stretchable—the elements in each column can expand to the screen’s full width.

Fig. 5.6. Rows and columns in the Favorite Twitter Searches app’s TableLayout.
Figure 5.7 shows the names of all the app’s GUI components. Recall that, for clarity, our naming convention is to use the GUI component’s class name in each component’s Id property in the XML layout and in each variable name in the Java code.
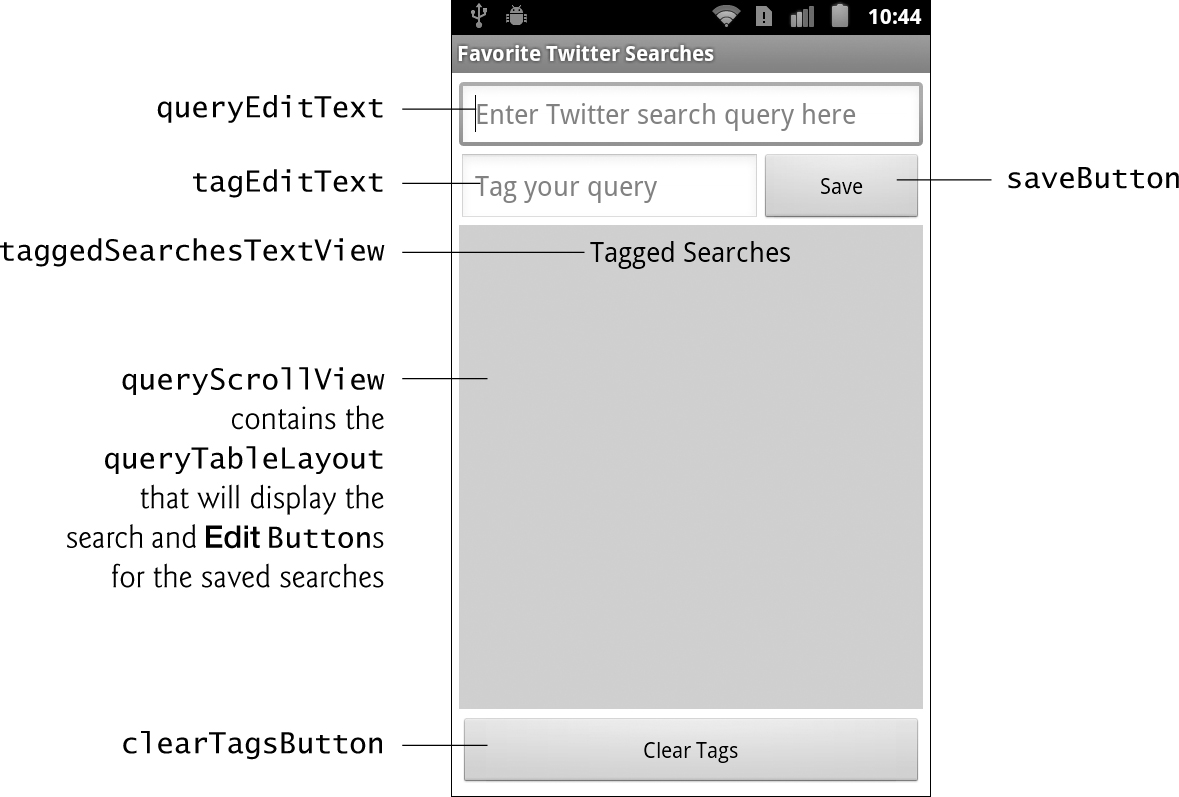
Fig. 5.7. Favorite Twitter Searches GUI’s components labeled with their Id property values.
5.4.2. Creating the Project
Begin by creating a new Android project named FavoriteTwitterSearches. Specify the following values in the New Android Project dialog, then press Finish:
• Build Target: Ensure that Android 2.3.3 is checked
• Application name: Favorite Twitter Searches
• Package name: com.deitel.favoritetwittersearches
• Create Activity: FavoriteTwitterSearches
• Min SDK Version: 10. [Note: This SDK version corresponds to Android 2.3.3; however, we do not use any Android 2.3.3-specific functionality in this app. If you’d like this app to execute on AVDs or devices running an earlier Android version, you can set the Min SDK Version to a lower value. For example, you could specify 8 to indicate that the app can execute on Android 2.2 or higher.]
5.4.3. Creating the Resource Files
In this app, we stored a literal color value and a few literal dimension values in the files colors.xml and dimen.xml, respectively. These file names are used by convention, and the files are placed in the app’s res/values folder. Each color and dimension you create in these files will be represented in the auto-generated R.java file by a constant that you can use to reference the specified value. To create each file:
1. Right click the project name in the Package Explorer window and select New > Other..., then select Android XML File from the Android node in the New dialog. This displays the New Android XML File dialog.
2. In the File text field, enter the name colors.xml.
3. Under What type of resource would you like to create?, select the Values radio button. This will cause the new file to be placed into the project’s res/values folder.
4. Click Finish to create the file.
5. Repeat this process to create the dimen.xml file.
The contents of these two files are shown in Figs. 5.8–5.9. As you’ll see, we use the color and dimensions in these files in our XML layouts. We’ll also use several Android predefined colors from the class R.color. As in previous apps, we also defined various string resources in the strings.xml file.
1 <?xml version="1.0" encoding="UTF-8"?>
2 <resources>
3 <color name="light_orange">#8f90</color>
4 </resources>
Fig. 5.8. Colors defined in colors.xml.
colors.xml
Each XML document that represents resources must contain a resources element in which you specify the resources. Within that element in Fig. 5.8, we define the one color value that we use in this app (light_orange). The color element (line 3) specifies a name attribute that’s used to reference the color and a hexadecimal value specifying the color.
dimen.xml
In Fig. 5.9, we define dimen elements that represent the widths search tag and Edit Buttons. A benefit of defining dimensions as resources is that you can use density-independent pixel (dp or dip) and scale-independent pixel (sp) values, which Android automatically converts to the appropriate pixel values for a given device. In code, you can set only fixed pixel sizes, so you’d have to manually calculate the proper pixel values for each device.
1 <?xml version="1.0" encoding="UTF-8"?>
2 <resources>
3 <dimen name="tagButtonWidth">230dp</dimen>
4 <dimen name="editButtonWidth">50dp</dimen>
5 </resources>
Fig. 5.9. Dimensions defined in dimen.xml.
strings.xml
In Fig. 5.10, we define the String literal values we use throughout this app. Line 4 defines the searchURL. The user’s search queries are appended to this URL before the twitter search is displayed in the device’s web browser.
1 <?xml version="1.0" encoding="UTF-8"?>
2 <resources>
3 <string name="app_name">Favorite Twitter Searches</string>
4 <string name="searchURL">http://search.twitter.com/search?q=</string>
5 <string name="tagPrompt">Tag your query</string>
6 <string name="queryPrompt">Enter Twitter search query here</string>
7 <string name="taggedSearches">Tagged Searches</string>
8 <string name="edit">Edit</string>
9 <string name="clearTags">Clear Tags</string>
10 <string name="save">Save</string>
11 <string name="erase">Erase</string>
12 <string name="cancel">Cancel</string>
13 <string name="OK">OK</string>
14 <string name="missingTitle">Missing Text</string>
15 <string name="missingMessage">
16 Please enter a search query and tag it.</string>
17 <string name="confirmTitle">Are You Sure?</string>
18 <string name="confirmMessage">
19 This will delete all saved searches</string>
20 </resources>
Fig. 5.10. Strings defined in strings.xml.
5.4.4. Adding the TableLayout and Components
Using the techniques you learned in Chapter 4, you’ll build the GUI in Figs. 5.6–5.7. You’ll start with the basic layout and controls, then customize the controls’ properties to complete the design. As you add components to each row of the TableLayout, set the Id and Text properties of the components as shown in Fig. 5.7. When building the GUI, place your literal string values in the strings.xml file in the app’s res/values folder. Use the Outline window to add components to the proper TableRows of the TableLayout.
Step 1: Deleting and Recreating the main.xml File
For this application, once again you’ll replace the default main.xml file with a new one that uses a TableLayout in which components are arranged relative to one another. Perform the following steps to replace the default main.xml file:
1. Right click the main.xml file in the projects /res/layout folder and select Delete to delete the file.
2. Right click the layout folder and select New > Other... to display the New dialog.
3. In the Android node, select Android XML File and click Next > to display the New Android XML File dialog.
4. Specify the file name main.xml and select TableLayout, then click Finish.
Step 2: Configuring the Visual Layout Editor to Use the Appropriate Android SDK
As you did in Fig. 3.7, select Android 2.3.3 from the SDK selector drop-down list at the top-right side of the Graphical Layout tab to indicate that we’re designing a GUI for an Android 2.3.3 device.
Step 3: Configuring the Visual Layout Editor’s Size and Resolution
As you did in Fig. 3.11, select 3.7in WVGA (Nexus One) from the Device Configurations drop-down list at the top-left side of the Graphical Layout tab. This configures the design area for devices with 480-by-800 (WVGA) resolution.
Step 4: Configuring the TableLayout
In the Outline window, select the TableLayout and set the following properties:
• Background: @android:color/white
• Id: @+id/tableLayout
• Padding: 5dp
• Stretch columns: *
We’ve specified the Background color using one of Android’s predefined color values (white) from the R.color class—you can find the names of the predefined colors at
developer.android.com/reference/android/R.color.html
To access a predefined color resource, you specify @android:color/ followed by the name of the resource.
By default, the layout fills the entire screen, because the Layout width and Layout height properties have the value match_parent. Setting the Padding property to 5dp ensures that there will be 5 density-independent pixels around the border of the entire GUI. The Stretch columns property indicates that the columns should stretch horizontally to fill the layout’s width.
Step 5: Adding the TableRows
Next, use the Outline window as you did in Chapter 4 to add five TableRows to the TableLayout. Select the TableLayout each time before adding the next TableRow, so that the TableRows are properly nested in the TableLayout. Change the Id properties of the five TableRows to tableRow0, tableRow1, tableRow2, tableRow3 and tableRow4, respectively. Also, select each TableRow and set its Layout width property to match_parent so that the rows are the full width of the layout.
Step 6: Adding the Components to the TableRows
Using Figs. 5.6–5.7 as your guide, add the EditTexts, Buttons, TextView and ScrollView to the layout. Also, place a TableLayout inside the ScrollView. Name the elements as shown in Fig. 5.7. Study the XML elements in main.xml (Fig. 5.11) to see the values specified for the attributes of each GUI component. We’ve highlighted the new features and key features for this example.
1 <?xml version="1.0" encoding="utf-8"?>
2 <TableLayout xmlns:android="http://schemas.android.com/apk/res/android"
3 android:id="@+id/tableLayout" android:layout_width="match_parent"
4 android:layout_height="match_parent" android:padding="5dp"
5 android:stretchColumns="*" android:background="@android:color/white">
6
7 <!-- tableRow0 -->
8 <TableRow android:id="@+id/tableRow0"
9 android:layout_height="wrap_content"
10 android:layout_width="match_parent">
11 <EditText android:layout_width="match_parent"
12 android:layout_height="wrap_content" android:layout_span="2"
13 android:inputType="text" android:id="@+id/queryEditText"
14 android:hint="@string/queryPrompt"
15 android:imeOptions="actionNext">
16 </EditText>
17 </TableRow>
18
19 <!-- tableRow1 -->
20 <TableRow android:id="@+id/tableRow1"
21 android:layout_height="wrap_content"
22 android:layout_width="match_parent">
23 <EditText android:layout_height="wrap_content"
24 android:hint="@string/tagPrompt" android:inputType="text"
25 android:id="@+id/tagEditText" android:imeOptions="actionDone"
26 android:layout_gravity="center_vertical"></EditText>
27 <Button android:id="@+id/saveButton"
28 android:layout_height="wrap_content"
29 android:layout_width="wrap_content"
30 android:layout_gravity="center_vertical"
31 android:text="@string/save"></Button>
32 </TableRow>
33
34 <!-- tableRow2 -->
35 <TableRow android:id="@+id/tableRow2"
36 android:layout_height="wrap_content"
37 android:layout_width="match_parent"
38 android:background="@color/light_orange">
39
40 <TextView android:layout_height="wrap_content"
41 android:id="@+id/taggedSearchesTextView"
42 android:text="@string/taggedSearches"
43 android:layout_width="match_parent"
44 android:layout_gravity="center_horizontal"
45 android:layout_span="2" android:textSize="18sp"
46 android:textColor="@android:color/black"
47 android:padding="5dp"></TextView>
48 </TableRow>
49
50 <!-- tableRow3 -->
51 <TableRow android:id="@+id/tableRow3"
52 android:background="@color/light_orange"
53 android:layout_height="wrap_content"
54 android:layout_width="match_parent" android:layout_weight="1">
55
56 <ScrollView android:id="@+id/queryScrollView"
57 android:layout_width="match_parent"
58 android:layout_span="2" android:padding="5dp">
59 <TableLayout android:id="@+id/queryTableLayout"
60 android:layout_width="match_parent"
61 android:layout_height="match_parent" android:padding="5dp"
62 android:stretchColumns="*"></TableLayout>
63 </ScrollView>
64 </TableRow>
65
66 <!-- tableRow4 -->
67 <TableRow android:id="@+id/tableRow4"
68 android:layout_height="wrap_content"
69 android:layout_width="match_parent">
70
71 <Button android:layout_width="wrap_content"
72 android:layout_height="wrap_content"
73 android:text="@string/clearTags"
74 android:id="@+id/clearTagsButton"
75 android:layout_span="2" android:layout_marginTop="5dp"></Button>
76 </TableRow>
77 </TableLayout>
Fig. 5.11. Favorite Twitter Search app’s XML layout.
Key Features in main.xml
Recall from Chapter 4 that the android:layout_span attribute (lines 12, 45, 58 and 75) must be specified directly in the XML, as it does not display in the Properties window in design view. We’ve highlighted the resources from the colors.xml, dimen.xml and strings.xml files that were used to set various properties of the GUI components. You can access the various resource values in XML as follows:
• Strings: Specify @string/ followed by the name of the resource—for example, lines 14 and 31 specify string resource values for the android:hint attribute of the each EditText. This attribute displays inside an EditText a hint that helps the user understand the EditText’s purpose. We use other string resources to represent the text on various GUI components, such as the Buttons (lines 31 and 73) and the TextView (line 41).
• Colors: Specify @color/ followed by the name of the resource—for example, lines 38 and 52 specify a color resource for the background color of tableRow2 and the ScrollView, respectively.
Lines 15 and 25 introduce the EditText attribute android:imeOptions, which enables you to configure options for the current input method. For example, when queryEditText has the focus and the soft keyboard is displayed, the keyboard contains a Next button—specified with the android:imeOptions attribute value actionNext (line 15). If the user touches this button, the focus is transfered to the next component that can accept text input—tagEditText. When tagEditText has the focus, the soft keyboard contains a Done button—specified with the android:imeOptions attribute value actionDone (line 25). If the user touches this button, the system hides the soft keyboard.
Lines 27–31 and 71–75 define the Buttons for saving a search and clearing all previously saved searches, respectively. Lines 56–63 define a ScrollView that contains a TableLayout (lines 59–62) in which the search Buttons will be displayed programmatically. The TableLayout’s android:stretchColumns attribute is set to "*" so that the contents of each TableRow we programmatically place in this TableLayout can stretch to fill the layout’s width. If there are more search Buttons than can be displayed on the screen, you can drag your finger up or down the ScrollView to scroll through the Buttons in the TableLayout. As you’ll see in Section 5.5, this TableLayout will contain TableRows that each contain a search Button and an Edit Button.
You’ll notice in line 54 that we set tableRow3’s android:layout_weight attribute to 1. This value makes tableRow3 more important than the other rows when the main table layout is resized based on the available space. Because tableRow3 is the only component to that specifies a android:layout_weight attribute, it stretches vertically to occupy all remaining vertical space that is not occupied by the other rows.
5.4.5. Creating a TableRow That Displays a Search and an Edit Button
Next, you’ll define a TableRow that will be programmatically inflated to create each search Button and corresponding Edit Button. In Section 5.5, you’ll configure these Buttons and add this TableRow to the queryTableLayout (Fig. 5.11, lines 59–62) to display the Buttons. To create another layout XML file:
1. Right click the layout folder and select New > Other... to display the New dialog.
2. In the Android node, select Android XML File and click Next > to display the New Android XML File dialog.
3. In the File text field, enter the name new_tag_view.xml.
4. Under What type of resource would you like to create?, select the Layout radio button. This places the new file new_tag_view.xml into the project’s res/layout folder.
5. At the bottom of the dialog, you can select the root element for the new layout. Choose TableRow.
6. Click Finish to create the file. The file opens immediately in XML view.
7. Switch to Graphical Layout tab in the Visual Layout Editor, then select Android 2.3.3 from the SDK selector drop-down list at the top-right side of the Graphical Layout tab and 3.7in WVGA (Nexus One) from the Device Configurations drop-down list at the top-left side of the Graphical Layout tab.
Add two Buttons to the layout. Configure the Buttons’ and the layout’s properties as shown in (Fig. 5.12). We didn’t specify the android:text attribute for the newTagButton because we’ll set this text to a particular search tag when the Buttons are created programmatically. We set the TableLayout’s android:background attribute to the predefined color transparent (line 6), so that the background color of the ScrollView will show through when we attach the TableRow to the ScrollView. By default, the ScrollView has the same background color as its parent—that is, tableRow3. In lines 9 and 12, notice that we use @dimen/ followed by the name of a dimension resource to specify the Buttons’ widths.
1 <?xml version="1.0" encoding="UTF-8"?>
2 <TableRow xmlns:android="http://schemas.android.com/apk/res/android"
3 android:id="@+id/newTagTableRow"
4 android:layout_width="match_parent"
5 android:layout_height="wrap_content"
6 android:background="@android:color/transparent">
7
8 <Button android:id="@+id/newTagButton"
9 android:layout_width="@dimen/tagButtonWidth"
10 android:layout_height="wrap_content"></Button>
11 <Button android:id="@+id/newEditButton"
12 android:layout_width="@dimen/editButtonWidth"
13 android:layout_height="wrap_content"
14 android:text="@string/edit"></Button>
15 </TableRow>
Fig. 5.12. The newTagTableRow that will be programmatically inflated.
5.5. Building the App
Figures 5.13–5.23 implement the Favorite Twitter Searches app in the single class FavoriteTwitterSearches, which extends Activity.
1 // FavoriteTwitterSearches.java
2 // Stores Twitter search queries and tags for easily opening them
3 // in a browser.
4 package com.deitel.favoritetwittersearches;
5
6 import java.util.Arrays;
7
8 import android.app.Activity;
9 import android.app.AlertDialog;
10 import android.content.Context;
11 import android.content.DialogInterface;
12 import android.content.Intent;
13 import android.content.SharedPreferences;
14 import android.net.Uri;
15 import android.os.Bundle;
16 import android.view.LayoutInflater;
17 import android.view.View;
18 import android.view.View.OnClickListener;
19 import android.view.inputmethod.InputMethodManager;
20 import android.widget.Button;
21 import android.widget.EditText;
22 import android.widget.TableLayout;
23 import android.widget.TableRow;
24
Fig. 5.13. FavoriteTwitterSearches’ package and import statements.
The package and import Statements
Figure 5.13 shows the app’s package and import statements. The package statement (line 4) indicates that the class in this file is part of the com.deitel.favoritetwittersearches package. This line was inserted by the IDE when you created the project. The import statements in lines 6–23 import the various classes and interfaces the app uses.
Line 6 imports the Arrays class from the java.util package. We’ll use this class’s sort method to sort the tags that represent each search so they appear in alphabetical order. Of the remaining import statements, we consider only those for the classes being introduced in this chapter.
• Class AlertDialog of package android.app (line 9) is used to display dialogs.
• Class Context of package android.content (line 10) provides access to information about the environment in which the app is running and allows you to access various Android services. We’ll be using a constant from this class with a LayoutInflater (discussed below) to help load new GUI components dynamically.
• Class DialogInterface of package android.content (line 11) contains the nested interface OnClickListener. We implement this interface to handle the events that occur when the user touches a button on an AlertDialog.
• Class Intent of package android.content (line 12) enables us to work with Intents. An Intent specifies an action to be performed and the data to be acted upon—Android uses Intents to launch the appropriate activities.
• Class SharedPreferences of package android.content (line 13) is used to manipulate persistent key/value pairs that are stored in files associated with the app.
• Class Uri of package android.net (line 14) enables us to convert an Internet URL into the format required by an Intent that launches the device’s web browser. We’ll say more about URIs and URLs in Section 5.5.
• Class LayoutInflater of package android.view (line 16) enables us to inflate an XML layout file dynamically to create the layout’s GUI components.
• Class InputMethodManager of package android.view.inputmethod (line 19) enables us to hide the soft keyboard when the user saves a search.
• Package android.widget (lines 20–23) contains the widgets (i.e., GUI components) and layouts that are used in Android GUIs. Class Button of package android.widget (line 20) represents a simple push button that the user touches to get the app to perform a specific action. You implement interface View.OnClickListener of package android.view (line 18) to specify the code that should execute when the user touches a Button.
Favorite Twitter Searches App Activity
FavoriteTwitterSearches (Figs. 5.14–5.23) is the Favorite Twitter Searches app’s only Activity class. When you created the FavoriteTwitterSearches project, the ADT Plugin generated this class as a subclass of Activity (Fig. 5.14, line 26) and provided the shell of an overridden onCreate method, which every Activity subclass must override.
25 // main (and only) Activity class for the Favorite Twitter Searches app
26 public class FavoriteTwitterSearches extends Activity
27 {
28 private SharedPreferences savedSearches; // user's favorite searches
29 private TableLayout queryTableLayout; // shows the search buttons
30 private EditText queryEditText; // where the user enters queries
31 private EditText tagEditText; // where the user enters a query's tag
32
Fig. 5.14. Class FavoriteTwitterSearches is a subclass of Activity.
Line 28 declares the SharedPreferences instance variable savedSearches. SharedPreferences objects store key/value pairs in which the keys are Strings and the values are primitive types or Strings. We use the SharedPreferences object to store the user’s saved searches. Line 29 declares the TableLayout that will be used to access the part of the GUI in which we programmatically display new buttons. Lines 30–31 declare two EditTexts that we’ll use to access the queries and tags the user enters at the top of the app.
Overridden Method OnCreate of Class Activity
The onCreate method (Fig. 5.15) is called by the system
• when the app loads
• if the app’s process was killed by the operating system while the app was in the background, and the app is then restored
• each time the configuration changes, such as when the user rotates the device or opens/closes a physical keyboard.
33 // called when the activity is first created
34 @Override
35 public void onCreate(Bundle savedInstanceState)
36 {
37 super.onCreate(savedInstanceState); // call the superclass version
38 setContentView(R.layout.main); // set the layout
39
40 // get the SharedPreferences that contains the user's saved searches
41 savedSearches = getSharedPreferences("searches", MODE_PRIVATE);
42
43 // get a reference to the queryTableLayout
44 queryTableLayout =
45 (TableLayout) findViewById(R.id.queryTableLayout);
46
47 // get references to the two EditTexts and the Save Button
48 queryEditText = (EditText) findViewById(R.id.queryEditText);
49 tagEditText = (EditText) findViewById(R.id.tagEditText);
50
51 // register listeners for the Save and Clear Tags Buttons
52 Button saveButton = (Button) findViewById(R.id.saveButton);
53 saveButton.setOnClickListener(saveButtonListener);
54 Button clearTagsButton =
55 (Button) findViewById(R.id.clearTagsButton);
56 clearTagsButton.setOnClickListener(clearTagsButtonListener);
57
58 refreshButtons(null); // add previously saved searches to GUI
59 } // end method onCreate
60
Fig. 5.15. Overriding Activity method onCreate.
The method initializes the Activity’s instance variables and GUI components—we keep it simple so the app loads quickly. Line 37 makes the required call to the superclass’s onCreate method. As in the previous app, the call to setContentView (line 38) passes the constant R.layout.main to inflate the GUI from main.xml. Method setContentView uses this constant to load the corresponding XML document, then inflates the GUI.
Line 41 uses the method getSharedPreferences (inherited indirectly from class Context) to get a SharedPreferences object that can read tag/query pairs stored previously (if any) from the "searches" file. The first argument indicates the name of the file that contains the data. The second argument specifies the accessibility of the file and can be set to one of the following options:
• MODE_PRIVATE—The file is accessible only to this app. In most cases, you’ll use this constant as the second argument to getSharedPreferences.
• MODE_WORLD_READABLE—Any app on the device can read from the file.
• MODE_WORLD_WRITABLE—Any app on the device can write to the file.
These constants can be combined with the bitwise OR operator (|).
We aren’t reading a lot of data in this app, so it’s fast enough to load the searches in onCreate—lengthy data access should never be done in the UI thread; otherwise, the app will display an Application Not Responding (ANR) dialog—typically after five seconds of inactivity. For more information about ANR dialogs and designing responsive apps, see
developer.android.com/guide/practices/design/responsiveness.html
Lines 44–49 obtain references to the queryTableLayout, queryEditText and tagEditText to initialize the corresponding instance variables. Lines 52–56 obtain references to the saveButton and clearTagsButton and register their listeners. Finally, line 58 calls refreshButtons (discussed in Fig. 5.16) to create Buttons for the previously saved searches and their corresponding Edit buttons that allow the user to edit each search.
61 // recreate search tag and edit Buttons for all saved searches;
62 // pass null to create all the tag and edit Buttons.
63 private void refreshButtons(String newTag)
64 {
65 // store saved tags in the tags array
66 String[] tags =
67 savedSearches.getAll().keySet().toArray(new String[0]);
68 Arrays.sort(tags, String.CASE_INSENSITIVE_ORDER); // sort by tag
69
70 // if a new tag was added, insert in GUI at the appropriate location
71 if (newTag != null)
72 {
73 makeTagGUI(newTag, Arrays.binarySearch(tags, newTag));
74 } // end if
75 else // display GUI for all tags
76 {
77 // display all saved searches
78 for (int index = 0; index < tags.length; ++index)
79 makeTagGUI(tags[index], index);
80 } // end else
81 } // end method refreshButtons
82
Fig. 5.16. refreshButtons method of class FavoriteTwitterSearches recreates and displays new search tag and edit Buttons for all saved searches.
refreshButtons Method of Class FavoriteTwitterSearches
Method refreshButtons of class FavoriteTwitterSearches (Fig. 5.16) creates and displays new query tag and edit Buttons either for a newly saved search (when its argument is not null) or for all saved searches (when its argument is null).
We’d like to display the Buttons in alphabetical order so the user can easily scan them to find a search to perform. First, lines 66–67 get an array of Strings representing the keys in the SharedPreferences object. SharedPreferences method getAll returns a Map containing all the key/value pairs. We then call keySet on that object to get a Set of all the keys. Finally, we call toArray (with an empty String array as an argument) on the Set object to convert the Set into an array of Strings, which we then sort in line 68. Arrays.sort (a static method of class Arrays from package java.util) sorts the array in its first argument. Since the user could enter tags using mixtures of uppercase and lowercase letters, we chose to perform a case-insensitive sort by passing the predefined Comparator<String> object String.CASE_INSENSITIVE_ORDER as the second argument to Arrays.sort.
Lines 71–80 determine whether the method was called to create the GUI for one new search or for all the saved searches. Line 73 calls makeTagGUI (Fig. 5.18) to insert the GUI for one new tag. The call to Arrays.binarySearch in the second argument locates the insertion point that enables us to maintain the tag buttons in alphabetical order. When refreshButtons is called with a null argument, lines 78–79 call makeTagGUI for every saved search.
makeTag Method of Class FavoriteTwitterSearches
Method makeTag of class FavoriteTwitterSearches (Fig. 5.17) adds a new search to savedSearches or modifies an existing search. Line 87 uses SharedPreferences method getString to look up the previous value, if any, associated with tag. If the tag does not already exist in the file, the second argument (null in this case) is returned. In this case, the method also calls refreshButtons (line 96) to add the GUI for the new search.
83 // add new search to the save file, then refresh all Buttons
84 private void makeTag(String query, String tag)
85 {
86 // originalQuery will be null if we're modifying an existing search
87 String originalQuery = savedSearches.getString(tag, null);
88
89 // get a SharedPreferences.Editor to store new tag/query pair
90 SharedPreferences.Editor preferencesEditor = savedSearches.edit();
91 preferencesEditor.putString(tag, query); // store current search
92 preferencesEditor.apply(); // store the updated preferences
93
94 // if this is a new query, add its GUI
95 if (originalQuery == null)
96 refreshButtons(tag); // adds a new button for this tag
97 } // end method makeTag
98
Fig. 5.17. makeTag method of class FavoriteTwitterSearches adds a new search to the save file, then resets the Buttons.
Lines 90–92 add the new tag or modify the existing tag’s corresponding value. To modify the file associated with a SharedPreferences object, you must first call its edit method to obtain a SharedPreferences.Editor object (line 90). This object provides methods for adding key/value pairs to, removing key/value pairs from, and modifying the value associated with a particular key in a SharedPreferences file. Line 91 calls its putString method to save the new search’s tag (the key) and query (the corresponding value). Line 92 commits the changes to the "searches" file by calling SharedPreferences.Editor method apply to make the changes to the file.
makeTagGUI Method of Class FavoriteTwitterSearches
Method makeTagGUI of class FavoriteTwitterSearches (Fig. 5.18) adds to the queryTableLayout one new row containing a tag and an Edit button. To do this, we first inflate the new_tag_view.xml layout that you created in Section 5.4.5. Recall that this layout consists of a TableRow with a newTagButton and a newEditButton.
99 // add a new tag button and corresponding edit button to the GUI
100 private void makeTagGUI(String tag, int index)
101 {
102 // get a reference to the LayoutInflater service
103 LayoutInflater inflater = (LayoutInflater) getSystemService(
104 Context.LAYOUT_INFLATER_SERVICE);
105
106 // inflate new_tag_view.xml to create new tag and edit Buttons
107 View newTagView = inflater.inflate(R.layout.new_tag_view, null);
108
109 // get newTagButton, set its text and register its listener
110 Button newTagButton =
111 (Button) newTagView.findViewById(R.id.newTagButton);
112 newTagButton.setText(tag);
113 newTagButton.setOnClickListener(queryButtonListener);
114
115 // get newEditButton and register its listener
116 Button newEditButton =
117 (Button) newTagView.findViewById(R.id.newEditButton);
118 newEditButton.setOnClickListener(editButtonListener);
119
120 // add new tag and edit buttons to queryTableLayout
121 queryTableLayout.addView(newTagView, index);
122 } // end makeTagGUI
123
Fig. 5.18. makeTagGUI method of class FavoriteTwitterSearches creates the tag and Edit Button’s for one search and adds them to the queryTableLayout at the specified index.
Android provides a service that enables you to inflate a layout. To use this service, you obtain a reference to it (lines 103–104) by calling the Activity’s inherited getSystemService method with the argument Context.LAYOUT_INFLATER_SERVICE. Since getSystemService can return references to various system services, you must cast the result to type LayoutInflater. Line 107 calls the LayoutInflater’s inflate method with the R.layout.new_tag_view constant that represents the new_tag_view.xml layout. This returns a reference to a View, which is actually the TableRow containing the Buttons. Lines 110–113 get a reference to the newTagButton, set its text to the value of tag and register its OnClickListener. Lines 116–118 get a reference to the newEditButton and register its OnClickListener. Line 121 adds the newTagView to the queryTableLayout at the specified index.
clearButtons Method of Class FavoriteTwitterSearches
Method clearButtons (Fig. 5.19) removes all of the saved search Buttons from the app. Line 128 calls the queryTableLayout’s removeAllViews method to remove all of the nested TableRows containing the Buttons.
124 // remove all saved search Buttons from the app
125 private void clearButtons()
126 {
127 // remove all saved search Buttons
128 queryTableLayout.removeAllViews();
129 } // end method clearButtons
130
Fig. 5.19. method clearButtons of class FavoriteTwitterSearches removes all the Buttons representing the saved searches from the app.
Anonymous Inner Class That Implements Interface OnClickListener to Respond to the Events of the saveButton
Lines 132–170 (Fig. 5.20) create the anonymous inner-class object saveButtonListener that implements interface OnClickListener. Line 53 registered saveButtonListener as saveButtons’s event-handling object. Lines 134–169 implement the OnClickListener interface’s onClick method. If the user entered both a query and a tag (lines 138–139), the method calls makeTag (Fig. 5.17) to store the tag/query pair (lines 141–142), then clears the two EditTexts (lines 143–144) and hides the soft keyboard (lines 147–149).
131 // create a new Button and add it to the ScrollView
132 public OnClickListener saveButtonListener = new OnClickListener()
133 {
134 @Override
135 public void onClick(View v)
136 {
137 // create tag if both queryEditText and tagEditText are not empty
138 if (queryEditText.getText().length() > 0 &&
139 tagEditText.getText().length() > 0)
140 {
141 makeTag(queryEditText.getText().toString(),
142 tagEditText.getText().toString());
143 queryEditText.setText(""); // clear queryEditText
144 tagEditText.setText(""); // clear tagEditText
145
146 // hide the soft keyboard
147 ((InputMethodManager) getSystemService(
148 Context.INPUT_METHOD_SERVICE)).hideSoftInputFromWindow(
149 tagEditText.getWindowToken(), 0);
150 } // end if
151 else // display message asking user to provide a query and a tag
152 {
153 // create a new AlertDialog Builder
154 AlertDialog.Builder builder =
155 new AlertDialog.Builder(FavoriteTwitterSearches.this);
156
157 builder.setTitle(R.string.missingTitle); // title bar string
158
159 // provide an OK button that simply dismisses the dialog
160 builder.setPositiveButton(R.string.OK, null);
161
162 // set the message to display
163 builder.setMessage(R.string.missingMessage);
164
165 // create AlertDialog from the AlertDialog.Builder
166 AlertDialog errorDialog = builder.create();
167 errorDialog.show(); // display the Dialog
168 } // end else
169 } // end method onClick
170 }; // end OnClickListener anonymous inner class
171
Fig. 5.20. Anonymous inner class that implements interface OnClickListener to respond to the events of the saveButton.
If the user did not enter both a query and a tag, the method displays an AlertDialog (lines 151–168) indicating that the user must enter both a query and a tag. You use an AlertDialog.Builder object (created at lines 154–155) to configure and create an AlertDialog. The argument to the constructor is the Context in which the dialog will be displayed—in this case, the FavoriteTwitterSearches Activity, which we refer to via its this reference. Because we’re accessing this from an anonymous inner class, we must fully qualify it with the class name. Line 157 sets the AlertDialog’s title with the String resource R.string.missingTitle. This will appear at the top of the dialog.
Dialogs often have multiple buttons. In this case, we need only one button that allows the user to acknowledge the message. We specify this as the dialog’s positive button (line 160). Method setPositiveButton receives the button’s label (specified with the String resource R.string.OK) and a reference to the button’s event handler. For this dialog, we don’t need to respond to the event, so we specify null for the event handler. When the user touches the button, the dialog is simply dismissed from the screen.
Line 163 sets the message that appears in the dialog (specified with the String resource R.string.missingMessage). Line 166 creates the AlertDialog by calling the AlertDialog.Builder’s create method. Line 167 displays the modal dialog by calling AlertDialog’s show method.
Anonymous Inner Class That Implements Interface OnClickListener to Respond to the Events of the clearTagsButton
Lines 173–213 of Fig. 5.21 create the anonymous inner-class object clearTagsButtonListener that implements interface OnClickListener. Line 56 registered this object as clearTagsButtons’s event handler. Lines 175–212 implement the OnClickListener interface’s onClick method, which displays an AlertDialog asking the user to confirm that all the stored searches should be removed.
172 // clears all saved searches
173 public OnClickListener clearTagsButtonListener = new OnClickListener()
174 {
175 @Override
176 public void onClick(View v)
177 {
178 // create a new AlertDialog Builder
179 AlertDialog.Builder builder =
180 new AlertDialog.Builder(FavoriteTwitterSearches.this);
181
182 builder.setTitle(R.string.confirmTitle); // title bar string
183
184 // provide an OK button that simply dismisses the dialog
185 builder.setPositiveButton(R.string.erase,
186 new DialogInterface.OnClickListener()
187 {
188 @Override
189 public void onClick(DialogInterface dialog, int button)
190 {
191 clearButtons(); // clear all saved searches from the map
192
193 // get a SharedPreferences.Editor to clear searches
194 SharedPreferences.Editor preferencesEditor =
195 savedSearches.edit();
196
197 preferencesEditor.clear(); // remove all tag/query pairs
198 preferencesEditor.apply(); // commit the changes
199 } // end method onClick
200 } // end anonymous inner class
201 ); // end call to method setPositiveButton
202
203 builder.setCancelable(true);
204 builder.setNegativeButton(R.string.cancel, null);
205
206 // set the message to display
207 builder.setMessage(R.string.confirmMessage);
208
209 // create AlertDialog from the AlertDialog.Builder
210 AlertDialog confirmDialog = builder.create();
211 confirmDialog.show(); // display the Dialog
212 } // end method onClick
213 }; // end OnClickListener anonymous inner class
214
Fig. 5.21. Anonymous inner class that implements interface OnClickListener to respond to the events of the clearTagsButton.
Lines 185–201 define the AlertDialog’s positive button and its event handler. When the user clicks this button, its event handler executes. Line 191 calls clearButtons (Fig. 5.19) to remove all the Buttons representing the saved searches. Then, we get a SharedPreferences.Editor object for savedSearches (lines 194–195), clear all the key/value pairs by calling the SharedPreferences.Editor object’s clear method (line 192) and commit the changes to the file (line 198). Line 203 indicates that the dialog is cancelable, so the user can press the back button on the device to dismiss the dialog. Line 204 sets the dialog’s negative button and event handler. Like the positive button in Fig. 5.20, this button simply dismisses the dialog. Lines 207–211 set the dialog’s message, create the dialog and display it.
Anonymous Inner Class That Implements Interface OnClickListener to Respond to the Events of each of the newTagButtons
Lines 216–234 of Fig. 5.22 create the anonymous inner-class object queryButtonListener that implements interface OnClickListener. Line 113 registers this object as the event-handling object for each of the newTagButtons as they’re created.
215 // load selected search in a web browser
216 public OnClickListener queryButtonListener = new OnClickListener()
217 {
218 @Override
219 public void onClick(View v)
220 {
221 // get the query
222 String buttonText = ((Button)v).getText().toString();
223 String query = savedSearches.getString(buttonText, null);
224
225 // create the URL corresponding to the touched Button's query
226 String urlString = getString(R.string.searchURL) + query;
227
228 // create an Intent to launch a web browser
229 Intent getURL = new Intent(Intent.ACTION_VIEW,
230 Uri.parse(urlString));
231
232 startActivity(getURL); // execute the Intent
233 } // end method onClick
234 }; // end OnClickListener anonymous inner class
235
Fig. 5.22. Anonymous inner class that implements interface OnClickListener to respond to the events of the queryButton.
Lines 218–233 implement the OnClickListener interface’s onClick method. Line 222 gets the text of the Button that was clicked, and line 223 retrieves the corresponding search query from savedSearches. Line 226 call Activity’s inherited method getString to get the String resource named searchURL, which contains the Twitter search page’s URL. We then append the query to the end of the URL.
Lines 229–230 create a new Intent, which we’ll use to launch the device’s web browser and display the Twitter search results. An Intent is a description of an action to be performed with associated data. The first argument passed to Intent’s constructor is a constant describing the action we wish to perform. Here we use Intent.ACTION_VIEW because we wish to display a representation of the data. Many constants are defined in the Intent class describing actions such as searching, choosing, sending and playing. The second argument (line 230) is a Uri (uniform resource identifier) to the data on which we want to perform the action. Class Uri’s parse method converts a String representing a URL (uniform resource locator) to a Uri.
Line 232 passes the Intent to the startActivity method (inherited indirectly from class Context) which starts the correct Activity to perform the specified action on the given data. In this case, because we’ve said to view a URI, the Intent launches the device’s web browser to display the corresponding web page. This page shows the results of the supplied Twitter search. This is an example of an implicit Intent—we did not specify a component to display the web page but instead allowed the system to launch the most appropriate Activity based on the type of data. If multiple activities can handle the action and data passed to startActivity, the system displays a dialog in which the user can select which activity to use. If the system cannot find an activity to handle the action, then method startActivity throws an ActivityNotFoundException. In general, it’s a good practice to handle this exception. We chose not to here, because Android devices on which this app is likely to be installed will have a browser capable of displaying a web page.
In future apps, we’ll also use explicit Intents, which specify an exact Activity class to run in the same app. For a list of apps and the intents they support, visit
openintents.org
developer.android.com/guide/appendix/g-app-intents.html
Anonymous Inner Class That Implements Interface OnClickListener to Respond to the Events of the editButton
Lines 237–253 of Fig. 5.23 create the anonymous inner-class object editButtonListener that implements interface OnClickListener. Line 118 registers this object as each newEditButtons’s event-handling object. Lines 239–252 implement the onClick method of interface OnClickListener. To determine which search Button’s query to edit, we first get the editButton’s parent layout (line 243)—the one that contains the editButton—then use it to get the Button with the ID R.id.newTagButton in that layout (lines 244–245)—this is the corresponding search Button. Line 247 gets the searchButton’s text, then uses it in line 250 to set the tagEditText’s value. Finally, line 251 gets the corresponding query from the savedSearches object and displays that value in the queryEditText.
236 // edit selected search
237 public OnClickListener editButtonListener = new OnClickListener()
238 {
239 @Override
240 public void onClick(View v)
241 {
242 // get all necessary GUI components
243 TableRow buttonTableRow = (TableRow) v.getParent();
244 Button searchButton =
245 (Button) buttonTableRow.findViewById(R.id.newTagButton);
246
247 String tag = searchButton.getText().toString();
248
249 // set EditTexts to match the chosen tag and query
250 tagEditText.setText(tag);
251 queryEditText.setText(savedSearches.getString(tag, null));
252 } // end method onClick
253 }; // end OnClickListener anonymous inner class
254 } // end class FavoriteTwitterSearches
Fig. 5.23. Anonymous inner class that implements interface OnClickListener to respond to the events of the editButton.
5.6. AndroidManifest.xml
When you create the project for each Android app in Eclipse, the ADT Plugin creates and configures the AndroidManifest.xml file (also known as the app’s manifest), which describes information about the app. Here, we introduce the contents of this file (Fig. 5.24) and discuss one new feature we added to it. We’ll discuss other manifest features file as they’re needed in later apps. For complete details of the manifest, visit:
developer.android.com/guide/topics/manifest/manifest-intro.html
1 <?xml version="1.0" encoding="utf-8"?>
2 <manifest xmlns:android="http://schemas.android.com/apk/res/android"
3 package="com.deitel.favoritetwittersearches"
4 android:versionCode="1" android:versionName="1.0">
5 <application android:icon="@drawable/icon"
6 android:label="@string/app_name">
7 <activity android:name=".FavoriteTwitterSearches"
8 android:label="@string/app_name"
9 android:windowSoftInputMode="stateAlwaysHidden">
10 <intent-filter>
11 <action android:name="android.intent.action.MAIN" />
12 <category android:name="android.intent.category.LAUNCHER" />
13 </intent-filter>
14 </activity>
15 </application>
16 <uses-sdk android:targetSdkVersion="10" android:minSdkVersion="8"/>
17 </manifest>
Fig. 5.24. AndroidManifest.xml file for the Favorite Twitter Searches app.
The manifest element (lines 2–17) is the root element of AndroidManifest.xml. This element’s package attribute (line 3) specifies the package that’s used to manage the code. The element’s android:versionCode attribute (line 4) specifies an internal integer version number for your app that’s used to determine whether one version of the app is newer than another. The element’s android:versionName attribute (line 4) specifies the version number that is displayed to users when they’re managing apps on a device.
Within the manifest element are the nested application (lines 5–15) and uses-sdk (line 16) elements. The application element is required. The element’s android:icon attribute specifies a drawable resource which is used as the app’s icon. If you don’t provide your own icon, the app uses the icon that is supplied by the ADT Plugin when you create the app’s project. Versions of this icon are stored in app’s res/drawable folders. The element’s android:label attribute specifies the app’s name. The uses-sdk element specifies the app’s target SDK (10 represents Android SDK version 2.3.3) and its minimum SDK (8 represents version 2.2). These settings allow this app to execute on devices running Android versions 2.2 and higher.
Within the application element is the activity element (lines 7–14), which specifies information about this app’s Activity. If the app has more than one Activity, each will have its own activity element. The android:name attribute (line 7) specifies the Activity’s fully qualified class name. If you precede the class name with just a dot (.), the class name is automatically appended to the package name specified in the manifest element. The android:label attribute (line 8) specifies a string that is displayed with the Activity. By default, the manifest was configured with the app’s name for this attribute. We added the android:windowSoftInputMode attribute in line 9. The value stateAlwaysHidden indicates that the soft keyboard should not be displayed when this Activity is launched. To add this attribute, you can either edit the XML directly, or you can double click the AndroidManifest.xml file in your project to open the manifest editor. Figure 5.25 shows the Application tab of the manifest editor. The tab names are at the bottom of the editor window. To set the android:windowSoftInputMode attribute, select .FavoriteTwitterSearches in the Application Nodes section of the window (at the bottom-left side). This displays the activity elements attributes at the bottom-right of the editor. Scroll to Window soft input mode and click the Select... button to see the available options, then select stateAlwaysHidden and click OK.

Fig. 5.25. Application tab in the manifest editor.
Within the activity element is the intent-filter element (lines 10–13), which specifies the types of intents the Activity can respond to. This element must contain one or more action elements. The one at line 11 indicates that this is the app’s main activity—that is, the one that is displayed when the app is launched. The category element (line 12) specifies the kind of Android component that handles the event. In this case, the value "android.intent.category.LAUNCHER" indicates that this activity should be listed in the application launcher with other apps on the device.
5.7. Wrap-Up
In this chapter, we created the Favorite Twitter Searches app. First we designed the GUI. We introduced the ScrollView component—a ViewGroup that lets users scroll through content too large to display in the space available—and used it to display the arbitrarily large list of saved searches. Each search was associated with a Button that the user could touch to pass the search to the device’s web browser. You also learned how to create resource files by using the New Android XML File dialog. In particular, you created a colors.xml file to store color resources, a dimen.xml file to store dimensions and a second layout file that the app inflated dynamically. We discussed how to reference colors and dimensions in XML layouts and how to use predefined colors from Android’s R.color class.
We stored the search tag/query pairs in a SharedPreferences file associated with the app and showed how to programmatically hide the soft keyboard. We also used a SharedPreferences.Editor object to store values in, modify values in and remove values from a SharedPreferences file. In response to the user touching a search Button, we loaded a Uri into the device’s web browser by creating a new Intent and passing it to Context’s startActivity method.
You used AlertDialog.Builder objects to configure and create AlertDialogs for displaying messages to the user. You created GUI components programmatically by manually inflating an XML layout file, which enabled the app to modify the GUI dynamically in response to user interactions. You used this technique to create a TableRow containing two new Buttons for each search—one to perform the search and one to edit the search. These TableRows were added to a TableLayout in a ScrollView, so that all the tagged searches could be displayed in a scrollable region on the screen.
Finally, we discussed the AndroidManifest.xml file and showed you how to configure the app so that the soft keyboard is not displayed when the app is launched.
In Chapter 6, you’ll build the Flag Quiz Game app in which the user is shown a graphic of a country’s flag and must guess the country from 3, 6 or 9 choices. You’ll use a menu and checkboxes to customize the quiz, limiting the flags and countries chosen to specific regions of the world.
Self-Review Exercises
5.1. Fill in the blanks in each of the following statements:
a. __________ are typically used to launch activities—they indicate an action to be performed and the data on which that action is to be performed.
b. We implement interface __________ to handle the events that occur when the user touches a button on an AlertDialog.
c. Lengthy data access should never be done in the UI thread; otherwise, the app will display a(n) __________ dialog—typically after five seconds of inactivity.
d. An Intent is a description of an action to be performed with associated __________.
e. Intents specify an exact Activity class to run in the same app.
f. When you create the project for each Android app in Eclipse, the ADT Plugin creates and configures the __________ file (also known as the app’s manifest), which describes information about the app.
g. The __________ attribute specifies the app’s name.
h. Within the activity element is the __________ element, which specifies the types of intents the Activity can respond to.
5.2. State whether each of the following is true or false. If false, explain why.
a. Extensive input/output should be performed on the UI thread; otherwise, this will affect your app’s responsiveness.
b. A benefit of defining dimensions as resources is that you can use density-independent pixel (dp or dip) and scale-independent pixel (sp) values, which Android automatically converts to the appropriate pixel values for a given device.
c. You call toArray (with an empty String array as an argument) on the Set object to convert the Set into an array of Strings.
Answers to Self-Review Exercises
a. Intents.
b. OnClickListener.
c. Application Not Responding (ANR).
d. data.
e. Explicit.
f. AndroidManifest.xml.
g. android:label.
h. intent-filter.
a. False. Extensive input/output should not be performed on the UI thread, since that would affect your app’s responsiveness.
b. True.
c. True.
Exercises
5.1. Fill in the blanks in each of the following statements:
a. A(n) __________ is a ViewGroup that can contain other Views (like a layout) and that lets users scroll through content too large to display on the screen.
d. The __________ inflates an XML layout file, thus creating the components specified in the XML.
e. A layout fills the entire screen if the Layout width and Layout height properties have the value __________.
f. The __________ method is called by the system when the app loads, or if the app’s process was killed by the operating system while the app was in the background and the app is then restored, or each time the configuration changes, such as when the user rotates the device or opens/closes a physical keyboard.
g. __________ (a static method of class Arrays from package java.util) sorts the array in its first argument.
h. You use __________ objects to configure and create AlertDialogs for displaying messages to the user.
5.2. State whether each of the following is true or false. If false, explain why.
a. An Algorithm specifies an action to be performed and the data to be acted upon—Android uses Algorithms to launch the appropriate activities.
b. You implement interface View.OnClickListener of package android.view to specify the code that should execute when the user touches a Button.
c. The first argument passed to Intent’s constructor is the data to be operated on.
d. With an explicit Intent, we allow the system to launch the most appropriate Activity based on the type of data.
e. If you don’t provide your own icon, the app uses the icon that’s supplied by the ADT Plugin when you create the app’s project.
f. The category element value "android.application.category.LAUNCHER" indicates that this activity should be listed in the application launcher with other apps on the device.
5.3. (Enhancements to the Favorite Twitter Searches App) Make the following enhancements to the Favorite Twitter Searches app:
a. Provide a Delete button for each search so the user can discard individual searches.
b. Allow the user to add filters to searches (e.g., include only tweets with videos, images or links). You may need to investigate the Twitter search operators in more detail.
5.4. (Favorite Flickr Searches App) Investigate the Flickr (flickr.com) search mechanism, then reimplement this chapter’s Favorite Twitter Searches app as a Favorite Flickr Searches app.
5.5. (Enhanced Favorite Flickr Searches App) Make the following enhancements to the Favorite Flickr Searches app:
a. Provide a Delete button for each search so the user can discard individual searches.
b. Allow the user to add filters to searches (e.g., include only images containing a specific color, shape, object, etc.).
5.6. (Word Scramble Game) Create an app that scrambles the letters of a word or phrase and asks the user to enter the correct word or phrase. Add a timer function giving the user a limited amount of time to answer. Keep track of the user’s score. Include levels (three-, four-, five-, six- and seven-letter words). Once you learn to use web services in Chapter 14, consider using an online dictionary to select the words. As a hint to the user, provide a definition with each word.
5.7. (Blackjack App) Create a Blackjack card game app. Two cards each are dealt to the dealer and the player. (We provide card images with the book’s examples.) The player’s cards are dealt face up. Only the dealer’s first card is dealt face up. Each card has a value. A card numbered 2 through 10 is worth its face value. Jacks, queens and kings each count as 10. Aces can count as 1 or 11—whichever value is more beneficial to the player. If the sum of the player’s two initial cards is 21 (that is, the player was dealt a card valued at 10 and an ace, which counts as 11 in this situation), the player has “blackjack” and the dealer’s face-down card is revealed. If the dealer does not have blackjack, the player immediately wins the game; otherwise, the hand is a “push” (that is, a tie) and no one wins the hand. If the player does not have blackjack, the player can begin taking additional cards one at a time. These cards are dealt face up, and the player decides when to stop taking cards. If the player “busts” (that is, the sum of the player’s cards exceeds 21), the game is over, and the player loses. When the player stands (stops taking cards), the dealer’s hidden card is revealed. If the dealer’s total is 16 or less, the dealer must take another card; otherwise, the dealer must stay. The dealer must continue to take cards until the sum of the dealer’s cards is greater than or equal to 17. If the dealer exceeds 21, the player wins. Otherwise, the hand with the higher point total wins. If the dealer and the player have the same point total, the game is a “push”, and no one wins.
5.8. (Enhanced Blackjack App) Enhance the Blackjack app in Exercise 5.7 as follows:
a. Provide a betting mechanism that allows the player to start with $1000 and adds or subtracts from that value based on whether the user wins or loses a hand. If the player wins with a non-blackjack hand, the bet amount is added to the total. If the player wins with blackjack, 1.5 times the bet amount is added to the total. If the player loses the hand, the bet amount is subtracted from the total. The game ends when the user runs out of money.
b. Locate images of casino chips and use them to represent the bet amount on the screen.
c. Investigate Blackjack rules online and provide capabilities for “doubling down,” “surrendering” and other aspects of the game.
d. Some casinos use variations of the standard Blackjack rules. Provide options that allow the user to choose the rules under which the game should be played.
e. Some casinos use different numbers of decks of cards. Allow the user to choose how many decks should be used.
f. Allow the user to save the game’s state to continue at a later time.
5.9. (Other Card Game Apps) Investigate the rules for any card game of your choice online and implement the game as an app.
5.10. (Solitaire Card Game) Search the web for the rules to various solitaire card games. Choose the version of the game you like then implement it. (We provide card images with the book’s examples.)