1. Introduction to Android
Objectives
In this chapter you’ll be introduced to:
• The history of Android and the Android SDK.
• The Android Market for apps.
• A review of basic object-technology concepts.
• Key software for Android app development, including the Android SDK, the Java SDK and Eclipse integrated development environment (IDE).
• Important Android documentation.
• Test-driving an Android app that enables you to draw on the screen.
• The Deitel online Android Resource Centers.
1.6 Android 4.0 (Ice Cream Sandwich)
1.7 Downloading Apps from the Android Market
1.9 Android Software Development Kit (SDK)
1.10 Object Technology: A Quick Refresher
1.11 Test-Driving the Doodlz App in an Android Virtual Device (AVD)
1.13 Android Development Resources
Self-Review Exercises | Answers to Self-Review Exercises | Exercises
1.1. Introduction
Welcome to Android app development! We hope that you’ll find working with Android How to Program to be an informative, challenging, entertaining and rewarding experience. This portion of the book is geared toward Java programmers. We use only complete working apps, so if you don’t know Java but have object-oriented programming experience in another language, such as C#, Objective-C/Cocoa or C++ (with class libraries), you should be able to master the material quickly, learning Java and Java-style object-oriented programming as you learn Android app development. In addition, we’ve provided a friendly, rich introduction to Java in the appendices.
The book uses an app-driven approach—we discuss each new technology in the context of complete working Android apps, with one app per chapter. We describe the app and test-drive it. Next, we briefly overview the key Eclipse (integrated development environment), Java and Android SDK (Software Development Kit) technologies we’ll use to implement the app. For apps that require it, we walk through designing the GUI visually using Eclipse. Then we provide the complete source-code listing, using line numbers, syntax shading (to mimic the syntax coloring used in the Eclipse IDE) and code highlighting to emphasize the key portions of the code. We also show one or more screen shots of the running app. Then we do a detailed code walkthrough, emphasizing the new programming concepts introduced in the app. The source code for all of the book’s apps can be downloaded from www.deitel.com/books/AndroidHTP/. Figure 1.1 lists key online Android documentation.

Fig. 1.1. Key online documentation for Android developers.
Read the Before You Begin section following the Preface for information on downloading the software you’ll need to build Android apps. The Android Developer site provides free downloads plus documentation, how-to videos (Fig. 1.38), coding guidelines and more. To publish your apps to Google’s app marketplace—Android Market—you’ll need to create a developer profile at market.android.com/publish/signup. There’s a registration fee and you must agree to the Android Market Developer Distribution Agreement. We discuss publishing your apps in more detail in Chapter 2, Android Market and App Business Issues.
As you dive into Android app development, you may have questions about the tools, design issues, security and more. There are several Android developer newsgroups and forums where you can get the latest announcements or ask questions (Fig. 1.2).

Fig. 1.2. Android newsgroups and forums.
1.2. Android Overview
The first-generation Android phones were released in October 2008. By October 2011, a comScore study showed that Android had over 46% of the U.S. smartphone market share, compared to 28% for Apple’s iPhone and 17% for Blackberry.1 In August 2010, more than 200,000 Android smartphones were being activated each day, up from 100,000 per day only two months earlier.2 As of December 2011, more than 700,000 Android devices were being activated daily.3 There are now over 300 different Android devices worldwide.
1 www.comscore.com/Press_Events/Press_Releases/2011/12/comScore_Reports_October_2011_U.S._Mobile_Subscriber_Market_Share.
2 www.wired.com/gadgetlab/2010/08/google-200000-android-phones/.
3 www.informationweek.com/news/mobility/smart_phones/232300932.
The Android operating system was developed by Android, Inc., which was acquired by Google in July 2005. In November 2007, the Open Handset Alliance™—a 34-company consortium initially and 81 now (www.openhandsetalliance.com/oha_members.html)—was formed to develop Android, driving innovation in mobile technology and improving the user experience while reducing costs. Android is used in numerous smartphones, e-reader devices and tablet computers.
Openness and Open Source
One benefit of developing Android apps is the openness of the platform. The operating system is open source and free. This allows you to view Android’s source code and see how its features are implemented. You can also contribute to Android by reporting bugs (see source.android.com/source/report-bugs.html) or by participating in the Open Source Project discussion groups (source.android.com/community/index.html). Numerous open-source Android apps from Google and others are available on the Internet (Fig. 1.3). Figure 1.4 shows you where you can get the Android source code, learn about the philosophy behind the open-source operating system and get licensing information.
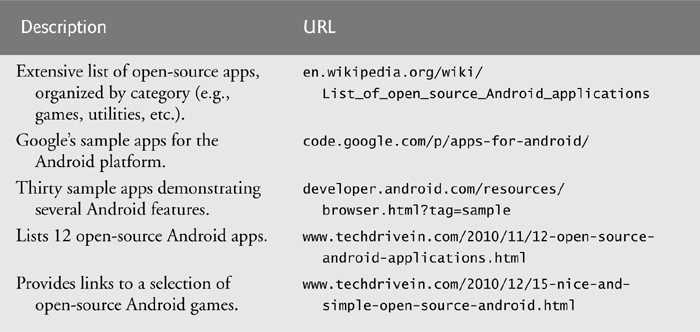
Fig. 1.3. Open-source Android apps resource sites.

Fig. 1.4. Android source code and documentation resources.
Java
Android apps are developed with Java—the world’s most widely used programming language. Java was a logical choice for the Android platform, because it’s powerful, free and open source. Java is used to develop large-scale enterprise applications, to enhance the functionality of web servers, to provide applications for consumer devices (e.g., cell phones, pagers and personal digital assistants) and for many other purposes.
Java enables you to develop apps that will run on a variety of devices without any platform-specific code. Experienced Java programmers can quickly dive into Android development, using the Android APIs (Application Programming Interfaces) and others available from third parties.
The openness of the platform spurs rapid innovation. Android is available on devices from dozens of original equipment manufacturers (OEMs) in 48 countries through 59 carriers.4 The intense competition among OEMs and carriers benefits customers.
4 code.google.com/events/io/2010/.
Java is object oriented and has access to powerful class libraries that help you develop apps quickly. GUI programming in Java is event driven—in this book, you’ll write apps that respond to various user-initiated events such as screen touches and keystrokes. In addition to directly programming portions of your apps, you’ll also use Eclipse to conveniently drag and drop predefined objects such as buttons and textboxes into place on your screen, and label and resize them. Using Eclipse with the Android Development Tools (ADT) Plugin, you can create, run, test and debug Android apps quickly and conveniently, and you can visually design your user interfaces.
Multitouch Screen
Many Android smartphones wrap the functionality of a mobile phone, Internet client, MP3 player, gaming console, digital camera and more into a handheld device with full-color multitouch screens. These allow you to control the device with gestures involving one touch or multiple simultaneous touches (Fig. 1.5).

Fig. 1.5. Android gestures.
Using the multitouch screen, you can navigate easily between your phone, apps, music library, web browsing, and so on. The screen can display a keyboard for typing e-mails and text messages and entering data in apps (some Android devices also have physical keyboards). Using two fingers, you can zoom in (moving your fingers apart) and out (pinching your fingers together) on photos, videos and web pages. You can scroll up and down or side to side by just swiping your finger across the screen.
Built-in Apps
Android devices come with several built-in apps, which may vary depending on the device. These typically include Phone, Contacts, Mail, Browser and more. Many manufacturers customize the default apps; we’ll show you how to interact with the apps regardless of how they’ve been changed.
Android Naming Convention
Each new version of Android is named after a dessert, going in alphabetical order:
• Android 1.6 (Donut)
• Android 2.0–2.1 (Eclair)
• Android 2.3 (Gingerbread)
• Android 3.0 (Honeycomb)
• Android 4.0 (Ice Cream Sandwich)
1.3. Android 2.2 (Froyo)
Android 2.2 (also called Froyo, released in May 2010) included several new features and enhancements (Fig. 1.6). In subsequent sections we’ll discuss Android 2.3 (Gingerbread) and Android 3.0 (Honeycomb).


Fig. 1.6. Android 2.2 user features (developer.android.com/sdk/android-2.2-highlights.html).
New Developer Features in Android 2.2
The Android Cloud to Device Messaging (C2DM) service allows app developers to send data from their servers to their apps installed on Android devices, even when the apps are not currently running. The server notifies the apps to contact the server directly to receive updated app or user data.5 Android Application Error Reports, which can be accessed by logging into your Android Market publisher account, enable you to receive app-crash and app-freeze reports from your apps’ users.
5 code.google.com/android/c2dm/.
Android 2.2 also includes several new APIs that allow you to easily add functionality into your apps (Fig. 1.7). We use some of these new frameworks in this book. We also use web services. With these, you can create mashups, which enable you to rapidly develop apps by combining the complementary web services of several organizations, possibly with information feeds of various types (such as RSS, Atom, XML, JSON and others) (Fig. 1.8). For example, www.housingmaps.com uses web services to combine Craigslist (www.craigslist.org) real-estate listings with the capabilities of Google Maps—the most widely used API for mashups—to show the locations of apartments for rent in a given area. We use WeatherBug web services in Chapter 14.
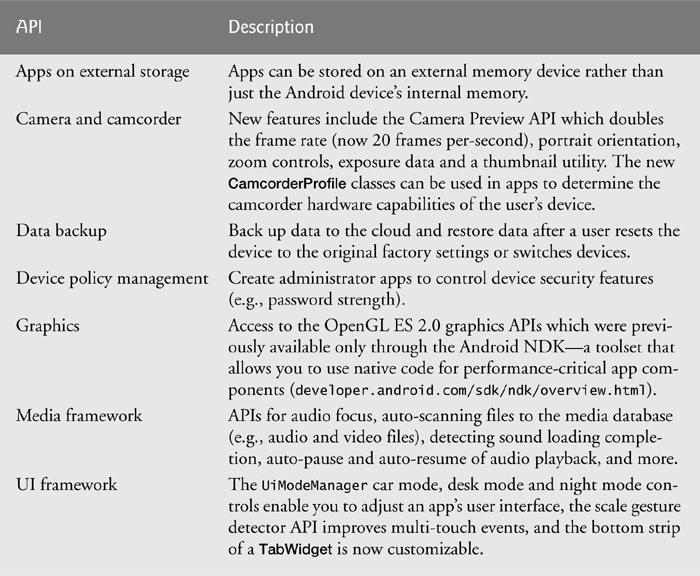
Fig. 1.7. Android 2.2 APIs (developer.android.com/sdk/android-2.2-highlights.html).
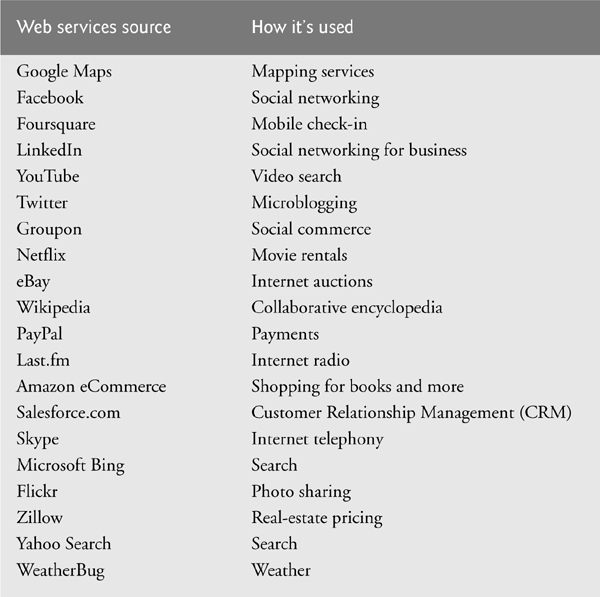
Fig. 1.8. Some popular web services (www.programmableweb.com/apis/directory/1?sort=mashups).
Figure 1.9 lists directories where you’ll find information about many of the most popular web services.
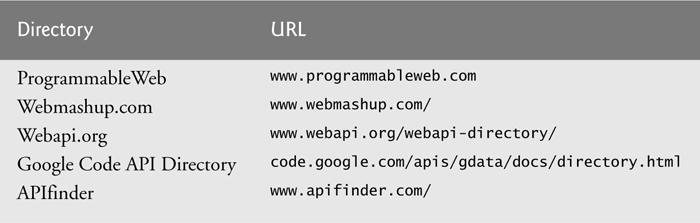
Fig. 1.9. Web-services directories.
1.4. Android 2.3 (Gingerbread)
Android 2.3 (Gingerbread), released in December 2010 (with Android 2.3.3—a minor update—released in February 2011), added more user refinements, such as a redesigned keyboard, improved navigation capabilities, increased power efficiency and more. Figure 1.10 describes some of the key new user features and updates.


Fig. 1.10. Android 2.3 user features (developer.android.com/sdk/android-2.3-highlights.html).
The platform also added several new developer features for enhanced communications, game development and multimedia (Figure 1.11). For further details about each of these features, go to developer.android.com/sdk/android-2.3-highlights.html.

Fig. 1.11. Android 2.3 developer features (developer.android.com/sdk/android-2.3-highlights.html).
1.5. Android 3.0 (Honeycomb)
Tablet sales will account for over 20% of all personal-computer sales by 2015.6 Interest in Android tablets is increasing rapidly. At the 2011 Consumer Electronic Show, 85 new Android tablets were announced.7 Android 3.0 (Honeycomb) includes user-interface improvements specifically for large-screen devices (e.g., tablets), such as a redesigned keyboard for more efficient typing, a visually appealing 3D user interface, System and Action Bars for easier navigation and more (Fig. 1.12). It also gives developers new tools to optimize apps for larger-screen devices (Fig. 1.13).
6 www.forrester.com/ER/Press/Release/0,1769,1340,00.html.
7 www.computerworld.com/s/article/9206219/Google_Android_tablets_gain_traction_with_developers?source=CTWNLE_nlt_dailyam_2011-01-25.


Fig. 1.12. New Android 3 features (developer.android.com/sdk/android-3.0-highlights.html).


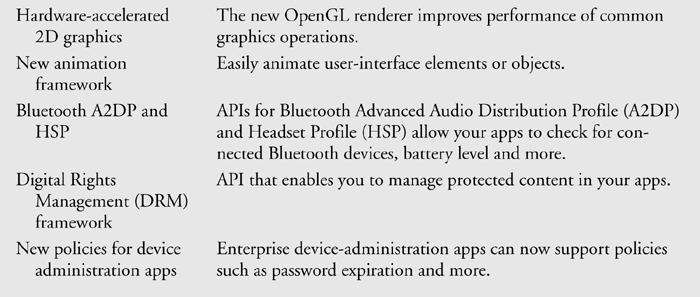
Fig. 1.13. New developer features in Android 3 (developer.android.com/sdk/android-3.0-highlights.html).
1.6. Android 4.0 (Ice Cream Sandwich)
Android 4.0 (Ice Cream Sandwich), released in late 2011, merges Android 2.3 (Gingerbread) and Android 3.0 (Honeycomb) into one operating system for use on all Android devices. This allows you to incorporate Honeycomb’s features such as the holographic user interface, new launcher and more (previously available only on tablets) into your smartphone apps, and easily scale your apps to work on different devices. In addition to a refined user interface that includes improved text input, spell checking, multitasking, e-mail and faster web browsing, Ice Cream Sandwich adds several new features for users (Fig. 1.14) and developers (Fig. 1.15). We use some of the new Android 4.0 developer features in the online bonus chapters, accessible on the book’s Companion Website.

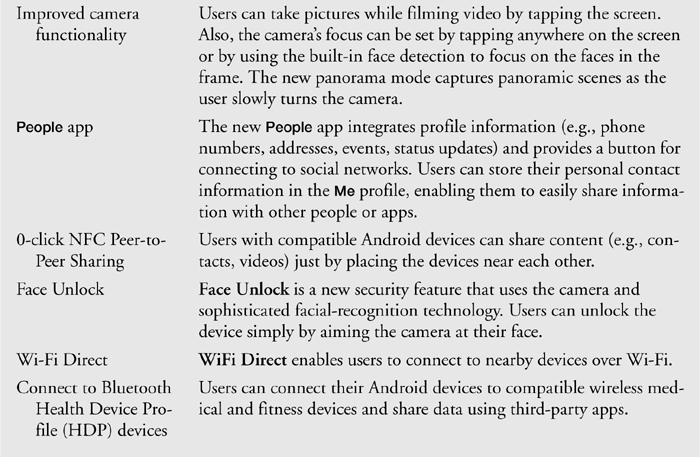
Fig. 1.14. Some of the new user features in Android 4 (developer.android.com/sdk/android-4.0-highlights.html).

Fig. 1.15. Some of the new developer features in Android 4 (developer.android.com/sdk/android-4.0-highlights.html).
1.7. Downloading Apps from the Android Market
There are hundreds of thousands of apps in Google’s Android Market, and the number continues to grow quickly. Figure 1.16 lists some popular Android apps. You can download additional apps directly onto your Android device through Android Market. Android Market notifies you when updates to your downloaded apps are available.
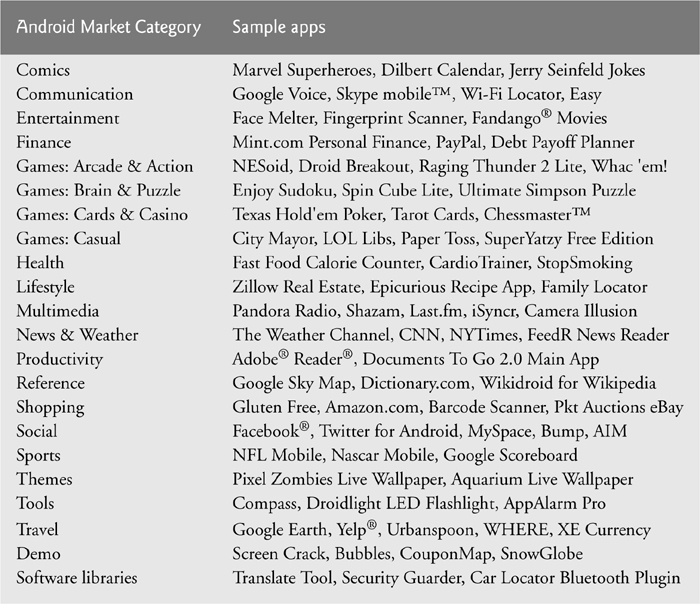
Fig. 1.16. Some popular Android apps in Android Market.
Visit market.android.com to check out the featured apps, or check out some of the other Android app review and recommendation sites (Fig. 1.17). Some are free and some are fee based. Developers set the prices for their apps sold through Android Market and receive 70% of the revenue. As a marketing strategy, many app developers offer basic versions of their apps for free so users can determine whether they like them, then purchase more feature-rich versions. We discuss this so-called “lite” strategy in more detail in Section 2.10.

Fig. 1.17. Android app review and recommendation sites.
1.8. Packages
Android uses a collection of packages, which are named groups of related, predefined classes. Some of the packages are Android specific, while others are Java and Google packages. These packages allow you to conveniently access Android OS features and incorporate them into your apps. They’re written mainly in Java and are accessible to Java programs. The Android packages help you create apps that adhere to Android’s unique look-and-feel conventions. Figure 1.18 lists the packages we discuss in this book. For a complete list of Android packages, see developer.android.com/reference/packages.html.


Fig. 1.18. Android, Java and Google packages used in this book, listed with the chapter in which they first appear.
1.9. Android Software Development Kit (SDK)
The Android SDK provides the tools you’ll need to build Android apps. It’s available at no charge through the Android Developers site. See the Before You Begin section after the Preface for complete details on downloading the tools you need to develop Android apps, including the Java SE, the Eclipse IDE, the Android SDK 3.x and the ADT Plugin for Eclipse.
Eclipse Integrated Development Environment (IDE)
Eclipse is the recommended integrated development environment for Android development, though developers may also use a text editor and command-line tools to create Android apps. Eclipse supports many programming languages, including Java, C++, C, Python, Perl, Ruby on Rails and more. The vast majority of Android development is done in Java. The Eclipse IDE includes:
• Code editor with support for syntax coloring and line numbering
• Auto-indenting and auto-complete (i.e., type hinting)
• Debugger
• Version control system
• Refactoring support
You’ll use Eclipse in Section 1.11 to test-drive the Doodlz app. Starting in Chapter 3, Welcome App, you’ll use Eclipse to build apps.
Android Development Tools (ADT) Plugin for Eclipse
The Android Development Tools (ADT) Plugin for Eclipse—an extension to the Eclipse IDE—allows you to create, run and debug Android apps, export them for distribution (e.g., upload them to Android Market), and more. ADT also includes a visual GUI design tool. GUI components can be dragged and dropped into place to form GUIs without any coding. You’ll learn more about ADT in Chapter 3, Welcome App.
The Android Emulator
The Android emulator, included in the Android SDK, allows you to run Android apps in a simulated environment within Windows, Mac OS X or Linux. The emulator displays a realistic Android user-interface window. Before running an app in the emulator, you’ll need to create an Android Virtual Device (AVD), which defines the characteristics of the device on which you want to test, including the hardware, system image, screen size, data storage and more. If you want to test your apps for multiple Android devices, you’ll need to create separate AVDs to emulate each unique device.
We used the emulator (not an actual Android device) to take most of the Android screen shots for this book. You can reproduce on the emulator most of the Android gestures (Fig. 1.19) and controls (Fig. 1.20) using your computer’s keyboard and mouse. The gestures on the emulator are a bit limited, since your computer probably cannot simulate all the Android hardware features. For example, to test GPS apps in the emulator, you’ll need to create files that simulate GPS readings. Also, although you can simulate orientation changes (to portrait or landscape mode), there’s no way to simulate particular accelerometer readings (the accelerometer measures the orientation and tilting of the device). You can, however, upload your app to an Android device to test these features. You’ll see how to do this in Chapter 11, Route Tracker app. You’ll start creating AVDs and using the emulator to develop Android apps in Chapter 3’s Welcome app.

Fig. 1.19. Android gestures on the emulator (developer.android.com/guide/developing/tools/emulator.html).
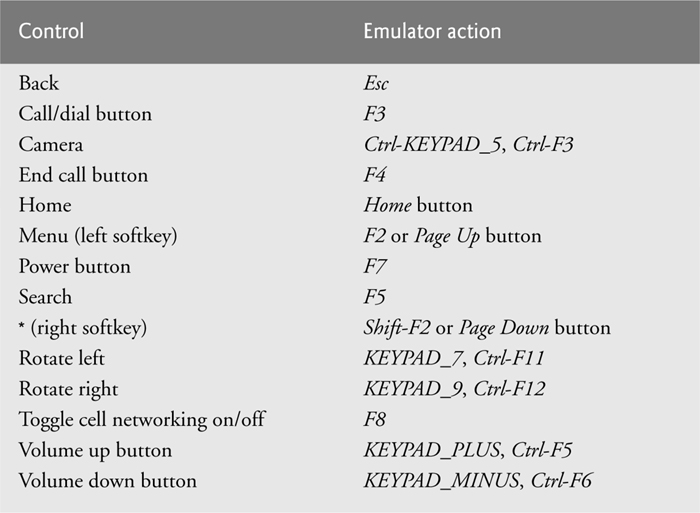
Fig. 1.20. Android hardware controls on the emulator (for additional controls, go to developer.android.com/guide/developing/tools/emulator.html).
1.10. Object Technology: A Quick Refresher
Building software quickly, correctly and economically remains an elusive goal at a time when demands for new and more powerful software are soaring. Objects, or more precisely—as we’ll see in Chapter 3—the classes objects come from, are essentially reusable software components. There are date objects, time objects, audio objects, video objects, automobile objects, people objects, etc. Almost any noun can be reasonably represented as a software object in terms of attributes (e.g., name, color and size) and behaviors (e.g., calculating, moving and communicating). Software developers are discovering that using a modular, object-oriented design and implementation approach can make software development groups much more productive than was possible with earlier popular techniques like “structured programming”—object-oriented programs are often easier to understand, correct and modify.
The Automobile as an Object
To help you understand objects and their contents, let’s begin with a simple analogy. Suppose you want to drive a car and make it go faster by pressing its accelerator pedal. What must happen before you can do this? Well, before you can drive a car, someone has to design it. A car typically begins as engineering drawings, similar to the blueprints that describe the design of a house. These drawings include the design for an accelerator pedal. The pedal hides from the driver the complex mechanisms that actually make the car go faster, just as the brake pedal hides the mechanisms that slow the car, and the steering wheel “hides” the mechanisms that turn the car. This enables people with little or no knowledge of how engines, braking and steering mechanisms work to drive a car easily.
Just as you cannot cook meals in the kitchen of a blueprint, you cannot drive a car’s engineering drawings. Before you can drive a car, it must be built from the engineering drawings that describe it. A completed car has an actual accelerator pedal to make the car go faster, but even that’s not enough—the car won’t accelerate on its own (hopefully!), so the driver must press the pedal to accelerate the car.
Methods and Classes
Let’s use our car example to introduce some key object-oriented programming concepts. Performing a task in a program requires a method. The method houses the program statements that actually perform its tasks. The method hides these statements from its user, just as the accelerator pedal of a car hides from the driver the mechanisms of making the car go faster. A program unit called a class houses the methods that perform the class’s tasks. For example, a class that represents a bank account might contain one method to deposit money to an account, another to withdraw money from an account and a third to inquire what the account’s current balance is. A class is similar in concept to a car’s engineering drawings, which house the design of an accelerator pedal, steering wheel, and so on.
Instantiation
Just as someone has to build a car from its engineering drawings before you can actually drive a car, you must build an object of a class before a program can perform the tasks that the class’s methods define. The process of doing this is called instantiation. An object is then referred to as an instance of its class.
Reuse
Just as a car’s engineering drawings can be reused many times to build many cars, you can reuse a class many times to build many objects. Reuse of existing classes when building new classes and programs saves time and effort. Reuse also helps you build more reliable and effective systems, because existing classes and components often have gone through extensive testing, debugging and performance tuning. Just as the notion of interchangeable parts was crucial to the Industrial Revolution, reusable classes are crucial to the software revolution that has been spurred by object technology.
Messages and Methods Calls
When you drive a car, pressing its gas pedal sends a message to the car to perform a task—that is, to go faster. Similarly, you send messages to an object. Each message is a method call that tells a method of the object to perform its task. For example, a program might call a particular bank-account object’s deposit method to increase the account’s balance.
Attributes and Instance Variables
A car, besides having capabilities to accomplish tasks, also has attributes, such as its color, its number of doors, the amount of gas in its tank, its current speed and its record of total miles driven (i.e., its odometer reading). Like its capabilities, the car’s attributes are represented as part of its design in its engineering diagrams (which, for example, include an odometer and a fuel gauge). As you drive an actual car, these attributes are carried along with the car. Every car maintains its own attributes. For example, each car knows how much gas is in its own gas tank, but not how much is in the tanks of other cars.
An object, similarly, has attributes that it carries along as it’s used in a program. These attributes are specified as part of the object’s class. For example, a bank-account object has a balance attribute that represents the amount of money in the account. Each bank-account object knows the balance in the account it represents, but not the balances of the other accounts in the bank. Attributes are specified by the class’s instance variables.
Encapsulation
Classes encapsulate (i.e., wrap) attributes and methods into objects—an object’s attributes and methods are intimately related. Objects may communicate with one another, but they’re normally not allowed to know how other objects are implemented—implementation details are hidden within the objects themselves. This information hiding is crucial to good software engineering.
Inheritance
A new class of objects can be created quickly and conveniently by inheritance—the new class absorbs the characteristics of an existing one, possibly customizing them and adding unique characteristics of its own. In our car analogy, a “convertible” certainly is an object of the more general class “automobile,” but more specifically, the roof can be raised or lowered.
Object-Oriented Analysis and Design (OOAD)
How will you create the code for your programs? Perhaps, like many programmers, you’ll simply turn on your computer and start typing. This approach may work for small programs, but what if you were asked to create a software system to control thousands of automated teller machines for a major bank? Or suppose you were asked to work on a team of 1,000 software developers building the next U.S. air traffic control system? For projects so large and complex, you should not simply sit down and start writing programs.
To create the best solutions, you should follow a detailed analysis process for determining your project’s requirements (i.e., defining what the system is supposed to do) and developing a design that satisfies them (i.e., deciding how the system should do it). Ideally, you’d go through this process and carefully review the design (and have your design reviewed by other software professionals) before writing any code. If this process involves analyzing and designing your system from an object-oriented point of view, it’s called an object-oriented analysis and design (OOAD) process. Languages like Java are object oriented. Programming in such a language, called object-oriented programming (OOP), allows you to implement an object-oriented design as a working system.
1.11. Test-Driving the Doodlz App in an Android Virtual Device (AVD)
In this section, you’ll run and interact with your first Android app. The Doodlz app allows the user to “paint” on the screen using different brush sizes and colors. You’ll build this app in Chapter 9. The following steps show how to import the app’s project into Eclipse and how to test-drive the app in the Android Virtual Device (AVD) that you set up in the Before You Begin section following the Preface. Later in this section, we’ll also discuss how to run the app on an actual Android device.
The screen captures in the following steps (and throughout this book) were taken on a computer running Windows 7, Java SE 6, Eclipse 3.6.1, Android 2.2/2.3/3.0 and the ADT Plugin for Eclipse.
1. Checking your setup. Confirm that you’ve set up your computer properly to develop Android apps by reading the Before You Begin section located after the Preface.
2. Opening Eclipse. To start Eclipse, open the folder containing Eclipse on your system and double-click the Eclipse (![]() ) icon. If this is your first time opening Eclipse, the Welcome tab (Fig. 1.21) will open. Click the Workbench button to close this tab and switch to the program development view—this is formally called the Java perspective in Eclipse.
) icon. If this is your first time opening Eclipse, the Welcome tab (Fig. 1.21) will open. Click the Workbench button to close this tab and switch to the program development view—this is formally called the Java perspective in Eclipse.

Fig. 1.21. Welcome to Eclipse tab in Eclipse.
3. Opening the Import Dialog. Select File > Import... to open the Import dialog (Fig. 1.22).
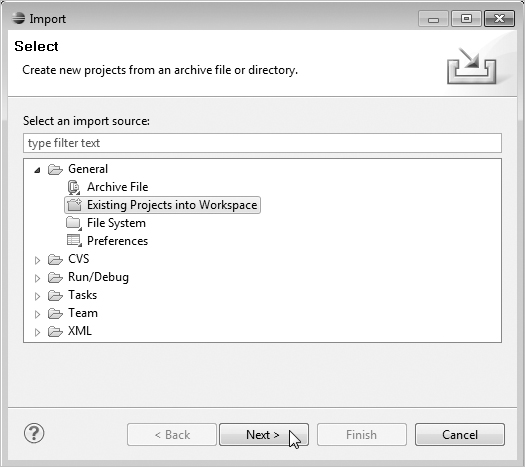
Fig. 1.22. Import dialog.
4. Importing the Doodlz app’s project. In the Import dialog, expand the General node and select Existing Projects into Workspace, then click Next > to proceed to the Import Projects step (Fig. 1.23). Ensure that Select root directory is selected, then click the Browse... button. In the Browse For Folder dialog (Fig. 1.24), locate the Doodlz folder in the book’s examples folder, select it and click OK. Click Finish to import the project into Eclipse. The project now appears in the Package Explorer window (Fig. 1.25) at the left side of the Eclipse window.
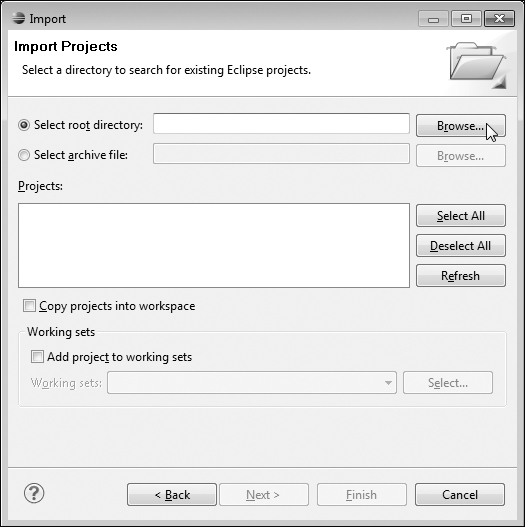
Fig. 1.23. Import dialog’s Import Projects step.

Fig. 1.24. Browser For Folder dialog.
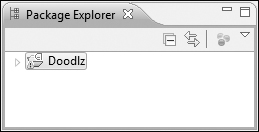
Fig. 1.25. Package Explorer window in Eclipse.
5. Launching the Doodlz app. In Eclipse, select the Doodlz project in the Package Explorer window (Fig. 1.25), then select Run As > Android Application from the Run As button (![]() ) drop-down menu on the IDE’s toolbar (Fig. 1.26). This will execute Doodlz in the NexusS Android Virtual Device (AVD) (Fig. 1.27) that you created in the Before You Begin section. If you prefer to test the app in a different AVD, you select Window > Android SDK and AVD Manager, then select the AVD you wish to use and click Start.... If multiple AVDs are running when you launch an app, the Android Device Chooser dialog will appear to allow you to choose the AVD on which to execute the app. We’ll discuss the Android Device Chooser dialog later in this section.
) drop-down menu on the IDE’s toolbar (Fig. 1.26). This will execute Doodlz in the NexusS Android Virtual Device (AVD) (Fig. 1.27) that you created in the Before You Begin section. If you prefer to test the app in a different AVD, you select Window > Android SDK and AVD Manager, then select the AVD you wish to use and click Start.... If multiple AVDs are running when you launch an app, the Android Device Chooser dialog will appear to allow you to choose the AVD on which to execute the app. We’ll discuss the Android Device Chooser dialog later in this section.

Fig. 1.26. Launching the Doodlz app.

Fig. 1.27. Android Virtual Device (AVD) with the running Doodlz app.
6. Exploring the AVD. The left side of the AVD displays the running app. The right side (Fig. 1.28) contains various buttons that simulate the hard and soft buttons on an actual Android device and a keyboard that simulates the device’s hard or soft keyboard. Hard buttons are actual buttons on a device. Soft buttons are buttons that appear on the device’s touch screen. You use the AVD’s buttons to interact with apps and the Android OS in the AVD. When the app is installed on an Android device, you can create a new painting by dragging your finger anywhere on the canvas. In the AVD, you “touch” the screen by using the mouse.

Fig. 1.28. Android Virtual Device (AVD) with the running Doodlz app.
7. Displaying the app’s options. To display the app’s options, touch the Menu (![]() ) button—on some actual devices this button appears as parallel horizontal bars (
) button—on some actual devices this button appears as parallel horizontal bars (![]() ). The app now appears as shown in Fig. 1.29. The options include Color, Line Width, Erase, Clear and Save Image. Touching Color displays a GUI for changing the line color. Touching Line Width displays a GUI for changing the thickness of the line that will be drawn. Touching Erase sets the drawing color to white so that as you draw over colored areas, the color is erased. Touching Clear clears the entire drawing. Touching Save Image saves the image into the device’s Gallery of images. You’ll explore each of these options momentarily.
). The app now appears as shown in Fig. 1.29. The options include Color, Line Width, Erase, Clear and Save Image. Touching Color displays a GUI for changing the line color. Touching Line Width displays a GUI for changing the thickness of the line that will be drawn. Touching Erase sets the drawing color to white so that as you draw over colored areas, the color is erased. Touching Clear clears the entire drawing. Touching Save Image saves the image into the device’s Gallery of images. You’ll explore each of these options momentarily.
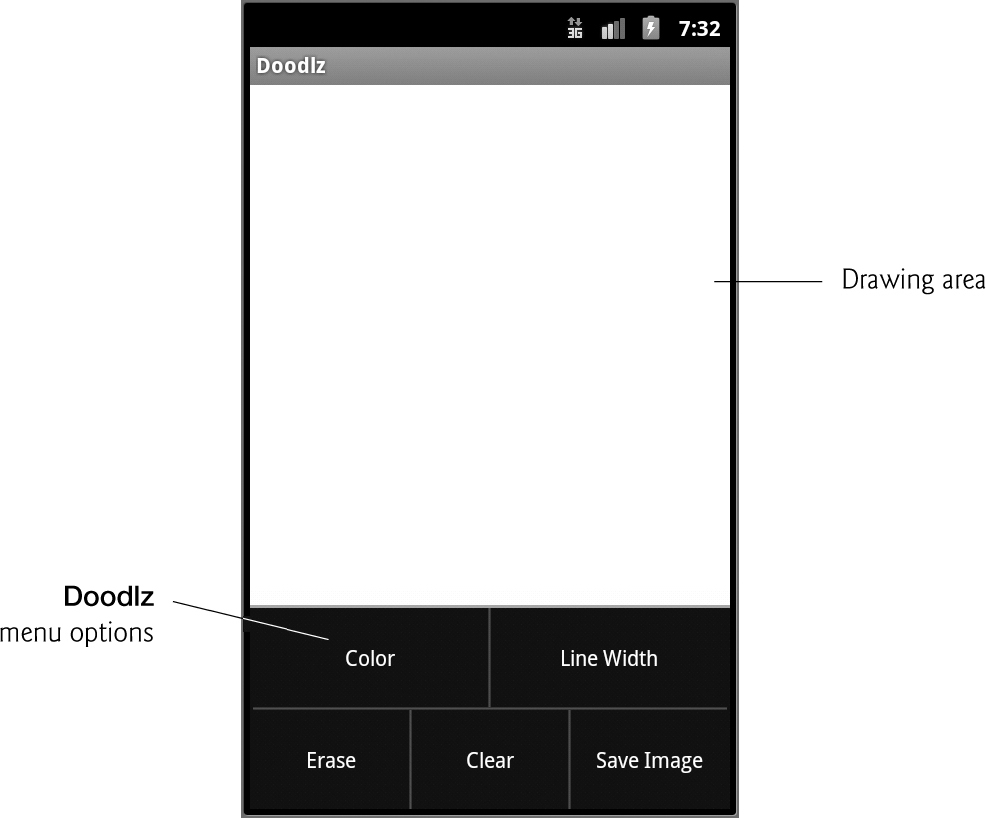
Fig. 1.29. Doodlz menu options.
8. Changing the brush color to red. To change the brush color, touch the Color menu item to display the GUI for changing the color (Fig. 1.30(a)). Colors are defined using the RGBA color scheme—the red, green, blue and alpha components are specified by integers in the range 0–255. The GUI consists of Red, Green, Blue and Alpha SeekBars that allow you to select the drawing color’s red, green, blue and transparency amounts. Drag the SeekBars to change the color. As you do, the app displays the new color. Select a red color now by dragging the Red SeekBar to the right as in Fig. 1.30(a). Touch the Done button to return to the drawing area. Drag your “finger” (that is, the mouse) on the screen to draw flower petals (Fig. 1.30(b)).

Fig. 1.30. Changing the drawing color to red and drawing flower petals.
9. Changing the brush color to dark green. Change the drawing color again by touching the AVD’s Menu (![]() ) button, then touching Color. Select a dark green color by dragging the Green
) button, then touching Color. Select a dark green color by dragging the Green SeekBar to the right and ensuring that the Red and Blue SeekBars are at the far left (Fig. 1.31(a)).

Fig. 1.31. Changing the line color and line width.
10. Changing the line width. To change the line width, touch the Menu (![]() ) button, then touch Line Width. Drag the
) button, then touch Line Width. Drag the SeekBar for the line width to the right to thicken the line (Fig. 1.31(b)). Touch the Done button to return to the drawing area. Draw the flower stem and leaves. Repeat Steps 9 and 10 for a lighter green color and thinner line, then draw the grass. (Fig. 1.32).

Fig. 1.32. Drawing the stem and grass in the new line color and line width.
11. Finishing the drawing. Use the instructions in Steps 9–10 to change the drawing color to blue (Fig. 1.33(a)) and select a narrower line (Fig. 1.33(b)). Switch back to the drawing area and draw the raindrops (Fig. 1.34).

Fig. 1.33. Changing the line color and width.

Fig. 1.34. Drawing the rain in the new line color and line width.
12. Saving the image. If you’d like, you can save the image to the Gallery by touching the Menu (![]() ) button, then touching Save Image. You can then view this image and others stored on the device by opening the Gallery app.
) button, then touching Save Image. You can then view this image and others stored on the device by opening the Gallery app.
13. Returning to the home screen. You can return to the AVD’s home screen by clicking the home (![]() ) button on the AVD.
) button on the AVD.
Running the Doodlz App on an Android Device
If you have an Android device, you can easily execute an app on the device for testing purposes.
1. First, you must enable debugging on the device. To do so, go to the device’s Settings app, then select Applications > Development and ensure that USB debugging is checked.
2. Next, connect the device to your computer via a USB cable—typically this comes with the device when you purchase it.
3. In Eclipse, select the Doodlz project in the Package Explorer window, then select Run As > Android Application from the Run As button (![]() ) drop-down menu on the IDE’s toolbar (Fig. 1.26).
) drop-down menu on the IDE’s toolbar (Fig. 1.26).
If you do not have any AVDs open, but do have an Android device connected, the IDE will automatically install the app on your device and execute it. If you have one or more AVDs open and/or devices connected, the Android Device Chooser dialog (Fig. 1.35) is displayed so that you can select the AVD or device on which to install and execute the app. In this case, we first started two AVDs and connected one actual device, so there are three “devices” on which we could possibly run the app. We set up several AVDs so that we could simulate real Android devices with different versions of the Android OS and different screen sizes.

Fig. 1.35. Android Device Chooser dialog.
In the Choose a running Android device section of Fig. 1.35, the dialog shows that we have one actual device connected to the computer (represented by the second line in the device list) and three AVDs. Each AVD has an AVD Name that we chose (NexusS and MotorolaXoom). Select the device or AVD you wish to use, then click OK to install and execute the app on that device or AVD. If you have other AVDs that you’ve defined and they’re not currently executing, you can use the bottom half of this dialog to select and launch one of those AVDs.
When you build apps for distribution via the Android Market, you should test the apps on as many actual devices as you can. Remember that some features can be tested only on real devices. If you don’t have many actual devices available to you, consider creating AVDs that simulate the various devices on which you’d like your app to execute. When you configure each AVD to simulate a specific real device, look up the real device’s specifications online and configure the AVD accordingly. In addition, you can modify the AVD’s config.ini file as described in the section Setting hardware emulation options at
developer.android.com/guide/developing/tools/avd.html
This file contains options that are not configurable via the ADT Plugin in Eclipse. Modifying these options allows you to more precisely match the hardware configuration of a real device.
1.12. Deitel Resources
Our website (www.deitel.com) provides more than 100 Resource Centers on various topics including programming languages, software development, Web 2.0, Internet business and open-source projects. The Resource Centers evolve out of the research we do to support our publications and business endeavors. We’ve found many exceptional resources online, including tutorials, documentation, software downloads, articles, blogs, podcasts, videos, code samples, books, e-books and more—most of them are free. We announce our latest Resource Centers in our newsletter, the Deitel® Buzz Online, and on Facebook and Twitter. Figure 1.36 provides a list of the Deitel resources to help you get started with Android app development.
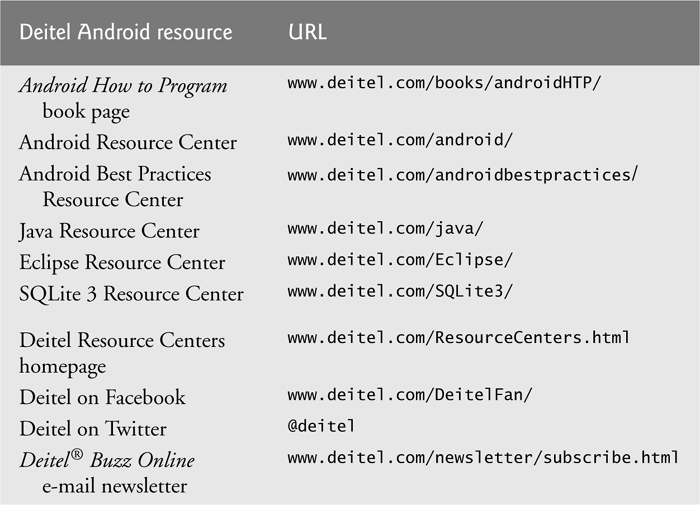
Fig. 1.36. Deitel Android resources.
1.13. Android Development Resources
Figure 1.37 is a list of Android development resources. Figure 1.38 lists several of the Android developer videos available on developer.android.com. For additional resources, visit our Android Resource Center at www.deitel.com/android.

Fig. 1.37. Android development tips and resources.

Fig. 1.38. Android developer videos.
1.14. Wrap-Up
This chapter presented a brief history of Android and discussed its functionality. We discussed features of the Android 2.2, 2.3, 3.0 and 4.0 operating systems. We provided links to some of the key online documentation and to the newgroups and forums you can use to connect with the developer community. We discussed Android Market and provided links to some popular app review and recommendation sites. You learned the Android gestures and how to perform each on an Android device and on the emulator. We introduced the Java, Android and Google packages that enable you to use the hardware and software functionality you’ll need to build your Android apps. You’ll use many of these packages in this book. We also discussed Java programming and the Android SDK. We provided a quick refresher on basic object-technology concepts, including classes, objects, attributes and behaviors. You test-drove the Doodlz app on the Android emulator.
In Chapter 2, we discuss the business side of Android app development. You’ll see how to prepare your apps for submission to the Android Market. We provide tips for pricing and marketing your app. We also show how to use Android Market capabilities for tracking app sales, payments and more.
Self-Review Exercises
1.1. Fill in the blanks in each of the following statements:
a. In November 2007, the __________—a 34-company consortium initially and many more now—was formed to develop Android, driving innovation in mobile technology and improving the user experience while reducing costs.
b. Using Eclipse with the __________ Plugin, you can create, run, test and debug Android apps quickly and conveniently, and you can visually design your user interfaces.
c. Multitouch screens allow you to control your Android device with __________ involving one touch or multiple simultaneous touches.
d. You can create __________, which enable you to rapidly develop apps by combining the complementary web services of several organizations, possibly with information feeds of various types (such as RSS, Atom, XML, JSON and others).
e. The Android __________ contains APIs for audio focus, auto-scanning files to the media database (e.g., audio and video files), detecting sound loading completion, auto-pause and auto-resume of audio playback, and more.
f. Android uses a collection of __________, which are named groups of related, predefined classes.
g. The package __________ gives access to Android content providers.
h. The __________, included in the Android SDK, allows you to run Android apps in a simulated environment within Windows, Mac OS X or Linux.
i. Almost any noun can be reasonably represented as a software object in terms of __________ (e.g., name, color and size) and behaviors (e.g., calculating, moving and communicating).
j. A program unit called a(n) __________ houses the methods that perform its tasks.
k. You send messages to an object. Each message is a(n) __________ that tells a method of the object to perform its task.
1.2. State whether each of the following is true or false. If false, explain why.
a. One benefit of developing Android apps is that the operating system is proprietary to Google.
b. The openness of the Android platform discourages innovation.
c. The Android Development Tools (ADT) Plugin for Eclipse—an extension to the Eclipse IDE—allows you to create, run and debug Android apps, export them for distribution (e.g., upload them to Android Market) and more.
d. You can reuse a class many times to build many objects. Reuse of existing classes when building new classes and programs saves time and effort.
e. Attributes are specified by the class’s methods.
f. Objects may communicate with one another, but they’re normally not allowed to know how other objects are implemented—implementation details are hidden within the objects themselves.
Answers to Self-Review Exercises
a. Open Handset Alliance.
b. Android Development Tools (ADT).
c. gestures.
d. mashups.
e. Media framework.
f. packages.
g. android.provider.
h. Android emulator.
i. attributes.
j. class.
k. method call.
a. False. The operating system is open source and free.
b. False. The openness of the platform spurs rapid innovation.
c. True.
d. True.
e. False. Attributes are specified by the class’s instance variables.
f. True.
Exercises
1.1. Fill in the blanks in each of the following statements:
a. Android apps are developed with __________—the world’s most widely used programming language—a logical choice because it’s powerful, free and open source.
b. GUI programming in Java is __________-driven—you’ll write apps that respond to various user interactions such as screen touches and keystrokes.
c. Touching the screen and holding your finger in position is called a(n) __________.
d. Touching and quickly flicking your finger across the screen in the direction you’d like to move is called a(n) __________.
e. Use the __________ framework to add drag-and-drop capabilities in an app.
f. With Android 4’s __________ capability, using the camera, compatible devices determines the positioning of the user’s eyes, nose and mouth. The camera also tracks where the user is looking, allowing you to create apps that change perspective based on where the user is looking (e.g., 3D game landscapes).
g. As a marketing strategy, many app developers offer basic versions of their apps for free so users can determine whether they like them, then purchase more feature-rich versions. This is called the “__________” strategy.
h. Before running an app in the emulator, you’ll need to create a(n) __________, which defines the characteristics of the device on which you want to test, including the hardware, system image, screen size, data storage and more.
i. Performing a task in a program requires a(n) __________ which houses the program statements that actually perform its tasks.
j. You must build an object of a class before a program can perform the tasks that the class’s methods define. The process of doing this is called __________.
k. __________ helps you build more reliable and effective systems, because existing classes and components often have gone through extensive testing, debugging and performance tuning.
l. Classes __________ (i.e., wrap) attributes and methods into objects—an object’s attributes and methods are intimately related.
m. A new class of objects can be created quickly and conveniently by __________—the new class absorbs the characteristics of an existing one, possibly customizing them and adding unique characteristics of its own.
n. Unlike actual buttons on a device, __________ buttons appear on the device’s touch screen.
o. Colors are defined using the RGBA color scheme in which the red, green, blue and __________ components are specified by integers in the range 0–255.
1.2. State whether each of the following is true or false. If false, explain why.
a. The vast majority of Android development is done in C++.
b. Microsoft Visual Studio is the recommended integrated development environment for Android development, though developers may also use a text editor and command-line tools to create Android apps.
c. You can reproduce on the emulator most of the Android gestures and controls using your computer’s keyboard and mouse.
d. Objects, or more precisely the classes objects come from, are essentially reusable software components.