
5. Doodlz App
Objectives
In this chapter you’ll:
![]() Detect when the user touches the screen, moves a finger across the screen and removes a finger from the screen.
Detect when the user touches the screen, moves a finger across the screen and removes a finger from the screen.
![]() Process multiple touches so the user can draw with multiple fingers at once.
Process multiple touches so the user can draw with multiple fingers at once.
![]() Use a
Use a SensorManager and the accelerometer to detect motion events.
![]() Use a
Use a Paint object to specify the color and width of a line.
![]() Use
Use Path objects to store each line’s data and use a Canvas to draw each line into a Bitmap.
![]() Create a menu and display menu items on the app bar.
Create a menu and display menu items on the app bar.
![]() Use the printing framework and the Android Support Library’s
Use the printing framework and the Android Support Library’s PrintHelper class to enable the user to print a drawing.
![]() Use Android 6.0’s new permissions model to request permission for saving an image to external storage.
Use Android 6.0’s new permissions model to request permission for saving an image to external storage.
![]() Add libraries to an app with the Gradle build system.
Add libraries to an app with the Gradle build system.
5.2 Test-Driving the Doodlz App in an Android Virtual Device (AVD)
5.3.1 Activity and Fragment Lifecycle Methods
5.3.3 Using SensorManager to Listen for Accelerometer Events
5.3.5 Drawing with Canvas, Paint and Bitmap
5.3.6 Processing Multiple Touch Events and Storing Lines in Paths
5.3.8 Printing and the Android Support Library’s PrintHelper Class
5.3.9 New Android 6.0 (Marshmallow) Permissions Model
5.3.10 Adding Dependencies Using the Gradle Build System
5.4 Creating the Project and Resources
5.4.2 Gradle: Adding a Support Library to the Project
5.4.4 Importing the Material Design Icons for the App’s Menu Items
5.4.5 MainActivityFragment Menu
5.4.6 Adding a Permission to AndroidManifest.xml
5.5.1 content_main.xml Layout for MainActivity
5.5.2 fragment_main.xml Layout for MainActivityFragment
5.5.3 fragment_color.xml Layout for ColorDialogFragment
5.5.4 fragment_line_width.xml Layout for LineWidthDialogFragment
5.5.5 Adding Class EraseImageDialogFragment
5.7 MainActivityFragment Class
5.7.1 package Statement, import Statements and Fields
5.7.2 Overridden Fragment Method onCreateView
5.7.3 Methods onResume and enableAccelerometerListening
5.7.4 Methods onPause and disableAccelerometerListening
5.7.5 Anonymous Inner Class for Processing Accelerometer Events
5.7.7 Overridden Fragment Methods onCreateOptionsMenu and onOptionsItemSelected
5.7.9 Overridden Method onRequestPermissionResult
5.7.10 Methods getDoodleView and setDialogOnScreen
5.8.1 package Statement and import Statements
5.8.2 static and Instance Variables
5.8.4 Overridden View Method onSizeChanged
5.8.5 Methods clear, setDrawingColor, getDrawingColor, setLineWidth and getLineWidth
5.8.6 Overridden View Method onDraw
5.8.7 Overridden View Method onTouchEvent
5.9.1 Overridden DialogFragment Method onCreateDialog
5.9.2 Method getDoodleFragment
5.9.3 Overridden Fragment Lifecycle Methods onAttach and onDetach
5.9.4 Anonymous Inner Class That Responds to the Events of the Alpha, Red, Green and Blue SeekBars
5.10 LineWidthDialogFragment Class
5.10.2 Anonymous Inner Class That Responds to the Events of the widthSeekBar
5.11 EraseImageDialogFragment Class
Self-Review Exercises | Answers to Self-Review Exercises | Exercises
5.1 Introduction
The Doodlz app enables you to paint by dragging one or more fingers across the screen (Fig. 5.1). The app provides options for setting the drawing color and line width. Additional options allow you to
• clear the screen
• save the current drawing on your device, and
• print the current drawing.
Depending on your device’s screen size, some or all of the app’s options are displayed as icons directly on the app bar—any that do not fit are displayed as text in the overflow options menu (![]() ) that appears on the app bar.
) that appears on the app bar.

This app introduces Android 6.0’s new permissions mechanism. For example, Android requires the user’s permission to allow an app to save files (like this app’s drawings) on a device. In Android 6.0, rather than prompting the user at installation time with a complete list of permissions the app requires, the app requests each permission individually, only when the permission is required to perform a given task for the first time. In this app, Android prompts for permission the first time the user attempts to save a drawing.
First, you’ll test-drive the app. Then we’ll overview the technologies used to build it. Next, you’ll design the app’s GUI. Finally, we’ll walk through the app’s complete source code, emphasizing the app’s new features.
5.2 Test-Driving the Doodlz App in an Android Virtual Device (AVD)
Opening and Running the App
Open Android Studio and open the Doodlz app from the Doodlz folder in the book’s examples folder, then execute the app in the AVD or on a device. This builds the project and runs the app.
Understanding the App’s Options
Figure 5.2(a) and (b) show the app bar and overflow options menu on the Nexus 6 AVD, and Fig. 5.2(c) shows the app bar on the Nexus 9 AVD.

This app has the following menu items:
• Color (![]() )—Displays a dialog for changing the line color.
)—Displays a dialog for changing the line color.
• Line Width (![]() )—Displays a dialog for changing the thickness of the line that will be drawn as you drag your finger(s) on the screen.
)—Displays a dialog for changing the thickness of the line that will be drawn as you drag your finger(s) on the screen.
• Erase Image (![]() )—First confirms whether you wish to erase the entire image, then clears the drawing area if you do not cancel the action.
)—First confirms whether you wish to erase the entire image, then clears the drawing area if you do not cancel the action.
• Save (![]() )—Saves the image on the device. You can view the image via the Google Photos app by opening that app’s menu and touching Device Folders to see thumbnails of your stored images.1
)—Saves the image on the device. You can view the image via the Google Photos app by opening that app’s menu and touching Device Folders to see thumbnails of your stored images.1
1. On some devices you might need to take a picture with the device’s camera app before you’ll be able to save properly from the Doodlz app.
• Print (![]() )—Displays a GUI for selecting an available printer so you can print your image or save it as a PDF document (the default).
)—Displays a GUI for selecting an available printer so you can print your image or save it as a PDF document (the default).
You’ll explore each of these options momentarily.

When a menu item is displayed on the app bar, if the menu item has an icon, that icon is displayed; otherwise, the menu item’s text is displayed in small capital letters. Any menu items in this app that cannot fit on the app bar are accessible in the drop-down options menu (![]() ), which displays the menu items using their text labels.
), which displays the menu items using their text labels.
Changing the Brush Color to Red
To change the brush color, touch ![]() on the app bar—or select Color from the options menu if the icon is not displayed on the app bar. This displays the Choose Color dialog (Fig. 5.3).
on the app bar—or select Color from the options menu if the icon is not displayed on the app bar. This displays the Choose Color dialog (Fig. 5.3).

Colors are defined using the ARGB color scheme in which the alpha (i.e., transparency), red, green and blue components, respectively, are specified by integers in the range 0–255. For alpha, 0 means completely transparent and 255 means completely opaque. For red, green and blue, 0 means none of that color and 255 means the maximum amount of that color. The GUI consists of Alpha, Red, Green and Blue SeekBars that allow you to select the amount of alpha, red, green and blue, respectively, in the drawing color. You drag the SeekBars to change the color. As you do, the app displays the new color below the SeekBars. Select a red color now by dragging the Red SeekBar to the right as in Fig. 5.3. Touch the SET COLOR button to set this color as the drawing color and dismiss the dialog. If you do not wish to change the color, you can simply touch outside the dialog to dismiss it. You can erase by changing the drawing color to white (i.e., moving all four SeekBars’ thumbs to the far right).
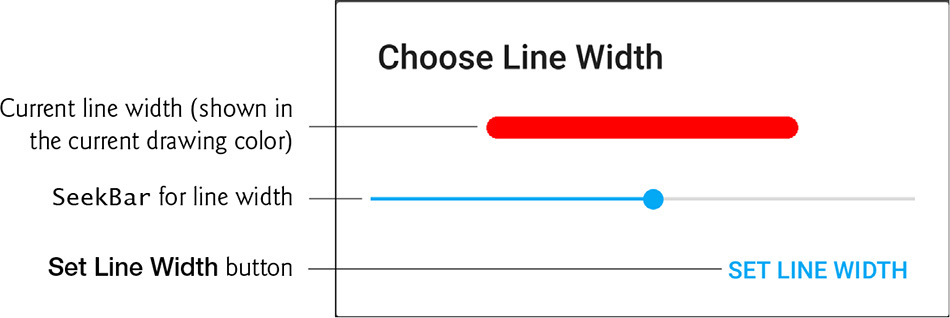
Changing the Line Width
To change the line width, touch ![]() on the app bar—or select Line Width from the options menu if the icon is not displayed on the app bar. This displays the Choose Line Width dialog. Drag the
on the app bar—or select Line Width from the options menu if the icon is not displayed on the app bar. This displays the Choose Line Width dialog. Drag the SeekBar for the line width to the right to thicken the line (Fig. 5.4). Touch the SET LINE WIDTH button to return to the drawing area.
Drawing the Flower Petals
Drag your “finger”—the mouse when using the emulator—on the drawing area to draw flower petals (Fig. 5.5).

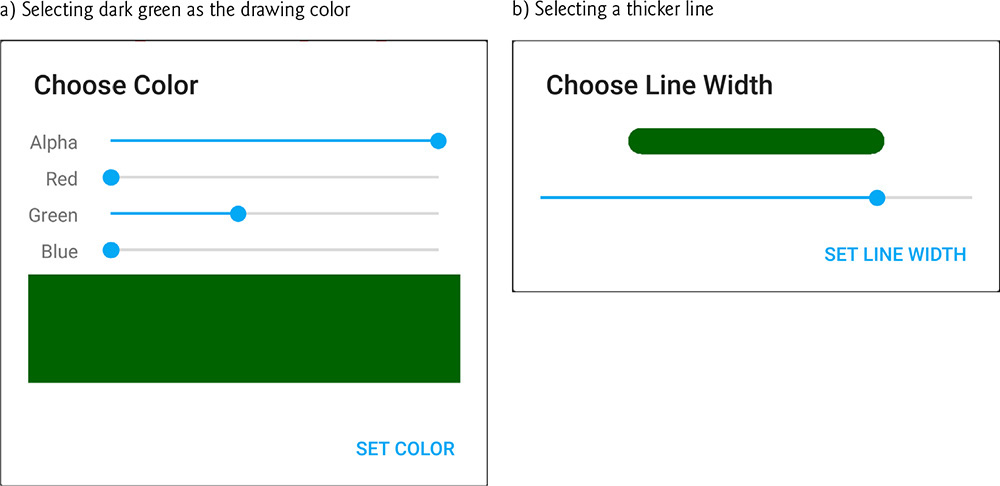
Changing the Brush Color to Dark Green
Touch ![]() or select the Color menu item to display the Choose Color dialog. Select a dark green color by dragging the Green
or select the Color menu item to display the Choose Color dialog. Select a dark green color by dragging the Green SeekBar to the right and ensuring that the Red and Blue SeekBars are at the far left (Fig. 5.6(a)).
Changing the Line Width and Drawing the Stem and Leaves
Touch ![]() or select the Line Width menu item to display the Choose Line Width dialog. Drag the
or select the Line Width menu item to display the Choose Line Width dialog. Drag the SeekBar for the line width to the right to thicken the line (Fig. 5.6(b)). Draw the flower stem and leaves. Repeat Steps 9 and 10 for a lighter green color and thinner line, then draw the grass (Fig. 5.7).

Finishing the Drawing
Next, change the drawing color to a semitransparent blue (Fig. 5.8(a)) and select a narrower line (Fig. 5.8(b)). Then draw the raindrops (Fig. 5.9).


Saving the Image
You can save your image to the device and view it using the Photos app. To do so, touch ![]() on the app bar—or select Save from the options menu if the icon is not displayed on the app bar. You can then view this image and others stored on the device by opening the Photos app.
on the app bar—or select Save from the options menu if the icon is not displayed on the app bar. You can then view this image and others stored on the device by opening the Photos app.
Printing the Image
To print the image, touch ![]() on the app bar—or select Print from the options menu if the icon is not displayed on the app bar. This displays a dialog of printing options. By default, you can save the image as a PDF document. To choose a printer, tap Save as PDF and select from the list of available printers. If no printers appear in the list, you need to configure Google Cloud Print for your printer. For information on this, visit
on the app bar—or select Print from the options menu if the icon is not displayed on the app bar. This displays a dialog of printing options. By default, you can save the image as a PDF document. To choose a printer, tap Save as PDF and select from the list of available printers. If no printers appear in the list, you need to configure Google Cloud Print for your printer. For information on this, visit
5.3 Technologies Overview
This section presents the new technologies that we use in the Doodlz app.
5.3.1 Activity and Fragment Lifecycle Methods
A Fragment’s lifecycle is tied to that of its parent Activity. There are six Activity lifecycle methods that have corresponding Fragment lifecycle methods—onCreate, onStart, onResume, onPause, onStop and onDestroy. When the system calls these methods on an Activity, it will also call the corresponding methods (and potentially other Fragment lifecycle methods) on all of the Activity’s attached Fragments.
This app uses Fragment lifecycle methods onResume and onPause. An Activity’s onResume method is called when a Fragment is on the screen and ready for the user to interact with it. When an Activity hosts Fragments and the Activity is resumed, all of its Fragments’ onResume methods are called. In this app, MainActivityFragment overrides onResume to enable listening for the accelerometer events so the user can shake the device to erase a drawing (Section 5.7.3).
An Activity’s onPause method is called when another Activity receives the focus, which pauses the one that loses the focus and sends it to the background. When an Activity hosts Fragments and the Activity is paused, all of its Fragments’ onPause methods are called. In this app, MainActivityFragment overrides onPause to suspend listening for the shake-to-erase accelerometer events (Section 5.7.4).

When an app is paused, it should remove listeners for sensor events so these events are not delivered to the app when it’s not on the screen. This saves battery.
We discuss other Activity and Fragment lifecycle methods as we need them. For more information on the complete Activity lifecycle, visit
and for more information on the complete Fragment lifecycle, visit
5.3.2 Custom Views
You can create a custom view by extending class View or one of its subclasses, as we do with class DoodleView (Section 5.8), which extends View. To add a custom component to a layout’s XML file, you must provide its fully qualified name (i.e., its package and class name), so the custom View’s class must exist before you add it to the layout. We demonstrate how to create the DoodleView class and add it to a layout in Section 5.5.2.
5.3.3 Using SensorManager to Listen for Accelerometer Events
In this app, you can shake the device to erase a drawing. Most devices have an accelerometer for detecting device movement. Other currently supported sensors include gravity, gyroscope, light, linear acceleration, magnetic field, orientation, pressure, proximity, rotation vector and temperature. You’ll use class Sensor’s sensor-type constants to specify the sensors for which your app should receive data. The list of Sensor constants can be found at
We’ll discuss the accelerometer and sensor event handling in Section 5.7. For a complete discussion of Android’s other sensors, see the Sensors Overview at
5.3.4 Custom DialogFragments
Several previous apps have used AlertDialogs in DialogFragments to display information to the user or to ask questions and receive responses from the user in the form of Button clicks. The AlertDialogs you’ve used so far were created using anonymous inner classes that extended DialogFragment and displayed only text and buttons. AlertDialogs may also contain custom Views. In this app, you’ll define three subclasses of DialogFragment:
• ColorDialogFragment (Section 5.9) displays an AlertDialog with a custom View containing GUI components for previewing and selecting a new ARGB drawing color.
• LineWidthDialogFragment (Section 5.10) displays an AlertDialog with a custom View containing a GUI for previewing and selecting the line thickness.
• EraseImageDialogFragment (Section 5.11) displays a standard AlertDialog asking the user to confirm whether the entire image should be erased.
For the ColorDialogFragment and EraseImageDialogFragment, you’ll inflate the custom View from a layout resource file. In each of the three DialogFragment subclasses, you’ll also override the following Fragment lifecycle methods:
• onAttach—The first Fragment lifecycle method called when a Fragment is attached to a parent Activity.
• onDetach—The last Fragment lifecycle method called when a Fragment is about to be detached from a parent Activity.
Preventing Multiple Dialogs from Appearing at the Same Time
It’s possible that the event handler for the shake event could try to display the confirmation dialog for erasing an image when another dialog is already on the screen. To prevent this, you’ll use onAttach and onDetach to set the value of a boolean that indicates whether a dialog is on the screen. When this boolean’s value is true, we will not allow the event handler for the shake event to display a dialog.
5.3.5 Drawing with Canvas, Paint and Bitmap
You can use methods of class Canvas to draw text, lines and circles. Canvas methods draw on a View’s Bitmap (both from package android.graphics). You can associate a Canvas with a Bitmap, then use the Canvas to draw on the Bitmap, which can then be displayed on the screen (Section 5.8). A Bitmap also can be saved into a file—we’ll use this capability to store drawings in the device’s gallery when you touch the Save option. Each drawing method in class Canvas uses an object of class Paint (package android.graphics) to specify drawing characteristics, including color, line thickness, font size and more. These capabilities are presented with the onDraw method in the DoodleView class (Section 5.8.6). For more details on the drawing characteristics you can specify with a Paint object, visit
5.3.6 Processing Multiple Touch Events and Storing Lines in Paths
You can drag one or more fingers across the screen to draw. The app stores the information for each individual finger as a Path object (package android.graphics) that represents line segments and curves. You process touch events by overriding the View method onTouchEvent (Section 5.8.7). This method receives a MotionEvent (package android.view) that contains the type of touch event that occurred and the ID of the finger (known as a pointer) that generated the event. We use the IDs to distinguish the different fingers and add information to the corresponding Path objects. We use the type of the touch event to determine whether the user has touched the screen, dragged across the screen or lifted a finger from the screen.
In addition to standard touch-event handling, Android 6.0 provides enhanced support for using a Bluetooth stylus with apps, including access to pressure data and which stylus button the user presses. In this app, for example, you could use a stylus button to specify an erase mode, or you could use the stylus’ pressure data to change the stroke thickness dynamically as the user draws. For more information, visit
5.3.7 Saving to the Device
The app’s Save option allows you to save a drawing to the device. You can view the image in the Photos app by selecting Device Folders from the app’s menu to see thumbnails of the stored images—touch a thumbnail to view the full-size image. A ContentResolver (package android.content) enables the app to read data from and store data on a device. You’ll use a ContentResolver (Section 5.8.11) and the method insertImage of class MediaStore.Images.Media to save an image into the device’s Photos app. The MediaStore manages media files (images, audio and video) stored on a device.
5.3.8 Printing and the Android Support Library’s PrintHelper Class
In this app, we use class PrintHelper (Section 5.8.12) from Android’s printing framework to print the current drawing. Class PrintHelper provides a user interface for selecting a printer, has a method for determining whether a given device supports printing and provides a method for printing a Bitmap. PrintHelper is part of the Android Support Library, which provides new Android features for use in current and older Android versions. The support library also includes additional convenience features, like class PrintHelper, that support specific Android versions.
5.3.9 New Android 6.0 (Marshmallow) Permissions Model
Android requires the permission android.permission.WRITE_EXTERNAL_PERMISSION before an app can write to external storage. For Doodlz, we need this permission to save the image that the user draws.
Android 6.0 (Marshmallow) has a new permissions model that’s designed for a better user experience. Before Android 6.0, a user was required at installation time to grant in advance all permissions that an app would ever need—this caused many people not to install certain apps. With the new model, the app is installed without asking for any permissions. Instead, the user is asked to grant a permission only the first time the corresponding feature is used.
Once the user grants a permission, the app has that permission until:
• the app is reinstalled or
• the user changes the app’s permissions via the Android Settings app.
You’ll learn how to implement the new permissions model in Sections 5.7.8–5.7.9.
5.3.10 Adding Dependencies Using the Gradle Build System
Android Studio uses the Gradle build system to compile your code into an APK file—the installable app. Gradle also handles project dependencies, such as including in the build process any libraries used by the app. For Doodlz, you’ll add a support library dependency to your project so you can use the PrintHelper class for printing an image (Section 5.4.2).
5.4 Creating the Project and Resources
In this section, you’ll create the project, import material design icons for the app’s menu items and edit the various resources used by the GUI and the app’s Java code.
5.4.1 Creating the Project
Create a new Blank Activity project. Specify the following values in the Create New Project dialog’s New Project step:
• Application name: Doodlz
• Company Domain: deitel.com (or specify your own domain name)
For the remaining steps in the Create New Project dialog, use the same settings as in Section 4.4.1. This creates a MainActivity that hosts a Fragment. The Fragment will define the app’s drawing area and respond to the user’s touches. Follow the steps in Section 2.5.2 to add an app icon to your project.
Once the project is open in Android Studio, in the layout editor, select Nexus 6 from the virtual-device drop-down list (Fig. 2.11). Also, delete the Hello world! TextView in fragment_main.xml and the FloatingActionButton in activity_main.xml.
Use the Theme Editor (Section 3.5.2) to specify Material Blue 500 as the app’s primary color, Material Blue 700 as the dark primary color and Light blue accent 400 as the accent color. Also, follow the steps in Section 4.4.3 to configure the project for Java SE 7 support.
5.4.2 Gradle: Adding a Support Library to the Project
This app requires the Android Support Library to use the PrintHelper class. To add the support library as a project dependency, follow these steps:
1. Right click the app folder, then select Open Module Settings.
2. In the Project Structure window that appears, open the Dependencies tab.
3. Click the Add button (![]() ), then select Library dependency to open the Choose Library Dependency dialog.
), then select Library dependency to open the Choose Library Dependency dialog.
4. Select support-v4 (com.android.support:support-v4:23.1.0) from the list, then click OK. The dependency will appear in the list in the Dependencies tab.
5. Click OK. The IDE will display Gradle project sync in progress... while the project is being configured to use the Android Support Library.
For more on when to use and how to set up the Android Support Library, visit
http://developer.android.com/tools/support-library
http://developer.android.com/tools/support-library/setup.html
5.4.3 strings.xml
You created String resources in earlier chapters, so we show only a table of the String resource names and corresponding values here (Fig. 5.10). Double click strings.xml in the res/values folder, then click the Open editor link to display the Translations Editor for creating these String resources.
For languages that support uppercase letters, Google’s material design specification indicates that a Button’s text should use all capital letters (e.g., CANCEL or SET COLOR).

5.4.4 Importing the Material Design Icons for the App’s Menu Items
This app’s menu specifies icons for each menu item. Menus items that fit on the app bar (which depends on the device) display the corresponding icon. Use the techniques you learned in Section 4.4.9 to import the following material design vector icons:
• ![]() (
(ic_palette_24dp)
• ![]() (
(ic_brush_24dp)
• ![]() (
(ic_delete_24dp)
• ![]() (
(ic_save_24dp)
• ![]() (
(ic_print_24dp)
The names in parentheses are the names that are displayed as tooltips in the Vector Asset Studio dialog when you hover over an image. For each image, open its XML file and change the fillColor to
@android:color/white
so that the icons are displayed in white against the app’s blue app bar.
5.4.5 MainActivityFragment Menu
In Chapter 4, you edited the default menu provided by the IDE to display the Flag Quiz app’s Settings menu item. In this app, you’ll define your own menu for the MainActivityFragment. You will not use MainActivity’s default menu in this app, so you can delete the menu_main.xml file in your project’s res/menu folder. You should also remove the methods onCreateOptionsMenu and onOptionsItemSelected from class MainActivity, as these will not be used.
Menus for Different Android Versions
Keep in mind that the printing capability is not available in versions prior to Android 4.4. If you are developing an app with menus for multiple versions of Android, you may want to create multiple menu resources by using the resource qualifiers discussed in earlier apps. For example, you could create a menu resource for Android versions prior to 4.4 and a separate one for Android versions 4.4 and higher. In the menu resource for pre-Android-4.4, you can omit menu options that are unavailable in earlier Android versions. For more information on creating menu resources, visit
Creating the Menu
To create the menu resource, follow these steps:
1. Right click the res/menu folder and select New > Menu resource file to open the New Resource File dialog.
2. Enter doodle_fragment_menu.xml in the File name field, and click OK. The IDE opens the file in the editor where it displays the file’s XML. You must edit the XML directly to add menu items to the menu resource.
3. In this menu, we’ll use each menu item’s showAsAction property to specify that the menu item should be displayed on the app bar if there is room. When working with the Android Support Libraries to provide a backward-compatible app bar, you must use the showAsAction attribute from the XML namespace app, rather than the XML namespace android. Edit the <menu> element’s opening tag to include the app XML namespace
xmlns:app="http://schemas.android.com/apk/res-auto"
4. Add the code for the first menu item in Fig. 5.11 to the XML file. The id of the menu item is @+id/color, its title property is @string/menuitem_color, its icon property is @drawable/ic_palette_24dp and its showAsAction property is ifRoom. The value ifRoom indicates that Android should display the menu item on the app bar if there’s room available; otherwise, the menu item will appear as a text menu item in the overflow options menu at the right side of the app bar. Other showAsAction values can be found at
1 <item
2 android:id="@+id/color"
3 android:title="@string/menuitem_color"
4 android:icon="@drawable/ic_palette_24dp"
5 app:showAsAction="ifRoom">
6 </item>
Fig. 5.11 | An <item> element representing a menu item.
5. Repeat Step 3 for each of the IDs and titles in Fig. 5.12 to create the menu items for Line Width, Delete, Save and Print, then save and close the menu’s file. The completed XML for the menu is shown in Fig. 5.13.

1 <?xml version="1.0" encoding="utf-8"?>
2 <menu xmlns:android="http://schemas.android.com/apk/res/android"
3 xmlns:app="http://schemas.android.com/apk/res-auto">
4 <item
5 android:id="@+id/color"
6 android:title="@string/menuitem_color"
7 android:icon="@drawable/ic_palette_24dp"
8 app:showAsAction="ifRoom">
9 </item>
10
11 <item
12 android:id="@+id/line_width"
13 android:title="@string/menuitem_line_width"
14 android:icon="@drawable/ic_brush_24dp"
15 app:showAsAction="ifRoom">
16 </item>
17
18 <item
19 android:id="@+id/delete_drawing"
20 android:title="@string/menuitem_delete"
21 android:icon="@drawable/ic_delete_24dp"
22 app:showAsAction="ifRoom">
23 </item>
24
25 <item
26 android:id="@+id/save"
27 android:title="@string/menuitem_save"
28 android:icon="@drawable/ic_save_24dp"
29 app:showAsAction="ifRoom">
30 </item>
31
32 <item
33 android:id="@+id/print"
34 android:title="@string/menuitem_print"
35 android:icon="@drawable/ic_print_24dp"
36 app:showAsAction="ifRoom">
37 </item>
38 </menu>
Fig. 5.13 | doodle_fragment_menu.xml.
5.4.6 Adding a Permission to AndroidManifest.xml
In addition to using Android 6.0’s new permissions model in which the app asks the user to grant permissions dynamically, each app also must specify any permissions it uses in the AndroidManifest.xml file. To do so:
1. Expand the project’s manifests folder and open AndroidManifest.xml.
2. Inside the <manifest> element and before the <application> element, add
<uses-permission
android:name="android.permission.WRITE_EXTERNAL_STORAGE" />
5.5 Building the App’s GUI
In this section, you’ll create the app’s GUI and create the classes for the app’s dialogs.
5.5.1 content_main.xml Layout for MainActivity
The content_main.xml layout for this app’s MainActivity contains only the MainActivityFragment, which was created automatically when you created the project. For more readable code, we changed the fragment’s id property:
1. Open content_main.xml in the layout editor’s Design view.
2. Select the fragment in the Component Tree, then change the Fragment’s id to doodleFragment in the Properties window and save the layout.
5.5.2 fragment_main.xml Layout for MainActivityFragment
The fragment_main.xml layout for the MainActivityFragment needs to display only a DoodleView. The layout file was created with a RelativeLayout automatically when you created the project. To change the root element of the layout from a RelativeLayout to a DoodleView, you must first create class DoodleView (a subclass of View), so you can select it when placing the custom view in the layout:
1. Expand the java folder in the Project window.
2. Right click the com.deitel.doodlz node, then select New > Java Class.
3. In the Create New Class dialog that appears, enter DoodleView in the Name field, then click OK. The file will open in the editor automatically.
4. In DoodleView.java, indicate that class DoodleView is a subclass of View by adding extends View to the class’s definition. If the IDE does not add an import for android.view.View, place the cursor immediately following extends View. Next, click the red bulb (![]() ) that appears above the beginning of class
) that appears above the beginning of class DoodleView’s definition and select Import Class.
5. The IDE will display an error indicating that you have not defined a constructor for the new class. To fix this, place the cursor immediately following extends View. Click the red bulb (![]() ) that appears above the beginning of class
) that appears above the beginning of class DoodleView’s definition and select Create constructor matching super. In the Choose Super Class Constructors dialog, choose the two-argument constructor, then click OK. The IDE will add the constructor to the class. You’ll add code to this constructor in Section 5.8.3. The two-argument constructor is called by Android when inflating the DoodleView from a layout—the second argument specifies the View properties set in the layout XML file. You can learn more about class View’s constructors at
6. Switch back to fragment_main.xml in the layout editor and click the Text tab.
7. Change RelativeLayout to com.deitel.doodlz.DoodleView.
8. Remove the properties for top, right, bottom and left padding—the DoodleView should occupy the entire screen.
9. In Design view, select CustomView - com.deitel.doodlz.DoodleView in the Component Tree window, then set the id to doodleView.
10. Save and close fragment_main.xml.
5.5.3 fragment_color.xml Layout for ColorDialogFragment
The fragment_color.xml layout for the ColorDialogFragment contains a two-column GridLayout that displays a GUI for selecting and previewing a new drawing color. In this section, you’ll create ColorDialogFragment’s layout and the ColorDialogFragment class. To add the fragment_color.xml layout:
1. Expand the project’s res/layout node in the Project window.
2. Right click the layout folder and select New > Layout resource file to display the New Resource File dialog.
3. In the dialog’s File name field, enter fragment_color.xml
4. In the Root element field, enter GridLayout, then click OK.
5. In the Component Tree window, select the GridLayout.
6. In the Properties window, change the id value to colorDialogGridLayout and the columnCount to 2.
7. Using the layout editor’s Palette, drag Plain TextViews and SeekBars onto the colorDialogGridLayout node in the Component Tree window. Drag the items in the order they’re listed in Fig. 5.14 and set each item’s id as shown in the figure. We’ll show you how to add the colorView next.

Adding the colorView to the Layout
The colorView does not need its own class—we’ll programmatically use methods of class View to change the color displayed in colorView. Android Studio does not provide a drag-and-drop way to add an object of class View to a layout, so you’ll need to edit the layout’s XML directly to add the colorView. To do so:
1. Click the Text tab at the bottom of the layout editor to switch from the Design view to the layout’s XML text.
2. Add the code in Fig. 5.15 immediately before closing </GridLayout> tag.
1 <View
2 android:layout_width="wrap_content"
3 android:layout_height="@dimen/color_view_height"
4 android:id="@+id/colorView"
5 android:layout_column="0"
6 android:layout_columnSpan="2"
7 android:layout_gravity="fill_horizontal"/>
Fig. 5.15 | fragment_color.xml.
3. Switch back to the layout editor’s Design tab.
4. Configure the GUI component properties with the values shown in Fig. 5.16. For the dimension value color_view_height, recall that in the Resources dialog, you can click New Resource and select New Dimension Value... to open the New Dimension Value Resource dialog. Specify 80dp for the color_view_height.
5. Save and close fragment_color.xml.


1. In the project’s java folder, right click the upper package com.deitel.doodlz and select New > Java Class to display the Create New Class dialog.
2. In the Name field, enter ColorDialogFragment.
3. Click OK to create the class. You’ll create the code for this class in Section 5.9.
5.5.4 fragment_line_width.xml Layout for LineWidthDialogFragment
The fragment_line_width.xml layout for the LineWidthDialogFragment contains a GridLayout that displays a GUI for selecting and previewing a new line thickness. In this section, you’ll create LineWidthDialogFragment’s layout and the LineWidthDialogFragment class. To add the fragment_line_width.xml layout:
1. Expand the project’s res/layout node in the Project window.
2. Right click the layout folder and select New > Layout resource file to display the New Resource File dialog.
3. In the dialog’s File name field, enter fragment_line_width.xml
4. In the Root element field, enter GridLayout, then click OK.
5. In the Component Tree window, select the GridLayout, and change its id value to lineWidthDialogGridLayout.
6. Using the layout editor’s Palette, drag an ImageView and a SeekBar onto the lineWidthDialogGridLayout node in the Component Tree window so that the window appears as shown in Fig. 5.17. Set each item’s id as shown in the figure.

7. Configure the GUI component properties with the values shown in Fig. 5.18. Give the dimension value line_imageview_height a value of 50dp.
8. Save and close fragment_line_width.xml.

Adding Class LineWidthDialogFragment to the Project
To add class LineWidthDialogFragment to the project:
1. In the project’s java folder, right click the upper package com.deitel.doodlz and select New > Java Class to display the Create New Class dialog.
2. In the Name field, enter LineWidthDialogFragment.
3. Click OK to create the class.
5.5.5 Adding Class EraseImageDialogFragment
The EraseImageDialogFragment does not require a layout resource, as it will display a simple AlertDialog containing text. To add class EraseImageDialogFragment to the project:
1. In the project’s java folder, right click the upper package com.deitel.doodlz and select New > Java Class to display the Create New Class dialog.
2. In the Name field, enter EraseImageDialogFragment.
3. Click OK to create the class.
5.6 MainActivity Class
This app consists of six classes:
• MainActivity (discussed below)—This is the parent Activity for the app’s Fragments.
• MainActivityFragment (Section 5.7)—Manages the DoodleView and accelerometer event handling.
• DoodleView (Section 5.8)—Provides the drawing, saving and printing capabilities.
• ColorDialogFragment (Section 5.9)—A DialogFragment that’s displayed when the user chooses the option to set the drawing color.
• LineWidthDialogFragment (Section 5.10)—A DialogFragment that’s displayed when the user chooses the option to set the line width.
• EraseImageDialogFragment (Section 5.11)—A DialogFragment that’s displayed when the user chooses the option to erase, or shakes the device to erase, the current drawing.
Class MainActivity’s onCreate method (Fig. 5.19) inflates the GUI (line 16) and configures its app bar (lines 17–18), then uses the techniques you learned in Section 4.6.3 to determine the device’s size and set MainActivity’s orientation. If this app is running on an extra-large device (line 26), we set the orientation to landscape (lines 27–28); otherwise, we set it to portrait (lines 30–31). We removed the other autogenerated methods in class MainActivity, as they’re not used in this app.
1 // MainActivity.java
2 // Sets MainActivity's layout
3 package com.deitel.doodlz;
4
5 import android.content.pm.ActivityInfo;
6 import android.content.res.Configuration;
7 import android.os.Bundle;
8 import android.support.v7.app.AppCompatActivity;
9 import android.support.v7.widget.Toolbar;
10
11 public class MainActivity extends AppCompatActivity {
12 // configures the screen orientation for this app
13 @Override
14 protected void onCreate(Bundle savedInstanceState) {
15 super.onCreate(savedInstanceState);
16 setContentView(R.layout.activity_main);
17 Toolbar toolbar = (Toolbar) findViewById(R.id.toolbar);
18 setSupportActionBar(toolbar);
19
20 // determine screen size
21 int screenSize =
22 getResources().getConfiguration().screenLayout &
23 Configuration.SCREENLAYOUT_SIZE_MASK;
24
25 // use landscape for extra large tablets; otherwise, use portrait
26 if (screenSize == Configuration.SCREENLAYOUT_SIZE_XLARGE)
27 setRequestedOrientation(
28 ActivityInfo.SCREEN_ORIENTATION_LANDSCAPE);
29 else
30 setRequestedOrientation(
31 ActivityInfo.SCREEN_ORIENTATION_PORTRAIT);
32 }
33 }
Fig. 5.19 | MainActivity class.
5.7 MainActivityFragment Class
MainActivityFragment (Sections 5.7.1–5.7.10) displays the DoodleView (Section 5.8), manages the menu options displayed on the app bar and in the options menu, and manages the sensor event handling for the app’s shake-to-erase feature.
5.7.1 package Statement, import Statements and Fields
Section 5.3 discussed the key new classes and interfaces used by MainActivityFragment. We’ve highlighted these classes and interfaces in Fig. 5.20. DoodleView variable doodleView (line 24) represents the drawing area. Accelerometer information is delivered to the app as float values. The float variables in lines 25–27 are used to calculate changes in the device’s acceleration to determine when a shake event occurs (so we can ask whether the user would like to erase the drawing). Line 28 defines a boolean variable with the default value false that will be used throughout this class to specify when there’s a dialog displayed on the screen. We use this to prevent multiple dialogs from being displayed simultaneously—for example, if the Choose Color dialog is displayed and the user accidentally shakes the device, the dialog for erasing the image should not be displayed. The constant in line 31 is used to ensure that small device movements (which happen frequently) are not interpreted as shakes—we picked this constant via trial and error by shaking the app on several different types of devices. The constant in line 35 is used to identify the request for the permission needed to save the user’s drawing.
1 // MainActivityFragment.java
2 // Fragment in which the DoodleView is displayed
3 package com.deitel.doodlz;
4
5 import android.Manifest;
6 import android.app.AlertDialog;
7 import android.content.Context;
8 import android.content.DialogInterface;
9 import android.content.pm.PackageManager;
10 import android.hardware.Sensor;
11 import android.hardware.SensorEvent;
12 import android.hardware.SensorEventListener;
13 import android.hardware.SensorManager;
14 import android.os.Bundle;
15 import android.support.v4.app.Fragment;
16 import android.view.LayoutInflater;
17 import android.view.Menu;
18 import android.view.MenuInflater;
19 import android.view.MenuItem;
20 import android.view.View;
21 import android.view.ViewGroup;
22
23 public class MainActivityFragment extends Fragment {
24 private DoodleView doodleView; // handles touch events and draws
25 private float acceleration;
26 private float currentAcceleration;
27 private float lastAcceleration;
28 private boolean dialogOnScreen = false;
29
30 // value used to determine whether user shook the device to erase
31 private static final int ACCELERATION_THRESHOLD = 100000;
32
33 // used to identify the request for using external storage, which
34 // the save image feature needs
35 private static final int SAVE_IMAGE_PERMISSION_REQUEST_CODE = 1;
36
Fig. 5.20 | MainActivityFragment class package statement, import statements and fields.
5.7.2 Overridden Fragment Method onCreateView
Method onCreateView (Fig. 5.21) inflates MainActivityFragment’s GUI and initializes the instance variables. A Fragment can place items in the app’s app bar and options menu. To do so, the Fragment must call its setHasOptionsMenu method with the argument true. If the parent Activity also has options menu items, then the Activity’s and the Fragment’s items will be placed on the app bar or in the options menu (based on their settings).
37 // called when Fragment's view needs to be created
38 @Override
39 public View onCreateView(LayoutInflater inflater, ViewGroup container,
40 Bundle savedInstanceState) {
41 super.onCreateView(inflater, container, savedInstanceState);
42 View view =
43 inflater.inflate(R.layout.fragment_main, container, false);
44
45 setHasOptionsMenu(true); // this fragment has menu items to display
46
47 // get reference to the DoodleView
48 doodleView = (DoodleView) view.findViewById(R.id.doodleView);
49
50 // initialize acceleration values
51 acceleration = 0.00f;
52 currentAcceleration = SensorManager.GRAVITY_EARTH;
53 lastAcceleration = SensorManager.GRAVITY_EARTH;
54 return view;
55 }
56
Fig. 5.21 | Overriding Fragment method onCreateView.
Line 48 gets a reference to the DoodleView, then lines 51–53 initialize the instance variables that help calculate acceleration changes to determine whether the user shook the device. We initially set variables currentAcceleration and lastAcceleration to SensorManager’s GRAVITY_EARTH constant, which represents the acceleration due to Earth’s gravity. SensorManager also provides constants for other planets in the solar system, for the moon and for other entertaining values, which you can see at
5.7.3 Methods onResume and enableAccelerometerListening
Accelerometer listening should be enabled only when the MainActivityFragment is visible. For this reason, we override Fragment lifecycle method onResume (Fig. 5.22, lines 58–62), which is called when the Fragment is on the screen and ready for the user to interact with it. Method onResume calls method enableAccelerometerListening (lines 65–75) to begin listening for accelerometer events. A SensorManager is used to register listeners for accelerometer events.
Method enableAccelerometerListening first uses Activity’s getSystemService method to retrieve the system’s SensorManager service, which enables the app to interact with the device’s sensors. Lines 72–74 then register to receive accelerometer events using SensorManager’s registerListener method, which receives three arguments:
• The SensorEventListener that responds to the events (defined in Section 5.7.5).
• A Sensor object representing the type of sensor data the app wishes to receive—this is retrieved by calling SensorManager’s getDefaultSensor method and passing a Sensor-type constant (Sensor.TYPE_ACCELEROMETER in this app).
• The rate at which Android delivers sensor events—SENSOR_DELAY_NORMAL indicates the default rate. A faster rate can be used to get more accurate data, but this is also more CPU and battery intensive.
57 // start listening for sensor events
58 @Override
59 public void onResume() {
60 super.onResume();
61 enableAccelerometerListening(); // listen for shake event
62 }
63
64 // enable listening for accelerometer events
65 private void enableAccelerometerListening() {
66 // get the SensorManager
67 SensorManager sensorManager =
68 (SensorManager) getActivity().getSystemService(
69 Context.SENSOR_SERVICE);
70
71 // register to listen for accelerometer events
72 sensorManager.registerListener(sensorEventListener,
73 sensorManager.getDefaultSensor(Sensor.TYPE_ACCELEROMETER),
74 SensorManager.SENSOR_DELAY_NORMAL);
75 }
76
Fig. 5.22 | Methods onResume and enableAccelerometerListening.
5.7.4 Methods onPause and disableAccelerometerListening
To ensure that accelerometer listening is disabled when the MainActivityFragment is not on the screen, we override Fragment lifecycle method onPause (Fig. 5.23, lines 78–82), which calls method disableAccelerometerListening (lines 85–94). Method disableAccelerometerListening uses class SensorManager’s unregisterListener method to stop listening for accelerometer events.
77 // stop listening for accelerometer events
78 @Override
79 public void onPause() {
80 super.onPause();
81 disableAccelerometerListening(); // stop listening for shake
82 }
83
84 // disable listening for accelerometer events
85 private void disableAccelerometerListening() {
86 // get the SensorManager
87 SensorManager sensorManager =
88 (SensorManager) getActivity().getSystemService(
89 Context.SENSOR_SERVICE);
90
91 // stop listening for accelerometer events
92 sensorManager.unregisterListener(sensorEventListener,
93 sensorManager.getDefaultSensor(Sensor.TYPE_ACCELEROMETER));
94 }
95
Fig. 5.23 | Methods onPause and disableAccelerometerListening.
5.7.5 Anonymous Inner Class for Processing Accelerometer Events
Figure 5.24 overrides SensorEventListener method onSensorChanged (lines 100–123) to process accelerometer events. If the user moves the device, this method determines whether the movement was enough to be considered a shake. If so, line 121 calls method confirmErase (Section 5.7.6) to display an EraseImageDialogFragment (Section 5.11) and confirm whether the user really wants to erase the image. Interface SensorEventListener also contains method onAccuracyChanged (line 127)—we don’t use this method in this app, so we provide an empty body because the method is required by the interface.
96 // event handler for accelerometer events
97 private final SensorEventListener sensorEventListener =
98 new SensorEventListener () {
99 // use accelerometer to determine whether user shook device
100 @Override
101 public void onSensorChanged(SensorEvent event) {
102 // ensure that other dialogs are not displayed
103 if (!dialogOnScreen) {
104 // get x, y, and z values for the SensorEvent
105 float x = event.values[0];
106 float y = event.values[1];
107 float z = event.values[2];
108
109 // save previous acceleration value
110 lastAcceleration = currentAcceleration;
111
112 // calculate the current acceleration
113 currentAcceleration = x * x + y * y + z * z;
114
115 // calculate the change in acceleration
116 acceleration = currentAcceleration *
117 (currentAcceleration - lastAcceleration);
118
119 // if the acceleration is above a certain threshold
120 if (acceleration > ACCELERATION_THRESHOLD)
121 confirmErase();
122 }
123 }
124
125 // required method of interface SensorEventListener
126 @Override
127 public void onAccuracyChanged(Sensor sensor, int accuracy) {}
128 };
129
Fig. 5.24 | Anonymous inner class that implements interface SensorEventListener to process accelerometer events.
The user can shake the device even when dialogs are already displayed on the screen. For this reason, onSensorChanged first checks whether a dialog is displayed (line 103). This test ensures that no other dialogs are displayed; otherwise, onSensorChanged simply returns. This is important because the sensor events occur in a different thread of execution. Without this test, we’d be able to display the confirmation dialog for erasing the image when another dialog is on the screen.
The SensorEvent parameter contains information about the sensor change that occurred. For accelerometer events, this parameter’s values array contains three elements representing the acceleration (in meters/second2) in the x (left/right), y (up/down) and z (forward/backward) directions. A description and diagram of the coordinate system used by the SensorEvent API is available at
This link also describes the real-world meanings for a SensorEvent’s x, y and z values for each different Sensor.
Lines 105–107 store the acceleration values. It’s important to handle sensor events quickly or to copy the event data (as we did here) because the array of sensor values is reused for each sensor event. Line 110 stores the last value of currentAcceleration. Line 113 sums the squares of the x, y and z acceleration values and stores them in currentAcceleration. Then, using the currentAcceleration and lastAcceleration values, we calculate a value (acceleration) that can be compared to our ACCELERATION_THRESHOLD constant. If the value is greater than the constant, the user moved the device enough for this app to consider the movement a shake. In this case, we call method confirmErase.
5.7.6 Method confirmErase
Method confirmErase (Fig. 5.25) simply creates an EraseImageDialogFragment (Section 5.11) and uses the DialogFragment method show to display it.
130 // confirm whether image should be erased
131 private void confirmErase() {
132 EraseImageDialogFragment fragment = new EraseImageDialogFragment();
133 fragment.show(getFragmentManager(), "erase dialog");
134 }
135
Fig. 5.25 | Method confirmErase displays an EraseImageDialogFragment.
5.7.7 Overridden Fragment Methods onCreateOptionsMenu and onOptionsItemSelected
Figure 5.26 overrides Fragment’s onCreateOptionsMenu method (lines 137–141) to add the options to the method’s Menu argument using the method’s MenuInflater argument. When the user selects a menu item, Fragment method onOptionsItemSelected (lines 144–169) responds to the selection.
We use the MenuItem argument’s getItemID method (line 147) to get the resource ID of the selected menu item, then take different actions based on the selection. The actions are as follows:
• For R.id.color, lines 149–150 create and show a ColorDialogFragment (Section 5.9) to allow the user to select a new drawing color.
• For R.id.line_width, lines 153–155 create and show a LineWidthDialogFragment (Section 5.10) to allow the user to select a new line width.
• For R.id.delete_drawing, line 158 calls method confirmErase (Section 5.7.6) to display an EraseImageDialogFragment (Section 5.11) and confirm whether the user really wants to erase the image.
• For R.id.save, line 161 calls the saveImage method to save the painting as an image stored in the device’s Photos after checking for and, if necessary, requesting permission to write to external storage.
• For R.id.print, line 164 calls doodleView’s printImage method to allow the user to save the image as a PDF or to print the image.
136 // displays the fragment's menu items
137 @Override
138 public void onCreateOptionsMenu(Menu menu, MenuInflater inflater) {
139 super.onCreateOptionsMenu(menu, inflater);
140 inflater.inflate(R.menu.doodle_fragment_menu, menu);
141 }
142
143 // handle choice from options menu
144 @Override
145 public boolean onOptionsItemSelected(MenuItem item) {
146 // switch based on the MenuItem id
147 switch (item.getItemId()) {
148 case R.id.color:
149 ColorDialogFragment colorDialog = new ColorDialogFragment();
150 colorDialog.show(getFragmentManager(), "color dialog");
151 return true; // consume the menu event
152 case R.id.line_width:
153 LineWidthDialogFragment widthDialog =
154 new LineWidthDialogFragment();
155 widthDialog.show(getFragmentManager(), "line width dialog");
156 return true; // consume the menu event
157 case R.id.delete_drawing:
158 confirmErase(); // confirm before erasing image
159 return true; // consume the menu event
160 case R.id.save:
161 saveImage(); // check permission and save current image
162 return true; // consume the menu event
163 case R.id.print:
164 doodleView.printImage(); // print the current images
165 return true; // consume the menu event
166 }
167
168 return super.onOptionsItemSelected(item);
169 }
170
Fig. 5.26 | Overridden Fragment methods onCreateOptionsMenu and onOptionsItemSelected.
5.7.8 Method saveImage
Method saveImage (Fig. 5.27) is called by the onOptionsItemSelected method when the user selects the Save option in the options menu. The saveImage method implements part of the new Android 6.0 permissions model that first checks whether the app has the required permission before performing a task. If not, the app requests permission from the user before attempting to perform the task.
Lines 176–178 check whether the app does not yet have permission to write to external storage so that it can save the image. If the app does not have the permission android.permission.WRITE_EXTERNAL_STORAGE, lines 181–182 use the built-in shouldShowRequestPermissionRationale method to determine whether an explanation of why the app needs this permission should be displayed. The method returns true when it would be helpful to explain to the user why the app requires permission—for example, if the user denied the permission previously. If so, lines 183–203 create and display a dialog with the explanation. When the user clicks the dialog’s OK button, lines 195–197 request the android.permission.WRITE_EXTERNAL_STORAGE permission using the inherited Fragment method requestPermissions. If an explanation is not necessary—for example, if this is the first time the app needs the permission—lines 207–209 immediately request the permission.
171 // requests the permission needed for saving the image if
172 // necessary or saves the image if the app already has permission
173 private void saveImage() {
174 // checks if the app does not have permission needed
175 // to save the image
176 if (getContext().checkSelfPermission(
177 Manifest.permission.WRITE_EXTERNAL_STORAGE) !=
178 PackageManager.PERMISSION_GRANTED) {
179
180 // shows an explanation of why permission is needed
181 if (shouldShowRequestPermissionRationale(
182 Manifest.permission.WRITE_EXTERNAL_STORAGE)) {
183 AlertDialog.Builder builder =
184 new AlertDialog.Builder(getActivity());
185
186 // set Alert Dialog's message
187 builder.setMessage(R.string.permission_explanation);
188
189 // add an OK button to the dialog
190 builder.setPositiveButton(android.R.string.ok,
191 new DialogInterface.OnClickListener() {
192 @Override
193 public void onClick(DialogInterface dialog, int which) {
194 // request permission
195 requestPermissions(new String[]{
196 Manifest.permission.WRITE_EXTERNAL_STORAGE},
197 SAVE_IMAGE_PERMISSION_REQUEST_CODE);
198 }
199 }
200 );
201
202 // display the dialog
203 builder.create().show();
204 }
205 else {
206 // request permission
207 requestPermissions(
208 new String[]{Manifest.permission.WRITE_EXTERNAL_STORAGE},
209 SAVE_IMAGE_PERMISSION_REQUEST_CODE);
210 }
211 }
212 else { // if app already has permission to write to external storage
213 doodleView.saveImage(); // save the image
214 }
215 }
216
Fig. 5.27 | Method saveImage.
The requestPermissions method receives a String array of permissions the app is requesting and an integer (SAVE_IMAGE_PERMISSION_REQUEST_CODE) that’s used to identify this request for permission. When requestPermissions is called, Android displays a dialog (Fig. 5.28) that allows the user to DENY or ALLOW the requested permissions. The system invokes the callback method onRequestPermissionsResult (Section 5.7.9) to process the user’s response. If the app already has the requested permission, line 213 calls the DoodleView’s saveImage method to save the image.

5.7.9 Overridden Method onRequestPermissionsResult
Method onRequestPermissionsResult (Fig. 5.29) receives a permission requestCode for the request that was made and passes it to the switch in lines 224–229, which executes appropriate code for the request. This app has only one permission request, so the switch statement has only one case identified by the SAVE_IMAGE_PERMISSION_REQUEST_CODE constant. For apps that require multiple permissions you should specify unique values for each permission when you call method requestPermissions. Line 226 checks whether the user granted the app permission to write to external storage. If so, line 227 calls the DoodleView’s saveImage method to save the image.
 Software Engineering Observation 5.1
If the user attempts to save the image and denies permission, the next time the user attempts to save, the permission dialog will contain a Never ask again checkbox. If the user checks this and denies permission, then attempts to save in the future, method onRequestPermissionResult will be called with PackageManager.PERMISSION_DENIED as an argument. A production app should handle this case and tell the user how to change the app’s permissions via the Settings app.
217 // called by the system when the user either grants or denies the
218 // permission for saving an image
219 @Override
220 public void onRequestPermissionsResult(int requestCode,
221 String[] permissions, int[] grantResults) {
222 // switch chooses appropriate action based on which feature
223 // requested permission
224 switch (requestCode) {
225 case SAVE_IMAGE_PERMISSION_REQUEST_CODE:
226 if (grantResults[0] == PackageManager.PERMISSION_GRANTED)
227 doodleView.saveImage(); // save the image
228 return;
229 }
230 }
231
Fig. 5.29 | Overridden Fragment method onRequestPermissionsResult.
5.7.10 Methods getDoodleView and setDialogOnScreen
Methods getDoodleView and setDialogOnScreen (Fig. 5.30) are called by methods of the app’s DialogFragment subclasses. Method getDoodleView returns a reference to this Fragment’s DoodleView so that a DialogFragment can set the drawing color, set the line width or clear the image. Method setDialogOnScreen is called by Fragment lifecycle methods of the app’s DialogFragment subclasses to indicate when a dialog is on the screen.
Software Engineering Observation 5.2
This app’s Fragments interact with one another directly. We chose this tightly coupled approach for simplicity in this app. Generally, a parent Activity manages an app’s Fragment interactions. To pass data to a Fragment, the Activity provides a Bundle of arguments. Each Fragment class typically provides an interface of callback methods that the Activity implements. When the Fragment needs to notify its parent Activity of a state change, the Fragment calls the appropriate callback method. These techniques make Fragments more reusable across activities. We’ll demonstrate these techniques in Chapter 9’s Address Book app.
232 // returns the DoodleView
233 public DoodleView getDoodleView() {
234 return doodleView;
235 }
236
237 // indicates whether a dialog is displayed
238 public void setDialogOnScreen(boolean visible) {
239 dialogOnScreen = visible;
240 }
241 }
Fig. 5.30 | Methods getDoodleView and setDialogOnScreen.