
IN ADVENTURE 3 you began to create GUIs using the Tkinter module in Python. You created different programs that used buttons, text boxes and labels. That little bit of knowledge can take you a very long way. By mixing and matching those few basic elements, you can create almost anything you can think of.
In this adventure, you’ll take your knowledge of Tkinter one step further. You’re about to embark on a series of small adventures in which you’ll learn how to create a colour mixer and a click speed game. You’ll also be introduced to the concepts behind the programs and different ways to modify how your program works so that you can create your own ideas.
Time to start!
Creating Sliders
In this program, you’ll create a colour picker. Before you start, let’s look at one of the things you’ll be using in your program: a slider.
So far in your Tkinter Python programs you have used text boxes to input data into your programs. Although this is very flexible, there are many other ways to input data.
Sliders are used to input numerical data into your program. Look at Figure 4-1 to see an example of a GUI with a slider. Sliders use a knob and a path and give a number depending how far the knob is along the path. The further the knob is along the path, the higher the number.

FIGURE 4-1 A GUI with a slider
In Tkinter, a slider is known as a Scale. Like other objects in Tkinter and Python, you can achieve a lot with only a few lines of code.
Time for you to create a super basic slider! The program you’re about to create will simply create a Tkinter window with a slider—it won’t do anything else but you’ll build upon on this later. Look at Figure 4-2 to see what you will be creating.
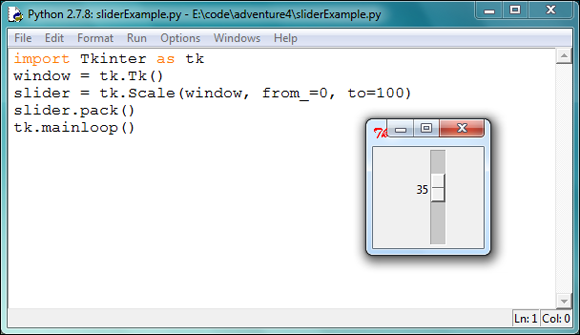
FIGURE 4-2 A Tkinter slider
- Open IDLE and create a new file editor by clicking File ⇒ New Window.
- Create a folder called
Adventure 4and save the program in the folder asslider.py. - On the first line of the file editor add the following lines:
import Tkinter as tkwindow = tk.Tk() - Next, you need to create a slider in your program. You achieve this with a single line:
slider = tk.Scale(window, from_=0, to=100) - Next you finish the program in the usual way, by packing the slider and running the main loop:
slider.pack()tk.mainloop() - Save the program.
- Run the program using Run ⇒ Run Module.
- A small window with a slider should appear. Try sliding the slider by clicking the knob and dragging it up and down.
Look at that sliding action. Up, down, in the middle, just above the middle. Notice how the numbers update as you move the slider. Neat, isn’t it?
Now that you are acquainted with the slider, you’re going to learn about how computers represent colours and how to create a canvas object in Tkinter. The canvas will be used to display colours.
How Colours Work on Computers and as Hexadecimal Values
As you may know, all colours are made by mixing the three primary colours: red, green and blue. By mixing different levels of these three base colours together you can make any colour you want. For example, if you mix a lot of red with a little bit of green and a lot of blue you can make a bright purple.
For every colour, your computer needs a way to represent how much red, green and blue to mix together. There are a few ways of doing this. The first way is to use the numbers 0 to 255 to state how much red, green and blue are mixed together. For example, to make a very strong green colour you would have a red value of 0, a green value of 255 and a blue value of 0. You can combine any values for the three primary colours. For example, you could have a red value of 128, a green value of 37 and a blue value of 243 or anything else you want.
Another way to represent colour is to use hexadecimal colour values. Colours are still made up from a mixture of red, green and blue values, but the values are written slightly differently. Instead of using the numbers 0 to 255, hexadecimal values use a combination of letters and numbers. For example, a strong green colour has a value of #00FF00. To work out the value of each colour you need to understand how counting in hexadecimal works.
Let’s look at how you normally count. You can probably count from 0 to 9. You start on 0. Then 1 comes before 2, 3 then 4 come next and so on until your reach 9. After 9, you reach the number 10; you start increasing the number on the right again so you have 11, 12, 13 until you reach 19; then the number on the left changes again so you have 20. Each number that makes up a bigger number is called a digit. So the digits for 23 are 2 and 3. You count ten numbers (0-9) on the lowest digit before you increase the one to the left of it.
Hexadecimal counting is slightly different. You start on 0, 1 comes before 2, 3 before 4 and so on all the way up to 9. You might expect the number after 9 to be 10, but in hexadecimal it is A. The number after A is B, then C, D, E and finally F. If you were to convert the numbers A, B, C, D, E and F to numbers that you were used to, A would be the number 10, B would be 11, C 12, D 13, E 14 and F is 15. Once you’ve counted to F, the next number is 10. The hexadecimal value of 10 isn’t 10, it’s actually 16; this is because F is 15 and the number after F is 10. So 10 in hexadecimal is 16 in normal numbers.
After counting to 10 in hexadecimal you start again. The next number is 11, then 12, 13, 14, all the way to 19, then it’s 1A, 1B, 1C, 1D, 1E and 1F. After that the next number is 20 (which is 32 in normal numbers). This pattern continues all the way to FF, which is the value 255 in normal numbers.
Getting back to colours, each colour that uses a hexadecimal colour code is a combination of three sets of hexadecimal values. For example a red value of FF, a blue value of 00 and a green value of FF would be written as #FF00FF. All hexadecimal colour codes have a hash symbol (#) at the start. The first pair of hexadecimal values is always red, the second is green and the third is blue.
A few important colours to know: the value of #FFFFFF is white, which is the maximum value you can have for a hexadecimal colour code. The opposite of white is black, which has the value of #000000 and is the smallest hexadecimal value for any colour code. A strong red is #FF0000, strong green #00FF00 and a strong blue is #0000FF.
Don’t worry if this is a little confusing to begin with. Table 4-2 has example colours that are written in hexadecimal. There’s also a program you’ll learn about later that converts the numbers 0-255 into hexadecimal codes.
| Table 4-2 A Selection of Colours and Their Hexadecimal Values | |||
Red #FF0000 |
Green #00FF00 |
Blue #0000FF |
White #FFFFFF |
Purple #FF00FF |
Yellow #FFFF00 |
Turquoise #00FFFF |
Black #000000 |
Light Blue #AAAAFF |
Orange #FFAA00 |
Pink #FF9696 |
Light Grey #AAAAAA |
Mint/Light Green #DDFFFF |
Light Brown #A17840 |
Rosy Red #EF0B05 |
Dark Grey #333333 |
The best way to understand what is going on is to try it out for yourself. In the next part of your adventure you’ll be introduced to the canvas object in Tkinter and use hexadecimal colour codes to change it.
Changing the Canvas Colour
The canvas in Tkinter is used for drawings and displaying images. In your colour picker program, you’ll use the canvas as a large space to display your colour.
You’ve just been introduced to the canvas and how colours are represented in hexadecimal values, so you’re now going to create a short program that combines the two to display a colour in a window.
- First open IDLE and create a new file editor.
- Save the program as
canvasColour.pyin theAdventure 4folder. - Copy these lines of code into the file editor:
import Tkinter as tk
window = tk.Tk()


colour = "#FF0000" - Add the next line of code to your program:
canvas = tk.Canvas(window, height=300, width=300, bg=colour) - Finally add the last two lines of the program into the file editor:
canvas.pack()
window.mainloop() - Save the program and run it using Run⇒Run Module.
- The window should appear, filled with a red square (see Figure 4-3).
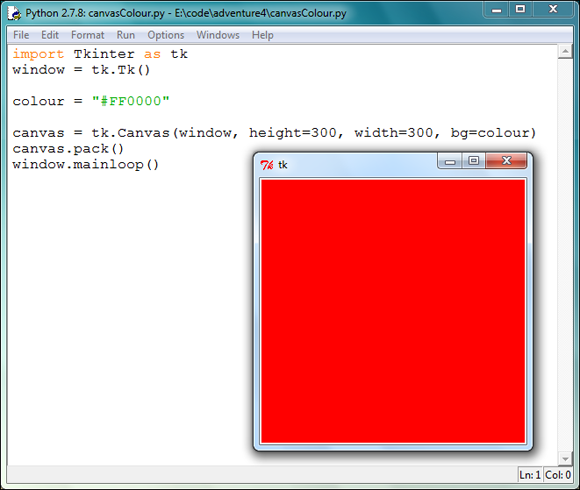
FIGURE 4-3
A Tkinter canvas
You can change the colour of the background by changing the value of the colour variable. For example, to change the square to black you would change the value of the hexadecimal colour code in the string to #000000. Use Table 4-2 to help you or try making your own using hexadecimal values.
Try using other colours and experiment with creating your own.
Making the Colour Picker
The first larger program you are going to create in this adventure is the colour picker. The program will use three sliders to create a colour. Once the main part of the program is done, you’ll add a text box so that you can copy and use your colours in other programs.
- First things first. Open IDLE and create a new file editor using File⇒New Window.
- Save the program as
colourPicker.pyin theAdventure 4folder. - Add the two lines that are used to import the
Tkintercommands into Python and set upTkinter:import Tkinter as tk
window = tk.Tk() - Next you need to add a function that tells Python what to do when a slider is updated:
def sliderUpdate(source):
    red = redSlider.get()
    green = greenSlider.get()
    blue = blueSlider.get()


colour = "#%02x%02x%02x" % (red, green, blue)
canvas.config(bg=colour) - The next part of the program creates the sliders and the canvas. Add it to your program below the function:
redSlider = tk.Scale(window, from_=0, to=255,
  command=sliderUpdate)
greenSlider = tk.Scale(window, from_=0, to=255,
  command=sliderUpdate)
blueSlider = tk.Scale(window, from_=0, to=255,
  command=sliderUpdate)


canvas = tk.Canvas(window, width=200, height=200) - Instead of using
pack()you can use a grid so that the objects are aligned next to each other as well as on the top or below. Add the following code to arrange the sliders and canvas in a grid:redSlider.grid(row=1, column=1)
greenSlider.grid(row=1, column=2)
blueSlider.grid(row=1, column=3)
canvas.grid(row=2, column=1, columnspan=3) - Finally add the
mainloop()function to the program:tk.mainloop() - Now click on Run⇒Run Module to run the program.
- The window will appear and you’ll see the three sliders. Slide them up and down to change the colour.
- Figure 4-4 shows the colour picker program working.

FIGURE 4-4 The colour picker GUI
Adding a Text Box
Now that you have your colour mixer program working, it would be useful to be able to copy the hexadecimal colour code so that you can use it in other programs.
With just a few lines of Python code you can add a text box to the bottom of the window so that you can copy the hexadecimal colour values into other programs and applications. Here’s how:
- Make sure you have the code for your colour picker program open in IDLE. You should have saved it as
colourPicker.pyin theAdventure 4folder. - At the end of the
sliderUpdate()function, add these two lines. They will update the text box to include the hexadecimal colour value whenever a slider is updated:hexText.delete(0, tk.END)
hexText.insert(0, colour) - Below the line that begins with
canvas = tk.Canvasadd the following line of code to create the text box:hexText = tk.Entry(window) - Find this line of code in your program:
window.mainloop() - Above it, add this line of Python code to add the text box to the window using the grid system:
hexText.grid(row=3, column=1, columnspan=3) - Save the program and run it using Run⇒Run Module.
You should notice that the window now has an additional text box at the bottom. Try moving the sliders and you will notice that the value in the text box changes. This value will be the same as the colour used for the background of the canvas.
Figure 4-5 shows the program with the added text box.
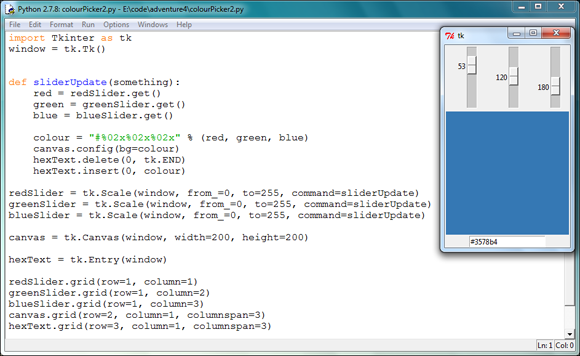
FIGURE 4-5 The colour picker with the text box
You can copy this value and use it in other programs and applications. For example, if you are using graphics software to draw a picture you can use it to select a colour for the paintbrush. You can also use it to set the colour of different things in your Python programs.
Creating a Click Speed Game
In the final stage of this adventure in GUIs, You’re going to create a small but perfectly formed game. The aim of the game is to click as fast as possible. The time it takes to click 100 times is calculated by the game and displayed in the GUI. This program demonstrates how different GUI components can be combined with time and a count to create a game.
This GUI includes a button, a slider that records the number of times you’ve clicked the button and a label that shows the number of seconds it took to click 100 times.
- Open IDLE and create a new window with File⇒New Window.
- Save the program as
clickSpeed.pyin theAdventure 4folder. - Add the following lines of code to allow your program to use
Tkinterand the time module:import Tkinter as tk
import time
window = tk.Tk() - Next add these variables below the code. The first variable records the number of times you have clicked a button, the start variable records the time you started clicking, and the goal variable is the number of times you need to click in order to complete the game:
clicks = 0
start = 0
goal = 100 - This function runs code whenever the button is clicked. The global expression before the variables means that this function can change the value of these variables. Add the first three lines of the function to your program:
def buttonClick():
    global clicks
global start - The next part of the function checks how many times you’ve clicked. If you haven’t started clicking, it will record the start time and add 1 to the clicks variable. If the number of clicks is greater than or equal to the maximum number of clicks it will calculate how long it took to click that many times, display the score and reset the clicks to 0. If the number of clicks is greater than 0 and less than the goal, then the number of clicks will be increased by 1. The last line sets the slider to the number of times the button has been clicked. Add these lines of code now:
    if clicks == 0:
           start = time.time()
           clicks = clicks + 1
        elif clicks + 1 >= goal:
    score = time.time() - start
           label.config(text="Time: " + str(score))
           clicks = 0
    else:
        clicks = clicks + 1
slider.set(clicks) - These lines of code create the button, slider and label. Add them to your program:
button = tk.Button(window, text="Click me",
  command=buttonClick)
slider = tk.Scale(window, from_=0, to=goal)
label = tk.Label(window) - Finally the button, slider and label are added to the window and the window starts. Add these lines of code to your program:
button.pack()
slider.pack()
label.pack()
window.mainloop() - Save your program and click Run⇒Run Module.
- Your program should look something like Figure 4-6.
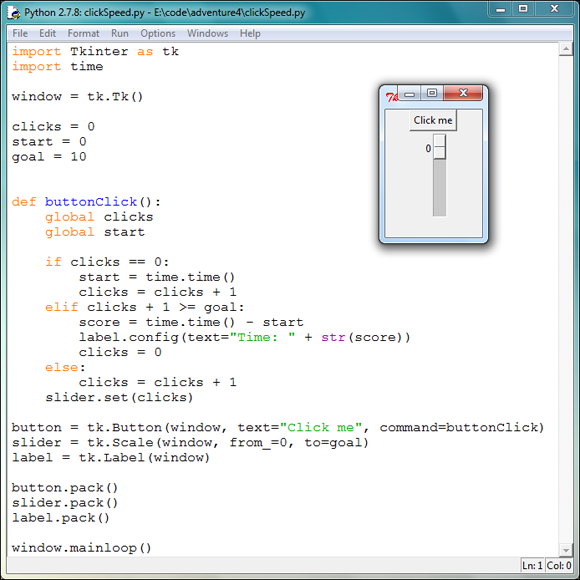
FIGURE 4-6 The click speed game
Python Command Quick Reference Table |
|
Command |
Description |
|
|
The |
|
To create colours in Tkinter, you store them in strings. A hash sign (#) goes at the start of the string and the colour value is determined by the six numbers and letters in the string. |
|
The |
|
The |
|
This is used to arrange |
|
This code is used to format red, green and blue integer values to as a hexadecimal value stored in a string. |
Achievement Unlocked: Accomplished creator of advanced GUIs with Tkinter.