
WHEN YOU USE computers, you’re probably used to interacting with programs using both a mouse and a keyboard. You click buttons and things happen. You enter information into text boxes, read messages displayed in dialogue boxes, and resize, minimise and close the boxes in which you’ve been working.
So far on your adventures here, you have created programs that interact with the user only by using text—in other words, you have only made programs that use Commandline Interfaces (or CLI). CLIs only allow users to interact with them through commands given from the keyboard and don’t allow them to use a mouse. You have been creating these programs by using the raw_input() function, where a prompt appears in the command line so the user can enter some characters that are then passed to the program. These programs are straightforward for programmers like yourself, of course! But most people expect programs to be nicely packaged in a window with buttons and all the other stuff they’re used to.
In this adventure, you’ll learn how to provide users with all of that, by creating Graphical User Interfaces (or GUI, which some people pronounce as “gooey”). A GUI is a program that allows the person using it to interact with it using a mouse and keyboard. Figure 3-1 shows a simple example of a GUI.
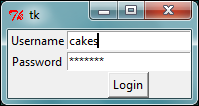
FIGURE 3-1 A simple GUI made in Tkinter
In this adventure, you will become familiar with a module called Tkinter, which you use with Python to create GUIs. You’ll create some short programs that use buttons, text boxes and labels and then create a program that uses a button to generate random sentences. Let’s get going!
Creating Buttons
In the first part of this adventure, you will create a basic program that creates a button. As the adventure progresses, you’ll make the button do different things when you click it. To start off, you’ll use the following code to create a button that will print Beep! to the Python shell when you click it.
- Open IDLE and create a new window using File⇒New Window.
- Create a new folder called
Adventure 3and save the new file asbutton.py. - Before you do anything else, you need to enable your Python program to use the
Tkintermodule. Type the following code into your file:import Tkinter as tk
window = tk.Tk()The first line imports the functions from the
Tkinterlibrary and renames it totkso that it is easier to spell. The second line then creates aTkinterwindow so that it can now be used by Python. - Next, add some code to tell the button what to do when you click it:
def buttonClick():
print "Beep!"The
buttonClick()function is used with the button. Later in the program this function will be called when the button is pressed, but it is not linked up just yet. In this case the program will printBeep!to the Python shell. You’ve called the functionbuttonClick(),but you can actually call the function anything you like, as long as it matches the argument you give to the button later in the program. - Now you need some code to create the button and place it on the window:
button = tk.Button(window, text="Click me!", command=buttonClick)
button.pack()
window.mainloop()The line with the
buttonvariable creates a new button using thetk.Button()function. The first argument,window, states where the button will be placed; in this case it will be placed on the window that was created at the start of the program. Thetext="Click me!"argument tells the function what to display on the button. This is an example of a named argument; you can read about these in the Digging Into the Code sidebar that follows.Finally, the last argument states which function will be run when the button is clicked. In this case, the program will run the
buttonClick()function created earlier in the program.The
pack()function works out the size and position of the button and then actually displays the button on the window. Thepack()function knows to put the button on the window as this was given as the first argument when the button was created. Without thepack()function, the button would not be displayed. Themainloop()function is run at the end of allTkinterprograms. It makes the window appear and handles all the button presses and other stuff when the program is running. - Save the program again and click Run⇒Run Module.
- After a short pause, a window should appear with a button displaying the words
Click me!(see Figure 3-2). Click the button andBeep!will be printed to the Python shell.
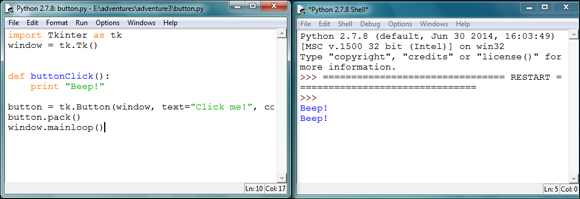
FIGURE 3-2 The window with a button and the output from the click shown in the Python shell.
Changing the Button Text on Click
By changing the code in the buttonClick() function, you can make clicking the button result in a different outcome.
This function isn’t just fun, it is also great for testing to see how the button works. But it’s not a good idea to print things to the Python shell for a finished program when you’re using a GUI . Instead, the program should aim to display all of the output in the GUI and not the shell. This is because it’s not very intuitive for someone using your program to interact with one window (for example, clicking a button) and have information appear in another. It is more intuitive when information is displayed in the window that the user interacts with.
What if you want the text on the button itself to change when you click it? With Tkinter you can change the text on buttons after the program has started running. Follow these steps to change the text on the button from Click me! to Clicked after it is clicked:
- Change the
buttonClick()function to this:def buttonClick():
button.config(text="Clicked") - Save the program.
- Run the program using Run⇒Run Module.
- Click the button and the text on it will change to say it has been clicked, as you can see in Figure 3-3.
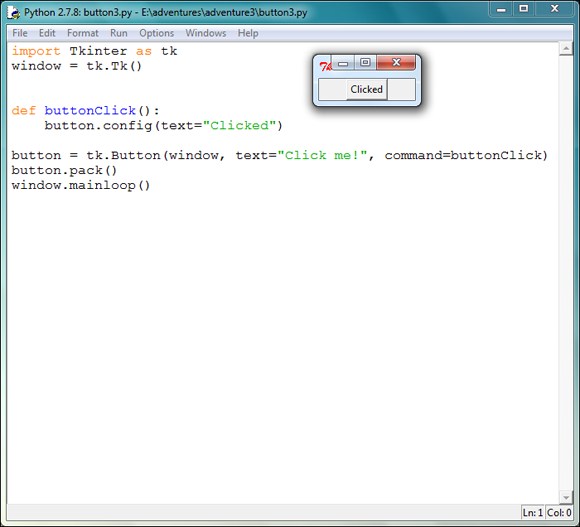
FIGURE 3-3 When the button is clicked, the text on the button changes.
You’ll notice that this change to the program uses the button.config() function. This function allows properties stored about the button to be changed. For example, in your program the text property is changed to Clicked using this function. In the next section, you’ll learn how to use button.config() to count how many times the button has been clicked!
Counting Clicks
With a slight change to the button.py program, you can make it record the number of times the button has been clicked. Counting the number of times a button has been clicked is useful in a number of situations. For example, you could use the count to change the text on the button depending on the number of times it has been clicked. The next bit of code will show you how to do this.
- Open your
button.pyprogram and save it asbuttonCount.pyin theAdventure 3folder. - Replace the
buttonClick()function with the following code, making sure you include the first line outside the function that creates thecountvariable:count = 0
def buttonClick():
global count
count = count + 1
button.config(text=str(count)) - Save the program.
- Run it using Run⇒Run Module.
When the window appears, click the button several times. Each time you click it, it will update to display the number of times you have clicked it (see Figure 3-4).
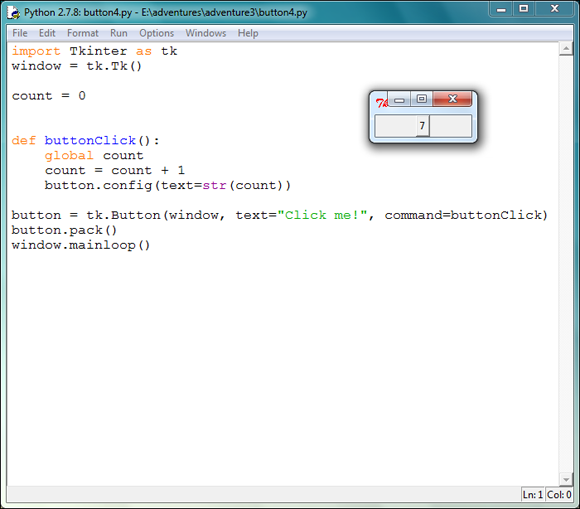
FIGURE 3-4 The button after it has been clicked seven times
Creating Text Boxes
As mentioned earlier in this adventure, it is not a good idea to display information in the Python shell when using a GUI. Neither is it a good idea to collect user input from the Python shell. Instead, you should aim to contain all input and output in the GUI.
You learned in previous adventures how to input data using the raw_input() function in Python. This function is quite straightforward to use, but it means the user has to type the input into the shell, so it is not very practical when you are creating a GUI. It is important to keep all the data input on the GUI in order to make your program usable for new users, so in this case the raw_input() function is not a good choice.
The entry widget in Tkinter allows you to create text entry boxes on your GUIs. These are easy to use, and you can set them up with just a few lines of Python code.
Your next program will create a GUI with a text entry box and a button. When the window appears it will have a button and a text box. Every time the button is pressed it will copy and paste the text, so that it appears twice. Follow these steps to create the program:
- Open IDLE and open the file editor using File⇒New Window.
- Save the file as
double.pyin theAdventure 3folder. - Type the following two lines at the start of the program. As you’ve done before, this piece of code will import the instructions from
Tkinterand allow your program to use these instructions:import Tkinter as tk
window = tk.Tk() - Next create the
changeString()function by typing this code into your program:def changeString():
stringToCopy = entry.get()
entry.insert(0, stringToCopy)The
changeString()function will be called when a button is clicked. The first line gets the contents of a text entry box and stores it in thestringToCopyvariable. The second line inserts the string back into the entry text box at position 0. In short, this duplicates the contents of the text box. Note that theentrywidget is not created until later in the program. - Next type these lines of code to create a text entry field and a button:
entry = tk.Entry(window)
button = tk.Button(window, text="Change", command=changeString)The
entryvariable stores aTkinterbutton. It is placed on top of the window that was initialised earlier in the program. A button is created, the same as before, and calls thechangeString()function when clicked. - Finally, type these last three lines of code. They place the text entry field and button onto the window, then make the window open and manage all events that happen inside it:
entry.pack()
button.pack()
window.mainloop() - Save the program and click Run⇒Run Module.
- When the
Tkinterwindow opens, enter some text in the text box and then click the button. You will see the text duplicate itself. The text will double every time you click the button, as you can see in Figure 3-5.
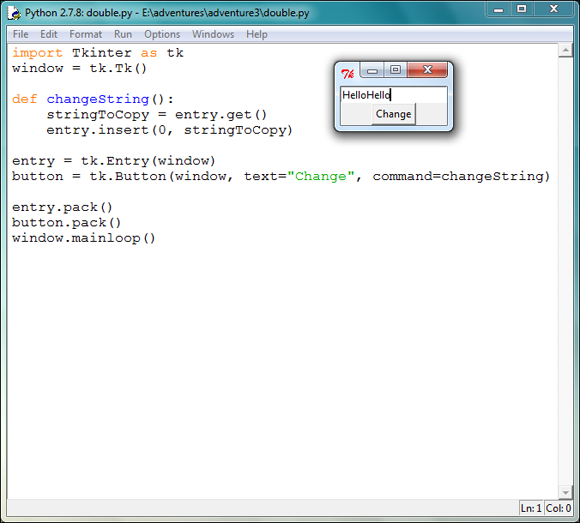
FIGURE 3-5 The text box after the button has been pressed
Writing It Backwards
Let’s have some fun and make the text appear backwards. You only need to make a small modification to the double.py program to do this:
- Make sure the
double.pyprogram is open and save it asbackwards.pyin theAdventure 3folder. - Change the
changeString()function so that it contains the following lines of code:def changeString():
stringToCopy = entry.get()
stringToCopy = stringToCopy[::-1]
entry.delete(0, tk.END)
entry.insert(0, stringToCopy) - Run the program by clicking Run⇒Run Module.
- When the window pops up, enter some text in the text entry field. Click the button and the text will be reversed, as shown in Figure 3-6. Click it again and the text will return to normal.
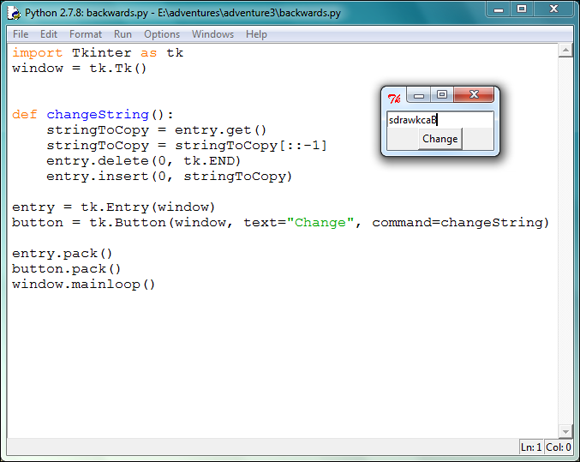
FIGURE 3-6 The text box, reversed
Adding Passwords
Passwords are used to restrict access to information or certain features of a program. The text boxes that are used to input passwords usually don’t show the password as it’s being typed, but show an asterisk (*) in place of each character instead. That way, other people can’t see the password.
You might be surprised to hear that it’s really easy to make password boxes with Python and Tkinter. All you need to do is add an extra named argument, and the text entry field is turned into a password box.
You are now going to create a program that checks whether a password is correct. In the GUI there will be a field for entering the password and a button to submit the password. If the password is correct, a label will appear at the bottom with the text Correct, otherwise it will say Incorrect.
- Open IDLE and create a new file editor window with File⇒New Window.
- Save the program as
password.pyin theAdventure 3folder. - Type the first two lines of Python code into the file editor to import and initialise the program:
import Tkinter as tk
window = tk.Tk() - Next create the
checkPassword()function. As you can guess, this will check if the password entered is correct:def checkPassword():
password = "Oranges"
enteredPassword = passwordEntry.get()
if password == enteredPassword:
confirmLabel.config(text="Correct")
else:
confirmLabel.config(text="Incorrect") - Next, add the following code to create the password label and the password entry box:
passwordLabel = tk.Label(window, text="Password:")
passwordEntry = tk.Entry(window, show="*") - Add this next bit of code into the file editor:
button = tk.Button(window, text="Enter", command=checkPassword)
confirmLabel = tk.Label(window) - The next bit of code lays out all of the
Tkinterwidgets in the GUI. This label will be used to tell the users whether or not they have entered the correct password. The label is left blank when it is first created and is updated when thecheckPassword()function is called. This final section of code adds all of theTkinterwidgets to the GUI and starts the GUI. Type it into the file editor:passwordLabel.pack()
passwordEntry.pack()
button.pack()
confirmLabel.pack()
window.mainloop() - That’s it! Save the program and run it using Run⇒Run Module. When the window appears, type in a random word and click the Enter button. You should see the label at the bottom of the window change to
Incorrect. Try out some other words, and you should get the same result. Now enter the correct password. The default password for this program isOranges(though you may have changed it). When you click the button with the correct password, the label at the bottom of the window should change toCorrect, as in Figure 3-7.
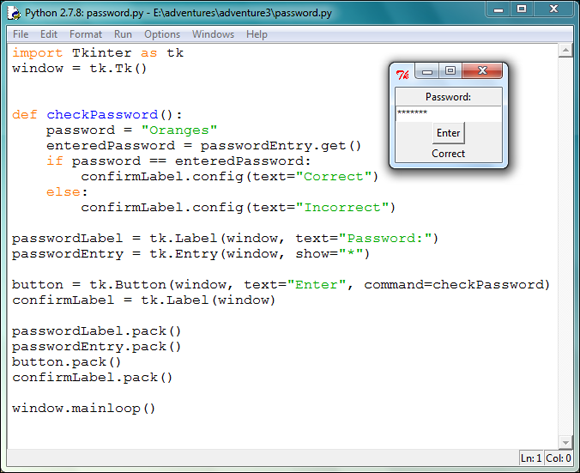
FIGURE 3-7 The password field
Building a Random Sentence Generator
You’ve already covered a lot of ground in this adventure and have learned how to create buttons and make things happen when you click them. Now you’ll use those new skills to create an awesome program that generates random sentences.
This program is great fun. It takes a person’s name and then chooses a verb and a noun to create a sentence. For example, if you enter the name Barry, it might generate a sentence like “Barry likes cakes” or, less believably, “Barry eats cats”.
Lists are extremely useful in Python, as you’re about to find out. In the random sentence generator program, you store any number of words in a list that will be used to randomly generate the sentences. There are only a small number of words stored in the sample program, so try adding your own to make the sentences even more random.
- Open IDLE and create a new file editor using File⇒New Window.
- Save the file as
randomSentences.pyin theAdventure 3folder. - Type the following lines into the file editor. These import
Tkinterand start it up, and also import therandommodule so that it can select random words from the supplied list.import Tkinter as tk
import random
window = tk.Tk() - Below this, add the next bit of code, which will select a random word from your list of nouns:
def randomNoun():
nouns = ["cats", "hippos", "cakes"]
noun = random.choice(nouns)
return noun - Add the next bit of code, which will select a random verb:
def randomVerb():
verbs = ["eats", "likes", "hates", "has"]
verb = random.choice(verbs)
return verbThis works exactly the same as the
randomNoun()function—the only difference is the contents of the list. See the Digging into the Code sidebar for an explanation of how this function works.
- The next function generates the random sentence and places it in the text box at the bottom of the window. Add this code to the bottom of the program:
def buttonClick():
name = nameEntry.get()
verb = randomVerb()
noun = randomNoun()
sentence = name + " " + verb + " " + noun
result.delete(0, tk.END)
result.insert(0, sentence) - Now that you have written the functions, you can add the widgets for the window. You do this the same way as you did earlier in this adventure. This code adds a label that says
Name, a text box to enter a name, a button that will generate a random sentence when clicked, and a text box to store the random sentence. Type the code into your program:nameLabel = tk.Label(window, text="Name:")
nameEntry = tk.Entry(window)
button = tk.Button(window, text="Generate", command=buttonClick)
result = tk.Entry(window) - Finally, the last bit of the program lays out the text boxes, button and label in the window and starts the main loop. Add this to your file editor:
nameLabel.pack()
nameEntry.pack()
button.pack()
result.pack()
window.mainloop() - Now click Run⇒Run program to run your program.
- When the window appears, type a name into the text box labelled
Name. Click the Generate button and a random sentence of three words will appear at the bottom. Figure 3-8 shows the program in action. Just think of the possibilities—it can provide you with hours of entertainment!
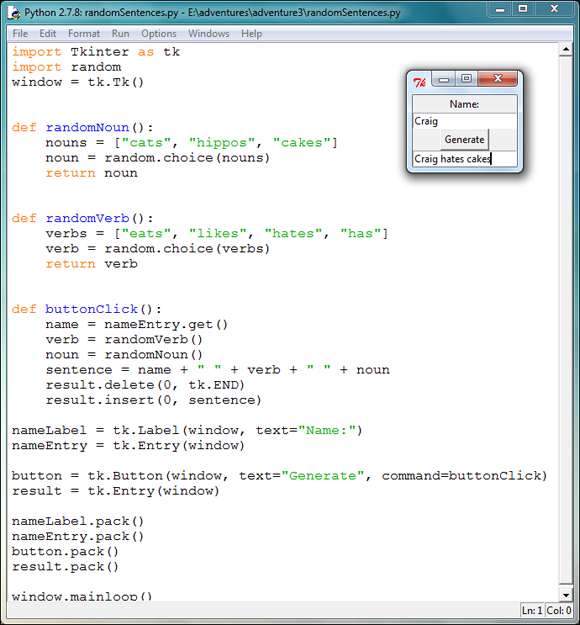
FIGURE 3-8 The finished random sentence generator
Programming a Guessing Game
As the final stage of this adventure, you’ll use the new coding skills you learned in this adventure to create a number guessing game.
The game—surprise!—allows you to guess a number. When you press the button it will generate a random number and compare it with your guess. If you guessed the correct number you score a point, otherwise your score remains the same.
- Open IDLE and create a file editor using File⇒New Window.
- In the file editor add this code:
import random
import Tkinter as tk
window = tk.Tk()
maxNo = 10
score = 0
rounds = 0 - The next bit of the code will run when the button is clicked. It works out whether you have entered a valid number and then whether or not your guess was correct. Afterwards, it updates the labels and text boxes on the screen. Add it to your program now:
def buttonClick():
    global score
    global rounds
    try:
        guess = int(guessBox.get())
        if 0 < guess <= maxNo:
            result = random.randrange(1, maxNo + 1)
            if guess == result:
                score = score + 1
            rounds = rounds + 1
        else:
            result = "Entry not valid"
    except:
        result = "Entry not valid"
    resultLabel.config(text=result)
    scoreLabel.config(text=str(score) + "/" + str(rounds))
    guessBox.delete(0, tk.END)
Are you unsure what you’ve just told the program to do? Read the Digging into the Code sidebar at the end of the example to figure it out.
- The next bit of the program creates the labels, text entry and button that are used in the GUI. Type this into your program:
guessLabel = tk.Label(window, text="Enter a number from 1 to " + str(maxNo))
guessBox = tk.Entry(window)
resultLabel = tk.Label(window)
scoreLabel = tk.Label(window)
button = tk.Button(window, text="guess", command=buttonClick) - Finally, add these statements to your program. They add the widgets to the GUI and make the main loop run:
guessLabel.pack()
guessBox.pack()
resultLabel.pack()
scoreLabel.pack()
button.pack()

window.mainloop() - Save the program as
guessingGame.pyin theAdventure 3folder and run the program. When the window appears, enter a number into the text box. Click the button to generate a random number and the program will check whether your guess was the same as the random number. Figure 3-9 shows the completed game.
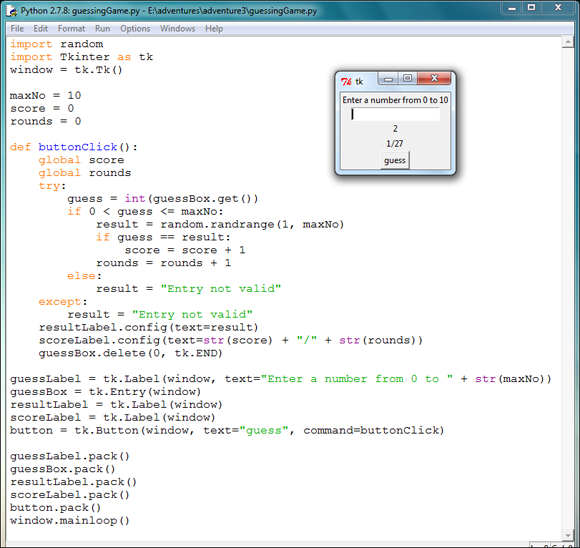
FIGURE 3-9 The finished guessing game
For further adventures with Tkinter and the GUI, try the commands listed in the following quick table.
Python Command Quick Reference Table |
|
Command |
Description |
|
Importing the |
|
With the |
|
The |
|
The |
|
This function converts data types, such as integers and floats, into strings. |
|
Use the |
|
This function returns the value in a text box. |
|
This function inserts a value into a text box. The value you want to insert should be given as an argument to the function. |
|
This function deletes the contents of a text box. |
|
Adding |
|
The |
|
Labels place text in the |
|
The |
|
Lists are a collection of values. They can be stored together in a single variable. Lists are a very important construct in Python. |
Achievement Unlocked: You can create GUIs with the Tkinter module.