PYTHON IS USED for a huge variety of things. So far, you’ve used it to create a text-based interface, drawings with the turtle module and GUIs with the Tkinter module. In this and the following adventures, you will learn to use PyGame. As its name suggests, PyGame is a module in Python that can be used to make games. PyGame is a very versatile module and is also very good for creating drawings, animations, sounds, interactive art and lots of other things.
As PyGame is a Python module, you can use it alongside all of the Python that you’ve learned so far.
In this adventure, you’re going to use PyGame to create some animations. In later adventures, you’ll build upon the things you’ve learned here, building up to the final adventure in which you will build a fantastic game.
Installing PyGame
Before starting this adventure, you need to have PyGame installed on your computer. Unless you’re using a Raspberry Pi, PyGame probably isn’t pre-installed on your computer. Before you go any further, follow the installation instructions in the Appendix for PyGame on your computer.
My First PyGame
In PyGame, you can create shapes and build upon them to create images, animations and games. In this adventure, you will start by learning how to create shapes in PyGame. You’ll then combine the shapes to create images and animations.
This first program is really straightforward. All it will do is draw a circle. You can see what this will look like in Figure 5-1.
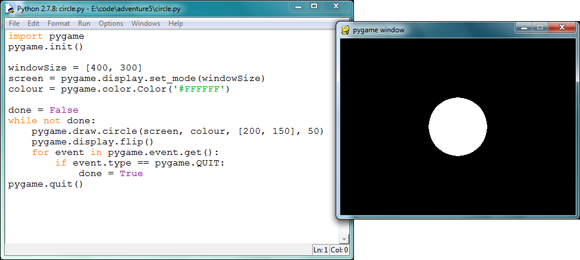
FIGURE 5-1 Your first PyGame program
- Open a new file editor in IDLE by clicking File⇒New Window.
- On the first line of the file, you will need to import and initialise
PyGame. Copy these two lines of code to do this:import pygame
pygame.init() - Copy these two lines of code to set up the window size:
windowSize = [400, 300]
screen = pygame.display.set_mode(windowSize) - Next, you need to set the title of the window, which you do by using
set_caption(). In this case we have called itCircles, but you can use any string you like to set the title of the window. Copy this line into the file editor:pygame.display.set_caption("Circles") - Colours in
PyGamecan be represented using hexadecimal values, which you have already used forTkinterin the previous adventure. To use a hexadecimal colour inPyGameyou use the codepygame.color.Color('#FFFFFF')and change the colour argument in the brackets to whatever you want. Copy this code into your file editor:colour = pygame.color.Color('#FFFFFF') - Copy this part of the code to make the program loop:
done = False
while not done: - To draw a circle in
PyGameyou use thecircle()function. This takes four arguments:- The surface that you want to put it on, in this case, “screen”.
- The colour, for which the variable white has been used.
- The coordinates for the centre of the circle.
- The radius of the circle. The radius, as you probably know, is the distance between the centre of the circle and the edge of the circle.
The
flip()function then updates the window to include all shapes that were drawn to it. Copy this code (and remember to indent):pygame.draw.circle(screen, colour, [200, 150], 50)
pygame.display.flip() - In order for the program to close when the Close button is clicked, you need to include code in your program to tell Python what to do. The four lines of code at the end of the program allow the window to be closed. The
forgets all of the events, such as attempts to close the window. Theifstatement checks if any of these events are a request to close the window. If they are,doneis set toTrue, which will cause the main game loop to terminate. The last line, which is outside the main game loop, quitsPyGame. Copy these four lines into the file editor (remember to indent):for event in pygame.event.get():
if event.type == pygame.QUIT:
done = True
pygame.quit() - Run your program by going to Run⇒Run Program. Create a new folder called
Adventure 5. Save the program ascircle.py. - You can see the result of the program in Figure 5-1.
Getting PyGame running to draw a single shape does take a few lines of code. However, it doesn’t get much more complicated to draw multiple shapes in the same window. You are probably already beginning to imagine the exciting things you can do with this!
Creating Rectangles
There are a number of shapes that can be drawn in PyGame. You’ve already seen how to draw a circle. Creating other shapes isn’t that different to creating a circle. You’re now going to look at how to create a rectangle and then try out a couple of programs that use rectangles.
Shapes are very versatile when creating programs. They can be used in games and animations for various purposes. They can be combined in different ways to create new things like custom buttons, menus, backgrounds and a whole load of other things.
Creating a Rectangle
The code to create a basic rectangle is very straightforward. Let’s look at it before moving onto some more complex programs that use rectangles:
import pygame
pygame.init()
windowSize = [400, 300]
screen = pygame.display.set_mode(windowSize)
colour = pygame.color.Color('#0A32F4')
done = False
while not done:
pygame.draw.rect(screen, colour, [10, 20, 30, 40])
pygame.display.flip()
    for event in pygame.event.get():
        if event.type == pygame.QUIT:
            done = True
pygame.quit()
This code will generate a small blue rectangle in the top-left corner of the window, like in Figure 5-2.
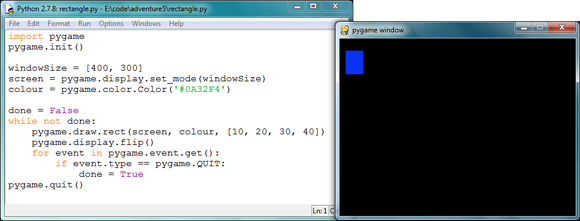
FIGURE 5-2 A PyGame rectangle
Want to try out the program? Just follow these steps:
- Open IDLE and create a new window with File⇒New Window.
- Save the program as
rectangle.pyin theAdventure 5folder. - Run the program with Run⇒Run Module.
A Rainbow of Rectangles
As with any Python code, small changes to the program will drastically change the effect of the program. For example, by adding an extra loop to the basic rectangle program, along with a few other lines of code, you can make a whole rainbow of stacked rectangles. In this next program you will do just that.
Figure 5-3 shows what the finished program looks like.

FIGURE 5-3 A gradient of rectangles
- Open IDLE and create a new window using File⇒New Window.
- Save the program as
rainbow.pyin theAdventure 5folder. - In the file editor, add the following code to set up
PyGameand the window:import pygame
pygame.init()
width = 400
height = 300
windowSize = [width, height]
screen = pygame.display.set_mode(windowSize) - The next bit of the code sets the starting colour of the rectangle:
colour = pygame.color.Color('#646400')
row = 0
done = False
while not done:
increment = 255 / 100 - Next add the following code to draw the rectangles. The
whileloop will stop drawing rectangles when they fill the screen. If this weren’t included, the program would carry on drawing rectangles off the screen! Add the code now:while row <= height:
pygame.draw.rect(screen, colour, (0, row, width, row + increment))
pygame.display.flip()
if colour[2] + increment < 255:
colour[2] += increment
row += increment - Finally add this code to handle when the user wants to close the window:
    for event in pygame.event.get():
        if event.type == pygame.QUIT:
            done = True
pygame.quit() - Save and run the program with Run⇒Run Module.
Colour Grid
This next program creates a grid of randomly coloured squares. It uses the rectangle in PyGame. The program repeats over and over again, placing a randomly coloured square at a random position every time it loops. The random module is used to do this.
- Open IDLE and click on File⇒New Window.
- Save the program as
randomGrid.pyin theAdventure 5folder. - Copy these lines of code into the file editor:
import random
import pygame
pygame.init() - The
PyGameClock()is similar to the time module. It is used to control the speed that thewhileloop in the program runs. You will see how this works later in the program. Add this code to your program:width = 400
height = 300
windowSize = [width, height]
screen = pygame.display.set_mode(windowSize)
clock = pygame.time.Clock()
sqrW = width / 10
sqrH = height / 10 - The next part of the program will draw the squares at random positions:
done = False
while not done:
    red = random.randrange(0, 256)
    green = random.randrange(0, 256)
    blue = random.randrange(0, 256)

    x = random.randrange(0, width, sqrW)
    y = random.randrange(0, width, sqrH)
    pygame.draw.rect(screen, (red, green, blue), (x, y,  sqrW, sqrH))

    pygame.display.flip()

    for event in pygame.event.get():
        if event.type == pygame.QUIT:
            done = True
    clock.tick(10)
pygame.quit() - Save the program and run it. You should see something that looks like Figure 5-4.

FIGURE 5-4 The colour grid
Creating Ellipses
Ellipses are like circles only elongated, with their width not the same the whole way around (think of an egg). In PyGame you can create ellipses in the same way that you’d create any other shape.
Wobbling Circle
You are now going to create a small animation featuring a wobbling circle. The program will use an ellipse, and the height and width of the ellipse will change during the animation.
- As usual, open IDLE and click on File⇒New Window.
- Save the program as
wobble.pyin theAdventure 5folder. - Start by adding these lines of code to the program:
import math
import pygame
pygame.init() - Add these lines to set up the window:
windowSize = [400, 300]
screen = pygame.display.set_mode(windowSize)
clock = pygame.time.Clock() - The next bit of code determines the length and width of the ellipse, as well as the x and y coordinates where the ellipse will be placed. You calculate the x and y values by taking half of the height or width of the screen, then subtracting half the height or width of the shape. Add the code now:
width = 200
height = 200
x = windowSize[0] / 2 - width / 2
y = windowSize[1] / 2 - height / 2
colour = pygame.color.Color('#57B0F6')
black = pygame.color.Color('#000000') - The next part of the program draws the ellipse. Each time the loop repeats, it changes the width and height of the shape using the
cos()andsin()functions. Both of these functions use their arguments to generate waves. As the values increase, the returned values make a smooth wave. This is useful as the ellipse will change size in a continuous and smooth motion. The x and y positions are also adjusted to compensate for the change in width and height so that the shape stays in the centre of the window. Add this code:count = 0
done = False
while not done:
screen.fill(black)
pygame.draw.ellipse(screen, colour, [x, y, width, height])
width += math.cos(count) * 10
x -= (math.cos(count) * 10) / 2
height += math.sin(count) * 10
y -= (math.sin(count) * 10) / 2
count += 0.5
pygame.display.flip()
for event in pygame.event.get():
if event.type == pygame.QUIT:
done = True
clock.tick(24)
pygame.quit() - Run the program with Run⇒Run Module.
The program will create a wobbling circle and should look something like Figure 5-5.
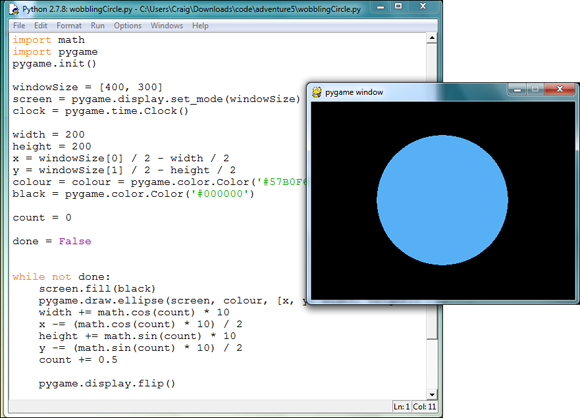
FIGURE 5-5 A single frame of the wobbling circle animation
Saving Your Images
Saving images that you’ve created in PyGame is very straightforward. To save a PyGame surface, you only have to use this one line of Python code:
pygame.image.save(surface, filename)
For example, if you want to save the surface called screen in a file called squares.png, you use the following line of code:
pygame.image.save(screen, "squares.png")
Saving a Single Image
In two of the programs you created earlier in this adventure, you made a grid of randomly coloured squares and a gradient. These two images are suitable for saving, as they are not animations. Although you can save a single image from the wobbling circle program if you want, it is probably not worth it—because it is an animation, all you’d be able to save is an image of the ellipse.
To save an image generated in the two earlier programs, simply add this statement on the second last line of the program before pygame.quit():
pygame.image.save(screen, "squares.png")
To change the filename, you change the text in the string. Figure 5-6 shows an image from the colour grid program.

FIGURE 5-6 A saved image from the colour grid program
Saving a Series of Images
It may not be worth saving a single image from an animation, but it might be more useful to save a series of images from an animation. To do this, you save the surface each time the loop repeats.
One way of doing this is to put the save() function by itself in the loop. This will save the surface for each frame in the animation.
Here is part of the wobbling circle program, modified to save the image in each frame. It also includes a fileNo variable so that the images are numbered in order when they are saved:
fileNo = 0
while not done:
    screen.fill(black)
    pygame.draw.ellipse(screen, colour, [x, y, width, height])
    width += math.cos(count) * 10
    x -= (math.cos(count) * 10) / 2
    height += math.sin(count) * 10
    y -= (math.sin(count) * 10) / 2
    count += 0.5

    pygame.display.flip()
    pygame.image.save(screen, "circle" + str(fileNo) + ".png")
    fileNo += 1
One problem with this method of saving the program is that it will create a lot of images very quickly. You can add an if statement, however, so that only a certain number of images are saved. This code modifies the last two lines of the previous program and adds an if statement so that it only saves 20 images:
    if fileNo < 20:
        pygame.image.save(screen, "circle" + str(fileNo) +  ".png")
        fileNo += 1
Python Command Quick Reference Table |
|
Command |
Description |
|
Imports the contents of the |
|
Initialises |
|
Sets the size of a |
|
Sets the title of a |
|
Draws a circle on a |
|
Updates the window to include any shapes you’ve drawn. |
|
Checks for events such as keypresses and closing the window. Returns the events as a list. |
|
Gets the type of the event, such as a keypress or the window closing. |
|
Used to check if an event was to quit the window. |
|
Quits |
|
Draws a rectangle on a |
|
Creates a colour that |
|
Creates a clock that can return the time and control the frames per second of a loop. |
|
Controls the number of frames per second of the |
|
Draws an ellipse in |
|
Calculates the sine of a number. This can be used to generate wiggly lines when plotted on a graph. |
|
Generates the cosine of a number. This can also be used to create slightly different wiggly numbers. |
|
Saves a |
|
The shorthand addition operator adds a value to a variable. |

Achievement Unlocked: Expert creator of shapes with PyGame.