Flash Lesson 1: Getting Started with the Drawing Tools

In addition to creating engaging animated content, Flash functions as a full-featured vector illustration program that enables you to create attractive graphics and digital illustrations for use in your movies. If you use industry-standard applications such as Photoshop or Illustrator, you’ll find many similarities as well as some powerful tools that are unique to Flash.
What you’ll learn in this lesson:
- • Working with Shapes
- • Organizing layers
- • Transforming and combining graphics
- • Working with text
- • Applying filters
Starting up
Before starting, make sure that your tools and panels are consistent by resetting your workspace. See “Resetting the Flash workspace” in the Starting up section of this book.
You will work with several files from the fl01lessons folder in this lesson. Make sure that you have loaded the CClessons folder onto your hard drive from www.digitalclassroombooks.com/CC/DesignTools. See “Loading lesson files” in the Starting up section of this book.
Drawing in Flash
Adobe Flash Professional CC has many powerful tools to help you create shapes, paths, colors and patterns. Whatever you create with the drawing tools can then be animated using the Timeline. In this lesson, you will experiment with two different drawing models that you can use to create artwork in Flash: the Merge Drawing mode and the Object Drawing mode.
Using the Merge Drawing mode
The default mode is the Merge Drawing mode. At first, this mode might be difficult for new users to grasp, especially those already familiar with the drawing tools in Adobe Illustrator. In this lesson, however, you’ll see how the Merge Drawing mode offers some unique benefits over traditional drawing tool behaviors. To view the finished project, choose File > Open within Flash Professional CC. In the Open dialog box, navigate to the fl01lessons folder and select the file, fl0102_done.fla, then click Open. Keep this file open for reference or choose File > Close to close the file.

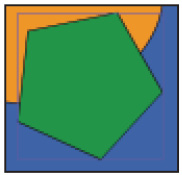
The finished project.
Creating artwork in Merged Drawing mode
In Merge Drawing mode, shapes can be easily torn apart like clay: strokes can be separated from fills (and vice versa) and you can create partial selections to break up your shapes even further. Most importantly, two shapes drawn in this mode will automatically merge when they overlap, making it easy to create complex combined shapes. Mergeable artwork is easily distinguishable on the Stage by its stippled (dotted) appearance.
You’ll first get familiar with how this unique mode behaves before diving into a more complex drawing lesson.
1 Launch Flash CC Professional, if it is not already open.
2 Choose File > Open and navigate to the fl01lessons folder that you copied onto your computer. Select and open the file named fl0101.fla. You’ll start your artwork off with a basic shape drawn in Merge Drawing mode. First, you’ll need to make sure you’re in the right drawing mode.
3 Select the Oval tool (![]() ) from the Flash Tools panel. This tool is grouped with the Oval Primitive tool, and you might need to click and hold the mouse button on currently selected shape tool to select it.
) from the Flash Tools panel. This tool is grouped with the Oval Primitive tool, and you might need to click and hold the mouse button on currently selected shape tool to select it.
Click your mouse button to reveal more shape tools under the Oval tool.
4 At the bottom of the Flash Tools panel, locate the Object Drawing button (![]() ) and make sure it’s not selected. This button controls whether or not you’re drawing in Merge or Object Drawing mode. When selected, the button appears shaded.
) and make sure it’s not selected. This button controls whether or not you’re drawing in Merge or Object Drawing mode. When selected, the button appears shaded.
5 Next, you’ll choose your fill (inside) and stroke (outline) colors. At the bottom of the Flash Tools panel, locate the color swatch marked with a pencil icon (![]() ) and click it. The Swatches panel appears; select black as your stroke color. Below it, click the color swatch marked with a paint bucket icon (
) and click it. The Swatches panel appears; select black as your stroke color. Below it, click the color swatch marked with a paint bucket icon (![]() ); from the Swatches panel, select a light orange for your fill color. Click the Reset button at the bottom of the Property Inspector to make sure the Oval Options are all set at 0.
); from the Swatches panel, select a light orange for your fill color. Click the Reset button at the bottom of the Property Inspector to make sure the Oval Options are all set at 0.
6 Click and drag in the middle of your Stage to draw an oval; once you’re satisfied with the size and shape, release the mouse button. Switch to your Selection tool (![]() ) at the top of the Tools panel; this tool allows you to select, move, and manipulate items on the Stage.
) at the top of the Tools panel; this tool allows you to select, move, and manipulate items on the Stage.
7 Click once on the fill (inside) area of your shape and the fill becomes selected without the stroke (outline). Double-click the fill, and both the stroke and fill become selected. You can now move or manipulate the shape as one whole object. Deselect the shape by clicking the Stage.
8 Off to the upper-left corner, click and drag to create a marquee (selection area), and release it once it partially overlaps your new shape. You’ll notice that the shape becomes partially selected; you can now use the Selection tool (![]() ) to click and drag the selected portion away from the rest.
) to click and drag the selected portion away from the rest.
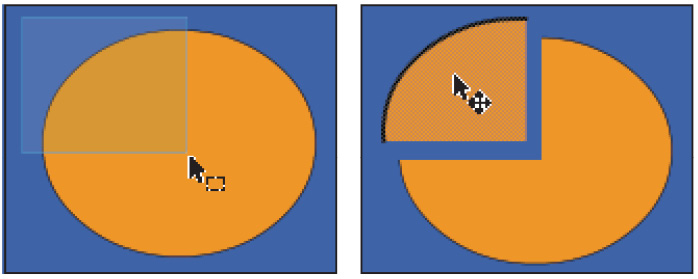
You can partially select mergeable shapes and pull them apart, which can create some interesting shape variations.
9 Next, you’ll draw a new shape that overlaps the current one. Reselect the Oval tool (![]() ) from the Tools panel on the right. You can leave your current color settings the same. Click and drag to draw a new shape that partially overlaps the first. Once again, switch to the Selection tool.
) from the Tools panel on the right. You can leave your current color settings the same. Click and drag to draw a new shape that partially overlaps the first. Once again, switch to the Selection tool.
10 Double-click the fill of the new shape to select it, and pull it away from the existing one. Click the stage to deselect the object when you’re done. You’ll notice that the new shape has taken a piece out of the old one where the two overlapped.
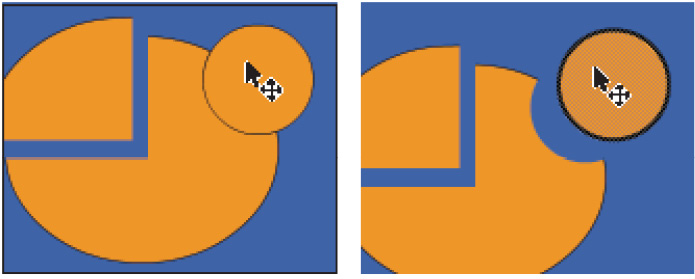
Overlapping shapes automatically merge, causing one to “knock” the other out when removed.
11 Choose File > Save As. In the Save dialog box, navigate to the fl01lessons folder, then type fl0101_work.fla into the Save As text field. Click Save.
Working with Drawing objects
In contrast to artwork created in Merge Drawing mode (referred to as shapes), Object Drawing mode provides more rigid control over artwork created on the Stage. Much like drawing shapes in Illustrator CC, shapes drawn in this mode group their stroke and fill together to avoid separation, and so partial selections are prevented. Drawing Objects give you the ability to stack and arrange shapes within a single layer, providing a deeper level of ordering amongst multiple pieces of artwork.
1 Select a green shade from the Fill color swatch on the Tools panel. Directly beneath the Oval tool, select the Polystar tool (![]() ).
).
2 Locate the Object Drawing button (![]() ) at the bottom of the Tools panel, and click to select it. The button should be pressed in at this point, indicating that Object Drawing mode is enabled.
) at the bottom of the Tools panel, and click to select it. The button should be pressed in at this point, indicating that Object Drawing mode is enabled.
3 Click and drag to draw a new polygon on the Stage. You’ll notice the shape appears inside a bounding box. Switch to the Selection tool (![]() ) and choose Edit > Deselect All.
) and choose Edit > Deselect All.
Drawing Objects appear inside of bounding boxes, and their strokes and fills can’t be separated.
4 If you click once on the fill or stroke of the shape, the bounding box around the entire shape appears selected. Click and drag to draw a selection area (marquee) around part of the polygon, and you’ll see that partial selections also result in the entire shape becoming selected.
5 Double-click the fill of the shape; you’ll be brought inside the Drawing Object to edit its contents. Interestingly enough, the contents of the Drawing Object are the same mergeable shapes you worked with in the last lesson. You can think of a Drawing Object as a container around a mergeable shape that keeps its parts grouped together.

Double-clicking a Drawing Object doesn’t select it, but rather brings you inside to edit its contents.
 You can also exit a Drawing Object’s Edit mode using the links shown above the Stage. Click the Scene 1 link to return to the main Timeline, and you should no longer see the words Drawing Object appear to its right.
6 Exit the Drawing Object by double-clicking the Stage. Once again, return to the Tools panel and select the Polystar tool (![]() ). Click and drag to draw another shape on the Stage that overlaps the polygon you drew in Step 3.
). Click and drag to draw another shape on the Stage that overlaps the polygon you drew in Step 3.
7 Choose the Selection tool and select the new shape. Pull it slightly away from the original shape; you’ll notice the two shapes did not merge as they would with mergeable shapes. Leave the new shape selected and make sure that it still slightly overlaps the first polystar.
8 Next, you’ll see how Drawing Objects can be meticulously stacked and arranged, even on the same Timeline layer. With the new shape selected, choose Modify > Arrange > Send to Back. The new shape is pushed behind the first. The Arrange menu allows you to restack Drawing Objects, groups, and symbols.

When a Drawing Object is selected, you have access to the Arrange menu (Window > Arrange), which allows you to change that shape’s stacking order relative to other Drawing Objects on the Stage.
 Mergeable shapes always fall below Drawing Objects, groups, or symbols on the Stage. To have a mergeable shape appear above other items, you need to place it on its own layer and move that layer to the top of the stack.
9 Choose File > Save, then choose File > Close.
Putting it all together
Now that you have a feel for how the two drawing modes work, you’ll complete a piece of artwork using your new skills and become familiar with additional drawing tools.
1 Choose File > Open and navigate to the fl01lessons folder. Select and open the file named fl0102.fla.
2 Choose File > Save As. In the Save dialog box, navigate to the fl01lessons folder, then type fl0102_work.fla into the Save As text field. Click Save.
3 On the Stage, you see a single oval; switch to the Selection tool (![]() ) and click once on the oval to select it. A bounding box appears, indicating that this is a Drawing Object. A look at the Property Inspector confirms this, since it should read Drawing Object at the top.
) and click once on the oval to select it. A bounding box appears, indicating that this is a Drawing Object. A look at the Property Inspector confirms this, since it should read Drawing Object at the top.
4 In order to dissect this shape further, you’ll need to break it back down to a mergeable shape like the ones you created earlier. Make sure the shape is selected, and choose Modify > Break Apart. The shape now appears with a dotted pattern that indicates it is mergeable artwork.

The Break Apart command allows you to break any artwork down to its next most basic form.
5 Deselect the oval shape by clicking the pasteboard or a different area of the Stage.To create the mouth of your fish, click and drag with your Selection tool to create a partial selection that overlaps the left edge of the oval. Delete the selected portion by using the Backspace (Windows) or Delete (Mac OS) key. With mergeable shapes, you can delete partial selections to dissect shapes in unusual ways.

Create a partial selection around the oval where you’ll form the mouth of your fish.
6 With the Selection tool active, move your cursor close to the open-ended stroke at the top of the oval. When an L-shaped angle icon (![]() ) appears below your pointer, click and drag the anchor point down and to the left as shown below.
) appears below your pointer, click and drag the anchor point down and to the left as shown below.
7 Continue using the Selection tool to click and drag the bottom anchor point up to meet the first anchor point as shown below.
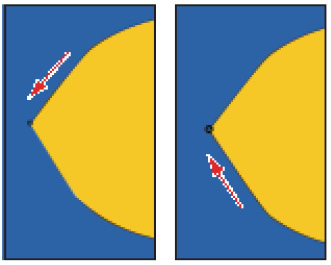
The Selection tool can pull open-ended paths to reshape an object.
8 Choose File > Save to save your file.
 Paths on mergeable shapes automatically join when Snap to Objects is enabled. Snap to Objects can be enabled using View > Snapping > Snap to Objects, or by using the Snap to Objects button (
![]() ) at the bottom of the Tools panel.
) at the bottom of the Tools panel.
Using the Line tool
Most illustration programs have a line tool, and while it’s not the most creative tool in the box, you can use Flash’s Selection tool to make it more useful. In the following steps, you’ll form the tail of your fish using a few simple moves.
1 Select the Line tool (![]() ) from the Tools panel. Make sure that Object Drawing mode is disabled (if necessary, deselect the Object Drawing button (
) from the Tools panel. Make sure that Object Drawing mode is disabled (if necessary, deselect the Object Drawing button (![]() ) at the bottom of the Tools panel). Select Solid from the style menu on the Property Inspector to set a solid line.
) at the bottom of the Tools panel). Select Solid from the style menu on the Property Inspector to set a solid line.
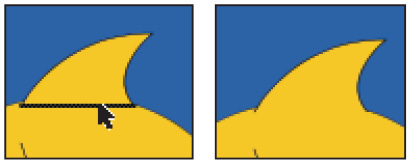
2 Move your crosshair cursor close to the right edge of the oval, and click and drag to draw an upward diagonal line. Starting where your first line leaves off, click and drag to draw a second line that meets the oval again below where the first line began.

With Snap to Object enabled and Object Drawing disabled, diagonal lines automatically join if drawn close enough together.
3 Where the last line meets the oval, click and drag to draw a diagonal line moving downward. As you did in step 2, click and drag where the line leaves off to draw a second line that meets the oval again. These steps should have formed a spiky tail that you’ll fine-tune in the next steps.
4 To change this from a spiky tail to a rounded, more appropriate one, you’ll use the Selection tool. Choose the Selection tool (![]() ), and move your cursor toward the middle of the first diagonal line you created. Once you are close enough, a curved icon appears (
), and move your cursor toward the middle of the first diagonal line you created. Once you are close enough, a curved icon appears (![]() ) below your pointer. Click and drag upward to bend the line into a curve. As you can see, the Selection tool can also bend or reshape straight lines and curves.
) below your pointer. Click and drag upward to bend the line into a curve. As you can see, the Selection tool can also bend or reshape straight lines and curves.

The Selection tool can be used to easily reshape lines and curves.
5 Repeat step 4 for each of the three remaining lines until the tail is formed.
6 Next you’ll need to fill the two sides of your new tail. By default, shapes drawn with path-centric tools such as the Line, Pen, and Pencil tools do not automatically fill. To fill these shapes, click and choose the Paint Bucket tool (![]() ) from the Tools panel.
) from the Tools panel.
The Paint Bucket tool allows you to add fills where none exist, or to change the color of an existing fill.
7 Click the Fill color swatch at the bottom of the Tools panel. Choose the light orange color marked #FFCC00. (You can also type this in the text field at the top of the Swatches panel to select the specified color.) Click inside of the tail fins to fill them with the selected color.
Add fills to empty paths using the Paint Bucket tool.
8 Switch back to the Line tool, and click and drag to draw two close, parallel, vertical lines in the middle of the oval. You will use these to form the gills for your fish.
9 Switch to the Selection tool (![]() ), and use the technique shown in steps 4 and 5 to bend each line into a slight curve in the same direction.
), and use the technique shown in steps 4 and 5 to bend each line into a slight curve in the same direction.
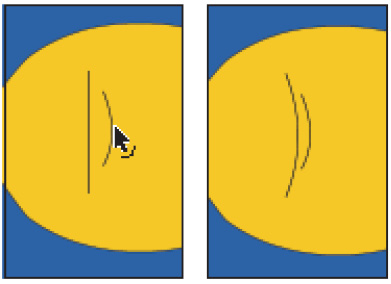
Use the same technique you used to create the tail to bend out some gills for your fish.
10 With the Selection tool active, click and select each of the two overlapping lines that separate the tail from the fish body. Press Backspace (Windows) or Delete (Mac OS) to clear the lines away.
11 Choose File > Save to save your file.
 You can easily switch from any tool to the Selection tool by pressing the V key, without having to go over to the Tools panel.
Using the Pen tool
For precision illustration tasks, you will most likely want to use the Pen tool. The Pen tool allows for point-to-point drawing, and precise control over curves and lines in between. You can even add or remove points to fine-tune your work. If you’ve used the Pen tool in Illustrator CC, you’ll already be familiar with the Pen tool and its related tools.
You’ll use the Pen tool to create fins for your new fish in the following steps.
1 Select the Pen tool (![]() ) from the Tools panel. In the Properties Panel or Tools panel, set your stroke color to black (#000000).
) from the Tools panel. In the Properties Panel or Tools panel, set your stroke color to black (#000000).
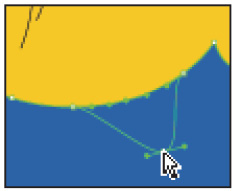
2 In the space above your oval, click and release the mouse pointer on the Stage to create a new point. Move your pointer to the left of the point you just created, and click and release again to create a second point. This point is joined to the first by a new path (line).
3 Position your cursor above and to the right of your last point. Click and hold your mouse button, and then drag to the right. This forms a curve between your new point and the last one. Once you’ve gotten the curve just right, release the mouse button.

Creating precision lines and curves using the Pen tool.
 You can create curves from any new point by clicking and holding the mouse button and dragging in the direction you want to form the curve. (Be sure not to release the mouse button first.)
4 Next, you’ll close up the shape. The next time you create a point, however, the Pen tool will attempt to draw a curve in the same direction as the last. To reset the last point drawn so that you can control the curve, click the last point you created.
5 Move your pointer over the first point you created, and you should see a small loop appear below the pen cursor. Click and hold your mouse button; drag to the right to form the final curve, and release the mouse to complete the shape.
6 As with other path-based tools, shapes created with the Pen tool do not automatically fill. To fill the new shape, choose the Paint Bucket tool (![]() ) from the Tools panel. In the Tools panel, make sure the Fill color is still set to the orange color labeled #FFCC00.
) from the Tools panel. In the Tools panel, make sure the Fill color is still set to the orange color labeled #FFCC00.
7 Click once inside your new shape to fill it with the currently active fill color.
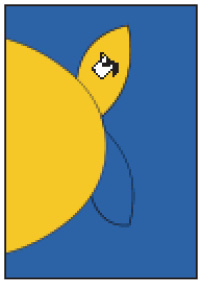
8 Now you’ll move the fin into place and connect it with the rest of the body. Choose the Selection tool (![]() ), and double-click the fill of the fin to select the entire shape. Drag it into place at the top of the oval, slightly overlapping it. Click the Stage to deselect the shape; when you deselect the shape, the two become merged.
), and double-click the fill of the fin to select the entire shape. Drag it into place at the top of the oval, slightly overlapping it. Click the Stage to deselect the shape; when you deselect the shape, the two become merged.

Move your new fin into place above the fish body.
9 The fin should now be merged with the oval. Use the Selection tool and click once to select the portion of the stroke that overlaps onto the oval. Only that portion should become selected. Press Backspace (Windows) or Delete (Mac OS) to clear away the selected stroke.
Intersecting strokes in mergeable artwork become segmented and can be individually selected and removed.
 By default, strokes that overlap between two merged shapes become segmented, and individual portions can be selected and removed.
10 Choose File > Save to save your file.
Using the Add and Delete Anchor Point tools
You can add or remove points along existing paths with the Add and Delete Anchor Point tools. These tools are found under the Pen tool and enable you to further fine-tune your illustrations. You’ll add a bottom fin to your fish by manipulating the existing oval shape that forms its body.
1 Choose the Subselection tool (![]() ) from the Tools panel. Click the edge of the oval; this reveals the points and paths that form this shape. From here, you can manipulate, add, or remove points along this path.
) from the Tools panel. Click the edge of the oval; this reveals the points and paths that form this shape. From here, you can manipulate, add, or remove points along this path.

Use the Subselection tool to activate the points and paths that compose a shape.
2 Click and hold your mouse pointer on the Pen tool (![]() ); this reveals the Add, Delete, and Convert Anchor Point tools. Choose the Add Anchor Point tool (
); this reveals the Add, Delete, and Convert Anchor Point tools. Choose the Add Anchor Point tool (![]() ). Note: You can also use the = and - keys to toggle between the Add and Delete anchor point tools.
). Note: You can also use the = and - keys to toggle between the Add and Delete anchor point tools.
3 At the bottom center of the oval, you’ll notice a single anchor point. Using the Add Anchor Point tool, click once to the left and once to the right of that point to add two new anchor points.
If you add the anchor point(s) in the wrong place, or add too many, choose the Delete Anchor Point tool (![]() ) and click any point to remove it.
) and click any point to remove it.

Use the Add Anchor Point tool to add two additional points surrounding the bottom point.
4 Choose the Subselection tool and, if necessary, click the outline of your oval to reactivate the points and paths. Click the point at the very bottom of the oval to activate it; the point now appears solid instead of hollow.
5 Click and drag the point down and to the right, which extends that portion of the oval into a fin-like shape.
With more points in place, you can easily pull out and extend a fin from the existing shape.
6 Choose File > Save to save your file, and leave the file open.
Using the Combine Objects menu
If you need to create more complex combinations of shapes, you can use the Combine Objects menu, found at Modify > Combine Objects. This menu enables you to create punches, crops, or intersections between overlapping shapes, and even lets you convert mergeable artwork into Drawing Objects.
Before you can perform any Combine Objects menu commands on a piece of artwork, it first must be converted to a Drawing Object. To do this, you’ll use the Union command to convert your fish from mergeable artwork to a Drawing Object.
1 Select the entire fish by choosing Edit > Select All. You can also use the Selection tool (![]() ) to draw a selection area around the artwork if you prefer.
) to draw a selection area around the artwork if you prefer.
2 Choose Modify > Combine Objects > Union. This command converts the selected artwork to a Drawing Object, and a bounding box appears around your fish and its parts. Choose Edit > Deselect All.

Convert mergeable artwork to Drawing Objects using Modify > Combine Objects > Union.
3 Select the Polystar tool (![]() ), and enable Object Drawing mode by selecting the button at the bottom of the Tools panel. From the Properties Panel, click the Options button. This opens the Tool Settings dialog box for the Polystar tool.
), and enable Object Drawing mode by selecting the button at the bottom of the Tools panel. From the Properties Panel, click the Options button. This opens the Tool Settings dialog box for the Polystar tool.
4 In the Tool Settings dialog box, type 3 for the number of sides. Leave the Star point size at its defaults and click OK to exit the dialog box. On the Stage, while holding your Shift key (to constrain the angle), click and drag to draw a right-pointing triangle.
If the new triangle appears unfilled, select any fill color from the Tools panel, and use the Paint Bucket tool to fill it.
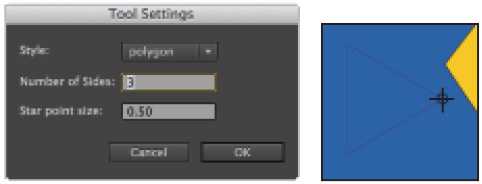
Use the Polystar tool to set and draw a triangle shape that you’ll punch from the fish below.
5 With the shape still selected, choose the Free Transform tool (![]() ) from the Tools panel. A bounding box with handles appears; grab the top middle handle and drag it downward to scale the shape down vertically.
) from the Tools panel. A bounding box with handles appears; grab the top middle handle and drag it downward to scale the shape down vertically.
Choose the Selection tool and move the shape so that it overlaps the fish on the left where a mouth should be.
6 Choose Edit > Select All so that the new shape and your fish both appear selected. Choose Modify > Combine Objects > Punch. The new shape is knocked out from your fish, leaving behind a mouth-like opening.

Use Modify > Combine Objects > Punch to subtract one shape from another.
7 Select the Oval tool from the Tools panel. Make sure you have a fill color selected (any color will do). With the Shift key held down, click and drag to draw a small, perfect circle. To match the figure shown in this example, use your Property Inspector to set the circle to a width and height of 50. Switch to your Selection tool and position the circle on top of your fish above the mouth you created.
8 Choose Edit > Select All. With both the circle and fish selected, choose Modify > Combine Objects > Punch. This punches the circle into the body of the fish, making space for an eye.

Use the Punch command to create a space for your fish’s eye.
9 Choose File > Save to save your file.

Using the Primitive tools (Smart Shapes)
The Rectangle and Oval Primitive tools provide you with an easy and time-saving way to create common variations on these basic shapes. From rounded or scalloped rectangles, to double-radius ovals, these smart shapes are especially powerful, because you can continue to modify them long after they’ve been created.
Using the Oval Primitive tool
Your new fish needs an eye, and the best tool for the job is the Oval Primitive tool, which allows you to create complex variations on ovals and circles.
1 Select the Oval Primitive tool (![]() ) from the Tools panel. This tool can be found underneath the Oval tool. From the Tools panel, choose black (#000000) for your fill color, and set the stroke to None (
) from the Tools panel. This tool can be found underneath the Oval tool. From the Tools panel, choose black (#000000) for your fill color, and set the stroke to None (![]() ).
).
2 Choose View > Snapping, and select Snap to Objects to temporarily disable object snapping. While holding your Shift key (to constrain width and height), click and drag to draw a small circle on the Stage. Switch to your Selection tool (![]() ), and position the circle above the spot where the eye should appear on your fish (a hole should appear there from the last exercise).
), and position the circle above the spot where the eye should appear on your fish (a hole should appear there from the last exercise).
Use the W and H values on the Property Inspector to set the new circle’s size to 45 by 45.
3 In the Property Inspector, locate the three sliders at the bottom marked Start Angle, End Angle, and Inner Radius. Click and drag the Inner Radius slider toward the right, and you’ll see that it forms a knockout in the center of the circle. Set the Inner Radius to suit your artwork (the figure and sample file use a value of around 49).
You can also enter a precise value in the text field to the right of the slider.

Use the Inner Radius slider to punch a center into an oval primitive.
4 Locate the Start Angle and End Angle sliders in the Property Inspector. Click and drag the Start Angle slider until its value reads somewhere between 40 and 45. You’ll notice that as you increase the angle, the circle forms a C shape; this slider tells the circle to begin its circumference (shape) at a different angle, resulting in a partial shape.
5 You’ll now perform the same action for the End Angle. Grab the End Angle slider and drag it to the right until the value reads about 330. The circle now ends at a different location as well. As you can see, this can be very powerful in any situation where you need to create wedges or partial circle shapes without the need for complex punch or knockout commands.
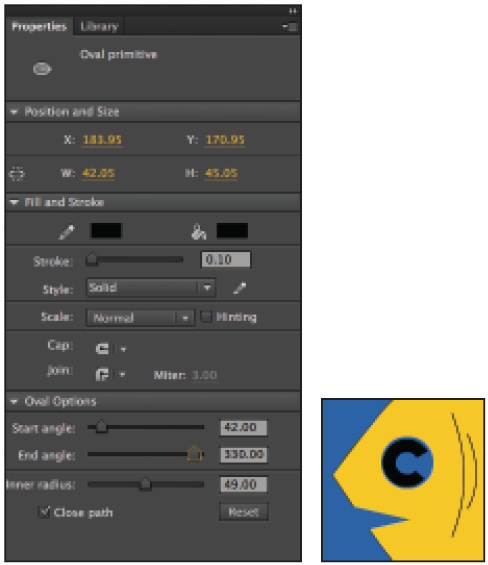
Use the sliders to affect your smart shape at any point. You can even deselect and return to the shape later on to edit its settings.
6 Choose View > Snapping > Snap to Objects to re-enable object snapping.

The Rectangle Primitive tool
The close cousin of the Oval Primitive tool is the Rectangle Primitive tool, which gives you control over corner radii on rectangles and squares. Like the Oval Primitive tool, you can easily set values for a new primitive shape, and return to edit it at any time.
It’s time to give your fish a way to speak its mind, so you’ll create a basic word balloon using the power of the Rectangle Primitive tool.
1 Choose the Rectangle Primitive tool (![]() ) located under the Rectangle tool on the Tools panel. From the Tools panel or the Property Inspector, set a fill color of white (#FFFFFF) and a stroke color of black (#000000).
) located under the Rectangle tool on the Tools panel. From the Tools panel or the Property Inspector, set a fill color of white (#FFFFFF) and a stroke color of black (#000000).
2 Click and drag to draw a rectangle to the upper left of your fish. It’s okay if it goes off the Stage into the pasteboard. If you’d like to match the sample file, in the Property Inspector make sure the Lock width and height button (![]() ) is disabled and set the rectangle’s size to 200 pixels wide by 130 pixels high.
) is disabled and set the rectangle’s size to 200 pixels wide by 130 pixels high.
3 In the Property Inspector, locate the Rectangle Options section; you’ll see four text fields and a slider. Here is where you set the corner radius for all or each of your rectangle’s corners. By default, the four corners are locked together and use the same value.
Click and drag the slider to the right until the corner values read about 40; you see the corners of the rectangle begin to round out.

Add a corner radius to the rectangle primitive using the slider in the Property Inspector.
 To give each corner a unique value, click the chain link icon (
![]() ) to the left of the slider to unlock the four corners. You can then type in a different value for each corner in its respective text field.
) to the left of the slider to unlock the four corners. You can then type in a different value for each corner in its respective text field.
4 Next, you’ll modify the corner radius using a slightly different technique. Instead of using the slider in the Property Inspector, you can grab the points adjacent to any corner and drag them to reshape the corner radius.
5 Switch to the Selection tool (![]() ), then click and drag the point in the upper-left corner of your rectangle to the left and right. As you can see, this modifies the corners of your rectangle; move slightly to the right to reduce the corner radius.
), then click and drag the point in the upper-left corner of your rectangle to the left and right. As you can see, this modifies the corners of your rectangle; move slightly to the right to reduce the corner radius.

Using the Selection tool can be a more tactile way to modify corners.
6 Choose File > Save to save your work.
You’ll now add the stem to make this a true word balloon; however, you might have noticed that primitive shapes behave unlike any other shape you’ve used so far. While they appear to look and function much like Drawing Objects, they actually can’t be modified in the way that Drawing Objects can.
Neither the Selection nor Subselection tool will allow you to modify them in the way you’ve been able to do with Drawing Objects and mergeable artwork. To accomplish this, you need to break the shape down to artwork that you can manipulate freely. Keep in mind, however, that doing this is a one-way street: You can’t convert a shape or Drawing Object back into a primitive shape once it’s been broken apart.
7 If it’s not already active, switch to the Selection tool (![]() ) and click once to select the rectangle primitive.
) and click once to select the rectangle primitive.
8 You’ll now break this out of a primitive down to artwork you can manipulate further. Choose Modify > Break Apart, and the shape now appears with the dotted pattern that indicates it is now a mergeable shape. Keep in mind that you cannot go back.

Use Modify > Break Apart to convert the primitive shape to a mergeable shape.
Choose the Subselection tool (![]() ) from the Tools panel and click once on the edge of the shape to reveal its points and paths.
) from the Tools panel and click once on the edge of the shape to reveal its points and paths.
9 Switch to the Add Anchor Point tool (![]() ). In the lower-right corner of the rectangle, click to create two new consecutive anchor points before the corner.
). In the lower-right corner of the rectangle, click to create two new consecutive anchor points before the corner.
10 Switch to the Subselection tool, again, then click the second point (the one closest to the corner) and drag it down and to the right to form the stem of your word balloon.

Form a stem by pulling out the second of the two new points you created.
11 With the shape still selected, choose Modify > Combine Objects > Union to convert the shape to a Drawing Object, which you can easily move and stack later on.
12 Choose File > Save to save your work.
Adding text to your artwork
Flash allows you to create and style text to include in your movies, which can also be incorporated into animations or rendered in 3D. In addition, text is one of a few objects in Flash that can have filters applied to enhance its appearance.
In this lesson, you’ll use the Text tool to add and style some cool text inside your fish’s word balloon and alongside the edge of the Stage.
1 Select the Text tool (![]() ) from the Tools panel.
) from the Tools panel.
2 Click once and drag within your word balloon to create a new text box that’s slightly smaller than the balloon itself. The box appears with a blinking cursor in the upper-left corner, indicating that you’re ready to type.
3 Type the words A Fish’s Story: within the text box. Click and drag across all the text within the box to select it.

Use the Text tool to add some text to your word balloon.
4 In the Property Inspector, locate the Character options, which include options to set Family (font), Color, and Size. Choose Arial (or equivalent) from the Family menu to change the typeface. Move your cursor above the Size value, and drag to set the type size to 24 points. Click the Color swatch and set the type color to black (#000000).

Specify typeface, size, and color options for your new text from the Property Inspector.
5 Press the Escape key twice to exit the current text box and make the Text tool active again. You’ll now add some text along the left side of the Stage for more visual impact.
6 At the top of the Property Inspector, locate the Change orientation of text drop-down menu. Click it and select the Vertical option. This will create vertically-oriented text next time you use the Text tool.

The Change orientation of text drop-down menu.
7 Click (but don’t drag) near the left edge of the Stage to create a new text box, and type the words Go Fish! You’ll see that the text now is created vertically alongside the left edge of the Stage.
 You’ll notice that you’ve created text on the Stage using two slightly different techniques: Clicking and dragging to create a pre-sized text box and clicking the Stage to begin a new type path. The former of the two will result in a text box that can take advantage of advanced type options and such as text-flow, multi-column text. The single click approach is a good way to create single lines of text for more basic and aesthetic purposes.
Adding filters
To enhance the appearance of text, you can add popular live filters such as drop shadows, blurs, glows, and more. Filters can also be applied to other objects in your movie, such as button and movie clip symbols (covered later in this book). For now, you’ll add some basic filters to make your text stand out.
1 Switch to the Selection tool (![]() ), and click once on your text box in the lower-left corner to select it.
), and click once on your text box in the lower-left corner to select it.
 Pressing the V key while editing text types a v in the text box; it doesn’t switch to the Selection tool as anticipated. To exit a text box, use the Esc (escape) key, and then press the V key to jump to the Selection tool.
2 At the bottom of the Property Inspector, locate and expand the Filters section. (Try collapsing the Container and Flow options to give your filter options more space.)
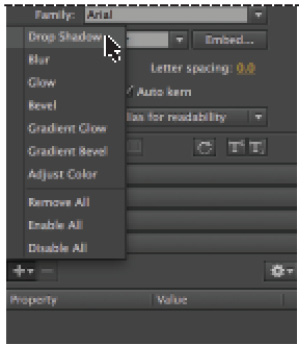
3 In the upper-left corner of the Filters section, click the Add Filter button (![]() ) to add a new filter. A menu appears, showing you the various filters you can apply to your text. Select the Drop Shadow filter.
) to add a new filter. A menu appears, showing you the various filters you can apply to your text. Select the Drop Shadow filter.
Apply filters to selected text from the Filters section of the Property Inspector.
4 Options appear for the new Drop Shadow filter, which you can fine-tune. To start, click and drag the Strength value to reduce the strength (opacity) to 30 percent.
5 Click and drag the Distance value to increase the distance to 10 pixels. Under the Quality setting, select High.

Set specific options for your filter, including color, strength, and distance.
6 Choose File > Save to save your file.
Working with colors
Flash offers a lot of options for creating, saving, and working with colors and gradients. In addition, the panels and workspace make it easy to choose and apply colors from virtually anywhere, or to save color sets that you can share between multiple Flash documents and projects.
Getting set up
1 First you’ll want to make sure that the Color and Swatches panels are visible. Choose Window > Color. By default, the Color and Swatches panels are already grouped together.
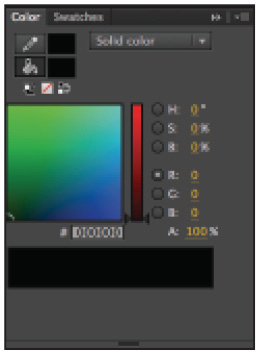
The Swatches and Color panels are grouped together by default.
2 Drag the panel group by its title bar over the Property Inspector and Library panel on the right side, releasing the mouse when you see a light blue line. The two panels should now appear docked in the panel group above the Property Inspector and Library panel.

Move the Color and Swatches panel group to the Properties and Libraries panel group.
Creating gradients
A gradient is a gradual blend between two or more colors, and is often used for complex color transitions or to imply lighting effects. You can create and save gradients and apply them to fills or strokes within your artwork. Flash supports linear gradients and radial gradients. Both types can include any number of colors.
Linear gradients blend in a uniform manner and, as the name implies, in a straight line going in any direction or angle.
Radial gradients blend in a circular manner, either from the inside out or the outside in (depending on your perspective).

On the left, a linear gradient; on the right, a radial gradient.
Your fish is almost complete, so it’s time to bring it to life with some dynamic and exciting colors.
1 Choose your Selection tool (![]() ), and click once on your fish to select it. Choose Modify > Break Apart to separate the fish and its parts, and then choose Edit > Deselect All. Click once on the body of the fish.
), and click once on your fish to select it. Choose Modify > Break Apart to separate the fish and its parts, and then choose Edit > Deselect All. Click once on the body of the fish.
2 Locate the Color type drop-down menu at the top-right corner of the Color panel. This allows you to choose a solid color or gradient for the currently active color. Choose Radial gradient to set a radial gradient to your fill. The fish displays the default black-to-white gradient.

Choose Radial to switch your shape’s fill to a radial gradient.
3 At the bottom of the Color panel, you see the color ramp, which now appears with two color stops (sliders), one for each color that forms your gradient. You’ll need to assign a new color to each stop.
4 Double-click the right slider, and the Swatches panel appears. Choose the dark orange color marked #CC6600. Double-click the left slider, and from the Swatches panel, choose the light orange color marked #FF9900.
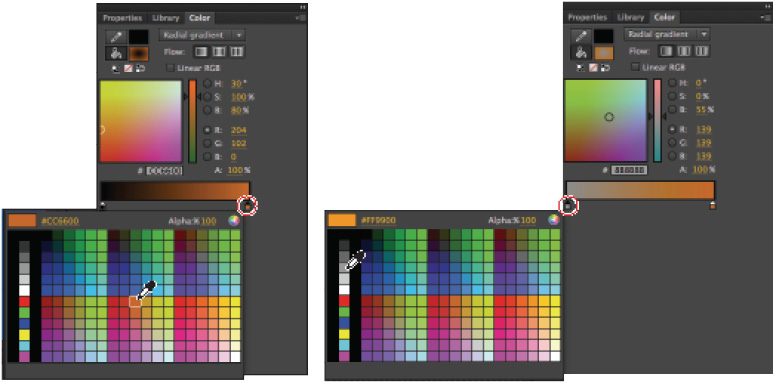
Set a unique value for each color stop on your gradient.
5 The position and distance between the two sliders determines the blend point. Moving one slider closer to the other changes the balance between the two colors.
Click and drag the left slider slightly toward the middle; this makes the lighter orange more prominent than the dark orange.
6 To add colors to your gradient, you’ll add more color stops. Add a new color stop by clicking the far left edge of the color ramp. A new stop should appear below the color ramp. Double-click the stop, and choose white (#FFFFFF) from the Swatches panel.
Now, you’ll save this gradient for use later on.
7 Locate and open the Color panel menu (![]() ) in the upper-right corner of the panel. Choose Add Swatch to add your new gradient swatch to the existing swatch presets.
) in the upper-right corner of the panel. Choose Add Swatch to add your new gradient swatch to the existing swatch presets.
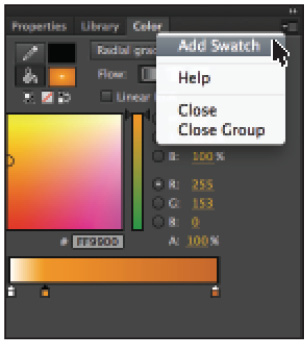
Save your new gradient as a preset that you can recall later on from the Swatches panel.
8 Choose File > Save to save your file.
Using opacity with gradient colors
A cool feature in Flash is the ability to set a unique opacity level for each individual color in a gradient. This can create some interesting effects, and add cool lighting-style effects to your illustrations. In this next exercise, you’ll create and color some underwater bubbles using this interesting effect.
1 Choose the Oval tool (![]() ) from the Tools panel. If it’s not already enabled, activate Object Drawing mode by pressing the button at the bottom of the Tools panel.
) from the Tools panel. If it’s not already enabled, activate Object Drawing mode by pressing the button at the bottom of the Tools panel.
2 From the bottom of the Tools panel, choose white (#FFFFFF) for your stroke color, and choose the black-to-white radial gradient preset for your fill color.
3 While holding the Shift key down (to constrain proportions), click and drag to draw a small circle to the left of your fish. Leave the circle selected.
4 If it’s not already open, choose Window > Color to open the Color panel.
5 Double-click the black color stop to open the Swatches panel, and choose white (#FFFFFF).
6 With the stop still active, locate the Alpha slider; this sets the opacity of the selected color in the current gradient. Click and drag the slider downward until the value reads 0 percent. This produces an interesting light flare effect inside the bubble.

Draw a new oval and use the Color panel to reduce the opacity of one of your oval’s gradient colors.
7 Choose File > Save to save your file.
Creating custom colors
As you might have discovered, creating and saving a solid color swatch is nearly identical to creating and saving a gradient swatch. In this case, you’ll set specific RGB values to create a color that you can apply to your artwork, as well as add to your existing swatches.
1 Choose the Selection tool (![]() ) and double-click once on your fish to select it. In the Property Inspector, set the stroke color style to solid and the color to black (#000000).
) and double-click once on your fish to select it. In the Property Inspector, set the stroke color style to solid and the color to black (#000000).
2 Locate the R, G, and B text fields on the Color panel, click the stroke icon (![]() ) to make certain the stroke (and not the fill) is selected, and type 250, 100, and 16, respectively. This creates a dark orange color that is immediately applied to the stroke.
) to make certain the stroke (and not the fill) is selected, and type 250, 100, and 16, respectively. This creates a dark orange color that is immediately applied to the stroke.
3 From the Color panel menu located in the upper-right corner, select Add Swatch to add your new color to the Swatches panel.
4 Choose File > Save to save your file.
Saving a custom color set
Once you’ve added new color swatches, you’ll want to save that set for use with other projects and documents. If you’ve ever created and saved custom color swatches in applications like Photoshop or Illustrator, you’ll find that saving color sets in Flash is very similar.
1 Click the Swatches panel tab located next to the Color panel tab to open the Swatches panel. Click the panel menu button (![]() ) in the upper-right corner of the Swatches panel.
) in the upper-right corner of the Swatches panel.
2 From the panel menu, choose Save Colors.

Save the current swatches as a new color set that you can recall at any time.
3 From the dialog box that appears, choose your Save location (for this lesson, you can choose the fl01lessons folder), and name the new file fl01colors.clr.
4 Click Save to save the color set into the selected folder. The color set appears in your destination folder as a single .clr (Flash Color Set) file.
 You can also choose to save your swatches in .act (Adobe Color Table) format, which allows you to exchange it with Adobe applications such as Photoshop and Fireworks. You can even load .act color tables exported from Fireworks back into Flash.
Organizing and layering graphics
As you build more complex graphics on the Stage, you’ll want to position and layer them as needed to make your movie work for you. Flash gives you a lot of control over your Stage through a robust layer structure that you might already be accustomed to using in other Adobe design applications.
Working with layers
On a single layer, you have a great deal of flexibility to arrange Drawing Objects and grouped graphics; however, as your artwork becomes more complex, you’ll want the power of layers to stack and arrange your artwork. In addition to controlling stacking order, layers let you hide specific graphics from view, and even lock those items from accidentally being edited or deleted.
You can think of layers as clear pieces of film that you can place graphics on and stack together; each layer sits above another, allowing you to reveal the items below, but also to control which items appear above or below another. Each layer and its contents can be isolated in view, toggled out of view, or locked to prevent editing.
In the next steps, you’ll separate the graphics you’ve created so far onto individual layers for more control.
1 To start, you’ll make sure that each set of graphics you want to assign to a layer is grouped or converted to a Drawing Object. This will make them easier to move and distribute.
Verify that your word balloon (leave the text separate) is a Drawing Object by selecting it and viewing its info in the Property Inspector. If not, use Modify > Combine Objects > Union to convert it to a Drawing Object.
2 Double-click to select your fish and the gills, then press and hold the Shift key and select the eye. Convert them to a single Drawing Object by choosing Modify > Combine Objects > Union.
3 Shift+click to select the fish, the bubble, and the word balloon. Make sure to not select the text. Right-click (Windows) or Ctrl+click (Mac OS) on any of the selected items; a context menu appears.

Use Distribute to Layers to separate multiple objects at once to their own layers on the Timeline.
4 At the bottom of the menu, locate and select Distribute To Layers. All the items on your Stage are placed onto several new layers, which appear on the Timeline panel at the bottom.
The layers are named generically (Layer 2, Layer 3, and so on). To fix this, you’ll identify which graphics belong to which layers and rename them appropriately.
5 Choose Edit > Deselect All. First, click the fish on the Stage to select it, and look at the Timeline panel below. The layer that becomes selected is the one to which it belongs. Double-click directly on the layer’s name to edit it, and type in the name Fish.
6 Repeat step 4 for the bubble and word balloon, naming them Bubble and Word Balloon, respectively. For Layer 1, rename this layer Text since all the text was left on this layer.

Double-click a layer’s name to edit it. Rename your layers clearly so you know exactly what’s on each one.
7 Choose File > Save to save your file.
Arranging, locking, and hiding layers
Once you’ve arranged your artwork on individual layers, you can easily control which layers are visible (or invisible) and editable, and easily rearrange the order and appearance of items in your movie.
1 Locate the layer titled Bubble, which contains the bubble you created earlier. Click to select it.
2 Click and drag upwards on the layer; you see a black beam follow your cursor within the layers. This indicates where the layer will be moved when you release the mouse.
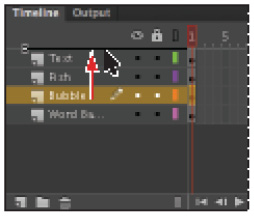
When dragging layers, follow the black beam to determine where your layer will be placed.
3 Drag the layer all the way up and release it at the top of the layer stack to move the bubble to the top.
4 Locate the two column headers above your layers; one appears with an visibility icon (![]() ) and one appears with a padlock icon (
) and one appears with a padlock icon (![]() ), which means that it is locked. Under the padlock column, click the Text, Word Balloon, and Bubble layers to lock those layers (a padlock icon should appear on the layer). Leave the Fish layer unlocked.
), which means that it is locked. Under the padlock column, click the Text, Word Balloon, and Bubble layers to lock those layers (a padlock icon should appear on the layer). Leave the Fish layer unlocked.
5 Click the Text layer below the visibility column; an X appears and the text disappears. Toggle the layer’s visibility back on again by clicking the X.

Click under the padlock or visibility icon to lock, hide, and show specific layers.
 To lock all layers except for the one you’re targeting, press and hold the Alt key (Windows) or Option key (Mac OS) and click the target layer below the padlock column. All layers except for the one you clicked will lock. This also works for visibility.
Creating layer folders
As you accumulate more layers on the Timeline, it makes sense to try and group them logically so that you can easily view, lock, and hide related layers with a few clicks. You can create layer folders on the Timeline that can group several related layers together, making it easy to collapse, hide, and lock them as needed.
1 Click to select the Text layer, which should currently be the second layer on the Timeline.
2 Locate the New Folder button (![]() ) below the layer stack, and click it once to create a new folder above the current layer.
) below the layer stack, and click it once to create a new folder above the current layer.
3 Double-click the Folder title, and type Word Balloon and Text as the new name.
4 Click and drag the Text layer up below the folder and to the right and release it; it should now appear indented below the folder, indicating it is now inside the new folder. (Follow the bar; it should appear indented below the layer folder before you release the mouse button.)
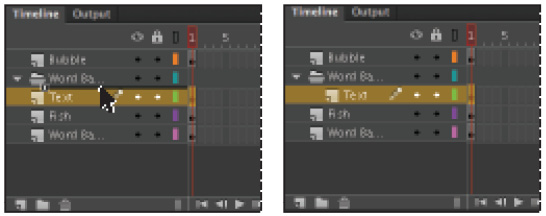
Move layers into your new layer folder.
5 Repeat step 4 with the Word Balloon layer to add it to the new layer folder. If necessary, rearrange the two layers within the folder so that the text appears above the Word Balloon.
6 Collapse the layer folder and hide its included layers by clicking the arrow that appears to the left of the folder name. The Word Balloon and Text layers temporarily disappear from view on the Timeline.

Collapse or expand a layer (and its contents) by using the arrow shown to the left of its title.
7 Choose File > Save to save your file.
You can now lock or hide all layers under that folder at once by clicking the layer folder under the Padlock and Visibility columns, respectively. To access individual layers again, expand the layer folder.
 Layer folders can be created several levels deep, allowing you a lot of organizational control when you need it. To create a nested layer folder, select any layer inside of a layer folder and click the New Folder button below the Timeline.
Transforming graphics
Once you’ve created artwork on the Stage, Flash gives you a lot of options for scaling, rotating, skewing, and tweaking graphics and colors. Transforming existing graphics is as much a part of illustration as building them, so in the next steps you’ll explore the various tools and panels at your disposal.
The Transform menu and Free Transform tool
The Modify menu at the top of your screen features a Transform menu, which provides shortcuts to many common transformation tasks as well as helpful dialog boxes. You’ll use this menu in the next exercise to tweak the size and rotation of your fish.
1 Choose the Selection tool (![]() ), and click once on the fish to select it (make sure its layer is unlocked).
), and click once on the fish to select it (make sure its layer is unlocked).
2 Choose Modify > Transform > Scale and Rotate. This opens the Scale and Rotate dialog box, where you can enter values for Scale (in percentage) and Rotation (in degrees).
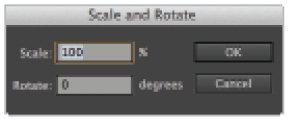
Choose Modify > Transform > Scale and Rotate to open the Scale and Rotate dialog box.
3 Type 75 for the Scale value, and 25 for the rotation value; then click OK to exit the dialog box.
4 Your fish now appears smaller and rotated slightly upward. Use the Selection tool to move your fish to the center of the Stage, closer to the word bubble.
To fine-tune, you’ll use the Free Transform tool, which offers a more tactile (but less precise) way of scaling and rotating your artwork.

Rotate the fish.
5 Leave the fish selected, and choose the Free Transform tool (![]() ) from the Tools panel. The fish now appears inside a black bounding box with eight handles.
) from the Tools panel. The fish now appears inside a black bounding box with eight handles.
6 Move your mouse pointer over the top-right handle of the bounding box until you see a double-arrow icon appear. While pressing and holding the Shift key, click and drag the corner handle down and to the left to resize your fish slightly smaller. If the text box makes it difficult to select the fish, you can move the text to another location on the Stage.

With the Free Transform tool, you can use corner handles to rotate or resize your artwork.
7 Move your cursor just above the same handle until you see the rotating arrow icon (![]() ). Once this icon appears, click and drag in a clockwise or counter-clockwise motion to adjust the rotation of your graphics to your liking.
). Once this icon appears, click and drag in a clockwise or counter-clockwise motion to adjust the rotation of your graphics to your liking.
8 Choose File > Save to save your file.

The Transform panel
An alternative to the Free Transform tool and Transform menus is the Transform panel, which offers many of the same features plus some additional options for skewing and transforming graphics in the 3D plane.
1 Choose Edit > Deselect All. If necessary, unlock the Bubble layer for editing. Use the Selection tool (![]() ) to select the bubble graphic.
) to select the bubble graphic.
2 Select Edit > Copy and then Edit > Paste in Center to make a copy of the bubble. Repeat this to make a third bubble. Use the arrow keys on your keyboard or the Selection tool to arrange the three bubbles vertically to the left of your fish’s mouth.
3 Select the bottommost bubble. Choose Window > Transform to open the Transform panel. Locate the horizontal and vertical scale values at the top. The Constrain button (![]() ) directly to the right is activated by default and will keep the horizontal and vertical values locked together.
) directly to the right is activated by default and will keep the horizontal and vertical values locked together.
4 Click and drag left over the horizontal value until the overall scale of the bubble is reduced to around 50 percent.

Use the Transform panel to precisely scale an object.
5 Select the next bubble above the last, and repeat the same technique from step 4 to reduce this bubble to 75 percent. This time, however, click and select the Skew option button. Click and drag the horizontal (left) skew value until it reads -20 degrees. This adds a slight leftward tilt to the bubble.
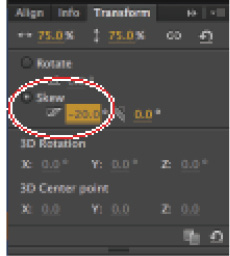
Add skewing to an object by selecting it and using the Skew values on the Transform panel.
6 Select the top bubble, and click to select the Skew option button. Click and drag the horizontal (left) skew value until it reads 15 degrees. Close the Transform panel.
 To remove all the transformation values from an object, select it and click the Remove Transform button (
![]() ) at the bottom of the Transform panel.
) at the bottom of the Transform panel.
Transforming gradients
If you use gradients to fill or stroke graphics in your movie, you can precisely position, scale, and modify them using the Gradient Transform tool. Because your fish and bubbles both use gradient fills, you’ll finalize your artwork with a little gradient tweaking.
1 From the Tools panel, click and hold your pointer on the Free Transform tool (![]() ) to select the Gradient Transform tool (
) to select the Gradient Transform tool (![]() ), then click the body of your fish to select it.
), then click the body of your fish to select it.
2 A circular bounding box appears around your fish. Move your cursor over the center point of the bounding box until a four-way arrow appears. You can click and drag this point to shift the center point of the gradient. Click and drag the point up and to the left; this helps to imply a light source coming from the upper left.

Move the point shown in a Gradient Transform bounding box to shift a gradient’s center point.
3 Locate the scale handle in the lower-right corner of the bounding box. Click and drag it inward to scale the gradient down inside the fish. This increases the presence of the darkest color that makes up your fill.

Scale down a gradient using the handle shown. This also changes the perceived balance of colors.
4 Choose File > Save to save your file.
 For linear gradients, the rotate handle allows you to change the direction of the gradient. This also works for radial gradients if the center point is offset from the middle.
Self study
Using the technique shown in the last exercise, shift the gradient points for your three bubbles to match the fish.
Review
Questions
1 Name two primary differences between Mergeable Shapes and Drawing Objects.
2 Which tool would you choose to manipulate individual points that make up a shape or path?
3 What three advantages does isolating artwork on a layer offer?
Answers
1 Two primary differences between Mergeable Shapes and Drawing Objects are: Drawing Objects can be arranged, whereas mergeable shapes cannot. Mergeable shapes can be partially selected, whereas Drawing Objects cannot.
2 The tool you would choose to manipulate individual points that make up a shape or path is the Subselection tool.
3 Three advantages of isolating artwork on a layer are: the ability to control stacking order, turn visibility on or off, and lock contents for editing.