Photoshop Lesson 6: Introduction to Photoshop Layers

Once you discover how to use layers, you can expand your capabilities to create incredible compositions, repair images, and easily apply effects.
What you’ll learn in this lesson:
- • Starting to create layers
- • Selecting and moving layers
- • Using layer masks
- • Creating compositions
- • Understanding clipping masks
Starting up
Before starting, make sure that your tools and panels are consistent by resetting your preferences. See “Resetting Adobe Photoshop CC preferences” in the Starting up section of this book.
You will work with several files from the ps06lessons folder in this lesson. Make sure that you have loaded the CClessons folder onto your hard drive from www.digitalclassroombooks.com/CC/DesignTools. See “Loading lesson files” in the Starting up section of this book.
Discovering layers
Think of layers as clear sheets of film, each containing its own image content. Layers can be stacked on top of each other, and you can see through the transparent area of each layer to view the content on the layers below. Each layer is independent of the others and can have its contents changed without affecting the others. You can reorder layers to create different stacking orders, and change the blending modes on the layers to create interesting overlays. Once you have mastered layers, you can create composites and repair image data like never before.
A new default image starts with only a background layer. The number of additional layers, layer effects, and layer sets that you can add to an image is limited only by your computer’s memory. In this lesson, you’ll find out how to take advantage of layers to create interesting composites and make non-destructive changes to your images.
Getting a handle on layers
In the first part of the lesson, you will work with the most fundamental concepts of using layers. Even if you are using layers already, it is a good idea to run through this section. Due to the fast pace of production, many users skip right into more advanced layer features without having the opportunity to learn basic layer features that can save them time and aggravation.
Creating a new blank file
In this lesson, you’ll create a blank file and add layers to it one at a time.
1 Choose File > New. The New dialog box appears.
2 In the New dialog box, choose Default Photoshop Size from the Preset drop-down menu.
3 Choose Transparent from the Background Contents drop-down menu, and click OK. By selecting Transparent, your new document starts with one layer instead of the default, opaque, Background layer.

Create a new document with a transparent layer.
4 You will now save the file. Choose File > Save As and navigate to the ps06lessons folder. In the File name text field, type mylayers. Choose Photoshop from the Format drop-down menu and click Save. If the Photoshop Format Options dialog box appears, click OK.
To help you work with layers, Photoshop provides a panel specific to layers. In addition to showing thumbnail previews of layer content, the Layers panel allows you to select specific layers, turn their visibility on and off, apply special effects, and change the order in which they are stacked.
5 If the Layers panel is not visible, choose Window > Layers. Click the Layers tab and drag it out of the docking area for this lesson so that you can more closely follow the changes you are making.
6 If the Swatches panel is not visible, choose Window > Swatches. Click and drag the Swatches tab to take it out of the docking area.
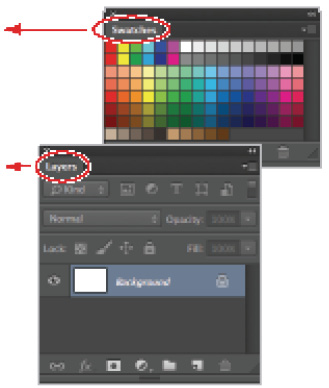
Click on the panel tabs and drag the Swatches and Layers panels out of the docking area.
7 Select the Rectangular Marquee tool (![]() ) and click and drag; to constrain the marquee selection to a square, press and hold the Shift key as you drag. Release the mouse when you have created a large, square marquee. Exact size is not important for this step.
) and click and drag; to constrain the marquee selection to a square, press and hold the Shift key as you drag. Release the mouse when you have created a large, square marquee. Exact size is not important for this step.
8 Click any red color in the Swatches panel. In this example, CMYK Red is used.
9 Choose Edit > Fill, or use the keyboard shortcut Shift+Backspace (Windows) or Shift+Delete (Mac OS) to open the Fill dialog box.
10 In the Use drop-down menu, select Foreground Color. Leave the other settings at their default and click OK.
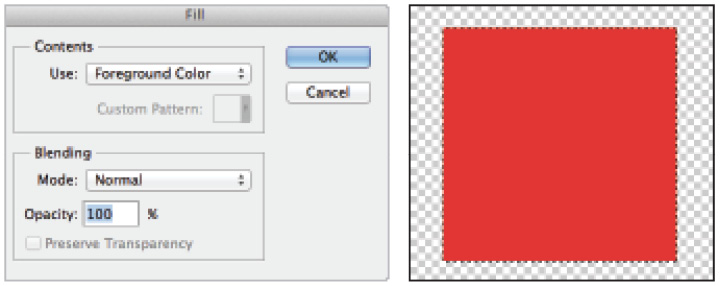
Fill with your foreground color.
The result.
 You can press Alt+Backspace (Windows) or Option+Delete (Mac OS) to automatically fill with your foreground color without opening the Fill dialog box. Keep in mind that either the Backspace or Delete key can be used for this shortcut.
11 Choose Select > Deselect to turn off the selection marquee, or use the keyboard shortcut Ctrl+D (Windows) or Command+D (Mac OS).
12 Choose File > Save.
Naming your layer
You will find that as you increase your use of layers, your Photoshop image can become quite complicated and confusing. Layers are limited only by the amount of memory you have in your computer, so you could work with 100-layer images. To help you stay organized, and therefore more productive, be sure to name your layers appropriately.
1 Double-click the layer name, Layer 1. The text becomes highlighted and the insertion cursor appears. You can now type red square, and then press the Enter (Windows) or the Return (Mac OS) key, to provide this layer with a descriptive name.
2 You can also name a layer before you create it. Press and hold the Alt (Windows) or Option (Mac OS) key and click the Create a New Layer button (![]() ) at the bottom of the Layers panel. The New Layer dialog box appears.
) at the bottom of the Layers panel. The New Layer dialog box appears.
 As a default, new layers appear on top of the active layer. Use Ctrl+Alt (Windows) or Command+Option (Mac OS) to open the New Layer dialog box and add the new layer underneath the active layer.
3 In the File name text field, type yellow circle, since you are about to create a yellow circle on this layer.
4 For organizational purposes, you can change the color of the layer in the Layers panel, which can help you locate important layers more quickly. For the sake of being color-coordinated, choose Yellow from the Color drop-down menu and click OK. A new layer named yellow circle is created. The Layer Visibility icon in the Layers panel has a yellow background. This background does not affect the actual contents of your layer.

Press and hold the Alt/Option key when creating a new layer so that you can name it right away.
Now you will put the yellow circle on this layer.
5 Click and hold the Rectangular Marquee tool (![]() ), then choose the hidden Elliptical Marquee tool (
), then choose the hidden Elliptical Marquee tool (![]() ).
).
 You can also cycle through the marquee selection tools by pressing Shift+M.
6 Click and drag while holding the Shift key down to create a circle selection in your image area.

Click and drag while holding the Shift key to create a circle selection.
7 Position your cursor over the Swatches panel and click to choose any yellow color.
In this example, CMYK Yellow is selected.
8 Use the keyboard shortcut Alt+Backspace (Windows) or Option+Delete (Mac OS) to quickly fill the selection with yellow.
9 Choose Select > Deselect, or use the keyboard shortcut Ctrl+D (Windows) or Command+D (Mac OS).
You will now create a third layer for this file. This time, you’ll use the Layers panel menu.
10 Click and hold the Layers panel menu and choose New > Layer. The New Layer dialog box appears.
 If you prefer keyboard shortcuts, you can press Ctrl+Shift+N (Windows) or Command+Shift+N (Mac OS) to create a new layer.
11 Type green square in the File name text field and choose Green from the Color drop-down menu. Click OK; a new layer is created.
12 Click and hold the Elliptical Marquee tool to select the hidden Rectangular Marquee tool. Press and hold the Shift key, then click and drag a small square selection on your document.
13 Position your cursor over the Swatches panel and click to choose any green color from the panel. In this example, CMYK Green is selected.
14 Use the keyboard shortcut Alt+Backspace (Windows) or Option+Delete (Mac OS) to quickly fill the selection with green.
15 Choose Select > Deselect, or use the keyboard shortcut Ctrl+D (Windows) or Command+D (Mac OS).

The document now has three layers.
16 Choose File > Save. Keep the mylayers.psd file open for the next part of this lesson.
Selecting layers
As basic as it may seem, selecting the appropriate layer can be difficult. Follow this exercise to see how important it is to be aware of layers by keeping track of which layer is active.
1 You should still have the mylayers.psd file open from the last exercise. If not, access the file in the ps06lessons folder and select the green square layer in the Layers panel.
2 Select the Move tool (
) and click and drag to reposition the green square on the green square layer. Note that only the green square moves. This is because layers that are active are the only layers that are affected.
3 With the Move tool still selected, select the yellow circle layer in the Layers panel and then click and drag the yellow circle in your image file. The yellow circle moves.
4 Now, select the red square layer in the Layers panel.
5 Choose Filter > Blur > Gaussian Blur. The Gaussian Blur dialog box appears.
6 In the Gaussian Blur dialog box, type 7 in the Radius text field, then click OK.
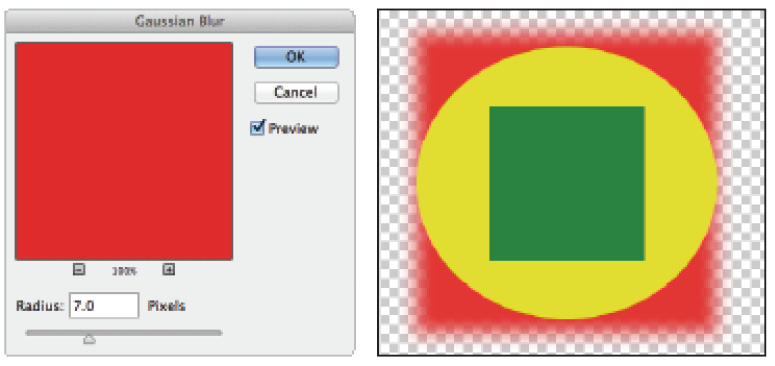
Apply a filter. The result.
7 Choose File > Save. Keep the file open for the next part of the lesson.
Tips for selecting layers
There are several methods you can use to make sure that you are activating certain layers and changing the properties on the specific layer you want to modify.
1 You should still have the mylayers.psd file open from the last exercise. If it is not, access the file in the ps06lessons folder and select the red square layer in the Layers panel.
2 Make sure that the Move tool (
) is selected, then press and hold the Ctrl (Windows) or Command (Mac OS) key and select the yellow circle in the image file. Notice that the yellow circle layer is automatically selected.
3 Now, press and hold the Ctrl (Windows) or Command (Mac OS) key and select the green square in the image file. The green square layer is selected. By pressing and holding the Ctrl or Command key, you turn on an auto-select feature that automatically selects the layer that contains the pixels you have clicked on.
4 Make sure that the Move tool is still selected, and right-click (Windows) or Ctrl+click (Mac OS) on the green square. Note that when you access the context tools, overlapping layers appear in a list, providing you with the opportunity to select the layer in the menu that appears. Select the green square layer.
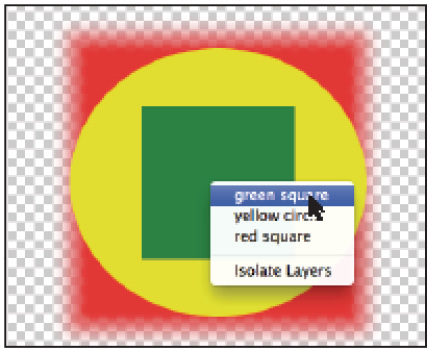
Select a layer using contextual tools.
5 Right-click (Windows) or Ctrl+click (Mac OS) on an area of the image file that contains only the red square pixels to see that only one layer name appears for you to choose from. Choose red square.
Moving layers
Layers appear in the same stacking order in which they appear in the Layers panel. For instance, in the file you have been working on in this lesson, the green square was created last and is at the top of the stacking order, essentially covering up the yellow circle and red square wherever it is positioned.
By moving the position of a layer, you can change the way an image looks, which allows you to experiment with different image compositions.
1 With the mylayers.psd file still open, click and drag the green square layer in the Layers panel below the red square layer. Release the mouse button when you see a light bar appear underneath the red square layer. The dark line indicates the location of the layer that you are dragging. Notice that the green square might not be visible at this time because it is underneath the red square, and thus hidden.
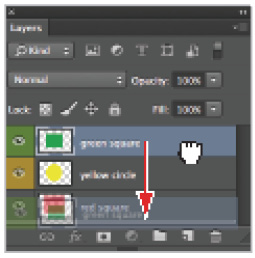
Click and drag to reorder layers.
2 You might find it easier to use keyboard commands to move the layers’ positions in the stacking order. Select the green square layer and press Ctrl+] (right bracket) (Windows) or Command+] (right bracket) (Mac OS) to move it up one level in the stacking order. Press this keyboard combination again to move the green square layer back to the top of the stacking order.
3 Select the yellow circle layer and press Ctrl+[ (left bracket) (Windows) or Command+[ (left bracket) (Mac OS) to put the yellow circle one level down in the stacking order, essentially placing it behind the red square. Press Ctrl+] (right bracket) (Windows) or Command+] (right bracket) (Mac OS) to move it back up one level in the layer stacking order.
The image layers should now be back in the same order as when the image was originally created: red square on the bottom, yellow circle in the middle, and green square on the top.
4 Choose File > Save. Keep the file open for the next part of this lesson.
Changing the visibility of a layer
One of the benefits of using layers is that you can hide the layers that contain pixel data on which you are not currently working. By hiding layers, you can focus on the image editing at hand, keeping distractions to a minimum.
1 With the mylayers.psd file still open, select the Visibility icon (![]() ) to the left of the red square layer. The red square disappears.
) to the left of the red square layer. The red square disappears.
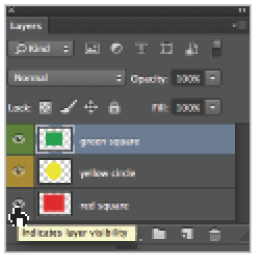
Turn the visibility of a layer off and on by selecting the Visibility icon.
2 Click again on the spot where the Visibility icon previously appeared. The red square layer is visible again.
3 This time, press and hold the Alt (Windows) or Option (Mac OS) key, and click the same Visibility icon. By using the Alt/Option modifier, you can hide all layers except the one you clicked.
4 Alt/Option+click the same Visibility icon to make all the layers visible again.
Using masks in a layer
There is one last feature fundamental to understand before you delve further into layers: the layer mask feature. Without the mask feature, making realistic composites or blending one image smoothly into another would be much more difficult.
1 With the mylayers.psd file still open, choose the red square layer in the Layers panel.
2 Click the Add Layer Mask button (![]() ) at the bottom of the Layers panel. A blank mask is added to the right of the red square layer.
) at the bottom of the Layers panel. A blank mask is added to the right of the red square layer.

Adding a layer mask.
3 To make sure your foreground and background colors are set to the default black and white, press D on your keyboard.
4 Select the Gradient tool (![]() ) from the Tools panel, and make sure that the Linear Gradient option is selected in the Options bar.
) from the Tools panel, and make sure that the Linear Gradient option is selected in the Options bar.
5 Confirm that you have the layer mask selected by clicking it once in the Layers panel.
6 Click and drag across the red square in the image from the left side of the square to the right. Note that some of the red square becomes transparent, while some remains visible. Click and drag with the Gradient tool as many times as you like. Note that in the Layers panel, wherever black appears in the mask thumbnail, the red square is transparent, as the mask is essentially hiding the red square from view.

Select the layer mask. Click and drag using the Gradient tool across the image.
7 Choose File > Save. Keep this file open for the next part of this lesson.
Preserve transparency
The last step in this practice file will be to apply transformations to your layers. Transformations include scaling, rotating, and distorting a layer. To help illustrate how transformations work, you will first duplicate a layer and link it to the original.
1 With the mylayers.psd file still open, select the green square layer.
2 Select the Move tool (
), and then press and hold the Alt (Windows) or Option (Mac OS) key and position the cursor over the green square in the image. You will see a double-arrow cursor (![]() ). While still pressing and holding the Alt/Option key, click and drag the green square to the right. A duplicate of the layer is created; release the mouse to see that a green square copy layer has been added to the Layers panel.
). While still pressing and holding the Alt/Option key, click and drag the green square to the right. A duplicate of the layer is created; release the mouse to see that a green square copy layer has been added to the Layers panel.

Duplicate a layer using the Alt/Option key.
3 Double-click the layer named green square; when the text is highlighted, type the name green square shadow.
4 Delete the word copy from the topmost layer named green square copy.
5 Click the green square shadow layer to select it. You’ll now take advantage of a feature that allows you to fill without making a selection. Choose Edit > Fill, or use the keyboard shortcut Shift+Backspace (Windows) or Shift+Delete (Mac OS). The Fill dialog box appears.
6 In the Fill dialog box, choose Black from the Use drop-down menu. Leave the Mode (in the Blending section) set to Normal and Opacity set to 100 percent, check Preserve Transparency, and click OK.

Preserve Transparency maintains the transparent sections The result. of a layer.
Notice that because you chose to preserve the transparency, only the green pixels are changed to black and the rest of the layer (the transparent part) remains transparent. You’ll use this feature later in this lesson when creating a composition from several images.
7 With the green square shadow layer still active, select Filter > Blur > Gaussian Blur. The Gaussian Blur dialog box appears.
8 In the Gaussian Blur dialog box, type 8 in the Radius text field, and click OK.
9 Using the Move tool (
), reposition the green shadow layer so that it appears slightly off to the lower right of the green square layer, creating the look of a shadow.
10 Type 8. When you have a layer selected and the Move tool active, you can type a numeric value to instantly change the opacity. By typing 8, you have changed the opacity of the green square shadow to 80 percent.
In this section, you will link the green square layer and green square shadow layer together. This allows you to move them simultaneously and also to apply transformations to both layers at the same time.

Use the Move tool to reposition the shadow layer.
11 Select the green square layer, then Shift+click the green square shadow layer. Both are now selected.
12 Select the Link Layers button (![]() ) at the bottom of the Layers panel. The Link icon appears to the right of the layer names, indicating that they are linked to each other.
) at the bottom of the Layers panel. The Link icon appears to the right of the layer names, indicating that they are linked to each other.

Keep layers together by linking them.
13 Select the Move tool, and click and drag the green square to another location. Notice that the shadow also moves. Move the squares back to the center of the image.
14 Choose Edit > Free Transform, or use the keyboard shortcut Ctrl+T (Windows) or Command+T (Mac OS). A bounding box appears around the green square and its shadow.
15 Click the lower-right corner handle and drag it to enlarge the squares. Release the mouse when you’ve resized them to your liking. No particular size is necessary.
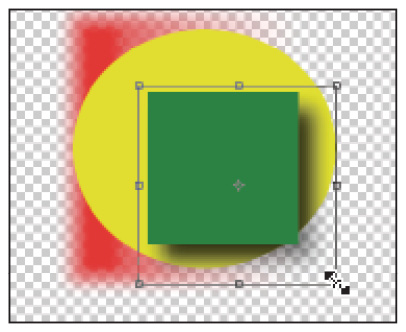
Click and drag the bounding box to scale the layer contents.
16 Press the Esc key (in the upper-left corner of your keyboard) to cancel the transformation.
17 Now, choose Edit > Free Transform again, but this time press and hold the Shift key while dragging the lower-right corner of the bounding box toward the lower-right corner of your image. Pressing and holding the Shift key keeps the layer contents proportional as you scale. Release the mouse when you’re done with the transformation.
18 You can also enter exact scale amounts by using the Options bar. Type 150 in the W (Width) text field, and then click the Maintain Aspect Ratio button (![]() ). The layer contents are scaled to exactly 150 percent. Select the check box in the Options bar to confirm this transformation.
). The layer contents are scaled to exactly 150 percent. Select the check box in the Options bar to confirm this transformation.
19 Choose File > Save, and then File > Close to close this practice file.
Creating a composition
Now you will have the opportunity to put your practice to work by creating a composition with images and type.
1 Choose File > Browse in Bridge and navigate to the ps06lessons folder.
2 Double-click the file ps0801_done.psd to see the composition that you will create. You can keep this file open for reference, or choose File > Close.
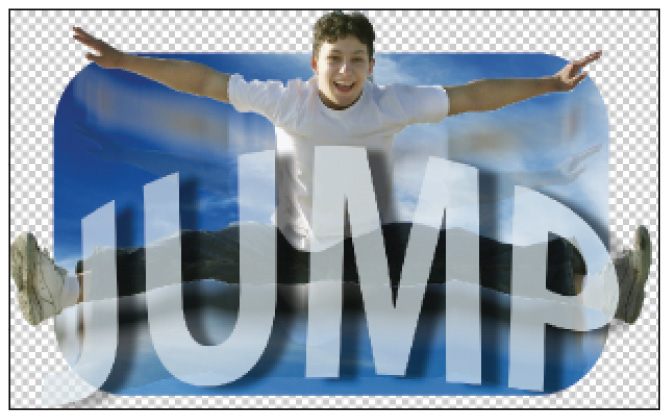
The completed lesson file.
3 Return to Bridge and double-click ps0801.psd to open it in Photoshop. An image of a blue sky with clouds appears.
4 Choose File > Save As. In the Save As dialog box, navigate to the ps06lessons folder and type ps0801_work into the File name text field; leave the format as Photoshop and click Save.
Moving images in from other documents
You’ll start this composition by opening another file and dragging it into this file. Be aware that when moving one document into another, an image’s resolution plays an important part in how that image appears proportionally in the destination file. For instance, if a 72-ppi image is moved into a 300-ppi image, it becomes relatively smaller, as the 72-ppi image takes up much less pixel space in the 300-ppi image. On the other hand, if you move a 300-ppi image into a 72-ppi image, it takes up a larger space. If you plan to create composites of multiple images, it is best to choose Image > Image Size and adjust the pixel resolutions of the images before combining them. In this section, you will learn how to check the resolution of your images before combining them into one document.
1 With the ps0801_work.psd file open, choose Image > Image Size. The Image Size dialog box appears. Notice that this image’s resolution is 300 ppi. Click OK.

The image resolution of this file is 300 ppi.
2 Choose File > Browse in Bridge and navigate to the ps06lessons folder.
3 Double-click ps0802.psd to open it in Photoshop. An image of a boy jumping appears. For this image, you will check the resolution without opening the Image Size dialog box.
4 Click and hold the document size box to see a pop-up window appear in the lower-left corner of the workspace. This information provides you with dimension and resolution information. Note that this image is also 300 ppi. Release the mouse button to dismiss the pop-up window.

Check the resolution in the document window.
5 Select Window > Arrange > 2-up Vertical. This positions the ps0801_work.psd and ps0802.psd documents so that you can see them both at the same time.
6 Select the Move tool (
).
7 Press and hold the Shift key, and click and drag the ps0802.psd image into the ps0801_work.psd. Holding the Shift key assures you that the layer is being placed in the exact center of the document into which it is being dragged. Release the mouse when a border appears around the ps0801_work.psd image.
 You don’t have to see both images at the same time to drag and center one image into another image. You can press and hold the Shift key while using the Move tool to click and drag the image over. When you drag an image to the tab of another file, that file comes forward. But don’t release; drag your copied image into the image area, and then release.
8 Choose File > Save. Keep the file open for the next part of this lesson.
9 Click the tab for the ps0802.psd file, and then click the X in the tab or choose File > Close. You can also use the keyboard shortcut Ctrl+W (Windows) or Command+W (Mac OS) to close the file. If you are asked to save the file, choose No.
Creating a layer mask
You just created the first layer in this document. It is important to keep your layers organized as you work; the Layers panel can become cumbersome when additional layers are created without being properly named.
1 Double-click the word Layer 1 in the Layers panel. When the Layer 1 text becomes highlighted, type boy.
Now you’ll select the boy and create a layer mask to cover the background sky.
2 Select the boy layer in the Layers panel to make sure it is the active layer, and then select the Quick Selection tool (![]() ). With the Quick Selection tool, start brushing over the image of the boy. A selection is created as you brush. If you accidently select the area outside the jumping boy, press and hold the Alt (Windows) or Option (Mac OS) key and brush over that area again to delete it from the selection.
). With the Quick Selection tool, start brushing over the image of the boy. A selection is created as you brush. If you accidently select the area outside the jumping boy, press and hold the Alt (Windows) or Option (Mac OS) key and brush over that area again to delete it from the selection.
Because you will be turning your selection into a mask, you do not have to be precise. You can edit the selection later if necessary.

Create a selection using the Quick Selection tool.
3 With the selection still active, select the Add Layer Mask button (![]() ) at the bottom of the Layers panel. A mask is created, revealing only your selection of the jumping boy.
) at the bottom of the Layers panel. A mask is created, revealing only your selection of the jumping boy.

Select the Add Layer Mask button. The result.
Editing the layer mask
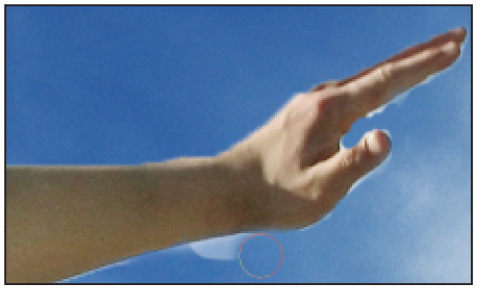
Your mask may not be perfect, but you can easily edit it using your painting tools. In the example shown here, the hand was not correctly selected with the Quick Selection tool and therefore created an inaccurate mask. Zoom into the image and locate a section where your selection may not be precise; it is more than likely to be around the boy’s hands.

The mask needs to be adjusted in this section.
1 Select the layer mask thumbnail that is to the right of the boy layer’s thumbnail in the Layers panel.

Select the layer mask thumbnail.
2 Press D on your keyboard to select the default foreground and background colors of black and white. Note that when working on a mask, painting with white reveals the image, while painting with black hides it.
3 Press X on your keyboard, and note that by pressing X, you are swapping the foreground and background colors in the Tools panel. Make sure that black is the foreground color.
4 Select the Brush tool and position the cursor over an area of the image where the mask is a bit inaccurate. You see a circle representing the brush size.
 If you have Caps Lock pressed, you will not see the brush size preview.
If the brush size is too big or too small for the area of the mask that needs to be retouched, adjust the size before you start painting.
5 Press the ] (right bracket) key to make the brush size larger, or the [ (left bracket) key to make the brush size smaller.
6 Use the Opacity slider in the Options bar to change the opacity back to 100, or press 0 (zero). Pressing 0 (zero) is the keyboard shortcut for returning your brush opacity to 100%.
7 Start painting the areas of the mask that were not accurate; in this case, perhaps where some of the sky on the boy layer still appears. Experiment even further by painting over the entire hand. The hand disappears.
8 Press X on your keyboard to bring white to the foreground, and paint over the location where the hand was to reveal it again. You are essentially fine-tuning your mask by painting directly on it.
Painting the mask.
9 If you find that your brush should have a harder edge, press Shift+] (right bracket). For a softer edge press Shift+[ (left bracket).
The benefit of working with a layer mask is that you can fine-tune and edit it as many times as you want without permanently altering the image. This gives you a lot of freedom and control, and allows you to make more accurate selections. This type of image editing is referred to as nondestructive.
10 When you are finished editing your selection, press Ctrl+0 (zero) (Windows) or Command+0 (zero) (Mac OS) to return to the Fit in Screen view. Then, to deselect the layer mask thumbnail, select the boy layer thumbnail in the Layers panel.
Cloning layers
You’ll now clone (or duplicate) the boy layer two times. You’ll then apply filters and adjust the opacity of the new layers.
1 Select the boy layer thumbnail in the Layers panel to ensure that it is the active layer. Select the Move tool (
) and reposition the boy so that his feet touch the bottom of the image.

Click and drag the boy layer downward.
2 With the Move tool still selected, press and hold the Alt (Windows) or Option (Mac OS) key while dragging the jumping boy image up toward the middle of the image. By pressing and holding the Alt/Option key, you are cloning the layer. Don’t worry about a precise location for the cloned layer, as you’ll adjust its position later. Release the mouse before releasing the Alt/Option key.
Clone the layer of the boy jumping.
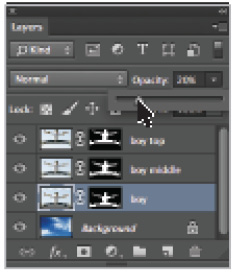
3 Press and hold the Alt (Windows) or Option (Mac OS) key once again and drag the newly created layer upward to clone it. Position this new layer at the top of the image. There are now three layers with the boy jumping.
4 In the Layers panel, double-click the layer named boy copy. When the text becomes highlighted, type boy middle to change the layer name.
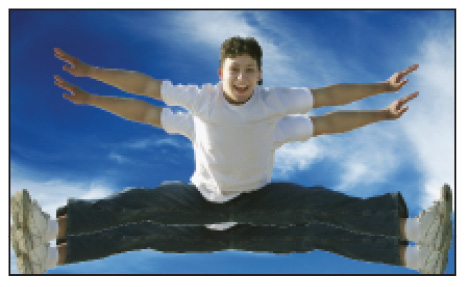
5 Double-click the layer named boy copy 2. When the text becomes highlighted, type boy top to change the layer name.

You now have three jumping boy layers.
6 Choose File > Save to save this file. Keep the file open for the next part of this lesson.
Aligning and distributing layers
The layers may not be evenly spaced or aligned with each other. This can be adjusted easily by using the Align and Distribute features in Photoshop.
1 Select the boy layer and then Ctrl+click (Windows) or Command+click (Mac OS) on the boy middle and boy top layers. All three layers become selected.
Note that when you have two or more layers selected, there are additional options in the Options bar to align and distribute your layers.
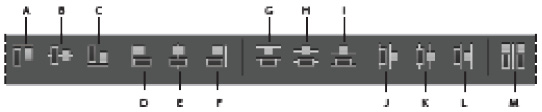
A. Align top edges. B. Align vertical centers. C. Align bottom edges. D. Align left edges. E. Align horizontal centers. F. Align right edges. G. Distribute top edges. H. Distribute vertical centers. I. Distribute bottom edges. J. Distribute left edges. K. Distribute horizontal centers. L. Distribute right edges. M. Auto-Align Layers.
2 Choose the Align Horizontal Centers button (![]() ) and then the Distribute Vertical Centers button (
) and then the Distribute Vertical Centers button (![]() ). You might or might not see a dramatic adjustment here; it depends on how you positioned the layers when you created them.
). You might or might not see a dramatic adjustment here; it depends on how you positioned the layers when you created them.
3 Choose File > Save. Keep the file open for the next part of this lesson.
Applying filters to layers
Now you’ll apply a filter to the boy and boy middle layers and then adjust their opacity.
1 Select the boy middle layer in the Layers panel.
2 Choose Filter > Blur > Motion Blur. The Motion Blur dialog box appears.
3 Type -90 in the Angle text field, drag the distance slider to 150, and then click OK. You have created a blur that makes it look like the boy is jumping up.

Apply the motion blur.
Result.
4 Choose the boy layer in the Layers panel and press Ctrl+F (Windows) or Command+F (Mac OS). This applies the last-used filter to this layer.
You will now adjust the opacity on these layers.
5 With the boy layer still selected, click the arrow to the right of Opacity in the Layers panel. A slider appears. Click and drag the slider to the 20 percent mark.
Drag the opacity slider.
6 Make sure that the Move tool (
) is active, and select the boy middle layer. This time, you’ll change the opacity using a keyboard shortcut. Type 5; the layer opacity is instantly changed to 50 percent.
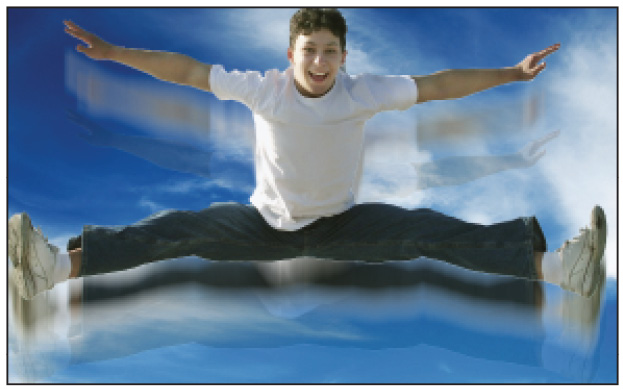
The layers after the opacity has been adjusted.
 While the Move tool is active, you can type in any value to set the opacity on a selected layer. For instance, typing 23 would make the layer 23 percent opaque, and 70 would make the layer 70 percent opaque. Type 0 (zero) to return to 100 percent opacity.
7 Choose File > Save to save this file. Keep the file open for the next part of this lesson.
Creating a type layer
You are now going to add a text layer to this document and apply a warp, as well as a layer style.
1 In the Layers panel, select the boy top layer to make it active. The new type layer will appear directly above the active layer.
2 Select the Type tool (![]() ) and set the following options in the Options bar:
) and set the following options in the Options bar:
From the font family drop-down menu, choose Myriad Pro. From the font style drop-down menu, choose Black. If you do not have Black, choose Bold.
Type 200 in the font size text field.

A. Presets. B. Text orientation. C. Font family. D. Font style. E. Font size. F. Anti-aliasing. G. Left-align text. H. Center text. I. Right-align text. J. Text color. K. Warp text. L. Character and Paragraph panels.
3 Now, click once on the Text color box in the Options bar. The Color Picker dialog box appears, with a Select text color pane.
4 You can either enter a color value in this window or click a color in the color preview pane. In this example, you will click a color. Position your cursor over an area in the image that has light clouds, and click. This samples that color, and applies it to the text. Click OK to close the Color Picker.

Sample a color from your image.
You are now ready to type.
5 Click once on the image near the boy’s sneaker on the left side of the image. Exact position is not important, as it can be adjusted later.
6 Type JUMP, then press and hold the Ctrl (Windows) or Command (Mac OS) key and drag the word Jump to approximately the bottom center of the image. By pressing and holding the Ctrl/Command key, you do not have to exit the text entry mode to reposition the text.
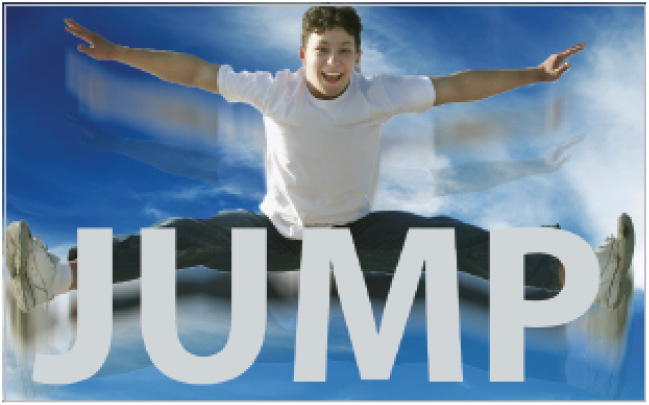
Reposition the text using the Ctrl or Command key.
7 Select the Create Warped Text button (![]() ) in the Options bar. The Warp Text dialog box appears. Select Arc Upper from the Style drop-down menu. If you like, experiment with the other style selections, but return to Arc Upper when finished. Click OK. The text is warped.
) in the Options bar. The Warp Text dialog box appears. Select Arc Upper from the Style drop-down menu. If you like, experiment with the other style selections, but return to Arc Upper when finished. Click OK. The text is warped.

Warping the text.
8 Click the check mark (![]() ) in the Options bar to confirm your text entry.
) in the Options bar to confirm your text entry.
9 In the Layers panel, click and drag the Opacity slider to about 70 percent, or type 70 into the Opacity text field.
10 Choose File > Save and keep the file open for the next part of this lesson.
Applying a layer style
Layer styles allow you to apply interesting effects to layers, such as drop shadows, embossing, and outer glows, to name a few. In this section, you will add a drop shadow to your text layer.
1 Select the text layer to make sure that the layer is active.
2 Click and hold the Add a Layer Style button (![]() ) at the bottom of the Layers panel. Choose Drop Shadow from the menu; the Layer Style dialog box appears.
) at the bottom of the Layers panel. Choose Drop Shadow from the menu; the Layer Style dialog box appears.

Adding a drop shadow to the text layer.
At some point, you should experiment with all the layer style options listed in the column on the left, but for now you’ll work with the drop shadow options.
3 With the Layer Styles dialog box open, click and drag the shadow (in the image window) to reposition it. You can also manually enter values. In this example, the shadow is set to an angle of 160, the distance at 70, and the size at 30. Click OK; the drop shadow is applied.
Creating a clipping mask
You will now create a clipping mask to complete this image. A clipping mask allows you to use the content of one layer to mask the layers above it. In this example, you will create a shape on a vector layer and position it under what is now the background. You will then clip through several layers, masking them within that original vector layer. Although this might sound confusing, it really isn’t once you have seen the clipping mask feature in action.
1 First, you need to convert the Background to a layer so you can change its stacking order in the Layers panel.
2 Press and hold the Alt (Windows) or Option (Mac OS) key and double-click the Background layer in the Layers panel. It is automatically converted to Layer 0.
3 Double-click the Layer 0 name, and when the text becomes highlighted, type sky.
4 Click and hold the Rectangle tool (![]() ) and select the hidden Rounded Rectangle tool (
) and select the hidden Rounded Rectangle tool (![]() ). In the Options bar, make sure that Shape is selected in the Pick tool mode drop-down menu, and then type 1 in (inch) in the Radius text field. This value is for the curved corners of the rounded rectangle you are creating.
). In the Options bar, make sure that Shape is selected in the Pick tool mode drop-down menu, and then type 1 in (inch) in the Radius text field. This value is for the curved corners of the rounded rectangle you are creating.
5 Click and drag from the boy’s thumb on the left side of the image down to the bottom of the letter “P” in JUMP. The shape is created; don’t worry about the color.
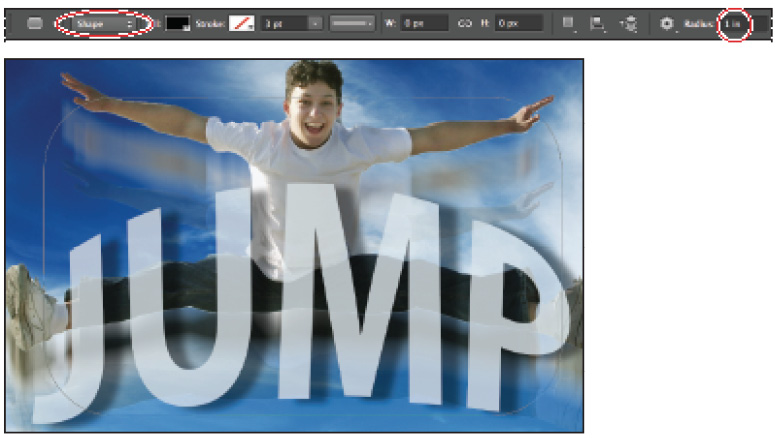
Set the shape options, then click and drag to create the shape layer.
6 In the Layers panel, click and drag the Rounded Rectangle 1 so that it is beneath the sky layer.
7 Press and hold the Alt (Windows) or Option (Mac OS) key, and position your cursor over the line that separates the Rounded Rectangle 1 layer from the sky layer. When you see the Clipping Mask icon (![]() ) appear, click with the mouse. The sky layer is clipped inside the shape layer.
) appear, click with the mouse. The sky layer is clipped inside the shape layer.

Alt/Option+click in between the layers.
The result.
8 Now, position your cursor on the line separating the sky layer from the boy layer, and Alt/Option+click the line. The clipping now extends up into the boy layer.
9 Position the cursor on the line separating the boy layer from the boy middle layer, and Alt/Option+click again. The clipping mask is now extended to the boy middle layer.
10 Select the Move tool (
) and the Rounded Rectangle 1 layer. Click and drag to reposition the layer to see how the sky, boy, and boy middle layers are clipped inside the shape.
You will now trim the layers to eliminate areas you don’t need.
11 Choose Image > Trim; the Trim dialog box appears. Leave the settings at the default and click OK. The image is trimmed down to the smallest possible size, without cropping out any image data.
Filtering your layers
A handy layer feature is the ability to filter layers. By filtering layers, you can easily locate layers based upon attributes such as the kind of layer, the blending mode used, name, and more.
1 To experiment with the filter, click the Filter for type layers button (![]() ) to the right of the Pick a file type drop-down menu.
) to the right of the Pick a file type drop-down menu.
2 Click the Filter for type layers button; only the selected type of layer appears. Note that when you click Kind, you can choose from other attributes, such as Name, Effect, Mode, Attribute, and Color.

You can filter the layers that appear in the Layers panel.
A. Filter for pixel layers. B. Filter for adjustment layers. C. Filter for type layers. D. Filter for shape layers. E. Filter for smart objects. F. Turn layer filtering on/off.
3 Choose File > Save, and then File > Close.
Self study
Layers are fun to build and use when creating professional composites. Included in the ps06lessons folder are several images (boyguitar.psd, girlguitar.psd, pianokeys.psd, and sheetmusic.psd) that you can use in any way that you want to create a composite. Experiment with these sample files to create new layers, layer masks, and clipping masks. Take the composition further by adding text and warping it.
Review
Questions
1 List at least three ways that you can create a layer in a document.
2 Why should you be concerned about resolution when compositing several images?
3 What is the difference between the Background layer and a regular layer?
Answers
1 You can create new layers in a document using several methods:
a. Create a new blank layer using the Create a New Layer button (![]() ) in the Layers panel. You can also choose Layers > New > Layer or select New Layer from the Layers panel menu.
) in the Layers panel. You can also choose Layers > New > Layer or select New Layer from the Layers panel menu.
b. Create a new layer by clicking and dragging content from one image to another.
c. Create a text layer; when you add text, a new text layer is automatically created.
d. Create a shape. If the Shape tool is selected and the Options bar is set to Shape tool, a new Shape layer is automatically created.
2 When combining images from several different sources, it is important for the pixel dimensions or resolutions to be similar, or the images will not be proportional to each other and may not work well as a composite.
3 The Background layer is different from a regular layer in that it does not support layer features. It cannot be moved in the stacking order, repositioned, transformed, or have its blending mode or opacity changed.