
IN THIS CHAPTER
Home networks are simpler than ever before, but they’re a long way from being foolproof. Some of the typical problems you might run into can include
Difficulties playing online games
Inability to access the Internet
Problems with different versions of Windows running on the same network
Use this chapter to help you keep network protocols, software, and hardware working properly so you can work and play the way you like.
If you’re going to build a home network, you need to understand something about TCP/IP, the protocol that makes the Internet and your home network work. TCP/IP enables different brands of computers and different operating systems to share the same network. If TCP/IP is not installed or configured properly, your computer can’t connect to the Internet
You don’t need to know everything about TCP/IP, but knowing nothing about it isn’t a good idea either.
In the following sections you learn
The difference between private and public IP addresses
How devices on your network get an IP address
When and how to assign an IP address manually
How to refresh and renew IP addresses
How to use Windows XP’s network troubleshooters
What Windows XP’s network repair tool does and when to use it
How to get older and newer versions of Windows to talk to each other
How to add MacOS and Linux PCs to your home network
Let’s get started!
IP addresses are used to identify devices on the Internet. Every device that uses the Internet must have an IP address. An IP address acts like a street address or telephone number to uniquely identify a particular computer or device. Most IP addresses are used by devices that are directly visible to the Internet (these are called public IP addresses). Home networks use private IP addresses, which are not directly visible to the Internet. Home networks use one of these private IP address ranges:
172.16.0.0—172.31.255.255
192.168.0.0—192.168.255.255
(A third range, 10.0.0.0–10.255.255.255, is also available for private networks, but is not usually supported by home network routers.)
A private IP address, by definition, can’t be used on the public Internet. How does a router make the connection between the Internet and your home network? As you learned in Chapter 8, “Home Networks at Work and School,” routers use a feature called network address translation (NAT) to convert private IP addresses to public IP addresses that work on the Internet. The router keeps track of which information requests were sent by which device on the network and makes sure that the right device gets the information when the Internet transmits the data back to the router.
To enable the router to connect to a home network and the Internet connection at the same time, the router uses two types of network connections:
The WAN port connects the router to a device such as a cable modem and, thus, the Internet. The WAN port has an IP address it receives from the cable modem, or it might require you to configure an IP address manually (see next section). The WAN port’s address is a different address than the one your network uses.
The LAN side of the router might have a single port, which connects the router to an ethernet switch, or multiple ports if the router has a built-in ethernet switch. The LAN side of the router has a private IP address that is known as the gateway address. Figure 11.1 helps you visualize this.

So, how do devices on the network get their IP addresses? There are two ways to assign IP addresses:
Manually
Automatically
Home networking would be just about as difficult as office networking if you had to assign IP addresses manually. I show you how to do it in a later part of this chapter because it can be helpful in special situations. However, most of the time you don’t need to do it yourself because almost all routers feature dynamic host configuration protocol (DHCP). DHCP takes care of the hard work of providing IP addresses for your computer.
DHCP is enabled through your router’s web-based configuration program (Figure 11.2). Generally, the router’s LAN setting is factory-configured with an IP address in the 192.168.xxx.xxx range and a subnet mask (always 255.255.255.0—why isn’t important for this discussion). Some routers are just about foolproof because they enable you to select only the last set of digits in the starting and ending IP address ranges. However, if your router enables you to type in anything you like for the range of DHCP-assigned IP addresses, as in this example, make sure you enter an IP address range that
Uses the first three groups of numbers as in the router’s LAN address (in this case, 192.168.123.xxx).
Provides a range of digits for the fourth group that doesn’t overlap the router’s LAN address. In this example, the router’s address is 192.168.123.254, and the DHCP address range is 192.168.123.100–105.

By default, Windows PCs are configured to look for a server-assigned IP address. You can also configure other types of network devices to use DHCP-assigned IP addresses. So, when you turn on a network device connected to a router with DHCP enabled, the first device to connect to the network gets the first IP address listed. The second device gets the second address, and so forth. The process is the same whether the devices connect via an ethernet cable, with wireless ethernet, or through HomePlug or HomePNA networking: It’s first come, first serve.
Actually, there are two different ways that a Windows PC (starting with Windows 98) can get an IP address. The second method is known as automatic private IP addressing (APIPA). Windows PCs assign themselves an APIPA IP address if they’re configured to get a server-assigned IP address but can’t find a DHCP server to connect to.
How can you tell whether your system is using APIPA? The most obvious sign is that you can’t connect to the Internet. Systems with APIPA-assigned IP addresses can still communicate with each other to share printers and network resources, but they cannot access the Internet.
To determine whether APIPA IP addressing is the reason you can’t connect to the Internet, run ipconfig or winipcfg as discussed in Chapter 10, “Securing Your Home Network.” These utilities display the IP address of your system. A system that is using APIPA will have an IP address starting with 169.254.
Systems that have assigned themselves an APIPA periodically check for a DHCP server to come on line. If they see one, they are supposed to dump their APIPA address and get a DHCP address instead. However, in my experience, you’re better off to take action right away when you determine that one or more systems have an APIPA IP address. If you don’t, systems that have a DHCP-assigned IP address can’t communicate with systems that have an APIPA-assigned IP address. In effect, you have two networks—and one “notwork.”
Try the following solutions:
Check network cable connections to the PC and switch or router; see “Troubleshooting Cabling Problems,” p. 335, this chapter, for details. Restart the computer after reattaching or replacing cables.
Make sure the router is configured as a DHCP server; see “DHCP for Easy Networking,” p. 318, this chapter, for details. Be sure to save any changes to the router configuration and restart PCs after resetting the router.
Make sure the router is configured to assign enough IP addresses for all your network devices. If you use MAC address filtering, make sure the list of MAC addresses is up to date. Be sure to save any changes to the router configuration and restart PCs after resetting the router.
On a wired network, restart the computer to see whether it can obtain an IP address from DHCP.
On a wireless network, make sure you have a working connection to your WAP or wireless router; see “Configuring Your Wireless Adapters,” Chapter 6, “Installing and Configuring a Wi-Fi Network.” p. 159, for details.
On a wireless network, verify that your system is connected to the correct WAP or router. Windows XP’s Zero Configuration Utility is notorious for connecting to the wrong WAP; see “Using the Windows XP Wireless Configuration Utility,” p. 159, Chapter 6, and “Using a Vendor-Supplied Wireless Network Configuration Tool,” p. 162, Chapter 6, for solutions.
On a wireless network, make sure you are getting a strong signal (50% or greater) from your WAP or wireless router. Low signal strength can cause your system to connect to the WAP or wireless router, but not get a valid IP address from the DHCP server. Without a valid IP address, you can’t access the Internet or other devices on the network.
On a non-PC device such as a print server, video game system, or PVR, restart the device or rerun its configuration routine.
If you move your laptop computer between a home network and an office network that both use DHCP to provide IP addresses, your laptop might try to use the office IP address at home or the home IP address at the office.
You can use the release and renew IP address options in ipconfig or winipcfg to discard the incorrect IP address and get a new one.
To use ipconfig (Windows XP and Windows 2000):
Click Start, Run.
Type
cmdand press Enter.Type
ipconfig /release alland press Enter to release the old IP address. The IP address is listed as 0.0.0.0.Type
ipconfig /renew alland press Enter to get a new IP address from the DHCP server in your router.Type
exitand press Enter to close the window.
See Figure 11.3 for an example of using ipconfig /release all and ipconfig/renew all.

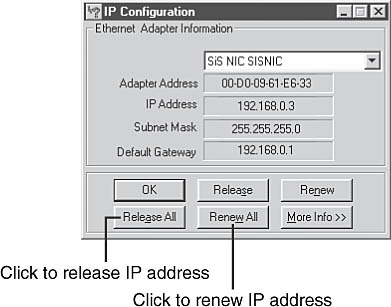
To use winipcfg (Windows 9x/Me):
Click Start, Run.
Type
winipcfgand click OK.Click Release All to drop the old IP address. The IP address and subnet mask change to all zeros.
Click Renew All to get a new IP address from the DHCP server in the router.
See Figure 11.4 for an example of using winipcfg.
If your laptop uses a user-assigned IP address at the office, at home, or both, this trick won’t work. Instead see “Dealing with Multiple TCP/IP and Network Configurations,” p. 328, this chapter.
If you find that some devices on your home network have problems with picking up a server-assigned IP address, you can assign them an IP address manually. Consider doing this if you’re constantly working through the suggestions in “Recovering from an APIPA-Assigned IP Address,” p. 319, this chapter.
Although the process of configuring a manual IP address differs depending on whether you’re working with a PC running Windows 2000 or XP, a PC running older versions of Windows, or a non-PC device, the information you need to provide is the same:
IP address and subnet mask—. Use an IP address in the same range as the rest of your network. It must not overlap the IP address range used by your router’s DHCP server or the router’s LAN address. Check the router’s DHCP configuration to see allowable address ranges.
Default gateway—. This is the LAN address of your router.
DNS servers—. These are the IP addresses of the servers that translate hostnames such as www.erewhon.net into IP addresses.
To determine what IP address to use, reopen your router’s DHCP configuration screen and note the IP address range it provides. Use a nonconflicting address in the same range. For example, if the router uses 192.168.0.1 for its LAN address and provides IP addresses from 192.168.0.100 to 192.168.0.105 to clients, any IP address from 192.168.0.2 through 192.168.0.99 and from 192.168.0.106 through 255 would be acceptable.
Tip: Leave Room for DHCP Range Expansion

You’ll probably want to use DHCP for most network clients, so to leave room, make sure the IP addresses that you assign are not directly after or directly before the IP addresses provided by the router. Leave 5 to 10 addresses open before the first IP address provided by the router or after the last IP address provided by the router.
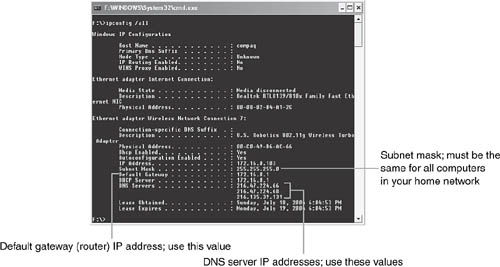
The easiest way to get the rest of the information you need is to go to a computer that is working correctly and use our old friends ipconfig or winipcfg to display network information. Figure 11.5 provides an example using ipconfig, used by Windows XP and Windows 2000.
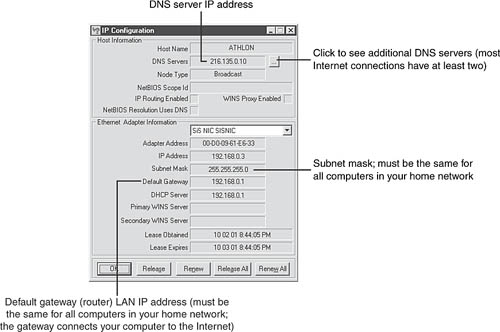
If you use Windows 9x/Me, you use winipcfg. Click the More Information button to see a display similar to Figure 11.6.
Use Tables 11.1 and 11.2 to list the information you need for any manual IP addresses you decide to use on your network.
Table 11.2. Manual IP Address Configuration Information
Device Description | Available IP Address (from Table 11.1) | Subnet (from | Default Gateway (Router LAN address from Table 11.1) | DNS Servers (from |
|---|---|---|---|---|
To configure a manual IP address on a computer running Windows XP or Windows 2000:
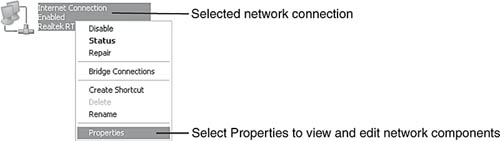
Right-click My Network Places and select Properties.
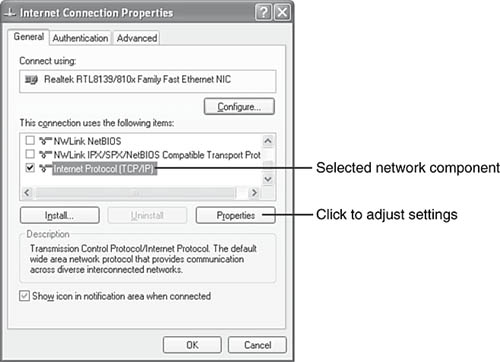
Right-click the connection you are configuring and select Properties (Figure 11.7).
Scroll through the list of network components to Internet Protocol (TCP/IP) and select it.
Click Properties (Figure 11.8).
By default, Windows 2000 and XP are configured to Obtain an IP Address Automatically (Figure 11.9). To change this configuration, click Use the Following IP Address and enter the information requested from your worksheet (Table 11.2):
IP address
Subnet mask
Default gateway

To add the DNS server information, click Use the Following DNS Server Addresses and enter the DNS servers’ addresses from Table 11.2.
Figure 11.9 shows a typical configuration before making changes, and Figure 11.10 shows the same system after adding configuration information based on the network shown in Figure 11.4.

After you click OK, you might need to reboot your computer before the settings take effect.
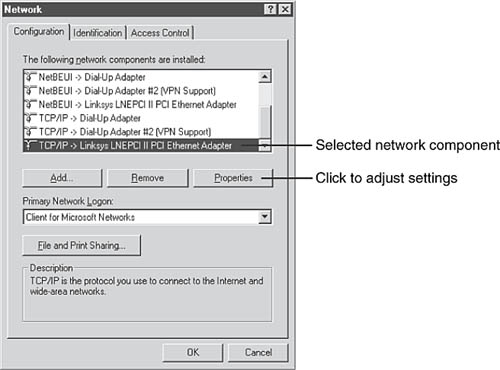
To configure a manual IP address on a computer running Windows 9x or Me:
Click, Start, Settings, Control Panel.
Open Network.
Scroll through the list of network components to TCP/IP->your network card and select it.
Click Properties (Figure 11.11).
Caution: Don’t Change Your Corporate Network Configuration

If you open your laptop’s TCP/IP configuration and discover it’s already completed with information from a different network than your home network, don’t change anything on this screen. See “Dealing with Multiple TCP/IP and Network Configurations,” p. 328, this chapter, for help.
By default, Windows 9x and Me are configured to Obtain an IP Address Automatically. Click each tab of the TCP/IP properties sheet as shown in Figure 11.12 and make changes based on your worksheets. The values in Figure 11.12 are based on the network shown in Figure 11.6.

Click OK after completing the changes. Reboot your computer when prompted, and the changes take effect when your system restarts.
It’s easy to move a laptop between a small office network and a home network when both use DHCP to assign IP addresses. Typically, small office networks, like home networks, use a workgroup configuration: There’s no dedicated server and PCs share their resources (folders, printers, scanners, and so forth) with other PCs.
However, if your workplace network is a domain, not a workgroup (it has a domain server running Windows Server or a similar user-authentication method), be very careful about tinkering with your network configuration. Fiddle around with your network configuration to make your home network easier to navigate, and you could trigger big headaches for the IT folks back in your office when you bring in your computer the next day.
Keep these facts in mind as you move between networks:
You don’t need to change from a domain to a workgroup to share your home Internet connection. If you use DHCP at both work and home, just refresh your IP address when you get home and you should be able to get on the Internet. If you have problems, find out what changes were made to your web browser settings at the office and reset your web browser’s configuration.
If you are a member of a domain at work, you can’t use the domain configuration to connect to your network at home. Consider using network management software to enable you to switch back and forth between a domain (office) and a workgroup (home).
If you use a fixed IP address at the office and DHCP to connect to your home address, you don’t need to fiddle around with your network settings manually to get things working. One of these suggestions should help:
If you use a wired network at work and a wireless network at home (or vice versa), you should be able to connect to each network without any difficulty because each network connection is configured separately.
If you use the same network adapter in both locations on a system running Windows XP, you can use the Alternative Configuration tab shown in Figure 11.10 to configure your home network settings. You can’t use DHCP with the Alternative Configuration tab, but you can set up a user-assigned IP address, as discussed in “Configuring a Windows XP/2000 Computer to Use a Manual IP Address,” p. 324, this chapter.
You can store multiple network configurations (home/office, main office/branch office/home, and so on) with a variety of third-party programs whether you use Windows XP or earlier versions of Windows.
Note: Feeling Techy? Do It Yourself with Netsh

Windows 2000 and XP contain a command-line utility called netsh, which can be used to automate switching between home and office networks. Ask your IT department about it or see the following websites for more information:
Mike Rose—Windows on Multiple Networks http://www.tcm.phy.cam.ac.uk/~mr349/win_multi_net.html.
Use
netshto configure your laptop for different networks http://is-it-true.org/nt/nt2000/utips/utips46.shtml.
Third-party network configuration management programs include
Select-a-Net (http://www.select-a-net.com/)
IP Switcher (http://www.softmate.co.kr/UK/ipswitcher/index.htm)
Net Switcher (http://www.netswitcher.com)
Mobile Net Switch (http://www.mobilenetswitch.com/)
Use the following sections to get your network up and running after problems.
Some routers “remember” the network adapters that have requested an IP address via DHCP, even if you have removed or disconnected the adapter. To see which devices the router has provided an IP address to, open the router’s DHCP configuration and look at the DHCP clients table. If you see an adapter that is not in use, select it and delete it (Figure 11.13).

The situation shown in Figure 11.13 can happen if you switch from a wired to a wireless ethernet connection or remove one USB or PC Card/CardBus adapter and insert another.
You can also use this feature to kick unknown devices off your wireless network (at least temporarily). If you see unfamiliar devices showing up in your DHCP clients table, you’d better enable security or use stronger measures. See Chapter 10 for details.
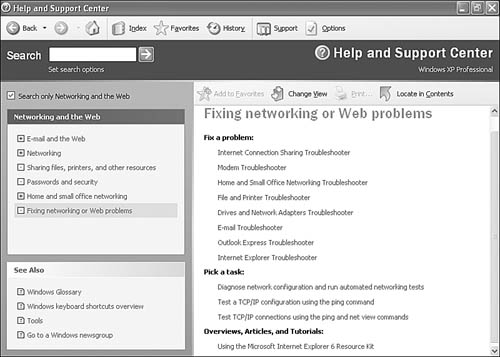
Windows XP includes several troubleshooting tools for home networks. To view the list:
Click Start, All Programs, Help and Support Center.
Click Networking and the Web.
Click Fix Networking or Web problems.
Windows XP’s Help and Support Center displays network troubleshooters and other support tools (Figure 11.14).
To start a troubleshooter, click it. Most of the troubleshooters start by asking you a question. Depending on your answer, the troubleshooter might
Suggest a course of action.
Offer to run a Windows tool such as Device Manager. These options are listed with a curved arrow.
Ask another question.
Offer to investigate the settings on your computer.
To get the most out of the network troubleshooters:
Make sure your network cable or wireless network adapter is connected to your computer, even if your network connection is not working.
Make sure you select the right troubleshooter for your problem.
Answer the questions carefully.
If you are asked to change network settings, write down the old settings before you change them.
In the following sections, I show you how to use some of the tools introduced in this section.
The Network Diagnostics tool scans your network hardware, browser, email, and other network settings to see whether they’re working correctly. To start it, click Diagnose Network Configuration from the Pick a Task menu shown in Figure 11.14.
Click Scan Your System to start the process. A status bar informs you of the tests’ progress. Figure 11.15 shows the results of a successful test. FAILED appears in place of passes on a system with problems. Click the check mark next to the category for more information. Details for each item vary by the item type, such as hardware, website, operating system version, and so on.

The ping command is used to send a signal to a specified IP address or website and receive a response back from that address or website. You can “ping” your own computer, your router or gateway, your broadband Internet connection, or your ISP.
The ping command is run from the command line in Windows.
To open a command-line window in Windows 9x/Me:
To open a command-line window in Windows 2000/XP:
To ping a particular address, type ping xxx.xxx.xxx.xxx and press Enter. (Replace xxx.xxx.xxx.xxx with the actual IP address.) To ping a particular website, type ping Websitename and press Enter (replace Websitename with the actual website).
Here’s how to use ping to test your home network configuration:
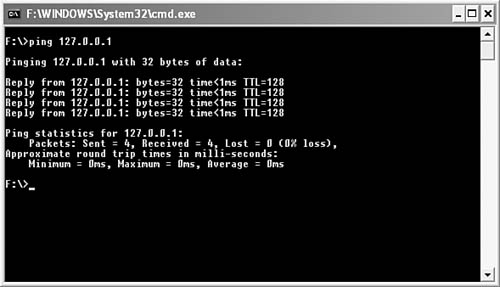
To make sure your system has TCP/IP installed, type
ping 127.0.0.1(also called the local loopback). Regardless of the IP address assigned your computer by your ISP or DHCP server, your system uses this IP address for testing. If your system responds as seen in Figure 11.16 with Reply From, you have the TCP/IP protocol installed. If you get anUnknown Hostmessage, reinstall TCP/IP. Reconfigure your IP address if you assigned the computer a manual IP address.To see whether you can connect with your router, ping its LAN IP address.
To see whether you can ping another device on the network, including non-PC network adapters, ping the device’s IP address. If you are unable to ping a particular device, check cabling and then check your IP address setup.
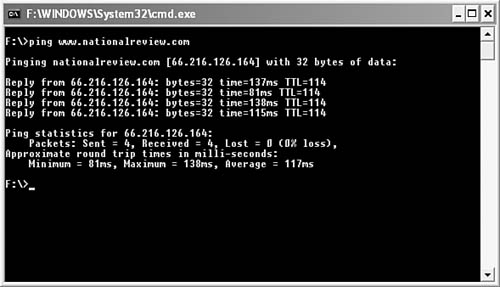
To see whether you can connect with the Internet, ping a favorite website, as in Figure 11.17.
Error messages you might see include the following:
Unknown Host—. You might have misspelled the IP address or website, but if you spelled them correctly, this error indicates that you can’t reach the address or website specified. Check cabling and then IP configuration.Host Timed Out—. A normal message for some sites that don’t respond to ping commands for security reasons; if all IP addresses that you ping display this information, your Internet connection has a speed problem beyond your control.
If you are having problems with a network connection, you can run the Windows XP Repair option. Right-click the network connection in the Network Connections folder and select Repair. This releases and renews the IP address, refreshes domain name system information, and performs other tasks. If the repair option fails, it usually indicates that you don’t have a valid connection to a DHCP server. This could be caused by cable failure, problems with your wireless ethernet adapter, or a problem with your router. See the respective other sections of this chapter for details.
Windows 2000 and XP have an additional network component called Quality of Service Packet Scheduler (QoS Packet Scheduler), which is enabled by default (Figure 11.18). This service is not supported in older versions of Windows, and as a result, connections between a Windows 9x/Me system and a system running QoS are extremely slow; it can take a minute or more just to view the contents of a shared folder.
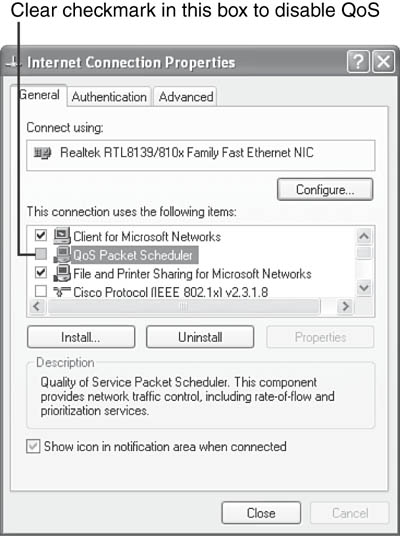
If your network has a mixture of Windows 9x/Me and Windows 2000/XP clients, disable QoS by clearing the check mark in the properties sheet for your network connection.
Even if you have a wireless network, your router connects to your broadband Internet device with a cable, and a cable connects the broadband Internet device with the world. If your network has additional cabled connections, the odds of cable problems increase. Use the following sections to help you conquer cable problems.
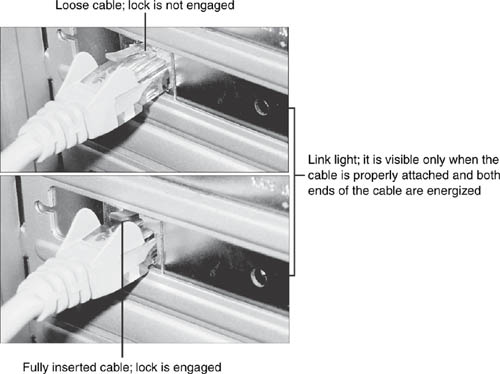
The most obvious reason for a wired network connection to fail is a loose cable. Although ethernet, DSL, and telephone cables have locking tabs, if they’re not pushed in firmly enough to lock the tab in place, the connection will fail sooner or later. Compare the cables in Figure 11.19.
If you have the tools and connectors needed to build ethernet cables (see Chapter 5, “Installing and Configuring a Wired Ethernet Network”), or you can borrow them, you can fix broken ethernet cables. The most common problem I’ve seen is a broken locking tab. If the locking tab is broken, the cable can’t make a reliable connection. To fix this problem, cut off the end of the cable with the broken locking tab and attach a replacement RJ-11 connector, as described in Chapter 5.
A cable that has good connectors and locking tabs but doesn’t connect reliably might have sustained internal damage. Don’t step on network cables! To determine whether the cable has failed, connect it to another computer. If the cable works correctly on another computer, the original computer’s ethernet card or port may have failed. See “Troubleshooting Ethernet Port/Card Problems,” p. 340, this chapter.
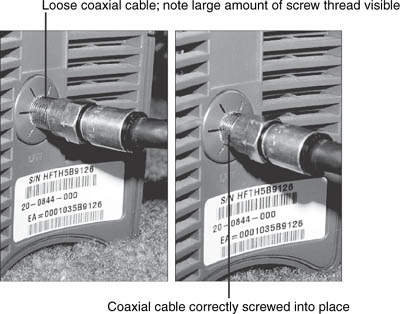
Cable modems use a coaxial cable connection to the cable TV network. If the cable isn’t tight enough or has been damaged, you won’t have a reliable connection. See Figure 11.20 for a comparison between loose and properly connected coaxial cables.
If your coaxial cable connections to the cable modem appear sound, look at the cable itself. If there are several splices in the cable, this can cause a loss of signal quality from the CATV network to your cable modem. If the cable has cracks or tears in the outer jacket, it should be replaced.
Caution: Get the Right Cable for your Router
If you need to replace the CAT5 cable running from your broadband Internet device to your router, be sure to choose a cable that’s the same standard or better. CAT3 cables use the same connector, but are designed to handle 10Mbps signals instead of the faster 100Mbps signals supported by CAT5 cables. Also, be sure to check the cable type. Although most cable modems use a standard Cat 5 cable, some might use a crossover cable (which reverses the order of some wire pairs). Both types are available at most computer stores and departments. Installing the wrong type of cable will prevent data transfer between the device and your router. Some routers automatically detect the cable type and adjust for it, or use a manual switch, but others don’t.
To determine whether the cable running to the cable modem is at fault, disconnect the splitter from the CATV cable coming into your location and connect the cable modem directly to the CATV cable. If you can now synchronize with the network and make a connection, the splitter or the cable running from the splitter is defective and should be replaced.
Properly connected CATV cables should be immune to weather problems, but if you find that you’re having loss of connection problems with your cable modem (or cable TV, for that matter) when it rains or snows, you may have unprotected connections between cable segments or bad splices on your cable. Ask the cable provider to check your outside cable and its connection to the fiber-optic cable for problems. Rubber boots and tape can be used to secure splices and connections against weather problems.
Most broadband Internet access devices are external units. The signal lights on the front of the unit can help you diagnose connection problems. Table 11.3 shows you how the signal lights on the Toshiba PCX1100 and PCX1100U cable modems can be used to diagnose problems (shown in shaded boxes). Your cable or DSL modem and connection type will vary, so see your manual for details.
Table 11.3. Signal Lights on the Toshiba PCX1100 Series Cable Modem
Signal Light | Color | Off | Blinking | On | Items to Check |
|---|---|---|---|---|---|
Power | Green | No power | N/A | Power on | AC adapter, AC cord plugged into unit |
Cable | Green | No cable signal from CATV network if power on | Synchronizing and registering with network | Cable modem ready | Coaxial cable to cable modem; coaxial cable into splitter |
PC | Green | No Ethernet or USB connection to computer if power on | N/A | Ethernet or USB connection to computer is present | Verify USB or Ethernet cable properly plugged into cable modem and PC; correct type of Ethernet cable used; check USB or Ethernet port on PC for proper operation |
Data | Green | No data transfer in progress if power on | Data transfer in progress | N/A | No problem apparent unless light stays off during web page opening, email sending/receiving, or file downloads/uploads |
Test | Amber | Self-test OK if power on | Self-test in progress | Self-test failed | Reset cable modem |
DSL modems use similar signals to those shown in Table 11.3, except that the connection to the DSL modem is made with a UTP cable instead of a coaxial cable.
Tip
Because the process of synchronizing the cable modem with the CATV network can take as long as 30 minutes if the cable modem is turned off, it should be left on at all times.
As you can see from Table 11.3, when signal lights are off, it’s usually bad news. However, if the Test/TST signal light stays on, this also indicates a problem with the cable modem.
Loose cables, or using the wrong cable between the cable modem and the Ethernet card in the computer or the router’s WAN port, will cause loss of signal. Loss of signal will result in most of the problems listed in Table 11.3. If the cables are the correct type, appear in good condition, and are attached correctly to the cable modem and the PC, check the Ethernet adapter or USB port on the PC as discussed in the following sections. A self-test failure can sometimes be cured if you reset the cable modem by either pressing the reset switch on the cable modem (if available) or by turning off or unplugging the cable modem, waiting for 30 seconds, and turning it on/plugging it back in again. If the self-test continues to fail, contact your ISP or cable modem vendor for repair or replacement.
If your modem spontaneously reboots, which will cause it to go through the Power On Self Test (POST) and force it to resynchronize to the cable network, look for these interference sources nearby:
Power spikes coming from refrigerators, vacuum cleaners, or air conditioners
EMI (electromagnetic interference), such as cordless phones
If the network adapter connecting your PC to the home network fails or the USB port used for external adapters malfunctions, the computer cannot connect to the home network.
Problems with your Ethernet, wireless ethernet, and USB connections can come from any of the following sources:
Hardware and device driver failure
Incorrect port configurations
Resource conflicts with another device
Here’s how to solve these problems.
If the Ethernet port, card, or adapter has failed, you may be able to determine this from one of the following symptoms:
The signal lights on the back of the Ethernet card don’t light up when the computer is on and a cable from a working cable modem, switch, or router is plugged into the card (refer to Figure 11.19).
The Windows Device Manager doesn’t list the card, or displays the card with a red
Xacross the card listing (see next section).The card is not displayed as a PCI/PnP device when you turn on your system.
Tip: Check the MAC Address before you Conclude it’s Broken
If you use MAC address filtering (see Chapter 10), make sure the MAC address for the computer’s network adapter has been added to the router’s table of valid MAC addresses. If not, fix that problem first and your connection might begin to work.
If your Ethernet card fits into a slot, you can replace it. In Windows, be sure to remove it from the Device Manager before you physically remove the card from your system. Be sure to install the correct drivers for your new card.
If your Ethernet port is built in to your system and you have an open PCI expansion slot, you may be able to install a replacement 10/100 Ethernet card as an alternative to repairing your system or replacing your motherboard. If you use a notebook computer with a built-in Ethernet port, you can use a PC Card or CardBus-based 10/100 Ethernet adapter as a replacement. Remember, you can also use a USB/ethernet adapter if you don’t like fiddling with the interior of your PC.
Although hardware failures can take place, it is more likely that problems with your Ethernet port or adapter come from a resource conflict with another card or from a problem with your drivers. The Windows Device Manager can help you determine which of these is the problem.
To open the Windows Device Manager:
Click Start, Control Panel (Windows 2000/XP) or Start, Settings, Control Panel (Windows 9x/Me).
If the System icon is not visible in Windows XP, click Switch to Classic view.
Click the System icon. The General tab (listing Windows version and RAM) is displayed.
In Windows XP or Windows 2000, click the Hardware tab and then the Device Manager button. Click the Device Manager tab in Windows 9x/Me. A yellow-circled exclamation mark (
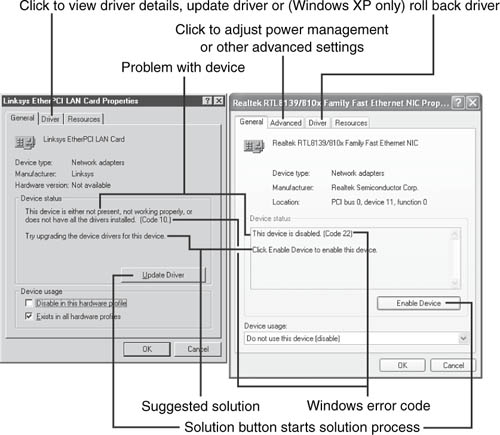
!) symbol next to a device indicates a conflict with other devices or a driver problem. A redXindicates the device has failed or has been disabled. The Windows 98 Device Manager is shown in Figure 11.21. The Windows XP Device Manager is shown in Figure 11.22.Double-click the device icon to display the properties sheet. Click the solution button on the General tab to fix the problem with the device (Figure 11.23).
Follow the prompts onscreen to update drivers, enable the device, resolve resource conflicts, or provide other solutions. Restart the system if prompted to do so.


The USB port is an increasingly popular way to connect a network adapter to your PC, particularly a wireless ethernet or HomePlug adapter. Although USB support is universal among PCs built in the last few years, you might encounter one or more of these problems:
USB port not enabled in system BIOS
High-speed USB (USB 2.0) support not enabled in system BIOS
USB drivers not loaded
Not enough power provided by the USB port for device
Note: One Button, Many Uses
The solution button performs various tasks depending on the device’s problems. For example, if the device needs a new driver, the solution button reads Update or Reinstall Driver. If the device is disabled, the solution button reads Enable Device.
If your network adapter doesn’t work when you plug it into a USB port, your USB port might not be enabled or working. Check the following:
USB port status—. Open the Windows Device Manager as discussed in the previous section and scroll down to the bottom of the hardware listing. You should see a category called
Universal Serial Bus Controllers. Click the plus (+) sign next to this category to display its contents. As with other devices, a redXindicates the device has been disabled; check its Properties sheet for an option to reenable it. A yellow!indicates a driver or conflict problem.Tip
If the Universal Serial Bus category is not displayed in the Windows Device Manager but your system has USB ports present, they have been disabled in the system BIOS. See your system documentation for details on how to access your system BIOS (you normally press a particular key during startup to access the setup program) and enable these ports.
USB hub power issues—. Because many external devices connect to the USB port, and most systems have only two, four, or six USB ports, many users prefer to attach multiple devices to an external USB hub. Most standalone USB hubs come with a small AC adapter to make sure that all USB devices have plenty of power (500mA per port); such hubs are called self-powered hubs. USB hubs built in to monitors, keyboards, and other devices are usually bus-powered, drawing power from your system’s USB ports and providing only 100mA per port. Bus-powered hubs might not provide adequate power for some devices. For example, some USB network adapters require 500mA of power. If your network adapter won’t work when you plug it in through a bus-powered hub (you might see an error message), connect it directly to a USB port on your system, or purchase a self-powered hub and use it for your network adapter and other USB devices. To determine how much power a device uses and how much power is available per port, click the Power tab for a USB root hub or Generic hub (external hub) in Device Manager.
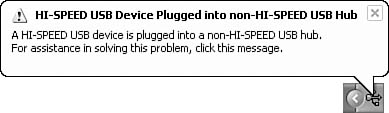
USB port type—. USB 1.1 ports have a maximum speed of only 12Mbps, far slower than the 100Mbps provided by fast ethernet or the 480Mbps speed of USB 2.0. You might not notice the difference in speed in a home network, but your system will display an error message (Figure 11.24) if you connect a USB 2.0 network adapter to a USB 1.1 port. If you see this message on a system that has USB 2.0 ports, you might have plugged the network adapter into the wrong port or you might need to install USB 2.0 drivers or configure the system BIOS to provide USB 2.0 support. See your system manual for details.
A router has two functions:
It enables your home network to connect to the Internet.
It helps prevent hostile traffic from reaching your network.
To perform the second task, routers block, by default, certain types of Internet traffic. Different types of Internet traffic use different logical ports provided in each Internet connection. For example, your web browser uses TCP port 80 to view HTTP web pages, and your email program connects with the POP3 email server using TCP port 110. Routers permit traffic between so-called well-known ports like these and others. Software firewalls also watch these logical ports and block or allow traffic based, in part, on which programs are using the Internet connection. Web browsers are allowed to use the Internet connection, but you must grant permission to other programs before they can use the connection.
However, some online games, video chat, and other functions might not work on a home network because the router or software firewall prevents access to the TCP ports or UDP ports used by the application.
There are two ways to deal with this problem:
Determine which ports are needed by the application and configure the router or software firewall to allow the traffic.
Disable firewall protection for the client by placing the client’s IP address into the demilitarized zone (DMZ).
Some routers are preconfigured with options to permit traffic for certain programs. Figure 11.25 shows the Special Apps configuration screen for a U.S. Robotics wireless router.
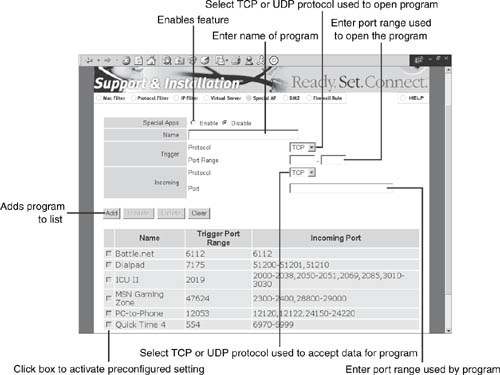
This method enables the router to protect the client while permitting programs that use nonstandard ports to run correctly. It does take time to configure, but the advantage is that these settings work for any IP address on the home network.
The second method is quicker, but potentially more dangerous. The DMZ zone turns off router protection for the specified IP address (Figure 11.26). The specified IP address has full access to the Internet—and the Internet has full access to that IP address!

One problem with the DMZ is that it is tied to the IP address. If your network uses DHCP, the IP address for particular devices might change from time to time. If you have a particular network device that must have DMZ support, consider giving it a static IP address. Otherwise, you might expose the wrong computer to the Internet.
In addition to the specific suggestions in this chapter, be sure to check the following:
Vendor websites for network adapters and routers—. The latest drivers and firmware updates can solve many problems, especially with wireless connections.
The Microsoft Windows Knowledge Base—. Check it out at http://support.microsoft.com.
Software vendor websites—. If you’re having problems getting software to work with a router or firewall program in place or have other network/Internet-related problems, software vendor websites can help.
Third-party home network information sites—. I particularly recommend Practically Networked (http://www.practicallynetworked.com), Tom’s Networking (http://www.tomsnetworking.com/), and Dux Computer Digest (http://www.duxcw.com/).
Tip: Software Firewalls and Port Configuration
Don’t forget to disable a software firewall (such as Zone Alarm) if you are playing a game or other program that needs access to nonstandard TCP or UDP ports. It doesn’t matter whether you configure the router to permit traffic if the software firewall stops it. If you put a computer in the DMZ, run a commercial software firewall on it at all times other than when you run a program that requires DMZ service. A commercial firewall program helps protect the computer from hostile intruders (see Chapter 10).