
IN THIS CHAPTER
After the work you dragged home from the office is done and after the last bit of homework is ready for tomorrow’s class, your home network is just getting warmed up. You can use your home network to share all kinds of online entertainment sources, and to share video, music, and photos you create yourself. In this chapter, you discover the many ways you can make your home network make your home theater, TV, and game systems more fun and more exciting.
Although you can view your digital photos and videos on your computer monitor and listen to digital music tracks with your PC’s speakers, it’s a lot less enjoyable if you’re trying to share your digital favorites with others. Even the largest computer monitor is small compared to a typical TV, and most computers’ speakers are tiny and don’t have much oomph. The solution? Pipe that content over to your home theater system. Dolby Digital surround sound will make your favorite digital music tracks sound great, and your big-screen television will banish the bad memories of boring slide shows in dark rooms forever.
Whether you prefer a wired or wireless network solution, vendors offer a growing number of solutions that can help you enjoy your digital media through TVs, stereo systems, or home theater systems. Depending on the vendor, these devices might be called media adapters, media players, or similar terms. What’s more important is choosing the right media adapter for your needs.
With many models to choose from, each with different features and price tags, the process of selecting a home media adapter can be overwhelming at first glance. However, if you use the following process, it will become clear to you which models make the cut:
Determine what type(s) of digital content you want to play through your home entertainment system. Some media servers handle only music, and others handle music and still photos. A few can also play back certain types of video files. Refer to Table 7.1 for media file types.
Caution: Watch Out for WMA Pitfalls!

Although almost all digital media adapters can play back some types of WMA files, many do not support files created with digital rights management (DRM; also known as copy protection) enabled (the default setting used by Windows Media Player). Other WMA options such as lossless compression can also cause problems, so find out what a particular device’s limitations in handling WMAs are before you buy.
Determine the type(s) of connections to your home entertainment system that a media adapter needs to have. For example, if your home theater system has component video jacks as well as S-video, you’ll see the best video quality if you can connect your media server to the component video jacks.
Determine which media adapters support the media types and connections you need. Keep in mind that most wireless media adapters also support wired ethernet networks. See Table 7.2 for examples.
Table 7.2. Selected Digital Media Adapters Feature Comparison
Vendor
Model #
Photo Playback
Audio Playback
Video Playback
PC Software App Req
Supported Networks
Creative Labs
Sound Blaster Wireless Music
—
Yes
—
Yes
802.11g; 802.11b
D-Link
DSM-320 Wireless Media Player
Yes
Yes
Yes
Yes
802.11g; 10/100 Ethernet
Gateway
Connected DVD Player
Yes
Yes
Yes[*]
Yes
802.11g or 10/100 Ethernet
GoVideo
D2730
Yes
Yes
Yes[*]
Yes
10/100 Ethernet; optional 802.11b
HP
EN5000
Yes
Yes
—
Yes
10Mbps Ethernet
HP
EW5000
Yes
Yes
—
Yes
802.11b(g); 10Mbps Ethernet
Linksys
WMLS11B
—
Yes
—
Yes
802.11b(g); 10/100 Ethernet
Linksys
WMA11B
Yes
Yes
—
Yes
802.11b(g); 10/100 Ethernet
Netgear
MP-101
—
Yes
—
Yes
802.11b(g); 10/100 Ethernet
Turtle Beach
Audiotron-100
—
Yes
—
No
10/100 Ethernet
[*] Device also includes a DVD player.
As you can see from Table 7.2, most media adapters require that a PC on the network run server software. Some media adapters can work with multiple PCs running server software, but others require that only one PC on the network run server software. In either case, only the PC(s) running server software can be accessed by the media player.
Tip: Got a Spare PC? Make It a Media Server!

If you find yourself with an older Pentium II, Pentium III, or AMD Athlon or Duron-based system that isn’t fast enough for gaming or modern office suites, give it new life by making it your media server. Install your favorite network adapter, install the server software for your media adapter, copy all the media files you want to use with your media adapter to folders on its hard disk, and use it strictly to host media files. If the hard disk on the old PC is too small for your collection of media files, upgrade to an 80GB or larger hard disk or use a network storage device. See “Using Network Storage,” in Chapter 8, “Home Networks at Work and School,” p. 239, for details.
If your media player works with only one PC, copy the media files from other PCs on the home network into the media folders on the server PC.
You should also consider the type(s) of audio and video connectors you want to use. Many media adapters support only stereo jacks for audio and composite or S-video output for video. However, a few models support component video and digital audio output for better video and sound quality. If your home theater system and big-screen TV are equipped to handle these inputs, consider home media adapters that support those outputs.
To connect a typical media adapter, follow these basic steps:
Install the media server software on the PC containing the media files you want to play.
Tip: Got a PlayStation2? Make It a Media Player!
If you have a PlayStation2 with the Sony Network adapter installed, you can use it as a networked media player for music, movies, and photos on your PC. Just add the GameShark Media Player program (about $30). For more information or to order, see the developer’s website at http://www.broadq.com.
Connect the media adapter to the network or to the PC for configuration.
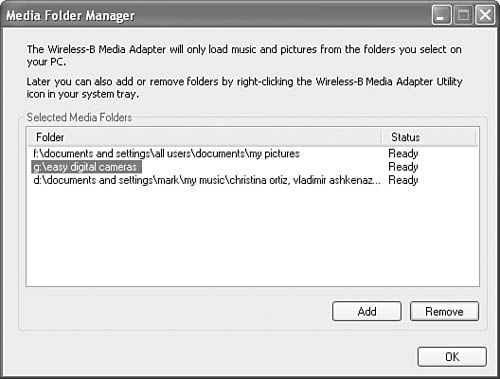
Select the folders where your media is stored.
Select the network type if your media adapter supports more than one network type.
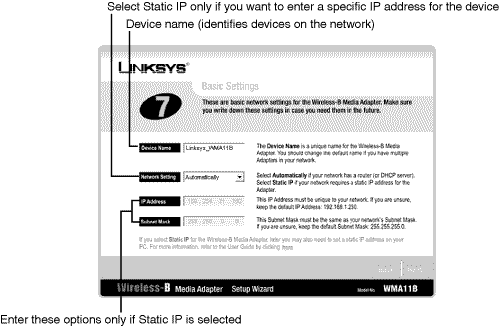
Configure your media adapter to use the network. Figure 7.1 shows a typical configuration screen using a server-assigned (dynamic) IP address. Figure 7.2 shows a typical configuration screen for a Wi-Fi (Wireless ethernet) network.
Note: Use the Wire, Even for Wireless Nets

Most media adapters can be connected to a 10/100 Ethernet port on your PC or network switch (or router). Even if the media adapter will eventually be connected to a wireless network, it’s usually faster and easier to configure the media adapter via its ethernet port for configuration. Check your media adapter’s manual for details.
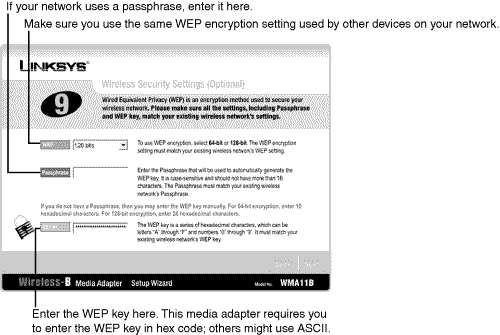
If your Wi-Fi network uses encryption, you need to select an encryption level and supply the WEP key or the WPA passphrase your network is configured to use (Figure 7.3).
If you use an ASCII-to-hex converter, keep in mind that many of them output hex code using a spacer symbol (such as a percent sign) between hex characters. For example, if your WEP code (in ASCII) is LAN80211WIF54, an ASCII-to-hex converter might output %4C%41%4E%38%30%32%31%31%57%49%46%35%34. Enter only the hex characters when you enter the hex equivalent of your ASCII WEP key. See Table 7.3.
After the media adapter is configured, attach its antenna (if necessary).
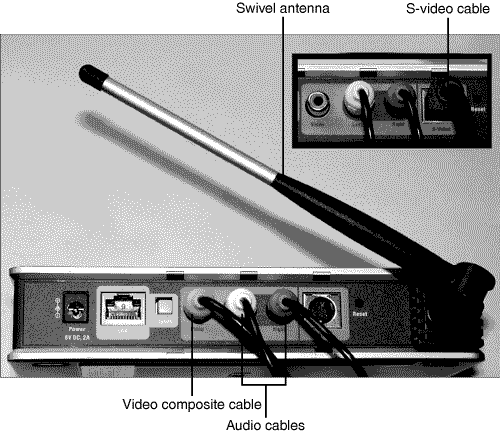
Connect cables to the appropriate jacks on the media adapter. Refer to Figures 7.4 and 7.5.
Connect the audio cables from the media adapter to your home theater or stereo system’s audio input jacks. See Figure 7.6.
Connect the video cable from the media adapter to your TV or monitor’s video input jack. See Figure 7.7.


After connecting your media adapter to your TV and home theater system, it’s time to enjoy the digital goodness that’s been trapped on your PC until now. Most media adapters include a remote control that can be used to
Turn the media adapter on and off.
Select the type(s) of media content to play.
Select specific folders, artists, genres, or specific files to play.
Check or change adapter configuration.
Tip: Easy ASCII-to-Hex Conversions
If you entered the WEP key in your wireless network’s WAP or router configuration using ASCII (plain text), but your media adapter or other Wi-Fi devices require you to enter code in hexadecimal, try these solutions:
Open your WAP or router’s configuration screen to see whether the router can be switched from ASCII to hex display of the WEP key. If so, note the hex characters and enter them when needed.
Use an ASCII-to-Hex conversion utility or website, such as the one available at the Mikezilla website:http://www.mikezilla.com/exp0012.html.
To start the fun, follow this basic procedure for media players that connect to your TV:
Turn on your home theater system.
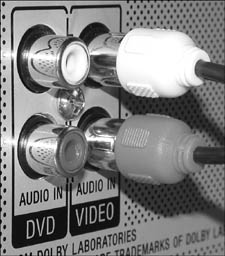
Select the mode appropriate for the connection between your home theater system and the media adapter. For example, Figure 7.6 shows the audio cables from the media adapter plugged into the jacks marked “video” on the home theater system. In this example, Video mode should be selected on the home theater system.
Turn on your TV.
Select the connection you used between the TV and the media adapter. For example, if you used the video-in jack, select Video.
Turn on your media adapter.
After the media adapter displays its startup menu, select the media you’d like to play from the menu.
Sit back and enjoy the fun!
Media adapters, like any other computer-related device, are wonderful when they work, but frustrating when they don’t work. Use this checklist of typical problems and solutions to help you enjoy your media.
Caution: Don’t Lose the Remote!
Depending on the media adapter, losing the remote can prevent you from selecting the media files you want to play and can also prevent you from configuring the media adapter. Make sure you keep the remote for your media adapter in a safe place!
Make sure the server PC is turned on and that the server program is running. Most media adapters’ server programs display an icon in the system tray.
If you have just installed the media adapter’s server program on your PC, you should reboot the PC. The program will load after the reboot.
Tip: Music with a Side of Photos? Yes, You Can!
Some media players enable you to play music and view digital photos at the same time. Typically, you need to select the music you want to play, start playing it, and then select the photos you want to view. See your media adapter’s instructions for more information.
If the server PC was started in Safe Mode or another mode that does not load startup programs, the media server application is not running. Restart the server PC in normal mode.
Check the network configuration on the media adapter. The network type or wireless network configuration settings might be set incorrectly on the media adapter. The router’s configuration might not be set to permit the MAC address for the media adapter to access the network, or it might not be configured to provide enough IP addresses via DHCP. For more information about these and other network-specific problems and solutions, see Chapter 11, “Troubleshooting Your Home Network.”
Check the network configuration of the PC running the media adapter’s server software. If the PC is unable to connect with other network resources (the Internet, shared folders, shared printers), the media adapter will not be able to connect to it. See Chapter 11 for solutions.
If the media adapter or server PC is connected to a wired network, check the cable connections. If the cable is disconnected or loose, shut down the media adapter or the PC, reconnect the cable, wait about 30 seconds, and restart the media adapter or the PC.
If you can’t turn on the media adapter with the remote control, make sure the media adapter is plugged in to a working AC power source. If you can’t turn on the media adapter with its on/off switch after verifying that it’s plugged into a working power source, contact the vendor for help.
If you can’t move the onscreen selector with the remote control, make sure there is nothing blocking the infrared (IR) transmitter on the remote control or the IR receiver on the media adapter. If the transmitter or receiver windows are free of obstructions, remove and replace the batteries in the remote control with fresh alkaline batteries. If the remote control continues to fail, contact the vendor for help.
Open the folder maintenance program on the PC(s) running the media server program and verify that the folders selected for use contain the media files you want to play. If incorrect folders are selected, select the correct folders (Figure 7.8) and retry selecting the files you want to play with your media adapter’s remote control.
Make sure the files you want to play or view are compatible. Files stored in formats that are not supported by your media adapter are ignored by your media adapter. For example, if you want to play audio files in .WAV format, but your media adapter is not compatible with .WAV files, .WAV files stored in the folders used by your media adapter will not be displayed in your media adapter’s selection menu.
If your media adapter displays a file name but doesn’t play it, chances are the file or files you selected for playback have features not supported by the media adapter.
For example, WMA files created with Digital Rights Management (copy protection) are not supported by most media adapters. MP3 files with quality settings below a certain quality standard or above a certain quality standard are not supported by some media adapters. Certain types of photo files (such as CMYK TIF files) are not supported by most media adapters. Video files created with codecs not supported by your media adapter won’t play.
To solve the problem, rerecord DRM (copy-protected) music files with the DRM or copy-protection setting disabled in Windows Media Player or other ripping programs. Rerecord digital music files into MP3 files using a quality setting supported by your media adapter. Convert graphics files with unsupported features with a photo editor or graphics file-conversion program. Convert video files using an unsupported codec into files using the correct codec with a video-editing or creation program.
Make sure your home theater system is turned on. If it is turned off, turn it on.
Make sure the audio cables are connected tightly between the home theater system and the media adapter.
Check the audio setting on your home theater system. Make sure you have selected the correct source for audio. For example, if your media adapter is plugged into the Video connectors on the home theater system, you need to select Video as the audio source using the home theater’s remote control or controls on the home theater receiver.
Adjust the volume on the home theater system. Turn up the volume on your music adapter’s remote control if it is turned down.
If you still don’t hear anything, shut down the media adapter and try playing some other audio source (radio, CD, movie) through the home theater system. If the home theater system is unable to play any audio source, check the speaker connections, audio source and volume. If these appear to be set correctly but you still can’t hear anything, contact the vendor of your home theater system for help.
If your home theater system is working correctly with other audio sources, your media adapter might need servicing. Contact the vendor for help.
If you play action or strategy games on your PC, chances are you’ve enjoyed some type of network or online play for awhile, either by using a dial-up modem or a broadband Internet connection. With a home network, multiple PC gamers can play, and console game players can also join the action.
A home network makes the following gaming scenarios possible:
Host your own LAN party. Get friends with PCs together for pizza, snacks, beverages, and friendly deathmatches.
Sibling rivalry takes on a whole new meaning with head-to-head combat over the home network between the game consoles in the den and the spare bedroom.
If you have broadband Internet access connected to your home network, the gamers in your household can take on the (gaming) world.
All three of the premiere game consoles on the market, the Sony PlayStation 2, the Microsoft Xbox, and the Nintendo GameCube, can be added to a home network. Depending on the console, it might be ready out of the box for some types of home networks or it might require add-on hardware.
Table 7.4 compares the network features of each of these game systems.
Table 7.4. LAN and Online Gaming Compatibility by Game System
Online Gaming | LAN (Network) Gaming | Network Ready | Additional Hardware Required | |
|---|---|---|---|---|
Microsoft Xbox | Yes | Yes | 10/100 Ethernet | |
Nintendo GameCube | Yes | Yes | No | Nintendo GameCube Broadband Adapter[3] |
Sony PlayStation 2 | Yes | Yes | No | |
[1] The Xbox Live Starter Kit includes a subscription service for online play with supported titles, a special headset with microphone, and integration with MSN Messenger to provide chat, buddy list, and other features. [2] Optional adapters from Microsoft or third-party vendors can be used to add the Xbox to other types of networks. [3] Optional adapters from third-party vendors can be used to add the GameCube to other types of networks after the Nintendo GameCube Broadband (10/100 Ethernet) adapter is installed. [4] Optional adapters from third-party vendors can be used to add the PlayStation2 to other types of networks after the Sony Network (10/100 Ethernet and 56Kbps dial-up modem) adapter is installed. [5] Some PlayStation2 retail bundles include the Sony Network Adapter. [6] A few early PlayStation2 online games—such as Tony Hawk ProSkater 3, and ProSkater 4—can be played using various third-party USB-to-ethernet adapters plugged into the USB port on the PlayStation2. However, most recent online games require the official Sony Network adapter. | ||||
To play LAN-enabled games through a 10/100 Ethernet network with the Xbox, select LAN or Network when prompted by the game. No configuration is necessary.
If you want to play online games on a 10/100 Ethernet network, you need the following hardware:
Xbox Live Starter Kit
An approved router
The Xbox Live Starter Kit contains the Xbox Communicator (headset and microphone), Xbox Live starter disc (CD modifies the Xbox Dashboard for online play), an Xbox Live subscription code good for 12 months, and instruction manuals.
Although the Xbox can be used with any 10/100 Ethernet switch for LAN play, Microsoft has approved only a few routers for use with Xbox Live online gaming. These are listed in Table 7.5.
Table 7.5. Xbox Live Approved Routers
Brand | Model | Firmware Versions | Network Type(s) Supported | Vendor Website |
|---|---|---|---|---|
D-Link | DI-604 | 2.18, 3.2, 3.36 | 10/100 Ethernet | |
DI-614+ | 2.18[1], 3.2, 3.35 | 10/100 Ethernet; 802.11b; 802.11b+[2] | ||
DI-624 | 2.25, 2.28, 2.42 | 10/100 Ethernet; 802.11b; 802.11g; 108G[3] | ||
Linksys | BEFSR41 (v3)[4] | 1.04.8 | 10/100 Ethernet | |
BEFW11S4 (v4)[5] | 1.45.3 | 10/100 Ethernet; 802.11b | ||
WRT54G | 2.02.7[6] | 10/100 Ethernet; 802.11g; 802.11b | ||
Microsoft | MN-100 | 1.08[7], 1.11.017 | 10/100 Ethernet | |
MN-500 | 1.08[7], 1.11.017 | 10/100 Ethernet; 802.11b | ||
MN-700 | 02.00.07.0331, 02.00.08.0333 | 10/100 Ethernet; 802.11g; 802.11b | ||
[1] Router might disconnect multiple Xbox consoles after nearly 24 hours of operation; upgrade to newer firmware to resolve this issue. [2] D-Link’s proprietary high-speed (22Mbps) extension to 802.11b. This mode is not supported by the Microsoft MN-740 Wireless Xbox adapter. Configure the router to run in standard 802.11b mode if the MN-740 is used on the Xbox. [3] D-Link’s proprietary high-speed (108Mbps) extension to 802.11g. This mode is not supported by the Microsoft MN-740 Wireless Xbox adapter. Configure the router to run in standard 802.11g or 802.11b modes if the MN-740 is used on the Xbox. [4] Version 3 of this router has six signal lights. See http://www.linksys.com/products/imagelib2/befsr41_v3.jpg. Compare to older versions, which have additional signal lights. See http://www.linksys.com/products/imagelib2/befsr41.jpg. [5] Version 4 of this router has seven signal lights. See http://www.linksys.com/products/imagelib2/befw11s4_v4.jpg. Compare to older versions, which have additional signal lights. See http://www.linksys.com/products/imagelib2/befw11s4.jpg and http://www.linksys.com/products/imagelib2/befw11s4v2.jpg. [6] This firmware version’s implementation of Universal Plug and Play (UPnP) prevents users from connecting to Xbox Live. Disable UPnP in the router’s configuration until an upgrade version of the firmware is available. [7] Router might disconnect all but the first Xbox console after a few minutes of operation; upgrade to the other firmware listed. | ||||
Some popular models of routers have been tested but have been found not to work with Xbox Live. These routers are listed in Table 7.6.
Table 7.6. Routers Incompatible with Xbox Live
Brand | Model | Network Type(s) Supported | Notes | Vendor Website |
|---|---|---|---|---|
D-Link | DI-754 | 10/100 Ethernet; 802.11a (optional upgrade to 802.11b) | ||
DI-764 | 10/100 Ethernet; 802.11b; 802.11b+[1]; 802.11a | |||
Linksys | BEFSR11 | 10/100 Ethernet | Firmware versions 1.43, 1.44.2 tested; must use external switch to support network | |
BEFW11S4 (v2) | 10/100 Ethernet; 802.11b | Firmware versions 1.43, 1.45 tested | ||
Netgear | MR314 | 10/100 Ethernet; 802.11b | Firmware version 3.29 tested | |
RP114 | 10/100 Ethernet | Firmware version 3.26 tested | ||
RP334 | HomePNA; 10/100 ethernet | Firmware version 3.26 tested | ||
RT311 | 10/100 Ethernet | Firmware version 3.25 tested; must use external switch to support network | ||
RT314 | 10/100 Ethernet | Firmware version 3.25 tested | ||
Network Everywhere | NR041[2] | 10/100 Ethernet | Firmware version 1.2 tested | |
SMC | 7004VBR | 10/100 Ethernet | Firmware version 1.20 tested | |
7004WFW[1] | 10/100 Ethernet; 802.11b | Firmware version 1.00 | ||
[1] When multiple Xbox consoles are used with this router, consoles might be disconnected after random periods of time. [2] The Xbox Live website identifies this router as a Linksys product; however, it is sold under Linksys’ Network Everywhere brand. | ||||
What if you already have a home network and your router is not listed or has been tested and found not to work with Xbox Live? A router not listed as Compatible or Not Compatible might work; try it and see whether you can play a game. If you have a router listed as Not Compatible, try upgrading the firmware to a newer version than those tested by Microsoft. If you need to replace your router, use Table 7.6 to determine which features a replacement router (see the models listed in Table 7.5) should have.
Tip: Getting the Latest News on What Works—or Doesn’t
To stay on top of the latest test results for Xbox Live-compatible routers, go to http://www.xbox.com/en-US/live/connect/routerlanding.htm.
Xbox Live can work with a wide variety of broadband services. However, a number of major broadband cable and DSL ISPs have provided specific support information to Microsoft. If you’re having problems getting Xbox Live to work with your current broadband ISP, check out the list available at http://www.xbox.com/en-US/live/connect/providers.htm. Some providers list specific cable modems and other equipment tested to work with Xbox, and all provide setup information.
To configure the Xbox for online gaming using a 10/100 Ethernet network:
Install the Xbox Live Starter Kit’s hardware and software.
Shut down the Xbox.
Connect the Xbox to your router’s LAN port.
Turn on the Xbox.
Select Xbox Live from the Xbox Dashboard.
Follow the instructions to create your account (a 12-month account is included with the Starter Kit).
The Xbox is configured by default to receive an IP address from the DHCP server built in to your router. However, you might need to use the Xbox Dashboard to adjust PPPoE configuration. The Xbox, unlike some other console games, uses the router’s PPPoE configuration to connect with broadband services that use PPPoE. If you see a PPPoE error with the Xbox, but computers on the network can connect to the Internet, turn off PPPoE in the Network Settings section of the Xbox dashboard.
Tip: Check Your Serial Number Before You Buy!
If your PlayStation2 was not bundled with the Sony Network adapter, you should verify that it will work with the Sony Network adapter. The online version of the Sony Network adapter’s instruction manual lists PlayStation2 serial number series that do not work with the Sony Network adapter, along with a toll-free number for more information.
To download the manual, set your browser to http://www.playstation.com.
Select your region, click Hardware, click Network Adaptor, and click Product Manual. The manual requires Adobe Acrobat Reader 5.x or Adobe Reader 6.x or above.
PlayStation2 users need to connect the Sony Network adapter to the expansion bus on the rear of the PlayStation2. An 8MB memory card is necessary to store the network configuration you select. PlayStation2 offers a very large collection of online and LAN-enabled games.
To install the Sony network adapter for use with a 10/100 Ethernet network:
Turn off your PlayStation2 console.
Unplug it.
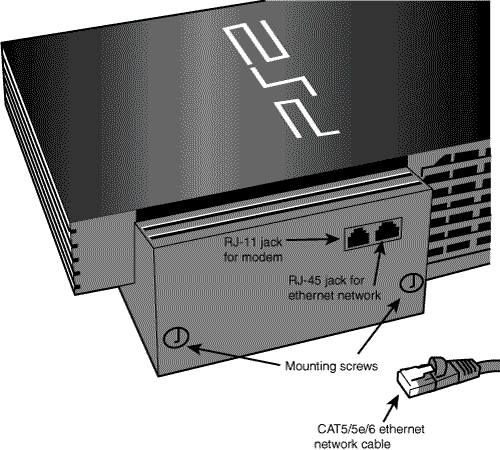
Remove the expansion bay cover on the back of the console.
Push the Network adapter into place, making sure the connectors on the rear of the unit mate properly with the connectors inside the unit.
Tighten the mounting screws (Figure 7.9).
Connect a CAT5/5e/6 network cable to the network adapter and to the network’s router.
Be sure an 8MB memory card with at least 137KB of empty space is inserted into the PlayStation2. The memory card is used to store your network configuration.
Plug the console into an AC power source.
Turn on the console and verify that the power light is green.
To configure the Sony network adapter, use the CD included with the Network adapter. Enter the following information when prompted:
Name of network configuration (your choice)
Behind a firewall: Yes (basic firewall protection is built in to all routers)
Subscribe to an ISP: No
High Speed Connection: Yes
Enter username and password if your connection uses PPPoE (required by many DSL service providers)
Follow the prompts onscreen to complete your configuration.
For more information on network settings, see Chapter 11.
Nintendo GameCube users need to install the Broadband Adapter to play games online through a broadband Internet connection or through a 10/100 Ethernet LAN. Unlike PlayStation2, the library of GameCube games that support online play is very small, and only a few games support LAN play.
Tip: Need Help? Sony Has You Covered
For more information on the PlayStation2 Network adapter configuration process, use the Network Adaptor Installation and Troubleshooting Wizard, by setting your browser to http://www.playstation.com.
Select your region, click Hardware, click Network Adaptor, and click Network Adaptor Installation and Troubleshooting Wizard.
To install the Nintendo GameCube Broadband Adapter for use with a 10/100 Ethernet network:
Turn off your GameCube console.
Unplug it from AC power.
Disconnect the controllers.
Turn the unit over.
Remove the cover labeled Serial Port 1.
Insert the Broadband Adapter (Figure 7.10).
Connect a CAT5/5e/6 network cable to the Broadband Adapter and to the network’s switch.
Reconnect the controllers.

To play LAN-enabled games through the Broadband Adapter, select LAN when prompted by the game. No configuration is necessary.
Tip: Need Help? Nintendo Has You Covered
For more information on the GameCube Broadband Adapter configuration process, go to http://www.nintendo.com/online/index.jsp.
To configure the Broadband Adapter for use with online games, configure the adapter within each game’s option menu. In the first online game for GameCube, Phantasy Star Online, this option is located in the Options menu, Network Options submenu, Provider Option submenu. With a network that uses DHCP (IP addresses provided by a router), use the following settings:
ethernet Settings: Automatic
IP Address Auto Settings (DNS and DHCP): these are provided automatically by the DHCP server in the router
If your ISP uses PPPoE (used by many DSL connections), use the following settings:
ethernet Settings: PPPoE
PPPoE Settings: User ID (username) and password
Note: Building a Bridge Between Wired and Wireless Ethernet
A bridge is a network device that converts one type of network signal to another, enabling devices using different types of adapters to become part of the same network. An ethernet/Wi-Fi bridge converts ethernet signals into Wi-Fi signals.
Save the settings, and then you can start your game.
For more information on network settings, see Chapter 11.
When it comes to official support of Wi-Fi (wireless ethernet) home networking, game consoles are a mixed bag:
Fortunately, there are plenty of third-party ethernet/Wi-Fi bridges that will enable you to connect your consoles to a Wi-Fi network. Table 7.7 lists some of the most popular products.
Table 7.7. Wi-Fi/Ethernet Bridges Compatible with Console Games
Brand | Model | Compatible With | Networks Supported | Vendor Website |
|---|---|---|---|---|
Belkin | FSD7330[1] | PlayStation2, Xbox, GameCube | 802.11g (b) | |
D-Link | DWL-G810[1] | PlayStation2, Xbox, GameCube | 802.11g (b)[2] | |
DWL-810+[1] | PlayStation2, Xbox, GameCube | 802.11b[3] | ||
Linksys | WGA54G | PlayStation2, Xbox, GameCube | 802.11g (b) | |
WGA11B | PlayStation2, Xbox, GameCube | 802.11b | ||
Motorola | WE800G[1] | PlayStation2, Xbox | 802.11g (b) | broadband. motorola.com |
Netgear | PlayStation2, Xbox, GameCube | 802.11g (b) | ||
ME101[1] | PlayStation2, Xbox, GameCube | 802.11b | ||
[1] This bridge can be used with any wired ethernet device, including set-top boxes and printers. [2] Also supports D-Link’s proprietary Xtreme G (108Mbps) extension to 802.11g. [3] Also supports D-Link’s proprietary AirPlus (22Mbps) extension to 802.11b. [4] Supports multiple-device bridging; connect an ethernet switch to this bridge and you can bridge two or more consoles or other ethernet devices to Wi-Fi. | ||||
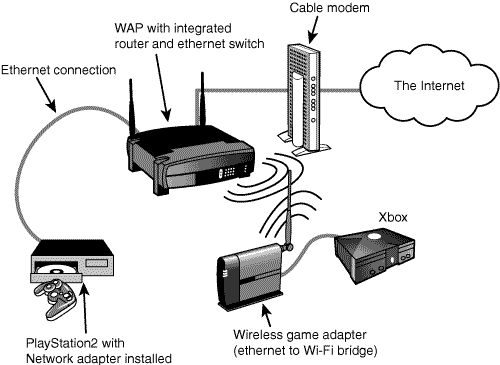
An ethernet/Wi-Fi bridge connects to your game console’s ethernet port with a standard CAT5/5e/6 cable (usually included with the bridge). Figure 7.11 shows a home network with a console connected via ethernet and another console connected via a wireless bridge.
Depending on the exact configuration of your network and your ethernet/Wi-Fi bridge, you might perform the configuration work with the bridge’s own controls by connecting the bridge to a PC’s ethernet port and configuring it through a utility supplied with the bridge or by logging into the bridge’s built-in web-based utility. In most cases, you need to connect the bridge to your PC for configuration before you can connect it to your game console.
Caution: Ready to Work? Not with a Router or WAP
Bridges built especially for use with console games are usually preconfigured for ad hoc mode, so expect to reconfigure almost any bridge you use with a console game for use with a router-based network (which uses infrastructure mode). Even if the bridge is designed to connect to a router, you will need to configure it manually if your wireless network uses WEP encryption or other security options.
Configuration options for an ethernet/Wi-Fi bridge are the same as for any other Wi-Fi device (refer to Chapter 6, “Installing and Configuring a Wi-Fi Network,” for details). To connect through a router or WAP (infrastructure mode), you need to configure options such as
Mode: Infrastructure (router or WAP)
SSID: Wireless network identification for infrastructure-mode networks (same for all computers)
WEP encryption: select disabled, 64-bit, or 128-bit (must be same for all computers)
WEP key: used only if WEP encryption is enabled (must be same for all computers)
DHCP: Enabled (router or WAP provides an IP address for the bridge)
Transmission rate: Auto (auto-negotiates the best possible data rate; choose a specific speed only if Auto doesn’t work well)
Mode (802.11g-based bridges only): Use Mixed if 802.11b and g devices are both found on the network; use 802.11g, G-only, or similar options to increase speed if network does not have 802.11b devices
Note: Log on for Maximum Control
Even if the bridge is equipped with a PC-based configuration program, you might need to log into the web-based configuration program built in to the bridge to configure some options. Check your bridge’s instruction manual for the IP address to specify and the login name to use to gain access.
After you have configured the bridge to work with your wireless network, disconnect it from your PC’s ethernet port, plug it into your console game, and play your favorite LAN or online game.
If you’ve connected your game console to your home network, but you can’t play your favorite LAN or online games, you won’t be happy until it works. And, if you’re not the game player, but your kids, spouse, or friends are the gamepad mavens, you’re going to hear about it until you ride to the rescue and make it work. Here are some of the most common problems and solutions.
The PlayStation2 and GameCube network adapters must be installed correctly before these systems are network-aware. Double-check the installation: Turn off the system, remove the adapter, and reinstall. If the console still cannot detect the adapter, try the adapter on a friend’s console. If the adapter doesn’t work on any console, the adapter has a problem and should be serviced. If working adapters don’t work when plugged into your console, your console has a problem and should be serviced.
The Xbox’s ethernet port is built in to the system. If this system doesn’t detect a network connection, contact the vendor for help.
If you can’t connect to an ethernet network, double-check the following:
Is the network cable plugged in correctly to both the network port on the console and the switch or router? If not, turn off the console, reconnect the cable, and turn it on again.
Is the network cable a straight-through cable or a crossover cable? Use a straight-through cable between your console and the switch or router. Standard ethernet cables are straight-through (same wire pairs on both ends).
Have you configured the console? Review the configuration notes earlier in this chapter, and see the vendor websites for additional information.
Tip: Case Studies for Success
Check out these online resources for more help in getting your console on a Wi-Fi network:
Microsoft Xbox—. The official Xbox guide for wireless connections is located at http://www.xbox.com/en-us/live/connect/wireless_connect.htm.
A user relates his experience at http://www.xbox.com/en-US/community/lifestyle/lifestyle-goingwireless.htm.
All Consoles—. A guide to networking console games with an ethernet/Wi-Fi bridge (referred to as a “converter”) http://www.transparent.uk.com/acatalog/Wireless_Gaming.html.
PC Magazine’s ExtremeTech site provides a good overview of wireless networking for console games at http://www.pcmag.com/print_article/0,1761,a=109717,00.asp.
For ethernet or wireless networks, check the following:
Have you updated the security settings used by your router? These settings include the number of IP addresses provided by the DHCP server (increase the number by one to provide an IP address for your console), and MAC address filtering (add the MAC address of your console or its network adapter to the MAC address listing in your router). See Chapter 11 for more details.
Is your console securely connected to the ethernet/Wi-Fi bridge? If the cable is loose or damaged, the console won’t be able to connect to the Wi-Fi network via the bridge.
Has the ethernet/Wi-Fi bridge been configured for the network? Most bridges, especially those made for game consoles, are configured by default for ad hoc networks or open (unsecured) infrastructure networks. Configure the bridge with the necessary security settings (WEP encryption level, WEP key) used by your network. See Chapters 6 and 11 for more details.
Recall from Chapter 2, “Building Blocks of the Home Network,” that digital video recorders (DVRs) such as TiVo and ReplayTV are replacing VCRs as the method of choice for time-shifting TV shows and recording personal libraries of favorite programs. They can also pause live TV broadcasts while you answer the door, take a phone call, or grab a snack between commercials. Those features already put them miles beyond the VCR. But, you can get much more out of your DVR by adding a home network equipped with broadband Internet access.
When you connect TiVo to your home network, you can
Schedule recordings remotely through a web browser much more quickly than via a dial-up connection.
Use your TiVo as a media adapter, playing MP3 music and TIFF, JPG, and other common photo and graphics formats through your TV and home theater system.
Transfer programs between TiVos or PCs on the home network for multiroom viewing.
ReplayTV DVRs 5500-series DVRs (the latest version as of mid-2004) have the following network features built in:
Network recording automatically switches to an available ReplayTV unit on the home network to prevent recording conflicts.
Pause and resume enables you to pause playback on one unit and continue viewing on another unit.
Room-to-room live video streaming between ReplayTV units on the home network.
Remote scheduling of recordings via the Internet.
JPEG photo transfer between any PC on the network and a ReplayTV DVR.
Upload of non-copyrighted content via the Internet to other ReplayTV DVRs.
As you can see, although TiVo and ReplayTV units differ somewhat in their network capabilities, both benefit from being connected to your home network. If you already have two or more TiVo or ReplayTV DVRs, adding them to a home network makes them even more entertaining.
TiVo Series 2 DVRs can be added to your home network through purchase of your choice of network hardware; TiVo service now includes home network support. TiVo connects to your home network via a USB network adapter, using one of the two USB ports on the rear of the unit. Table 7.8 lists network adapters recommended by TiVo.
Table 7.8. TiVo-Recommended Network Adapters
Brand | Model | Network Types Supported | TiVo Service Numbers Supported | Vendor Website |
|---|---|---|---|---|
Linksys | WUSB11 v 2.6, v2.8[*] | 802.11b (g) | All | |
WUSB11 v3.0[*] | ||||
WUSB12[*] | 802.11b (g) | Service numbers starting with 230, 240, 264, 275 | ||
USB100TX | 10/100 Ethernet | All | ||
USB200M | 10/100 Ethernet | All | ||
[*] Requires upgrade to latest TiVo DVR software. See http://customersupport.tivo.com/tivoknowbase/root/public/tv2006.htm for more details. | ||||
However, if you already have a different brand or model of USB network adapter, you might be able to use it with your TiVo. Table 7.9 lists USB adapters that TiVo customers report work properly with their TiVo units.
Table 7.9. TiVo Customer-Suggested Network Adapters
Brand | Model | Network Types Supported | TiVo Service Numbers Supported | Vendor Website |
|---|---|---|---|---|
3Com | 3C460B | 10BASE-T Ethernet | All | |
Belkin | F5D6050, F5D6050 ver 2000 | 802.11b (g) | All | |
F5D5050 | 10/100 Ethernet | All | ||
D-Link | DWL-120 Ver E | 802.11b (g) | All | |
D-Link DWL-120 Ver A | 802.11b (g) | Service numbers starting with 110, 130, 140 | ||
D-Link DWL-120 Ver D | 802.11b (g) | Service numbers starting with 230, 240, 264, 275 | ||
D-Link DWL-122 | 802.11b (g) | Service numbers starting with 230, 240, 264, 275 | ||
D-Link DSB-650TX | 10/100 Ethernet | All | ||
D-Link DUB-E100 | 10/100 Ethernet | All | ||
Dell | True Mobile 1180 USB | 802.11b (g) | Service numbers starting with 230, 240, 264, 275 | |
Hawking | WU250 | 802.11b (g) | All | |
UF200 | 10/100 Ethernet | All | ||
UF100 | 10/100 Ethernet | All | ||
Linksys | USB100M | 10/100 Ethernet | All | |
Microsoft | MN-510 | 802.11b (g) | Service numbers starting with 230, 240, 264, 275 | |
MN-110 | 10/100 Ethernet | All | ||
Netgear | MA101 Ver A | 802.11b (g) | Service numbers starting with 110, 130, 140 | |
MA111 | 802.11b (g) | Service numbers starting with 230, 240, 264, 275 | ||
FA101 | 10/100 Ethernet | All | ||
FA120 | 10/100 Ethernet | All | ||
Siemens | SS1001 | 10/100 Ethernet | All | |
SMC | SMC2662W ver 2 | 802.11b (g) | All | |
SMC2208 | 10/100 Ethernet | All |
If you have a USB network adapter other than those shown, give it a try. The worst that can happen is that you’d need to buy a TiVo-approved or customer-suggested model if your TiVo doesn’t like your adapter.
Figure 7.12 illustrates typical wireless ethernet (Wi-Fi) and wired (10/100) ethernet adapters and how they connect to a TiVo Series 2.

After you connect your TiVo Series 2 to a wired or wireless network adapter, turn it on to complete the configuration process.
To configure a wireless adapter on a network that uses DHCP to provide IP addresses automatically, follow this procedure:
Allow TiVo to provide a firmware update for your wireless adapter if prompted.
Review the Important Message onscreen.
Press SELECT to go to TiVo Central.
From TiVo Central, select Messages and Setup, Settings, Phone and Network Setup, Edit settings, and Wireless Settings.
Review the Wireless Checklist, and then press SELECT to continue.
Select your network’s SSID if listed. If not listed, select Connect to a closed wireless network.
Use the onscreen keyboard to enter the name of your wireless network.
If your network uses WEP encryption, enter the password as you entered it in the router or WAP’s configuration (TiVo can use either ASCII text or hex).
Select an encryption level (up to 128-bit; this must match the encryption level used by your WAP or router).
Select Yes to change your connection type from phoneline to broadband Internet if you have a broadband Internet connection on your home network.
Go to the TCP/IP settings screen and select Obtain the IP address automatically.
Enter a DHCP Client ID if your ISP requires this option.
Confirm the settings.
Use the Test Connection option to check your new connection.
If you connected TiVo to a wired ethernet network, follow this procedure:
Review the Important Message onscreen.
Press SELECT to go to TiVo Central.
Wait for a few minutes for TiVo to receive an IP address from the DHCP server in the router.
To confirm the settings, select Messages and Setup, Settings, Phone and Network Setup, Edit settings, and TCP/IP Settings.
Tip: Studying TiVo Networking
Before you take the plunge into TiVo networking, download and read the Home Media Features instruction manual (requires Adobe Acrobat Reader/Adobe Reader)from the TiVo website: http://www.tivo.com/pdfs/HMF_guide.pdf.
Go to the TCP/IP settings screen and select Obtain the IP address automatically.
Enter a DHCP Client ID if your ISP requires this option.
Confirm your settings.
Select Yes to change your connection type from phoneline to broadband Internet if you have a broadband Internet connection on your home network.
Use the Test Connection option to check your new connection.
ReplayTV units include a 10/100 Ethernet port, so they’re ready to connect to an ethernet network. You can use an ethernet/Wi-Fi bridge to connect a ReplayTV unit to your Wi-Fi network.
ReplayTV states that any ethernet router should work with its DVRs. However, ReplayTV recommends using one of the routers listed in Table 7.10 if your current router does not work properly.
After you connect your ReplayTV unit to a router on your network, follow this procedure to configure it on a network using a DHCP server (usually built in to your router) to provide IP addresses:
Turn on the unit.
Provide your Zip Code when prompted.
To connect using an ethernet/Wi-Fi bridge connecting to a router or WAP:
Configure the bridge with the correct settings for the network as discussed in Chapter 6.
Connect the bridge to the ReplayTV unit’s ethernet port.
Turn on the unit.
Provide your Zip Code when prompted.
If you plan to use MAC address filtering to secure your wireless or wired/wireless network (see Chapter 10, “Securing Your Home Network,” for details), you should set up your ReplayTV unit to use a static IP address. To enter a static IP address:
Tip: Boning Up on ReplayTV Networking
Before you take the plunge into ReplayTV networking, read the manual for your ReplayTV unit. If yours has gone missing, you can download it from the ReplayTV website (requires Adobe Acrobat Reader/Abobe Reader).
Get your manuals from http://www.digitalnetworksna.com/support/replaytv/manuals_downloads.asp. Select your unit’s series to see the user manual, quick setup guide, and other documents.
Don’t have Adobe Reader yet? Get it from http://www.adobe.com/products/acrobat/readermain.html.
For details, see “Manual IP Address Configuration,” Chapter 11, p. 322 or your ReplayTV unit’s manual.
If you need to set up your ReplayTV unit to connect through different types of networks, see the official ReplayTV website or third-party websites for help.
If you prefer to use a PC as a DVR, you can purchase a new Media Center PC with Microsoft Windows XP Media Center Edition or add a graphics card with integrated DVR and TV-viewing features such as the ATI All-in-Wonder series or the NVIDIA Personal Cinema series to an existing PC.
You can add any of these computers to a home network (see Chapters 5, “Installing and Configuring a Wired Ethernet Network,” and 6,”Installing and Configuring a Wi-Fi Network,” for details); but the real question is, how easily can you enjoy the digital goodness you record on one PC on the rest of your home network? Keep reading to discover what you can do.
Starting with ATI’s Multimedia Center software version 8.8, you can share recorded content created on your ATI All-in-Wonder card with other systems through the EAZYSHARE feature.
EAZYSHARE sets up one All-in-Wonder card as the server, and other computers running ATI graphics cards or All-in-Wonder cards based on the Radeon 7000 graphics processor (GPU) or newer as clients.
Tip: ReplayTV Networking Help
If you run into trouble getting your ReplayTV unit to work with your network configuration, see the Modem and Networking FAQ page at the ReplayTV website http://www.digitalnetworksna.com/support/replaytv/find_answer.asp.
Select Modem and Network from the appropriate category, then select your ReplayTV series for model-specific help.
For user-to-user help on all aspects of using ReplayTV, including home networking, check out ReplayTV FAQ at http://www.replayfaqs.com and the Planet Replay forums at http://www.planetreplay.com.
Client PCs can select the following options:
Timeshare (record now, view later) with rewind, fast forward, pause, store on disk, closed caption, and still-image capture.
Schedule a recording.
Separate channel, volume, screen appearance, and other options for each client.
Optional use of ATI’s radio-control REMOTE WONDER. REMOTE WONDER units can be set to separate IDs to reduce interference.
For more information about EAZYSHARE and other features of ATI’s Multimedia Center application, see http://www.ati.com/products/multimediacenter/. Upgrades to Multimedia Center 8.8 are free for owners of 8.1 and later versions; users of older versions can purchase the MMC 8.1 CD for about $10.
NVIDIA’s Personal Cinema cards enable you to share live TV or recorded programs over your home network through the use of the optional ForceWare Multimedia program. Unlike ATI’s EAZYSHARE, which works only with ATI-built graphics cards, ForceWare Multmedia works with graphics cards using recent NVIDIA or ATI RADEON chips.
Fore more information, including a free trial version and pricing, see http://www.nvidia.com/page/multimedia.html.
You can enjoy content created on a Windows Media Center PC over your home network by sharing its My Pictures, My Videos, and My Music folders. Use Windows Media Player version 9 on other Windows-based PCs to play the content from the shared folders. Other media players might also be able to play the content, depending on what format it was recorded in and with what options. To learn more about sharing folders, see Chapter 8.
If you want to view TV programs recorded with Windows XP Media Center Edition on other PCs running Windows XP, you need to install the following on each client PC:
Windows XP Service Pack 1 (includes Windows Media Player 9)
DirectShow Playback Support Update (Knowledge Base article 810243)
To download Windows XP Service Pack 1, you can use Windows Update (http://windowsupdate.microsoft.com) or go to http://www.microsoft.com/windowsxp/downloads/updates/default.mspx.
To locate the update to the DirectShow components, go to http://support.microsoft.com, click Knowledge Base Article ID Number Search, and search for 810243.
Media Center Extenders devices and software, which enable home network clients, TVs, and Xbox consoles to access TV, photo, video, and music content from PCs running Windows XP Media Center Edition 2005, are now available from Hewlett-Packard, Linksys, and Microsoft. To learn more about Media Center PCs and Windows XP Media Center Edition, see http://www.microsoft.com/windowsxp/mediacenter/default.mspx. To learn more about Media Center Extenders in general, see http://www.microsoft.com/windowsxp/mediacenter/evaluation/devices/default.mspx.
To learn more about HP’s Media Center Extender X5400, see www.hp.com. To learn more about the Linksys Media Center Extender, see www.linksys.com/extend. To learn more about the Microsoft Media Center Extender for Xbox, see http://www.microsoft.com/windowsxp/mediacenter/evaluation/devices/xboxextenderkit.mspx.