
IN THIS CHAPTER
Your Home Network—Under Siege
If you have a home network, particularly if you have wireless ethernet, a broadband Internet connection, or both, you’re in a war against an invisible army. Intruders ranging from the bored teenager down the street with a Wi-Fi–equipped laptop to the creators of sophisticated viruses want to get access to your home network. Casual snoopers might just want access to say “yeah, I did it,” but the creators of viruses, worms, malware, and fraudulent emails hope to fool you into giving them access to your personal data, your identities, and even your childrens’ innocence. In this chapter, you learn how to keep your network, your data, and your family safe from network and Internet intruders.
If your home network is 100% wired ethernet, it’s pretty simple to spot an unauthorized connection: Do you see an extra cable to your switch or router? However, fewer home networks today are 100% wired. Wireless ethernet, as you saw in Chapter 6, “Installing and Configuring a Wi-Fi Network,” is a great way to avoid the hassles of wiring your home. But, with the convenience of wireless networking comes additional risk.
Figure 10.1 shows the results of a brief stroll through my office building with NetStumbler (http://www.stumbler.net), a popular utility used to detect wireless networks.
Only one of the wireless networks I detected used encryption, and another one did not broadcast its SSID. Others broadcast their SSIDs, and they used the default SSID name provided by the vendor. I saw similar results when checking residential neighborhoods. Sooner or later, wireless networks that are not secured in some fashion are likely to be compromised.
You learned how to block casual intruders in Chapter 6 by enabling basic WEP security, but there are more and better ways to secure your wireless network, including the following:
Higher levels of WEP encryption
Concealing the identity of your wireless access point
Upgrading to WPA encryption
Continued upgrades to wireless security
Whether you have a wired, wireless, or mix-and-match network, you can also use the following techniques:
Control access by network adapter MAC addresses
Limit IP address ranges
Check router configuration screens
The following sections cover these techniques in detail.
In Chapter 6, I suggested using 64-bit WEP encryption for your wireless network for just one reason: It’s easy to enable and configure on your network. I wanted you to get your network running as quickly as possible with some basic security enabled.
However, you shouldn’t be satisfied with 64-bit WEP for one simple reason: there aren’t enough digits in the WEP key. The fewer the digits, the easier it is for an intruder to determine the key. As with a house or car, the person with the key has access.
To switch to 128-bit WEP encryption, follow this outline (see Chapter 6 for details):
Make sure wireless clients aren’t using the network.
Start the web-based configuration utility on the WAP.
Enable 128-bit WEP encryption and provide the WEP key (or generate one if your WAP supports passphrase) (see Figure 10.2).
Record the new WEP key.
Save the changes.
Configure each wireless network adapter on your network (don’t forget game systems, media adapters, print server, and so on) with the new encryption setting and WEP key (see Figure 10.3).
Reconnect to the WAP from a wireless client to verify everything is working correctly.


Unfortunately, even if you upgrade to 128-bit WEP encryption, the longer key isn’t as secure as you’d like. The problem is that any WEP key stays the same until you change it. Given enough time and enough data transmitted, a really determined intruder with the right analysis software can figure out what your WEP key is—if your wireless network can be detected. That’s why it’s important to follow these procedures as well:
Change the default SSID of your WAP.
Change the administrative password.
Disable broadcast of your SSID.
These tasks are performed using the web-based configuration tool built in to your WAP (Figure 10.4).

Why are these security procedures so important?
The default SSID identifies the brand of WAP your wireless network uses to everyone. If your WAP broadcasts your network’s SSID as shown in Figure 10.1, it’s easy for a would-be intruder to look up the documentation for your WAP, determine the default settings, use the default password (unless you’ve changed it) and lock you out of your own network (at least, until you reset your WAP).
Changing the default administrative password makes it much harder for a would-be intruder to take over your WAP, even if you didn’t change the default SSID.
Disabling SSID broadcast keeps snooping tools such as NetStumbler from finding your wireless network’s SSID. An “invisible” network is a difficult network to compromise.
However, it pays to take further approaches to security if you can.
Wi-Fi Protected Access provides a big boost in wireless network security over WEP. WPA uses encryption keys that are re-created frequently, making key cracking much more difficult (although not yet impossible). WPA is a worthwhile upgrade for any wireless network. What might stop you from switching your wireless network from WEP to WPA encryption?
Spotty vendor support—. Although WPA was approved in 2003, many vendors of wireless products haven’t rolled out WPA upgrades for all their hardware yet. A firmware upgrade might be required for adapters and WAPs.
PCs safer than specialty devices—. In Chapters 7, “Home Networks at Play,” and 8, “Home Networks at Work and School,” I showed you how to add home theater systems, game consoles, network storage, and print servers to your wireless network. The problem is that almost all of these devices still support only WEP encryption.
Operating system support issues—. If you use Windows XP, you need to install Service Pack 1a and the Wireless support rollup package (see Table 10.1). Some vendors support WPA encryption only for Windows 2000 and Windows XP, leaving out older Windows versions that might still be in use on your home network.
Table 10.1. Windows XP Upgrades Required for WPA Support
Install Order | Update Name | Website URL |
|---|---|---|
First | Service Pack 1a | http://www.microsoft.com/windowsxp/downloads/updates/sp1/default.mspx |
Second | Wireless update rollup package KB#826942 | http://support.microsoft.com/default.aspx?scid=kb;EN-US;826942 |
If all the devices on your wireless network support WPA, you can use it for security instead of WEP. However, if even one device doesn’t have WPA support, your home network must be content with WEP security.
To assure WPA support on all your network devices, you need to
Verify that your wireless router or WAP supports WPA. Upgrade the firmware on your router if necessary. See Chapter 11, “Troubleshooting Your Home Network,” for details.
Verify that your wireless adapters support WPA. Upgrade the firmware on adapters if necessary.
Download WPA-compatible drivers for your wireless adapters. Note that some vendors support WPA encryption only for Windows 2000 and Windows XP.
Install Windows XP Service Pack 1a on systems running Windows XP (Home Edition or Professional) (see Table 10.1).
Install the Wireless Update Rollup package on systems running Windows XP Service Pack 1 or greater (see Table 10.1 and Figure 10.5).
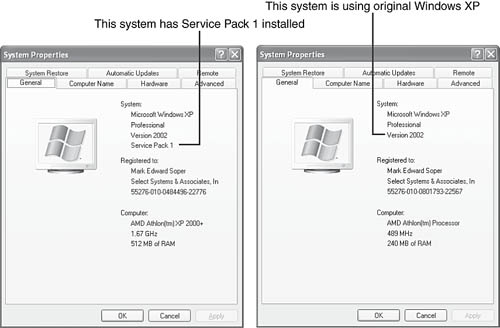
To determine whether your system already has Windows XP Service Pack 1 or 1a, right-click My Computer and select Properties. Information about your computer’s processor, memory size, and Windows version is displayed (see Figure 10.5).
If you can use WPA encryption, you enable it on both your wireless router/WAP (Figure 10.6) and your wireless adapters (Figure 10.7) in a manner similar to that used for WEP encryption.


On a home network, choose WPA Pre-Shared Key, as shown in Figure 10.7. The other method, WPA Radius, is used by corporate networks that have a Radius identity server. Select the TKIP algorithm; it rewrites the shared key periodically as determined by the group key renewal setting.
After you configure the wireless router or WAP with the new WPA settings, configure one of your adapters and test the connection. If all goes well, continue with the remainder of your wireless network.
However, even if you can’t enable WPA, you can still make your network a tough one to compromise. And, all that’s required to make the bad guys leave you alone is to be tougher than the network down the street.
Every network adapter—whether it’s built in to a PC, an add-on card, or built in to a specialized device such as a media adapter or a networked personal video recorder—has a unique identification. The media access control address, better known as the MAC address or physical address, is a list of six two-digit hexadecimal numbers (0–9, A–F).
With most wireless routers and WAPs, you can specify the MAC addresses of devices on your network. Only these devices can access your network. This is a very effective method for keeping unauthorized users away from your network.
Before you can use MAC filtering, you need to create a list of MAC addresses used by devices on your network. The MAC address is usually found on a label on the side of the network adapter, as shown in Figure 10.8. Depending on the device, the MAC address might be labeled MAC, MAC address, or ID No. Many devices that have integrated network adapters also list their MAC address on a label. Note that MAC addresses are sometimes listed as 12 digits rather than in six groups of 2 digits.

How can you determine the MAC addresses for network adapters that are already installed in a PC or are built in to a device? To find the MAC address for a network adapter that is already in a PC, you can use one of the following utility programs:
With Windows XP or Windows 2000, use
ipconfig.With Windows 9x or Windows Me, use
winipcfg.
The utility program ipconfig requires you to open a command-prompt window. To run it follow these steps:
Type
cmdand press the Enter key.Type
ipconfig /allto display the MAC addresses for the network adapter(s) in your computer, as shown in Figure 10.9.After you record the MAC addresses, type
Exitto close the window.

Repeat this process for each computer on your home network.
To run winipcfg:
Click Start, Run.
Type
winipcfgand click OK.Select your network adapter from the pull-down menu.
The Adapter Address listed (see Figure 10.10) is its MAC address.
After you record this address, click OK to close the program.

If you have video game systems, media adapters, personal video recorders, or other specialized network devices on your home network, you also need to record their MAC addresses. External network adapters, including USB, game adapters, and media adapters have labels listing their MAC addresses similar to those shown in Figure 10.8. Some devices with integrated network ports list the MAC address on the rear of the unit.
Tip: Record all the MACs

If you have a wireless adapter in a computer that also has an ethernet adapter, as in Figure 10.9, each network adapter has a unique MAC address (listed as a physical address). If your wireless router has an ethernet switch that you use for some of the PCs on your network, you need to list both wireless and wired MAC addresses to enable a PC using the ethernet switch to connect to your network. For the same reason, you should also determine the MAC addresses of PCs with wired ethernet, HomePlug or HomePNA adapters.
Table 10.2 shows you how to determine the MAC address for other types of networked entertainment devices.
Table 10.2. Determining the MAC Address for Specialized Devices
Device Type[*] | Brand & Model | Procedure |
|---|---|---|
Video Game | Microsoft Xbox | Start Xbox Live, Select Settings, Network Settings. The MAC address is listed on the bottom right of the screen. |
Video Game | Nintendo GameCube | The MAC address is on a sticker on the bottom of the GameCube Network Adapter. |
Video Game | Sony PlayStation2 | Use the Startup Disc to start the game system. Press Select on the controller for help after the connection test fails. The MAC address is displayed onscreen. |
Personal Video Recorder | ReplayTV | Assign the device a static IP address (see Chapter 7). Open a command prompt on a PC connected to the home network. Type |
Personal Video Recorder | TiVo Series 2 | Uses external ethernet or wireless adapter; get MAC address from adapter label. |
[*] If you use a wireless ethernet bridge to connect a video game or other device to your home network, you need to record only the MAC address of the bridge. The network “sees” the ethernet port in your entertainment device only if you connect it directly to the network. | ||

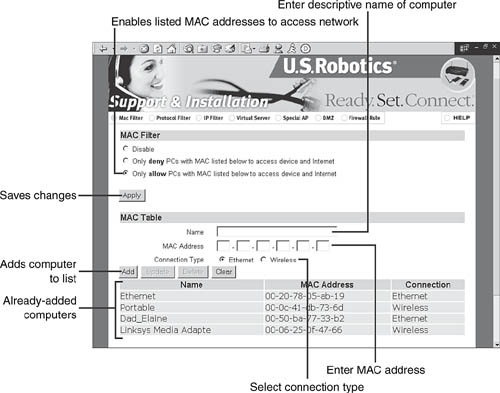
After you have created a complete list of MAC addresses, it’s time to open your WAP or wireless router’s web-based configuration utility to establish the access list. Log in to the WAP or router and look for a menu item such as Advanced, Filtering, MAC Filtering, or similar. Figure 10.12 depicts MAC filtering setup on a Linksys WAP54G.

If you use a wireless router that has both wireless and wired clients, you might need to indicate which type of connection is being made by a particular device. See Figure 10.13 for an example.
After you enable MAC address filtering to permit only listed devices on the network, devices with unlisted MAC addresses can’t connect.
Caution: Don’t Filter Out your Network

Figure 10.12 shows that MAC addresses filter work in two ways: They can be used, as in this example, to permit only listed addresses to access the network. However, if you select Prevent instead of Permit, all the MAC addresses you list will be blocked from the network. If you goof up and select Prevent by mistake, use the reset button on your WAP or wireless router to reset its configuration to the factory defaults and start over.
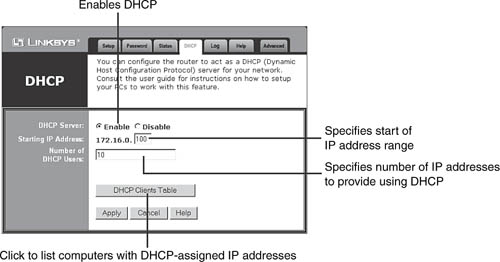
Another method of limiting access to your wireless network is to adjust the number of dynamic IP addresses provided by the router. Most home networks use dynamic host configuration protocol (DHCP), also known as server-assigned IP addresses, to provide IP addresses for the home network. This is far easier than assigning an IP address to each device on your network (see Chapter 11 for details). However, most routers are configured to provide dozens of IP addresses by default, even if you have only a few PCs and other devices on your home network. Excess IP addresses can be grabbed by intruders if you don’t use WEP encryption or other types of security. After they’re on your home network, they can access any unprotected shared folders and steal bandwidth from your Internet access.
Tip: As you Add to your Network, Add to your List
As soon as you receive a new network device, write down its MAC address and add it to the router or WAP’s configuration table. That will ensure that it can access the network as soon as you complete its configuration.
To limit the number of IP addresses your router provides to the network, log in to the router’s web-based configuration utility and look for the menu listing for LAN, DHCP server, or a similar name. Depending on the router, you might specify the number of DHCP users (each user = one IP address) or specify a range of IP addresses. In the example shown in Figure 10.14, the router provides IP addresses from 172.16.0.100 to 172.16.0.109.
Following these suggestions will help you protect your home network, but don’t forget to secure your Internet connection.
Caution: Out of IP Addresses? No Network for Newcomers!
Just as you need to update the list of MAC addresses when you add new network devices, you might also need to add additional IP addresses before you add new devices. If you don’t have enough IP addresses for newcomers, additional devices will assign themselves a private IP address that will isolate them from the rest of the network.
For all the concerns about Internet security since cable and DSL modems first became popular, it’s horrifying how many home Internet users have essentially unsecured broadband connections. Adding a home network to share an Internet connection only makes security issues worse, because most broadband security still depends on how you configure each individual computer. You need to guard each PC sharing an Internet connection against the following:
Unauthorized access
Viruses, worms, and Trojan horse programs
Spyware and malware
Deceptive email
To do so successfully, you need a combination of hardware, software, and informed common sense. To improve your Internet security, keep reading.
One of the most important defenses against intruders is some type of Internet firewall. You’ve probably read about firewalls, but you might not understand what a firewall can do for you. What is a firewall?
In network terms, a firewall is a barrier between one network and another. Just as a firewall in a building helps prevent a fire from spreading to an adjacent building, an Internet firewall is intended to prevent unauthorized programs or data from accessing your system.
It’s common among many home network and Internet users to assume that an ordinary router is a true firewall. It’s true that a router prevents the Internet from seeing the true IP address of PCs on your network. Routers use a feature called network address translation (NAT), to translate the private IP addresses used on a network into the public IP address that the router uses to connect to the Internet. Figure 10.15 shows how NAT works.

Although a router using NAT hides local network IP addresses from direct access by outside intruders, it isn’t designed to cope with types of attacks against the router itself, such as denial of service or attempts to open unauthorized network services.
To improve security beyond the level that NAT translation in a basic router provides, there are three levels of firewall protection to consider:
Routers with stateful packet inspection and other security features
Firewall appliances
Personal firewall software
The following sections examine each of these in greater detail.
For greater security, you can get a router that uses a feature called stateful packet inspection (SPI). SPI examines network traffic to determine whether incoming traffic was actually requested by the network and blocks unsolicited traffic. A router that features SPI is often referred to as a firewall router or a VPN router because most of these routers also add support for two or more VPN connections and provide support for inbound VPN connections.
Some routers that feature SPI include additional security features such as
Script and active content blocking (Java, ActiveX)
Website filtering
Time filtering
Traffic and event logging
If you have problems with users installing ActiveX or Java programs, some firewall routers can block this activity. Website filtering enables you to block websites based on keywords or names, a good feature for home networks that will be used by children. Time filtering enables you to shut off Internet access at specified times of the day; you can use this feature to stop late-night web surfing.
Firewall routers are more expensive than basic routers. Many firewall routers don’t include wireless features, but you can add a WAP to enable a firewall router with ethernet ports to work with both wired and wireless clients. Firewall routers are available from firms that also produce basic routers, such as
Linksys (www.linksys.com)
Netgear (www.netgear.com)
D-Link (www.dlink.com)
Belkin (www.belkin.com)
A firewall appliance is similar to a firewall router, but typically adds features such as
Notification of intrusion attempts
Requirement that connections run an up-to-date version of antivirus software
Support for multiple VPN connections inbound and outbound
Automatic firmware updates
A firewall appliance is more expensive than a firewall (SPI) router. Which should you choose?
Choose a basic router for a small home network that’s used for a mixture of work-from-home, educational, and recreational activities.
Choose a firewall router if you need to have two or more VPN connections running at the same time or have a small business that uses your home network. Firewall routers also support recreational and entertainment uses.
A firewall appliance is overkill for a home network, unless you want maximum control over network activity and want to pay for self-managing features such as automatic antivirus and intrusion warnings. If you have entertainment devices that need Internet access such as personal video recorders or video game consoles, contact the vendor to see whether such devices are supported by a particular firewall appliance.
Some of the leading vendors of firewall appliances include
Cisco (http://www.cisco.com)
HotBrick (http://www.hotbrick.com)
SonicWall (http://www.sonicwall.com)
Symantec (http://www.symantec.com)
Windows XP features an Internet Connection Firewall. To enable it in the original version and in Service Pack 1, click the Advanced tab on the properties sheet for Network Connections and click the Protect My Computer and Network check box.
In Service Pack 2, Windows XP is equipped with a more powerful and more configurable firewall. To verify whether firewall, antivirus, and automatic updates through Windows Update are enabled, open the Security Center icon in Control Panel. To configure the Windows XP SP2 Firewall (Figure 10.16), open the Windows Firewall icon in Control Panel.

Compared to the original Windows XP Firewall, SP2’s Firewall is much improved:
Configuring the firewall for network and Internet-compatible programs is much easier
The firewall works with home and small-business networks
The firewall can log activity
However, neither the original Windows XP firewall nor the SP2 version checks outgoing traffic. As a result, they permit spyware or Trojan horse programs installed on your computer to send data to remote computers. For full protection, I recommend using a third-party firewall instead.
If you have a basic router, you can greatly improve the security of the computers on your home network by installing firewall software on each computer. Basic firewall software inspects incoming traffic to determine whether it has been requested by your PC; unsolicited traffic is rejected. Most third-party firewalls also alert you to programs that are attempting to access the Internet, providing you with the opportunity to stop programs you don’t recognize. Firewalls also hide your computer from intruders. Free basic firewall software includes
Zone Alarm (http://www.zonelabs.com)
Sygate Personal Firewall (http://soho.sygate.com)
Kerio Personal Firewall limited version (http://kerio.com)
These and many other companies also provide commercial firewall programs. Commercial firewall programs provide more protection than their crippled freeware siblings. For example, a comparison of Zone Alarm and Zone Alarm Pro reveals that Zone Alarm Pro adds
Enhanced control over programs’ access to the Internet
Protection against pop-up ads and adware cookies
Protection against personal information leaving your system
Monitoring and halting of outgoing mail that might contain viruses
Some commercial programs integrate antivirus and additional security features into security suites. You can use the comparison tools available at many vendors’ websites to determine which firewall or firewall suite is best for you.
Some of the leading commercial firewall software and security suite products include
Zone Alarm Pro, Zone Alarm Security Suite (http://www.zonelabs.com)
Norton Personal Firewall, Norton Internet Security Suite (http://www.symantec.com)
PC-Cillin Internet Security (http://www.trendmicro.com)
McAfee Personal Firewall, McAfee Internet Security Suite (http://www.mcafee.com)
Sygate Personal Firewall Pro (http://soho.sygate.com)
Kerio Personal Firewall (http://kerio.com)
The best way to find out what a firewall can do for you, as well as show you what you need to do to use it effectively, is to try it. Some of the commercial products listed offer limited time trials. In the following section, I show you how to use ZoneAlarm, the best known (and one of the best) free (for noncommercial use) software firewalls.
ZoneAlarm divides network traffic into two categories:
Internet Zone
Trusted Zone
By default, it permits your installed web browser to connect to the Internet. All other online and network traffic is placed in the Internet Zone (allowing minimal interaction with your PC) until you manually select programs and activities that can be placed in the Trusted Zone.
ZoneAlarm identifies programs when they try to access the Internet for the first time and pops up a dialog asking you whether the program should be allowed access or denied access, as in Figure 10.17. Expect to see several of these dialog boxes as you use your computer for the first few days.

Before granting access, look carefully at the program. To stop repeated alerts, click the check box next to Remember This Setting before you allow or deny the program.
Attempts by others to access shared resources or other network/Internet intrusion attempts on your system will trigger an alert such as the one in Figure 10.18.
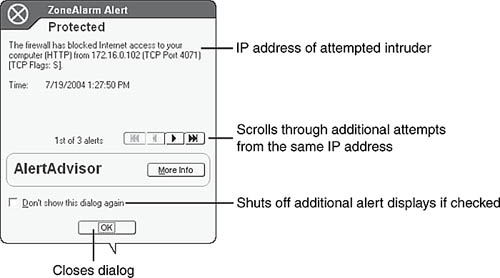
Look carefully at the IP address in an alert like the one in Figure 10.18. This IP address is on your home network (compare to the list of IP addresses in Figure 10.14). However, until you instruct ZoneAlarm to permit access from your home network to the system, ZoneAlarm blocks all attempts to view or use shared resources. If a system running ZoneAlarm attempts to use another computer’s shared resources, a Windows error appears indicating that the resource is not available. The solution? Add your home network to the list of Trusted Zones.
To add your home network to the Trusted Zone:
Open the ZA icon in the system tray.
Click Firewall.
Click Add.
Select IP Range to bring up a dialog box similar to the one shown in Figure 10.19.
Make sure Trusted is selected in the pull-down menu.
Enter the starting address of your home network in the first IP address line. If you use DHCP to provide your network with IP addresses, use the first IP address specified in your router’s DHCP settings. Refer to Figure 10.14.
Enter the last IP address on your network in the second IP address line. Use the last IP address provided by your router’s DHCP server unless you manually assign addresses to other devices.
Type a descriptive name for your home network.
Click OK. The specified IP addresses on your network are listed as Trusted in the Firewall listing (Figure 10.20).
Click Apply to complete the process.


After adding your home network’s list of IP addresses, you can access other computer’s shared resources and they can access yours while being protected from intruders outside the network.
Antivirus software is essential for both individual PC users and home network users. With the most recent versions of antivirus applications from leading vendors such as Norton (www.symantec.com) and McAfee (www.mcafee.com), you protect your network from
Computer viruses carried by floppy disks and other media
Emails that include hostile scripts or have attachments with other types of harmful programs
Automatic protection (which updates your antivirus software for you) should be enabled during installation. Figure 10.21 shows a typical status screen from the Norton Antivirus component in Norton System Works 2004.

As you can see from Figure 10.21, this system needs a full system scan. You can schedule these to take place during off hours (such as during the day when you’re at work). Depending on the antivirus application and version of Windows you use, you can use the program’s own scheduler or the scheduler built in to most versions of Windows.
Don’t make the all-too-common mistake of assuming that once you’ve installed antivirus software you don’t need to maintain it. Automatic updates help keep detection features up-to-date, but most antivirus programs today include only one year of updates. On the system shown in Figure 10.21, the last date for updates without additional charges is March 26, 2005.
Remember that you need up-to-date antivirus for each PC on your network. To save money, consider the following:
Buying multipacks
Buying programs that provide a license for two PCs
Getting bundles that include antivirus with other network/Internet security tools
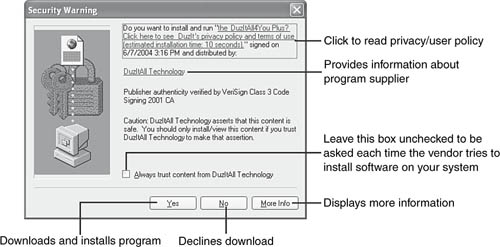
Pop-up ads, mailbox spam, browser hijacking, and slow system performance are just a few of the problems caused by so-called adware or spyware programs. Adware programs display pop-up ads (and might also send ads to your email box or take over your browser’s home page) based on your browsing behavior. Spyware refers to programs that are designed to monitor and transmit reports about your online behavior to remote websites for marketing or other purposes. These programs are often installed as part of the process of installing “free” programs from the Internet, such as screensavers, customized cursors, weather display programs, password helpers, and many more. Some websites offer such free programs through pop-up ActiveX installers, such as the one shown in Figure 10.22.
Tip: Why Upgrading Antivirus Beats Updating
I have never purchased a renewal to an installed antivirus program. Instead, I purchase the newest version and use it until it’s time for the next version. Here’s why:
Renewals provide continued updates to virus signatures (the behavior and clues used to detect viruses and other threats) but they don’t provide enhancements to the basic virus-detection program.
Buying the latest version of an antivirus program adds new features that you won’t get if you renew your subscription to the previous year’s version.
You’ll pay a bit more doing it this way, but you get better protection and more features.
How should you deal with pop-up installers? These rules of thumb are your first line of defense:
If you didn’t click on a link to download something, click No! Never take an unsolicited download. If the program offered is required to view the contents of a particular website (such as a new version of Macromedia Flash or Apple Quick Time), visit the vendor website yourself and download the update.
Always read the privacy or user policy presented before you accept a download.
Consider searching for other programs with similar features and less obnoxious marketing techniques.
Never click the check box Always Trust Content, no matter what vendor. The security certificates used to identify the source of downloaded programs have occasionally been stolen or forged.
Your second line of defense is to adjust how your web browser handles downloaded programs and other content. By default, Internet Explorer offers various security zones that adjust how the browser handles different types of content. By default, the Internet zone (includes all websites until you use other categories) uses Medium security (Figure 10.23). To display this dialog, open the Internet properties sheet in Control Panel and click Security.
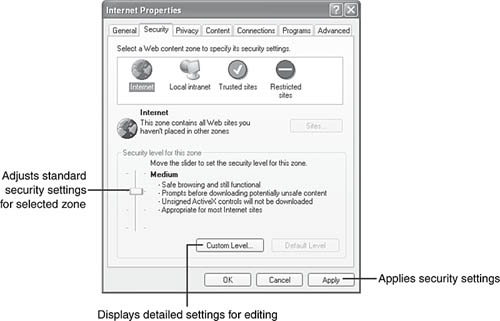
You can increase the security of your browser two ways:
Adjust the sliding bar upward to High to disable active content.
Create a custom level.
Using High disables ActiveX program downloads, file downloads, and Java programs among others. This sounds useful, but unfortunately this setting prevents many legitimate websites from working properly.
You can create your own customized security settings by clicking Custom Level and adjusting the settings (Figure 10.24).
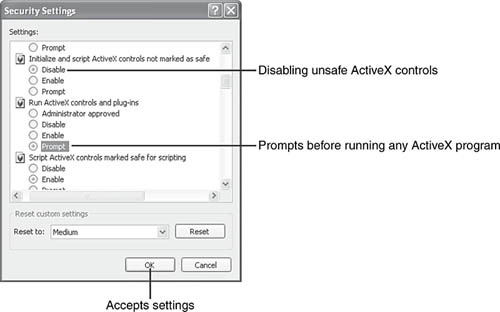
I suggest the following approach to creating a custom security level:
Use Prompt when offered for signed ActiveX, Java, and other active content on your system. You need to approve each active content program that tries to run. This prevents the downloading of programs without your consent.
On systems used by your children, set active content settings (ActiveX, Java, scripts) to Disabled. Make them ask you for permission to download that “cool” new program. This prevents the downloading of programs that are likely to contain spyware or malware.
Unsigned programs and content (doesn’t display a security certificate such as the one in Figure 10.22) should never be allowed to run. You wouldn’t take candy from a stranger, and you shouldn’t accept programs from strangers either.
If you visit reputable websites frequently that use a lot of active content, add those URLs to the Trusted sites zone. This eliminates the need to constantly approve active content when you visit the websites in the Trusted Zone, without affecting security settings for other sites.
Even if you’re already following these precautions, your system might already be infected. Two of the most effective ways to clean up adware/spyware infections are
Spybot Search & Destroy (http://www.safer-networking.org/en/index.html)
Lavasoft AdAware (http://www.lavasoft.de/)
These free programs use different methods to detect and remove spyware and adware from your system. AdAware is also available in a commercial Plus version that prevents adware/spyware infections.
Tip: For More About Browser Security, Surf These
Find a great visual guide to completing the Internet Explorer security dialog at http://www.dslreports.com/forum/remark,1333507~mode=flat.
Microsoft doesn’t enable you to save custom security settings. Consider add-on browser software that enhances IE’s security settings, such as Secure IE (http://www.winferno.com), Norton Internet Security 2004 (http://www.symantec.com), and McAfee Security Suite (http://www.mcafee.com).
Find a concise guide to configuring IE and Mozilla (a popular open-source browser) at http://cybercoyote.org/security/settings.htm.
One of the biggest problems in Internet and home network security today is phishing—a term that refers to the widespread use of bogus emails intended to entice you into revealing personal information. You might have already gotten fake emails, but if more people in your home are now online as a result of your home network, the odds of somebody being conned have increased—unless you take precautions.
Many of these emails purport to come from major institutions—such as Citibank, U.S. Bank, or eBay—but a careful analysis of the email reveals that the credit card, account, password information, and so forth that you provide to the sender will go somewhere else.
These types of emails have some characteristics in common, as shown in Figure 10.25.
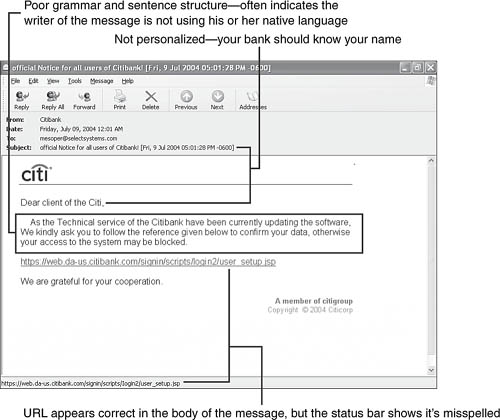
Note the misspelling of the URL at the bottom of Figure 10.25. To see the actual URL for a link in the status line, move your mouse over the link. The actual CitiBank online banking URL is https://web.da-us.citibank.com/cgi-bin/citifi/scripts/login2/login.jsp (https://indicates a secured site). The fake email has Iogin2 instead of login2, but you can’t tell in the body of the message because l and I look about the same in a sans serif font.
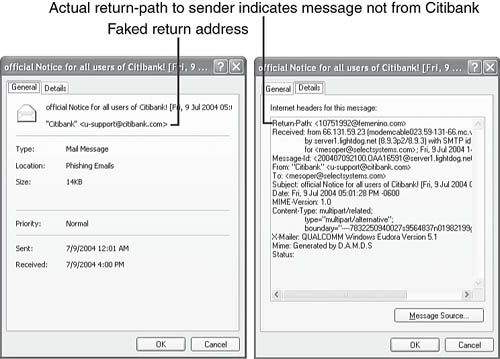
Even before you open such an email, you can often tell a phony from the real deal by looking at the details of the email. For example, the fake email shown in Figure 10.25 purports to be from <[email protected]> if you right-click the email, select Properties, and look at the General tab (Figure 10.26, left). Click the Details tab, though, and it’s clear from the Return-Path (Figure 10.26, right) that Citibank has never had anything to do with this email.
If anyone in your home gets an alarmist message like this, contact your financial institution to see whether there’s really a problem; don’t use the convenient link in the message because it’s probably a fake. Disregard any messages purporting to come from an institution you don’t do business with. Fake messages from eBay run the highest risk of catching an unwary user, because so many people shop and sell on eBay. ZoneAlarm’s free version even has a special eBay setting designed to alert you if you try to surf to a fake eBay site.
A home network is a wonderful way for your family to enjoy the Internet. Unfortunately, it’s also a wonderful way for all types of assorted evildoers to cause problems for your family. Here are some ways to protect your family while you all enjoy home networking and Internet access.
You can control the websites your children visit in a variety of ways. As I discussed earlier, many firewall routers have provisions for blocking undesirable websites. That’s good as far as it goes, but in a world of billions of web pages, that requires a lot of maintenance. Better options include the following:
Using the parental control features provided by some commercial broadband ISPs
Using add-on parental control packages
Using filtered Internet service in conjunction with your existing broadband service
To find out whether your broadband provider offers parental controls, check online help for your ISP or call its helpline. Note that some providers offer email filtering, but not website filtering.
Leading parental control packages include
Cyber Snoop (www.pearlsoftware.com)
CyberPatrol (www.cyberpatrol.com)
Netopia (www.netopia.com)
Some Internet security suites also feature parental control features, and some router vendors also partner with parental control developers.
Tip: Usernames and Passwords Keep Users Honest
To keep kids whose computers have filtered access away from adults’ unfiltered computers, make sure to use Windows XP’s username and password login option.
Some filtered Internet access providers provide only dial-up service, but the following providers support broadband connections:
Covenant Promotions (http://www.covpro.net/)
CIS Internet (http://www.wv-cis.net/)
Family-Surf.com (http://www.internetfilters.net)
Trial versions of some products and services are available. Try several out before you settle on one. Some of these vendors also provide email and chat protection.