


The z/OS system programmer
Because the base elements and optional features of IBM z/OS are integrated into a single package with compatible service levels, you must install, with few exceptions, the entire z/OS product. You can install z/OS using one of several IBM packages.
This chapter presents the available z/OS delivery options to install z/OS, as listed here:
•IBM z/OS ServerPac (ServerPac)
•Custom-Built Product Delivery Option (CBPDO)
•IBM SystemPac
•Entry Server Offering
In addition, this chapter briefly describes the download process and installation steps for using the ServerPac installation option.
|
Attention: When you order any of the installation packages, you receive a comprehensive installation guide that details the installation tasks step-by-step from the beginning of the installation until you start your system.
For example, if you choose the ServerPac installation package, you receive ServerPac: Installing Your Order documentation that is tailored to your order for installation. This document is unique to your environment and is based on what you have ordered.
|
In a mainframe IT installation, system programmers are responsible for installing, customizing, and maintaining the z/OS operating system (OS). Their responsibilities also include installing or upgrading all additional products that run on the system, including middleware products. Middleware is a software layer between the OS and the user, or user application. Middleware supplies major functions that are not provided by the operating system.
This chapter describes the tasks involved with the install process.
3.1 z/OS Operating System: The role of a system programmer

Figure 3-1 z/OS Operating System: The role of a system programmer
The role of a system programmer
As a system programmer, and to meet the specific requirements of your installation, you can customize z/OS functions and interfaces to take advantage of new functions after installation. The role of the system programmer is to install, customize, and maintain the operating system. z/OS runs on various hardware configurations. A system programmer must define the hardware input/output (I/O) configuration resources that are to be available to z/OS. The hardware used can be either IBM or other manufacturer machines. As a z/OS system programmer, you must be aware of the following items:
•Storage concepts
•Virtual storage and address spaces concepts
•Device I/O configurations
•Processor configurations
•Console definitions
•System libraries where the software is placed
•System data sets and their placement
•Customization parameters that are used to define a z/OS configuration
•Execution of the performance analysis task through the use of performance monitors, such as the z/OS Resource Management Facility (RMF)
System operations
Installing and configuring system software is a task that occurs frequently. For the various products installed, different system programmers might be assigned to different products and subsystems. Introduction and management of new workloads on the system, such as batch jobs and online transaction processing, might also involve individual system programmers being assigned to support the various types of workloads that run in the complex.
System programmers must be skilled at debugging problems with system software. These problems are often captured in a copy of the computer's memory contents called a dump, which the system produces in response to a failing software product, user job, or transaction.
Using the dump and specialized debugging tools, the system programmer can determine where the components have failed. When the error occurs in a software product, the system programmer works directly with the software vendor to report the problem and wait for a potential fix to install.
z/OS operating system
Several IBM packages are available for installing z/OS. Some are entitled with the product (as part of your z/OS license, at no additional charge). Others are available for an additional fee.
|
Important: Because the base elements and optional features are integrated into a single package with compatible service levels, you must install, with few exceptions, the entire z/OS product.
|
Installing z/OS
One of the following methods can be used to install z/OS:
•ServerPac (entitled with z/OS)
ServerPac is an entitled software delivery package consisting of products and service for which IBM has performed the System Modification Program/Extended (SMP/E) installation steps and some of the post-SMP/E installation steps. To install the package on your system and complete the installation of the software that it includes, you use the IBM CustomPac Installation dialog.
The CustomPac Installation dialog generates tailored installation jobs and saves detailed definitions of volume, catalog, and data set configurations, which can be tailored, saved, and merged to install subsequent ServerPacs. The CustomPac Installation dialog is the same dialog that is used for all of the CustomPac offerings, including SystemPac (dump-by-data-set format), IBM ProductPac®, and IBM RefreshPac.
•CBPDO (entitled with z/OS)
Custom-Built Product Delivery Option (CBPDO) is an entitled software delivery package consisting of uninstalled products and unintegrated service. There is no dialog program to help you install, as there is with ServerPac. You must use SMP/E to install the individual z/OS elements and features, and their service, before you can perform an initial program load (IPL). Installation instructions are in the publication z/OS Program Directory.
•SystemPac (additional charge with z/OS)
SystemPac is a software package, available for an additional fee and offered worldwide, that helps you install z/OS and subsystems (IBM DB2, IBM IMS, IBM Customer Information Control System (IBM CICS), Network Control Program (NCP), and IBM WebSphere Application Server). SystemPac is tailored to your specifications; it is manufactured according to parameters and I/O definition file (IODF) definitions that you supply during order entry.
The goal is to have the system tailored to your specifications, and to have products enabled according to your specified configuration. Parameters are collected by telephone. Using a printed questionnaire as a guide, you tell an IBM representative your responses. Upon completion, a printout showing all of the parameters and definitions that you specified is sent to you for reference.
3.2 z/OS system programmer management overview

Figure 3-2 z/OS system programmer management overview
z/OS system programmer management overview
As a z/OS system programmer, you need to be involved in the customization of the items illustrated in Figure 3-2. These items are explained in the following list:
•Address spaces. When z/OS is started, z/OS establishes system component address spaces. During the IPL, the first address space started is the master scheduler address space (*MASTER*). There are other system address spaces for various subsystems and system components.
•Paging. Page data sets contain the paged-out portions of address spaces, the common service area (CSA), pageable link pack area (PLPA), and the data written to virtual I/O (VIO) data sets.
•Dispatching work. The scheduling of address spaces as dispatchable units to run on a central processor (CP) in the z/OS system is done by the z/OS dispatcher component. The z/OS dispatcher is responsible for finding and dispatching (run on a CP) the highest priority dispatchable unit in the system (service request blocks (SRBs) and tasks).
•Job flow. z/OS uses IBM Job Entry Subsystem (JES) to receive jobs (also called batch, which is a non-interactive type of transaction) into the OS, to schedule them for processing by z/OS, and to control their output processing. JES is the component of the OS that provides supplementary job management and data management.
JES also provides supplementary task management functions, such as scheduling, control of job flow, and spooling (storing output on direct access storage device (DASD) spool volumes rather than printing them at the moment they are produced).
•z/OS storage. The system programmer must be aware of all storage considerations when installing and customizing a z/OS environment. The initialization process begins when the system operator selects the LOAD (IPL) function at the system console. z/OS locates all of the usable main storage that is online and available to the system, and creates a virtual environment for the building of various system areas.
This initialization phase allocates the system's minimum virtual storage for the system queue area (SQA) and the extended SQA, allocates virtual storage for the extended local system queue area (extended LSQA) for the master scheduler address space, and allocates virtual storage for the CSA and the extended CSA. The amount of storage allocated depends on the values specified on the CSA system parameter read during
the IPL.
the IPL.
•System data sets. Each installation must incorporate required system data sets into the system by allocating space for them on appropriate direct access devices (DASD) during system installation. The DEFINE function of Access Method Services is used to define both the space requirements and the volume for each system data set. Some data sets must be allocated on the system residence volume (the volume that has the kernel of z/OS code). Other data sets can be placed on other direct access volumes.
•Operator communication. The operation of a z/OS system involves the following elements:
– Console operations, or how operators and system programmers interact instantaneously with z/OS to monitor or control the hardware and software.
– Message (produced by z/OS) processing and command (produced by an operator) processing that forms the basis of operator interaction with z/OS, and the basis of z/OS automation.
– Managing hardware, such as processors and peripheral devices (including the consoles where operators or system programmers do their work), and software, such as the z/OS operating control system, JES, subsystems (such as IBM NetView®) that can control automated operations, and all of the applications that run on z/OS.
•Security. Data security is the protection of data against unauthorized disclosure, transfer, modification, or destruction, whether accidental or intentional. A security system, such as IBM Resource Access Control Facility (RACF), must be installed in your OS by a system programmer to maintain the resources necessary to meet the security objectives. The system programmer has the overall responsibility, using the technology available, to transform the objectives of the security policy into a usable plan.
•Availability. The software products supporting system programmers and operators in managing their systems heavily influence the complexity of their job and their ability to keep system availability at a high level. Performance management is the system management discipline that most directly impacts all users of system resources in an enterprise and can be achieved, for example, by using RMF.
•Integrity. An OS is said to have system integrity when it is designed, implemented, and maintained to protect itself against unauthorized access, and does so to the extent that security controls specified for that system cannot be compromised. Specifically for z/OS, there must be no way for any unauthorized program, using any system interface, defined or undefined, to perform the following actions:
– Bypass store or fetch protection.
– Bypass password use, Virtual Storage Access Method (VSAM) password, or RACF security checking.
– Obtain control in an authorized state.
3.3 The system programmer and z/OS operations

Figure 3-3 The system programmer and z/OS operations
The system programmer and z/OS operations
A system programmer has to plan the following operations areas:
•z/OS Workload Manager
z/OS Workload Manager (WLM) provides a solution for managing workload distribution, workload balancing, and distributing resources to competing workloads. Managing workloads is possible due to the combined cooperation of various subsystems (CICS, IBM IMS/ESA, JES, Advanced Program-to-Program Communication (APPC), Time Sharing Option Extensions (TSO/E), z/OS UNIX System Services, distributed data facility (DDF), DB2, System Object Model (SOM), LAN Server for MVS (LSFM), and Internet Connection Server) with the WLM component.
•System performance
The task of tuning a system is an iterative and continuous process. The controls offered by system resources manager (SRM) are only one aspect of this process. Initial tuning consists of selecting appropriate parameters for various system components and subsystems. After the system is operational and criteria have been established for the selection of jobs for execution by job classes and priorities, SRM will control the distribution of available resources according to the parameters specified by the installation.
WLM, however, can only deal with available resources. If these are inadequate to meet the needs of the installation, even optimal distribution might not be the answer. Other areas of the system should be examined to determine the possibility of increasing available resources.
When requirements for the system increase and it becomes necessary to shift priorities or acquire additional resources, such as a larger processor, more storage, or more terminals, the WLM goals might have to be adjusted to reflect changed conditions.
•I/O device configuration
As a system programmer, you must define an I/O configuration to the operating system (software) and the channel subsystem (hardware). The Hardware Configuration Definition (HCD) component of z/OS consolidates the hardware and software I/O configuration processes under a single interactive user interface. The validation checking that HCD does as you enter data helps to eliminate errors before you attempt to use the I/O configuration.
The output of HCD is an IODF, which contains the server, the logical partitions and the I/O configuration data. An IODF is used to define multiple hardware (servers) and software configurations to z/OS. When you activate an IODF, HCD defines the I/O configuration to the channel subsystem or the operating system.
With the HCD activate function or the z/OS ACTIVATE operator command, you can make changes to the current configuration without having to restart the software or perform a Power-on Reset (POR) of the hardware. Making changes while the system is running is known as dynamic configuration or dynamic reconfiguration.
•Console operations
The operation of a z/OS system involves the following elements:
– Console operations, or how operators interact with z/OS to monitor or control the hardware and software
– Message and command processing that forms the basis of operator interaction with z/OS and the basis of z/OS automation
Operating z/OS involves managing hardware, such as processors and peripheral devices (including the consoles where your operators do their work), and software, such as the z/OS operating control system, the job entry subsystem, subsystems (such as IBM Tivoli NetView for z/OS) that can control automated operations, and all of the applications that run on z/OS.
Planning z/OS operations for a system must take into account how operators use consoles to accomplish their work and how you want to manage messages and commands. Because messages are also the basis of automated operations, understanding message processing in an z/OS system can help you plan z/OS automation.
System operations
Also involved are the business goals and policies established to enable the installation to grow and handle work efficiently. These needs, of course, vary from installation to installation, but they are important when you plan your z/OS operations.
Managing the complexity of z/OS requires you to think about the particular needs of your installation. However, installations can consider the following goals when planning z/OS operations.
•Increasing system availability
Many installations need to ensure that their system and its services are available and operating to meet service level agreements (SLAs). Installations with 24-hour, 7-day operations need to plan for minimal disruption of their operation activities. In terms of z/OS operations, how the installation establishes console recovery or whether an operator must restart a system to change processing options are important planning considerations.
•Controlling operating activities and functions
As more installations make use of multisystem environments (as in IBM Parallel Sysplex), the need to coordinate the operating activities of those systems becomes crucial. Even for single z/OS systems, you must consider controlling communication between functional areas (such as a tape-pool library and the master console area, for example).
In both single and multisystem environments, the commands that operators can issue from consoles can be a security concern that requires careful coordination. As a planner, ensure that the correct people are performing the correct tasks when they interact with z/OS. If your installation uses remote operations to control target systems, you also need to consider how to control those activities from the host system.
•Simplifying operator tasks
Because the complexity of operating z/OS has increased, the tasks and skills of operators also require careful consideration. How operators respond to messages at their consoles and how you can reduce or simplify their actions are important to operations planning. Further, planning z/OS operator tasks in relation to any automated operations that help simplify those tasks is also needed.
•Streamlining message flow and command processing
In thinking about operator tasks, consider how to manage messages and commands. Operators need to respond to messages. Routing messages to operator consoles, suppressing messages to help your operators manage increased message traffic, and selecting messages for automated operations can all help you manage system activity efficiently.
•Single system image
Single system image enables the operator, for certain tasks, to interact with several images of a product as though they were one image. For example, the operator can issue a single command to all z/OS systems in the sysplex rather than repeating the command for each system.
•Single point of control
Single point of control enables the operator to interact with a suite of products from a single workstation. An operator can accomplish a set of tasks from a single workstation, thereby reducing the number of consoles that the operator has to manage.
3.4 Requirements for z/OS installation
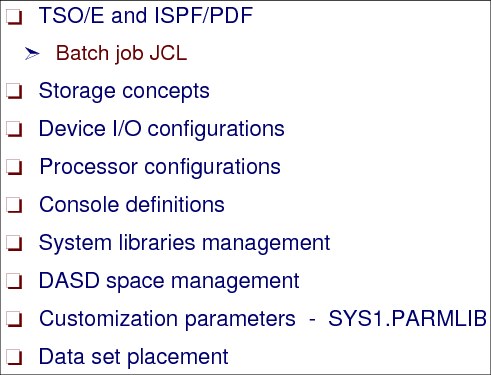
Figure 3-4 Requirements for z/OS installation
Requirements for z/OS installation
To be able to install and customize a z/OS operating system, a system programmer has to possess certain basic skills and functions. Figure 3-4 lists some of the areas that a programmer needs to be familiar with, and these areas are explained here:
TSO/E TSO/E is an option of the z/OS Operating System that enables users to interactively share computer time and resources. TSO/E is an integral part of z/OS, and serves as a platform for other elements, such as IBM BookManager READ, HCD, and Interactive System Productivity Facility (ISPF)/Program Development Facility (PDF). See “TSO/E” on page 65 for a complete description of TSO/E.
ISPF/PDF ISPF/PDF work under TSO/E to provide panels with which users can interact. ISPF provides the underlying dialog management service that displays panels, and enables a user to navigate through the panels. PDF is a dialog of ISPF that helps maintain libraries of information in TSO/E and enables a user to manage the library through facilities, such as browse, edit, and utilities. See “Interactive System Productivity Facility” on page 83 for a complete description of ISPF.
JCL During the install phase of z/OS, many batch jobs are required to be submitted. The job control language (JCL) for these jobs needs to be updated for your environment. Therefore, it is essential that a system programmer be very familiar with JCL, batch job submission from TSO/E, and using ISPF. See “Introduction to JCL: Creating a data set” on page 134.
Storage Storage concepts must be understood by the system programmer in setting up a z/OS environment. See “z/OS storage concepts” on page 247.
Device I/O An I/O configuration is the definition of hardware resources that are available to the operating system and the connections between these resources. The resources include:
– Channels (IBM ESCON and IBM FICON®)
– ESCON and FICON Directors (switches)
– Control units
– Devices
When you define a configuration, you need to provide both physical and logical information about these resources. For example, when defining a device you provide physical information, such as its type and model, in addition to logical information, such as the identifier you will assign in the configuration definition.
You must define an I/O configuration to the OS (software) and the channel subsystem (hardware). The HCD component of z/OS consolidates the hardware and software I/O configuration processes under a single interactive user interface.
Processors When more than one processor exists in a complex, or more than one logical partition (LPAR) exists in a complex, z/OS is required to be defined in multisystem mode or a sysplex.
Consoles A console configuration consists of the various consoles that operators use to communicate with z/OS. Your installation first defines the I/O devices it can use as consoles with the HCD. HCD manages the I/O configuration for the z/OS system. After you have defined the devices, indicate to z/OS which devices to use as consoles by specifying the appropriate device numbers in the CONSOLxx parmlib member.
System libraries management
When installing z/OS, the current z/OS system becomes the driving system that you use to install the target system. The target system is the system software libraries and other data sets that you are installing. You log on to the driving system and run jobs there to create or update the target system. After the target system is built, it can be restarted on the same hardware (same LPAR or same processor), or on different hardware than that used for the driving system.
DASD space management
The space required by system software data sets, except for partitioned data set extended (PDSE) data sets, is affected by the block sizes you choose for those data sets. Generally, data sets with larger block sizes use less space to store the same data than those with smaller block sizes. Data sets that store more data in less space usually offer better DASD performance than those that use more space to store the same data. The DASD space required to install z/OS includes:
•All elements
•All features that support dynamic enablement, regardless of your order
•All unpriced features that you ordered
SYS1.PARMLIB data set
SYS1.PARMLIB is a required partitioned data set (PDS) that contains IBM-supplied and installation-created members, which contain lists of system parameter values.
3.5 z/OS system with SMP/E

Figure 3-5 z/OS terminology for maintenance of the SMP/E libraries
z/OS terminology for the install
SMP/E is a tool designed to manage the installation of software products on your z/OS system, and to track the modifications that you make to those products. Usually, it is the system programmer's responsibility to ensure that all software products and their modifications are properly installed on the system.
The system programmer also has to ensure that all products are installed at the correct level, so that all elements of the system can work together. At first, that might not seem too difficult, but as the complexity of the software configuration increases, so does the task of monitoring all of the elements of the system.
|
Remember: All of the information found in the global zone, combined with the information found in the distribution and target zones, represents the data that SMP/E needs to install and track your system software.
|
The following SMP/E functions need to be understood during any install process:
LMOD The load module (LMOD) entry contains all of the information needed to replace or update a given load module. This includes information, such as whether the load module is link-edited or copied during the system generation process, any link-edit statements required to relink the load module, the link-edit attributes of the load module, and the libraries in which it exists. An LMOD entry is generally created by one of the following methods:
•Installing a system modification (SYSMOD) that adds the load module
•Processing JCLIN commands
ACCEPT The ACCEPT function is an SMP/E control statement that controls the placement (installing) of SYSMODs into the distribution libraries. Processing is similar to that during APPLY except that the distribution zone is updated, not the target zone, and JCLIN data is not processed by ACCEPT.
If the installation is successful, any entries in the SMPSCDS data set (SCDS) created by APPLY are deleted, as are temporary libraries created by RECEIVE. Therefore, after a SYSMOD is accepted, it can no longer be removed by SMP/E.
APAR An authorized program analysis report (APAR) identifies IBM-supplied fixes of a temporary corrective nature to elements of IBM-supplied function SYSMODs. APAR fixes are intended to solve problems currently being experienced by an installation.
The APAR fix is usually in the form of either a modification to a load module or an update to card-image data. It is intended as a temporary arrangement until a program temporary fix (PTF) is issued to fix the problem permanently. This PTF will supersede the APAR fix, and specifies this relationship on its ++VER statement.
To get an APAR SYSMOD accepted into the distribution libraries, the APARS keyword must be specified in the ACCEPT control statement, which protects against inadvertent updating of distribution libraries that are to be kept free of temporary fixes.
The ++VER statement in the APAR SYSMOD must specify the function modification identifier (FMID) of the function that “owns” the elements being updated.
Note the following examples:
++APAR(AP12345)
++VER(C150) FMID(HCI6300)
It is better to avoid accepting APARs into the distribution library, however, because the relevant PTF will become available in due course as a more permanent form of service.
APPLY The APPLY function is a function of SMP/E. It is an SMP/E control statement that applies SYSMODs to the CICS target libraries, where they can be tested. If the tests are not satisfactory, you can remove all or selected SYSMODs using the RESTORE function. If the test is successful, you can use the ACCEPT function to store the elements from the SYSMOD into the distribution libraries.
During JCLIN processing, every affected entry in the target zone is saved in the SCDS, in case the target system libraries and the target zone must be restored to their original status.
CSI Consolidated software inventory (CSI) is a keyed VSAM data set, logically divided by SMP/E into zones. For further information about the CSI and the logical structure of zones, see System Modification Program Extended: User’s Guide, SA23-2277.
Distribution zone The distribution zone describes the structure and contents of a set of distribution libraries.
FMID FMID is a keyword of SYSMODs that is used in identifying the release and option to which a SYSMOD is applicable for a particular product.
Global zone The global zone is a logical division of the SMP/E CSI, containing data such as the following information:
•Definitions of all other related zones
•Descriptions of the SYSMODs present in the PTF temporary store (PTS)
•Descriptions of the system utilities to be started during SMP/E processing
•Data definition (DD) entries for use by dynamic allocation
Load module In the context of SMP/E, a load module (LMOD) is an executable load module in a target library (such as hlq.SDFHLOAD).
PTF A PTF contains IBM-supplied fixes to elements of IBM-supplied function SYSMODs. PTFs are intended for installation by all users to avoid possible problems. A PTF can contain fixes for several different problems, so several APAR fixes reported in IBM RETAIN might all be superseded by the more permanent PTF.
Every PTF is introduced by a ++PTF header statement, and contains the FMID keyword on its ++VER modification control statement, identifying for example, CICS (HCI6300) as the owner of the modules being serviced.
Note the following examples:
++PTF(UP12345)
++VER(C150) FMID(HCI6300)
PTS PTS is an SMP/E primary data set used to store temporary SYSMODs that are in RECEIVE or APPLY status; that is, they have not been rejected or accepted.
RECEIVE RECEIVE is a function of SMP/E. It is an SMP/E control statement that initiates processing of a SYSMOD. RECEIVE reads the SYSMODs from the SMPPTFIN data set. Each SYSMOD must have been received before any other function can be run. RECEIVE updates the SMPPTS data set and performs syntax checking on input.
Before any SYSMOD for a product can be received, the global zone must have been initialized with a global zone entry. A service SYSMOD can be received into the PTS before the function to which it applies has been received. They can be maintained there until the function is received. This supports all service for a product, such as CICS, to be installed with the base product.
REJECT REJECT is a function of SMP/E. It is an SMP/E control statement that removes SYSMODs from the PTS data set and deletes any temporary libraries that SMP/E might have allocated when the SYSMOD was received (RELfiles). If the SELECT or EXCLUDE option is not coded on the REJECT control statement, then all SYSMODs not applied or accepted will be removed from the PTS. This is called a mass rejection.
All other SYSMOD processing functions (RECEIVE, APPLY, RESTORE, and ACCEPT) can have SELECT or EXCLUDE specified, or can default to mass-processing mode.
RESTORE RESTORE is a function of SMP/E. It is an SMP/E control statement that removes SYSMODs from the target system libraries after they have been applied, and restores the target libraries to their status before application of the SYSMODs. If necessary, RESTORE reconstructs the target zone entries from the SCDS. If you select mass restore, all SYSMODs that have been applied but not accepted will be removed from the target libraries.
SYSMOD SMP/E can install a large variety of system updates, provided they are packaged as a SYSMOD. A SYSMOD is the actual package of elements and control information that SMP/E needs to install and track system modifications.
Target zone The target zone describes the structure and contents of a set of target system libraries.
UCLIN UCLIN is a function of SMP/E. It is an SMP/E control statement that can be used to manipulate the various data sets that make up the SMP/E database. The most common use of this function is to initialize the SMP/E database before the first attempt to use it.
USERMOD USERMOD (user modification) is a user-supplied modification to elements of IBM-supplied function SYSMODs. USERMODs are similar to APAR fixes, but are supplied by the user and not by IBM. Examples of USERMODS include those in the following list:
•A local fix to bypass a problem until an official IBM fix is available
•A user modification to add or alter functionality in CICS
3.6 z/OS delivery options

Figure 3-6 z/OS package options
z/OS package options for ordering
Several IBM packages are available for installing z/OS. Some packages are entitled with the product (as part of your z/OS license, at no additional charge). Other packages are available for an additional fee. This section describes each package:
ServerPac ServerPac is an entitled software delivery package consisting of products and service for which IBM has performed the SMP/E installation steps and some of the post-SMP/E installation steps. To install the package on your system and complete the installation of the software that it includes, you use the CustomPac Installation dialog. For ServerPac orders, service is integrated with product code.
|
Tip: Starting with z/OS V1R13, ServerPac: Installing Your Order is no longer sent in hardcopy format. Instead, the information is available in PDF format on a DVD that also includes the program directories.
|
CBPDO CBPDO is an entitled software delivery package consisting of uninstalled products and unintegrated service. There is no dialog program to help you install, as there is with ServerPac. You must use SMP/E to install the individual z/OS elements and features, and their service, before you can perform an IPL. Installation instructions are in the z/OS Program Directory.
SystemPac SystemPac is a software package, available for an additional fee and offered worldwide, that helps you install z/OS, subsystems (DB2, IMS, CICS, NCP, and WebSphere Application Server). SystemPac is tailored to your specifications; it is manufactured according to parameters and IODF definitions that you supply during order entry. The goal is to have the system tailored to your specifications and have products enabled according to your specified configuration.
As previously mentioned, parameters are collected by telephone. Using a printed questionnaire as a guide, you tell an IBM representative your responses. Upon completion, a printout showing all of the parameters and definitions you specified is sent to you for reference. The documentation SystemPac Installation Guide that is included with your order specifies the integrated service level applicable to your order.
|
Tip: Starting with z/OS V1R13, SystemPac Installation Guide is no longer sent in hardcopy format. Instead, the information is available in PDF format on a DVD that also includes the program directories.
|
ShopzSeries ShopzSeries is an Internet application that you can use to order z/OS software products and service. Using ShopzSeries, you can order corrective and preventive service over the Internet, with delivery over the Internet or by tape.
Service with ShopzSeries reduces your research time and effort by using your uploaded SMP/E CSI to ensure that all applicable service, including reach-ahead service, for the installed FMIDs in the target zones is selected.
The following web address is the main page for ShopzSeries:
|
Important: IBM provides entitled service ordering and service delivery capabilities for the z/OS platform products electronically using the Internet. ShopzSeries is the primary ordering and delivery method for software service on these platforms.
The IBM S/390 Service Update Facility (SUF), the Internet-based software service tool for ordering and receiving z/OS, z/OS.e, IBM z/VM®, and Virtual Storage Extended/Enterprise System Architecture (VSE/ESA) software service, was discontinued effective January 15, 2006.
|
3.7 Choosing an installation package
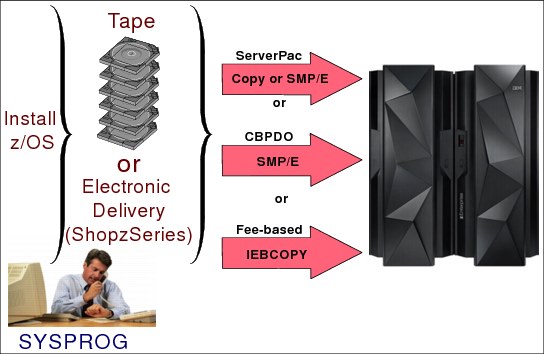
Figure 3-7 System programmer installing z/OS
Choosing an installation package
Before z/OS, large applications ran on an IBM Multiple Virtual Storage (MVS) OS that consisted of the Base Control Program (BCP), the Data Facility Storage Management Subsystem Data Facility Product (DFSMSdfp), and JES2 or JES3, plus a collection of other software products that the applications required, such as ISPF, TSO/E, and so on. You traditionally run these products at various release levels, using a “mix and match” approach.
With the introduction of z/OS, all of these products were integrated into a single product. You no longer order new levels of some products but not of others. Rather, you order and install an entire set of products integrated into one functionally rich OS. Only components for which you have a license are allowed to run. For z/OS components, this is documented in the IFAPRDxx member of SYS1.PARMLIB.
z/OS base elements and optional features
Because the base elements and optional features of z/OS, as described in 1.6, “z/OS V2R1 base elements” on page 10 and 1.7, “z/OS optional features” on page 17, are integrated into a single package with compatible service levels, you must install, with few exceptions, the entire z/OS product. You can install z/OS using one of several IBM packages. Two of these packages are available at no additional charge when you license z/OS:
•ServerPac
•CBPDO
Ordering ServerPac
ServerPac is an entitled software delivery package consisting of products and service for which IBM has performed the SMP/E installation steps and some of the post-SMP/E installation steps. To install the package on your system and complete the installation of the software that it includes, you use the CustomPac Installation dialog.
When you order a new system or a new release of z/OS, you also receive all of the new maintenance or service (including corrections) that is applicable to the release. ServerPac, when installed, replaces a complete z/OS system or subsystem. ServerPac is provided by system or subsystem type; that is, you get a separate ServerPac for each z/OS or subsystem.
Tape delivery
If you chose tape delivery when you ordered your ServerPac, you receive a box containing the ServerPac system tapes, the ServerPac documentation, and any publications or client code CDs for the products included in your order.
The ServerPac Installation dialog is used to install the ServerPac order, so the first step is to unload the dialog from tape. Then, you receive the order into the dialog, and use the dialog to tailor the ServerPac configuration to match your system environment. The dialog will use the tailored configuration to generate a customized installation job stream that will create your new target system from the system tapes.
|
Restriction: z/OS is no longer delivered on 3480, 3480C, and 3490E tapes. DVD is a new delivery medium available with z/OS V1R12. Like tape and the Internet, this method can be used to order z/OS and products that run on z/OS. Your order is placed and processed through ShopzSeries as a DVD (4.7 gigabyte (GB) single-sided, single-layered) media order. To upload your DVD order you need a DVD reader and a workstation that is network-attached to your z/OS host system.
|
New or existing user
The best installation method is usually the one that requires the least amount of work for you. The following methods are useful:
•If you are new to z/OS and never had a previous system, use ServerPac's full system replacement option.
•If you are new to z/OS, and you also want to install a ServerPac in the dump-by-data-set format, you can order and install the Customized Offerings Driver (COD) first. This software is a pre-built stand-alone driving system that you can use to prepare the installation of a CBPDO or a ServerPac if you do not have a driving system, or even if your driving system does not meet the minimum system requirements.
Electronic delivery using ShopzSeries
You can order a ServerPac using ShopzSeries or by contacting IBM or your IBM Business Partner. You select the products you want included in your ServerPac system or subsystem from the product catalog. The product catalog for ServerPac is refreshed monthly to include products that have been supported or withdrawn from ServerPac in the previous month.
When your order is ready for download, you will receive an email from IBM. When you log on to ShopzSeries to access your order, the download pages are dynamically built. You can either download your order directly to a host system using the ServerPac dialog, or download it to your workstation first using Download Director in ShopzSeries and then upload it to
the host.
the host.
After you make your product selections, place your order as shown in Figure 3-8 on page 190. You receive an order confirmation in a few hours. After that, you must wait for the order to be built by IBM and placed on the download server. Depending on what you order, this might take up to 10 business days. After the order is ready to be downloaded, you will receive another note saying that it is ready. This second note will contain a link to the download page you need to use to get information for proceeding with the next step.
|
Fast Track: ShopzSeries is an Internet application that you can use to order z/OS software products and service. Using ShopzSeries, you can order corrective and preventive service over the Internet, with delivery over the Internet or by tape. Service with ShopzSeries reduces your research time and effort by using your uploaded SMP/E consolidated software inventory (CSI) to ensure that all applicable service, including reach-ahead service, for the installed FMIDs in the target zones is selected.
The following web address is the main page for ShopzSeries:
|
Fee-based options
Several fee-based options are available:
SystemPac SystemPac offers the capability to build a system with integrated subsystems in either full volume dump/restore format or data set copy format. The full volume dump/restore format enables you to install z/OS without using the dialog.
Installation is done through pack restore using DFSMS Data Set Services (DFSMSdss). If the vendor product is selected in the order, installation can be done using IBM z/OS Fast Dump Restore (FDR).
SystemPac is designed for those who have limited skill or time to install or upgrade z/OS, but who want to install or upgrade to use z/OS functions in e-commerce or other areas.
SystemPac tailors z/OS to your environment, such as DASD layout, migration of MVS configuration program / I/O configuration program (MVSCP/IOCP) to IODF, and naming conventions, based on information provided to IBM. With this offering, selected non-IBM products can be integrated.
Entry Server Offering The Entry Server Offering, only available in selected countries, is a packaged solution that includes hardware, software, installation services, maintenance, and financing to help clients obtain current technology.
3.8 ServerPac Internet delivery

Figure 3-8 ServerPac internet delivery
ServerPac Internet delivery
To choose Internet delivery, you must place your order using ShopzSeries. As previously mentioned, when your order is ready for download, you will receive an email from IBM.
When you log on to ShopzSeries to access your order, the download pages are dynamically built. You can either download your order directly to host using the ServerPac dialog or download it to your workstation first using Download Director in ShopzSeries, and then upload it to the host.
When you log on to ShopzSeries to access your order, the download pages are dynamically built. You can either download your order directly to host using the ServerPac dialog or download it to your workstation first using Download Director in ShopzSeries, and then upload it to the host.
The dialog “Server” option will generate a RECEIVE job that uses the SMP/E GIMGTPKG utility to retrieve your order directly from the IBM server. GIMGTPKG will place the data in your Download file system. The dialog “File System” option will generate a RECEIVE job that will retrieve your order from the Download file system after you have uploaded it from your workstation, if you chose to download it to your workstation first.
Later, the dialog RESTORE job will use the SMP/E GIMUNZIP program to load your new target system’s volumes from the Download file system. When you have finished, you can delete the Download file system. However, consider dumping it first, just in case.
GIMGTPKG service routine
The GIMGTPKG service routine can be used to obtain GIMZIP packages from a remote File Transfer Protocol (FTP) server in an Internet Protocol network and store the packages on a local z/OS host. GIMGTPKG performs the functions of the SMP/E RECEIVE FROMNETWORK TRANSFERONLY command, but does so independently of SMP/E.
GIMGTPKG uses FTP to transport the files of a GIMZIP package from a remote FTP server to a local host, therefore providing the following advantages:
•Industry standard FTP protocol
•Secure transmission using the capabilities of the z/OS FTP client
•Ensured integrity of the transported files
GIMUNZIP service routine
SMP/E provides the GIMZIP and GIMUNZIP service routines to construct, and then later unwrap, network-transportable packages of software. This enables you to create your own packages of SMP/E installable software, and then distribute them in your own enterprise, or to other enterprises. Specifically, the GIMZIP service routine will accept partitioned or sequential data sets as input and create a network-transportable package as output.
The GIMUNZIP service routine is used to extract data sets, files, and directories from archive files in GIMZIP packages created by the GIMZIP service routine. These packages typically contain software and associated materials in the form of SYSMODs, RELFILE data sets, HOLDDATA, and other materials, such as documentation, samples, and text files. These GIMZIP packages can be transported through a network, processed by the GIMUNZIP service routine, and then processed by the SMP/E RECEIVE command.
More specifically, the GIMUNZIP service routine extracts data sets, files, and directories from the archive files that compose the GIMZIP package. An archive file consists of a portable image of a sequential, partitioned, or VSAM data set, or a file or directory in a UNIX file system, and the information needed to create that data set, file, or directory from the portable image.
The data set, file, or directory into which the archive file is to be extracted can already exist, or GIMUNZIP can create a new one of the appropriate type. New sequential and partitioned data sets created by GIMUNZIP are always cataloged.
3.9 System and installation requirements

Figure 3-9 Determining the installation requirements
System and installation requirements
Having an installation plan helps you ensure that the software is able to meet your installation's functional requirements. Besides functionality, there are other issues to think about when planning to build a system:
•Hardware and software requirements, including non-IBM software compatibility
•Virtual storage mapping
•Application performance
•Building a minimum number of system software configurations
•Reducing installation and migration time
•Reducing the opportunities for error during migration
•Making it easier to manage the system after it is in production
•Minimizing migration actions for the people who use the system
How you choose to meet all of these requirements can have a significant effect on how much work is required to perform the tasks associated with each stage. Keep all of these additional requirements in mind when you are planning to build a new system.
3.10 Reviewing your current system

Figure 3-10 Reviewing your current system for migration
Reviewing your current system
More often than not, you will be planning to upgrade from your current z/OS system to the new release of z/OS. It is therefore very important to review the setup of your current environment while planning for the new system. Some areas to consider are listed here:
•System layout
When you install using ServerPac or dump-by-data set SystemPac, take advantage of the Recommended System Layout enhancement. This function takes into consideration the volume space available and the data set sizes in your order, and places the data sets accordingly. If you are a CBPDO customer, you might have to calculate available space for the data set types on target volumes to ensure that it is sufficient. Depending on the volume type, you might have to add another target volume.
•Catalog structure
A software upgrade uses your existing catalog structure. This includes your existing master catalog (with direct or indirect cataloging references) and user catalogs. In addition, software upgrade enables you to create new user catalogs as part of the installation process.
•Data set naming conventions in your present environment
Check the names of data sets on the volumes, because a data set name on a given volume must not be the same as the name of a data set that you plan to install on that volume. Use the View and Change option of Modify System Layout of the CustomPac Installation dialog to obtain a list of the data sets in your order.
•Security software considerations
Use the RACFDRV installation job as a sample of the security system definitions required so that you can perform the installation tasks.
Depending on your order, the system target and distribution libraries might exceed more than one DASD volume. Therefore, define your new system layout to be prepared for future installation and easy cloning of your system.
|
Important: See “Recommended data set placement” in z/OS Planning for Installation, GA32-0890, before defining where the following new data sets should exist:
•Target data sets
•Distribution libraries data sets
•Master catalog and user catalogs
•Dialog and order data sets
|
3.11 Driving system and target system

Figure 3-11 Using the driving system to create the new system
Driving system and target system
The driving system is the system image (both the hardware and software) that you use to install your new system image, which is the target system. The target system is the system software libraries and other data sets that you are installing. You log on to the driving system and run jobs there to create or update the target system. After the target system is built, it can be loaded on the same hardware (same LPAR or different LPAR on the same processor), or on different hardware from that used for the driving system.
Driving system requirements
The minimum driving system level for installing z/OS V2R1 is z/OS V1R12 (for installing z/OS V1R13, it is z/OS V1R11.)
To prepare the driving system before building the target system, you need to perform the following tasks:
•Identify the software requirements for the driving system according to the delivery package you are using, for example, ServerPac.
•Identify the hardware requirements for the driving system.
Preparing the target system
You are also required to prepare for the target system, as described here:
•Choose the software products to install and identify requisites.
•Order z/OS and related IBM products.
•Identify the hardware requirements for the target system.
•Identify the service needed for the target system.
Driving system requirements
Driving system requirements for installing z/OS by way of ServerPac or dump-by-data set SystemPac are listed here:
•An OS.
Use either of the following:
– z/OS V1R12 or later.
– The Customized Offerings Driver V3 (5751-COD). This entitled driving system is provided for those who either do not have an existing system to use as a driving system, or whose existing system does not meet the requirements of a driving system and choose to not upgrade their driving system.
•A TSO/E session on the restarted system must be established using a locally-attached or network-attached terminal.
•Appropriate authority by using the RACFDRV installation job as a sample of the security system definitions required so that you can perform the installation tasks.
|
Entitled packages ServerPac and CBPDO: Use ServerPac, using the full system replacement installation path. You will also need the COD V3 (5751-COD) as a driving system (COD is also entitled).
|
For more information about each of the requirements for both the driving and target system, see z/OS Planning for Installation, GA32-0890, for the z/OS release that you are installing.
|
Information: If you do not have a z/OS driving system, your SystemPac order contains the stand-alone versions of the following utility programs so that you can install your order:
•ICKDSF, to be used to initialize DASD, create volume tables of contents (VTOCs), and perform other utility functions during system installation
•DFSMSdss, to restore the volume from tape to DASD
The utilities are provided based on selections you make during local order entry. See “SystemPac Installation Guide” supplied with your order for details about running these utilities.
|
New installations with no driving system
As of February 22, 2011, the COD V3 (5751-COD) and PTF maintenance are no longer delivered on 3480, 3480C, and 3490E tapes. DVD is a new delivery medium available for this information.
3.12 z/OS installation using ServerPac
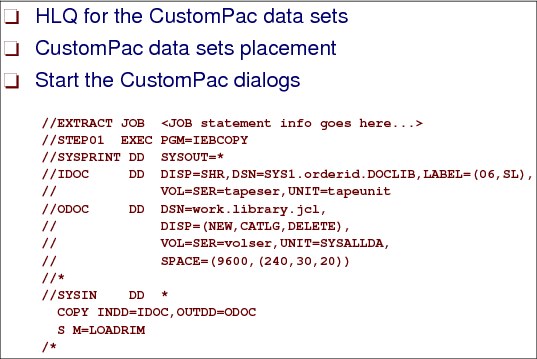
Figure 3-12 Installing the CustomPac dialog
z/OS installation using ServerPac
Your z/OS ServerPac order contains an ISPF dialog that you use to install z/OS. This dialog is called the CustomPac installation dialog because it is used to install all of the IBM CustomPac offering.
Installing the dialogs
To install the dialogs on your driving system for the first time, you must first copy the LOADRIM job to your driving system. Then use LOADRIM to load the rest of the dialog data sets onto your driving system's DASD.
Copying the LOADRIM job from tape
For orders delivered on tape, IBM provides the LOADRIM job as member LOADRIM in data set SYS1.orderid.DOCLIB, where orderid is the IBM-supplied number for your order. The SYS1.orderid.DOCLIB data set is the sixth file on the tape, which has a standard label (SL).
Copy LOADRIM from SYS1.orderid.DOCLIB. Create a job to copy the LOADRIM job to your driving system. Figure 3-12 shows a job that you can use.
Before beginning the installation, it is useful to perform these tasks:
•Review the contents of the ServerPac shipment that you received from IBM by checking the packing slip to verify that you have a complete set of installation tapes and documentation.
•Make sure your user ID has ALTER authority for the following high-level qualifiers:
– CPAC
– SYS1
– All product-specific high-level qualifiers for products that come with your package. You can find a listing of all qualifiers by using the A-ALIAS option of the dialog, or see Product Information in the appendix of IBM ServerPac Using the Installation Dialog, SA23-2278.
– System-specific aliases (SSA) named in the SSA panel. You will also need UPDATE access for the SSA qualifiers in the driving system's master catalog.
•During the job phase of the installation process, you might need RACF SPECIAL authority or equivalent if you use other security software.
•If you decided to use storage management subsystem (SMS) to manage data sets in your order, your user ID needs READ access to the FACILITY class profile STGADMIN.IGG.DIRCAT.
Installing the CustomPac dialogs
The first step in installing z/OS is to install the CustomPac dialogs from the RIM tape on your driving system. After they are installed, the dialogs do not have to be reinstalled with every order. They are auto-upgraded whenever you get a new order. Version checking starts the update of the dialogs during the CustomPac RECEIVE function.
Follow these steps to install the CustomPac dialogs:
1. Define the high-level qualifier (HLQ) for the CustomPac data sets (called master dialog data sets) pointing to a user catalog accessible by both the driving and the target systems; for example, SERVRPAC.
Because the dialogs are permanently installed at your installation, do not specify the IBM-supplied order number as the CustomPac qualifier.
2. If you intend to use SMS-managed dialog data sets, assign them to a management class that supports migration, unless SMS and Data Facility Storage Management Subsystem (DFSMS) Hierarchical Storage Manager (DFSMShsm) environments will be shared between driving and target systems.
3. As mentioned, for orders delivered on tape, IBM provides the LOADRIM job as member LOADRIM in data set SYS1.orderid.DOCLIB, where orderid is the IBM-supplied number for your order. The SYS1.orderid.DOCLIB is the sixth file on the tape, which has a standard label (SL).
4. The LOADRIM job contains steps to:
a. Delete previous CustomPac dialog data sets.
b. Unload master dialog data sets.
c. Allocate an order inventory data set to contain control information for all sent ServerPac orders.
3.13 The RIM tape samples

Figure 3-13 Using the CustomPac dialogs
The RIM tape samples
The relational database management system (RDBMS) Interface Module (RIM) tape
contains sample procedures, JCL, jobs, and command lists (CLISTs). They are in SYS1.orderid.DOCLIB. You can unload and modify these samples for your installation,
as listed and described in Table 3-1.
contains sample procedures, JCL, jobs, and command lists (CLISTs). They are in SYS1.orderid.DOCLIB. You can unload and modify these samples for your installation,
as listed and described in Table 3-1.
Table 3-1 Useful samples from the RIM tape
|
Name
|
Description
|
|
LOADRIM
|
LOADRIM is the JCL to unload files from tape and set up the installation dialog. When you edit the LOADRIM sample JCL, you can choose the name of the master data sets, the unit name of your tape drives, and the volume serial number (VOLSER) of the DASD that receives the installation dialog’s data sets.
|
|
SETUP
|
This is a sample LOGON procedure that includes the CustomPac dialog ISPF libraries.
|
|
CPPCSAMP
|
This sample CLIST can be used to set up the environment rather than modifying the LOGON procedure. CPPCSAMP uses library definitions (LIBDEFs), and is the preferred method to allocate the CustomPac libraries and start the dialog.
|
|
CPPINIT
|
With the CPPINIT CLIST, you can set up the environment from native TSO.
|
|
PRTDOC
|
This sample job prints the CustomPac Installation dialog reference manuals.
|
3.14 Starting the CustomPac dialogs
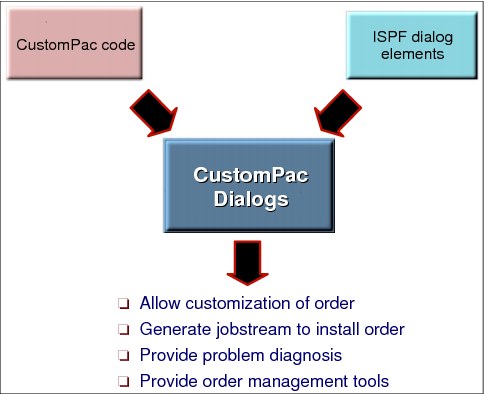
Figure 3-14 CustomPac dialogs
Starting the CustomPac dialogs
The CustomPac dialogs are now installed. To access the dialogs, follow these steps:
1. Customize the CPPCSAMP CLIST, changing the custompac.qualifier according to the qualifiers of the master dialogs data sets.
2. Save the customized CLIST.
3. Go to TSO/ISPF, option 6 and run the new CLIST, where DATA.SET.NAME is the partitioned data set where you saved the CLIST and CPPCSAMP is the member name where you saved the customized CPPCSAMP CLIST:
exec 'DATA.SET.NAME(CPPCSAMP)'
Figure 3-16 on page 203 shows the panel that you receive when you start the CustomPac dialogs.
|
Information: See IBM ServerPac Using the Installation Dialog, SA23-2278, for further considerations and a complete explanation of how to install your order with ServerPac.
|
3.15 Types of data sets and their volumes

Figure 3-15 Installation data sets
Types of data sets and their volumes
An installation needs to determine which data sets to place on each volume based on data set type, not based on element, feature, or product. There are five types of data sets in the suggested data set layout. Each type is placed on a separate (logical) volume. The types of data sets and their volumes are listed here:
•SMP/E global-shared data sets, on a volume shared by all systems in the complex that need access to SMP/E global information
|
Tip: These data sets contain SMP/E global system information. For the sake of organization, and ease of backup and recovery, it is useful to keep them together on a volume shared by all systems that use SMP/E in your complex.
If you maintain multiple global zones for subsystems or vendors, the global zone described here should contain ZONEINDEX references to all other zones. This will assist you in cross-zone conditional requisite checking, without requiring any changes to your installation's maintenance procedures.
|
•Target libraries (TLIBs) for product sets, on the following volumes:
– TLIB volume 1 (TVOL1)
– TLIB volume 2 (TVOL2) through TLIB volume n (TVOLn)
– Hierarchical file system (HFS) or IBM zSeries File System (zFS) target volume
– Licensed product set volume (for licensed programs not installed with the z/OS
product set)
product set)
– Vendor product set target volume
– Subsystem product set target volume
|
Information: TVOL1 through TVOLn can be shared with other systems (for Interactive Problem Control System (IPCS) or WLM migrations, for example). If TVOL1 does not contain enough space to hold all the data sets listed for your system, then the criterion for a split (between TVOL1A and TVOL1B, for instance) is that the IPCS and change migration libraries are kept together on the first volume (TVOL1A).
|
•Distribution libraries (DLIBs) for product sets, on the following volumes:
– DLIB volumes for target volumes (which include TVOL1, TVOL2-n, HFS, and zFS)
– DLIB volume for the licensed product sets
– DLIB volume for the vendor product sets
– DLIB volumes for the subsystem product sets
|
Tip: Place data sets on the DLIB volumes wherever they fit. There does not need to be a correlation between TVOL1 and the DLIB volume for TVOL1, or between TVOL2 and the DLIB volume for TVOL2, and so forth. It is possible, but not necessary, to SMS-manage the data sets.
|
•Image-related data sets, on the following volumes:
– Page data sets volume 1
– Page data sets volume 2 through n
– HFS or zFS customization volume
|
Remember: These data sets contain unshareable system image information. Although it is preferable to put them on separate volumes, as described next, if DASD is scarce you can combine them but at the expense of performance, availability, or both.
|
•Cluster-related data sets, on the following volumes:
– Master catalog volume (you can also choose to make this an image-related volume)
– JES checkpoint volume
– JES spool volume
– Sysplex volume 1
– Sysplex volume 2
– Softcopy volumes
|
Tip: These are shareable data sets used in a multisystem environment. Use system symbolics in the names of cluster-related data sets for easier maintainability.
Although all cluster-related data sets can be combined on the same volume, it is usually preferable to separate certain data sets from others for performance or availability reasons. For example, the following data sets should usually not be placed on the same volume:
•Primary and secondary RACF databases
•JES spool and checkpoint data sets
•Primary and backup SMS data sets
•Primary and secondary couple data sets
|
3.16 Receiving the ServerPac order

Figure 3-16 CustomPac primary menu
Receiving the ServerPac order
Before you use the dialog to install your order, perform the following tasks:
•Become familiar with the dialogs. Consult IBM ServerPac Using the Installation Dialog, SA23-2278, in particular the following sections:
– “Features of the dialog Panels” describes the ISPF Edit settings used, the available primary and line commands, language setting, dynamic help, and diagnostic messages.
– “Working With Your Order: An Overview of the dialog Activities” summarizes the steps to install a ServerPac order.
– “Using the Installation Menu” explains the dialog functions provided.
After you start the dialog, the first thing to do is to receive the order by choosing option R in the primary menu panel, as shown in Figure 3-16. Receiving the order means that you copy the order from tape, or from an FTP server, or from a file system on the driving system to DASD. This unloads the control tables and installation jobs from the shipment medium to your DASD.
|
Information: HELP (PF1) is available on any panel. The HELP key is a useful online help facility that explains every panel function in detail. Certain panels have PRIM and LINE commands available. Using the HELP key enables you to obtain a description and example of how to use the commands.
|
3.17 Order Receive panel
Figure 3-17 Order Receive panel
Order Receive panel
When you select option R, you receive the panel shown in Figure 3-17. The following information is entered on the Order Receive panel:
Receive the order from Here you specify the source medium of your order. It is still possible to receive from tape, but today other media are supported. These are Internet (Server), or from a UNIX System Services file system. Enter F for File System, S for Server, or T for Tape to specify where the ServerPac order resides, as explained here.
File System indicates that you used the Store and Forward download method (download to workstation) and then uploaded the order to the host Download file system outside the dialog. The RECEIVE job generated by this option will retrieve the order directly from the file system and not attempt a download.
Server indicates that the ServerPac order is to be received from an FTP server. Tape indicates that the ServerPac order is to be received from tape.
Order Number Enter your order number, as it was supplied by IBM (two alphabetic characters followed by six numerics). In Figure 3-17, for example, the order number is RV210008.
Data Set Qualifiers This is the HLQ used to allocate the order installation data sets. It is best to include the order number as part of the qualifier.
Volume Serial Enter the VOLSER of the DASD volume that will receive the order data sets.
STORCLAS If you have an SMS-managed environment, enter a valid storage class for the order data sets.
Dialog CLIST Rec. Fm. Dialog CLISTs for the order are supplied in both fixed block (FB) and variable block (VB) formats. FB is the default.
Press Enter after you have filled out the order details. Depending on your choice in the Receive order from field, you will get different follow-on panels. Based on the selection in Figure 3-17 on page 204, the next panel looks as shown in Figure 3-18 on page 206.
3.18 Receive an order from tape

Figure 3-18 Receive order from tape panel
Receive an order from tape
If you chose T in the previous panel, you will get the receive order from tape panel, as shown in Figure 3-18. In this panel, enter the tape VOLSER of the first tape of your ServerPac delivery.
|
Important: Enter the VOLSER of the IBM-supplied tape that contains the order-related installation material. This is the tape labeled with the order number and VOLSER of the first system tape in the format MxxxAA, where xxx is the order number.
|
This is the RIM tape. Ensure that you enter the correct volume serial number, because there is no validation made through the CustomPac dialogs. You also must enter a generic or esoteric tape unit name. The default is 3590. You can obtain this information from your I/O configuration.
After pressing Enter you will be guided to the Edit JOB statement panel, shown in Figure 3-19 on page 207.
3.19 Edit JOB Statement panel

Figure 3-19 Edit JOB Statement panel
Edit JOB Statement panel
The Edit JOB Statement panel is an informational panel. After you press Enter you will see the ISPF editor with the job statements for the receive process, as shown in Figure 3-20 on page 208. At that point, you can make changes to the job statements to meet your requirements.
3.20 Panel with the job statement

Figure 3-20 Panel to edit the job statement
Edit job statement panel
After you perform that customization press the PF3 key, which leads you to Figure 3-21 on page 209.
Modify the job statement as required and press PF3. The modifications made to the job statement are typically your installation standards for a job card. The Edit RECEIVE Job panel is then displayed, as shown in Figure 3-21 on page 209.
3.21 Edit RECEIVE Job panel

Figure 3-21 Edit RECEIVE Job panel
Edit RECEIVE job panel
After pressing Enter on this panel you receive the next ISPF editor panel, where the generated RECEIVE job is listed. At this point, you can review it and possibly make final changes to the job statements.
When you submit the job from the editor, it performs the following steps:
1. Verifies the status of the CustomPac data sets
2. Possibly deletes duplicate data sets
3. Allocates CustomPac order data sets (VSAM and non-VSAM)
4. Copies CustomPac data sets from the RIM tape to the specified DASD volume
5. Updates the existing order inventory for the next steps
If you run these steps successfully, you can proceed with the installation dialog.
|
Remember: Figure 3-22 only shows the first statements in the job. The JCL
stream is very large. You need to modify this JCL to use your installation standards for creating JCL. |
|
CPPPEDIF - RV210008 ----------------------------------------- COLUMNS 000 000
COMMAND ==> SCROLL ==> PAGE
****** ***************************** Top of Data ******************************
000001 //JOBNAME JOB 'ACCOUNTING INFO','PROGRAMMER NAME',
000002 // CLASS=A,
000003 // MSGCLASS=H,
000004 // MSGLEVEL=(1,1),
000005 // NOTIFY=&SYSUID,
000006 // USER=&SYSUID,
000007 // TIME=NOLIMIT,
000008 // REGION=0M
000009 //*
000010 //* MODIFY THE JOB STATEMENT ABOVE AS REQUIRED FOR YOUR INSTALLATION'S
000011 //* REQUIREMENTS, AND PRESS END TO CONTINUE.
000012 //*
000013 //*
000014 //* **************************************************************
000015 //* * THIS JCL WAS GENERATED BY SKELETON CPPS6101 *
000016 //* **************************************************************
000017 //************************************************
000018 //* Restart instructions:
000019 //* --------------------
000020 //* After determining the cause of the failure,
000021 //* and making any necessary corrections, restart
000022 //* this job using the following table as a guide.
000023 //************************************************
000024 //* Failing Restart Note
000025 //* Step Step
000026 //* --------- --------- -------
000027 //* CHKINV CHKINV
|
Figure 3-22 First statements of the JCL for the RECEIVE job.
Edit the job, if necessary, and save it. To submit the job, enter SUBMIT and then exit the dialog. The job loads your order from tape, FTP server, or file system to your DASD.
|
Important: You must exit the dialog for the RECEIVE job to run. You do not need to log off
from TSO. |
3.22 CustomPac Order Management Menu panel

Figure 3-23 Installing a new order panel
Installing a new order
To begin installing an order, select option I on the Order Processing panel shown in Figure 3-23.
To go directly to a specific order, enter the order number in the blank field under “INSTALL” and press Enter. Processing proceeds directly to the Installation Menu for the order.
If you leave the order number field blank and press Enter, the dialog displays a list of orders from which to choose.
To list all of the uninstalled orders, select the I option, but leave the order number field blank. The dialog displays a list of orders for your selection, as shown in Figure 3-24 on page 212.
|
Restriction: Although z/OS V1R10 or higher supports extended address volumes (EAVs), the ServerPac dialog does not support EAV in the configuration during installation.
|
3.23 Selecting an order to install

Figure 3-24 Selecting an order to install panel
Selecting an order to install
On the order installation panel, you might have several already received or installed CustomPacs. Select the one that you just received to proceed with the installation process. If it is your first ServerPac installation, you can only select this order number.
|
Attention: The order number used in these examples is displayed in Figure 3-24 as RV210008.
|
Select S to go into the installation dialog.
Order status
The Order Installation panel indicates installable orders with either of the following status codes (in the Status column):
Received This status is set when the order can be selected on the order list panel. For orders delivered on tape, this is after the RECEIVE job has run. For orders that are downloaded, this is after the first phase of the download has been completed.
Started This status is set when the work configuration has been created.
3.24 Installation dialog

Figure 3-25 Installation dialog
Installation dialog
After selecting a ServerPac order to install, the main installation dialog panel is started, as shown in Figure 3-25. When this panel is shown for the first time during a ServerPac order installation, the only option available is:
C Choosing option C on this panel enables you to select a configuration for merging an initial installation. If this is your first CustomPac installation, the Create Configuration panel will appear.
The other options are marked with an asterisk (*) and become available when the previous function has successfully finished. Now, select option C.
This panel is the starting point for all of the functions that are needed to install your order.
For an OS order, the Create option displays the Type of Installation panel shown in Figure 3-26 on page 214.
3.25 Choosing the installation type

Figure 3-26 CREATE Configuration panel: Choosing the installation type
Choosing the installation type
When you use the dialog to select an order, its included configuration is added to the dialog. You must select and create a configuration to start the installation. Option F installs a complete z/OS system. It installs all of the data sets needed to perform an IPL, log on to the target system, and run a z/OS image to complete other installation and customization tasks, including the following items:
1. System software and related data sets, such as distribution, target, SMP/E libraries, and so on.
2. System data sets, such as page data sets, system control files, and master catalog.
Because IBM creates a working set of operational data sets for you, a full system replacement helps assure a successful first IPL.
Full system replacement
Choose Full System Replacement, option F. A full system replacement installs a complete z/OS system. It installs all data sets needed to perform an IPL, log on to the target system, and run a z/OS image for completing other installation and customization tasks. These data sets fall into two major categories:
•System software and related data sets (such as distribution and target libraries, SMP/E CSI data sets, and sample libraries).
•Operational data sets (such as page data sets, system control files, and a master catalog).
3.26 JES and SDSF element selection

Figure 3-27 Selecting a JES and SDSF element
Selecting a JES and System Display and Search Facility for the configuration
Select at least one JES element for installation:
•JES2 and System Display and Search Facility (SDSF)
•JES3 and SDSF
If your installation requires both JES elements to be installed, you can select BOTH.
For each JES element that you select, specify whether the dialog is to merge the SMP/E zones of the JES element with the BCP zones. When you merge a JES element with the BCP zones, the SDSF zone is automatically merged with the BCP zones:
•If you specify the JES2 zone to be merged with the BCP zones, both JES2 and SDSF zones are merged with the BCP zones. Similarly, if you specify JES3 to be merged with the BCP zones, both JES3 and SDSF zones are merged with the BCP zones.
•If you specify both JES elements to be merged with the BCP zones, then the JES2, JES3, and SDSF zones are merged with the BCP zones.
|
Restriction: If you install both JES elements, you cannot merge only one of the JES elements with the BCP zones. The error message CPPP0601011E will appear to indicate that the action is not allowed.
|
Migration considerations
If you migrate JES2 or JES3 together with the rest of z/OS, it is preferable to specify Y on this panel to merge the selected JES elements into the BCP zone.
However, if you plan to stage your z/OS and JES migrations separately, do not merge zones. The dialog loads the JES element’s zones, but does not merge them.
When you select a single JES, the dialog processes the data sets for only the JES that you select. The dialog does not create or load data sets for the JES you omit.
If you want to change any of these decisions later, you must re-create the configuration by selecting the Create (C) option, specifying the wanted changes, selecting a saved configuration for merge (if applicable), and issuing the CR (create) command.
3.27 CREATE Configuration panel

Figure 3-28 CREATE Configuration panel
CREATE Configuration panel
Before you start the installation, you must select and create a configuration. On the CREATE Configuration panel, you can see the master configuration and, if available, other saved configurations. The included configuration is always automatically selected.
Any configurations you have saved are also displayed. Selecting a saved configuration (if you have one) will reduce the time needed to install the order. If you are using the dialog for the first time, simply enter the CR (create) primary command. Later in the installation, you will be able to save this configuration for use with subsequent ServerPac orders, or to preserve your work if you decide to re-create the configuration to change installation types or JES selections.
|
Information: See “Merging a Configuration with a Previous Order” in IBM ServerPac Using the Installation Dialog, SA23-2278, for further considerations.
|
Select configuration
When an order is sent to you, it is installed using control information stored in tables. These are generically referred to as the shipped order configuration. The configuration process copies this control information to WORK versions. You can merge variables and installation jobs that you have customized (and saved) for previous orders. From this panel you select the source configurations that will be used to create your WORK version.
You can choose to install ONLY the shipped order configuration or you can MERGE the shipped order configuration with a saved work configuration.
3.28 Installation Variables panel

Figure 3-29 Installation Variables panel
Installation Variables panel
After you select CR (create) as shown in Figure 3-28 on page 217, you then need to customize the Installation Options for Order to complete the install, as shown in Figure 3-25 on page 213. You need to go back through the install process, and when you get to the Installation Options for Order panel (Panelid CPPPFLOW) as shown in Figure 3-30, you see that you can now select Option V to specify values for variables.
After completing the C option, you will then be able to select the V (Variables) option the next time you enter this panel. After you complete each option, you can then select the next option.
|
CPPPFLOW -------- Installation Options for Order ( RV210008 ) ----------------
OPTION ==>
Complete these options to install the order:
C Create Create the Work Configuration
V Variables Specify Values for Variables
* Zones Specify SMPTLIB and SMP/E Zone Names Information
* Modify Modify the System Layout
* Alias Specify Catalogs for High-Level Qualifiers
* SSA Specify Temporary Aliases (SSAs) for Catalogs
* Installation Create and Submit Installation Jobs
You can use Save any time after creating the work configuration:
* Save Save the Current Work Configuration
|
Figure 3-30 Installation Options for Order panel
The Variable Selection List displays variables that are required to install your order. The list reflects the installation type you chose (full system replacement or software upgrade). Use this panel to set the values of these variables appropriately for your environment.
See the “Variables” appendix in ServerPac: Installing Your Order to see the specific variables for your order along with a brief description of each.
Verify the current contents and enter or change any values by typing over them in the Contents column if a value is either missing or invalid. Note that you cannot update variables with a status of C (customized).
It is useful to read “Defining Installation Variables” in IBM ServerPac Using the Installation Dialog, SA23-2278, before changing any installation variable values.
The variable for AUTH.LINKLIB can be an existing authorized library of your installation site. You can use the VAR edit command on some panels to change the installation variables later.
3.29 Define ZONE Information panel

Figure 3-31 Define ZONE Information panel
Define ZONE Information panel
After you complete the V option, you will then be able to select the Z (Zones) option the next time you enter this panel, as shown in Figure 3-32. After you complete each option, you are able to select the next option.
|
CPPPFLOW -------- Installation Options for Order ( RV210008 ) ----------------
OPTION ==>
Complete these options to install the order:
C Create Create the Work Configuration
V Variables Specify Values for Variables
Z Zones Specify SMPTLIB and SMP/E Zone Names Information
* Modify Modify the System Layout
* Alias Specify Catalogs for High-Level Qualifiers
* SSA Specify Temporary Aliases (SSAs) for Catalogs
* Installation Create and Submit Installation Jobs
You can use Save any time after creating the work configuration:
* Save Save the Current Work Configuration
|
Figure 3-32 Installation Options for Order panel
This brings you to the Define ZONE Information panel, where you can define your SMP/E zone configuration. This panel is displayed even if you do not plan to change the included zone names.
Choose zone names
Choose SMP/E zone names that are unique for your installation. Doing so will enable you to use SMP/E’s cross-zone processing, such as SMP/E’s reporting and management functions. If you want to rename the CSI data set, you can do so later in the Modify System Layout function. This panel enables you to change the names of zones in your order, but not the contents of zones.
After you enter the Z option, as shown in Figure 3-32 on page 220, the dialog displays the current DLIB and target zone names for your order, as shown in Figure 3-31 on page 220.
All DLIB zones for each system release (SREL) are physically defined in the same DLIB CSI data set. All target zones for each SREL are physically defined in the same target CSI data set.
|
Attention: For descriptions of the zones that came with your order, see “Zones Shipped with Your Order,” in ServerPac: IBM ServerPac Using the Installation Dialog, SA23-2278.
Be aware that JES zones for a cleared JES element and JES zones that are to be merged with the BCP zones will not appear in the dialog, even though they are listed in ServerPac: Installing Your Order.
|
Changing the SMP/E zone names in your order
In the panel shown in Figure 3-31 on page 220, type over the DLIB and target zone names with the names that you want for your installation and press Enter. The dialog checks for duplicate zone names and, if one is found, displays a message (CPP0639006E DUPLICATE Zone Name) on the panel.
Ensure that the zone names you specify are unique for all environments in your installation. The new zone names should not appear in ZONEINDEX subentries in the global zone ZONE entries for any of your existing systems.
3.30 Modify System Layout Options panel

Figure 3-33 Modify System Layout Options panel
Modify System Layout Options panel
After you complete the Z option, you will then be able to select the M (Modify) option the next time you enter this panel; see Figure 3-34. After you complete each option, you are able to select the next option.
|
CPPPFLOW -------- Installation Options for Order ( RV210008 ) ----------------
OPTION ==>
Complete these options to install the order:
C Create Create the Work Configuration
V Variables Specify Values for Variables
Z Zones Specify SMPTLIB and SMP/E Zone Names Information
M Modify Modify the System Layout
* Alias Specify Catalogs for High-Level Qualifiers
* SSA Specify Temporary Aliases (SSAs) for Catalogs
* Installation Create and Submit Installation Jobs
You can use Save any time after creating the work configuration:
* Save Save the Current Work Configuration
|
Figure 3-34 Installation Options for Order panel
Modify the System Layout panel
After you select the M option from Figure 3-34, the Modify the System layout panel shown in Figure 3-33 is displayed.
Defining the target system layout is one of the most important steps during order installation. During this part of the dialog, you create the data set layout for your new system. After you have modified this configuration, you can save it for merging with future ServerPac installations.
Modify your configuration in the following order:
1. Data set merges, if any
2. Data set space changes, if any
3. Specifying Reserved Space, if it will be used
4. Specifying which volumes are not to be initialized
5. Everything else
Following this sequence can help you avoid situations in which volumes become over-allocated.
You can create the new data set layout in one of three ways using the option selections shown in Figure 3-33 on page 222:
•Option A. Create a Recommended System Layout is used to make the dialog automatically assign the target and DLIB data sets in the configuration to physical volumes. The dialog does not automatically assign any SMS-managed data sets in the configuration.
•Option C. View and Change is used to assign your order's data sets to volumes by displaying groups of data sets and using the CHANGE PVOL command to specify their placement on physical volumes.
•Other options (D, M, S, U, V, L, and P) are used to assign your order's data sets to logical volumes, and then assign those logical volumes to physical volumes (DASD).
Using the option Recommended System Layout provides a foundation for the ongoing growth and maintenance of your system. When you group your system's data sets by their content and importance to your installation, you help to minimize the complexity of future installations.
Read and use the section “Modifying the System Layout” in IBM ServerPac Using the Installation Dialog, SA23-2278. The ServerPac: Installing Your Order publication that is included with your order also contains all information relating to the products to be installed.
3.31 SUMMARY of Features/Elements panel

Figure 3-35 SUMMARY of Features/Elements panel
SUMMARY of Features/Elements panel
When you select Option P of the Modify System Layout Options panel, shown in Figure 3-33 on page 222, the SUMMARY of Features/Elements panel shown in Figure 3-35 is displayed.
This panel enables you to manually customize individual data sets, logical volumes, and physical volumes. The panel lists the products, features, and elements included in your ServerPac order, and the following CustomPac-specific data set groups:
•CustomPac SREL-specific SMP/E data sets
•CustomPac operational and sample data sets
•CustomPac JES2 data sets
•CustomPac JES3 data sets
•CustomPac SMP/E data sets
The panel shows primary and line commands that you can issue to perform the actions you need to customize volumes and data set names. For example, the Select command entered next to a product displays the Logical Volume By FEATURE/ELEMENT panel for the selected product, where you can use the line command Assign to assign all data set profiles for the selected logical volume to a different logical volume.
The D line command returns the Summary of Data Sets panel shown in Figure 3-36 on page 225.
3.32 Summary of data sets

Figure 3-36 Displaying data sets of a feature or element
Summary of data sets of a feature or element
Type D on the Feature/Element line in Figure 3-35 on page 224 to display the panel shown in Figure 3-36. This panel displays a summary of the data sets in the system; the current example shows the Feature/Element for z/OS UNIX System Services.
You can use the Summary of Data Sets panel to perform any of the following tasks:
•Merge or unmerge ServerPac-shipped data sets (you cannot merge or unmerge user-defined data sets).
•Modify the attributes of particular data sets, or modify their space information.
•Make global changes to multiple data sets.
•Write a list of the data sets in the ISPF LIST data set or a user-defined file.
The Change primary command enables you to make global changes to data set profiles. For example, you can change the HLQ for those product data sets. The line command S enables you to change data set name, logical volumes space, and BLKSIZE definitions for a specific data set profile.
3.33 Creating a Recommended System Layout
Figure 3-37 Automatic Data Set Assignment panel
Creating the Recommended System Layout
When you select option A from the panel shown in Figure 3-33 on page 222, the Recommended System Layout panel shown in Figure 3-37 is displayed.
This option causes the dialog to automatically assign the target and DLIB data sets in the configuration to physical volumes. The dialog does not automatically assign any SMS-managed data sets in the configuration.
Primary commands
The primary commands shown in Figure 3-37 are listed here:
A ALL This setting causes all target and DLIB data sets in the configuration to be automatically assigned to physical volumes.
N NEW This setting assigns only data sets that are new to the configuration. This option preserves the assignment of data sets that already exist on volumes in the saved configuration.
P PARTIAL This setting automatically assigns new data sets, and also enables you to exclude particular volumes from the saved configuration, freeing their data sets for reassignment.
The dialog does not automatically assign an order’s operational data sets or any of the sample CustomPac data sets. You must place these data sets yourself.
Default Device Type
The Default Device Type field specifies the type of device to be used if the dialog creates more volumes for data set assignments. Enter a question mark (?) in the Default Device Type field and press Enter to see a list of other available devices. A configuration can include more than one device type.
Model after Volume
This field specifies a user-defined device type to be used for creating more volumes. This volume must either already be in the configuration, or you must have set the DYNAMIC DASD INFO installation variable to Y and the volume is online.
Installation considerations
Select ALL when you are installing a ServerPac order for the first time, or if you are not using a saved configuration as the basis of your new system. This approach creates a new configuration based only on the new order to be installed.
3.34 Summary of Physical Volumes panel

Figure 3-38 Summary of Physical Volumes panel
Summary of Physical Volumes panel
From Figure 3-33 on page 222, when you Enter V or SUMP on the command line, Figure 3-38 displays. This panel provides information about the physical volumes or SMS storage class names for a particular feature or element.
As sent by IBM, a new configuration consists of a target volume (MVSRES), a DLIB volume (MVSDLB), and a catalog volume (MVSCAT). Because MVSCAT contains only operational data sets, this volume is excluded from automatic assignments, and therefore is not shown in the panel display.
Use this panel to verify and change (if necessary) the attributes of the physical volumes. Before you proceed, however, note the following points:
•If there are warnings on this panel, do not try to resolve them until you have completed any data set merges, space allocation changes, or volume assignment changes that you intend to make.
•If you have DYNAMIC DASD INFO set to No, you must use the Select line command to display the Display and Change Volume Attributes panel. On that panel you must specify the required information about each volume, and can choose to reserve space on the volume or tell the dialog not to initialize it.
•If you have DYNAMIC DASD INFO set to Yes, you can use the Select line command to reserve space on the volume or tell the dialog not to initialize it.
•These changes should be among the last tasks that you perform before exiting Modify System Layout (because other changes you make could force you to perform rework), but they must be completed before you attempt to run any jobs that install the data sets on your DASD volumes.
Line commands
The following line commands can be used.
S | SELECT This command enables you to select physical volumes and SMS storage classes for reassignment:
•For a physical volume, the S line command displays a panel that enables you to specify a different physical volume, and to change the attributes of the current physical volume.
•For a storage class, the S line command displays a panel that enables you to specify a new storage class. To assign a STORCLAS in place of a physical volume, you must assign the logical volume to the STORCLAS.
D | DSLIST This command displays the data sets for the selected physical volume or storage class. The Summary of Data Sets panel is displayed, enabling you to accomplish any of the following tasks:
•Merge or unmerge IBM-supplied data sets.
•Make global changes to groups of data sets.
•Modify the attributes of particular data sets or modify their space information.
•Write a list of the data sets to the ISPF list data set or a user-defined file.
Physical volumes
As shipped by IBM, a new configuration consists of a target volume (MVSRES), a DLIB volume (MVSDLB), and a catalog volume (MVSCAT). Because MVSCAT contains only operational data sets, this volume is excluded from automatic assignments:
MVSCAT A VOLSER of the DASD on which SMP/E will allocate relative filenames (RELFILES) during RECEIVE processing if products are installed after the ServerPac installation jobs have been run. This value is required for the SMPTLIB DDDEF in the global zone.
MVSDLB DLIBs: With the ability to define very large volume sizes on certain hardware, it is possible that all your target libraries and DLIBs could fit on a single volume. If possible, use a large enough volume for your target libraries so that you will not need multiple SYSRES logical extension volumes.
DLIBs for product sets have a suggested data set placement to be on the following volumes:
•DLIB volumes for target volumes (which include TVOL1, TVOL2-n, HFS, and zFS)
•DLIB volume for the licensed product sets
•DLIB volume for the vendor product sets
•DLIB volumes for the subsystem product sets
Place data sets on the DLIB volumes wherever they fit. There does not need to be a correlation between TVOL1 and the DLIB volume for TVOL1, or between TVOL2 and the DLIB volume for TVOL2, and so forth. It is possible, but not necessary, to SMS-manage the data sets.
MVSRES As shipped by IBM, a new configuration consists of a target volume (MVSRES). Some products include one or more data sets that should reside either on the first target volume or on one of the last target volumes in the configuration. For example, a product might include several data sets of element type DATA that should reside on the IPL volume, which is always the first target volume.
During automatic assignment, the dialog recognizes such data sets and attempts to place them according to this requirement, rather than with other data sets of the same element type.
3.35 Current Volume Configuration panel

Figure 3-39 Automatic Data Set Assignment: Current Volume Configuration panel
Current Volume Configuration panel
As previously mentioned, as shipped by IBM, a new configuration consists of a target volume (MVSRES), a DLIB volume (MVSDLB), and a catalog volume (MVSCAT). MVSCAT contains only operational data sets. This panel is displayed by selecting option A in Figure 3-37 on page 226.
After you select a setting for automatic assignment the dialog displays the current volume configuration, as shown in Figure 3-39.
Command line options
From the command line, you can enter the following commands:
RESET This command can be abbreviated as R. Use this command to reverse any changes you have made to the volumes. This panel is redisplayed as it appeared when you entered this panel for the first time.
CREATE This command can be abbreviated as CR. Use this command to accept the volume information as it is displayed on this panel. This panel is redisplayed after you have confirmed the data set assignment.
Line command options
In the Current Volume Configuration panel, use line command S to select volumes for changes. Use line command L to list the data sets currently assigned to a volume. Use line command I to insert more volumes into the work configuration.
In this panel, you use line commands in the S column for the following purposes:
S SELECT This selects a volume for an action. If you select a volume for changes, see “Display and change volume attributes panel” on page 232.
I INSERT This adds a volume to this list.
L LIST This lists the data sets on the volume.
M MOVE This moves a volume. Use with BEFORE or AFTER:
•AFTER places selected volumes after this entry in the list.
•BEFORE places selected volume before this entry in the list.
|
Information: When you select the ALL or PARTIAL settings, the following line commands are also available on this panel:
•M, A, B: Move a volume to a different position in the list. To move a volume after another, enter Move for the volume to be moved, and After for the volume that is to precede it. To move a volume before another, enter Move and Before.
•You can move a volume only among other volumes of the same type. For example, you can move a target volume before or after other target volumes, but not into a group of DLIB volumes or BOTH volumes.
•To move a volume into a group of volumes of a different type, you must first change the volume’s type to the other type (target, DLIB, or BOTH) through line command S. You can then move the volume in the group of volumes with that type. Moving a volume will cause the dialog to adjust the volume sequence numbers accordingly.
|
X EXCLUDE This excludes a volume from this list.
If you plan to rename these volumes, select the volumes now through line command S and rename them as needed. Later, when the new configuration is created, it is more difficult to rename these volumes. When you select S the panel shown in Figure 3-40 on page 232 is shown.
|
Tip: You can further limit the dialog’s use of a volume capacity to less than the default 85% by reserving additional space. For example, if you want the volume to have 25% free space at the end of automatic assignment, you can accomplish this by reserving 10% of the volume’s space (334 cylinders for a 3390-3) for the ALL or PARTIAL settings or 15% for the NEW setting.
|
3.36 Display and change volume attributes panel

Figure 3-40 Display and change volume attributes panel
Display and Change Volume Attributes panel
If you select a volume for changes from Figure 3-39 on page 230, the dialog displays the panel shown in Figure 3-40, enabling you to change the volume and save your changes.
Display and Change Volume Attributes panel
This panel enables you to change the attributes of the selected volume, as explained here:
Volume Serial Enter the name of a volume. Use a name that is not already used in the configuration.
Volume Type Enter one of the following values: TARGET, DLIB, or BOTH.
Device Type Enter the physical volume's device type. By default, this value is set to 3390-3.
Reserved Space Enter the amount of space to be reserved on the volume in cylinders (for example, for data set expansions).
Initialize Volume This indicates whether the volume is to be initialized.
Use caution in resetting volumes from Initialize Volume NO to Initialize Volume YES. Doing so causes the volume to be initialized by the installation jobs, and any existing data on the volume is lost. Volumes for which Initialize Volume is set to NO must be online, even if DYNAMIC DASD INFO is set to NO. To save your changes to the volume, press Enter. You are returned to the Current Volume Configuration display.
3.37 Define alias-to-catalog relationships

Figure 3-41 Define CATALOG Data Set Names panel
Define alias-to-catalog relationships
From the Installation Menu, enter A, Define Alias to Catalog Relationships, as shown in Figure 3-42.
|
CPPPFLOW -------- Installation Options for Order ( RV210008 ) ----------------
OPTION ==>
Complete these options to install the order:
C Create Create the Work Configuration
V Variables Specify Values for Variables
Z Zones Specify SMPTLIB and SMP/E Zone Names Information
M Modify Modify the System Layout
A Alias Specify Catalogs for High-Level Qualifiers
* SSA Specify Temporary Aliases (SSAs) for Catalogs
* Installation Create and Submit Installation Jobs
You can use Save any time after creating the work configuration:
* Save Save the Current Work Configuration
|
Figure 3-42 Installation Options for Order panel
Use the ALIAS to CATALOG panel to specify which HLQ you want to be associated with a catalog. An M in the STA column indicates that this alias name must be associated with a master catalog. If you find several question marks (???????) in the TARGET System Catalog DSName field, it indicates that there is no catalog defined yet. This function enables you also to insert additional user-defined alias names and catalogs.
|
Tip: Use this panel to define a catalog data set name for each of the aliases in your order.
|
Figure 3-43 displays how the ALIAS to CATALOG panel first appears. Enter catalog names under the Target System Catalog Data Set Name field, as shown in Figure 3-41 on page 233. The catalog names are initially shown as ??????? because they are not yet defined.
You can specify the catalog name with which an alias is to be associated by typing over the question marks. The Type column specifies MCAT if the alias is associated with the master catalog. If present in your order, the SYS1 alias is automatically associated with the master catalog.
|
CPPP6021 -------------- ALIAS to CATALOG ( RV210008 ) --------- Row 1 from 87
COMMAND ==> SCROLL ==> PAGE
Define CATALOG Dataset Names
Primary Commands:(? SET Locate Find Next Previous SORT CANcel SAVE)
Line Commands:(Delete Insert Repeat)
S Alias STA Target System Catalog Data Set Name Type
- -------- --- -------------------------------------------- ----
@PL ??????.CATALOG
ABJ ??????.CATALOG
AIO ??????.CATALOG
AOP ??????.CATALOG
AOX ??????.CATALOG
SYS1 M ?MASTER.CATALOG MCAT
|
Figure 3-43 ALIAS to CATALOG panel
STA column
The STA (status) column shows one of these values or a blank:
Blank This indicates that the HLQ can be associated with any catalog. Associate these HLQs with the master catalog or a user catalog.
M This indicates that the HLQ must be associated with the master catalog.
U This indicates that the HLQ is not associated with any of the data sets in the work configuration. You created the HLQ with the R or I line command on this panel. You can associate the HLQ with any catalog in the configuration.
Define an HLQ for catalogs
In this option, you specify the catalog data set name for each alias. The dialog and the installation process for ServerPac use the standard order of catalog search when defining and locating data sets. Therefore, there must be an alias in the target system master catalog for each high-level qualifier used for data sets that are to be cataloged in a user catalog. Also, there must be aliases in the driving system master catalog for the SSAs that you chose to use when installing the order.
To associate the master catalog with an alias, type over ?MASTER.CATALOG with the actual master catalog name. Then, to use the master catalog for another alias, enter the ?MCAT command. To use a catalog name that is already defined for another alias, enter a question mark (?), followed by the alias name (for example, ?SYS1).
|
Important: Before you begin to define the alias-to-catalog relationships and SSA-to-catalog relationships, read Chapters 9 and 10 in IBM ServerPac Using the Installation Dialog, SA23-2278, to become familiar with using SSAs and the catalog structure. Also, those chapters contain worksheet models you can use to plan:
•The catalog and alias names, and their relationships
•The catalog names and their associated SSAs
|
After specifying the alias-to-catalog relationship, you can select SSA on the Installation panel, which leads you to the SSA-to-Catalog panel shown in Figure 3-44 on page 236.
3.38 Define system-specific alias (SSA)

Figure 3-44 Defining system-specific aliases
Define system-specific alias
From the Installation Menu, enter SSA, Specify Temporary Aliases (SSAs) for Catalogs, as shown in Figure 3-45. Figure 3-44 is then displayed.
|
CPPPFLOW -------- Installation Options for Order ( RV210008 ) ----------------
OPTION ==>
Complete these options to install the order:
C Create Create the Work Configuration
V Variables Specify Values for Variables
Z Zones Specify SMPTLIB and SMP/E Zone Names Information
M Modify Modify the System Layout
A Alias Specify Catalogs for High-Level Qualifiers
SSA SSA Specify Temporary Aliases (SSAs) for Catalogs
* Installation Create and Submit Installation Jobs
You can use Save any time after creating the work configuration:
* Save Save the Current Work Configuration
|
Figure 3-45 Installation Options for Order panel
Use the Catalog Selection List panel shown in Figure 3-44 to specify an SSA for each catalog. The SSAs you specify here are used to create alias entries for these catalogs in the driving system’s master catalog.
|
Important: For a software upgrade installation, the target system’s master catalog must already exist (the Allocate Catalog field is set to N and cannot be changed). User catalogs can be new or existing catalogs.
When you first display the Catalog Selection List panel, you might see a message warning you that you have not defined at least one SSA. If you try to exit this panel before completing the SSA definitions, the message reappears. Whether you receive this message or don’t, ensure that the needed SSA definitions exist and that any SSA definitions inherited from a saved configuration are still valid.
|
The following line command is valid for this panel:
S This selects a catalog, enabling you to specify:
– SSA
– When an SSA is to be used for this catalog, the SSA name
– Whether the catalog is to be allocated
– When the catalog is to be allocated, the unit and volume
– When the catalog is to be allocated, its size
Enter line command S for a data set name on this panel and press Enter to display the next panel, which is described in Figure 3-47 on page 238.
After you define the SSAs, the dialog displays the Catalog Selection List panel again with the updated SSA information. It will now include the SSA Name, as shown in Figure 3-46.
|
CPPP6031 --------------- SSA to CATALOG ( RV210008 ) -------- Row 1 to 1 of 1
COMMAND ==> SCROLL ==> PAGE
CPP9999977I UPDATE Request Cancelled
CATALOG Selection List
Primary Commands:(? CANcel SAVE)
Line Commands:(Select)
Allocate Define
| |
S Catalog Name SSA Name Type VOLume | | Unit
- -------------------------------------------- -------- ---- ------ - - ----
UCAT.CATALOG SMPESSA MCAT MVSCAT Y Y 3390
******************************* Bottom of data ********************************
|
Figure 3-46 SSA Name now displayed in the panel
When you are satisfied with the results, return to the Installation Menu panel Figure 3-25 on page 213.
3.39 Define SSA and CATALOG Data panel
Figure 3-47 Define SSA and CATALOG Data
Define SSA and CATALOG Data panel
The process you use to define SSAs depends on which of the following types your
installation is:
installation is:
•Full system replacement
•Software upgrade
See the section that applies to your installation in IBM ServerPac Using the Installation Dialog, SA23-2278, as listed here:
•“Defining SSA and catalog data for full system replacement”
•“Defining SSA data for software upgrade”
The panel shown in Figure 3-47 is displayed when you use full system replacement, option F on the panel shown in Figure 3-26 on page 214.
The panel fields are as follows:
Catalog Name of the catalog.
Type Type of catalog. MCAT indicates a master catalog; UCAT indicates a user catalog.
Define the following fields:
Define SSA Set this value to Y (yes) to define a new SSA in the driving system’s master catalog. Set this value to N (no) if the SSA is already defined in the driving system’s master catalog. If you set the Allocate Catalog field to Y, you must set the Define SSA field to Y.
Allocate Catalog This specifies whether to allocate the catalog. Set this value to Y (yes) if the catalog does not yet exist on the target system, and is to be allocated. Set this value to N (no) if the catalog already exists on the target system; it cannot be allocated again. All catalog names must be unique.
SSA Name This specifies the system-specific alias to be used to locate target system data sets that will be cataloged in the specified catalog. The name you choose must not have an existing alias entry in the driving system’s master catalog, and cannot be the same as the high-level qualifier of any data set cataloged in the driving system’s master catalog.
Catalog Volume This specifies the VOLSER of the DASD on which the catalog is to reside. For a pop-up list of volumes that exist in the work configuration, enter a question mark (?). Select a volume by entering S before the wanted volume serial. Note that you are not required to choose a volume from
the list.
the list.
Any VOLSER can be specified; if it does not exist, it is added to the configuration. If the volume you specified already exists in the work configuration, the unit you specify here must match the unit value you specified previously. Otherwise, a message is displayed to prompt you to resolve the mismatch.
Space This specifies the primary and secondary space to be allocated to the catalog. See “Determining Catalog Size” in z/OS DFSMS Managing Catalogs, SC26-7409, for information about how much space to allocate for catalogs. If you did not specify that the catalog is to be allocated (you set the Allocate Catalog field to N), do not enter values for these fields.
This is the end of the customization steps for the ServerPac. You are now ready to run the supplied installation jobs. From the Installation Menu, enter I and the panel in Figure 3-48 on page 240 will be displayed.
3.40 Job Selection List panel

Figure 3-48 Job Selection List panel
Job Selection List panel
From the Installation Menu enter I, Create and Submit Installation Jobs, as shown in Figure 3-48. Figure 3-49 is then displayed.
|
CPPPFLOW -------- Installation Options for Order ( RV210008 ) ----------------
OPTION ==>
Complete these options to install the order:
C Create Create the Work Configuration
V Variables Specify Values for Variables
Z Zones Specify SMPTLIB and SMP/E Zone Names Information
M Modify Modify the System Layout
A Alias Specify Catalogs for High-Level Qualifiers
SSA SSA Specify Temporary Aliases (SSAs) for Catalogs
I Installation Create and Submit Installation Jobs
You can use Save any time after creating the work configuration:
* Save Save the Current Work Configuration
|
Figure 3-49 Installation Options for Order panel
There are three types of components shown on the Installation Jobs panel:
SRC Source data such as parameter lists
DOC Documentation
JOB Executable JCL
The installation steps are grouped into the following sections:
•Package-specific installation
•Product-specific installation
•Post-installation
•Additional post-installation
•Customization section
•Installation verification section
•Cleanup jobs
•Migration section
•Customer-specific customization
When you enter the Installation Jobs panel for the first time, the installation jobs have still not been generated. All installation jobs are generated using ISPF tailoring services. Use the GENSKEL command on the command line to tailor all of the installation jobs at one time, as shown in Figure 3-50 on page 242.
When GENSKEL completes, the dialog saves the jobs in a backup data set. For more information about the commands you can use on this panel, see IBM ServerPac Using the Installation Dialog, SA23-2278.
|
Information: At this stage of the installation process, your primary source of information is ServerPac: Installing Your Order.
|
3.41 GENERATE File Tailored Installation Jobs panel
Figure 3-50 GENERATE File Tailored Installation Jobs panel
GENERATE File Tailored Installation Jobs panel
When you enter the GENSKEL command, the panel shown in Figure 3-50 is displayed.
The GENSKEL command submits a batch job, which generates all of the installation jobs. Each job is stored in the SCPPBENU data set that is provided through the ServerPac RECEIVE process.
For z/OS orders, GENSKEL processing can take as much as 30 minutes or longer to complete. Subsystem orders might need only several minutes to complete.
The installation jobs should be submitted in sequence. Always read the DOC section before you select and submit the related jobs. All installation steps and jobs are also described in ServerPac: Installing Your Order.
File-tailored jobs might already exist in the SCPPBENU data set. Set the Replace Job field to Y to replace jobs; set the field to N to preserve them.
You must tailor each of the installation jobs before you submit them. You can use the GENSKEL command to tailor installation jobs in the background. GENSKEL generates the installation jobs for your order, and stores them in the backup data set (SCPPBENU). Having the installation jobs stored in SCPPBENU enables you to review them, if wanted, after the order is installed.
File-tailored jobs might already exist in the SCPPBENU data set. Specify whether GENSKEL is to replace these jobs or preserve them. Set the Replace Job field to Y to replace jobs; set the field to N to preserve them.
Press Enter to generate the GENSKEL job. Then, submit the job with the SUBMIT command. Exit the dialogs until the GENSKEL job completes. You will see the JCL shown in Figure 3-51 on page 243.
|
File Edit Edit_Settings Menu Utilities Compilers Test Help
-------------------------------------------------------------------------------
ISREDDE2 ROGERS.CPPTEMP1.SCPPWORK Columns 00001 00072
Command ===> Scroll ===> PAGE
****** ***************************** Top of Data ******************************
000001 //SERVRP1 JOB (999,POK),'PAUL ROGERS',
000002 // CLASS=A,
000003 // MSGCLASS=T,
000004 // MSGLEVEL=(1,1),
000005 // NOTIFY=ROGERS,
000006 // TIME=NOLIMIT,
000007 // REGION=0M
000008 /*JOBPARM S=SC47,L=9999
000009 //*
000010 //* MODIFY THE JOB STATEMENT ABOVE AS REQUIRED FOR YOUR INSTALLATION'S
000011 //* REQUIREMENTS, AND PRESS END TO CONTINUE.
000012 //*
000013 //*
000014 //JOBLIB DD DSN=SERVILS1.RV210008.SCPPLOAD,
000015 // DISP=SHR
|
Figure 3-51 First part of the file tailoring JCL you need to submit
For your convenience, the Job Selection List panel displays only the installation jobs that apply to your order’s installation type (full system replacement or software upgrade). To view the entire set of jobs generated by GENSKEL, including jobs that are not needed for your installation type, check the SCPPBENU data set. (The GENSKEL output lists all of the generated jobs in the SYSPRINT output data set.) To access these jobs, enter line command B on the Installation Jobs display.
|
Important: After submitting the GENSKEL job, you must exit the dialog to release GENSKEL processing. Also, to avoid data set contention, you cannot start the dialogs until the GENSKEL job has completed.
|
Return back into the dialog
|
CPPPFLOW -------- Installation Options for Order ( RV210008 ) ----------------
OPTION ==>
Complete these options to install the order:
C Create Create the Work Configuration
V Variables Specify Values for Variables
Z Zones Specify SMPTLIB and SMP/E Zone Names Information
M Modify Modify the System Layout
A Alias Specify Catalogs for High-Level Qualifiers
SSA SSA Specify Temporary Aliases (SSAs) for Catalogs
I Installation Create and Submit Installation Jobs
You can use Save any time after creating the work configuration:
* Save Save the Current Work Configuration
|
Figure 3-52 Installation Options for Order panel
3.42 List of installation jobs

Figure 3-53 Installation jobs
Installation jobs
At this stage of the installation process, your primary source of information is ServerPac: Installing Your Order. When you have finished running the installation jobs and verification programs (IVPs) described in ServerPac: Installing Your Order, you have completed the installation.
Figure 3-53 displays the jobs and documentation that are required to install your order, based on the installation type that you chose earlier in the installation (full system replacement or software upgrade).
The “Jobs used to install the ServerPac” table in ServerPac: Installing Your Order lists all of the jobs and indicates the installation type to which they apply (full system replacement or software upgrade).
The job selection list includes the maximum return code MC of the STEP, the status of the STEP, and the actual return code of the STEP. The RC field shows SYST for a system abend.
3.43 Displaying the processing log

Figure 3-54 Processing Log Panel: SUMMARY command
Displaying the processing log
If you enter the SUMMARY primary command at the Job Selection List shown in Figure 3-53 on page 244, the Processing Log panel is displayed, as shown in Figure 3-54. This panel lists the jobs that were submitted from the job stream and their respective return codes. If output logging is active, you can browse the job output.
This panel lists the jobs that were submitted from the job stream and their respective return codes. If output logging is active, you can browse the job output. After a job's completion, the job output can be seen using the Output line command.
The job copying data sets to SystemPac Volumes (RESTORE) can run for a long time, depending on the number of products your ServerPac order contains. You should have two tape drives and all of the tape cartridges shipped with your order available before you start the RESTORE job.
Post-installation and customization is product-dependent and installation-dependent, and should be related to your specific requirements.
After the installation jobs have completed, you should be able to perform an IPL and test your new z/OS system.
3.44 SAVE Configuration panel

Figure 3-55 SAVE Configuration panel
SAVE Configuration panel
After you install a ServerPac order, you can use the Save Used Configuration function of the dialog to save your work configuration. This can help you save time in installing subsequent ServerPac orders. Rather than manually reentering all of the data required for each new order, you can merge the saved configuration with the new order and avoid much of the data entry.
Specify the HLQ for the configuration. The configuration data set is appended with either of the following low-level qualifiers:
•SCPPSENU for skeleton libraries
•SCPPTENU for table libraries
If the libraries do not exist, the dialog prompts you to confirm that the libraries can be allocated. If the libraries already exist, a new panel is displayed to confirm the deletion of the old libraries.
..................Content has been hidden....................
You can't read the all page of ebook, please click here login for view all page.