


TSO/E, ISPF, JCL, and SDSF
This chapter describes how to use the basic products that a system programmer needs to install and customize an IBM z/OS operating system. The following topics are covered:
•Time Sharing Option/Extensions (TSO/E)
As part of the install of z/OS process, a TSO/E session on the system that has undergone initial program load (IPL) must be established using a locally attached or network-attached terminal.
•Interactive System Productivity Facility and Program Development Facility (ISPF/PDF)
ISPF is a full-panel application navigated by a keyboard. ISPF includes a text editor and browser, and functions for locating files, listing files, and performing other utility functions when installing z/OS.
•Job control language (JCL)
Using batch JCL is the most common way to install a full volume dump order when ordering z/OS. When you have a z/OS driving system, you can install your order through a batch job that initializes and restores the direct access storage device (DASD) volumes.
•Spool Display and Search Facility (SDSF)
SDSF is useful during the install process of z/OS to be able to view the output of the many install JCL jobs that are used during this process.
2.1 z/OS facilities for system programmers

Figure 2-1 z/OS facilities for system programmers
z/OS facilities for system programmers
As a system programmer, it is helpful to be familiar with the basic tools used in your daily job. These tools and their uses are listed here:
•TSO/E and ISPF are used to perform the following tasks:
– Install and customize z/OS and other products
– Communicate interactively with the operating system
– Define and maintain user definitions
– Create data sets and JCL, and submit jobs
– Communicate with other TSO/E users
– Develop and maintain programs in languages, such as assembly language, Common Business Oriented Language (COBOL), Fortran, Pascal, C, C++, Java, PL/I, Restructured Extended Executor (REXX), command list (CLIST), and so on
– Manipulate data
•JCL enables you to submit jobs and allocate resources.
•SDSF is used to perform the following tasks:
– Monitor
• Jobs waiting for execution
• Output waiting to be printed
• System resources used by jobs
• System resources available for use
– Control
• System resources, such as printers
• Job priority and class
• Job output priority and class
2.2 TSO/E

Figure 2-2 Using TSO/E during the install process
TSO/E
TSO/E is a base element of z/OS. TSO/E enables users to interactively share computer time and resources. In general, TSO/E makes it easier for people with all levels of experience to interact with the z/OS system.
TSO/E has undergone continuous enhancements during its lifecycle, and it has become the primary user interface to the z/OS operating system.
TSO/E provides programming services that you can use in system or application programs. These services consist of programs, macros, and CLISTs. TSO/E services support a wide range of functions that are useful in writing both system programs and application programs that use the full-screen capabilities of TSO/E.
CLISTs, REXX execs, servers, and command processors are specific types of programs that you can write to run in the TSO/E environment.
TSO/E users
TSO/E offers advantages to a wide range of computer users, including system programmers, application programmers, information center administrators, information center users, TSO/E administrators, and others who access applications that run under TSO/E. This book describes the major tasks that each of these users can perform using TSO/E.
2.3 TSO/E highlights

Figure 2-3 Key features of z/OS TSO/E
TSO/E highlights
Highlights of TSO/E are described in this section.
Session Manager
The TSO/E Session Manager is an interface to line mode TSO/E. It saves the commands that you enter and the responses that you receive and enables you to re-display or print them. You can correct or change a command that is displayed on the window without having to retype the entire command. By enabling you to re-display, change, and reuse your input, the Session Manager makes TSO/E easier to use.
Commands
TSO/E provides numerous commands for both users and programmers that enable them to interact with TSO/E and the IBM Multiple Virtual Storage (MVS) system. The ALLOCATE, FREE, and EDIT commands are examples of commands that enable users to manage their data sets.
The TEST and TESTAUTH commands enable programmers to test assembly language programs, including command processors, Advanced Program-to-Program Communication (APPC)/MVS transaction programs, and other programs written in assembly language. The CONSOLE command enables users with CONSOLE command authority to perform MVS operator activities from a TSO/E session.
Online help
Terminal users can obtain online help for most TSO/E commands. Information Center Facility users can obtain help for each panel and message. TSO/E Enhanced Connectivity Facility users can also obtain online help for terminal messages. Installations can also provide online help information to users in other languages.
Data and notice handling
TSO/E simplifies the way in which data and notices are sent and received. For example, the TRANSMIT and RECEIVE commands enable users to send data and messages to other users in a network. The broadcast data set or individual user logs contain messages that either the system or another user sends using the SEND command.
In addition, a recovery routine prevents broken mail chains that can occur when message handling is interrupted. Notices are also handled more efficiently during logon processing. TSO/E keeps a copy of notices in storage, thereby reducing the I/O operations needed to inform users of waiting messages when they log on.
Logon processing
TSO/E provides a full-screen logon panel that makes the logon process easier:
•Saving user attributes from one session to the next
•Enabling program function keys to be used during logon
•Enabling users to enter commands during logon
•Explaining the error when incorrect information is specified
The LOGON and ACCOUNT command processors enable users to request private areas of up to
two gigabytes for each terminal session. Your installation can also customize the logon panel and the logon help panel, and customize logon processing using other exits.
two gigabytes for each terminal session. Your installation can also customize the logon panel and the logon help panel, and customize logon processing using other exits.
Language enablement
TSO/E enable installations to provide TSO/E messages and the TRANSMIT full-screen panel to users in different languages. The TSO/E CONSOLE command also supports the display of translated system messages issued during a console session.
The logon authorized pre-prompt exit and the PROFILE command support the specification of languages to be used in displaying translated information. An installation can specify help data sets for different languages in the IKJTSOxx member of SYS1.PARMLIB. Support for logon panels and their help text in different languages is also available.
The TSO/E REXX external function, SYSVAR, provides support for new arguments that REXX execs can use to obtain language information. Execs can use this information together with the new SETLANG function to set the language in which REXX messages are displayed.
Security
TSO/E provides several enhancements to support the use of security labels. Installations can also control communication between users to protect the security classification of information. For example, installations can control and audit the use of the SEND command. LISTBC command processing enhancements make it possible for installations to restrict users from viewing messages for which they do not have the appropriate security.
CLIST language
The CLIST language is a high-level programming language that enables programmers to issue lists of TSO/E commands and JCL statements in combination with logical, arithmetic, and string-handling functions provided by the language. The programs, called CLISTs, can simplify routine user tasks, start programs written in other languages, and perform complex programming functions.
Restructured Extended Executor language support
REXX is a high-level procedures language that enables both inexperienced users and experienced programmers to write structured programs called REXX execs. REXX execs can be run in any MVS address space (both TSO/E and non-TSO/E). TSO/E also enables users to write APPC/MVS transaction programs in the REXX language.
Installations can acquire IBM Compiler and Library for REXX/370 or a functionally equivalent compiler. A compiled REXX exec runs more efficiently, because it does not need to be interpreted at run time.
TSO/E service facility
The TSO/E service facility enables TSO/E users to run authorized or unauthorized programs, TSO/E commands, or CLISTs from an unauthorized environment, while maintaining system integrity.
TSO Command Package
The TSO Command Package provides functions that help to improve productivity:
•Support for running terminal sessions as batch jobs
•Automatic saving of data
•Accounting facility
•Defaults for the user-attribute data set
Information Center Facility
The Information Center Facility eases users into the data processing environment by providing a series of conversational panels. These panels eliminate numerous command-driven interactions between the user and the system. Information Center Facility provides panels that enable an administrator to maintain the facility, enroll users, and add, modify, and delete products.
Enhanced Connectivity Facility
The Enhanced Connectivity Facility (ECF) enables you to customize the way in which host server programs and personal computer (PC) requester programs communicate. IBM products or customer-written programs can supply the services.
The user can access MVS host services from a PC using IBM System/370-to-IBM Personal Computer ECF. This enables a DOS/PC user to interact with MVS or IBM Virtual Machine/System Product (VM/SP) systems using PC commands.
Support for z/OS UNIX
Installations can use the functions provided by the TSO/E ALLOCATE and FREE commands to manipulate z/OS UNIX files.
2.4 TSO/E customization
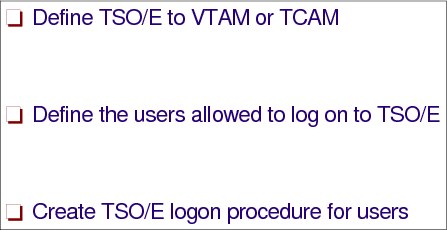
Figure 2-4 TSO/E required customization
TSO/E customization
TSO/E enables users to interactively work with the z/OS system. After the required customization, users are able to log on and issue commands from TSO/E.
Each user is defined to TSO/E by storing its user ID, logon procedure name, and the TSO/E resources which it has authority to use. This can be done in either of two ways:
•User Attribute data set (UADS), using the ACCOUNT command
•IBM Resource Access Control Facility (RACF) database
When RACF is installed, it can be used to control access to the system and store information about each TSO/E user. The RACF database contains profiles for every entity (user, data set, or group) defined to RACF. For more information about RACF, see z/OS Security Server RACF System Programmer's Guide, SA23-2287.
Customization of the TSO/E environment generally refers to making a TSO/E facility available or changing default values that affect TSO/E. You can customize the following areas:
•IBM Virtual Telecommunications Access Method (VTAM). You can change VTAM session protocols, provide substitute characters for unavailable keyboard characters, and override the default values used to start VTAM.
•Logon limits. You can limit and manage the maximum number of concurrent logons, the user’s region size, and user access to applications.
•The logon/logoff process. You can change how often the system displays the logon proceeding message, limit the number of attempts a user can make at entering information in response to logon prompts, tailor the reconnect option, and suppress messages that are generated during the execution of the logon job.
You can also review factors that affect logon performance, such as using STEPLIBs in logon JCL, and you can write exits to further customize the logon/logoff process. Your installation can use security labels (SECLABEL) if the correct products are installed.
•ISPF/PDF and others products. You can make ISPF/PDF and others products that run in the TSO environment available to TSO/E users.
•Authorized commands and programs. You can select which authorized commands and programs users can use.
•Command/program invocation platform support. You can start TSO/E commands and programs on the command/program invocation platform. Both authorized and unauthorized commands and programs are supported.
•Command availability in the background. You can make specific commands unavailable for use in the background.
•TRANSMIT and RECEIVE availability. You can make the TRANSMIT and RECEIVE commands available.
•HELP data set usage. You can customize the use of HELP data set members.
•Host services availability. You can make host services available to PC users.
•Language support. You can provide information to users in their national language.
For more details about customization, see z/OS TSO/E Customization, SA32-0976.
2.5 TSO/E: Terminal control address space start procedure
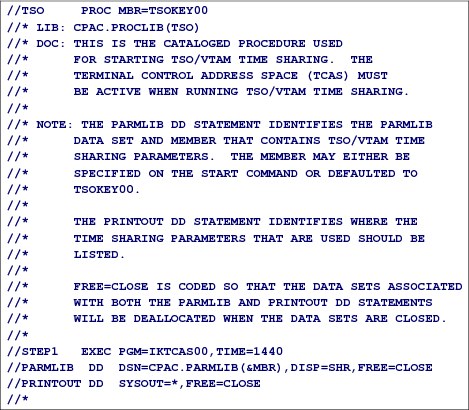
Figure 2-5 TSO/E: Terminal control address space start procedure
TSO/E: Terminal control address space start procedure
Before a user can log on to TSO/E, both VTAM and the terminal control address space (TCAS) must be active in the system. The system operator enters the START command to
start VTAM.
start VTAM.
After VTAM has been started, the system operator enters the START command to start TSO/E and activate TCAS. TCAS accepts logons from TSO/VTAM users and creates an address space for each user.
The TCAS (TSO) start procedure is usually stored in SYS1.PROCLIB. In the start procedure you specify the TSOKEYxx SYS1.PARMLIB member that contains the parameters to be used by TCAS to control the time-sharing buffers, maximum number of users, and other operational variables, as pointed by the parmlib DD card of the start procedure. If the parmlib DD card is not coded in the procedure, SYS1.PARMLIB is used.
When a user logs on, the VTAM terminal input/output (I/O) coordinator (VTIOC) is initialized. VTIOC controls the movement of data between TSO/E and VTAM. The parmlib member TSOKEY00 or an installation-defined alternative member contains parameters that are used during VTIOC initialization.
If a member other than TSOKEY00 is used, the operator must include the member name either on the START command or in the procedure that the START command starts. For a description of TSOKEY00, see z/OS MVS Initialization and Tuning Reference, SA23-1380.
2.6 TSO/E logon procedure
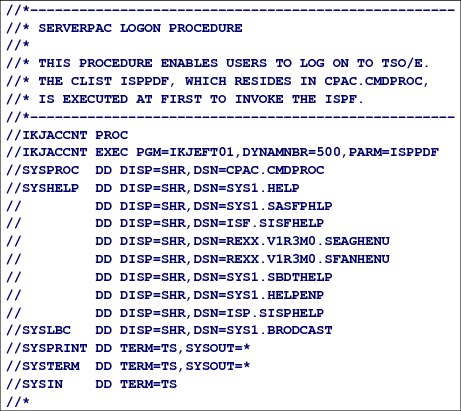
Figure 2-6 TSO/E logon procedure
TSO/E logon procedure
A TSO/E logon procedure contains JCL statements that run the required program and allocate the required data sets to enable a user to acquire the resources needed to use TSO/E. To log on to TSO/E, a user must have access to at least one logon procedure.
The logon procedure is usually in data set SYS1.PROCLIB or another library identified in the PROCxx concatenation in the IBM Job Entry Subsystem 2 (JES2) startup procedure, or in the IATPLBxx DD statement in the JES3 startup procedure. TSO/E provides a logon procedure in SYS1.PROCLIB called IKJACCNT for system programmers to access the system, for example, during the initial installation or if there are problems with the RACF database. Figure 2-6 shows a sample logon procedure. The statements specify the following values:
PGM=IKJEFT01 This identifies the program to be run. IKJEFT01 is the TSO/E-supplied Terminal Monitor Program (TMP) that provides an interface between the user command processors and the TSO/E control program. It obtains commands, gives control to command processors, and monitors their execution. This program can also be run in the background by submitting JCL. Rather than the IKJEFT01 program, an installation can use the Session Manager program (ADFMDF03) or its own TMP.
PARM You can pass a command, CLIST, REXX, or program to IKJEFT01 to be interpreted as the first line of input from the terminal after the user has logged on. In the example, it runs a CLIST or a REXX named BRDCST.
DYNAMNBR This defines the number of data sets that can be dynamically allocated at the same time. A constant of 2 is always added to the DYNAMNBR value that you specify. It enables data sets to be more quickly reallocated, because control blocks for data sets remain in storage, even after the data sets have been de-allocated.
Choose the value for DYNAMNBR carefully. Make the value large enough that it is not readily exceeded by the number of dynamic allocation requests made during the user's session. However, the larger the value you specify for DYNAMNBR, the more virtual storage is used. The actual amount of virtual storage depends on the number of data sets that the user allocates and de-allocates in a session.
The value cannot exceed the number of concurrently allocated resources specified in the SYS1.PARMLIB member ALLOCxx, parameter TIOT SIZE. For details, see z/OS MVS Initialization and Tuning Reference, SA23-1380.
SYSIN This specifies that SYSIN is the user's terminal.
SYSPRINT This specifies that SYSPRINT is to be directed to the user's terminal.
Additional data sets can be allocated dynamically during the user's session or can be defined in the logon procedure. The following DD statements have special meaning, and can be included in the logon procedure:
SYSPROC This defines the current REXX exec or CLIST library to be searched when the user uses the implicit form of the EXEC command. Figure 2-6 on page 72 shows the explicit form of the EXEC command and the library name is specified in the command. The implicit form is BRDCST.
SYSEXEC This defines the current REXX exec library concatenation to the EXEC command when users use the implicit form of the command. By default, the system searches SYSEXEC first, followed by SYSPROC.
The data sets described in SYSPROC and SYSEXEC DD statements must be partitioned, and have a record format of V, VB, F, or FB. You can allocate them dynamically using the ALLOCATE command and activate them with the ALTLIB command.
2.7 TSO/E logon process in a VTAM environment

Figure 2-7 TSO/E logon process in a VTAM environment
TSO/E logon process in a VTAM environment
In a VTAM environment, when a user enters a LOGON command to the TSO applid the following actions occur:
1. VTAM receives the command and passes it to the TCAS address space.
2. If the maximum number of users logged on in the system is reached, the logon is rejected; if not, and the user ID was not specified, TCAS prompts for the user ID.
3. After the user ID is specified, TCAS verifies that the user has authority to use TSO/E. Depending on the installation customization, a full-screen logon panel is shown to the user. Figure 2-8 on page 75 shows the panel displayed when the user is RACF defined.
The values shown in the fields PROCEDURE, ACCT NMBR, SIZE, and COMMAND are the same the user entered for the previous TSO/E session. If this is the first session, they are the default values. The command entered in the COMMAND field is run after any command entered in the PARM field on the EXEC statement of the logon procedure.
4. After the Enter key is pressed, TSO/E verifies the values entered, then the user ID and the logon procedure name is passed to JES. The JCL is interpreted and converted. The MASTER creates the user address space and the resources specified in the JCL are allocated.
5. The user receives a window with the READY prompt at the left top corner of the window. This is called line-mode TSO/E. Now TSO/E is ready to accept commands, and user interfaces, such as ISPF or SDSF can be called.
2.8 TSO/E full-screen logon panel

Figure 2-8 TSO/E full-screen logon panel
TSO/E full-screen logon panel
To log on to TSO/E, type LOGON <yourid> and press the Enter key. After you log on, a window similar to the one shown in Figure 2-8, which is known as a panel, is displayed. A panel is a predefined display image that fills your window. Notice that your user ID appears in uppercase letters to the right of the user ID arrow, and that other information required by your installation appears in uppercase letters to the right of other arrows.
The computer generally re-displays information in uppercase regardless of how you typed it. The area to the right of an arrow is called an input field. You can type information only in input fields. If you type anywhere else on the window, the keyboard locks. To unlock the keyboard, press the Reset key.
|
Important: The values that are required to be entered on the logon panel depend on your installation, and are determined by the system programming staff.
|
Enter a user ID
The user ID identifies the user that the system is to notify. The user ID is 1 through 7 alphanumeric or national (dollar sign ($), number sign (#), or at sign (@)) characters. The first character must be an alphabetic or national ($, #, @) character.
Entering a password
In the Password input field, you must enter the password that your administrator gave you. The characters do not appear on the window when you enter your password. Suppressing the password in this way prevents others from seeing it as you type it.
Change password
Optionally, you can also supply the following items:
•A new password (if you want to change it)
•A logon procedure, if you do not want to use the installation default
•An account number, if required by the installation
•An RACF group
•An identification (that you are connected to)
•The region size, if you need more than the installation default
•The first command to be run after your user ID is logged on
Command line
Figure 2-8 on page 75 shows that a command ISPPDF was specified. In this example, ISPPDF is an installation CLIST that allocates the required data sets and calls ISPF. In such cases, rather than entering TSO/E in line-mode, the user receives the ISPF Primary Menu panel and is in full-screen mode.
2.9 TSO/E line-mode
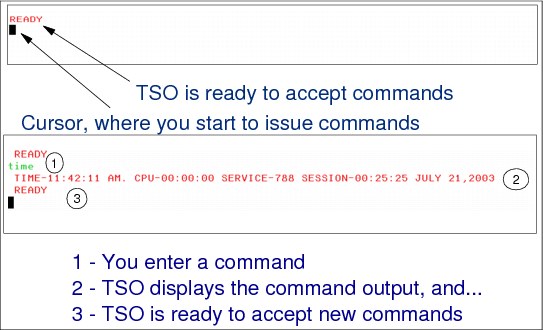
Figure 2-9 TSO/E line-mode
TSO/E line-mode
When you do not enter a command name in the panel shown in Figure 2-8 on page 75, you enter TSO/E in line-mode. When you log on, you see the panel shown in Figure 2-9. The word READY in the corner indicates that TSO is ready to accept your commands.
In TSO/E line-mode you type TSO/E commands one line at a time. It is a quick and direct way to use TSO/E, and was the way programmers originally used to communicate interactively with the z/OS operating system.
You probably will not use TSO/E in line-mode. The user interface provided by ISPF is a more friendly way to work with TSO/E. The following sections contain hints to help you when you are using TSO/E and ISPF.
For more information, see z/OS TSO/E Primer, SA32-0984, and z/OS TSO/E User's Guide, SA32-0971.
Interrupting a TSO/E function
The Attention Interrupt key enables you to interrupt or end a process that is taking place. If you are in a process and you want to stop or see a message requesting information you do not have, you can press the Attention Interrupt key to end the process.
The Attention Interrupt key often is labeled PA1. Sometimes it is called an escape key and is labeled Esc.
2.10 Using TSO/E as batch job
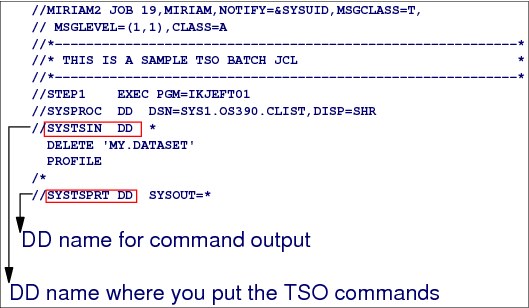
Figure 2-10 TSO/E batch
Using TSO/E as batch job
Rather than waiting at a terminal for your job to run, you can use the terminal to prepare a job containing the commands and data you would have entered at the terminal, then use the SUBMIT command to run the job. In this case, you are using the facilities of TSO/E exactly as though you submitted the commands individually at the terminal. You need the following JCL statements to submit your job:
•A JOB statement to identify your job
•An EXEC statement with the name of the TSO/E terminal monitor program (IKJEFT01, IKJEFT1A, or IKJEFT1B)
•At a minimum, the following ddnames:
– SYSTSPRT, which is used to control the output for your job. You can specify this DD as SYSOUT.
– SYSTSIN, which is used as input for your TSO/E commands. It can be in stream (use a slash asterisk (/*) to indicate the end of the stream).
•The DDNAMEs required by the application you intend to run
2.11 TSO/E Profile command
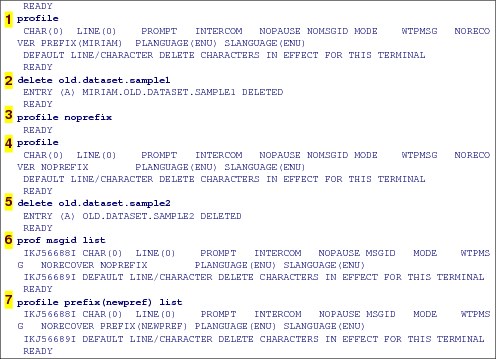
Figure 2-11 TSO/E PROFILE command
TSO/E Profile command
Under TSO/E you always have a TSO profile, which is kept from one session to another. The way you issue the command to see your TSO profile depends on which environment you are running in:
•In TSO/E line-mode environment, type PROFILE and press the Enter key.
•In ISPF/PDF environment, type TSO PROFILE in the command line.
Initially, a user profile is prepared for you when arrangements are made for you to use the system. The authorized system programmer creates your user ID and your user profile. The system programmer is restricted to defining the same user profile for every user ID that the programmer creates.
This typical user profile is defined when a user profile table (UPT) is initialized to hexadecimal zeroes for any new user ID. Therefore, your initial user profile is made up of the default values of the operands discussed under this command.
Use the PROFILE command or the PROFILE subcommand of EDIT to establish, change, or list your user profile. The information in your profile tells the system how you want to use your terminal.
Changing a TSO profile
To change the TSO profile, type the PROFILE command followed by its operands and values. PROFILE can be shortened to PROF.
Figure 2-11 on page 79 shows the command in line-mode:
1. The command output is shown at 1.
2. When you use PREFIX in your TSO profile, all data sets you refer to, when not embedded in single quotation marks, are prefixed with your prefix, as shown at 2.
3. To deactivate the prefix, enter the command PROFILE NOPREFIX, as shown at 3.
4. Now, you do not see the prefix name displayed in the output of the PROFILE command.
5. Now, you do not have to use quotation marks, but you have to inform the complete data set name, as shown at 5. Otherwise, you will receive an error message or delete a wrong data set.
6. You can issue PROFILE MSGID to have all diagnostic messages you receive identified by their IDs, as shown at 6. You can add the LIST operand in your PROFILE command to list the new profile after the change, as shown at 6.
7. Use to PROFILE command to define a new PREFIX.
For more information about the PROFILE command and its operands, see z/OS TSO/E Command Reference, SA32-0975.
2.12 TSO/E languages
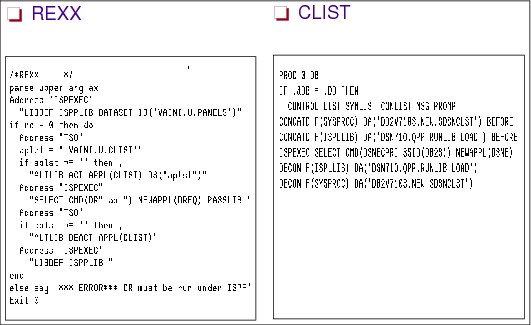
Figure 2-12 TSO/E languages
TSO/E languages
There are two languages available in the TSO/E environment: REXX and CLIST. REXX and CLIST can be used to customize and tailor your TSO/E environment specifically for the applications you want to use. Figure 2-12 shows a REXX exec and a sample CLIST procedure.
REXX
REXX is a programming language that is extremely versatile. With aspects, such as common programming structure, readability, and free format, it is a useful language for beginners and general users. Yet because the REXX language can be intermixed with commands to various host environments, provides powerful functions, and has extensive mathematical capabilities, it is also suitable for more experienced computer professionals.
The TSO/E implementation of the REXX language enables REXX execs to run in any MVS address space. You can write a REXX exec that includes TSO/E services and run it in a TSO/E address space, or you can write an application in REXX to run outside of a TSO/E address space.
|
Note: There is also a set of z/OS UNIX extensions to the TSO/E REXX language which enable REXX programs to access z/OS UNIX callable services. The z/OS UNIX extensions, called syscall commands, have names that correspond to the names of the callable services that they start, for example, access, chmod, and chown. For more information about the z/OS UNIX extensions, see z/OS Using REXX and z/OS UNIX System Services, SA23-2283.
|
CLIST
A CLIST is an interpretative language that helps you to work more efficiently with TSO/E. It is a command list language because the most basic CLISTs are lists of TSO/E commands. When started, it issues the TSO/E commands in sequence. The CLIST language includes the programming tools that you need to write extensive, structured applications. CLISTs can perform several complex tasks, from displaying a series of full-screen panels to managing programs written in other languages.
You can include TSO/E commands and subcommands (and user-written commands and subcommands) in a CLIST at any point where the specific functions (for example, allocate, free, and so on) are required. For certain applications, a CLIST might consist entirely of commands and subcommands.
2.13 Interactive System Productivity Facility
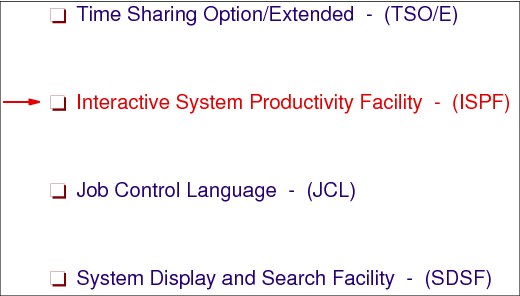
Figure 2-13 Interactive System Productivity Facility
Interactive System Productivity Facility
The ISPF/PDF is a set of panels that help you manage libraries of information about the z/OS system. The libraries are made up of units called data sets that can be stored and retrieved. You can have various kinds of information in data sets. Several examples are shown here:
•Source code
•Data, such as inventory records, personnel files, or a series of numbers to be processed
•Load modules
Using ISPF
ISPF is a multifaceted development tool set for the z/OS operating system. Since 1975, MVS programmers have used ISPF for host-based application development productivity. ISPF forms the basis of many TSO and CMS applications and provides extensive programmer-oriented facilities as well.
ISPF can be used in many ways, as these examples illustrate:
•Users can edit, browse and print data.
•Data processing administrators and system programmers can use ISPF to:
– Monitor and control program libraries.
– Communicate with MVS through TSO commands, CLISTs, or REXX execs.
•Programmers can use ISPF to develop a batch, interactive, or any other type of program and its documentation.
•Terminal users can start a wide range of utilities, such as search, compare, compilers, and so forth.
ISPF components
ISPF helps programmers develop interactive applications called dialogs. Dialogs are interactive because ISPF uses them to communicate with terminal users through a series of panels while the users perform application development tasks.
ISPF panels provide the following functions:
•Provide access to ISPF functions through menus.
•Request information from users through data entry panels.
•Provide information from users through scrollable data displays.
ISPF components
These are the main components of ISPF:
•Dialog Manager (DM)
DM provides services to dialogs and users. These include display, variable services, input and output, user and application profiles, table management, system interface services, dialog testing and debugging aids, and other services.
•Program Development Facility (PDF)
PDF provides services to assist the dialog or application developer. These include the edit and browse functions, data set and catalog utilities, TSO or CMS command interfaces, and data set search and compare functions.
•Software Configuration and Library Manager (SCLM)
The SCLM facility provides library management capabilities, such as versioning, auditing, and promotion. It also provides configuration management capabilities to track how all of the pieces of an application fit together, including source code, objects, load modules, test cases, documentation, and other items. The Build function tracks and starts the necessary compilers, assemblers and linkage editors.
•Client/Server component
The Client/Server component enables the users of ISPF applications to use a workstation running Windows or UNIX to display the panels of an ISPF application. It does this using the graphical user interface (GUI) of the workstation. Because of this, there is no requirement to change your existing ISPF applications to run in a GUI environment.
2.14 ISPF: Data set types supported

Figure 2-14 ISPF and ISPF/PDF data set types supported
ISPF: Supported data set types
A data set is a collection of logically related data; it can be a source program, a library of macros, or a file of data records used by a processing program. Data records are the basic unit of information used by a processing program. ISPF supports the following data set types for any ISPF options, such as Edit, Browse, and Delete:
•Sequential data set
A sequential data set is a data set whose records are organized on the basis of their successive physical positions. In a sequential data set, records are stored and retrieved in a sequential order.
•Partitioned data set and partitioned data set extended
A partitioned data set (PDS) is a data set on direct access storage that is divided into partitions called members. Each member can contain a program, part of a program, or data.
A partitioned data set is like a collection of sequential data sets, where the individual members each have a unique name. A directory index is used to locate members in the partitioned data set. The directory consists of 256-byte records, each one containing directory entries. There is one directory entry for each member.
For Virtual Storage Access Method (VSAM) data sets, ISPF supports creation, obtaining data set information, and deletion. Browse and Update are supported by DITTO, an IBM licensed program installed under ISPF.
|
Tip: You can create and delete VSAM data sets and obtain VSAM data set information. VSAM data sets are supported for Edit, Browse, and View if the ISPF Configuration table has been customized to enable such support.
|
ISPF does not support some of the following data set types:
•Record format variable block spanned (VBS) data sets
•Direct access (DA) data sets
•Tape data sets
•Generation data group (GDG) base data sets
2.15 ISPF Option 2

Figure 2-15 ISPF Edit Option 2
ISPF primary menu panel
The primary option menu panel, shown in Figure 2-16 on page 88, is the first panel that displays when you start ISPF.
|
Attention: The panelid shown is ISR@PRIM. To display the panelids on all ISPF panels, when you Enter ISPF, type panelid on the command line.
|
ISPF edit mode (Option 2)
You can use Edit to create or change source data, such as program code and documentation, using the ISPF full-screen editor. You can scroll the data up, down, left, or right. You can change the data by using Edit line commands, which are entered directly on a line number, and primary commands, which are entered on the command line.
Member name
On the panel shown in Figure 2-15, you can enter a Member name. Otherwise, you can press the Enter key from the panel to display all the member names, as shown in Figure 2-17 on page 88.
Members created through ISPF must follow the following naming conventions:
•The first character must be alphabetic or special (@ # $).
•Characters 2-8 must be alphabetic, numeric, or special (@ # $).
The primary option menu panel is shown in Figure 2-16.
|
Menu Utilities Compilers Options Status Help
------------------------------------------------------------------------------
ISR@PRIM ISPF Primary Option Menu
Option ===>
0 Settings Terminal and user parameters user ID . : KARAN
1 View Display source data or listings Time. . . : 14:18
2 Edit Create or change source data Terminal. : 3278
3 Utilities Perform utility functions Screen. . : 1
4 Foreground Interactive language processing Language. : ENGLISH
5 Batch Submit job for language processing Appl ID . : PDF
6 Command Enter TSO or Workstation commands TSO logon : IKJACCT
7 Dialog Test Perform dialog testing TSO prefix: KARAN
9 IBM Products IBM program development products System ID : SC74
10 SCLM SW Configuration Library Manager MVS acct. : ACCNT#
11 Workplace ISPF Object/Action Workplace Release . : ISPF 7.1
12 z/OS System z/OS system programmer applications
13 z/OS User z/OS user applications
Enter X to Terminate using log/list defaults
|
Figure 2-16 ISPF primary option menu
ISPF Option 2
When you select Option 2 from the primary option menu shown in Figure 2-16, the edit entry panel is displayed. You use this panel to enter the name of an ISPF library, an “other” data set or z/OS UNIX file, or a workstation file. If more than one data set or file name is specified, ISPF accepts the workstation file name first, then the “other” data set name, and then the ISPF library name.
In Figure 2-15 on page 87, the data set name (PDS member) displayed is KARAN.CNTL.CATALOG). If you press the Enter key, the members in that partitioned data set are displayed; see Figure 2-17.
|
Menu functions Utilities Help
------------------------------------------------------------------------------
EDIT KARAN.CNTL.CATALOG Row 0000001 of 0000041
Command ===> Scroll ===> CSR
Name Prompt Size Created Changed ID
. $CINDEX 36 2014/02/26 2014/03/04 16:36:34 KARAN
. #CCAS 60 2014/02/28 2014/02/28 15:24:17 KARAN
. #CDELRCV 19 2014/02/28 2014/02/28 13:19:05 KARAN
. #CMRGCAT 21 2014/02/28 2014/02/28 12:18:27 KARAN
. #CMVECAT 36 2014/02/28 2014/02/28 13:00:53 KARAN
. #CRACF 46 2014/02/28 2014/02/28 14:25:58 KARAN
|
Figure 2-17 Part of the members displayed from PDS ROGERS.JCL.VERS5
Edit Option 2
The Edit Option 2 enables you to create, display, and change data stored in ISPF libraries, other partitioned or single-volume or multivolume sequential data sets. You can also set the data encoding options to Unicode Transformation Format, 8-bit (UTF-8) or American Standard Code for Information Interchange (ASCII) to view or edit a data set containing data encoded as Unicode or ASCII.
2.16 ISPF: Other Sequential data set
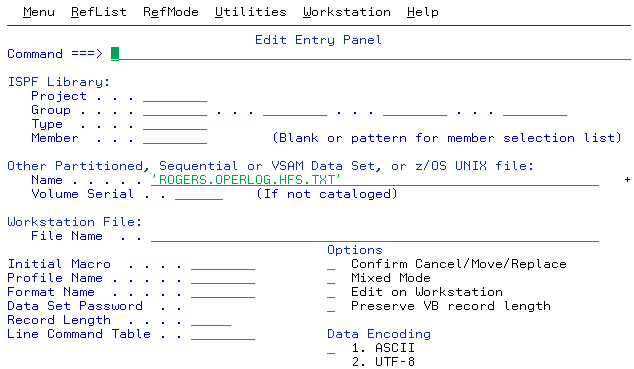
Figure 2-18 Specifying an Other Sequential data set
Other Sequential data set specification
ISPF enables you to create data sets and member names that follow the ISPF naming convention shown in Figure 2-18, (‘ROGERS.OPERLOG.HFS.TXT’).
All data sets and member names created in ISPF are converted to uppercase. If you create members outside of ISPF that do not meet these conventions, they are displayed in ISPF member lists and can be selected from those lists. These member names can also be specified for the Browse service, with the exception of member names containing lowercase alphabetic characters. (ISPF converts the member name to uppercase before searching for the member and therefore cannot process a lowercase member.)
Member names not meeting the ISPF naming convention are not supported for the other ISPF services. The same applies to data sets.
ISPF has useful online help and tutorial facilities (available when using ISPF). For example, if you need help completing the data requested by an ISPF utility, you can use the tutorial to help you understand the data entry requirements for that utility. For information about using the tutorial, see z/OS ISPF Dialog Developer's Guide, SC19-3619.
Data set name convention
The data set name must be a unique name with a maximum of 44 characters and with a maximum of 22 name segments or level qualifiers. The first name in the left is called the high-level qualifier (HLQ). The last name in the right is the low-level qualifier (LLQ).
Level qualifiers are separated by a dot (.), and each level qualifier can be from 1 up to 8 characters. The first character of a qualifier must be alphabetical (A-Z) or a national character (@ # $). The 7 remaining characters can be alphabetical, national, numeric (0-9), or a hyphen (-); for example:
MYID.JCL.FILE2 HLQ: MYID 3 qualifiers
Member name of a partitioned data set
The member name can be 8 bytes, where the first byte must be alphabetical (A-Z) or a national character (@ # $). The 7 remaining characters can be alphabetical, national, or numeric (0-9).
|
Important: All member names created in ISPF are converted to uppercase. If you create members outside of ISPF that do not meet these conventions, they are displayed in ISPF member lists and can be selected from those lists.
These member names can also be specified for the Browse service with the exception of member names containing lowercase alphabetic letters. (ISPF converts the member name to uppercase before searching for the member and therefore cannot process a lowercase member.) Member names not meeting the ISPF naming convention are not supported for the other ISPF services.
|
2.17 ISPF components
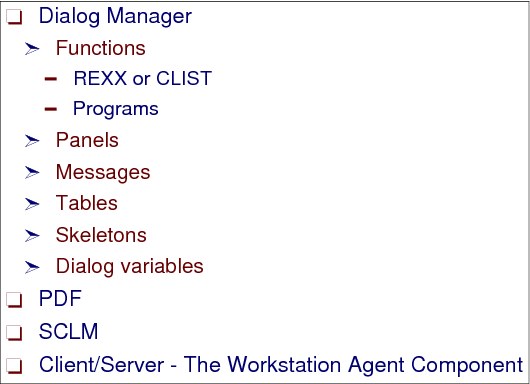
Figure 2-19 ISPF components
ISPF components
ISPF consists of four major components, DM, PDF, SCLM, and Client/Server, as shown in Figure 2-19. These components are considered one element in all releases of z/OS.
ISPF Dialog Manager
DM provides services to dialogs and users. A dialog is the interaction between a person and a computer. It helps a person who is using an interactive display terminal to exchange information with a computer. The user starts an interactive application through an interface that the system provides. The dialog with the user begins with the computer displaying a panel and asking for user interaction. It ends when the task for which the interactions were initiated is completed. Dialog Manager is composed of six elements:
•Functions. A function is a command procedure or a program that performs processing requested by the user. It can start ISPF dialog services to display panels and messages, build and maintain tables, generate output data sets, and control operational modes. They can be written as:
– REXX or CLIST command procedures
– Programs
•Panel definitions. A panel definition is a programmed description of the panel. It defines both the content and format of a panel. Most panels prompt the user for input. The user's response can identify which path is to be taken through the dialog, as on a selection panel. The response can be interpreted as data, as on a data-entry panel.
•Message definitions. Message definitions specify the format and text of messages to users. A message can confirm that a user-requested action is in progress or completed, or it can report an error in the user's input.
•Table. Tables are two-dimensional arrays that contain data and are created by dialog processing. They can be created as a temporary data repository, or they can be retained across sessions. A retained table can also be shared among several applications. The type and amount of data stored in a table depends on the nature of the application. Not all dialogs use tables.
•File tailoring skeletons. Skeletons work like a fill-in-the-blank exercise. They take dialog variables and put them into a data set containing statements that control the output format. The output data set can be used to drive other processes. File skeletons are frequently used to produce job data sets for batch execution. Various dialogs can use this kind of resource.
•Dialog variables. ISPF services use variables to communicate information among the various elements of a dialog application. ISPF provides a group of services for variable management. Variables can vary in length from zero to 32K bytes.
Program Development Facility
PDF provides View, Browse, Edit, and library access services that can be combined in a dialog with any of the ISPF services. The library access services run functions involving members of a programming library. These functions include adding, finding, and deleting members, and displaying member lists.
Software Configuration Library Manager
SCLM is a software tool that helps you develop complex software applications. Throughout the development cycle, SCLM automatically controls, maintains, and tracks all of the software components of the application. You can lock the version being edited in a private library and then promote it. Use SCLM to create, control, maintain, and track software components for a project. For more information about SCLM, see z/OS ISPF SCLM Project Manager’s and Developer’s Guide, SC19-3625.
ISPF Client/Server - the Workstation Agent component
The Workstation Agent (WSA) component enables you to run ISPF on a programmable workstation and display the panels using the display function of your workstation operating system. Manuals in the ISPF library refer to this as running in GUI mode. The ISPF WSA is supported on the following platforms:
•Microsoft Windows
•AIX
•HP-UX
•Solaris
Connecting to a workstation for data access has a direct effect on your installation’s processor processing time. One reason for using the ISPF Client/Server function is to offload processor cycles from the host to a less expensive workstation. But even if that is not your goal, an added benefit is that your users can use the connection for distributed editing.
Therefore, they can use their favorite editor to work with your data, whether that means using a host editor on host and workstation files, or using a workstation editor on the same files. By making the connection to the workstation, a user can edit workstation files on ISPF, or host files on his workstation. The distributed edit function can be used in standard 3270 mode, or in ISPF GUI mode.
2.18 Sample CLIST to allocate ISPF and SDSF data sets
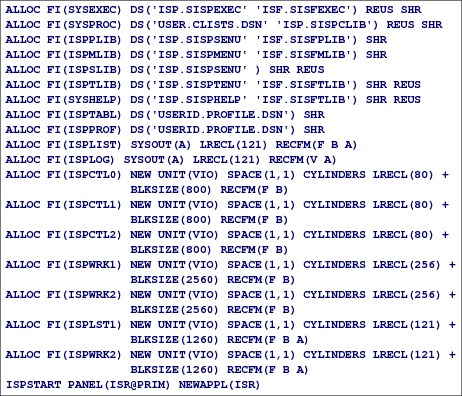
Figure 2-20 Sample CLIST to allocate ISPF and SDSF data sets
Sample CLIST to allocate ISPF and SDSF data sets
ISPF runs in a TSO/E environment. Before ISPF can be started, data sets must be available. This can be achieved in any of the following ways:
1. Allocate them in the logon procedure.
3. Save all commands shown in Figure 2-20 as a command and start during the logon process as the ISPPDF command shown in Figure 2-8 on page 75.
Required DDNAMEs
The required DDNAMEs are listed here:
•SYSEXEC for partitioned data sets containing REXX execs
•SYSPROC for partitioned data sets containing CLIST and REXX execs
•ISPPLIB for panel definitions libraries
•ISPTLIB for input table definitions libraries
•ISPMLIB for message libraries
•ISPPROF for the user profile data set under ISPF/PDF environment. ISPF/PDF use this data set for storing variables and settings to be used from one TSO/ISPF session to another.
Other important DDNAMEs
The DDNAMEs for ISPTABL (for output tables) and ISPSLIB (for skeletons) might be requested for specific applications.
For various data sets, if not preallocated, ISPF allocates them:
•ISPLOG DD name. The data set where ISPF logs commands issued by the user and some ISPF functions log errors detected.
•ISPLIST DD name. ISPF uses this data set when user requests printed output.
The DDNAMEs ISPCTLx (where x can be 1 - 9, A - W) are used by ISPF as a temporary data set. ISPF can use one for each logical window to generate JCL or utility control statements or to generate listings. ISPF can run up to 32 logical screens at one time. The default value is 8. The installation can change the default value by modifying the ISRCONFG table. ISPCTL0 is used only by Edit for the SUBMIT command.
The DDNAMEs ISPWRKx are used by ISPF for file tailoring services with ISPFILE allocated to a PDS. The DD names ISPLSTx are used for generated listings. The same preallocation can be done by the ALLOCATE command in a CLIST or in a REXX exec to be run before the ISPF start.
2.19 ISPF primary option menu

Figure 2-21 ISPF primary option menu
ISPF primary option menu
ISPF is started in a TSO/E environment through an ISPF, or PDF, or ISPSTART command. The ISPF Primary Option Menu contains the options that you can use to create your own applications online. If your installation has a customized ISPF Primary Option Menu, the menu might not contain all of options shown in Figure 2-21, or it might contain certain installation-specific options. Most ISPF panels have action bars at the top; many panels also have point-and-shoot text fields. The following list describes the panel options:
0 Settings displays and changes selected ISPF parameters, such as terminal characteristics and function keys.
1 View displays data using the View or Browse function. You can use View or Browse to look at (but not change) large data sets, such as compiler listings. You can scroll the data up, down, left, or right. If you are using Browse, a FIND command, entered on the command line, enables you to search the data for a character string. If you are using View, you can use all the commands and macros available to you in the Edit function.
2 Edit enables you to create or change source data, such as program code and documentation, using the ISPF full-screen editor. You can scroll the data up, down, left, or right. You can change the data by using Edit line commands, which are entered directly on a line number, and primary commands, which are entered on the command line.
3 Utilities perform library and data set maintenance tasks, such as moving or copying library or data set members, displaying or printing data set names and volume table of contents (VTOC) information, comparing data sets, and searching for strings of data.
4 Foreground calls IBM language processing programs in the foreground.
5 Batch calls IBM language processing programs as batch jobs. ISPF generates JCL based on information that you enter and submits the job for processing.
6 Command calls TSO commands, CLISTs, or REXX execs under ISPF.
7 Dialog Test tests individual ISPF dialog components, such as panels, messages, and dialog functions (programs, commands, menus).
9 IBM Products enable you to select other installed IBM program development products on your system.
The following products are supported:
•Tivoli Information Management
•COBOL Structuring Facility foreground dialog (COBOL/SF)
•Screen Definition Facility II (SDF II) licensed program
•Screen Definition Facility II-P (SDF II-P) licensed program
10 SCLM controls, maintains, and tracks all of the software components of an application.
11 Workplace gives you access to the ISPF Workplace, which combines many of the ISPF functions onto one object-action panel.
12 z/OS System gives you access to the z/OS System Programmer Primary Option Menu. It contains options for z/OS elements that are used by system programmers and administrators:
•Graphical Data Display Manager (GDDM) Print Queue Manager
•Hardware Configuration Definition (HCD) I/O configuration
•DCE configuration
•APPC Administration
•z/OS Workload Manager (WLM)
•IBM First Failure Support Technology (FFST)
•Infoprint Server
•z/OS Resource Management Facility (RMF)
•System Modification Program/Extended (SMP/E)
•Transmission Control Protocol/Internet Protocol (TCP/IP) Network Print Facility (NPF)
13 z/OS User gives you access to the z/OS Applications panel. It contains options for z/OS elements that are used by most ISPF users:
•BookManager Build
•BookManager Read
•BookManager Index Creation
•Data Facility Storage Management Subsystem (DFSMS) Removable Media Manager (DFSMSrmm)/Interactive Storage Management Facility (ISMF)
•DFSMS Data Facility Product (DFSMSdfp)/ISMF
•Data Facility Sort (DFSORT)
•Bulk Data Transfer (BDT) File-to-File
•Interactive Problem Control System (IPCS)
•z/OS UNIX Browse
•z/OS UNIX Edit
•z/OS UNIX Shell
•Security Server
•TSO/E Information Center Facility
•SDSF
X EXIT leaves ISPF using the log and list defaults. You can change these defaults from the Log/List pull-down on the ISPF Settings panel action bar.
2.20 ISPF panel areas

Figure 2-22 ISPF panel areas
ISPF panel areas
ISPF panels can contain the following areas:
1. Action bar. This is the area at the top of an ISPF panel that contains choices that give you access to actions available on that panel.
2. Option. The fields in this column are point-and-shoot text fields. For example, if you want to select the Edit Panel, to create or change source data, you type it in the option input field and press Enter. You can also type commands in the Option field.
3. Dynamic status area. You can specify what you want to be displayed in this area; in Figure 2-22 it displays descriptions of all options you can take from this panel.
4. Function Keys. ISPF uses Common Use Access (CUA)-compliant definitions for function keys F1-F12. For example, PF1 is used to start the ISPF Help function. You can eliminate this area by typing PFSHOW OFF in area 2, the Option field.
2.21 Action bars

Figure 2-23 Action bars
Action bars
Action bars give you another way to move through ISPF. If the cursor is located somewhere on the panel, there are several ways to move it to the action bar:
•Use the cursor movement keys to manually place the cursor on an action bar choice.
•Type ACTIONS on the command line and press Enter to move the cursor to the first action bar choice.
•Press F10 (Actions) or the Home key to move the cursor to the first action bar choice.
|
Restriction: ISPF does not provide a mouse emulator program. You can use Select in conjunction with point-and-shoot text fields and action bar choices to simulate moving the cursor to a field and pressing Enter. Each ISPF panel has different action bars.
|
When you make an action bar selection, the selected item is highlighted and ISPF displays a pull-down menu, that is, a list of numbered choices extending from the selection you made on the action bar. Figure 2-23 shows the result when you select Utilities on the panel.
You can select an action either by typing in its number and pressing Enter, or by selecting the action with your cursor. ISPF displays the requested panel. If your choice contains an ellipsis (...), ISPF displays a window. When you exit this panel or window, ISPF closes the pull-down menu and returns you to the panel from which you made the initial action bar selection.
Utilities action bar
This choice is available from many panels in ISPF and displays the options listed on the Utility Selection panel. The following choices are available from the Utilities pull-down menu:
1. Library Displays the Library Utility panel
2. Data set Displays the data set Utility panel
3. Move/Copy Displays the Move/Copy Utility panel
4. Data set List Displays the data set List Options panel
5. Reset Statistics Displays the Reset ISPF Statistics panel
6. Hardcopy Displays the Hardcopy Utility panel
7. Download Displays the panel that enables you to download workstation clients and other files from the host
8. Outlist Displays the Outlist Utility panel
9. Commands Displays the Command Table Utility panel
*0 Reserved Reserved for future use by ISPF; an unavailable choice
11. Format Displays the Format Specification panel
12. SuperC Displays the SuperC Utility panel
13. SuperCE Displays the SuperCE Utility panel
14. Search-for Displays the Search-For Utility panel
15. Search-forE Displays the Search-ForE Utility panel
16. Table Utility Displays the ISPF Table Utility panel
17. Directory List z/OS UNIX Directory List Utility
2.22 Customizing a TSO/ISPF/PDF session

Figure 2-24 Customizing a TSO/ISPF/PDF session
Customizing a TSO/ISPF/PDF session
You can customize a TSO/ISPF/PDF session by selecting Options → General Settings as shown in Figure 2-24. The Options pull-down provides access to many ISPF settings, including CUA attributes and colors, keylists, and point-and-shoot fields, and the Dialog Test Application ID pop-up.
For more information, see the topic about General Settings (Option 1) in Figure 2-25 on page 101. The first line shows other action fields where you can choose to change default settings, such as colors, function keys, and so on.
ISPF Help function
ISPF has a powerful Help function that can teach you how to use all of the default ISPF options. Access it by pressing the Help program function key or typing help in the command line. You can see and change the program function key assignments by using the KEYS command.
You can learn how to use ISPF by just using the help function. At the Primary Option Menu press Help to learn about the options. In the Help panel, press Help again to learn how to move through help panels. Several Help options are cursor-sensitive, meaning you have to move the cursor to that option to get more information.
A useful source of information for beginners in the ISPF environment is Interactive System Productivity Facility Getting Started, SC34-4440.
2.23 Customizing an ISPF session
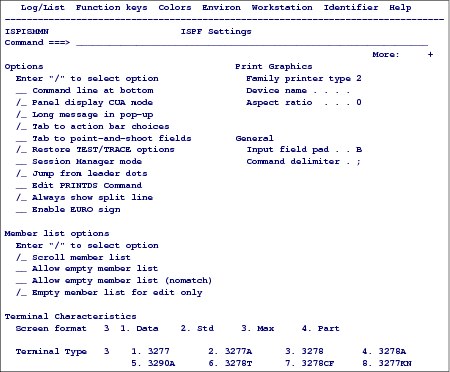
Figure 2-25 Customizing an ISPF session
Customizing an ISPF session
The General Settings option, specified in Figure 2-24 on page 100, enables you to display and change a variety of ISPF parameters at any time during the ISPF session. Changes remain in effect until you change the parameter again, and ISPF saves them from session to session. This topic explains how to use the fields on the ISPF Settings panel and the action bar choices.
|
Tip: If you select Option 0 on the ISPF Primary Option Menu, you will also see panelid ISPISMNN.
|
For a complete description of all options you can use to customize a session, see z/OS Interactive System Productivity Facility (ISPF) User's Guide Volume II, SC19-3628.
|
Important: The panel shown in Figure 2-25 has been customized and does not show the initial defaults.
|
2.24 Allocating data sets: Utility option

Figure 2-26 Allocating a data set: Utility option
Allocating data sets: Utility option
A data set, or file, is an area that is reserved on either disk or tape to enable you to write programs and store data. Before you can edit or store data, you must instruct the system to allocate space on disk, often referred to as direct access storage devices (DASD), and provide information to identify the format of this data set.
There are two ways to allocate a data set:
•By using ISPF dialogs
•By using JCL
Utilities option 3
In the ISPF Primary Option Menu, type 3 in the command line and press the Enter key. Option 3 displays the utilities panel, as shown in Figure 2-27 on page 103. The Utilities option (3) provides a variety of functions for library, data set, and catalog maintenance.
2.25 Utility Selection Panel
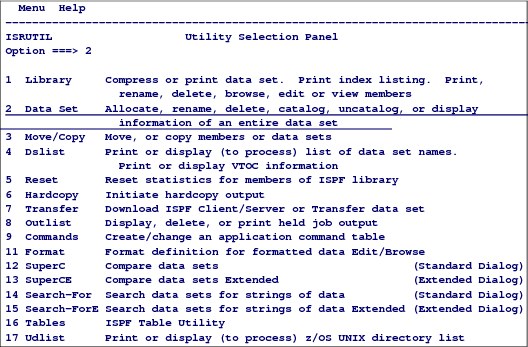
Figure 2-27 Utility Selection Panel option 2
Utility Selection Panel
The Utility Selection Panel gives you the ability to select utilities to perform a variety of functions:
•Compress or print a data set
•Create, rename, or delete a data set
•Move or copy data sets or members
•Search for strings in a data set
•Compare data sets
ISPF option 3.2 enables you to reserve space on a storage device and identify this space with a data set name, often referred to as a DSN or DSNAME.
In this example you will allocate a data set. To accomplish this, type 2 in the Option field and press Enter.
|
Fast path: From the ISPF primary panel, from the command line, you can go directly to the panel shown in Figure 2-28 on page 104 by specifying (=3.2) on the command line, which is essentially specifying option 3, then option 2.
|
2.26 Data set Utility: Allocating a data set
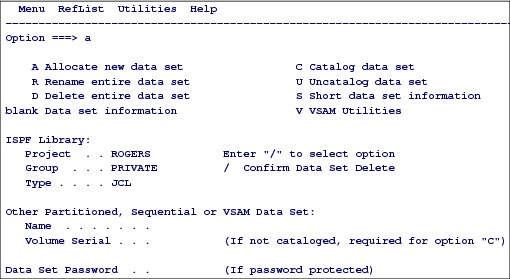
Figure 2-28 Allocating a data set - data set Utility panel
Data set Utility panel: Allocating a data set
The data set Utility panel presents a variety of actions you can perform. You can allocate, delete, rename, catalog, uncatalog, or obtain information about a specific data set. The V option enables you to create and obtain information about VSAM data sets easily.
From the ISPF Primary Option Menu you can go directly to this panel by typing =3.2 in the Option field, as discussed previously. To allocate a new data set, type A on the Option field, as shown in Figure 2-28. Next, specify the name of data set you want to create. In Figure 2-28, the following information was entered:
Project . . ROGERS
Group . . . PRIVATE
Type . . . . JCL
A data set with a three-level name can be entered in the Project, Group, and Type fields, as shown in area 1 in Figure 2-28. Type one level of the name in each field. ISPF does not add your prefix as HLQ. The prefix or HLQ in this example is ROGERS.
Data set name and volume serial
You can specify the data set name and optionally a volume, as shown in area 2 of the panel:
Other Partitioned, Sequential or VSAM data set:
Data set Name. . . 'HLQ.XXX.XXXX.XXX'
Volume Serial . . .
|
Important: Embed the data set name in single quotation marks unless you want the HLQ to equal your prefix.
|
If both a library (1) and a data set name (2) are specified on the same panel, the data set name takes priority. Therefore, to specify a library, leave the data set Name field blank. We did not enter the data set name option field. Therefore, the values specified in the library name are used. See Figure 2-18 on page 89 for data set naming conventions.
Data set name standards are site-dependent and can be protected by RACF or another security product. If you do not have the authority to allocate a DSN with a specific name, your request fails and you receive an error message.
The following list shows examples of data set names:
•SYS1.PARMLIB
•SYS1.PARMLIB.BACKUP.D99156
•ROGERS.PRIVATE.JCL
•GEORGE.TEST.NEW.SYSTEM.JCLLIB
High-level qualifier
The HLQ is the first part of the DSN. In the examples, the HLQs are SYS1 (usually reserved for MVS system DSNs), and MIRIAM, which can be your user ID. Several system data sets must be named as specified, but for personal or in-house data sets, use names that are meaningful and easy to associate with a user or application, and to enable efficient security and DASD maintenance strategies to be maintained.
2.27 Allocate New Data Set panel
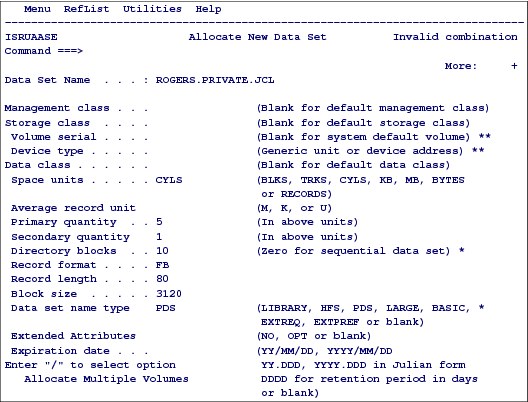
Figure 2-29 Allocate New data set panel
Allocate New Data Set panel
After pressing the Enter key, the Allocate New Data Set panel is displayed. This panel shows the information you have to provide to allocate the new data set.
In this example you are allocating a PDS. This type of data set supports individual members in the data set. Most environments now use DFSMS to control data set allocation; therefore, it is not necessary to specify management class, storage class, or data class information. In most cases the defaults are satisfactory. You must, however, specify the following information:
Space units These are the allocation units for your data set. The allocation units can be in blocks (BLKS), tracks (TRKS), cylinders (CYLS), kilobytes (KB), megabytes (MB), bytes, or records.
Primary quantity This is the number of primary space units that you want to allocate.
Secondary quantity This is the space that can be allocated for secondary extents, if the primary quantity fills up. Non-extended data sets can have a maximum of 16 extents, which include up to five multiple extents that might have been used to satisfy the primary extents.
|
Important: The exception to the 16-extent limitation is PDSE data sets, which can have up to 123 extents.
|
Directory blocks These must be specified for PDS. A directory is an index used to locate members in the partitioned data set. Each directory record consists of 256 bytes containing directory entries. There is one directory entry for each member.
The directory is written at the beginning of the primary space. It must fit in the first extent of the data set.
For PDS, be sure to request enough directory space to support growth of the data set. You cannot lengthen the directory after the data set is created. If the directory runs out of space, you must re-create the data set.
|
Remember: The number of member entries that fit in a directory block is listed here:
•For a data set with ISPF statistics: six entries per block
•For a data set without ISPF statistics: 21 entries per block
•For a load module data set: 4 to 7 entries, depending upon attributes
|
Record format The format can be any valid combination of the following options:
F Fixed-length records
V Variable length records
U Undefined format records
B Blocked records
A ASA printer control characters
M Machine code printer control characters
S Standard (for F) or spanned (for V): sequential data sets only
T Track-overflow feature
The option we used for a partitioned data set was FB.
Record length This is the logical record length, in bytes, of the records to be stored in the data set. In the case of a JCL or program library, this value is 80 bytes.
Block size This is the block size (physical record length), in bytes, of the blocks to be stored in the data set. If records are specified, the block size specifies the average record length.
Data set version Some types of data sets, such as PDSE, support different versions. z/OS V2R1 introduces PDSE V2. This field can be left blank to use the installation default or specify a 1 for a PDSE V1 or a 2 for a PDSE V2 data set.
Num of generations A PDSE V2 data set supports member generations. If enabled you can specify a nonzero number to indicate the number of generations to keep for each member. A 0 indicates no generations are kept.
Extended Attributes Many data sets can be on extended address volumes (EAVs). Specify No to indicate that the allocation is not to be on the extended address space (EAS) on an EAV. Specify OPT to have the system determine whether the data set is to be allocated in EAS space. Leave blank to take the default based on data type.
Data set allocated
After pressing the PF3 (Exit) key, the successful response to the allocation is indicated on the data set Utility panel that reappears. You are returned to this after processing the Allocate New Data Set panel. The upper right of the panel indicates data set allocated.
You have now created a partitioned data set with the name, ROGERS.PRIVATE.JCL This is an empty data set, so the first thing you do is add a member to this data set.
2.28 Edit profile for a user

Figure 2-30 Edit profile for a user
User edit profile
When you are in edit mode for a data set, the PROFILE command displays the information shown in Figure 2-30.
An edit profile for a user controls that user’s edit session through modes and temporary lines. For example, these modes and lines convert data to uppercase (caps mode), automatically renumber lines of data (autonum mode), or specify the left and right boundaries used by other commands (=BNDS> line).
Using edit profile types
Various kinds of data can have various edit profiles. For example, you can set up one edit profile for COBOL programs, another edit profile for memos, and a third edit profile for test data. The installation system programmer determines how many separate edit profiles are available to a user. Typically, 25 edit profiles are available.
Edit modes
The edit modes control how your edit session operates. To set these modes, use the associated primary commands. For example, if you are editing a COBOL program that is in uppercase and you want all your input to be converted to uppercase, set caps mode on by entering CAPS ON.
Primary commands
The primary commands listed here summarize the primary commands you use to display and change your edit profile. Notice that many of these command settings are displayed in the user profile shown in Figure 2-30 on page 109:
PROFILE This displays the current setting of each mode in this list and controls whether changes to these settings are saved.
AUTOLIST This controls whether a copy of the saved data is automatically stored in the ISPF list data set.
AUTONUM This controls whether lines of data are automatically renumbered when the data is saved.
AUTOSAVE This controls whether data is saved when you enter END.
CAPS This controls whether alphabetic characters are stored in uppercase when the data is saved.
HEX This controls whether data is displayed in hexadecimal format.
HILITE This controls the use of enhanced edit color.
IMACRO This names an edit macro used at the start of the edit session.
NOTES This controls whether tutorial notes are included in an Edit model.
NULLS This controls whether blank spaces at the end of a line are written to the panel as blanks or nulls. The difference is that nulls allow you to insert data; blanks do not.
NUMBER This controls the generation of sequence numbers in a data set.
PACK This controls whether ISPF packs (compresses) the data when it is saved.
RECOVERY This controls the recovery of an edit session after a system failure.
Edit primary commands
Primary commands affect the entire data set being edited. Line commands usually affect only a single line or block of lines. To enter a primary command, perform one of the following actions:
•Type the command on the command line and press Enter.
•Press the function key to which the command is assigned.
|
Information: There are many other commands. For a complete description of the commands, see z/OS Interactive System Productivity Facility (ISPF) Edit and Edit Macros, SC19-3621.
|
Modifying an edit profile
You modify an edit profile by entering commands to set various modes, options, and temporary lines. Whenever you change an edit profile value, ISPF saves the value (unless the edit profile is locked). The next time you edit data using the edit profile, the data is retrieved and the environment is set up again. This is easier than it sounds. First, there are defaults for all of the modes, and, in most cases, you do not need to change them. Second, if you decide that you want to change a mode, you simply enter the appropriate command. The edit profile is automatically changed and saved.
|
Attention: In Figure 2-30 on page 109, the AUTOSAVE primary command was changed from its default by issuing the following command:
autosave off prompt
|
2.29 Edit function: Option 2

Figure 2-31 Edit: Option 2
Edit function: Option 2
When you select Option 2 from the Primary Option Menu, the edit entry panel is displayed, as shown in Figure 2-32 on page 112. You use that panel to enter the name of an ISPF library, an “other” data set, a z/OS UNIX file, or a workstation file. If more than one data set or file name is specified, ISPF accepts the workstation file name first, then the “other” data set name, and then the ISPF library name.
You can add a new member to a PDS, or modify an existing member, by using ISPF Option 2 (Edit) in the ISPF Primary Option Menu.
2.30 Edit Entry panel
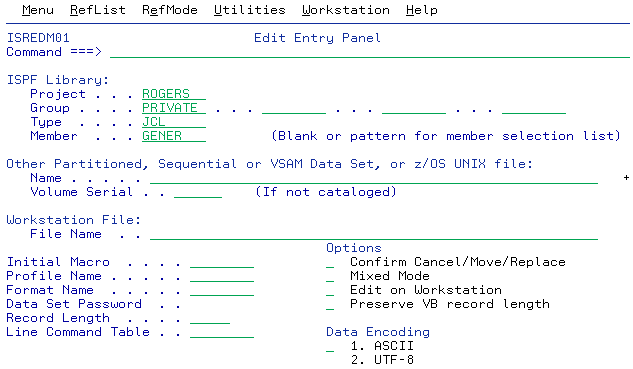
Figure 2-32 Edit Entry panel
Edit Entry panel
In the Edit Entry panel you have to supply the name of the PDS to which you want to add a new member. In this example, the PDS name is ROGERS.PRIVATE.JCL (the data set you allocated previously). If you are creating a new member or want to edit an existing member, you can enter the member name on the panel.
In Figure 2-32, a new member called GENER is entered. After entering the corresponding input fields in this panel, press Enter.
As discussed previously, if your data set has three qualifiers, you can use the Project/Group/Type fields to identify your data set. The advantage is that ISPF stores this information in your profile data set, and the next time that you enter this panel the fields are set by the saved information. If your data set does not have three qualifiers, you must use the Other Partitioned or Sequential data set field, embedding the data set name in single quotes, unless you want ISPF to add your prefix as the HLQ.
|
Remember: If you do not specify a member name and use the enter key, all members that exist in the Project/Group/Type fields that exist are displayed.
|
2.31 Editing a data set
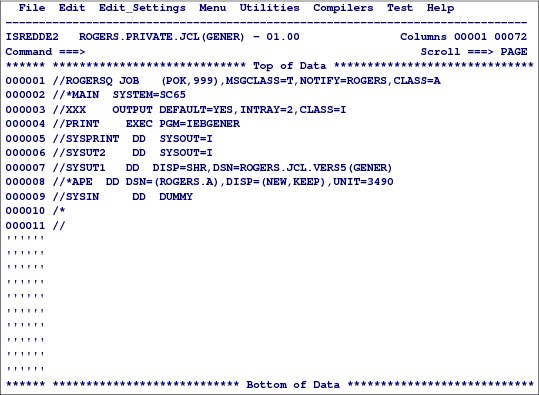
Figure 2-33 Editing a data set
Editing a data set
Because the member name GENER is a new member, the window displayed in Figure 2-33 will have no entries. On the first line, you might see the following first lines:
==MSG> -Warning- The UNDO command is not available until you change
==MSG> your edit profile using the command RECOVERY ON.
On the command line, enter the command RESET to remove those two lines. Now, you will have no lines to create your file. On the top line, to create lines, you can enter i12, which will insert 20 lines showing seven commas (,,,,,,,) in the non-text portion of the panel; see Figure 2-34 on page 114.
|
Important: The RESET primary command can restore line numbers in the line command field when those line numbers have been replaced by labels, pending line commands, error flags, and change flags. RESET can also delete special lines from the display, re-display excluded lines and excluded lines messages, and temporarily disable the highlighting of FIND strings.
|
Type the records that you want to create in the new member. In Figure 2-33, there are coded JCL statements filling the first 11 lines of the 12 lines that were inserted by the i12 command and you can see the remaining initial lines that were created by the i20 command.
Figure 2-34 shows inserted lines.
|
File Edit Edit_Settings Menu Utilities Compilers Test Help
-------------------------------------------------------------------------------
ISREDDE2 ROGERS.PRIVATE.JCL(GENER) - 01.00 Columns 00001 00072
Command ===> Scroll ===> PAGE
***** ***************************** Top of Data ******************************
''''''
''''''
''''''
''''''
''''''
''''''
''''''
''''''
''''''
''''''
''''''
''''''
****** **************************** Bottom of Data ****************************
|
Figure 2-34 Several of the 20 lines inserted
Using the Edit panel
You can use the Edit function to create, display, or change data stored in the partitioned data set member or sequential data sets. When the editor displays existing data, each line consists of a six-column Line Command field followed by a 72-column data field. To view data that is not displayed, use the scroll commands. The following list shows the PDF default values for function keys:
•F7/19 Scrolls up
•F8/20 Scrolls down
•F10/22 Scrolls left
•F11/23 Scrolls right
Using the PFK keys
To see the function key values, type KEYS in the Command line and press Enter. You can issue line commands and primary commands in edit mode.
|
Information: The ISPF line commands are described in Figure 2-35 on page 115.
The i command was used in the text described here.
|
2.32 ISPF edit: Various line commands
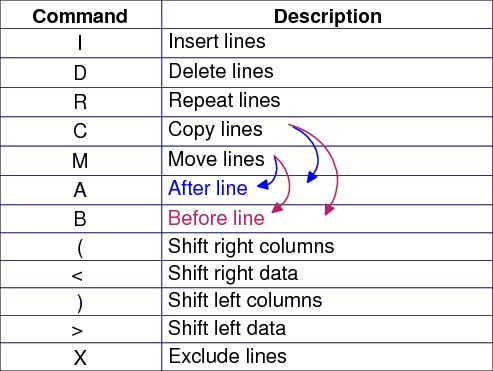
Figure 2-35 ISPF edit: various line commands
ISPF edit line commands
Line commands affect only a single line or block of lines. You enter line commands by typing them in the line command field on one or more lines and pressing Enter. The line command field is usually represented by a column of 6-digit numbers on the far left side of your display. When you are editing an empty data set or member, however, the line command field contains quotation marks. This field can also be used to define labels and to display flags that indicate special lines, such as the =NOTE= flag, which indicates a note line.
With line commands, you can perform the following tasks:
•Insert or delete lines
•Repeat lines
•Rearrange lines or overlay portions of lines
•Simplify text entry and formatting
•Define an input mask
•Shift data
•Include or exclude lines from the display
•Control tabs and boundaries for editing
•Convert various types of special temporary lines to data lines
Figure 2-35 shows various line commands you can use. Press Help again and a long message appears.
Rules for entering line commands
Enter a line command by performing one of these actions:
•Typing the command in the line command field and pressing Enter.
•Placing the cursor in the data or line command field and pressing a function key to which the command is assigned.
These rules apply to all line commands:
•You can type several line commands and make multiple data changes before you press Enter.
•The editor displays an error message if the line command is ambiguous. Because the line commands are processed from top to bottom, it is possible to have one error message appear that masks a later error condition.
•Only the first error condition found is displayed. After you have corrected that error condition, processing can continue and the next error condition, if any, is displayed. If you type a line command incorrectly, you can replace it before you press Enter by retyping it, blanking it out, or entering RESET.
2.33 ISPF edit: Repeating and deleting lines

Figure 2-36 ISPF edit: Repeating and deleting lines
ISPF edit: repeating and deleting lines
You can delete lines by issuing the line command D, which will delete one line. To delete multiple lines, issue Dxx, where xx is the number of lines to delete. You can also delete a block of lines by using DD at the beginning of the block and at the end of the block. In Figure 2-36 we deleted one line by entering D in the corresponding command line.
Repeating lines can be done by issuing R (one line), Rxx for xx lines, or RR for a block. Figure 2-36 shows the result of the execution of an R5 command: The line is repeated five times.
2.34 ISPF edit: Copying lines

Figure 2-37 Edit: Copying line
Edit: Copying lines
Copying lines can be done by issuing C to copy one line; Cxx, to copy xx lines; or CC to copy a block, with CC marking the first line and the last lines of the block to be copied. After indicating the lines, you must tell the Editor where to copy the lines to. This is done by typing either a B (for before) or an A (for after) on the line following or preceding where you want the data to be copied.
Copying one or more lines
To copy one or more lines in the same data set or member, perform these tasks:
1. Type C in the line command field of the line to be copied. If you also want to copy one or more lines that immediately follow this line, type a number greater than 1 after the C command.
2. Next, specify the destination of the line to be copied by using the A (after), the B (before), or the O (overlay) line command.
3. Press Enter, and the line (or lines) are copied to the new location.
Copying blocks of lines
To copy a block of lines in the same data set or member, perform these steps:
1. Type CC in the line command field of both the first and last lines to be copied. You can scroll (or use FIND or LOCATE) between typing the first CC and the second CC, if necessary.
2. Use the A (after), the B (before), or the OO (overlay) command to show where the copied lines are to be placed.
When you use the block form of the C command (CC) to copy and overlay lines, also use the block form of the O command (OO).
3. Press Enter, and the lines that contain the two CC commands and all of the lines between them are copied to the new location.
Copying lines to another data set or member
You can copy lines from another data set or member into the data set you are currently working with by performing the following tasks:
1. Type either CREATE or REPLACE on the command line.
2. Use one of the forms of the C command described previously.
3. Press Enter.
4. On the next panel that PDF displays, type the name of the data set or member that you want to create or replace.
5. Press Enter, and the lines are copied to the data set or member that you specified.
2.35 ISPF/PDF edit: Primary commands

Figure 2-38 ISPF/PDF edit: Primary commands tutorial
ISPF/PDF edit: Primary commands
Primary commands affect the entire data set. You type them on the Command ===> field. You use a primary command to perform the following tasks:
•Control your editing environment
•Find a specific line
•Find and change a character string
•Combine several members into one
•Split a member into two or more members
•Submit data to the job stream
•Save the edited data or cancel without saving
•Sort data
•Delete lines
•Access dialog element models
•Run an edit macro
An easy way to access a tutorial about all Edit primary commands is:
1. Type P in the Command line and press Enter. You receive the message COMMAND P NOT FOUND. Press Enter; you receive a short message at the upper right of the panel.
2. Press the Help function key; now you receive a long message.
3. Press the Help function key again; now you are in the tutorial of all Edit primary commands showing how each command works, and you receive the panel displayed in Figure 2-38.
2.36 ISPF/PDF edit: Saving new or updated files

Figure 2-39 ISPF/PDF: Save command
ISPF/PDF edit: Saving new or updated files
While you are editing a file, saves of the file can be performed without closing the file. The SAVE command saves edited data without ending your edit session. Generally, you do not need to use SAVE if recovery mode is on.
A SAVE command writes the data to the same data set from which it was retrieved unless you specified a concatenated sequence of partitioned data sets on the Edit Entry panel. In that case, the data is saved in the first library in the concatenation sequence, regardless of which library it came from. For a sequential data set, the complete data set is rewritten. For a partitioned data set, the member is rewritten with the same member name. If stats mode is on, the library statistics for the member are automatically updated.
Updating a file
To save your data, issue the SAVE primary command. With the profile option AUTOSAVE ON, pressing the F3/F15 END key ends the edition and saves the data.
|
Information: See 2.28, “Edit profile for a user” on page 109 to determine the settings for the AUTOSAVE command.
|
You can cancel your updates by issuing the CANCEL primary command. This action removes all changes made since the last SAVE was performed, or since the data set was edited.
2.37 ISPF Data Set List Utility option
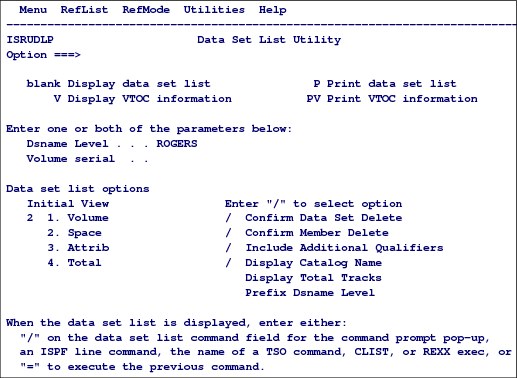
Figure 2-40 ISPF option 3.4 panel
ISPF Data Set List Utility option 3.4
When you select the ISPF option 3.4 from the primary panel, the Data Set List Utility panel (Figure 2-40) is displayed. You can either display or print lists of ISPF libraries, data sets, or volume table of contents (VTOC) information.
The Data Set List Utility is a useful option in your daily job. From the Menu, to use this list utility to manage all data sets that you have access to, as shown in Figure 2-41. Move the cursor to the Dsname Level field and enter the high-level qualifier of the data sets that you want to work with. First, take a look in the options available:
•You can obtain a list of all data sets in a DASD volume. To do this, use option V and enter a volume name.
•You can obtain a data set list.
•You can customize what kind of data set information you want.
|
Menu Options View Utilities Compilers Help
-------------------------------------------------------------------------------
ISRUDSL0 data sets Matching ROGERS Row 18 of 42
Command ===> Scroll ===> PAGE
Command - Enter "/" to select action Tracks %Used XT
------------------------------------------------------------------------------
ROGERS.PRIVATE.JCL 75 1 1
|
Figure 2-41 Option 3.4 list of data sets for HLQ ROGERS
Dsname Level
This field is used to specify the level (or levels) of any data set that you want ISPF to list or print for you. An optional installation exit, called the data set list (DSLIST) exit, can control whether a data set name appears in the list. See z/OS ISPF Planning and Customizing, GC19-3623, for more information about this exit.
When you specify the Dsname Level, you are defining the level qualifiers for the data set names to be included in the list.
An ISPF library typically has a three-level name:
project, group, and type
The Dsname Level field supports the inclusion of system symbols. ISPF retains the information you put in this field and displays it the next time you use this panel.
Using a data set name list
For a data set name list, the data set name qualifiers can be partially specified using asterisks (*) as global file-name characters and percent signs (%) as placeholders:
* A single asterisk indicates that at least one qualifier is needed to occupy that position. A single asterisk in a qualifier indicates that zero or more characters can occupy that position.
** A double asterisk indicates that zero or more qualifiers can occupy that position. A double asterisk in a qualifier is invalid.
% A single percent sign indicates that any one character can occupy that position. One to eight percent signs can be specified in each qualifier.
For example, entering ABC.DDD%*.E*%%%F.** lists all data sets with ABC as HLQ, second qualifier starts with DDD, the third starts with E and ends with F and has at least three characters between E and F. After that it can have any number of qualifiers. In Figure 2-40 on page 122 we used the ROGERS HLQ.
2.38 Working with a data set list

Figure 2-42 Data set list for ROGERS
Working with a data set list
Working with a data set list shows all cataloged data sets having the high-level qualifier ROGERS. You can select for any of the data sets for processing by entering by placing a forward slashmark (/) at the left of the data set name shown in Figure 2-42. This displays a menu on the window, as shown in Figure 2-44 on page 125. As you can see, this is a comprehensive list of action characters to enable you to manage your data sets.
If you place a slash (/) next to data set ROGERS.PRIVATE.JCL in Figure 2-42, the list of action characters shown in Figure 2-44 on page 125 enables you to access that data set by selecting one of the action codes by its number.
If you select the number 1, Figure 2-43 is displayed showing the members of the data set, which is the equivalent of an E, as shown in Figure 2-42. Using the slash (/) enables you to see all of the possible actions.
|
Menu functions Confirm Utilities Help
-------------------------------------------------------------------------------
ISRUDSM EDIT ROGERS.PRIVATE.JCL Row 00001 of 00002
Command ===> Scroll ===> PAGE
Name Prompt Size Created Changed ID
_________ GENER 11 2011/03/23 2011/03/24 09:29:21 ROGERS
_________ NEW 5 2011/03/24 2011/03/24 09:07:13 ROGERS
**End**
|
Figure 2-43 Members in data set ROGERS.PRIVATE.JCL
As mentioned, the menu shown in Figure 2-44 provides a list of action characters that you can use to manage your data sets.
|
ISRUDABC data set List Actions
More: +
Data set: ROGERS.PRIVATE.JCL
DSLIST Action
1__ 1. Edit 15. Reset
2. View 16. Move
3. Browse 17. Copy
4. Member List 18. Refadd
5. Delete 19. Exclude
6. Rename 20. Unexclude 'NX'
7. Info 21. Unexclude first 'NXF'
8. Short Info 22. Unexclude last 'NXL'
9. Print 23. SuperC 'SC'
10. Catalog 24. SuperCE 'SCE'
11. Uncatalog 25. Search-For 'SF'
12. Compress 26. Search-ForE 'SFE'
13. Free 27. Allocate
14. Print Index
|
Figure 2-44 Data set List Actions
Typing E next to data set ROGERS.PRIVATE.JCL displays a list of the members contained in that data set. After the member list is displayed, you can select a member by typing S in front of the member name. Also, you can perform many actions against the members, such as copy, rename, delete, and so forth. To see all actions available in the member list, follow these steps:
1. Type a question mark (?) at the left of any member name. You receive an error message.
2. Press the Help function key; you receive a long error message.
3. Press the Help function key again; the tutorial for the commands available is displayed. Note that in the upper right of the panel the following information appears:
More: +
It indicates a scrollable panel; you can go forward and backward throughout this panel using PF7 and PF8 (default keys).
2.39 Job control language

Figure 2-45 Job control language
Job control language
For your program to run on the computer and perform the work you designed it to do, your program must be processed by your operating system.
Your operating system consists of a z/OS Base Control Program (BCP) with a job entry subsystem (JES2 or JES3) and DFSMSdfp installed with it.
For the operating system to process a program, programmers must perform certain job control tasks. These tasks are performed through the job control statements:
•JCL statements
•JES2 control statements
•JES3 control statements
The JES2 and JES3 statements are called Job Entry Control Language (JECL) statements.
2.40 JCL introduction
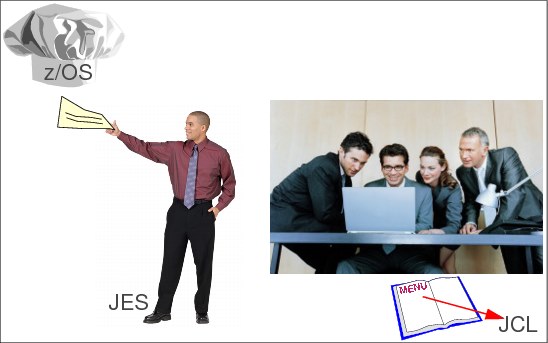
Figure 2-46 Job Control Language
JCL introduction
To get your MVS system to accomplish work for you, you must describe to the system the work you want done and the resources your work needs. You use JCL to provide this information to MVS.
One way of thinking about JCL is to compare it to a menu in a restaurant. If you are a customer at a restaurant, you and the other customers do not simply walk into the kitchen and start cooking your own dinners; that defeats the purpose of going to a restaurant. Instead, from a menu describing all that the restaurant has to offer, you select items to make up an order, specifying which entrées you want, which salad dressing you prefer, and any other special requests you have. You then ask the waiter to take your order to the kitchen.
In the kitchen, a team of chefs divides up the work and the appropriate ingredients to prepare each dish as quickly and efficiently as possible. While the meals are being prepared, you and your friends can ignore what is going on in the kitchen, engaging instead in dinner conversation and catching up on the latest news. When the waiter brings out your meal, you concentrate on your enjoyment of the meal.
Now imagine yourself back at the office using your MVS system, and think of JCL as the menu. In the same way that you and the other diners select items from the menu and place orders for the waiter to take to the team of chefs, you and other MVS users use JCL to define work requests (called jobs), and use a JES to submit those jobs to MVS.
Using the information that you and the other users provide with JCL statements, MVS allocates the resources needed to complete all of your jobs just as the kitchen chefs divided up the work to prepare the orders of all the customers.
And just as the chefs worked in the kitchen while you and the other diners devoted your attention to what was going on at your tables, MVS completes the submitted jobs in the background of the system, enabling you and the other users to continue working on other activities in the foreground. Also, just as the waiter conveys the results of the chefs’ work to you, JES presents the output of the jobs to you.
For a complete description of the process, see z/OS MVS JCL User’s Guide, SA23-1386.
2.41 JCL-related actions

Figure 2-47 JCL-related actions
JCL-related actions
Figure 2-47 shows an overview of the job submission process. The user performs the activities on the left side of the figure, and the system performs those on the right. In this example, MVS and JES make up the system.
For every job that you submit, you need to tell MVS where to find the appropriate input, how to process that input (that is, what program or programs to run), and what to do with the resulting output.
JCL statements
You use JCL to convey this information to MVS through a set of statements known as job control statements. JCL’s set of job control statements is quite large, enabling you to provide a great deal of information to MVS.
Most jobs, however, can be run using a small subset of these control statements. After you become familiar with the characteristics of the jobs you typically run, you might find that you need to know the details of only some of the control statements.
In each job, the control statements are grouped into job steps. A job step consists of all the control statements needed to run one process, for example a sort, a copy, or an application program. If a job needs to run more than one process, the job will contain another job step for each of those programs. A job can have from one up to 255 steps.
2.42 Required control statements
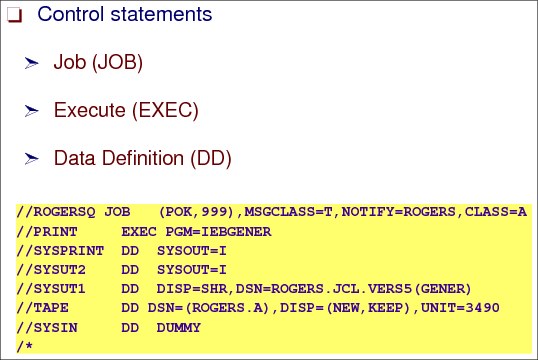
Figure 2-48 Required control statements
Required control statements
Every job must contain, at minimum, the following two types of control statements:
•A JOB statement
This statement marks the beginning of a job and assigns a name to the job. The JOB statement is also used to provide certain administrative information, including security, accounting, and identification information. Every job has one and only one JOB statement.
•An EXEC (run) statement
This statement marks the beginning of a job step, to assign a name to the step and identify the program or procedure to be run in the step. You can add various parameters to the EXEC statement to customize the way the program runs. Every job has at least one EXEC statement.
In addition to the JOB and EXEC statements, most jobs also contain:
•One or more data definition (DD) statements
These statements identify and describe the input and output data to be used in the step. The DD statement can be used to request a previously created data set, to define a new data set, to define a temporary data set, or to define and specify the characteristics of the output.
2.43 JCL streams and jobs

Figure 2-49 JCL streams and jobs
JCL streams and jobs
For the operating system to process a program, system programmers or application programmers must perform certain job control tasks. These tasks are performed through the job control statements:
•JCL statements, as mentioned before
•JES2 control statements or JES3 control statements
Job Entry Subsystems
MVS uses a JES to receive jobs into the operating system, schedule them for processing by MVS, and control their output processing. JES2 is descended from Houston Automatic Spooling Program (HASP). HASP is defined as a computer program that provides supplementary job management, data management, and task management functions, such as scheduling, control of job flow, and spooling. HASP remains in JES2 as the prefix of most module names and the prefix of all messages sent by JES2 to the operator.
Job Entry Subsystem 2
JES2 is a functional extension of the HASP II program that receives jobs into the system and processes all output data produced by the job. So, JES2 is that component of MVS that provides the necessary functions to get jobs into, and output out of, the MVS system. It is designed to provide efficient spooling, scheduling, and management facilities for the MVS operating system.
However, none of this explains why MVS needs a JES. Basically, by separating job processing into several tasks, MVS operates more efficiently. At any point in time, the computer system resources are busy processing the tasks for individual jobs, while other tasks are waiting for those resources to become available.
In its most simple view, MVS divides the management of jobs and resources between the JES and the base control program of MVS. In this manner, JES2 manages jobs before and after running the program; the BCP manages them during processing.
JES2 compared to JES3
IBM provides two JESs from which to choose: JES2 and JES3. In an installation that has only one processor (computer), JES2 and JES3 perform similar functions. That is, they read jobs into the system, convert them to internal machine-readable form, select them for processing, process their output, and purge them from the system. However, for an installation that has more than one processor in a configuration, there are noticeable differences in how JES2 exercises independent control over its job processing functions.
That is, in the configuration, each JES2 processor controls its own job input, job scheduling, and job output processing. In a sysplex environment, it is possible to configure JES2 to share spool and checkpoint data sets with other JES2 systems in the same sysplex. This configuration is called Multi-Access Spool (MAS).
Job Entry Subsystem 3
In contrast, JES3 exercises centralized control over its processing functions through a single global JES3 processor. This global processor provides all job selection, scheduling, and device allocation functions for all the other JES3 systems. The centralized control that JES3 exercises provides increased job scheduling control, deadline scheduling capabilities, and increased control by providing its own device allocation.
2.44 JES control statements in JCL
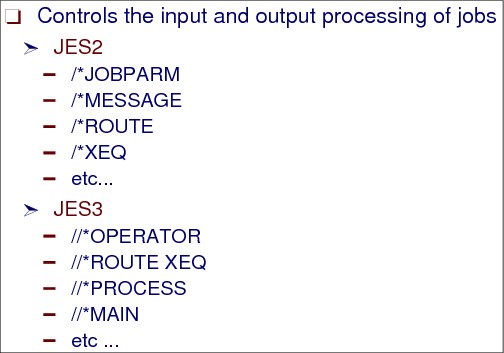
Figure 2-50 Coding JES2 and JES3 control statements in a JCL
JES control statements in JCL
Code JES control statements after JOB card JCL statement. The exception is for //*PAUSE, JES3 appears before the JOB statement or between its continuation. JES2 and JES3 ignore control statements in a procedure.
The rules for coding JES2 control statements are the same as the rules for JCL statements, with the following additions:
•Columns 1 and 2 always contain the characters slash asterisk (/*).
•Where comments are needed, code a JCL comment statement, which consists of two slashes and an asterisk (//*).
•If you code the same parameter on the same statement more than one time, JES2 uses the value in the last parameter.
The rules for coding JES3 control statements are the same as the rules for JCL statements, with the following additions:
•Generally, the characters two slashes and an asterisk (//*) are in columns 1 to 3. Various JES3 control statements must contain only a single slash and asterisk (/*) in columns 1 and 2.
•Columns 3 and 4 must not be blank.
•To code a comment on a JES3 control statement, code a blank after the control statement, and end the comment before column 72.
2.45 Introduction to JCL: Creating a data set

Figure 2-51 Creating jobs: An introduction to JCL
Introduction to JCL: Creating a data set
First, you need to know the basic JCL coding rules. The JCL statements follow these conventions:
•Start in column 1, and are identified by two slashes (//) at the beginning of the line.
•The commentary lines are identified by two slashes and an asterisk (//*) at the start of the line.
•The statements are coded from column 1 to column 71.
•A comma (,) indicates that the statement has continuation.
•A continuation of a statement must start between columns 4 and 16.
•Two slashes (//) and the rest of a statement with blanks indicates the end of the job.
•Key words are in uppercase.
Comments must be separated from the operators parameter by at least one blank.
Creating a data set using JCL
In 2.24, “Allocating data sets: Utility option” on page 102, you learned how to allocate a data set using ISPF dialogs. Next, you see how you can create a data set using JCL control statements. In Figure 2-51, the new data set being created is coded as follows:
//ROGERS1 JOB (MVS,POK),CLASS=A,MSGCLASS=H,
// MSGLEVEL=(1,1),REGION=0M,NOTIFY=&SYSUID
//ALLOC EXEC PGM=IEFBR14
//MYDS DD DSNAME=ROGERS.A.B,DISP=(NEW,KEEP,DELETE),
// UNIT=3390,VOLUME=SER=123456,SPACE=(CYL,(10,5))
//MYDS1 DD DSNAME=ROGERS.B.C,DISP=(NEW,CATLG,DELETE),
// UNIT=SYSDA,VOLUME=SER=654321,SPACE=(TRK,(20,5))
//* Required job statements
Every job must contain a minimum of the following two types of control statements:
JOB statement This statement marks the beginning of a job and assigns a name to the job. The JOB statement is also used to provide certain administrative information, including security, accounting, and identification information. Every job has one and only one JOB statement.
EXEC (run) statement This statement marks the beginning of a job step, to assign a name to the step, and to identify the program or procedure to be run in the step. You can add various parameters to the EXEC statement to customize the way the program runs. Every job has at least one EXEC statement.
In addition to the JOB and EXEC statements, most jobs usually also contain the following statements:
DD statements A job can contain one or more DD (data definition) statements, to identify and describe the input and output data to be used in the step. The DD statement can be used to request a previously-created data set, to define a new data set, to define a temporary data set, or to define and specify the characteristics of the output.
Job JCL statements
In addition to submitting jobs to a system, you can use JCL statements to create, delete, catalog, or uncatalog data sets. Figure 2-51 on page 134 shows the JCL that you use to create a data set and to review various fundamental JCL statements:
//ROGERS1 JOB The job statement marks the beginning of a job and assigns a name to the job (ROGERS1).
//ALLOC EXEC The EXEC statement marks the beginning of a job step; assigns a name to the step; identifies the program or the cataloged or in-stream procedure to be run in this step.
//MYDS DD The DD statement identifies and describes a data set.
//MYDS1 DD The DD statement identifies and describes a data set.
For more details, see z/OS MVS JCL Reference, SA23-1385.
2.46 JCL: JOB statement
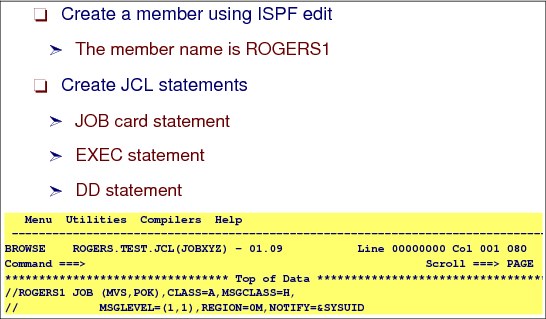
Figure 2-52 The JOB card
JCL: JOB statement
Create a member to insert your JCL control statements. You already know how to create a member in a partitioned data set (see 2.30, “Edit Entry panel” on page 112 to review). The first statement you code is the JOB statement, also known as the JOB card. The JOB statement marks the beginning of a job and tells the system how to process the job.
In this exercise of creating a job using JCL, we used the JCL shown in the highlighted box in Figure 2-52. The JOB card and its parameters are highlighted by the inner box (lines 000001 and 000002).
|
Remember: A JOB statement has two kinds of parameters: positional and keyword. Parameters are optional; however, your installation might require the accounting information parameter and the programmer's name parameter.
|
The first line of the JOBXYZ member is the job statement. It specifies parameters to be used by the job entry subsystem to schedule this job for processing. The format of the job card, and the importance of the data specified in the job card vary from installation to installation. The following fields are important:
Jobname The first field is the jobname, in this case ROGERS1. It can have up to eight characters. Various sites perform security checking against the job name to ensure standards, usually the ID of the user who submitted the job. Let us suppose the standard is: User ID suffixed with at least one alphanumeric character. If ROGERS is the user ID, ROGERS1 matches the standards. Other sites might not have any job name restrictions.
JOB This field identifies the job to the system, when submitted. It must be present, must follow the job name, and there must be at least one space between them.
ACCOUNT Various sites use this field for accounting and job processing information. In the example, the value is 19.
Programmer name The installation specifies if a programmer's-name parameter is required on the JOB statement. The installation decides what the parameter must contain.
NOTIFY This field tells the system where to send “job complete” information. &SYSUID tells the system to automatically insert your user ID here, so the information will be sent to you.
MSGCLASS MSGCLASS= assigns the job log to an output class. The output class and its characteristics are identified in a parameter file used at JES initialization.
MSGLEVEL This field tells the system to reproduce this JCL code in the output, and to include allocation messages.
CLASS The CLASS= field identifies the JES job class that this job will run under. In the example, CLASS=A is the JES job class. Many sites do not use this option, and the JES class is set according to your user ID. Job classes are set up at JES initialization.
2.47 JCL: EXEC statement
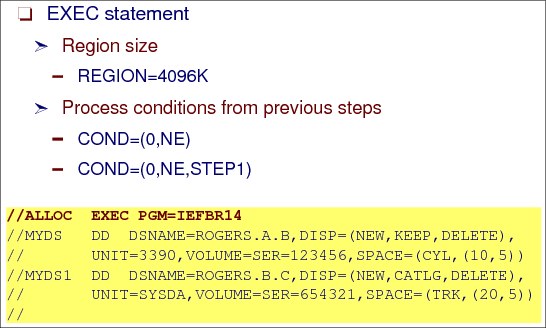
Figure 2-53 EXEC statement parameters
JCL: EXEC statement
The EXEC Statement identifies the step and the program to be run. This job only has one step, arbitrarily identified by the name STEP1, and it starts the IEFBR14 program. This program is provided in all installations and its only task is to receive control and give it back to the system; for this reason it is useful for several JCL capabilities.
In the EXEC you specify:
Step name In the example, STEP1 gives a name to the step. You might have called the step name IEFBR14 or any name that will help you identify the step. In a large job with many steps, unique step names can assist you when diagnosing problems. The choice is up to you.
EXEC This identifies a step job. It must be present.
PGM= This specifies the name of the program to be run. In this case the program name is IEFBR14.
EXEC statement parameters
Two other parameters that you might use on the EXEC are:
REGION The REGION parameter specifies the quantity of virtual storage (or central storage when ADDRSPC=REAL is coded) that a step requires. If no REGION parameter is specified, the system uses an installation default specified at JES initialization. Various programs can need more storage than is allowed by default. To enable the program to get more storage, you can code the REGION parameter as follows:
//STEP1 EXEC PGM=progname,REGION=4096K
This enables the programs to get up to 4 megabytes (MB) of storage below
16 MB and up to the installation default storage above 16 MB (IBM default is
32 MB).
16 MB and up to the installation default storage above 16 MB (IBM default is
32 MB).
COND The COND parameter is used to inform the system to test return codes from previous job steps and determine whether to bypass this job step. You can specify one or more tests on the COND parameter, and you can test return codes from particular job steps or from every job step that has completed processing.
If the test conditions are satisfied, the system evaluates the COND parameter as true and bypasses the job step. If the test conditions are not satisfied, the system evaluates the COND parameter as false and runs the job step. For example, consider the following statement:
//STEP2 EXEC PGM=IEFBR14,COND=(0,NE)
With this statement, the system checks the return code from all previous steps. If they were not equal to zero, then the system does not run this step. You can also check for return codes that are EQ (equal to), GT (greater than), LT (less than), GE (greater than or equal to), and LE (less than or equal to). You can check the return code in a specific step by coding the following statement:
//STEP2 EXEC PGM=IEFBR14,COND=(0,NE,STEP1)
With this statement, if STEP1 ends with return code zero, then STEP2 is run.
2.48 JCL: DD statement

Figure 2-54 JCL: DD statement parameters
JCL: DD statement
To reiterate, the program IEFBR14 actually does nothing. However, it enables you to submit a valid job and have the system process the DD statements identified in the JCL. This enables you to allocate, delete, catalog, and uncatalog data sets by using a batch process. At job initialization, after the program IEFBR14 has been located, the system allocates the data sets specified in the DD statements, then the control is passed to program IEFBR14, which does nothing, and you get notified that your job is done.
The DD (data definition) statement describes a data set and specifies the input and output resources needed for the data set. The DD statement is highlighted in Figure 2-54 and identifies the data set that you want to create.
This statement shows several of the parameters that can be coded in a DD statement:
ddname This parameter is used to give a name to the DD statement. NEWDD is the name assigned in the example. The programs refer to DD names rather than dsnames. So, unless a program allocates dynamically, all ddnames referred by a program must be coded. For example, if a program in a step needs a file identified as OUTFILE, you must code a DD named OUTFILE, identifying the relevant data set. In the example, IEFBR14 does not use data sets, so you can choose any ddname you want.
DSN This parameter is used to identify the data set. In the example MIRIAM.IEFBR14.TEST.NEWDD is the data set.
DD statement: DISP parameter
The DISP parameter describes the status of a data set to the system and tells what to do with the data set after termination of the step or job. You specify this value for both normal and abnormal termination.
The first field identifies the status of the data set and how to control access to it:
NEW This field indicates that the data set will be created and the job will have exclusive control of the data set. No other job can access this data set until the last step in this job that refers to this data set ends. NEW is the default.
OLD This field indicates the data set exists and the job requires exclusive access to it.
MOD This field indicates that if the data set exists, data will be appended to the end of the data set; otherwise, a new data set will be created. The job requires exclusive access to the data set.
SHR This field indicates that the data set can be shared by other users.
The second field in the DISP parameter indicates to the system what to do with the data set when the step finishes NORMAL. It can be:
CATLG Catalog the data set
UNCATLG Uncatalog the data set
DELETE Delete the data set
PASS Pass the data set to the subsequent steps
KEEP Keep the data set intact
The third field in the DISP parameter indicates the ABNORMAL completion action. It can be: DELETE, CATLG, UNCATLG, or KEEP.
In the example, the status field specifies to create the data set; in the normal termination of the step, to catalog; and in abnormal termination to delete the data set. To delete a data set that exists you code its DSN and DISP=(OLD,DELETE,DELETE).
|
Fast Path: A catalog is a data set that contains information about other data sets. It provides users with the ability to locate a data set by name, without knowing where the data set is. By cataloging data sets, your users will need to know less about your storage setup. Therefore, data can be moved from one device to another, without requiring a change in JCL DD statements that refer to an existing data set.
Cataloging data sets also simplifies backup and recovery procedures. Catalogs are the central information point for data sets; all data sets must be cataloged. In addition, all SMS-managed data sets must be cataloged.
|
DD statement: UNIT parameter
This parameter identifies the device or type of device on which the data set will be allocated. You use this parameter to specify the number of devices to be used. If the data set exists, you only need to specify the device type if the data is not cataloged. Most installations now administer disk storage with the Storage Management System (DFSMS). With SMS, you do not need to use the UNIT parameter to specify a device for SMS-controlled data sets. Several common examples are shown here:
UNIT=SYSDA Allocates the data set on a DASD
UNIT=3390 Allocates the data set on a 3390 type disk
UNIT=SYSALLDA Allocates the data set on a DASD
UNIT=TAPE Allocates the file on a TAPE device
DD statement: SPACE parameter
The SPACE DD parameter is required for allocating data sets on DASD. It identifies the space allocation required for your data set. Before a data set can be created on disk, the system must know how much space the data set will require and how the space is to be measured. You can code it as shown in the following example:
SPACE=(type,(primary-qty,second-qty,directory))
In this statement, type can be any of the following values:
TRK Requests that space be allocated in tracks.
CYL Requests that space be allocated in cylinders.
block length Specify here the block length to request an allocation in number of blocks. Indicates that the values specified for primary and secondary allocations are block quantities, and directs the system to compute the number of tracks to allocate using a block length. For example, SPACE=(3150,(5,1)) means that the system will allocate five blocks, each block having 3150 bytes, as primary space and one block as secondary space.
record length Specifies that the average record length in bytes will be used to allocate space. This is only applicable if SMS is active and the AVGREC parameter is coded.
The system allocates DASD space in whole tracks. The number of tracks required depends on how the records are blocked:
primary-qty Specifies the initial allocation amount.
secondary-qty Specifies an additional allocation amount. The system does not allocate additional space until it is needed.
directory You must code for a partitioned data set, to indicate the number of blocks the system must reserve for the directory. Partitioned data sets Extended (PDSE) grow dynamically; if you specify directory size, SMS uses the size you specify only if you later convert the PDSE to a PDS. Omit this parameter for sequential data sets.
Other DD statement SPACE parameter options
The following list includes several examples showing how you can code:
SPACE=(TRK,4) To allocate space to a sequential data set, requesting four tracks, only primary space.
SPACE=(CYL,(5,2)) To allocate space to a sequential data set, five cylinders as primary allocation space and two cylinders as secondary.
SPACE=(CYL,(10,,100) To allocate space to a partitioned data set, only primary allocation of 100 cylinders and 100 directory blocks.
LRECL and BLKSIZE parameters
Programs access data sets through ddnames. The ddnames are defined in the programs. Like them, data set characteristics, such as data set organization, logical record size, and record size, are also defined for the programs.
During the allocation process you have to specify several of these characteristics. You can use the following DD statement parameters to specify the data set characteristics:
LRECL Identifies the data set logical record size.
BLKSIZE Specifies the maximum length, in bytes, of a block.
RECFM Identifies the record format.
DSORG Identifies the data set organization. If you do not specify DSORG, the system uses the information in SPACE to determine if the data set is to be sequential or partitioned
These parameters are part of data control block (DCB) information and can be coded in the JCL as shown in the following statement:
// DCB=(LRECL=80,BLKSIZE=3120,RECFM=FB,DSORG=PO)
They can also be coded as individual parameters, without the need to specify the DCB=(....) parameter:
// LRECL=80,
// BLKSIZE=3120,
// RECFM=FB,
// DSORG=PO
If BLKSIZE is not specified, the system will determine what it considers to be an optimum block size for the device type on which the data set will be allocated. For a data set with fixed record format (all records with same size), the BLKSIZE must be a multiple of LRECL. For variable record size, the BLKSIZE must be a multiple of the greatest record plus four.
2.49 Submitting a job
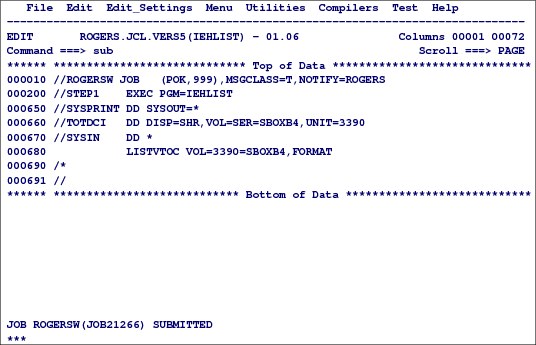
Figure 2-55 Submitting a job
Submitting a job
At this point, a job has been created in the data set ROGERS.JCL.VERS5(IEHLIST), as shown in the JCL member IEHLIST. Now this JCL is ready to be submitted for execution by using the SUBMIT command.
To submit the JCL stream, enter submit(sub) on the command line. The TSO/E command processor sends the JCL statements to the JES subsystem for execution.
After entering the command, you receive the following message indicating that your job was submitted successfully, as shown in Figure 2-55:
JOB jobname (jobnumber) SUBMITTED
2.50 System Display and Search Facility
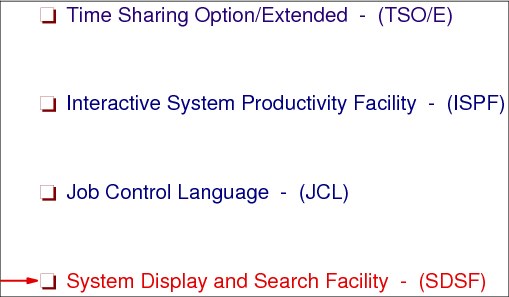
Figure 2-56 System Display and Search Facility (SDSF)
System Display and Search Facility
SDSF is a licensed program that helps authorized users efficiently monitor and control the operation of a JES2 or JES3 subsystem.
With SDSF you can authorize your JES users to perform the following tasks:
•Control job processing (hold, release, cancel, and purge jobs)
•Monitor jobs while they are being processed
•Display job output before deciding to print it
•Manage the system's workflow
•Control the order in which jobs are processed
•Determine the number of output jobs and the total number of records to be printed
•Control the order in which output is printed
•Control printers and initiators
•View the system log online and use commands to search for specific information in the log
•Dynamically change job data set output descriptors
•Issue JES and MVS commands that affect their jobs
•Print selected lines of the JES output data set
•Edit JCL direct from spool
2.51 SDSF: Panels hierarchy
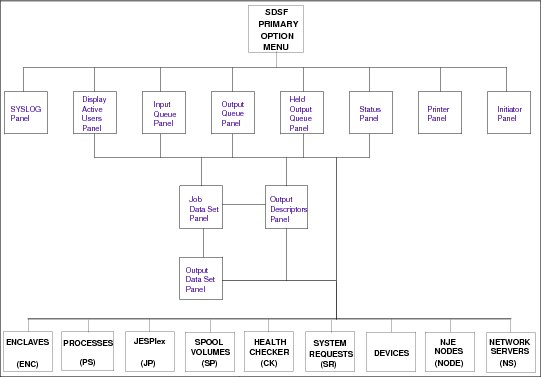
Figure 2-57 SDSF: JES2 Panel hierarchy
SDSF: JES2 panel hierarchy
SDSF consists of panels that provide immediate information about jobs, printers, queues, and resources in a JES2 system. The SDSF panel hierarchy is illustrated in Figure 2-57. From these panels, authorized users can enter SDSF commands to control the processing of jobs and the operation of system resources. Authorized users also can issue MVS and JES2 system commands from the SDSF panels.
SDSF provides an easy way to manage JES2 jobs, which can help you work more efficiently. It gives immediate, current, sysplex-wide information about jobs waiting to be processed or in execution, such as the following items:
•The status, class, priority, date, and time of a specific job
•All jobs on a specific queue, such as the input or held output queue
•Detail for a job no matter where it is in the sysplex
•Reasons why a job might be delayed
•Output from a job as it is created
Using the SDSF panels, SDSF commands and action characters, and by typing over panel fields, you can hold or release jobs, cancel jobs, filter the jobs displayed to show just the jobs that interest you, or change a job's priority, class, or destination.
2.52 JES2 SDSF Primary Option Menu
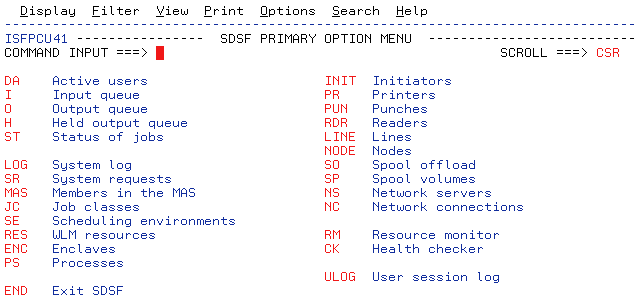
Figure 2-58 JES2 SDSF Primary Option Menu
JES2 SDSF Primary Option Menu
This section provides information about the SDSF facility and how you can use its functions to monitor and manage your workloads. You see how SDSF can be used to display job input and output data, and purge (delete) jobs that are on the input, output, or held queues. You review the monitoring functions of SDSF that enable you to evaluate the current workload, and enable you to cancel, hold, or reschedule work.
SDSF can be started from ISPF menus, but the setting of the options is often customized by each site differently. You will have to review your site's ISPF menus to find the SDSF option. Alternatively, issuing the TSO SDSF command from the Command ===> line starts SDSF. After choosing this option, the panel you receive will be similar to the one in Figure 2-58.
However, it might not have all the same options shown in the figure; the options can vary according to the security level of the user. The authority to perform functions in these options also varies according to the security level of the user. It is possible to control most system functions by using the SDSF facility. The scope of the functions includes reviewing job output, controlling the processing of jobs (both their input and output), printer control, operator functions, and system administration.
2.53 SDSF: JES3 panel hierarchy

Figure 2-59 SDSF: JES3 panel hierarchy
SDSF: JES3 panel hierarchy
SDSF consists of panels that provide immediate information about jobs, printers, queues, and resources in a JES3 system. The SDSF panel hierarchy is illustrated in Figure 2-59. From these panels, authorized users can enter SDSF commands to control the processing of jobs and the operation of system resources. Authorized users also can issue MVS and JES3 system commands from the SDSF panels.
SDSF provides an easy way to manage JES3 jobs, which can help you work more efficiently. It gives immediate, current, sysplex-wide information about jobs waiting to be processed or in execution, such as the following items:
•The status, class, priority, date and time of a specific job
•All jobs on a specific queue, such as the input or held output queue
•Detail for a job no matter where it is in the sysplex
•Reasons a job might be delayed
•Output from a job as it is created
Using the SDSF panels, SDSF commands and action characters, and by typing over panel fields, you can hold or release jobs, cancel jobs, filter the jobs displayed to show just the jobs that interest you, or change a job's priority, class, or destination.
2.54 JES3 SDSF Primary Option Menu

Figure 2-60 JES3 SDSF Primary Option Menu
JES3 SDSF Primary Option Menu
This section provides information about the SDSF facility and how you can use its functions to monitor and manage your workloads. You see how SDSF can be used to display job input and output data, and purge (delete) jobs that are on the input, output, or held queues. You review the monitoring functions of SDSF that enable you to evaluate the current workload, and enable you to cancel, hold, or reschedule work.
SDSF can be started from ISPF menus, but the setting of the options is often customized by each site differently. You will have to review your site's ISPF menus to find the SDSF option. Alternatively, issuing the TSO SDSF command from the Command ===> line starts SDSF. After choosing this option, the panel you receive will be similar to the one in Figure 2-60.
However, it might not have all of the same options shown in the figure; the options vary according to the security level of the user. The authority to perform functions in these options also varies according to the security level of the user. It is possible to control most system functions by using the SDSF facility. The scope of the functions includes reviewing job output, controlling the processing of jobs (both their input and output), printer control, operator functions, and system administration.
2.55 SDSF: Options menu
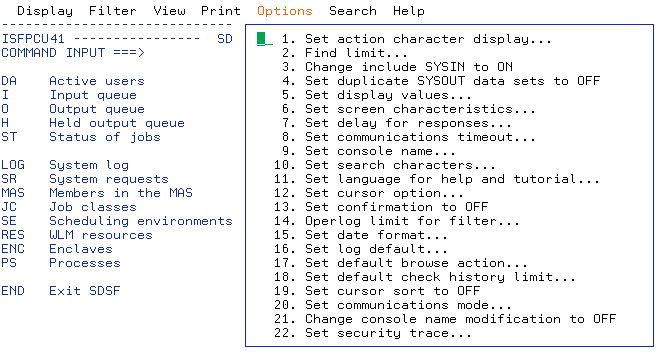
Figure 2-61 SDSF: Options menu pull-down
SDSF: Options menu pull-down
Before choosing any option, place the cursor in the menu action bar, select Options, and press Enter. Option 5 shows Set display values to OFF. If you then choose this option, the display options value will be set to OFF. You get the same result by issuing the SDSF command SET DISPLAY OFF in the COMMAND INPUT line.
You can customize your SDSF panels by choosing the View option in the action bar and then the Arrange option. You do that for each panel where the Arrange option is available, and choose the fields in the order you want them. SDSF stores the information in your ISPF/PDF profile data set, and uses them the next time you enter any SDSF options.
2.56 SDSF: viewing the output files

Figure 2-62 SDSF: Viewing the JES2 output files
SDSF: viewing the output files
To be able to see the JES output data sets created during the execution of the job, the output is saved on the JES spool as data sets. The JES data sets can be displayed by using the following SDSF JES queues: input (i SDSF option), execution queue (DA option), output queue (O option) or held queue (H option).
For output and held queues, you cannot see those JES data sets you requested to be automatically purged by setting a MSGCLASS out sysout CLASS that has been defined to not save output. Also, depending on the MSGCLASS you chose in the JOB card, the sysouts can be in the Output queue or in the Held queue.
The first window shown in Figure 2-62 displays the job that was submitted in Figure 2-55 on page 144 and whose output was directed to the HOLD (Class T) queue, as identified in the MSGCLASS=T parameter in the job card. Because only one job was submitted and run, then only one job is displayed on the hold queue.
Using the question mark (?) action character
Issuing a question mark (?) command in the NP column displays the output files generated by job 21266. Figure 2-62 displays ddnames:
•JES message log file
•JES JCL file
•JES system messages file
•The SYSPRINT file
This option is useful when you are seeing jobs with many files directed to SYSOUT and you want to display one associated with a specific step. You issue an S in the NP column to select a file you want to view.
Viewing the output files for a job
To see all files, then rather than a question mark (?), type S in the NP column. The result is shown in Figure 2-63 on page 153.
Figure 2-63 on page 153 shows part of the output for the job. The following list includes some of the most important items to note:
•IEF142I ROGERSW STEP1 - STEP WAS run - COND CODE 0000.
•The RC or Return Code value is 00, which indicates a successful completion of the step.
•The COND CODE or Condition Code is 0000, which indicates a successful completion of the job.
•The following messages show that the data set ADH.SC63.INTERVAL.DATA was allocated on disk volume SBOXB4, as shown in Figure 2-63 on page 153:
ADH.SC63.INTERVAL.DATA SBOXB4 1 2009.034 1999.365
|
15:22:19 ---- IAT6853 THE CURRENT DATE IS WEDNESDAY, 20 APR 2011 ----
IRR010I user ID ROGERS IS ASSIGNED TO THIS JOB.
15:22:19 IAT2000 JOB ROGERSW (JOB21266) SELECTED SC75 GRP=A
15:22:19 ICH70001I ROGERS LAST ACCESS AT 15:21:55 ON WEDNESDAY, APRIL 20, 20
15:22:20 - ---------TIMINGS (MINS.)---
15:22:20 -JOBNAME STEPNAME PROCSTEP RC EXCP CPU SRB VECT VAFF
15:22:20 -ROGERSW STEP1 00 794 .00 .00 .00 .00
15:22:20 -ROGERSW ENDED. NAME- TOTAL CPU TIME= .00 TO
//ROGERSW JOB (POK,999),MSGCLASS=T,NOTIFY=ROGERS 00001001
//STEP1 EXEC PGM=IEHLIST 00020000
//SYSPRINT DD SYSOUT=* 00065005
//TOTDCI DD DISP=SHR,VOL=SER=SBOXB4,UNIT=3390 00066006
//SYSIN DD * 00067005
/* 00069005
1 //ROGERSW JOB (POK,999),MSGCLASS=T,NOTIFY=ROGERS
2 //STEP1 EXEC PGM=IEHLIST
3 //SYSPRINT DD SYSOUT=*
4 //TOTDCI DD DISP=SHR,VOL=SER=SBOXB4,UNIT=3390
5 //SYSIN DD *
ICH70001I ROGERS LAST ACCESS AT 15:21:55 ON WEDNESDAY, APRIL 20, 2011
IEF236I ALLOC. FOR ROGERSW STEP1
IEF237I JES3 ALLOCATED TO SYSPRINT
IEF237I 8333 ALLOCATED TO TOTDCI
IEF237I JES3 ALLOCATED TO SYSIN
IEF142I ROGERSW STEP1 - STEP WAS run - COND CODE 0000
IEF285I ROGERS.ROGERSW.JOB21266.D000000A.? SYSOUT
IEF285I SYS11110.T152219.RA000.ROGERSW.R0200199 KEPT
IEF285I VOL SER NOS= SBOXB4.
IEF285I ROGERS.ROGERSW.JOB21266.D0000009.? SYSIN
IEF373I STEP/STEP1 /START 2011110.1522
IEF032I STEP/STEP1 /STOP 2011110.1522
CPU: 0 HR 00 MIN 00.09 SEC SRB: 0 HR 00 MIN 00.00 SEC
VIRT: 84K SYS: 212K EXT: 8K SYS: 10728K
IEF375I JOB/ROGERSW /START 2011110.1522
IEF033I JOB/ROGERSW /STOP 2011110.1522
CPU: 0 HR 00 MIN 00.09 SEC SRB: 0 HR 00 MIN 00.00 SEC
SYSTEMS SUPPORT UTILITIES---IEHLIST
DATE: 2011.110 TIME: 15.22.19
CONTENTS OF VTOC ON VOL SBOXB4 <THIS VOLUME IS NOT SMS MANAGED>
THERE IS A 2 LEVEL VTOC INDEX
Data sets ARE LISTED IN ALPHANUMERIC ORDER
FORMAT 4 DSCB NO AVAIL/MAX DSCB /MAX DIRECT NO AVAIL NEXT ALT FORMAT 6 LAS
VI DSCBS PER TRK BLK PER TRK ALT TRK TRK(C-H) (C-H-R) DSC
81 4497 50 45 0 0 0 8
---------------data set NAME---------------- SER NO SEQNO DATE.CRE DATE.EXP
ADH.SC63.INTERVAL.DATA SBOXB4 1 2009.034 1999.365
SMS.IND LRECL KEYLEN INITIAL ALLOC 2ND ALLOC EXTEND LAST BLK(T-R-L
0 CYLS 1
EATTR
NS
EXTENTS NO LOW(C-H) HIGH(C-H)
0 347 0 347 14
----UNABLE TO CALCULATE EMPTY SPACE.
-------------- the rest of the output is not displayed here---------------------
|
Figure 2-63 SDSF displaying output for the job
2.57 SDSF filters for panel displays

Figure 2-64 SDSF filter commands
SDSF filter commands
Use a FILTER command to limit rows on the tabular panels to only those that you want to display. The filters you set are displayed on any panel you are currently using:
Display Filter View Print Options Search Help
-------------------------------------------------------------------------------
SDSF OUTPUT ALL CLASSES ALL FORMS LINES 1,289,060 LINE 1-20 (724)
COMMAND INPUT ===> SCROLL ===> HALF
PREFIX=* DEST=(ALL) OWNER=* SYSNAME=*
DEST Use the DEST command to limit jobs on the SDSF panels to those with particular destinations. Type DEST on the command line or select it from the Filter pull-down menu. It affects only the H, I, O, PR, PUN, and ST panels.
•With no parameters, DEST displays jobs for all authorized destinations, if no IDEST list is specified in ISFPARMS. If both IDEST and DEST lists are specified in ISFPARMS, the jobs for authorized destination names in the IDEST list are displayed.
destination name This name can be from one to four destination names that replace the current destination list, in any format acceptable to JES.
+ Using a plus (+) sign followed by a destination adds the destination name that follows to the current destination list.
- Using a minus (-) sign followed by a destination deletes the destination names that follow from the current destination list.
? The question mark (?) displays the current setting for DEST.
|
Note: COMMAND INPUT ===> dest chicago omaha
•This command displays all jobs with destinations of CHICAGO and OMAHA. This list replaces the current destination list.
COMMAND INPUT ===> dest + laramie
•This command adds all jobs with the destination of LARAMIE.
|
OWNER Use the OWNER command to limit jobs displayed on the SDSF panels to the owning user IDs for those jobs. Jobs with writer IDs that match the owning user IDs are also displayed. Type OWNER on the command line or select it from the Filter pull-down menu. It only affects jobs on the DA, H, I, O, and ST panels.
•With no parameters, OWNER displays all jobs for all owner IDs.
owner-pattern This is the owning user ID for the job, or the netmail ID, which is in either the WTR field or is part of the DEST field in the O panel. When specified, SDSF displays only those jobs or output with owning user IDs or netmail IDs that match the specified owner-pattern.
The owner-pattern can be up to eight characters and might include the special pattern matching characters.
? This character displays the current setting for OWNER.
|
Example: COMMAND INPUT ===> owner *
•With no other filtering in effect, this command displays all jobs for all owner IDs.
COMMAND INPUT ===> owner rogers
•With no other filtering in effect, this command displays only jobs for that owner.
|
PREFIX Use the PREFIX command to limit your panels to jobs whose names match a specific character string. Type PREFIX on the command line or select it from the Filter pull-down menu. It only affects the DA, I, O, H, and ST panels.
•With no parameters - PREFIX displays all jobs, except on the H panel, where it displays all jobs with names that begin with your user ID.
•To display all jobs on the H panel, enter the H ALL command, and then enter the PREFIX * command. If you do not enter the PREFIX command, the PREFIX setting defaults to the PREFIX setting in ISFPARMS.
string-pattern This is a character string of up to eight characters that can limit which jobs are displayed on the DA, I, ST, O, and H panels. Only those jobs whose names match string-pattern are displayed, and on the O panel, jobs whose netmail ID match string-pattern are also displayed.
? The ? displays the current PREFIX setting of string-pattern. You can retain that setting by pressing Enter or change it by entering a new parameter.
|
Example: COMMAND INPUT ===> prefix ieb*
•When this command is in effect, the DA, I, ST, O, and H panels display only jobs whose names begin with the character string IEB.
|
SYSNAME Use the SYSNAME command to select the systems in the sysplex displayed on the DA panel. Type SYSNAME on the command line or select it from the Filter pull-down menu. It only affects the DA panel.
•With no parameters, SYSNAME selects only address spaces running on the system you are logged on to.
system-name The system-name is a character string of up to eight characters to limit the systems displayed on the DA panel. Only those address spaces running on systems whose names match system-name are displayed.
? The question mark (?) displays the current setting for SYSNAME.
|
Examples: Be aware of the following points:
COMMAND INPUT ===> sysname system10
•This command selects only SYSTEM10 for display on the DA panel.
COMMAND INPUT ===> sysname
•This command displays all address spaces running on the system the user is logged on to.
COMMAND INPUT ===> sysname *
•This command displays all address spaces running on all systems.
|
2.58 SDSF: Display Active Users (DA command)

Figure 2-65 SDSF - Display Active Users (DA command)
SDSF: Display Active Users (DA command)
SDSF provides the ability to monitor the current system workload. The DA command displays the active tasks and provides information about each task. This information includes processor usage for each task, the amount of processor time that a task has used, and the I/O-related Execute Channel Program (EXCP) statistics. Figure 2-65 displays part of the data that this facility captures. Press PF11 to move to the right and see all the available fields.
|
Attention: Notice that in the upper right corner of the figure, there are 155 active address spaces in the sysplex that has two logical partitions (LPARS), one JES2 and the other JES3. Also there are many columns for this display that are not shown.
|
Use the DA command to view jobs running on any system in a sysplex. You can list the active users and display information about MVS address spaces for jobs, started tasks, initiators, or TSO users on the DA panel. When RMF is installed, SDSF uses it as the source of data for the panel.
The DA command accepts parameters to limit the address spaces that are displayed according to type and position (location). The parameters control the type (jobs, started tasks, TSO users, or initiators) and position (swapped in, swapped out, in transition, or ready) of address spaces that are displayed.
Other DA command options
When you enter the DA OTSU command, SDSF displays only TSO users. The DA OJOB command shows only the JES jobs running, and the DA OSTC command shows only the active started tasks.
Using action characters
SDSF provides action commands you can use in the NP column. For example, from the Active Users panel, a user can enter S in the NP column next to a job to look at the output data set for that job. SDSF displays the output data set on the Output data set panel. You might not have the authority to issue various of the available commands. In this case, SDSF issues a message in the upper right of the panel. When you choose an action command, SDSF issues the system command that corresponds to the action you chose.
To display which action commands can be used in an SDSF panel, issue the HELP command in each option panel. Then choose option 3 - Action characters. A panel displays, listing all of the action commands that you can use in that option. Figure 2-66 displays the action characters for JES2 for the DA panel.
|
ACTION=//-Block,=-Repeat,+-Extend,?-JDS,A-Release,C-Cancel,CA-CancelARM,
ACTION=CD-CancelDump,CDA-CancelARMDump,D-Display,DL-DisplayLong,E-Restart,
ACTION=EC-RestartCancel,ES-RestartStep,ESH-RestartStepHold,H-Hold,K-SysCancel,
ACTION=KD-SysCancelDump,L-List,LL-ListLong,P-Purge,PP-PurgeProtected,Q-OutDesc,
ACTION=R-Reset,RQ-ResetQuiesce,S-Browse,SB-ISPFBrowse,SE-ISPFEdit,SJ-JCLEdit,
ACTION=W-Spin,X-Print,XC-PrintClose,XD-PrintDS,XDC-PrintDSClose,XF-PrintFile,
ACTION=XFC-PrintFileClose,XS-PrintSysout,XSC-PrintSysoutClose,Y-SysStop,
ACTION=Z-SysForce
|
Figure 2-66 Action characters for JES2 for the DA panel
Figure 2-67 displays the action characters for JES3 for the DA panel.
|
ACTION=//-Block,=-Repeat,+-Extend,?-JDS,A-Release,C-Cancel,CA-CancelARM,
ACTION=CD-CancelDump,CDA-CancelARMDump,CP-CancelPrint,D-Display,
ACTION=DE-DisplayEstimates,DL-DisplayLong,DSD-DisplayDDDnames,
ACTION=DSH-DisplaySpoolHold,DSP-DisplaySpoolPartition,DX-DisplayExtended,
ACTION=E-Restart,H-Hold,K-SysCancel,KD-SysCancelDump,L-List,LB-ListBDT,
ACTION=LH-ListHold,LT-ListTCP,P-Purge,Q-OutDesc,R-Reset,RQ-ResetQuiesce,
ACTION=S-Browse,SB-ISPFBrowse,SE-ISPFEdit,SJ-JCLEdit,W-Spin,X-Print,
ACTION=XC-PrintClose,XD-PrintDS,XDC-PrintDSClose,XF-PrintFile,
ACTION=XFC-PrintFileClose,XS-PrintSysout,XSC-PrintSysoutClose,Y-SysStop,
ACTION=Z-SysForce
|
Figure 2-67 Action characters for JES3 for the DA panel
2.59 Issuing MVS and JES commands

Figure 2-68 Using SDSF to issued MVS and JES Commands
Issuing MVS and JES commands
If you are authorized, then on the COMMAND INPUT ===> line of any SDSF panel you can issue any MVS, JES2, or JES3 command following a forward slash (/ followed by the command):
•/$da a JES2 command
•/*i j=21266 a JES3 command
•/d a,l a MVS command
Long commands
If the command is too long for the command line, type /+ on the command line and two more lines will appear to enable you to type the rest of the command, as shown in Figure 2-68. Using /* on the command line displays the system command extension pop-up menu, shown in Figure 2-68, which enables you to enter longer system commands. If you have already entered command text on the command line, it appears on the pop-up menu and you can continue typing the command.
User log (ULOG) panel
The ULOG panel enables you to display all MVS, JES3, and JES2 commands and responses (including commands generated by SDSF) you issued during your session. The log is deleted when you end the SDSF session.
If you have authority, you can use the ULOG command option to see only your commands and their response.
Viewing the ULOG
Use the ULOG command to browse the user log to see all of the system commands and responses issued during your current SDSF session in chronological order. A ULOG is displayed in Figure 2-69.
|
ISF031I CONSOLE ROGERS ACTIVATED
-$DA
$HASP612 NO ACTIVE JOBS
-SC75*I J=21266
IAT8674 JOB ROGERSW (JOB21266) P=01 CL=A OUTSERV(PENDING WTR)
IAT8699 INQUIRY ON JOB STATUS COMPLETE, 1 JOB DISPLAYED
-D A,L
IEE114I 11.07.42 2011.111 ACTIVITY 629
JOBS M/S TS USERS SYSAS INITS ACTIVE/MAX VTAM OAS
00006 00031 00012 00037 00019 00012/00030 00026
LLA LLA LLA NSW S NET NET NET NSW S
VLF VLF VLF NSW S RRS RRS RRS NSW S
OPTSO OPTSO OPTSO OWT S APPC APPC APPC NSW S
ASCH ASCH ASCH NSW S RMF RMF IEFPROC NSW S
SDSF SDSF SDSF NSW S HZSPROC HZSPROC HZSSTEP NSW SO
RACF RACF RACF NSW S JES2 JES2 IEFPROC NSW S
TSO TSO STEP1 OWT S TCPIP TCPIP TCPIP NSW SO
RMFGAT RMFGAT IEFPROC NSW SO CBDQDISP CBDQDISP TDIS OWT SO
WEBPW WEBPW WEBSRV IN SO INETD1 STEP1 OMVSKERN OWT AO
IOASRV IOASRV SERVER OWT SO PORTMAP PORTMAP PORTMAP OWT SO
TN3270 TN3270 TN3270 NSW SO FTPOE1 STEP1 TCPIP OWT AO
FTPMVS1 STEP1 TCPIP OWT AO PFA PFA PFA OWT SO
|
Figure 2-69 Viewing the ULOG
2.60 SDSF: Input queue panel
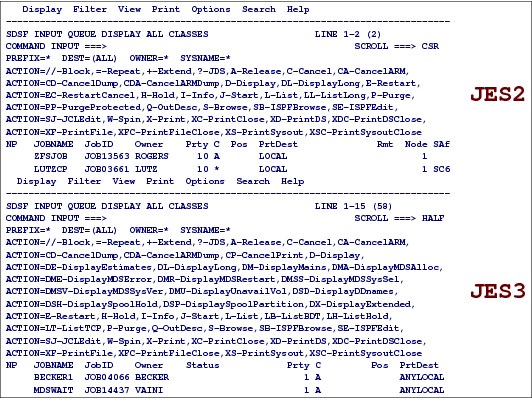
Figure 2-70 SDSF: Input queue panel
SDSF: Input queue panel
The Input queue panel provides information about jobs, TSO users, and started tasks that are on the JES input queue or are being processed by the system. Users display this information by entering I on the command input line of any SDSF panel. An example of the panels for JES2 and JES3 is shown in Figure 2-70.
Using the Input queue command
When you specify I with no parameters, the command displays the input queue for all jobs in the job classes, and in the converter queue. You must use special characters to display TSO users and started tasks.
You can display the following information using these parameters:
input-class The input class can be a list of up to seven input job classes that displays only jobs with those classes. There is no blank between I and an input class or between input classes.
H This parameter displays only jobs that are held.
NH This parameter displays only jobs that are not held.
|
Remember: Figure 2-70 shows only a subset of the fields of information that are available on the Input Queue panel. You can scroll right, left, up, and down throughout this panel. Also you can control the scroll using the SCROLL ===> field. You can use, for example, C (CSR), to better control the scroll.
|
Specifying multiple input classes
Enter the list of up to seven input job classes without a space after the I command. Only jobs in these input classes are displayed.
To display tasks and TSO users, you must use special characters. They are as follows:
Asterisk (*) Converter queue
Dollar sign ($) TSO users
Number sign (#) Started tasks
At sign (@) Jobs waiting to be transmitted to another node for execution
Exclamation mark (!) Hardcopy queue
|
Tip: The hardcopy queue contains all jobs that have any type of output in the system. Accessing the hardcopy queue by using the I command enables you to find output for a job, whether it is on a held or non-held JES2 output queue. You can also use the hardcopy queue to display output that has been printed but that remains in the JES spool.
|
Input command examples
The following list includes examples of the I command:
•COMMAND INPUT ===> i
This command displays the input queue for all jobs in the all classes and the converter queue.
•COMMAND INPUT ===> iak nh
This command displays the input queue for jobs in classes A and K that are not held.
•COMMAND INPUT ===> i$
This command displays the input queue for all TSO users.
•COMMAND INPUT ===> iabc
This command displays the input queue for jobs in classes A, B, and C that are held and not held.
•COMMAND INPUT ===> ia$#
This command displays jobs in class A, TSO users, and started tasks.
2.61 SDSF: Output queue panel
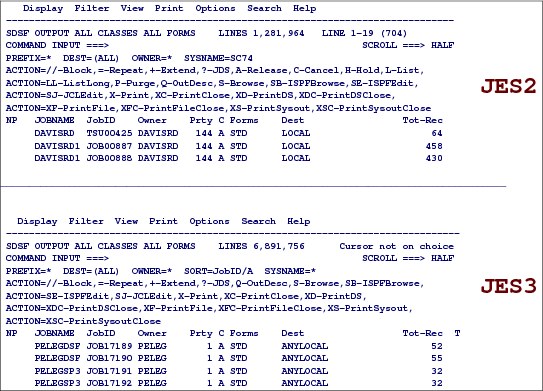
Figure 2-71 SDSF: Output queue panels for JES2 and JES3
SDSF: Output queue panel
The SDSF O command displays the non-held output queue. The Output Queue panel provides information about output data sets for jobs, TSO users, and started tasks that are on a JES2 and JES3 output queue. Users display this information by entering O on the command input line of any SDSF panel. Examples of these panels are shown in Figure 2-71.
When you specify the O command with no parameters, it displays information about all jobs, started tasks, and TSO users on any non-held output queue.
output-class The output-class can be a list of up to seven output classes. Specify the output class without a blank immediately after the O command. Only data sets in those non-held output classes are displayed. For example, if you want to display sysout class e, specify o(e).
Selecting output for display
You might want to use the PREFIX command to limit the entries in the display, as shown in the following list:
•PREFIX, with no parameter, displays all jobs for which you are authorized.
•PREFIX MQ* displays all jobs that start with the name MQ.
•PREFIX M%%R* displays all jobs that begin with M and have R in the fourth position.
Using the prefix command
When you first enter SDSF, the default is your logon ID prefix. If SDSF is not displaying what you expect, then issue the SET DISPLAY ON command. This controls the display of values you have set for PREFIX, DEST, OWNER, SORT, and FILTER. It displays as shown in Figure 2-71 on page 163 and as specified in the following command:
PREFIX=* DEST=(ALL) OWNER=* SYSNAME=SC74
SDSF displays using a prefix command
The output display shown in Figure 2-72 used the prefix ROG* command.
|
Display Filter View Print Options Search Help
------------------------------------------------------------------------------
SDSF OUTPUT ALL CLASSES ALL FORMS LINES 23,593 LINE 1-16 (16)
COMMAND INPUT ===> SCROLL ===> HALF
PREFIX=ROG* DEST=(ALL) OWNER=* SORT=JobID/A SYSNAME=*
ACTION=//-Block,=-Repeat,+-Extend,?-JDS,Q-OutDesc,S-Browse,SB-ISPFBrowse,
ACTION=SE-ISPFEdit,SJ-JCLEdit,X-Print,XC-PrintClose,XD-PrintDS,
ACTION=XDC-PrintDSClose,XF-PrintFile,XFC-PrintFileClose,XS-PrintSysout,
ACTION=XSC-PrintSysoutClose
NP JOBNAME JobID Owner Prty C Forms Dest Tot-Rec
ROGERS JOB20171 ROGERS 15 E STD ANYLOCAL 2,432
ROGERS JOB20174 ROGERS 15 E STD ANYLOCAL 2,859
ROGERS JOB20380 ROGERS 15 E STD ANYLOCAL 413
ROGERS JOB20402 ROGERS 15 A STD ANYLOCAL 128
ROGERS JOB20402 ROGERS 15 E STD ANYLOCAL 7,823
ROGERS JOB20792 ROGERS 15 E STD ANYLOCAL 2,925
ROGERS JOB20873 ROGERS 15 E STD ANYLOCAL 442
|
Figure 2-72 Using a prefix of ROG*
Using a prefix of DB2* displays as shown here:
NP JOBNAME StepName ProcStep JobID Owner C Pos DP Real Paging SIO
DB2GDBM1 DB2GDBM1 IEFPROC STC04424 STC NS FE 9826 0.00 0.00
DB2GDIST DB2GDIST IEFPROC STC04425 STC NS FE 2313 0.00 0.00
DB2GIRLM DB2GIRLM STC04423 STC NS FE 284 0.00 0.00
DB2GMSTR DB2GMSTR IEFPROC STC04422 STC NS FE 1887 0.00 0.00
DB2GSPAS DB2GSPAS IEFPROC STC04426 STC NS FB 982 0.00 0.00
2.62 SDSF: Held Output queue panel

Figure 2-73 SDSF: Held Output queue panel
SDSF: Held Output queue panel
The Held Output queue panel provides information about output that is being held on any JES2 output queue. This display shows you information about SYSOUT data sets for jobs, started tasks, and TSO users on any held JES2 output queue. Users display this information by entering H on the command input line of any SDSF panel. An example of this panel is shown in Figure 2-73. This figure shows only a subset of the information available on the Held Output queue panel. From this panel, a user can look at the output for a specific job and then decide to print or purge the output.
Selecting held output
When you specify H with no parameters, the command displays all jobs with names that are prefixed with your user ID. The held output class that you want to display can be specified using the H command as follows:
output-class You can request held output classes using the H command by specifying a list of up to seven output classes. H limits the panel to jobs with those classes. There is no blank between H and an output class or between output classes.
ALL Specifying the subparameter ALL displays all held output classes for all jobs. Issuing the command H ALL displays all held output classes.
string-pattern This subparameter is a character string that limits the panel to jobs with names that match that character string. The string-pattern might include the special pattern matching characters, where the string patter is HAI*. The command is H HAI* and is shown here:
NP JOBNAME JobID Owner Prty C ODisp Dest Tot-Rec Tot-
HAIMO TSU04529 HAIMO 144 S HOLD LOCAL 371
HAIMO TSU04544 HAIMO 144 S HOLD LOCAL 299
The following example shows the string-pattern is DSS* and the command is H DSS*.
NP JOBNAME JobID Owner Prty C ODisp Dest Tot-Rec Tot-
DSSMOVE JOB03008 HAIMO 144 T HOLD LOCAL 98
DSSMOVE JOB03009 HAIMO 144 T HOLD LOCAL 98
DSSMOVE JOB03010 HAIMO 144 T HOLD LOCAL 97
DSSMOVE JOB07986 HAIMO 144 T HOLD LOCAL 79
DSSCOPY1 JOB04310 HAIMO 144 T HOLD LOCAL 71
DSSREST1 JOB04312 HAIMO 144 T HOLD LOCAL 73
DSSCOPY1 JOB04317 HAIMO 144 T HOLD LOCAL 67
DSSREST1 JOB04319 HAIMO 144 T HOLD LOCAL 73
2.63 SDSF: Status panel
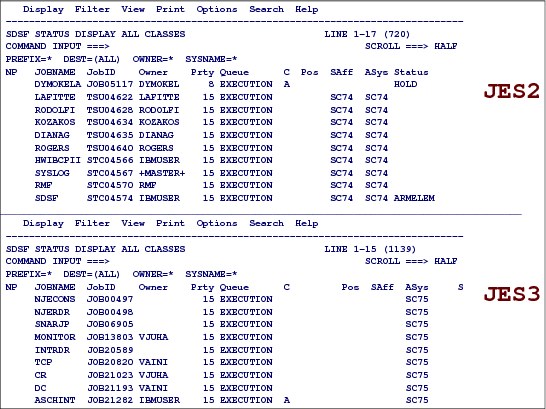
Figure 2-74 SDSF: Status panel
SDSF: Status panel
The Status panel provides information about jobs, started tasks, and TSO users that are on any of the JES2 queues. Users display this information by entering st on the command input line of any SDSF panel. An example of this panel is shown in Figure 2-74. This figure shows only a subset of the fields of information available on the Status panel.
Selecting the Status panel
When you specify ST, you can process a job from this panel even if it has been printed or processed (and not yet purged). Active jobs are highlighted on the panel.
The format of the command is shown in the following statement:
ST(classes) (string)
In this statement, define the variables as shown in the following list:
classes Classes displays information for a specific class.
•With JES2: Enter up to six classes with no blanks. For jobs in execution, use A-Z or 0-9.
•With JES3: Enter a single class, up to 6 characters. To filter the panel using more than one class, use the FILTER command.
Note that you can use these special characters for class (JES2 and JES3):
Asterisk (*) Converter queue
Dollar sign ($) TSO users in execution
Number sign (#) Started tasks in execution
Exclamation mark (!) Hard-copy queue
Plus sign (+) Output queue
Minus sign (-) Input queue
Question mark (?) Purge queue
Left parenthesis ( ) ) Receiver queue
Equals sign (=) Spin queue
Forward slash (/) Setup queue
At sign (@) Jobs waiting to be transmitted to another queue
string String is a character string that limits the panel to jobs with names that match the character string. The string can be up to eight characters in length, including the following special characters:
Asterisk (*) Represents any character or string of characters
Percentage sign (%) Represents any single character
|
Important: ST with no parameters displays all jobs. The information displayed might be limited by your authorization and by settings for SDSF filters, such as FILTER and PREFIX.
|
JES2 and JES3 action characters for the ST panel
The following figures show the action characters for the JES panels. Figure 2-75 displays the JES2 action characters for the ST panel.
|
ACTION=//-Block,=-Repeat,+-Extend,?-JDS,A-Release,C-Cancel,CA-CancelARM,
ACTION=CD-CancelDump,CDA-CancelARMDump,D-Display,DL-DisplayLong,E-Restart,
ACTION=EC-RestartCancel,ES-RestartStep,ESH-RestartStepHold,H-Hold,I-Info,
ACTION=J-Start,L-List,LL-ListLong,O-Release,P-Purge,PO-PurgeOutput,
ACTION=PP-PurgeProtected,Q-OutDesc,S-Browse,SB-ISPFBrowse,SE-ISPFEdit,
ACTION=SJ-JCLEdit,W-Spin,X-Print,XC-PrintClose,XD-PrintDS,XDC-PrintDSClose,
ACTION=XF-PrintFile,XFC-PrintFileClose,XS-PrintSysout,XSC-PrintSysoutClose
|
Figure 2-75 JES2 action characters for the ST panel
Figure 2-76 displays the JES3 action characters for the ST panel.
|
ACTION=//-Block,=-Repeat,+-Extend,?-JDS,A-Release,C-Cancel,CA-CancelARM,
ACTION=CD-CancelDump,CDA-CancelARMDump,CP-CancelPrint,D-Display,
ACTION=DE-DisplayEstimates,DL-DisplayLong,DM-DisplayMains,DMA-DisplayMDSAlloc,
ACTION=DME-DisplayMDSError,DMR-DisplayMDSRestart,DMSS-DisplayMDSSysSel,
ACTION=DMSV-DisplayMDSSysVer,DMU-DisplayUnavailVol,DSD-DisplayDDnames,
ACTION=DSH-DisplaySpoolHold,DSP-DisplaySpoolPartition,DX-DisplayExtended,
ACTION=E-Restart,H-Hold,I-Info,J-Start,L-List,LB-ListBDT,LH-ListHold,
ACTION=LT-ListTCP,P-Purge,Q-OutDesc,S-Browse,SB-ISPFBrowse,SE-ISPFEdit,
ACTION=SJ-JCLEdit,W-Spin,X-Print,XC-PrintClose,XD-PrintDS,XDC-PrintDSClose,
ACTION=XF-PrintFile,XFC-PrintFileClose,XS-PrintSysout,XSC-PrintSysoutClose
|
Figure 2-76 JES3 action characters for the ST panel
2.64 SDSF HELP panel

Figure 2-77 SDSF HELP panel
SDSF HELP panel
You can use the SDSF HELP panel to become familiar with all of the SDSF functions. This panel is displayed when you type the command help on the command line. The tutorial shows you the basic functions of SDSF. These panels will help you learn how SDSF works.
The help command
The help command or the PF1 key provides information about how to use SDSF or how to use each panel. The following list describes reasons for the help screens and PF keys:
•Purpose. Displays online help for SDSF.
•Where used. Any SDSF panel, including help and tutorial panels.
•Format. HELP.
– Press Enter to see the next help panel in a sequence.
•You can also use the following options:
– SEARCH. Search the help (ISPF only). Enter outside of help.
– I or F11. Display an index to help (ISPF only).
– TOC. Display the table of contents for help.
– TUTOR or F4. Display an interactive tutorial (ISPF only).
•Several PF keys have special uses in help:
– F4 (Tutor). Display an interactive tutorial (ISPF only).
– F5 (Extended help). Display the general help for the topic (ISPF only).
– F7 (Up). Display the start of the current topic or, if you are already at the start, display the previous menu.
– F10 (Previous). Back up one help panel.
– F11 (Index). Display the help index (ISPF only).
|
Information: Under ISPF, you can obtain more information about a highlighted phrase by placing the cursor on the phrase and pressing Enter.
|
..................Content has been hidden....................
You can't read the all page of ebook, please click here login for view all page.