
Chapter 3. Redeveloping web pages for the iPhone
|
This chapter covers |
|
|
As you learned in chapter 2, iPhone-based web apps can give your users great opportunities to leverage the interconnectivity of the internet and to interact with other users. Throughout part 2 we introduce you to lots of tools that you can use to create web pages using web technologies that can be every bit as sophisticated as what you might write using the iPhone SDK.
Before we get there, though, we first want to touch on the fundamentals—those tools that you might use to improve your existing web pages for iPhone users, even before you begin writing totally new iPhone web apps.
The lessons in this chapter should be considered entirely foundational, as they’ll be the basis for all the web chapters that follow. They also have wider scope, because you can apply them to web pages that might be viewed on other platforms, not just those for sole use by iPhone users.
Throughout part 2, we’ll depend on the three basic tools of web development: HTML, CSS, and JavaScript. Each is crucial to the libraries and tools that we’ll be discussing over the next seven chapters, and we presume you already have a solid basis in them. We’re only going to touch on deeper programming languages a few times, and in those instances we’ll use PHP for our examples, but you should be able to adapt the techniques we describe to whatever language you use for more dynamic web programming.
The Apple docs and web apps
Apple has a lot of comprehensive documentation at its website. These sources are generally more encyclopedic but less tutorial-oriented than what we’ve written in this book. Because of their more comprehensive nature, we’re frequently going to refer you to Apple’s docs after we’ve completed our introduction to a topic.
The Apple docs are generally split into two broad types: web docs and SDK docs. To access either of these, you’ll need to sign up for Apple’s Apple Developer Connection (ADC) program—which is free (though there are also premium memberships if you’re interested).
Web docs. The web docs are located at http://developer.apple.com/webapps/. The most vital document is the “Safari Web Content Guide for iPhone,” which contains a lot of general information on developing web pages for the iPhone, much of which is also covered in this book. You’ll also find specifics on the WebKit, which is the topic of the next chapter, and Dashcode, the topic of chapter 7.
SDK docs. The SDK docs are available at http://developer.apple.com/iphone/. We’ll talk about them in greater depth when we get to the SDK, in chapter 10.
There’s also a third category of docs available at Apple—the Mac Dev documentation—but that’s a bit beyond the scope of iPhone development.
Before we start redeveloping pages for the iPhone, we’ll also point you toward chapter 8. There’s info there about setting up a local web server on a Mac and on using a variety of clients for debugging. You might find it useful for following the examples in any of these web development chapters.
3.1. The iPhone viewport
The most fundamental concept in any iPhone web work is the viewport. It should be a part of every web page you write for the iPhone, from the simplest web redevelopment to the most complex Canvas-based graphical web app.
We first mentioned the concept of the viewport back in chapter 1. As we explained, though the iPhone has a display resolution of 320x480 (or vice versa, depending on orientation), it maps a much larger “virtual” window to that screen when you run Safari. The default virtual window (or viewport) is 980 pixels wide, which is then scaled down by a factor of approximately 3:1 or 2:1.
Figure 3.1 details what this viewport entails by showing the non-scaled content that can appear in the live area of each of the iPhone’s two orientations.
Figure 3.1. The iPhone’s viewport allows a much larger web page to be shown, scaled, in the iPhone’s display.

If you choose to stay with the default viewport size, figure 3.1 tells you a lot about how web pages will display to your viewers. In portrait mode, things will appear much as you’d expect, as the viewport will be approximately square; everything above 1090 pixels will appear “above the fold.” In landscape mode viewers will see a much abbreviated page, with only the first 425 pixels appearing above the fold.
Fortunately, you’re not stuck with the default viewport size. You have two ways to change it. First, any web page served on a .mobi domain and any web page containing mobile XHTML markup automatically uses an alternative default viewport of 320 pixels. Second, you can purposefully change the viewport of any web page by introducing the new viewport metatag. You’ll probably do this through a default header that you load across your entire site:
<meta name = "viewport" content = "width = 500">
Defining a viewport width of 500 would make your web page look as if it appeared in a 500-pixel-wide window before it was scaled onto an iPhone display. It’s the simplest sort of viewport command, and probably what you’ll do most often.
The remaining question is: why? What’s the purpose of using a viewport?
Most of the time, you probably won’t have to use the viewport at all. If you call up your web pages on an iPhone, and nothing looks too small, then you’re fine. If you instead find out that things are small—due either to sitewide decisions or to the content of local pages—that’s when you have to add a viewport tag to your web pages. Likewise, if you discover that your page looks really bad in the landscape orientation—due to the small live area—that might be another reason for a new viewport.
Generally, you should look at the viewport as an opportunity. In the world of desktop browsers, you have no idea what size of browser window a user might open, but on the iPhone you can control that exactly.
About the WebKit
The viewport command is part of the WebKit, an open source application browser engine that offers extensions to the core web standards. WebKit is being used by a number of browser developers, including Apache and Google. More importantly (at least for the iPhone designer) it’s the basis of Apple’s Safari. This means that a number of WebKit’s extensions, not yet broadly available in browsers like Internet Explorer or Firefox, will work on the iPhone. iPhone web developers thus have access to lots of cool gestures and transformations that can give them considerable power using entirely web-based designs.
We’re going to cover most of the possibilities of the WebKit in the next chapter. We’ve opted to cover one WebKit element here—the viewport—because it’s crucial to any sort of iPhone-related web design, whether it be a page redevelopment or a full-fledged web app.
Sitewide viewport changes and local viewport changes will each have slightly different causes, and will each require slightly different solutions as a result.
3.1.1. Making sitewide viewport changes
Two elements might cause you to make sitewide viewport changes in your global header file: graphics or fonts that are too small.
Graphics are the most common problem. If you use them for navigation or to depict any other critical information, you’ll probably have a problem because they’re unlikely to be very readable at a 3:1 scale.
Font problems are usually due to absolute values used in the CSS font-size property. Clearly a font set to a small point size is going to be even smaller on the iPhone screen. The better answer is to make changes to your CSS files, which we’ll return to shortly. But if you can’t for some reason, this may be another reason to change your sitewide headers.
Typically, deciding on a sitewide viewport size will take some fiddling. The exact size of graphics or fonts may force you to select a certain value. If you have a sitewide navigation bar, you’ll probably use its width as your viewport size. In the absence of any specific issues, a viewport size of 480 tends to work great. It’ll be readable in portrait mode (at a 3:2 scale) and very readable in landscape mode (at a 1:1 scale). You won’t want to go much lower than that, and you definitely shouldn’t go all the way down to a 320-wide viewport; a change that extreme will probably make your web page break in other ways, and also ignores the excellent clarity of the iPhone screen.
The goal is to figure that things will be smaller on an iPhone than on a desktop browser and find a good compromise within that constraint.
3.1.2. Making local viewport changes
Adjusting your global viewport is the first step in making your web pages readable on an iPhone. However, you may also find individual pages that look bad. This situation is most likely to occur on pages that display an individual graphic or applet. The Apple developer pages give an example of a Sudoku applet that appears much too small on an iPhone page because it was only designed to be a few hundred pixels wide. The authors ran into problems with pages that displayed book covers, which tended to max out at 450 pixels wide. In both cases when using a default viewport of 980 pixels, the individual elements appeared up in the top-left of the iPhone screen, much too small and left wasted white space on all sides.
One solution to this problem is to set an individual viewport on each relevant page with a width equal to the known (or calculated) width of the applet or graphic. The other is to use a special device-width constant in the metatag, like this:
<meta name = "viewport" content = "width = device-width">
device-width is one of several advanced elements that may be added to the viewport metatag by developers who have more complex sites.
3.1.3. Viewport properties and constants
The iPhone recognizes a total of six viewport properties, as shown in table 3.1. The width is the only viewport property that you will use on most web pages.
Table 3.1. The iPhone recognizes six properties that may be used as part of a viewport metatag to control exactly how an individual web page displays on an iPhone.
|
Property |
Default |
Minimum |
Maximum |
Constants |
|---|---|---|---|---|
|
height |
Calculated |
223 |
10,000 |
device-height, device- width |
|
width |
980 |
200 |
10,000 |
device-height, device- width |
|
initial-scale |
1.0 |
minimum-scale |
maximum-scale |
|
|
minimum-scale |
.25 |
>0 |
10.0 |
|
|
maximum-scale |
1.6 |
>0 |
10.0 |
|
|
user-scalable |
Yes |
N/A |
N/A |
yes, no |
We’ve already discussed how the height and width properties work: they assume a virtual window of the indicated height or width and then scale appropriately for display on the iPhone. Note that the device-width constant (which we’ve already met) has a match in device-height; you can decide whether you want your web page to fill the width of an iPhone display or its height.
The other four properties all control how zooming works. initial-scale determines how much an iPhone zooms when you initially view a page. The default value of 1 fits a web page to the iPhone screen. You might set it to a value smaller than 1 to immediately zoom to a leftmost column to make things more readable to iPhone viewers. But be careful when you use this technique, since it may not be obvious to your users that they’re viewing only part of the page.
user-scalable determines whether iPhone viewers are allowed to zoom in and out using pinch-zooming. If it’s set to no, then no zooming is allowed. If—as by default—it’s set to yes, then users may zoom in down to the minimum-scale value and they may zoom out up to the maximum-scale value. Generally, you shouldn’t have to change these last three values for redeveloped web pages, as a viewer choosing how your page looks is what the web is all about. However, if there are good UI reasons for controlling scalability or if you think a page looks particularly bad at certain scales, you may choose to modify them. On the other hand, you probably should turn scaling off for web apps, as those will be programs that you’re developing explicitly for viewing on an iPhone.
Note that you can set multiple values in a metatag by separating them either with a comma or a semicolon:
<meta name="viewport" content="width=device-height; initial-scale= 0.667">
You’ll find that we’ll keep coming back to viewports in the next several chapters—it’s a crucial technique for iPhone web pages.
3.2. Making your web pages iPhone friendly
The simplest sort of web page redevelopment involves making your page’s “iPhone friendly,” which we briefly defined in the previous chapter. In short, this concept involves you taking a day or less of work to do the simple cleanup required to turn existing web pages into web pages that work pretty well on the iPhone.
The basis of an iPhone-friendly page—as with any iPhone-based web page—is a good viewport. Once you’ve figured that out, you should also look at your pages’ technologies and generally consider good web design techniques to make sure your page looks nice. Making a page iPhone friendly is more about fixing problems than about showing off the iPhone’s strengths.
3.2.1. Avoiding missing iPhone functionality
Although the iPhone is often described as a fully functioning web browser, it’s not. In particular, you won’t have access to certain third-party plug-ins and you’ll discover that many events aren’t available on the iPhone.
If you can, avoid using these plug-ins and events. That’ll be pretty easy to do when you’re creating brand-new web apps, starting in the next chapter. But when you’re redeveloping existing web pages, you may find replacing this functionality impossible; nonetheless, it’s important to know where your pages will run into problems.
The Missing Technologies
In chapter 1 we mentioned the most notable third-party technologies that you won’t be able to use on the iPhone: Flash and Java. However, there are several other missing technologies that you might encounter, the most important of which are listed on table 3.2.
The list of unsupported technologies in table 3.2 may well be different by the time this book sees print. The best solution to deal with third-party technologies is always to check for them. If the technology is not detected, you should ideally deliver the user to an alternative page that displays the same information in a different format. If that’s not possible, you should at least deliver users to a page that explains why they can’t display the content. Simply displaying a nonworking page is probably the worst alternative of all.
Table 3.2. Although the iPhone’s browser itself is fully functional, some third-party technologies are not yet supported, the most important of which are listed here.
|
Technology |
Comments |
|---|---|
|
Flash |
The Flash programming language is widely expected to be supported at some point, though Apple has said nothing official. In the meantime, the WebKit and Canvas offer some weak alternatives for animation, as described in chapters 4 and 6. |
|
Java |
Sun announced plans to support Java on the iPhone in 2008, but that’s since run afoul of Apple’s limitation against downloads in SDK programs. There’s currently no word on when and if Java will be supported. |
|
SVG |
Scalable vector graphics are not supported. Canvas provides a good alternative, as described in chapter 6. |
|
XSLT |
Extensible Stylesheet Language Transformations are not supported. |
|
WML |
The iPhone’s Safari is not a cut-down, last-generation cell phone browser; thus the Wireless Markup Language is largely irrelevant. However, XHTML mobile profile documents do work at .mobi domains. |
Once you get past those third-party software packages, most things will work correctly in your browser. As we’ve already discussed, DOM, CSS, and JavaScript are among the advanced web techniques that will work as expected when viewed on an iPhone. However, there’s a big asterisk on the statement that JavaScript works, and that has to do with events.
The Missing Events
Unfortunately, events won’t work quite as you’d expect on the iPhone. Much of this goes back to one of the unique iPhone features that we discussed in chapter 1: its input device. Most specifically, it’s important to remember that the finger is not a mouse. Because a finger may or may not be on the screen at any time, your web page suddenly becomes stateless; you can no longer depend on events that presume that the mouse always moves from point A to point B through all the space in-between.
The statelessness of iPhone events causes two traditional categories of events to fail on the iPhone: drags and hovers. Thus, you can no longer allow click and drag (because the iPhone instead uses that gesture for its scrolling) and you can no longer test when the mouse moves over an area (because it doesn’t).
The loss of these events is going to affect the way you program using both CSS and JavaScript. In CSS your biggest problem will be with hover styles, which will of course no longer appear, but in all likelihood that won’t be a major issue for your web pages. In JavaScript these differences in input cause several specific events to work either differently or not at all, as detailed in table 3.3 (but we also suggest looking at http://www.quirksmode.org/dom/events/ to see if anything has changed by the time you read this book).
Table 3.3. Not all JavaScript events work on the iPhone, leaving you with a more restricted palette of options than in a traditional browser.
|
Functional events |
Changed events |
Nonfunctional events |
|---|---|---|
|
form.onreset |
formfield.onmousedown |
document.onkeydown |
|
formfield.onblur |
formfield.onmousemove |
document.onkeypress |
|
formfield.onchange |
formfield.onmouseout |
document.onkeyup |
|
formfield.onclick |
formfield.onmouseover |
form.onsubmit |
|
formfield.onfocus |
window.onscroll |
formfield.ondblclick |
|
formfield.onmouseup |
formfield.onmouseenter |
|
|
textarea.onkeydown |
formfield.onmouseleave |
|
|
textarea.onkeypress |
formfield.onselect |
|
|
textarea.onkeyup |
window.oncontextmenu |
|
|
window.onload |
window.onerror |
|
|
window.onresize |
It’s the changed JavaScript events that bear the most discussion, because they’re the most likely to cause you headaches because they seem to work.
formfield.onmousedown occurs at an unusual time. Unlike on a desktop browser, the onmousedown event isn’t reported until the onmouseup event occurs, making its usage relatively meaningless. This is what breaks the click-and-drag event types that we’ve already discussed.
formfield.onmousemove, formfield.onmouseout, and formfield.onmouseover are all similarly intertwined. All three always occur in that order when a user clicks on the screen. In addition, if the user clicked on a changeable element, formfield. onmousedown, formfield.onmouseup, and formfield.onclick are also reported immediately afterward. That’s a ton of events that actually don’t provide much information since they always occur together.
Finally, the window.onscroll event works kind of like formfield.onmousedown, in this case not appearing until after the scroll completes. This is less likely to be a UI issue for the average programmer, but it means that you no longer intercept a scroll before it occurs.
Of the events that just don’t work on the iPhone, the formfield.onmouseenter and formfield.onmouseleave events are the most likely to cause problems on your web page. These prevent you from recognizing hover-style events in JavaScript.
Because you can’t use these event types, you’ll find that many traditional UIs fail. Cut and paste is one of our first losses. Pop-up menus are going to be another casualty since most of them depend on click and drag to work. There are workarounds for these: you could develop a new cut-and-paste methodology in which you click on the edges of your text, and you could develop a new pop-up menu methodology in which you click and then release before a menu appears. These are all beyond the scope of the relatively simple web page changes that we’re covering here.
We’re going to return to the topic of web events on the iPhone twice. Later in this chapter, when we explore iPhone-optimized web pages, we’ll highlight the exact events that occur when a user touches or gestures at the iPhone screen. Then in chapter 4 we’ll talk about some new iPhone events that are introduced in the WebKit. Your first step in making a web page iPhone friendly will just be working around the event problems that we’ve highlighted in this section, but if you want to take the next step and rewrite your event model, we’ll point you toward those resources.
3.2.2. Creating good links
Events show us once more how finger mousing isn’t the same as mechanical mousing. The topic comes up again for basic web designs when you think about how your users select links. The topic is important enough that it’s another thing you need to consider when first redeveloping your web pages for the iPhone.
The main problem here is that a mouse pointer typically has a hot spot that’s one pixel wide—and a user’s finger point is many, many pixels wide. Thus, if you put your links too close together—such as in a column-based navigation bar (navbar) with links one under the other—a user won’t be able to select them without zooming in. It’s the same story for forms.
Depending on the way you’ve set up your web page, you may be able to solve this problem instantly. In the case of that columnar navbar, you can just put spaces between your links, and they’ll probably look fine on both desktop and iPhone browsers. For more complex setups, including forms, you may need a more wholesale page rewrite—or to create iPhone-specific views, a topic we’ll return to when we get to iPhone optimization.
In any case, the point here is to look at your links to see if they’re usable on the iPhone, and if not, to fix them with some simple redesigns.
3.2.3. Practicing good web work
If you’ve defined a viewport, created alternate pages for missing web technologies, and redisplayed any links that were too close together, you’ve done 90% of the work you need to make your web pages look good on the iPhone. However, before we leave the topic entirely, we’d like to offer our top suggestions for using generally good web practices to make your pages look their best. If you’re already an experienced web designer, you’ve probably got this in hand already, in which case you should skip ahead to iPhone optimization.
Good Css
To make your web pages more accessible on different platforms, we suggest you don’t use absolutes in your CSS. Instead, use relative values. For font sizes, use percentages like 80% and 120%, not absolutes like 10pt or 12px.
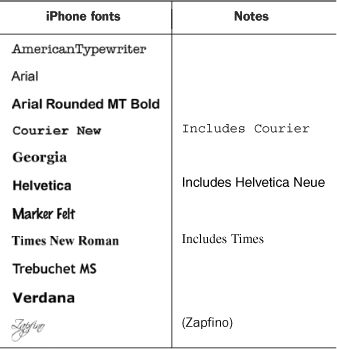
For font types, allow for a variety of fallbacks, and make sure they include fonts that are available on the iPhone, as listed in table 3.4.
Table 3.4. The iPhone supports a large set of fonts. For an iPhone-friendly page, make sure your CSS files include at least one of these in its standard listing.
Finally, consider carefully how you do any CSS positioning on your web pages. Sure, absolute positioning can make a web page look great, but it’ll ensure that your page only works at standard sizes—which means on an iPhone that you’ll be forced to use a default viewport size (like 980 pixels) rather than a smaller one that may allow for better scaling of fonts and graphics. Further, there are some quirks with positioning on the iPhone. We’ve listed our suggestions for using CSS positioning in table 3.5.
Table 3.5. There are four methods that you can use to position elements using CSS—but don’t expect them to work quite as you expect on the iPhone.
|
Type |
Definition |
Comments |
|---|---|---|
|
Static |
Positioning in normal flow of page |
The default behavior |
|
Relative |
Positioning relative to the normal flow |
Will work on an iPhone, and is the preferred method for more intricate layout in a mixed device environment |
|
Absolute |
Positioning relative to the containing block |
Will work with an iPhone-specific style sheet, but has more potential to cause problems if used to lay out an entire page due to size differences between different devices |
|
Fixed |
Positioning relative to the browser window |
Not supported on the iPhone |
The biggest surprise here is that fixed positioning is not supported. This is because Apple felt that it did not meld with its new paradigm of zooming web pages. A fixed element just doesn’t make sense after you pinch-zoom.
If you’re dependent on fixed positioning, though, you can use absolute positioning to mimic it. This is a standard web technique that we won’t discuss in depth here: you simply create one <div> that’s the size of your <body>, then stick another <div> inside that floats to the bottom (or top or whatever) of that top-level <div> using absolute positioning.
We’ll return to CSS in a bit, when we look at ways you can move your web pages from iPhone friendly to iPhone optimized by creating totally new CSS files intended for use only on the iPhone.
Good Tables and Good Columns
Column-based layouts have become a de facto part of web design over the last decade. This sort of design is more important than ever on the iPhone because users can zoom into a specific column using the double-tap feature of the iPhone. While this generally works without additional development work required, a careful developer can make sure that columns are optimized for the iPhone viewer.
First, this means that you should have columns in your web page. You probably already do.
Second, once you have columns, it’s important to make sure that your columns logically match the different categories of content that your pages contain. For example, if you have both content and navigation on a web page, you could split those up logically into two different columns. Mixing things together will make your columns less useful for your iPhone readers. This may cause you to rethink using floating tables or embedding tables within tables. On the flipside, you don’t want to split up content between multiple columns. For example, having a single story run through several columns on a page probably isn’t a good idea as it will force an iPhone user to zoom in, then out, then back in to see everything.
Third, it’s important to consider the fact that iPhone viewers may be looking at your pages one column at a time. This means that you need to think even more carefully than usual about what happens when a viewer gets to the end of a column. You thus might want to include some sort of navigation down at the bottom of a column.
3.2.4. Fixing common problems
To close up this short section on how to make your web pages more iPhone friendly, we’ve put together a quick guide for solving common problems, linking together all the suggestions we’ve offered so far. First, take a look at our iPhone best practices, which we’ve summarized in table 3.6. Then, if you’re having any particular problems, take a look at the individual sections below.
Now let’s move on to some of the problems that you may be encountering if you’re not following all of these best practices (or maybe even if you are).
Graphics are too Small
This is a classic viewport problem that arises from 980-pixel windows being viewed on a 320-pixel screen. The problem could be solved using a viewport, but we’ve also listed some other possibilities:
- Decrease the size of the viewport so that it’s in the range of 480–640.
- Replace the graphics with corresponding text, especially if you plan to use the graphics for navigation.
- Push the graphic off to a subsidiary page that only shows the graphic and allow the user to click through to that page. Be sure that the subsidiary page shows the graphic at device-width.
- Zoom in to the column with the graphics using the initial-scale viewport property.
Table 3.6. Making your web pages iPhone friendly can take just a couple of hours of work, but can result in dramatically improved user experiences for iPhone users. Here are several iPhone best practices that can improve your pages for your users, all summarized from discussions found in chapters 1 and 3.
|
Practice |
Explanation |
|---|---|
|
Use a viewport |
Decide the size of virtual browser that your web pages will support, and lock that in with a viewport command. |
|
Use relative values |
Whether you’re writing CSS, laying out tables, or doing something else, always use relative values, not absolutes. |
|
Use columns |
Lay your pages out in columns whenever you can, and make sure those columns match up to logical data units on your web pages. |
|
Watch your media |
Don’t use Flash, Java, or other unsupported third-party client software on web pages that you expect iPhone users to access. |
|
Be careful with events |
Remember that certain events don’t work the same on the iPhone. Don’t use click-and-drag events or hover events on iPhone web pages. |
|
Speed up your downloads |
Fall back on lessons learned in the 1990s to make faster, leaner web pages that will load quickly over the EDGE and 3G networks. |
|
Separate your links |
Put spaces between your links to make it easy for users to click on them with their fingers. |
|
Avoid scrollable framesets |
Because of the lack of scroll bars on the iPhone, framesets—which would be individually scrollable on the desktop—provide a subpar experience on the iPhone. |
|
Use words, not pictures |
Don’t use graphics that just repeat words, as they slow down loading and may be very small on an iPhone screen. |
|
Follow standard best practices |
Although we feel that last-generation mobile best practices are already outdated, you should still follow more general web-based best practices. Make sure that your web pages validate and are clean to provide the optimal experience for all of your users. |
Words are too Small
This also tends to be a viewport-related problem, and is likely to be less common than the graphic issue because a web client is already trying to adjust fonts to make them a reasonable size. Here are some possible solutions:
- Decrease the size of the viewport so that it’s in the range of 480–640.
- Adjust your CSS to use relative values instead of absolute values.
- Zoom in to the column with the text using the initial-scale viewport property. Note that you probably want to do this if you’re highlighting the core content of a page.
Columns are too Big
This is more a result of other issues than a problem in and of itself. You’ll probably see it when you try to decrease the size of the viewport—to address one of the previous problems—and you discover that a column refuses to shrink. Solutions include the following:
- Use relative numbers (e.g., 50%) to define column widths, not absolute numbers (e.g., 750).
- Reduce the size of any pictures that may be forcing your column to stay wide. For example, if you’re running forums and you allow users to post pictures to those forums, you may need to limit the width of pictures that users can post or alternatively to resize them on the fly.
- Allow large pictures to flow into nearby columns. If you’re using tables, you might do this using a colspan attribute. For example, you might have a page where a 728x90 banner ad sits above the top of your content. For a desktop page, this arrangement probably works fine, but if you’re using a smaller view-port for iPhones, you’ll need that banner ad to flow into the next column, even if that’s off the page on your iPhone display. If you need to flow off the page, in addition to setting the colspan attribute for the ad column you’ll need to set the viewport’s initial-scale property to something less than 1.0, which will keep the right-hand side of the ad from showing up on your iPhone screen.
3.3. Making your web pages iPhone optimized
In the previous section we explained how to make your web pages look better on the iPhone using a bare minimum of redevelopment. Our goal there was to fix problems and to thus give your iPhone users the same experience as your desktop users.
In the remainder of this chapter, we’re going to take the next step. We’ll look at more extensively redeveloping pages to work specifically for the iPhone. We won’t yet be using any iPhone-specific libraries, but we’ll explore some techniques and designs that will only work on the iPhone, and you may end up branching your web pages as part of this optimization process. To kick things off, we need to find out when our users are actually using an iPhone.
3.3.1. Detecting the iPhone through USER_AGENT
The idea behind iPhone optimization is to redevelop web pages so that they work great on the iPhone. To begin this process, you must know when a user is browsing from an iPhone. The easiest way to do this is—as is typical in web design—by looking at the user agent. Listing 3.1 shows the best way to do this using a PHP example.
Listing 3.1. Checking the user’s agent to see when an iPhone is browsing
<?
if (ereg("Mobile.*Safari",$_SERVER['HTTP_USER_AGENT'])) {
    $iphone = 1;
}
?>
There are, however, a few caveats in using this method. First, it may not be Apple’s preferred method. It was originally undocumented, and though it’s documented now, it could easily change. At the least, you should make sure this detection appears in a global header file where you can easily modify it in the future.
Second, it’s restrictive. There will soon be other smarterphone devices that have functionality similar to that of the iPhone. You may wish to use a broader net to catch all the smarterphone fish, but we leave that up to the specifics of your own website.
3.3.2. Detecting the iPhone through CSS
Depending on the precise dynamic language you use, you may have other ways that you prefer to use to detect which browser your users are using. Even CSS has its own methods that can be used to detect some browser capabilities.
We note this in particular because this method was originally Apple’s only supported way for detecting iPhone usage. Listing 3.2 shows how CSS can recognize an iPhone and thus apply a different style sheet.
Listing 3.2. Applying style sheets using media detection
<link media="only screen and (max-device-width: 480px)" href="small.css"
type= "text/css" rel="stylesheet">
<link media="screen and (min-device-width: 481px)" href="large.css"
type="text/css" rel="stylesheet">
Besides being supported, Apple’s method also has the interesting side effect that it will apply your small-device style sheet to any small screen that views your website, which may give you instant compatibility with future smarterphone devices.
This second method of detection leads right into our first major iPhone optimization topic; if you’re going to take the time to improve your website for the iPhone—beyond the day-or-less that we suggested creating a friendly site would take—then your CSS files are the right place to start work.
3.3.3. Optimizing with CSS
The easiest way to improve your web page’s readability on the iPhone is to start with your existing big-screen style sheet and then create a new small-screen style sheet that makes everything a little bigger. Table 3.7 offers some suggestions that we have found work well if you haven’t made any changes to the native viewport size. Your individual website will probably be different; ultimately you’ll need to view and review your pages until you find a happy medium.
Table 3.7. To make a web page viewable on an iPhone screen, you should create an alternative style sheet and increase the size of all your elements in that style sheet.
|
Element |
Changes |
|---|---|
|
Fonts with relative values |
Increase 20%–30% |
|
Fonts with absolute values |
Increase 2–3 points |
|
Select menus |
Increase 20%–30% |
|
Input boxes |
Increase 20%–30% |
Of the CSS elements noted, select menus deserve a short, additional note. They’re a great input type to use on iPhone-friendly or iPhone-optimized pages because of the built-in support for <select> s on the iPhone, which automatically pop up a large, easy-to-read widget. You should use them whenever you can.
For text-based CSS elements, we’ll also note that there’s an alternative that will allow you to change all of your text-based CSS elements at once. This is done with the -webkit-text-size-adjust property, which is a part of Apple’s WebKit. You could easily implement it without doing any more WebKit work, but we’ve nonetheless left its discussion for the next chapter.
3.4. Manipulating iPhone chrome
Thus far we’ve offered up some standard techniques for differentiating iPhone and desktop viewers. Now that you know when a user is browsing with an iPhone, you can start writing specific code for that situation. Let’s begin by looking at a simple optimization you can do by examining the iPhone’s chrome and the limited ways in which you can adjust it using standard web techniques.
3.4.1. The three bars
The iPhone chrome consists of all those elements that appear at either the top or the bottom of an iPhone page. There are different types of chrome used on the various iPhone programs, but for the mobile Safari web browser, there are just three, as summarized in table 3.8. You may wish to again refer to figure 1.1 for their placement on the screen.
Table 3.8. Three different bars full of buttons and inputs appear on your mobile Safari screen on the iPhone.
|
Chrome |
Functionality |
Size |
|---|---|---|
|
Status bar |
Displays overall iPhone status: network connectivity, battery charge, and current time |
320x20 or 480x20 |
|
URL bar |
Displays the web page title and major web page functions: the URL bar, search button, and reload button |
320x60 or 480x60 |
|
Bottom bar |
Displays web page navigation functions: back and forward, bookmark buttons, and tab navigator |
320x44 or 480x32 |
Each of the three bars shown in table 3.8 works slightly differently. The status bar is a permanent fixture of every iPhone page. Users probably don’t even notice it because of its omnipresence, but nonetheless it takes up 20 pixels at the top of the screen. The status bar can appear in two different colors, black or gray, but we won’t be able to control that until we get to SDK development; for web pages, the status bar is always gray.
The bottom bar is similarly stuck to the bottom of the page. It’s a more obvious intrusion because it only appears on web pages. Many web developers have hoped for a way to get rid of the bar or replace it, but so far no methods have been made available. If you want a site-specific bottom bar, you have to use absolute positioning, as we mentioned earlier when discussing CSS.
The URL bar appears at the top of every web page you view, but it scrolls off the top of a page as a user moves downward, recovering those 60 pixels of space. Like the bottom bar, there’s an advanced WebKit method that will get rid of this chrome. You can also exert some control over it using normal web methods. You can automatically push the URL bar off the top of the screen with a window.scrollTo(0, 1) command in JavaScript. This command must be delayed until the page has loaded sufficiently. Listing 3.3 shows one way to do this.
Listing 3.3. Scrolling the URL bar chrome off the screen with JavaScript

The code for our URL scroller is very simple. The hideURLbar function does the scroll, but it isn’t executed until the page is loaded.
Before you use this functionality be warned that, as with your work with the initial-scale property of the view screen, the result will not be entirely intuitive for the user. On the one hand, the user might be confused by seeing the page suddenly jump after it loaded. On the other hand, the user might be confused about where the URL bar went to, since it went away without the user doing anything. Some developers like the ability to instantly give their iPhone users another 60 pixels of space “above the fold,” but these UI difficulties must be considered.
Of course, the iPhone does lots of automated stuff like this. The manner in which it swaps between two orientations as you twist your iPhone around isn’t too different from an automatic scroll. So, perhaps users will get used to iPhones moving stuff around for them as they use the device more.
3.4.2. Web clips
Although not quite chrome, web clips represent another way in which mobile Safari provides you with unique functionality. Simply, a web clip is an icon that you can use to represent a web page on the iPhone.
As a developer, you just have to create a simple icon to represent your website. The web clip icon should be a 60x60 PNG graphic. Apple also suggests using “bold shapes and pleasing color combinations.” You don’t have to worry about the rounded corners or gloss that define Apple iPhone icons, because the iPhone will take care of all that for you.
Once you’ve uploaded your icon to your server, you can specify it with a link of type apple-touch-icon, like this:
<link rel="apple-touch-icon" href="/apple-touch-icon.png" />
Now you can encourage users to add your web page to the home screen of their iPhone, which they do by hitting the plus sign (+) in their bottom bar, then choosing Add to Home Screen. Your web page will appear with a short name and the icon that you designed, laid out in the standard iPhone manner.
Chrome defines the ways in which an iPhone looks unique, but as we’ve already discovered, it also acts unique. We’ve already looked at many events that were different or unavailable on the iPhone. Now that we’re working on iPhone-specific code, we can examine the flipside: events that are totally new to the iPhone.
3.5. Capturing iPhone events
Earlier in this chapter we showed how some events don’t work the same on the iPhone because of its unique input method. At the time, our task was simply to figure out which events to avoid when designing iPhone-friendly pages.
Now we’re ready to look at the flipside of user input by examining many of the standard iPhone gestures and seeing how those touches turn into JavaScript events. If you prefer to instead capture touches by hand, we refer you to the next chapter, which discusses some WebKit-specific events that do exactly that.
3.5.1. One-fingered touches
Table 3.9 gets us started with iPhone events by looking at the different one-fingered touches (which we previously encountered in chapter 1) and the events that they create.
Table 3.9. The iPhone recognizes several unique one-fingered touches, some of which correlate to normal web events.
|
Touch |
Summary |
Events |
|---|---|---|
|
Bubble |
User views info bubble with touch-and-hold gesture on clickable elements. |
(None) |
|
Flick |
User scrolls page with a one-fingered flick. |
onscroll |
|
Tap / Nothing |
User touches to emulate a mouse, but doesn’t click on a clickable element. |
(None) |
|
Tap / Click |
User touches to emulate a mouse and clicks on a clickable element, and it doesn’t otherwise change. |
mousemove |
|
User touches to emulate a mouse and clicks on a clickable element, and the content changes, as with a select box. |
mousemove |
|
|
Tap, Double |
User zooms into a column with a rapid double tap. |
(None) |
The most important thing to note here that the iPhone doesn’t give you access to certain events. In particular, you can’t see the two pure interface-centric one-fingered touches: zooming and info bubbles.
Of the accessible touches described in table 3.9, the flick is the only one that’s somewhat iPhone-specific, but it’s just mapped to a normal scroll event. You’re not likely to need to know too often when your users are scrolling your page, but if you want to, simple JavaScript lets you do so:
<script type=" application/x-javascript">
window.onscroll = function() {
    alert("A SCROLL has occurred");
}
</script>
In this example the window.onscroll function automatically detects whenever a flick occurs, just as it does a normal scroll on a desktop platform. Some developers have hoped for the ability to determine the length of a flick, but thus far Apple has not made that functionality available.
3.5.2. Two-fingered gestures
The iPhone also supports two two-fingered gestures. These are functions that truly distinguish the iPhone, because they would be impossible to emulate easily on a mouse. Table 3.10 summarizes them.
Table 3.10. The iPhone’s unique two-fingered gestures generate additional events, some of which can again be seen through normal web-based events.
|
Gesture |
Description |
Events |
|---|---|---|
|
Two-finger flick/scrollable |
User pans the screen with two fingers inside a scrollable element |
mousewheel |
|
Two-finger flick/not scrollable |
User pans the screen with two fingers not inside a scrollable element |
onscroll |
|
Pinch |
User zooms in or out with a two-fingered pinch |
(None) |
We’ve already met the pinch-zoom functionality, and perhaps it’s not too surprising that we can’t see its event, given that we haven’t been given access to any zoom events so far. The two-fingered flick, on the other hand, is new. It may, in fact, be new to most of your users too, as it’s one of the more secret functions of the iPhone. However, if you can trust your users to use it, you can take advantage of this function to accomplish some interesting things.
First, two-fingered flicks give you an option to implement framesets. You might recall that we cautioned against them earlier because one-fingered flick scrolling doesn’t work right with them. But if you can train your users to do two-fingered scrolling, they’ll be able to easily scroll individual frames.
Second, they allow you to create other types of scrollable elements, solely to detect the mousewheel event, and thus introduce new functionality to your web page. The following example shows a page with a <textarea> which that is scrollable, along with some JavaScript code that will detect a two-fingered scroll in that area:
<script type="text/javascript">
window.onmousewheel = function() {
   alert("A two-fingered SCROLL has occurred");
}
</script>
...
<textarea rows=100 cols=100>
</textarea>
This might be a nice feature if you want to lock a header and footer on your page but allow users to scroll the content in the middle.
Third, two-fingered flicks are (obviously) the functionality that you need to train your users to use if you’re already detecting for mousewheel events on your web page.
3.6. Redisplaying web pages
To date we’ve talked about how to take your existing web pages and redevelop them for the iPhone. So far it’s been a largely additive process. But what if you have web pages that still don’t look good, no matter what you do? In this case, consider a different solution, which probably means totally redisplaying your web pages for the iPhone. Granted, this may not be a possibility for all sites. To use this method, you must have good data abstraction built into your site—usually via individual web pages pulling data from an external source (such as MySQL), and then dumping that content into a template.
The first step in redisplaying your pages is simply creating new templates for iPhone users and then selecting them when you detect an iPhone. For optimal iPhone usage, your new templates should use a “river” format. This means that you redisplay your web pages’ data in a single column rather than using a multiple-column approach. You should place your most important navigation elements at the top of the page and your least important navigation elements at the bottom of the page. Your content then flows in between those spaces.
However, you should only decide to redisplay your page if it really doesn’t look good on iPhones. Because the iPhone is a desktop-class browser, you don’t have to notably cut down your web pages to make them work. Some professional websites have made the mistake of replacing a great user interface that worked well with the iPhone’s columnar zoom with a crippled river formatting; in doing so, they’ve decreased functionality for iPhone users, not increased it.
Given the limitations of a total redisplay, you may wish to consider a more piecemeal approach. In rewriting web pages for the iPhone, we have been more likely to move a single column here or there than to totally rewrite a page. Such a development process is very personal—much as web design itself is. Often it will be a process of deciding which minor bits of information can be removed from a page to allow everything else to be larger and more readable on a comparatively small screen.
Because the real work of page redisplay is so personal, we can’t give precise guidelines for how it will work on your individual pages. But we can look at what’s been done already and see what lessons those pages suggest. We’ll finish our look at iPhone optimization by exploring a couple of notable websites and what they’ve done.
There’s a fine line between creating an iPhone optimization of an existing web page and redisplaying your web page to the point where you’ve actually created a new iPhone web app (the topic of the rest of part 2). Our next two examples surely cross that line. Gmail and Facebook both provide insightful looks at how you might redisplay your own pages and also offer a bridge to the topics of the next chapters, where you’ll be creating iPhone-specific UIs for pages meant to be viewed exclusively on the iPhone.
3.6.1. The Gmail iPhone pages
Google’s Gmail was one of the earliest websites to redisplay itself for the iPhone, and perhaps for good reason. The Gmail pages as they existed were a definitive example of how hard it could be to read pages on the iPhone. They contained tons and tons of information in a tiny font, and the majority of it was in one huge column that didn’t get much more visible when you double-tapped it.
Today, iPhone Gmail users have a different experience. When they first log in, things seem the same; they’re presented with a tiny login screen at the top left of their iPhone screen, which could really use a device-width viewport. Yet as soon as they hit the first content page, they encounter an entirely redisplayed page. Figure 3.2 shows the same Gmail page side-by-side in Safari on the Mac and in mobile Safari on the iPhone Simulator.
Figure 3.2. Gmail offers a different experience for iPhone users through a page that has been redisplayed to the point where it’s become an iPhone web app.

The Gmail interface offers several ideas that developers redisplaying their pages for the iPhone should take note of. Most importantly, the iPhone page has been redeveloped into a river format. Whereas the desktop web page has a column to the left, everything has been incorporated into a single column on the iPhone page by putting navigation at the top of the page (and, though we can’t see it here, also at the bottom).
Beyond that, Google has adopted the same look as the iPhone chrome. We’ll talk more about how to make your iPhone web app look like a native app in the future when we cover iUI. Part of this chrome centers on the use of menus that appear only when you click a button, much as is the case with the << Menu button here.
However, the Gmail page also shows some of the limitations of redisplaying your pages on the iPhone. For one, it often hides content at deeper levels; you can no longer look at a list of your Gmail tags without going to a separate web page. In addition, Google has cut back on the amount of information on the screen. This helps you to read things, and also means that you have to download less at a time through a potentially slow EDGE connection, but it also makes it difficult to figure out what’s inside a message when you view it from the iPhone. This is because much of the subject gets cut off—a particularly annoying problem for mailing list messages where a mailing list title takes up part of the subject line.
3.6.2. The Facebook iPhone pages
Facebook is another website that has been rewritten to redisplay on the iPhone. Their main content pages are much more readable on the iPhone thanks to, once again, a river format. Rather than using the iPhone standard of pushing a menu off to another page, the iPhone Facebook pages create an elegant tabbed interface that works pretty nicely, though it eventually scrolls off the screen, thanks to the lack of absolute positioning on the iPhone.
Rather than repeating our Gmail discussion by looking at those core content pages, we’ve decided to examine the Facebook login screen, shown in figure 3.3.
Figure 3.3. Facebook’s iPhone Optimized login screen makes everything big and easy to use, and gets rid of superfluous content.
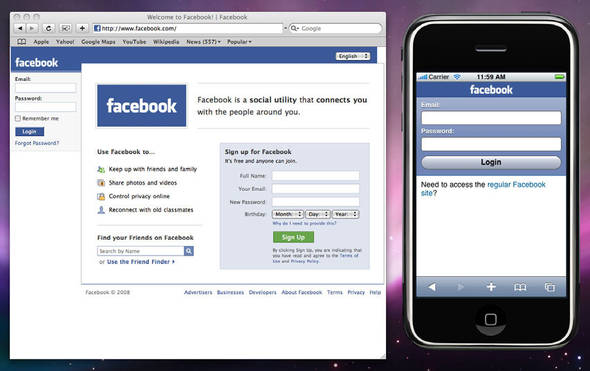
If Facebook’s normal login page were shown on the iPhone, it’d be impossible to read—and impossible to click on the login forms—until you did a columnar zoom on the left-hand column. The iPhone page instead just shows you login widgets that are full sized on your screen. Although it’s not shown, they’re also perfectly sized to fill an iPhone screen if it’s in landscape mode. The downside is that you lose all the extra information from the normal login page. To offset that deficit, the iPhone page gives users the option to hop over to the regular Facebook page, something that more sites should offer.
On the whole, this special Facebook login is much more functional on the iPhone. Further, this type of redevelopment is easy to do, since it just requires recoding a simple form for iPhone usage. If you’re clever, you could even do it without recoding the page: a simple viewport command with an initial-scale set to zoom in to the left column would have accomplished much the same job as Facebook’s wholescale redevelopment.
3.7. Supporting non-iPhone users
As we’ve noted, at some point your iPhone-optimized page will be so iPhone specific that it moves out of the arena of optimization and actually becomes a web app. When this happens, make sure you have a fallback page for non-iPhone users. Just as it’s great to have mobile versions of your desktop pages, you should also have desktop versions of your mobile pages.
Lessons for SDK developers
Many of the lessons in this chapter had to do specifically with web design, including good HTML practices and specific attributes and tags that can be used on the Safari web browser. This chapter also gave us our first look at the two biggest innovations we discussed in chapter 1: input and output.
When looking at input, we saw the problems of fat fingers and how events have to be modeled differently because the finger isn’t a mouse. These same differences and limitations will appear in your own SDK designs.
When looking at output, we saw the clever way in which the iPhone uses its relatively small screen to model a much larger viewing space. Using a similar model for an SDK program can help you to use the iPhone’s architecture to its fullest (and in fact is already used in the SDK’s UIWebView class).
We also saw our first hints at core iPhone functionality: the chrome and events.
The chrome will be a minor issue when you’re doing SDK development. You’ll still have a top bar, but you’ll have better control over what it looks like. You’ll be able to choose whether to have status-like bars or bottom bars depending on the needs of your program. Once you’ve made a choice, you can just pick the right class of objects from the SDK and drop it into your program.
The events listing in this chapter offer an excellent preview of how iPhone events are different from standard mouse-driven events. iPhone events aren’t just about point-and-click; they’re about one or more fingers temporarily touching the screen, then moving in different ways. You’ll learn about how touches can be accessed—even on the web—starting in the next chapter. In the meantime you should be considering how this new paradigm for input might change how users interact with your programs.
If you have two parallel websites running side by side, you can either automatically forward users from one set of pages to the other depending on their device, or give them the choice to move to the parallel website no matter which device a user is working from. We suggest the latter, as we saw in the Facebook example site.
We recommend this approach because we remain committed to letting users choose their web experience whenever possible, but also because we’ve already seen iPhone web apps that we felt provided an inferior experience to viewing the desktop web pages. This could well be a personal preference, and that’s a great reason to offer a choice. Even if your iPhone pages make the best possible use of an iPhone’s unique capabilities, some users may prefer the creakier but probably more fully featured possibilities offered by a true desktop web page.
When you step up to offering a full web app—without any parallel desktop pages—it’s polite to at least let desktop users know what’s going on. Some websites give a warning as to why an iPhone web app looks so funky on a desktop screen, while others just don’t allow users to visit the web app pages from a desktop browser. Another possibility that we haven’t seen yet would be to force a browser resize to a 320x480 screen. Ultimately your choice will depend on what you expect your user base to be—but giving readers more information by providing some sort of desktop page is rarely going to be a bad thing.
3.8. Summary
Although an iPhone theoretically contains a fully enabled desktop browser, there’s no way that a small handheld device could ever provide the complete functionality of a desktop display. Fortunately, there are some easy things you can do to improve the experience for iPhone viewers of your web page.
We’ve broken our redevelopment suggestions into two parts. First, there are fixes that you need to apply to make your web pages iPhone friendly. Second, there’s functionality you can use to directly detect iPhone usage and thus make your pages iPhone optimized. If you follow all the advice in this chapter—adding some simple iPhone variables to your pages, improving your web abstractions, engaging in some iPhone best practices, playing with the chrome, and looking at iPhone gestures—you’ll have dramatically improved how your web pages work on an iPhone.
The ultimate in iPhone optimization is creating totally new displays for your web page that format content in a method that’s more accessible on the iPhone’s smaller screen. If you go too far in this direction you’ll end up branching your code base, providing entirely different support for iPhones and desktops. Although that may be further than you want to go if you’re just supporting the occasional iPhone user, if you’re providing serious iPhone support—and as a reader of this book, you probably are—it may end up being a necessity. This leads nicely into our next topic—iPhone web apps, which are web pages built solely for use on the iPhone.