Preliminaries
This introductory chapter aims to make sure you have all the required tools and accessories to proceed with full confidence.
Three types of readers are likely to read this book. One group can skip to Chapter 2 immediately without reading Chapter 1. Another group may only need to read one small section in Chapter 1 before moving on to Chapter 2. The third group should read Chapter 1 very carefully before moving on.
- Group 1: You own a Mac. You have experience coding with Xcode on your Mac. You have an up-to-date iOS SDK and an up-to-date version of Xcode. You also have experience with DemoMonkey, and it’s installed on your machine. If all this is true, meet me in Chapter 2.
- Group 2: You own a Mac. You have experience coding with Xcode on your Mac. You have an up-to-date iOS SDK and an up-to-date version of Xcode. But you have no experience with DemoMonkey or it’s not installed on your machine. Please check out the section “Installing DemoMonkey” in this chapter and then meet me in Chapter 2.
- Group 3: You are a seeker of knowledge and have begun travelling down a wonderful road. We need to check your backpack and make sure you have all the tools you’ll need for your journey. So let’s start right here.
In order to program for the iPhone and/or iPad, and to follow along with the exercises, tutorials, and examples presented in this book, you’ll need to meet six minimal requirements. You may not completely understand these requirements right now, but that’s okay—just roll with me for a second, and I’ll explain everything as we go through these steps.
Note Whenever I say iPhone or iPad, I’m referring to any iPhone or iPad OS device, including the iPod touch. And when I say Macintosh HD, yours may be named something different.
Briefly, you’ll need six things:
- An Intel-based Macintosh
- The correct operating system for your Mac (OS X 10.8.1 Mountain Lion or later)
- To be a registered developer or be simulator-based (discussed in detail later in this chapter)
- To have the correct operating system for your iPhone (iOS 6 or later)
- To have the correct Software Development Kit (SDK) for your iPhone that runs a program called Xcode (version 4.4 and later)
- To have installed DemoMonkey
Let’s go into each of these in a bit more detail.
Getting a Mac
As far as your Mac is concerned, I’ll explain what you need in two ways—first a geeky way and then a newbie way.
- In geek terms: You need a Mac that has a 64-bit Intel-Core 2 duo processor or better.
- In newbie terms: You need a MacBook Pro that was manufactured from mid-2009 or later, or an iMac that was manufactured from mid-2007.
All the videos on the net that accompany this book are screencast from my MacBook Pro, bought in 2011; if I broadcast from my 2010 iMac, I first run the app on my MacBook Pro, bought in 2011.
You don’t need the latest revved-up Mac. If you haven’t bought one yet, get a basic, no-frills MacBook Air. See Figure 1-1.

Figure 1-1. The author uses the cheapest 2011 MacBook Pro on the market to perform all the coding and compiling in this book. Many of the authors’ students purchase the MacBook Air for $999, as illustrated here
Or buy a secondhand MacBook Pro on eBay or another such site. If you do that, or own an older Mac, you may be able to add some RAM. I suggest you make a free appointment at the nearest Apple Store’s Genius Bar and ask whether they can increase the RAM on your older model Mac. If so, ask about the maximum the RAM can be increased. Then ask explicitly: “Can this old computer run Mountain Lion, at least 10.8.1, and Xcode 4.4.1 or later?”
If you don’t have a Mac, you’ll need to buy one if you want to follow along with this book or program Objective-C to create iPhone apps. Keep in mind that, as mentioned, I’ve made a point to code and run every program in this book on Apple’s smallest and cheapest model, the MacBook Air—many of my newbie students buy the MacBook Air for $999.
You’ll need the correct version of OS X. At the time of this writing, that version is OS X 10.8.1. You need to have the latest greatest operating system inside your Mac. I see a lot of emails and forum questions revealing that many people think: “Ah, my code probably didn’t compile correctly because Dr. Lewis has a different version of OS X or/and iOS on his machine…”
Note Even if you think your system is up-to-date, I suggest you follow along in this section to make sure your system has the latest OS X and the latest iOS inside it. I say this because as you follow along in this book and tackle all the programs, there will be times when your code doesn’t work the first time you run it.
To make sure your system is recent enough to follow along with the book, please do the following:
- Close every program running on your Mac so that only the Finder is running.
- Click the little apple in the upper left-hand corner of your screen and select About This Mac. You’ll see the window shown in Figure 1-2. Make sure it says OS X 10.8.1 (or later).
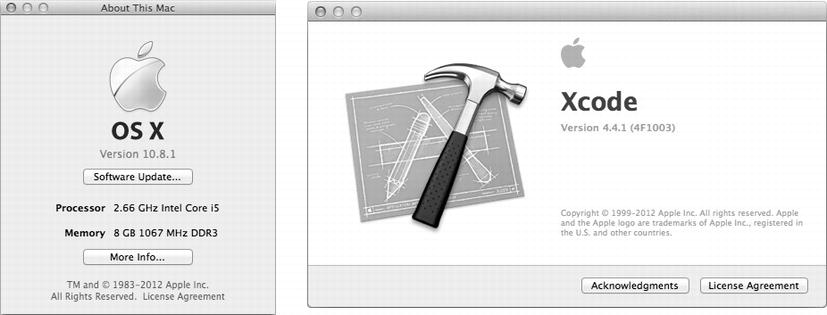
Figure 1-2. Here you can see that Dr. Lewis’s iMac is using OS X 10.8.1. and Xcode 4.4.1
Now make sure your Mac has the latest software:
- With all your programs closed except for the Finder, click the apple in the upper left-hand corner again and select Software Update, as illustrated in top image in Figure 1-3.
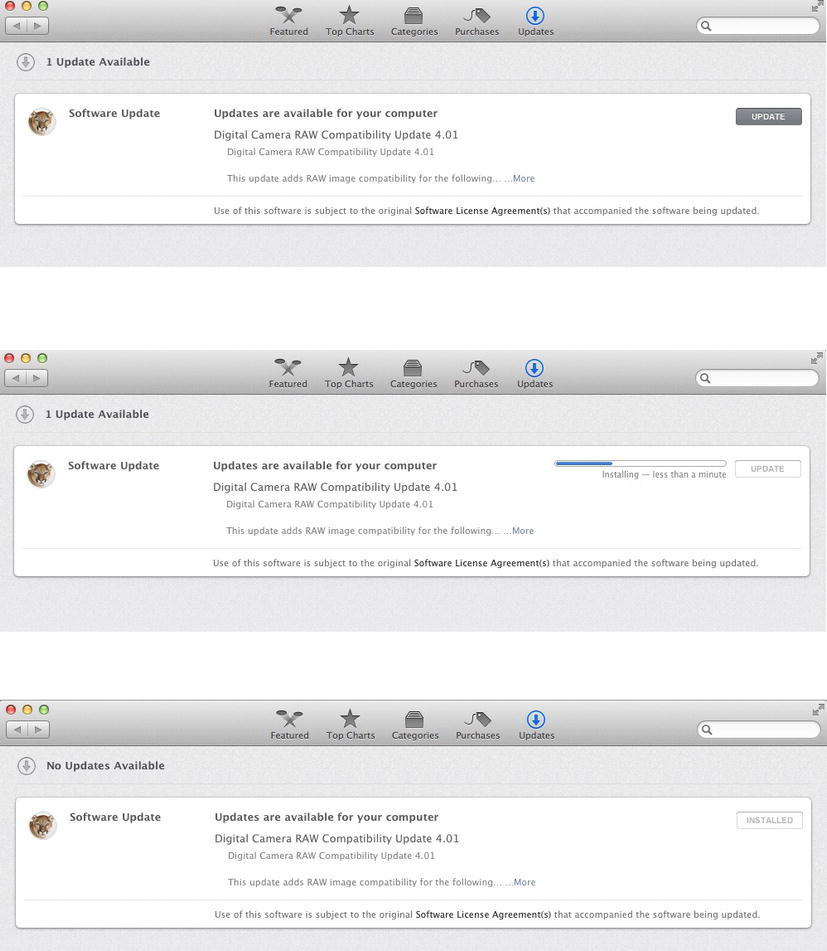
Figure 1-3. Top: Checking for new software. Middle: Download any new software and wait for software to download. Bottom: All software updated.
- If updates are available, click Continue and follow the instructions and screen prompts, as shown in two bottom figures of the three Figures 1-3
If your version of OS X or iOS makes my pictures seemed dated, don’t freak out. Along with volunteers, I maintain a forum that has news about recent updates of OS X and iOS. You can visit the forum at www.rorylewis.com/ipad_forum/.
Becoming a Developer
If you’re not already one, you need to become a registered developer via the iPhone/iPad DK for $99. Or you can get an introductory set of bells and whistles for free.
Making Your Choice
If you’re a student, your professor has probably already taken care of this, and you may already be registered under your professor’s name. If you’re not a student, you need to decide which type of developer you’d like to be. Here are your options:
- $0 option: You can go to the App Store and download Xcode for free. That’s fine, but bear in mind that unless you become a developer ($99), you’ll only be able to see the apps you code and program in this book running on the iPhone or iPad Simulator. You won’t be able to run them on a real physical iPad or iPhone. And you won’t be able to sell your apps on the iTunes store. Nor will you be able to log in to the developer site to view code snippets and updates, beta-test new products, or be a part of the Apple online community. Still, the free route may be a very good choice for people who aren’t sure whether they want to continue with Xcode and programming. If that’s the case, then download the latest version of Xcode from https://developer.apple.com/xcode/ and meet me at Figure 1-10.
- $99 option: If you do want to run your apps on a real iPad or iPhone, sell apps on the iTunes store, and be a part of the developer group at Apple, simply continue reading.
Let’s get started installing Xcode.
- Go to http://developer.apple.com/programs/ios/. You’ll see a page similar to the one shown in Figure 1-4. Click the Enroll Now button.

Figure 1-4. Click the Enroll Now button
- Click Continue, as illustrated in Figure 1-5.
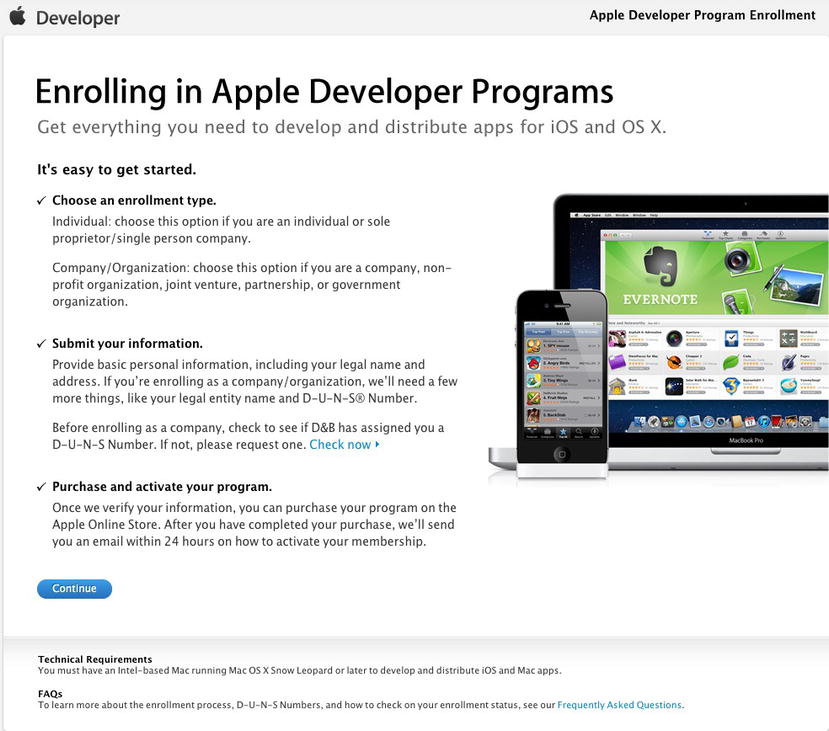
Figure 1-5. Click the Continue button
- Most people reading this book will select the “Create an Apple ID” option (arrow 1 in Figure 1-6) and then click Continue (arrow 2). If you already have an account, then you’ve been through this process before; go ahead with the process beginning with the “Sign in with your Apple ID” option, and I’ll meet you at step 6, where you’ll log in to the iPhone/iPad development page and download the SDK.
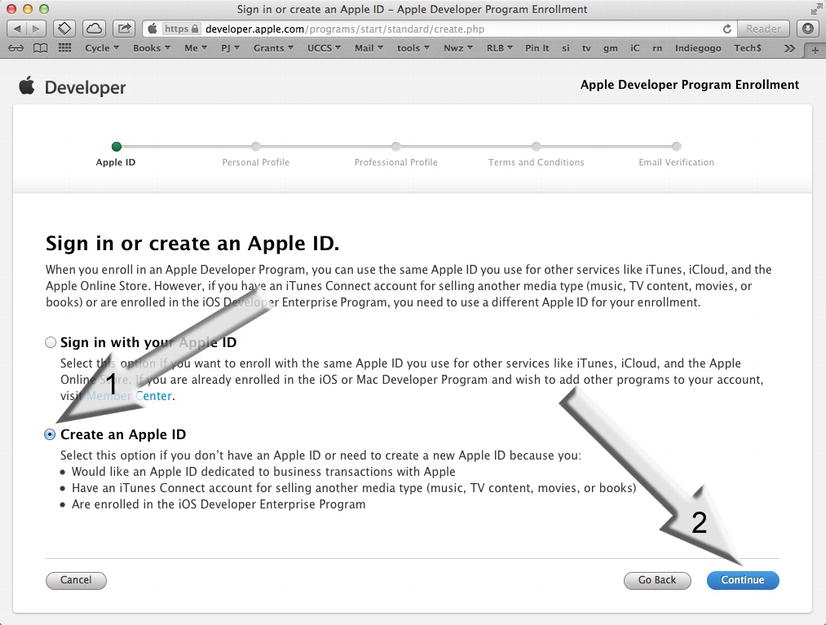
Figure 1-6. Click the “Create an Apple ID” option to proceed
- You’re probably going to be enrolling as an individual, so click the Individual button shown in Figure 1-7. If you’re enrolling as a company, click the Company button to the right, follow the appropriate steps, and then skip to step 6.
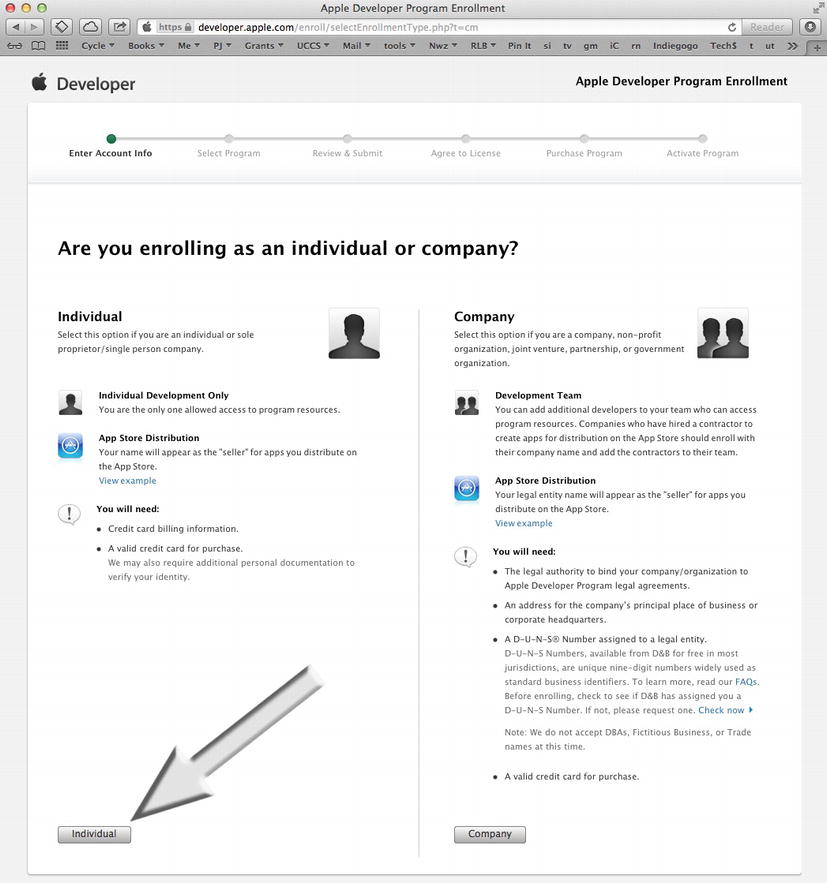
Figure 1-7. Click the Individual option
- Enter all your information as shown in Figure 1-8 and pay the Standard program’s $99 fee. The fee provides all the tools, resources, and technical support you’ll need. (If you’re reading this book, you don’t buy the Enterprise program at $299—it’s for commercial in-house applications.) After paying, save your Apple ID and username; you’ll get a confirmation email.
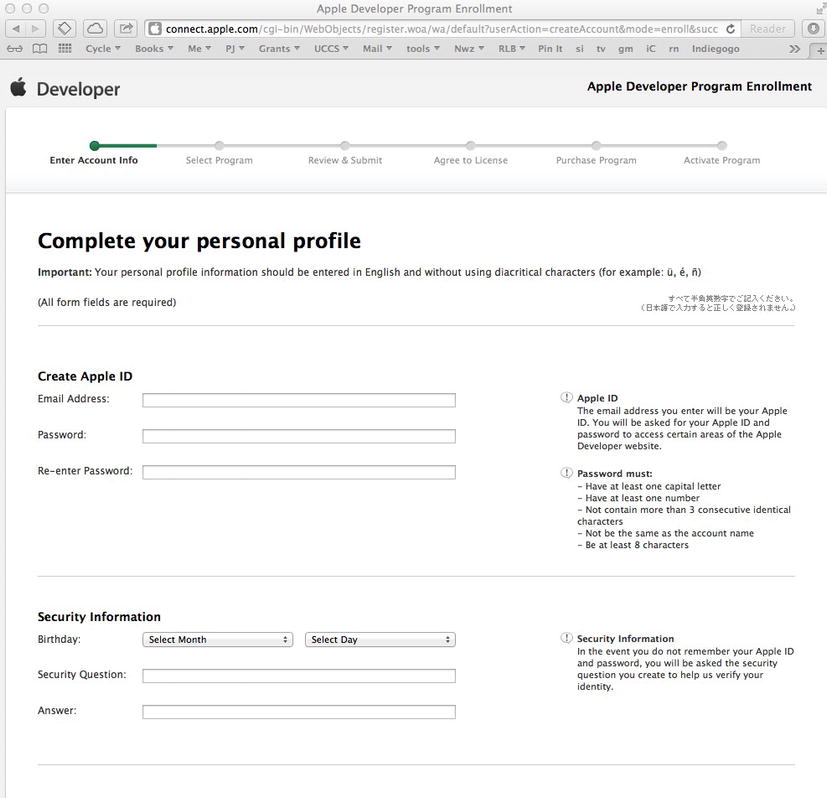
Figure 1-8. Enter all your information accordingly
Note Before you move on to step 6, make sure you have received your confirmation email and chosen a password to complete the last step of getting set up as a bona fide registered Apple developer. Congratulations!
- Use your Apple ID to log in to the main iOS development page at http://developer.apple.com. This page has three icons for the three types of Apple programmers. As shown on Figure 1-9, click the iOS Dev Center icon, which leads to the download page for iOS development software.
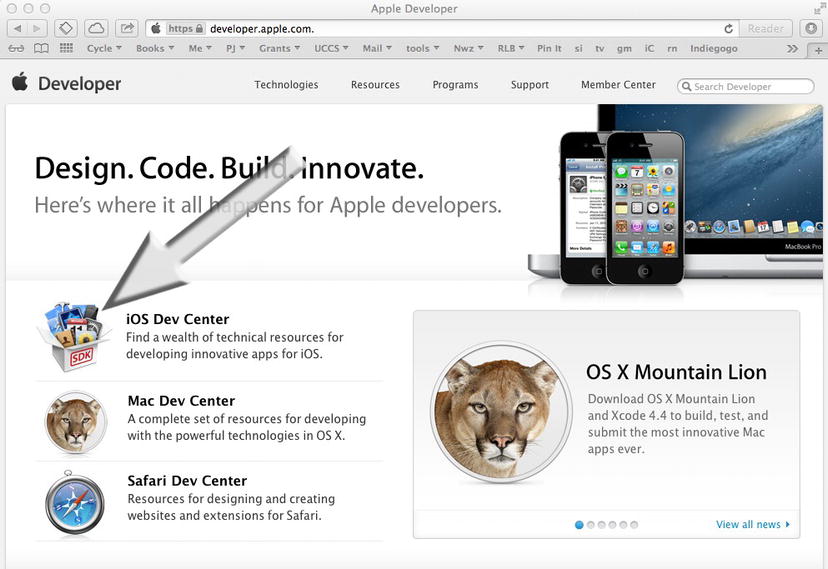
Figure 1-9. For now click the iOS Dev Center icon as indicated by the arrow. Later you may want to program applications for Mac computers or the Safari web browser
- After logging in with your username and password as described in step 6, you’ll see a screen similar to Figure 1-10. The iOS Dev Center contains all the tools necessary to build iOS apps. You’ll spend more time here later, but for now just go to the Developer Page of the latest build of the iOS SDK by clicking the icon indicated by the arrow.
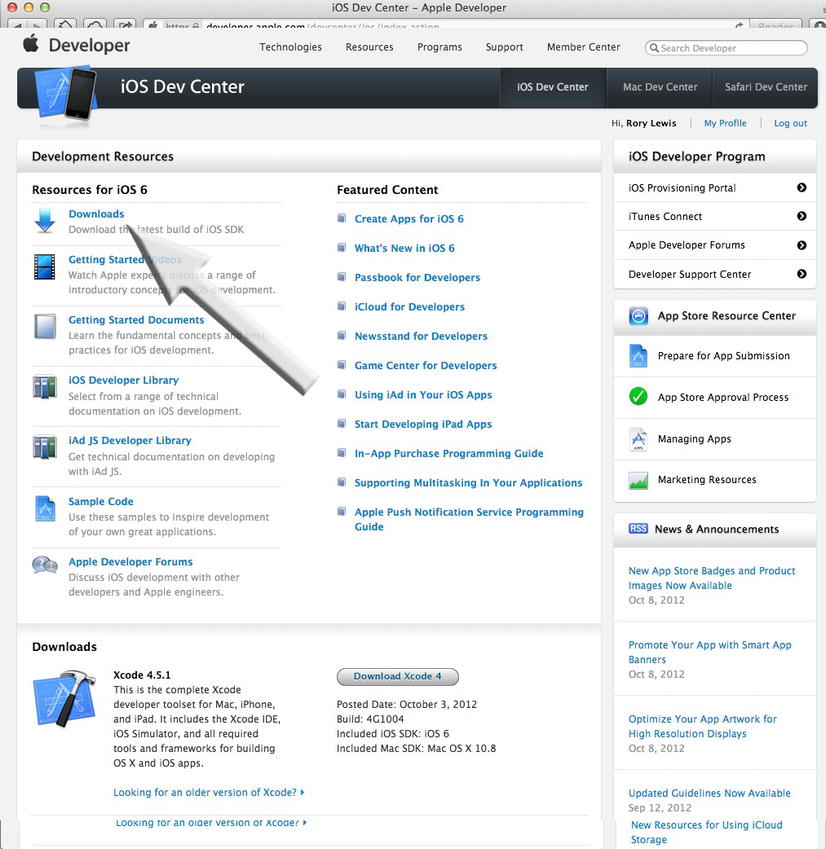
Figure 1-10. The Downloads link takes you to the bottom of the page
Note At the time of writing, Xcode 4.4 and iOS SDK 6 are the latest environments. By the time you read this book these may well have larger numbers. That’s not a problem—just go on to step 8. If by chance something has really thrown us a curve ball, it will be discussed and solved for you in our forum located at www.rorylewis.com/ipad_forum/ or http://bit.ly/oLVwpY.
- Click the latest version. The figures in this section show the latest version at the time of print. These will be different by the time you read this. Right now the latest complete version is Xcode 4.5.1 for Lion, so click the Download Xcode 4 button indicated by the arrow in Figure 1-11.
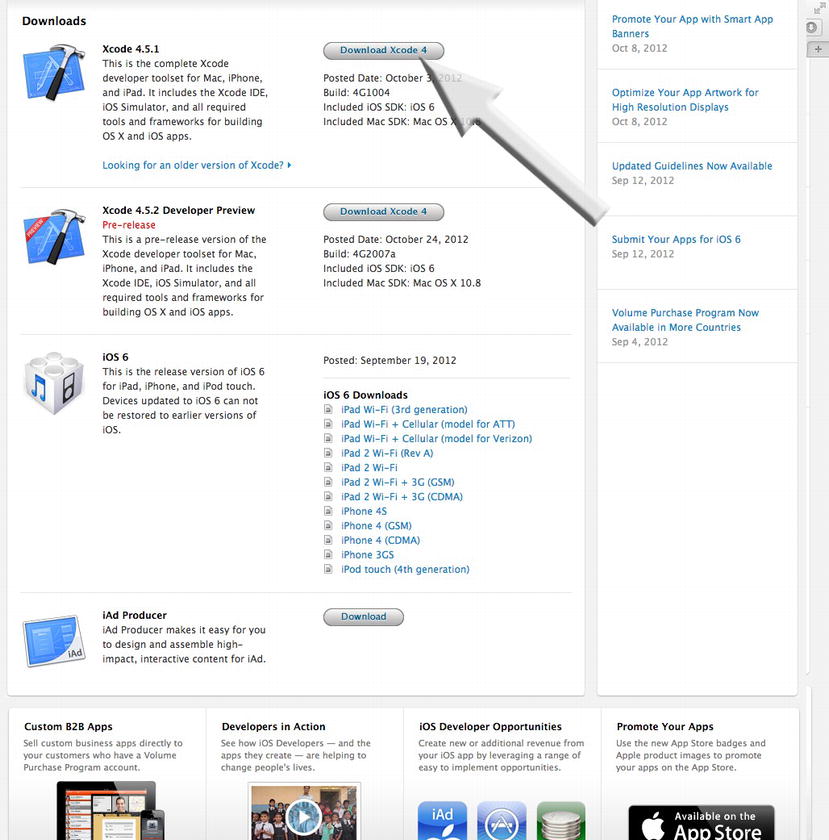
Figure 1-11. Clicking the Download Xcode 4 button takes you to the Xcode 4 Developer page
- Click the View in Mac App Store button. Remember that if it’s a later version than shown in Figure 1-12, things may look slightly different, but I have confidence in you.
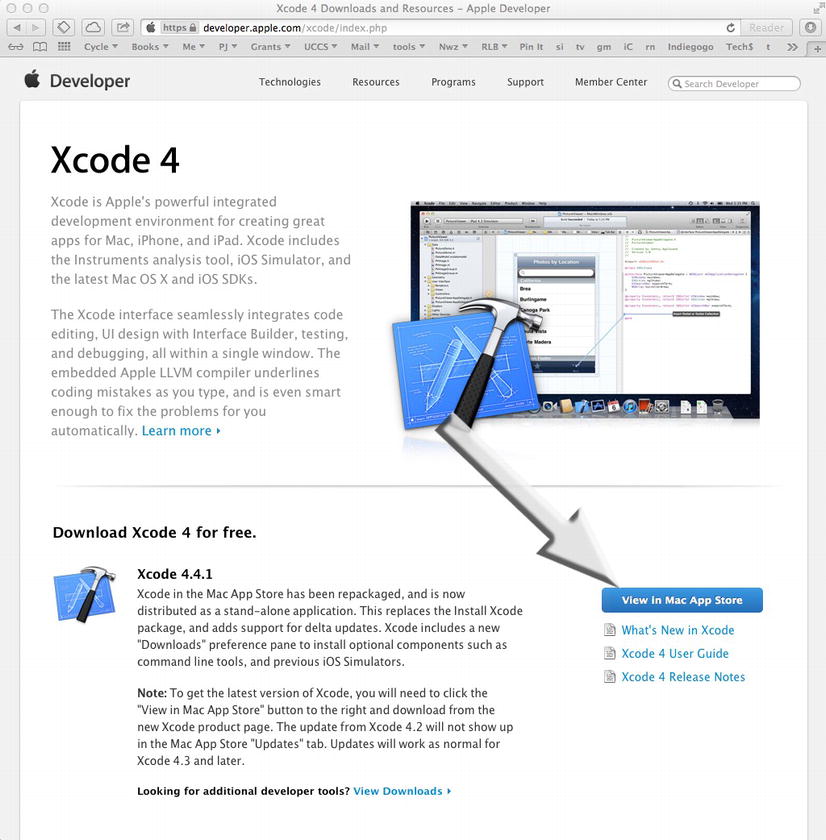
Figure 1-12. Click the View in Mac App Store button
- Click the Install button, as shown in Figure 1-13. As the download continues, the Install button changes to say “Installing.” When the download has finished, it changes to “Installed.” Included with Xcode’s iOS SDK is Apple’s Integrated Development Environment (IDE). This is the programming platform that contains a suite of tools, sub-applications, and boilerplate code that enable programmers to do their jobs more easily.
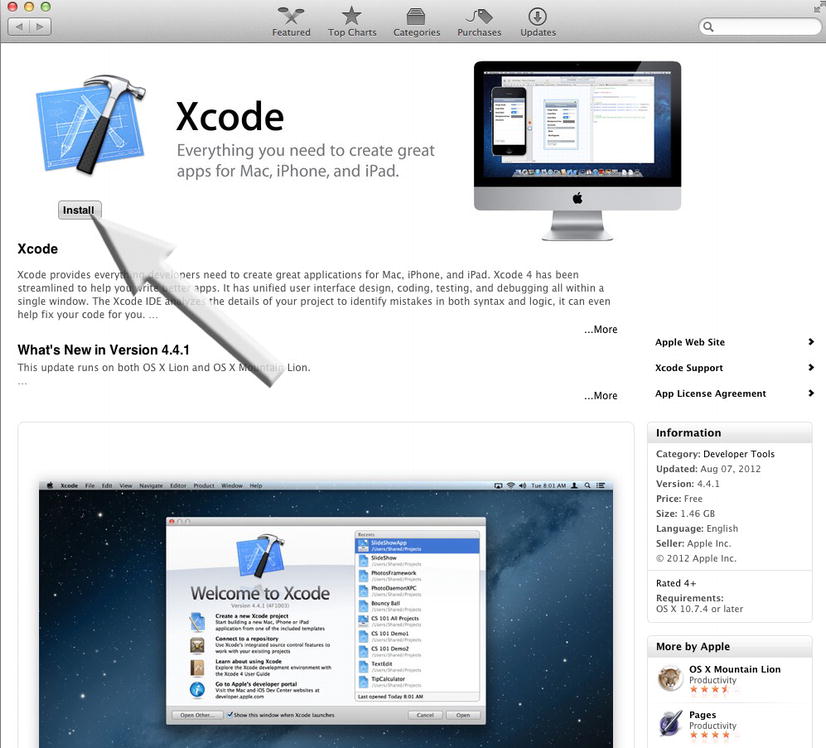
Figure 1-13. Click Install and wait for the download to complete
With your Xcode and iPhone/iPad Simulator tools installed and ready to access easily, you’re almost ready to roll.
ABOUT DEMOMONKEY
Before you load the final tool—called DemoMonkey—let’s step back and have a look at where you’re going.
Through the years I’ve found that the most efficient way to teach students code is to take what I call the subsystem approach, teaching which pieces or sections of code will serve you in which situations. In this book I use a cool program you may have seen if you watched the latest WWDC: DemoMonkey. Essentially, in DemoMonkey you drag a heading explaining what needs to be done from the DemoMonkey palette. As you drop it into your code at the appropriate section of your Xcode file, it magically transforms into code that the author of the DemoMonkey file wrote. Before you can download and compile the Xcode project that creates DemoMonkey, you need to make sure Xcode works. So in the next section you first run a simple app to make sure all is in order in Xcode land.
Getting Ready for Your First iPhone/iPad Project
Before starting on your first app, you need to make sure that everything runs. Assuming you’ve already downloaded and installed Xcode, open it up:
- Press Command + Shift + N (
 N) simultaneously to open a new window that showcases the different types of project templates in the land of Xcode.
 - Figure 1-14 displays the project templates: Master-Detail Application, OpenGL Game, Page-Based Application, Single View Application, Tabbed Application, Utility Application, and Empty Application. Click Single View Application, as shown in Figure 1-14, and then click Next.
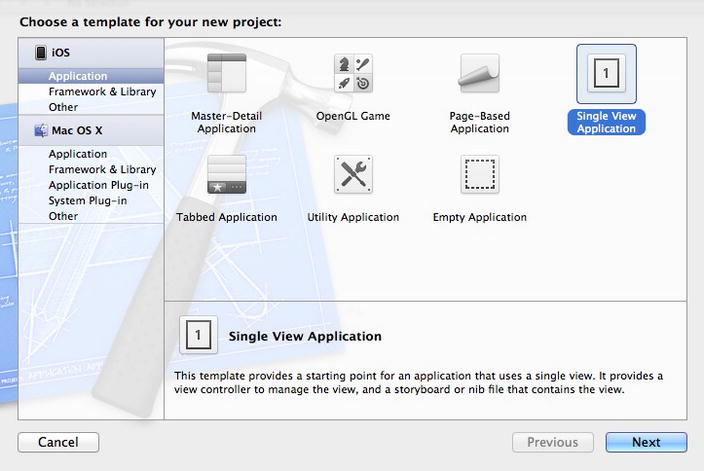
Figure 1-14. Select the Single View Application and then click Next
- On your screen you should see something very similar to Figure 1-15. First call your project test as indicated by arrow 1. Choose iPhone (arrow 2) and then click Next (arrow 3).

Figure 1-15. Let’s go for a test drive
Note This test doesn’t use Storyboards. I just want you to see that Xcode builds a simple app. So keep everything unchecked—yes, including “Use Storyboard”—for now (as shown in Figure 1-15).
- Figure 1-16 shows that you want to run your blank app. Click the “go” button, as indicated by the arrow.
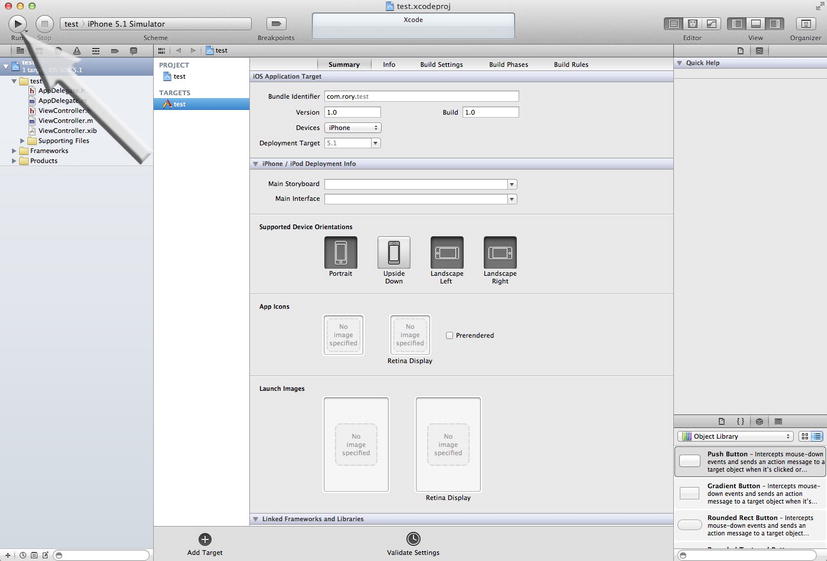
Figure 1-16. The initial Integrated Development Environment (IDE)
- The iPhone Simulator pops up, as shown in Figure 1-17.
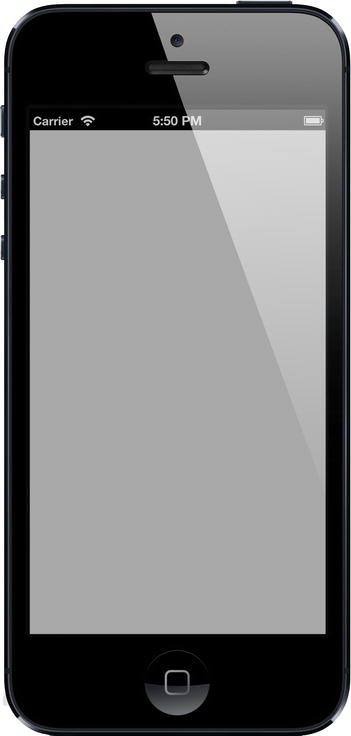
Figure 1-17. Your first test drive
Congratulations! You’ve loaded Xcode and have taken it for a test drive. Now let’s get DemoMonkey running and start your first app.
Installing DemoMonkey
DemoMonkey is an optional tool intended to help you follow along with the book’s projects. You only need it if you choose to use our .demoMonkey files for each chapter, which will allow you to drag and drop ready-to-use code snippets into the Xcode for most of the steps. If you don’t want to do that, you can still type the code yourself, and if you choose not to use DemoMonkey for this book, you can skip the rest of this chapter.
DemoMonkey will make life easier for you by letting you focus more on the code you’re using—but you’ll still be challenged in this book. That’s simply part of my pedagogy. The issue is really how to handle things when you get challenged.
Note When you find yourself in a tough spot, you can always reread the section, rewind the video examples, or—most importantly—visit the forum where you’ll often find many people, including me, online and ready to help you immediately. We may refer you to somebody else’s solution or we may help you directly. So go to the forum, say hello to the crowd, and become immersed by first seeking help from others and then going back to help others. The forum is at www.rorylewis.com/ipad_forum/ or http://bit.ly/oLVwpY .
With your Xcode running and building apps, you can now install DemoMonkey:
- Apple provides DemoMonkey as an OS X sample code project that’s available for download to anyone. Go to http://developer.apple.com/library/mac/#samplecode/DemoMonkey/Introduction/Intro.html or http://bit.ly/v3BuKI, as shown in Figure 1-18. Click Download Sample Code, as indicated by the arrow, and save the zip file into a desired location on your machine.
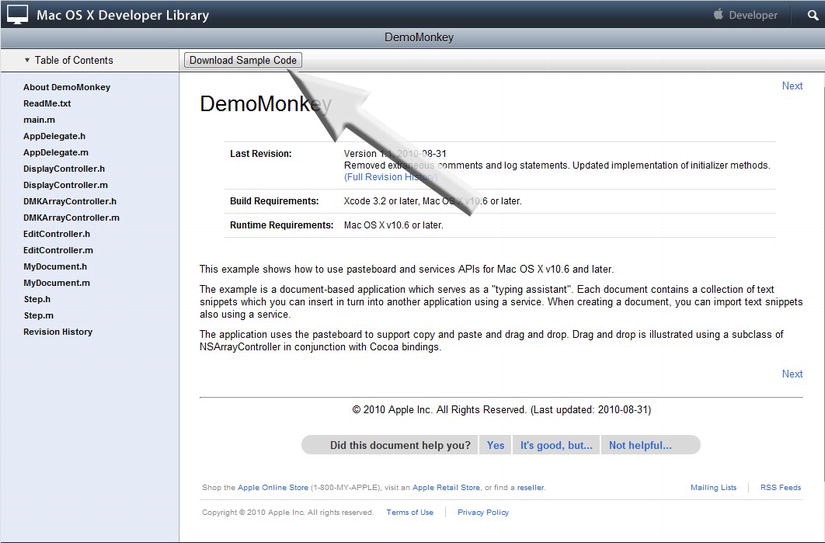
Figure 1-18. Download Sample Code
- Unzip the zip file by double-clicking it, open the folder, and then double-click the DemoMonkey.xcodeproj file, as indicated by the arrow in Figure 1-19. Once the Xcode project is open, press Command + B (
 B) simultaneously to compile the project.
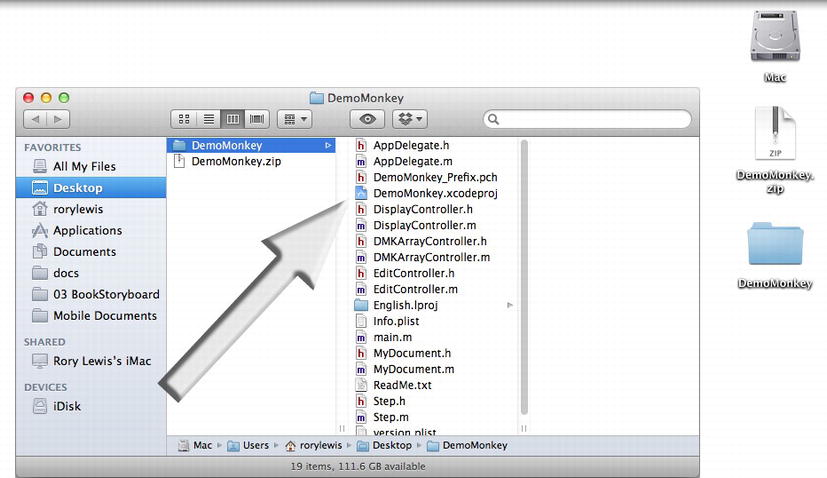
Figure 1-19. Open the DemoMonkey Xcode project inside your DemoMonkey folder
- After the “Build Succeeded” message shows up, expand the Project Navigator, right-click the DemoMonkey.app icon, and then choose Show in Finder from the context menu, as shown in Figure 1-20.
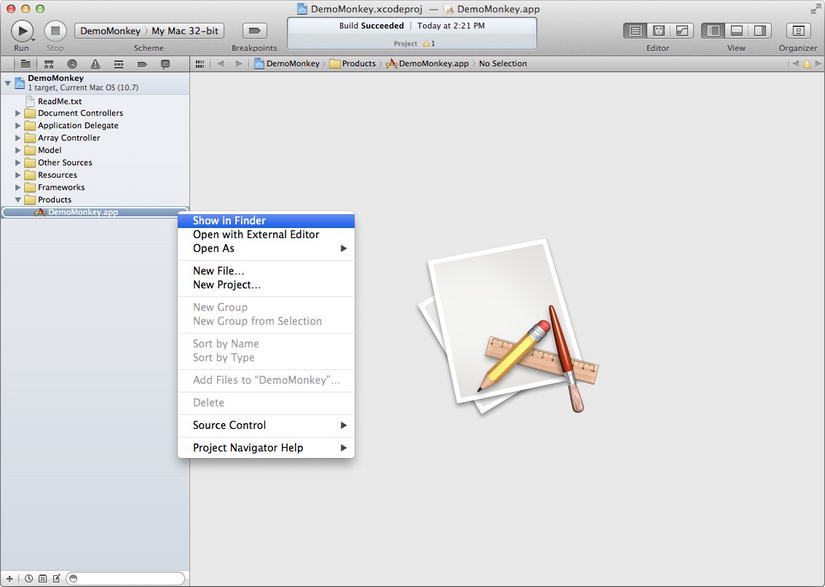
Figure 1-20. Expand the Project Navigator and choose Show in Finder from the context menu
- Lastly, once the Finder opens the folder containing the application you just built, drag the DemoMonkey.app to your Applications folder, as shown in Figure 1-21.
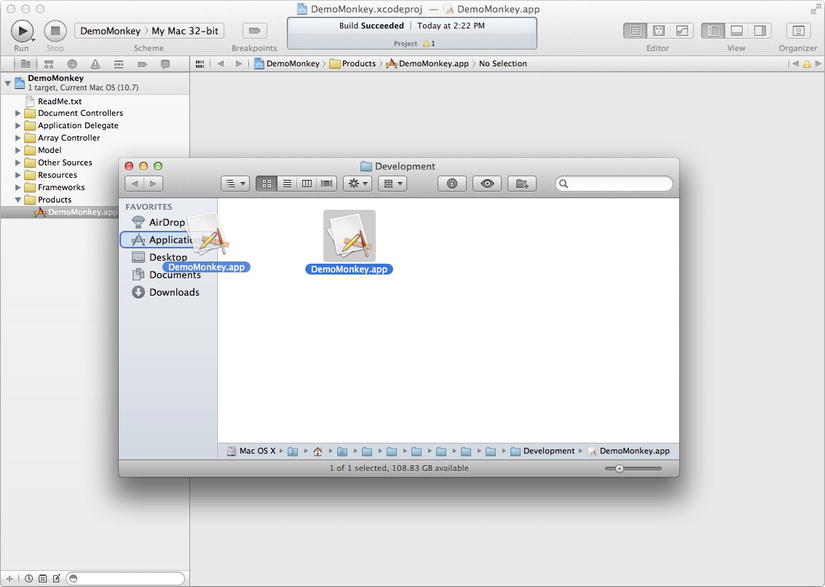
Figure 1-21. Drag the DemoMonkey.app to your Applications folder
Note If for some reason you were unable to reproduce the steps in this section, you can download a compiled DemoMonkey.app from my site using this link: http://bit.ly/RpCtFj. Then simply drag it to your Applications folder.
You’re ready to roll now!