Blast-Off!
The first program you’ll attempt is a basic, generic Hello World app. This chapter follows precisely the method I have found, through experience, to work very well when teaching this subject. I use this simple Hello World app to introduce students to critical skill sets they’ll use over and over again. As is the case with my own students, by the time you finish this chapter, you’ll know how to run your first app in the three different ways described in this chapter:
These three ways of running apps are critical because these are the most common ways that programmers in the real world code Xcode. Your first adventure with this new set of tools will be saying “Hello” to the world from the Single View Application template in Xcode.
Note Besides the information I present here in this book, including screenshots, I also offer screencasts of me going through each of the examples in this book. Downloading those will help you get through this book, as will lecture notes, third-party resources, and pertinent YouTube videos—all of which can be accessed by clicking the blue iOS 6 icon on the top bar at www.rorylewis.com.
Running your App on the iPhone Simulator
In this first example, you’re going to click a button, and text will appear above it that says “Hello World!”
- 1. Before opening Xcode, first close all open programs so you’ll be able to optimize your processing capabilities and focus your undivided attention on this new material. Press
 +Tab and then
  +Q to close everything. Only the Finder should remain on your screen. Find and click the Xcode icon in your Dock to open it. The “Welcome to Xcode” screen appears, as mentioned in Chapter 1. See Figure 2-1.
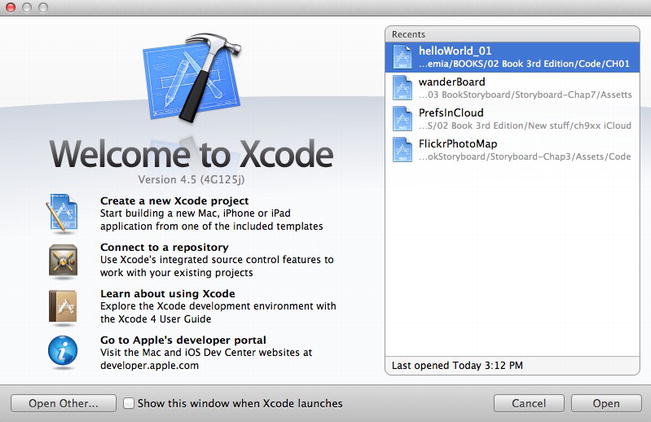
Figure 2-1. Click the Xcode icon in your Dock to open it. You’ll see the “Welcome to Xcode” screen
- 2. Open a new project in Xcode using either keyboard shortcuts or a mouse. I strongly suggest using keyboard shortcuts to save time and because the best way to not get work as an app developer is to use your mouse for functions that can be done with shortcuts. Press
 to open a new project. (If you were using your mouse to open a new project, you would choose “Create a new Xcode project.”) Select Single View Application (see arrow 1 in Figure 2-2). Name it helloWorld_01 in the Product Name field, enter your name in the Organization Name field, and for the Company Identifier enter com.[your first name here]. Leave the Class Prefix field alone, select iPhone as your Device if it has not been selected by default, and uncheck the Use Storyboards, Use Automatic References, and Include Unit Tests selection buttons. Press Return or click Next as depicted by arrow 2 in Figure 2-2.

Figure 2-2. Name the project helloWorld_01 and use your name or company name for the Company Identifier. For Device, select iPhone
Note My Single View Application template icon was highlighted by default; yours may not be. Regardless, click it and save the new project to your desktop as helloWorld_01.
- 3. As soon as you save this project to your desktop, Xcode instantiates the helloWorld_01 project environment, as indicated by the name on the top of the window (see Figure 2-3). If this looks a bit scary, stay cool… don’t freak out! This is Apple’s way of arranging all the goodies that you’ll eventually use to write complex apps. For now, just follow along and try to set aside all the questions you may be asking. Xcode has created six files:

Figure 2-3. Click helloWorld_01ViewController.xib to open the Interface Builder
- Two classes containing two files each: A header file (.h) and an implementation file (.m). Two of them end in Appdelegate, and two of them start with ViewController. I’ll get back to this later. Right now just know this: Each class is comprised of two files—a header file and an implementation file.
- Two nib files(.xib): nib stands for NeXT Interface Builder, used for interface files on Steve Job’s NeXT computer before he came back to Apple. xib stands for Mac OS X Interface Builder, but both are pronounced “nib” for the most part and are used interchangeably.
As shown in Figure 2-3, double-click ViewController.xibto open the file, located in the manila-colored helloWorld_01 folder inside the blue Xcode folder at the top of the Navigator area of the Xcode environment.
Note There is a slight possibility that your Navigation pane, which bears the folders seen in Figure 2-3, is closed. This is not a problem. To open your Utility area, go to the upper left of the workspace window, which includes inspectors and libraries. Use the View Selector in the toolbar to open and close the Navigator, Debug, and Utility areas. You may also need to again select the black folder Project Navigator icon, located directly under the Run button—the Run button looks like the Play button in iTunes.
- 4. When you open your xib file, your workspace will appear, as shown in Figure 2-4. Note that if the shaded area on the right isn’t showing the Utility area, which includes inspectors and libraries, navigate to your View Selector (which contains three icons). Click the far right icon, called the Utilities icon (see arrow 1 in Figure 2-4) and then click the Object Library icon. You may also want to select the icon’s viewing option in your Library to view your objects (see arrow 2 in Figure 2-4)—doing so will make following along with me easier.
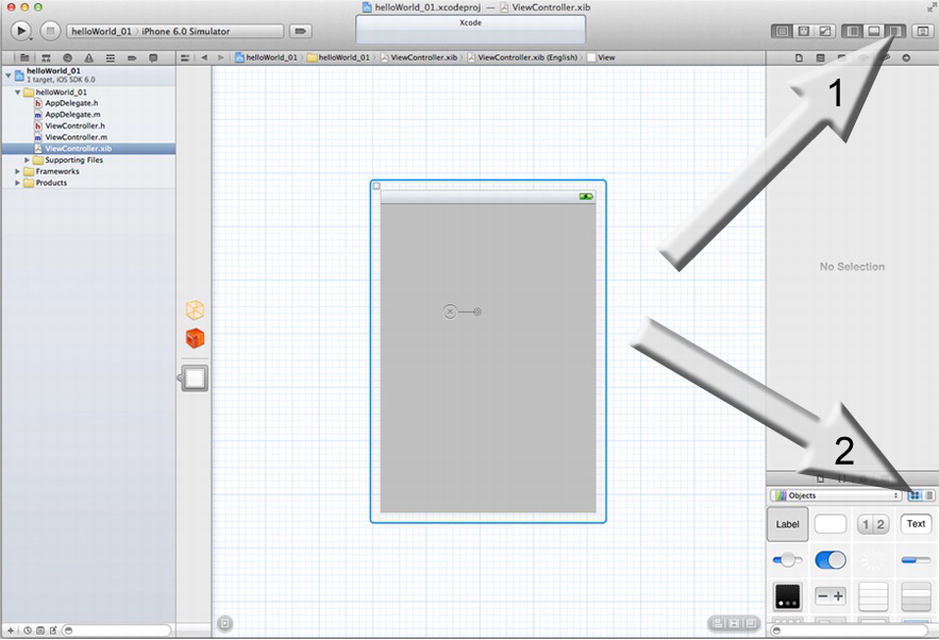
Figure 2-4. Your workspace
- 5. You now need to drag some goodies from the Library onto your canvas, which includes everything on the graph paper area. First, though, think about what you’re going to do. You’re going to click a button, and text will appear above it saying “Hello World!” Therefore, you need the button to click and a label that will contain the “Hello World!” text. Easy! First drag a label onto your canvas, as shown in Figure 2-5.
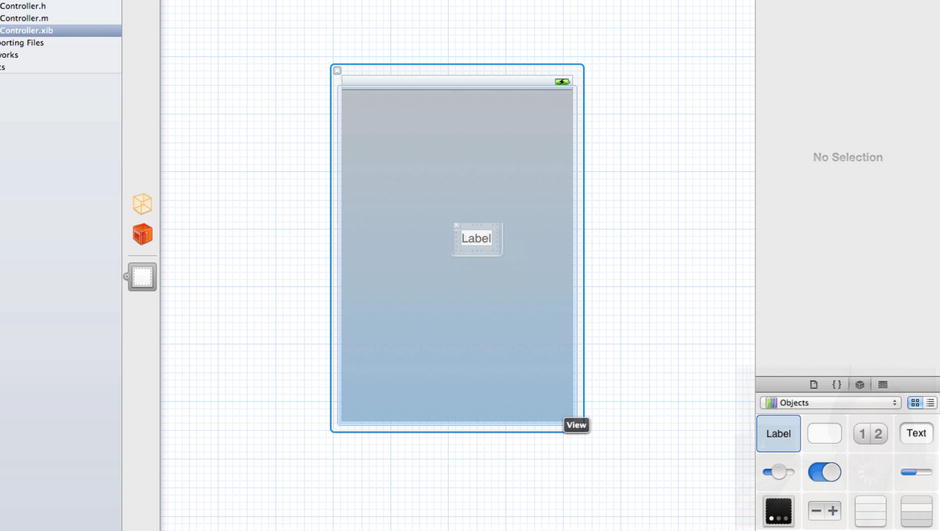
Figure 2-5. Drag a label onto your canvas
- 6. Move the label to a height that suits you and then move it horizontally until the blue center line appears. At this point, let it go, nicely centered in the middle of your canvas. This label will eventually contain the text “Hello World!” so drag the label’s side handle bars out to the right and left to make it a little larger, to about the size shown in Figure 2-6. In the Text box, delete the text label so that it’s blank as shown in Figure 2-7. Lastly, still looking at Figure 2-6, notice how the Alignment “centered text” icon is highlighted? Do the same and click it so that when your “Hello World!” text appears in the label, it’s nicely centered in the centered label. Beautiful. Now let’s move on to the button.

Figure 2-6. Center the label on your canvas. Delete its text and center its content
Note You’ll also see the Vertical Line Constraint just slightly to the right of the center line. That tells you the how close or far apart the distance relationships to the top and bottom of the canvas amongst other things are.
- 7. Drag out a button and place it below your text, moving it left to right until the center lines tell you it’s centered. Let it go, as shown in Figure 2-7. Double-click it and type Press Me! (see Figure 2-8).
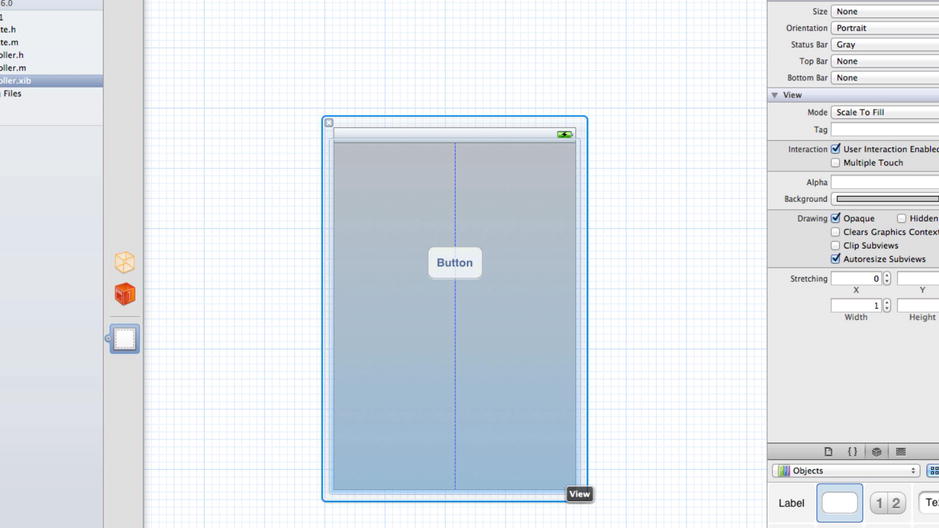
Figure 2-7. Drag a button onto the canvas
- 8. In View, select a color for the background, as shown in Figure 2-8. I selected light grey.
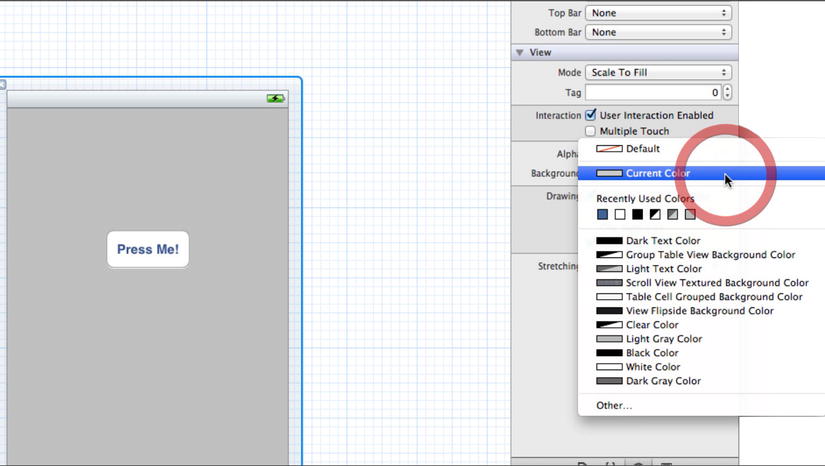
Figure 2-8. Choose a color for your background
- 9. You’re now finished loading your two items onto the canvas. Close the Object Library icon again by clicking it, as shown by arrow 1 in Figure 2-9. Save the file with the shortcut z +S. (This is the preferred method of saving, rather than using your mouse.) Now you need to open the Assistant in the Editor Selector, located to the left of the View Selector and indicated by arrow 2 in Figure 2-9.
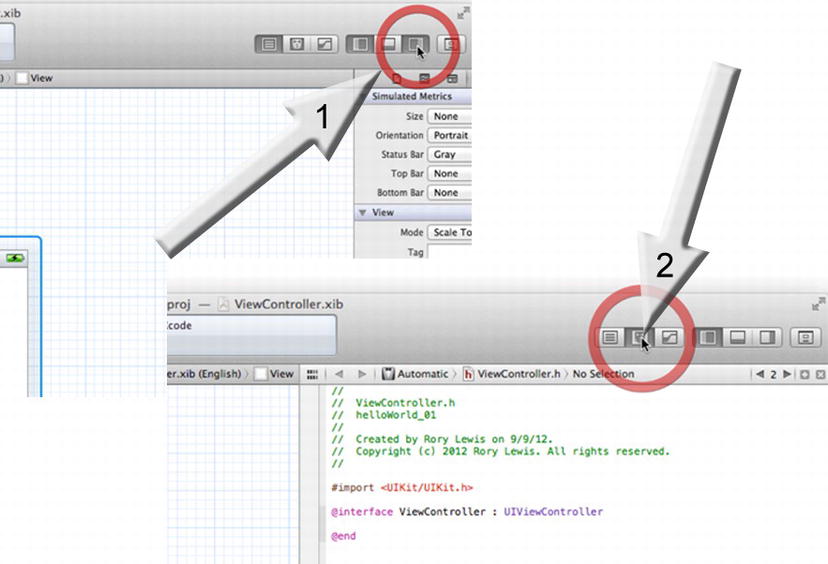
Figure 2-9. Close the Utilities folder, save your work, and open the Assistant
- 10. You’re going to be using something here called the Open URL contextual menu. You want to tell the label to print out text that says “Hello World!” when the button is pushed. We call these background commands “outlets”. In the past outlets had to be coded from scratch, but now the source code is conveniently placed to the right of the graphical builder. You can simply Control-drag (holding the Control key while dragging your mouse) connections from the graphical builder to your code. First, check that the code on the right is your header file—the green print at the top ends with .h (see Figure 2-11) as explained at the beginning of this chapter. Click the label on your canvas (it’s invisible because you took the text out, so you’ll need to poke around where you placed it) and Control-drag over from your label to any place under your @interface method, as shown in Figure 2-10. Once the black label appears saying Insert Outlet, release the mouse button.
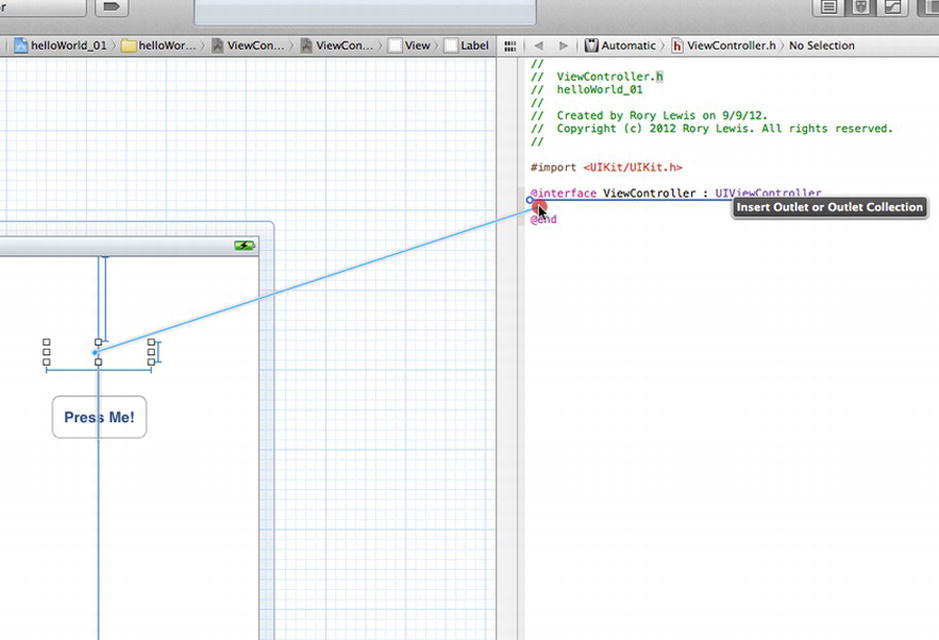
Figure 2-10. Control-drag from your label to create an outlet
Note The Assistant uses a split-pane editor, but note that you can open the Assistant automatically by Option-clicking a file in the Project Navigator or Symbol Navigator pane.
- 11. As mentioned in step 10, you want the Connection type to be Outlet (Apple figured this is what you probably need, so it appears by default). Don’t worry about Object and File’s Owner right now. You can name the label anything you like in the future, but for now name it label as in Figure 2-11, so your code will look the same as mine when you compare yours to my video, the images in this book, or the code you download from my web site. Don’t worry about UILabel for Type now either. Press Return, and the code @property (retain, nonatomic) IBOutlet UILabel *label; magically appears. You can see it highlighted here:
 #import <UIKit/UIKit.h>

 @interface helloWorld_01ViewController : UIViewController
 @property (retain, nonatomic) IBOutlet UILabel *label;
 @end
Figure 2-11. Make the IBOutlet a label – this automatically creates your Objective-C code
- 12. Now you need to place some code behind the button you dragged onto the canvas so it can do the action you want. In your case, you want the button to tell your label to do and say stuff. This is called declaring an action. For now, you just need to associate the button with action code; later you’ll define exactly what these actions will be. So, just as you did before with the label, click the button in your canvas and Control-drag over from it as shown in Figure 2-12. Once the black label appears saying Insert Outlet, Action . . . release the mouse button.
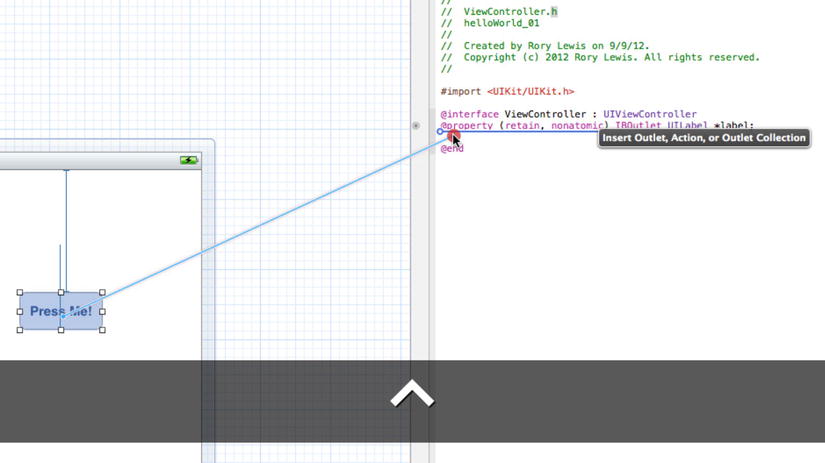
Figure 2-12. Control-drag from your button to create an action
- 13. Choose Action from the Connection drop-down menu. Again, don’t worry about Object and File’s Owner right now. Name it button and ignore everything else for now. This is illustrated in Figure 2-13.
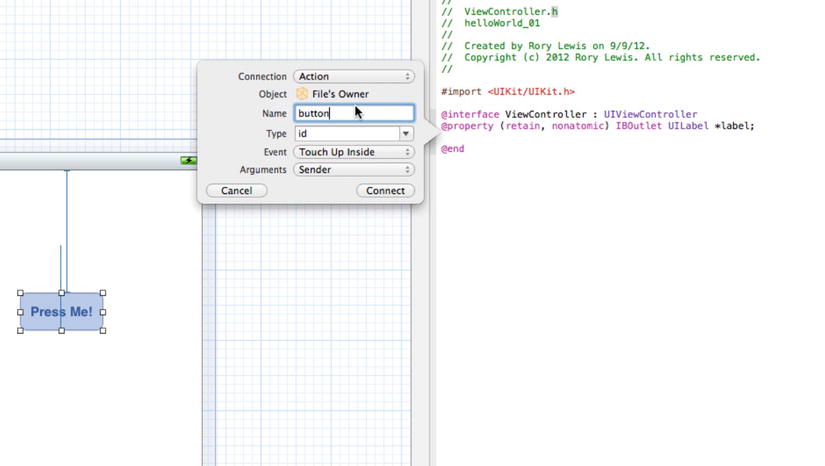
Figure 2-13. Create the action for your button
- 14. Press Return, and you’ll see -(IBAction)button: (id)sender; which appears as shown below. I discuss this further in the section “Digging the Code” at the end of this chapter.
#import <UIKit/UIKit.h>

@interface ViewController : UIViewController
@property (retain, nonatomic) IBOutlet UILabel *label;
- (IBAction)button:(id)sender;

@end
Before moving on to step 15, let’s look around and see where we’re at. Back in step 3, I said you have two classes that contain two files: a header file (.h) and an implementation file (.m). Let me talk a little bit about the difference between these two files.
The ViewController class manages the interactions your code has with the display, and it manages the user’s interactions with your code. It contains a view, but it’s not a view itself. You only have a minimal understanding of the ViewController class so far. What I want you to get, though, is that every class consists of two parts: the header (.h) file and the implementation (.m) file.
I want you to read this next part aloud, okay? We tell the computer in a header file what types of commands we will execute in the implementation file. Now, say it again in the context of your code: We tell the computer in the ViewController.h file what types of commands we will execute in the ViewController.m file.
Well, admit it—that wasn’t so bad! Let’s get back to the example.
- 15. To move on to the implementation file at this point, get into the habit of first switching views and going from the Assistant Editor to the Standard Editor. To do this, simply click the button immediately to the left of the Assistant Editor (remember arrow 2 in Figure 2-9). This is the Standard Editor.
- 16. Once in the Standard Editor, select your ViewController’s implementation file, as shown in Figure 2-14.
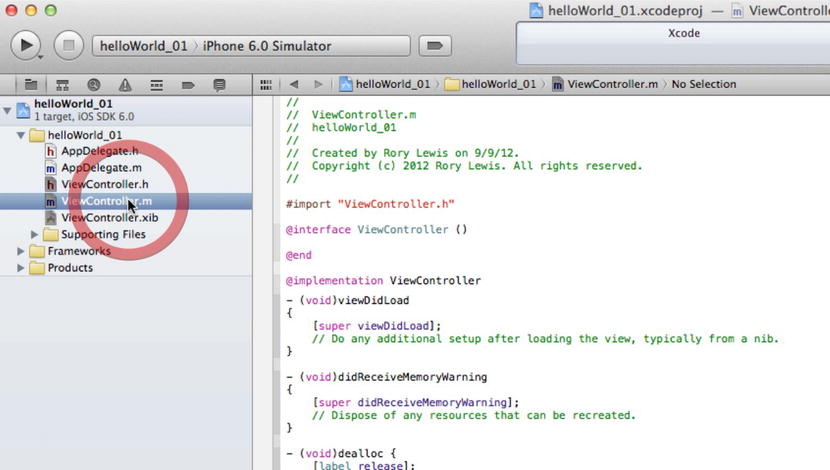
Figure 2-14. Open your helloWorld_01ViewController’s implementation file
Recall how in step 13 (Figure 2-13) you declared an action when you Control-dragged the button into your header file’s code? Remember that in the header file you declare actions, whereas in the implementation file you implement actions. Here in your ViewController’s implementation file, you’re going to implement the actions that you want to happen when somebody presses the button. Specifically, you want the label to say “Hello World!” How do you do that? Well, you need to type your very first code to start your journey toward geekdom. Yup, you’re going to code text. Take a deep breath and follow along.
Looking at the text of your ViewController’s implementation file, you can see that the clever people at Apple programmed Xcode to write a number of methods already that need to happen in the background just to get your app with label and buttons running on your iPhone. For now, I’ll ignore these methods. Just scroll down to the end until you get to one named - (IBAction)button:(id)sender. Hmm … wait a minute, that’s the code that appeared in step 14, right? Well, almost. That code ended with ; (semicolon) because in the header file, you declared this action. Xcode knows you now need to implement whatever actions you tell it to do inside the squiggly brackets. You need to remember this rule. You’ll use it over and over again.
Note A declaration in the .h file becomes a method in the .m file by replacing the colon with squiggly brackets.
After reaching the implementation of the action you declared in the header, I want you to place your cursor in between the two squiggly brackets, as indicated in the following code. Click there and read below.
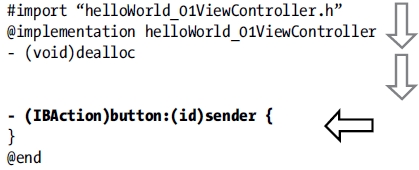
- 17. The code I want you to type is label.text = @"Hello World!". But it’s not that straightforward, because as you type, something really cool happens. Xcode figures out what you’re probably going to want to code in its autocompletion window, as illustrated in Figure 2-15. If you agree with the selection, press Tab, and Xcode places the completed, correctly typed and spelled command into your code. If the one it suggests is not the correct one, but you see the correct one a few commands down, just arrow down (↓) until you reach the correct selection and then press Tab. Cool, huh? After you’ve written label.text, continue on to step 18.
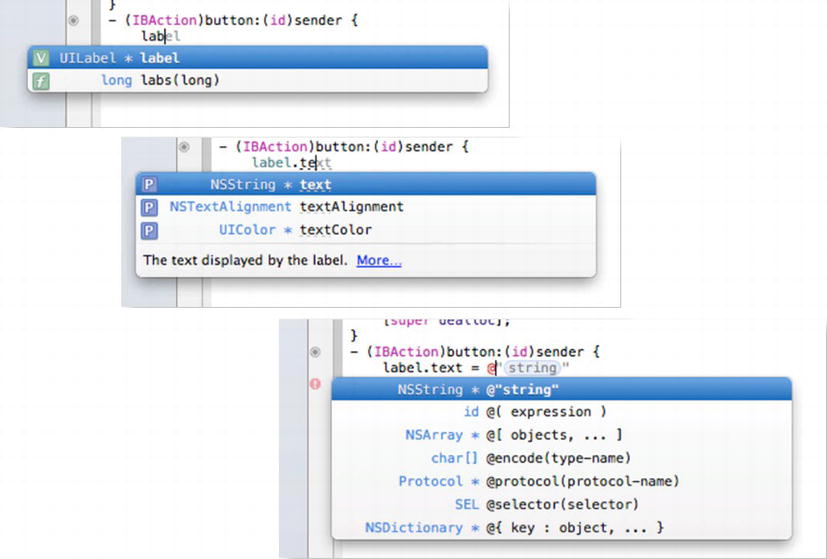
Figure 2-15. As you enter the text label.text, autocompletion suggests code. Type the text you want the label to say after the @ directive
- 18. Your code should look like that depicted in Figure 2-16. If you wanted to say I can feel I’m becoming a geek! instead, you’d type label.text = @"I can feel I'm becoming a geek!";. Save your work too (
 +S as shown in Figure 2-16). Please try not to use your mouse; try to use Command + S (
 +S) every time you save. You may also want to check that your header files and nib files are also saved because, during the course of reading these instructions, you may have had to go back and change files. Well, you need to go back and save them. So, go ahead and save everything now. If the file is highlighted in gray, it means you need to save it too.
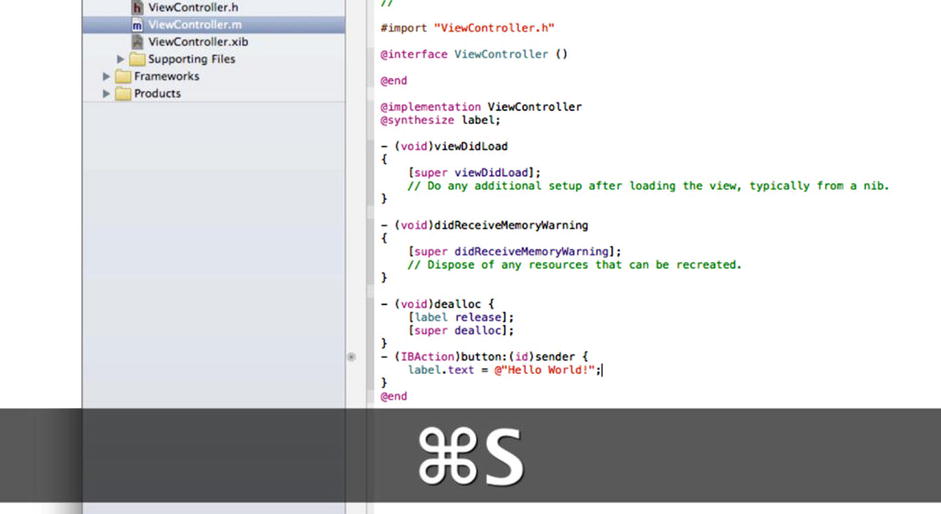
Figure 2-16. Save your work with
 +S
+S - 19. Ok! Let’s run it. Click on the run button as shown in Figure 2-17.
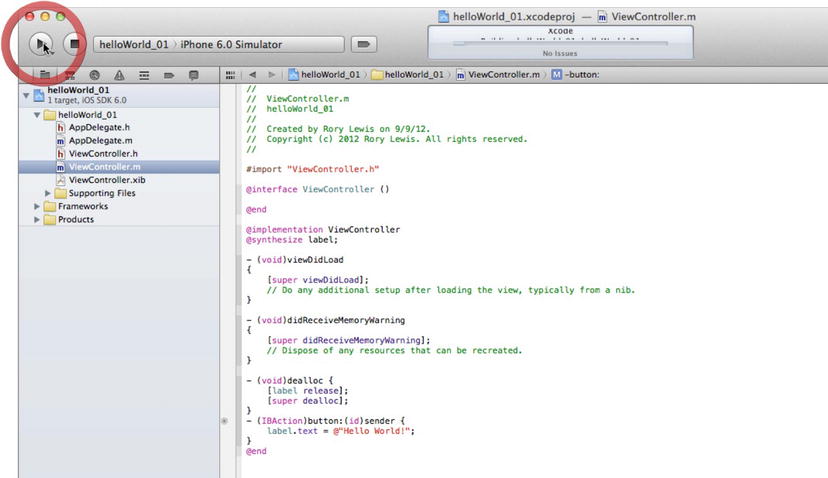
Figure 2-17. Run it with
 +R
+R
As Figure 2-18 shows, the iPhone Simulator loads your very first app, waits for you to press (click) the button, and then says “Hello World!”
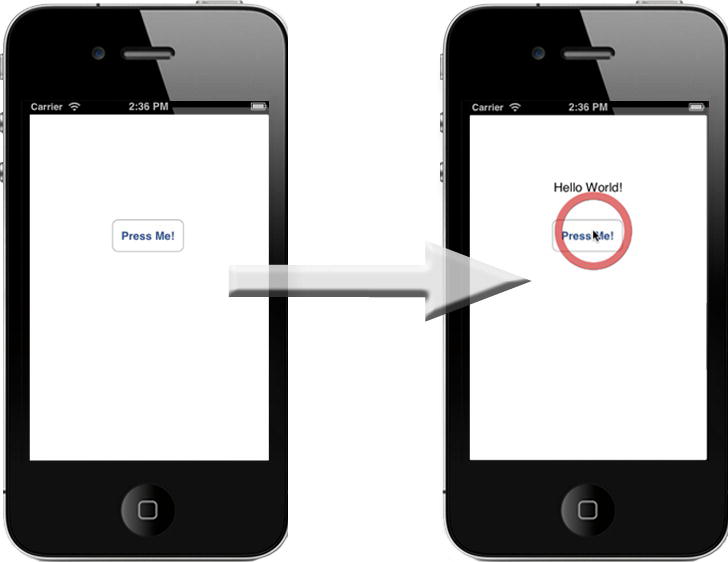
Figure 2-18. The iPhone Simulator is loaded and waiting for the user to press the button. Then it will say “Hello World!”
Congratulations, my friend! You’ve really done something very special today. You may have cursed me a couple of times or floundered here and there, but in getting here you’ve taken that very difficult leap from being a user of technology to being a coder of technology.
We still have a few things to do, so take a break. Walk the dog. Do something that doesn’t involve technology, even if it’s just taking a walk. Take a minute to realize that you’re beginning a long journey, one that will be difficult at times, but one wherein you can hold your head high and say, “Yeah, I code iPhone and iPad apps!”
Running Your iPhone App on the iPad Simulator
As you will see, apart from specifying that the app will be on an iPad rather than an iPhone, the app will be the exact same thing. But let’s go through it so you know that this is indeed the case.
- First, change the environment from the iOS Simulator. While still in the iPhone Simulator, click Hardware
 Device
  iPad so you can see how your first app would run if it were being run on an iPad (see Figure 2-19).
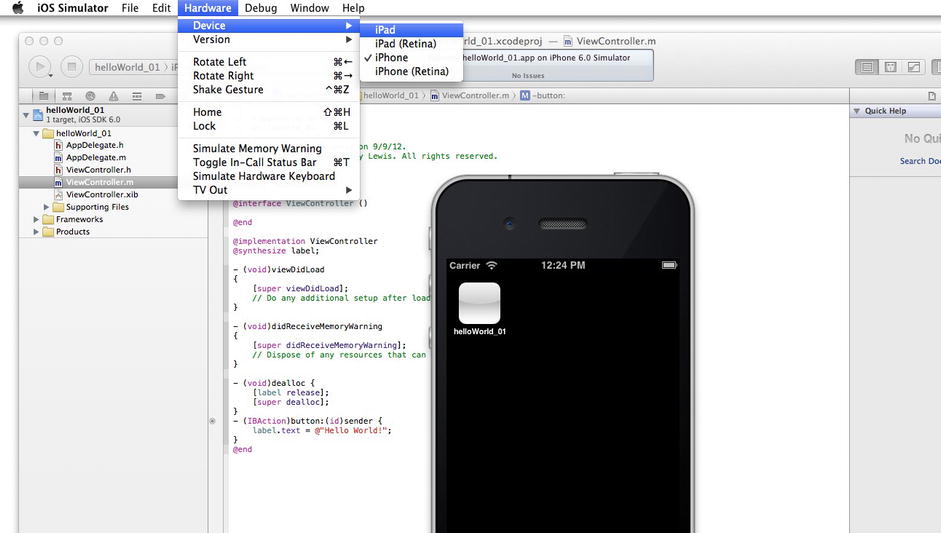
Figure 2-19. Let’s see how your iPhone app runs on the iPhone Simulator
- The result is the display shown in Figure 2-20. The Simulator may initially appear with the default screen, so click to the right of the highlighted middle dot.
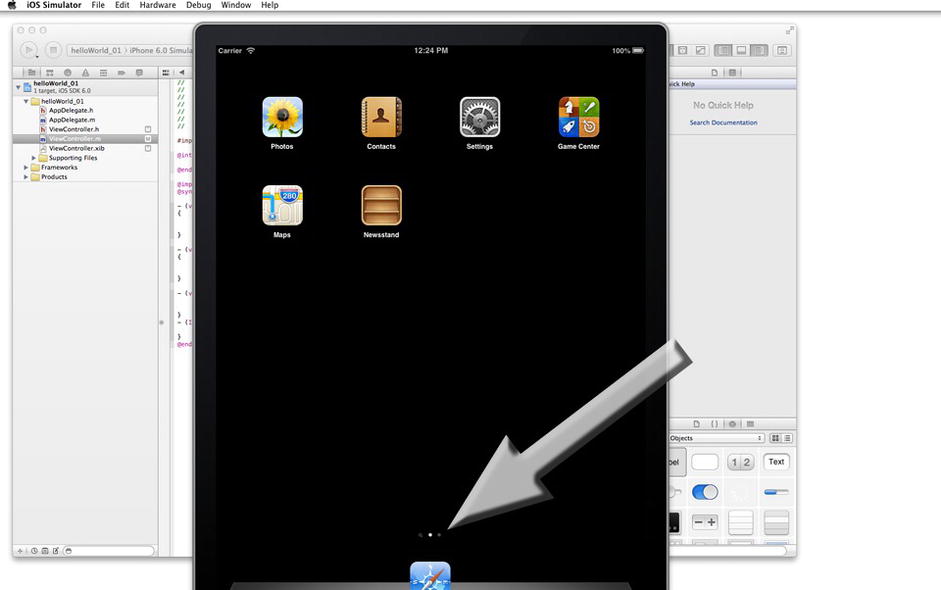
Figure 2-20. The initial screen of the iPad Simulator. If it initially it appears in default screen, click to the right of the highlighted middle dot
- Once it shifts to the screen that has the button for your app, double-click it, as shown by arrow 1 in Figure 2-21. Your app appears as a small iPhone-sized image as shown on the right. It can work like this, but go ahead and enlarge it to iPad size by clicking the zoom button, indicated by arrow 2 in Figure 2-21.
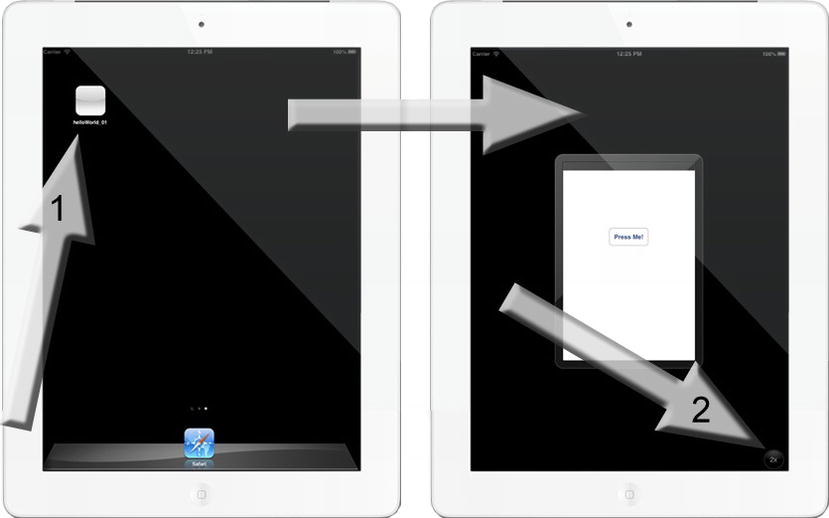
Figure 2-21. Click your app’s button and zoom it up with the zoom button
- Click on the Press Me! button you created, and you see it works (see Figure 2-22).
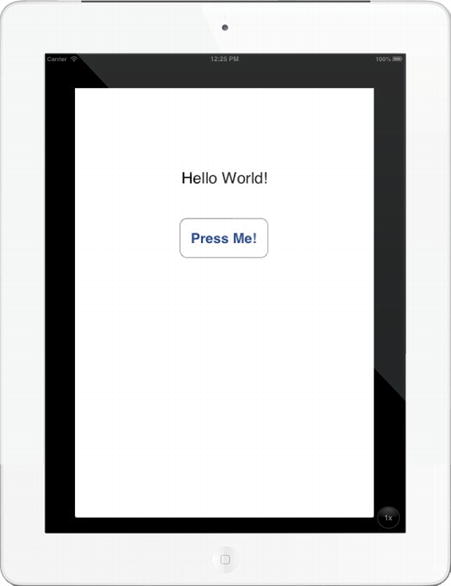
Figure 2-22. Click “Press Me!” It worked on the iPad
Running Your iPad App on the iPad Simulator
At the beginning of this chapter, I made a deal with you. I said you were going to make a very simple app and run it in three ways:
- iPhone app on iPhone Simulator
- iPhone app on iPad Simulator
- iPad app on iPad Simulator
You’ve already completed the first two. But it’s still not really an iPad app. If you look closely, you’ll see pixilation (jagged pixels)—what we often call pseudo iPad style. What you really want to do is program your app specifically for the iPad. A real iPad app is made specifically for the iPad and cannot be run on an iPhone. All the graphics and screen sizes are specifically designed for the iPad and are too large for the iPhone. So let’s go ahead and make an app specifically for the iPad.
- Close your helloWorld_01 app in Xcode by pressing
 +S to save it and then
  +Q to quit Xcode. You should now be looking at your empty desktop, except for the helloWorld_01 folder right under your Mac hard-drive icon. Good. You’re now going to run helloWorld_02, which will be exactly like helloWorld_01 except for a couple of steps.
 - Open Xcode and press z+Ò+N. Select View-Based App and then press Return. Now look at Figure 2-23: in Figure 2-2, you named it helloWorld_01. In Figure 2-23, you name it helloWorld_02. Most importantly, in Figure 2-23, you select iPad, not iPhone as you did in Figure 2-2 (that’s why it is selected by default in Figure 2-23). Once you have changed it to iPad, I want you to try remember all the steps you performed in helloWorld_01 and implement them on the iPad.
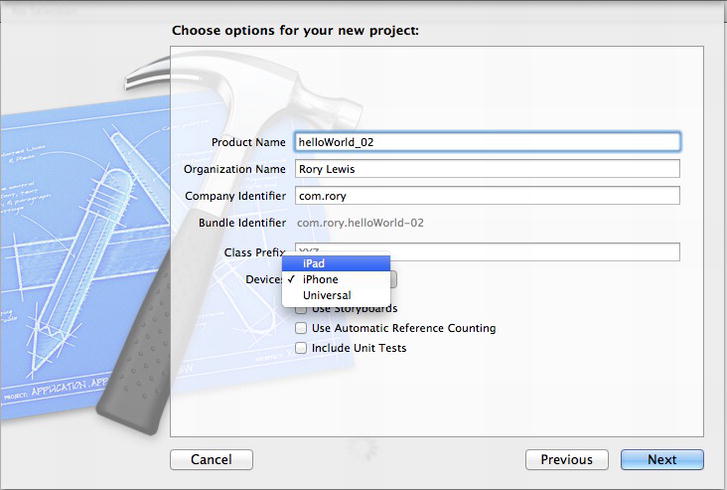
Figure 2-23. Open Xcode, select the View-based Application template, and then save a new project file to your desktop
Huh? Yes, that’s what I said. I make my students in the lecture hall redo helloWorld all over again, but now as an iPad app, and I encourage them to try not to peek at their lecture notes. I want them to try doing it on their own. If you need to refer back to earlier steps in this chapter, that’s okay—but then do it again and again until you can do it by memory. Students usually need to do it between three and six times before they can repeat it identically without referencing notes.
Note You may have noticed the Universal option in the drop-down menu in Figure 2-23. Universal allows you to code for the iPhone and the iPad at the same time. When run by your user, the app adapts the screen size to the current device. You’ll use Universal later in the book, but you can experiment with it now.
Now that you’ve created your new apps, you need to do a few organizational chores. Right now, on your beautiful clean open desktop, you only have two folders containing your two helloWorld programs. You need to make a place to store all your programs that will make sense to you as you continue to read this book. Create a subfolder in your Documents folder called My Programs and then save the files helloWorld_01 and helloWorld_02 there by dragging them to that folder. Now, with a fresh, clean, empty desktop, close all programs. Press z+Tab and then z+Q to close everything until only the Finder is left on your screen.
At the ends of chapters, I include this section called “Digging the Code,” wherein I start feeding you insights into the meaning of much of the code that miraculously appeared or that I instructed you to type. What I’ve found, though, is that the human brain makes its own associations if it keeps on doing something over and over again, and certain outcomes occur each time we repeat that action. I’ve found that if I first allow students to fly through huge amounts of code in sheer ignorant bliss, it does a great deal of good because it allows their brains to make connections that only they can make. So here in “Digging the Code” I start feeding you little snippets, just the right ones that connect the dots as to why you put this code here or that code there. Later, as you approach the end of the book, you’ll feel totally comfortable really digging the code and getting into it. For now, take a deep breath, relish the fact that you coded an app in the fundamental ways necessary for iPhone and iPad apps, and I’ll see you in Chapter 3.
Good job!
