
We will start by examining the existing scripts. Navigate to Administration | Scripts:

The same three scripts we saw in the menu can be seen here. Let's see what they do:
- Detect operating system: This script calls nmap and relies on sudo
- Ping: Uses the ping utility, and pings the host three times
- Traceroute: Calls the traceroute utility against the host
These three scripts are all executed on the Zabbix server, so they should work for any host, a server with a Zabbix agent, a switch, a storage device, and so on.
We will discuss other options in a moment, but for now, let's see whether all of these scripts work. Ping should work for most people. Traceroute will require the traceroute utility to be installed. As for operating system detection, it is unlikely to work for you out of the box. Let's try and make that one work.
Start by making sure that nmap is installed on the Zabbix server. As the script uses sudo, edit /etc/sudoers.d./zabbix (or use visudo) and add a line like this:
zabbix ALL=NOPASSWD: /usr/bin/nmap
Adapt the nmap path if necessary. Similar to restarting the Apache web server, you might have to uncomment the requiretty option in /etc/sudoers. Again, all of these changes have to be executed on the Zabbix server. When finished, run the operating system detection script from the menu, using one of the locations mentioned earlier:
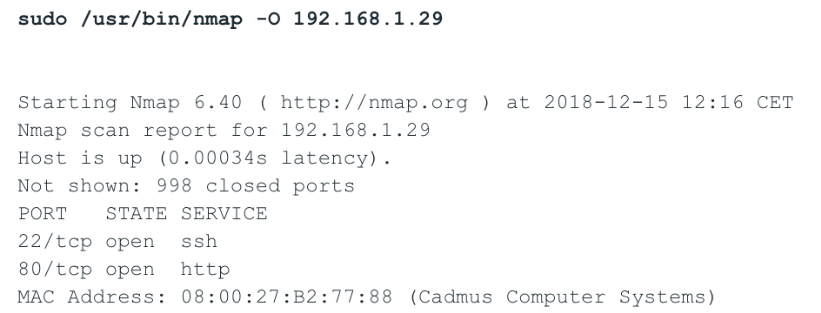
Hooray, that worked! The nmap command took some time to run. When running global scripts on the agent, they obey the same timeout as the remote commands we discussed earlier in this chapter. This script was run on the server. In this case, there's a 60-second timeout in the frontend.
Now, on to examining other script options, and also configuring some scripts of our own. When there's a problem on a system, it might be resource starvation. We might want to find out which processes on a system are stressing the CPU the most.
Navigate back to Administration | Scripts and click on Create script. For our first script, fill in the following:
- Name: Top CPU using processes
- Commands: top -n 1 -b | grep -A 10 "^[ ]*PID"
In our case, we will leave the other options as is. Here is a short overview of all the options:
| Column | Description |
| Type | Click the button to select a type script or IPMI |
| Execute on |
|
| Commands | Enter the full path to the commands to be executed within the script. The following macros are supported in the commands—{HOST.CONN}, {HOST.IP}, {HOST.DNS}, {HOST.HOST}, and {HOST.NAME}. If a macro may resolve to a value with spaces (for example, hostname), don't forget to quote as needed. Since Zabbix 2.2, user macros are supported in script commands. |
| Description | Enter a description for the script. |
| User group | Select the user group that the script will be available to (or All for all user groups). |
| Host group | Select the host group that the script will be available for (or All for all host groups). |
| Required host permissions | Select the permission level for the host group—Read or Write. Only users with the required permission level will have access to executing the script. |
| Enable confirmation | Mark the checkbox to display a confirmation message before executing the script. This feature might be especially useful with potentially dangerous operations (such as a reboot script) or ones that might take a long time. |
| Confirmation text | Enter a custom confirmation text for the confirmation popup enabled with the preceding checkbox (for example, Remote system will be rebooted. Are you sure?). To see how the text will appear, click on Test confirmation next to the field. Since Zabbix 2.2, the confirmation text will expand hostname macros—{HOST.HOST}, and {HOST.NAME}, host connection macros—{HOST.IP}, {HOST.DNS}, and {HOST.CONN}, and user macros. The macros will not be expanded when testing the confirmation message. |
When done, click on Add. For the top command, we told it to only print the process list and to do so once only. Then, we grabbed the header line and the next 10 lines after it – assuming the header line starts with any amount of spaces and a PID string.
Navigate to Monitoring | Problems, click on Another host in the Host column, and then choose Top CPU using processes.
You may use any other location where this context menu is available. We listed these locations earlier:

In this specific case, the systemd process is using most of the CPU. The Zabbix agent, which is running on this system, is not even in the top 10 here. Well, to be fair, on this system, nothing much is happening anyway. All of the processes are reported to be using no CPU at all.
Other similar diagnostic commands might show some package details, Media Access Control (MAC) addresses, or any other information that's easily obtained from standard utilities. Note that getting a list of processes that use the most memory is not possible with top on most operating systems or distributions; the ps command will probably have to be used. The following code might provide a useful list of the top 10 memory-using processes:
ps auxw --sort -rss | head -n 11
We are grabbing the top 11 lines here because that also includes the header.
Now, let's configure another script, one that will allow us to reboot the target system. Navigate to Administration | Scripts and click on Create script. Fill in the following:
- Name: Management/Reboot.
- Commands: reboot.
- User group: This command is a bit riskier, so we will limit its use to administrative users only; choose Zabbix administrators.
- Host group: As this would not work on SNMP devices, it would not make sense to make it show up for hosts other than Linux systems here; choose Selected and start typing Linux in the text field. Choose Linux servers in the drop-down.
- Required host permissions: We wouldn't want users with read-only access to be able to reboot hosts, so choose Write.
- Enable confirmation: This is a potentially destructive action, so mark this checkbox.
- Confirmation text: With the previous checkbox marked, we may fill in this field. Type Reboot this system?.
We may also test what this confirmation message will look like; click on Test confirmation:

While the Execute button is disabled right now, we can see that this would look fairly understandable. Click on Cancel in the confirmation dialog. The final result should look like the following. If it does, click on the Add button at the bottom:

Now, let's see what this script would look like in the menu. Navigate to Monitoring | Problems and click on Another host in the Host column. In the pop-up menu, move the mouse cursor over Management:

Notice how the syntax we used created a submenu; the slash is used as a separator. We could group Ping, Traceroute, and Top CPU using processes as Diagnostics, add more entries in the Management section, and create a useful toolset. Note that we can also use zabbix_get on the server here and poll individual items that we might not want to monitor constantly. Entries can be nested this way as many times as needed, but beware of creating too many levels. Such mouseover menus are hard to use beyond the first few levels, as it is too easy to make a wrong move and suddenly, all the submenus are closed.
Regarding the Reboot entry, if it seemed a bit risky to add, fear not—it does not work anyway. First, we had to use sudo for it in the command. Second, we had to configure sudoers to actually allow the running of that command by the zabbix user.