In this section, we will cover the following topics:
- Basics of Desired State Configuration
- Parsing structured objects using PowerShell
- Exploring Package Management
- Exploring PowerShellGet
- Exploring other enhanced features
Windows PowerShell 5.0 has many significant benefits; to know more about them, refer to the following link:
http://go.microsoft.com/fwlink/?LinkID=512808
Here are a few highlights of Windows PowerShell 5.0:
- Improved usability
- Backward compatibility
Classandenumkeywords are introduced- Parsing structured objects is easy using the
ConvertFrom-Stringcommand - We have a few new modules introduced in Windows PowerShell 5.0, such as
Archive,Package Management(formerly known asOneGet), and so on - ISE supports transcriptions
- Using
PowerShellGet, we can find, install, and publish modules - Debugging at runspace is possible using the
Microsoft.PowerShell.Utilitymodule
Desired State Configuration, also known as DSC, is a new management platform in Windows PowerShell. Using DSC, we can deploy and manage the configuration data for software servicing and can also manage the environment. DSC can be used to streamline a datacenter. This was introduced along with Windows Management Framework 4.0 and was heavily extended in Windows Management Framework 5.0.
Here are a few highlights of DSC in the April 2015 Preview:
- New cmdlets are introduced in WMF 5.0
- A few of the DSC commands are updated, which has made remarkable changes to the configuration management platform in PowerShell 5.0
- The DSC resources can be built using class, so there is no need for a MOF file
It's not mandatory to know PowerShell or to learn DSC, but it adds a great advantage.
This is similar to function, as we can use a configuration keyword; however, there is a huge difference because in DSC everything is declarative. This is a cool feature of Desired State Configuration. So, before beginning this exercise, I created a DSCDemo lab machine in the Azure cloud with Windows Server 2012, and it's available out of the box. So, the default PowerShell version we will use is 4.0.
For now, let's create and define a simple configuration that creates a file in the localhost. Yeah! A simple New-Item command can do this, but it's an imperative cmdlet, and we need to write a program to tell the computer to create it if it does not exist.
Let's execute the following code:
Structure of DSC configuration is as follows:
Configuration Name
{
    Node ComputerName
    {
        ResourceName <String>
        {

        }
    }
}
So now to create a simple text file with contents, we use the following code:
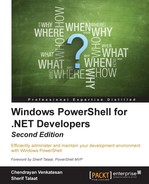
Configuration FileDemo
{
    Node $env:COMPUTERNAME
    {
        File FileDemo
        {
            Ensure = 'Present'
            DestinationPath = 'C:TempDemo.txt'
            Contents = 'PowerShell DSC Rocks!'
            Force = $true
        }
    }
}
Take a look at the following image:
The points marked in the figure are explained in the following list:
- 1: Here, using the
Configurationkeyword, we are defining a configuration with a nameFileDemo—it's a friendly name - 2: Inside the
Configurationblock, we created aNodeblock and created a file on localhost - 3: Here,
Fileis the resource name - 4: Here,
FileDemois a friendly name of the resource, which is a string. - 5: These are the properties of the file resource
- 6: This creates a MOF File—we called this similar to function; but wait, a file is not yet created here. We just created a MOF file.
Look at the MOF file structure in the following image:

We can manually edit the MOF file and use it on other machines that have PS 4.0 installed. It's not mandatory to use PowerShell to generate a MOF, but if you are comfortable with PowerShell, you can directly write the MOF file.
To explore the available DSC Resources, you can execute the following command:
Get-DscResource
The output is illustrated in the following image:

The points marked in the figure are explained in the following list:
- 1: This shows how the resources are implemented, which can be
Binary,Composite,PowerShell, and so on. In the preceding example, we created a DSC configuration, that isFileDemoand that is listed asComposite. - 2: This is the name of the resource.
- 3: This is the module name the resource belongs to.
- 4: These are the properties of resources.
To know the syntax of a particular DSC resource we can try the following code:
Get-DscResource -Name Service -Syntax
The output is illustrated in the following image which shows the resource syntax in detail:

Now, let's take a look at how DSC works and its three different phases, which are as follows:
- The Authoring phase
- The Staging phase
- The "Make it so" phase
In this phase, we will create a DSC configuration using PowerShell, and this will output a MOF file. We have seen a FileDemo example for creating a configuration. This is considered to be the Authoring phase.
In this phase, the declarative MOF file will be staged as per its node (a MOF file will be created for each computer). DSC has the push and pull model, where push simply pushes configuration to the target nodes. The custom providers need to be manually placed in the target machines. On the other hand, in the pull model, we need to build an IIS server that will have the MOF files as the target nodes. This is well defined by the OData interface. In the pull model, the custom providers are downloaded to target system.
This is the phase used to enact the configuration. In other words, here we will apply the configuration on the target nodes.
We will cover the multinode configuration and the other DSC topic details in Chapter 3, Exploring Desired State Configuration.
Before we summarize the basics of DSC, let's take a look at a few more DSC commands. We can do this by executing the following command:
Get-Command -Noun DSC*
The output is as shown in the following image:

Local Configuration Manager (LCM) is the engine for DSC, and this runs on all the nodes. LCM is responsible for calling the configuration resources that are included in a DSC configuration script. Try executing the Get-DscLocalConfigurationManager cmdlet to explore its properties. To apply the LCM settings on the target nodes, we can use the Set-DscLocalConfigurationManager cmdlet.
Using classes in PowerShell gets IT professionals, system administrators, and system engineers to start learning development.
Okay, it's time for us to switch back to Windows PowerShell 5.0 because the Class keyword is supported in the versions from 5.0 onward. You may wonder, why do we need to write class in PowerShell? Is it specially needed? Perhaps in this section, we will answer this, but this is one reason for which I would say that PowerShell is far better than scripting language.
When the class keyword was introduced, it was mainly focused at creating DSC resources. However, using class, we can create objects as we would with any other object-oriented programming language. The class we will create in Windows PowerShell is truly a .NET framework type.
You may now wonder, how do we create a PowerShell class? It's easy: just use the Class keyword! The following steps will help you to create a PowerShell class:
- Create a class using the command
Class ClassName {}—This is an empty class. - Define properties in the class using the command
Class ClassName {$Prop1 , $prop2} - Instantiate the class using the command
$var = [ClassName]::New() - Now, take a look at the output of
$var:Class ClassName { $Prop1 $Prop2 } $var = [ClassName]::new() $var
In this example, we will take a look at how to create a class and what its advantages are.
Define Properties in Class; run the following command:
Class Catalog
{
  #Properties
  $Model = 'Fujitsu'
  $Manufacturer = 'Life Book S Series'
}

$var = New-Object Catalog
$var
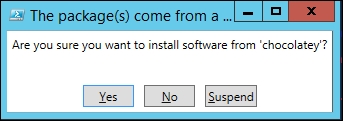
The following image shows the output of class, its members, and setting of the property value:

If we change the property value, the output will be as shown in the following image:

Now, let's create a method with the overloads. In the following example, we will create a method named SetInformation that will accept two arguments, $mdl and $mfgr, and these are of the String type.
Using $var.SetInformation, and with no parentheses, we will take a look at the overload definitions of the method.
Execute the following code:
Class Catalog
{
  #Properties
  $Model = 'Fujitsu'
  $Manufacturer = 'Life Book S Series'
  SetInformation([String]$mdl,[String]$mfgr)
  {
    $this.Manufacturer = $mfgr
    $this.Model = $mdl
  }
}
$var = New-Object -TypeName Catalog
$var.SetInformation
#Output
OverloadDefinitions
-------------------
void SetInformation(string mdl, string mfgr)
Let's set Model and Manufacturer using Set information, as follows:
Class Catalog
{
  #Properties
  $Model = 'Fujitsu'
  $Manufacturer = 'Life Book S Series'
  SetInformation([String]$mdl,[String]$mfgr)
  {
    $this.Manufacturer = $mfgr
    $this.Model = $mdl
  }
}
$var = New-Object -TypeName Catalog
$var.SetInformation('Surface' , 'Microsoft')
$var
The output is illustrated in the following image:

In PowerShell class, we can use the PowerShell cmdlets as well. The following code is just a demo of using the PowerShell cmdlet.
Class allows us to validate the parameters as well. Let's take a look at the code in the following example:
Class Order
{
  [ValidateSet("Red" , "Blue" , "Green")]
  $color
  [ValidateSet("Audi")]
  $Manufacturer
  Book($Manufacturer , $color)
  {
    $this.color = $color
    $this.Manufacturer = $Manufacturer
  }
}
The $Color and $Manufacturer parameters have a ValidateSet attribute, which has a set of values. Now, let's use New-Object and set property with an argument that doesn't belong to this set. Run the following command:
$var = New-Object Order
$var.color = 'Orange'
Now, we will get the following error:
Exception setting "color": "The argument "Orange" does not belong to the set "Red,Blue,Green" specified by the ValidateSet attribute. Supply an argument that is in the set and then try the command again."
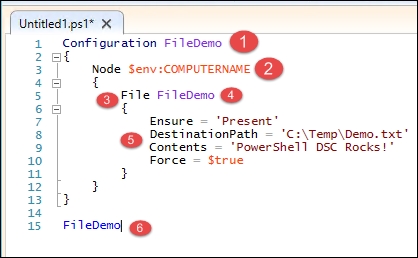
Let's set the argument values correctly to get the result using the Book method:
$var = New-Object Order
$var.Book('Audi' , 'Red')
$var
The output is illustrated in the following image:
A constructor is a special type of method that creates new objects. It has the same name as the class, and the return type is void. Multiple constructors are supported, but each one has to take different numbers and types of parameters. In this exercise, let's take a look at the steps to create a simple constructor in PowerShell that will create a user in the active directory. Execute the following code:
Class ADUser {
  $identity
  $Name
  ADUser($Idenity , $Name) {
    New-ADUser -SamAccountName $Idenity -Name $Name
    $this.identity = $Idenity
    $this.Name = $Name
  }
}
$var = [ADUser]::new('Dummy' , 'Test Case User')
$var
The output of the code we just saw is illustrated in the following image:

We can also hide the properties in a PowerShell class; as an example, let's create two properties and hide one. In theory, it hides the property but we can still use it. Execute the following code:
Class Hide {
  [String]$Name
  Hidden $ID
}
$var = [Hide]::new()
$var

However, we can perform operations such as Get and Set, as shown in the following code:
Class Hide {
  [String]$Name
  Hidden $ID
}
$var = [Hide]::new()
$var.Id = '23'
$var.Id
This will return the output as 23.
To know more about the class, use help about_Classes -Detailed.
In Windows PowerShell 5.0, a new cmdlet, ConvertFrom-String, has been introduced, and this is available in the Microsoft.PowerShell.Utility module.
Using this command, we can parse structured objects from any given string content. For more information, use help ConvertFrom-String –Detailed.
Now, let's consider an example where we will use ConvertFrom-String.
The scenario is such that a team has custom code that generates a log file to create a daily health checkup report of its environment. Unfortunately, the tool delivered by the vendor is an EXE file, and there is no source code available. The log file format is as follows:
"Error 4356 Lync" , "Warning 6781 SharePoint" , "Information 5436 Exchange",
"Error 3432 Lync" , "Warning 4356 SharePoint" , "Information 5432 Exchange"
There are many ways to manipulate this record, but let's take a look at how the PowerShell cmdlet, ConvertFrom-String, can help us. Using the following code, we will simply extract Type, EventID, and Server:
"Error 4356 Lync" , "Warning 6781 SharePoint" , "Information 5436 Exchange",
"Error 3432 Lync" , "Warning 4356 SharePoint" , "Information 5432 Exchange" |
ConvertFrom-String -PropertyNames Type , EventID, Server
So what's interesting in this? It's cool because now your output is a PSCustomObject object, which you can manipulate as required. Take a look at the following image:

Following is the output we just saw in the image:
"Error 4356 Lync" , "Warning 6781 SharePoint" , "Information 5436 Exchange",
"Error 3432 SharePoint" , "Warning 4356 SharePoint" , "Information 5432 Exchange" |
ConvertFrom-String -PropertyNames Type , EventID, Server | ? {$_.Type -eq 'Error'}
One of the outputs is Lync, and SharePoint has some error logs that need to be looked at as a priority. As your requirements may vary, you can use this cmdlet in whichever way you need.
ConvertFrom-String has a delimiter parameter that helps us to manipulate the strings as well. In the following example, let's use the –Delimiter parameter, which removes white spaces and returns the properties:
"Chen V" | ConvertFrom-String -Delimiter "s" -PropertyNames "FirstName" , "SurName"
This outputs FirstName and SurName as the result—FirstName as Chen and SurName as V.
In this example, we will walk you through using the template file to manipulate the string as we need. To do this, we need to use the TemplateContent parameter. You can use help ConvertFrom-String –Parameter TemplateContent.
Before we begin, we need to create a template file; to do this, let's ping a website, www.microsoft.com, which will return the outputs as follows:
Pinging e10088.dspb.akamaiedge.net [2.21.47.138] with 32 bytes of data:
Reply from 2.21.47.138: bytes=32 time=37ms TTL=51
Reply from 2.21.47.138: bytes=32 time=35ms TTL=51
Reply from 2.21.47.138: bytes=32 time=35ms TTL=51
Reply from 2.21.47.138: bytes=32 time=36ms TTL=51
Ping statistics for 2.21.47.138:
  Packets: Sent = 4, Received = 4, Lost = 0 (0% loss),
Approximate round trip times in milli-seconds:
  Minimum = 35ms, Maximum = 37ms, Average = 35ms
Now that we have the information in some structure, let's extract the IP and the bytes to do this. I replaced the IP and the bytes with {IP*:2.21.47.138}, as follows:
Pinging e10088.dspb.akamaiedge.net [2.21.47.138] with 32 bytes of data:
Reply from {IP*:2.21.47.138}: bytes={[int32]Bytes:32} time=37ms TTL=51
Reply from {IP*:2.21.47.138}: bytes={[int32]Bytes:32} time=35ms TTL=51
Reply from {IP*:2.21.47.138}: bytes={[int32]Bytes:32} time=36ms TTL=51
Reply from {IP*:2.21.47.138}: bytes={[int32]Bytes:32} time=35ms TTL=51
Ping statistics for 2.21.47.138:
  Packets: Sent = 4, Received = 4, Lost = 0 (0% loss),
Approximate round trip times in milli-seconds:
  Minimum = 35ms, Maximum = 37ms, Average = 35ms
The output is illustrated in the following figure:

ConvertFrom-String has a debug parameter. Using this, we can debug our template file. In the following example, let's consider the debugging output:
ping www.microsoft.com | ConvertFrom-String -TemplateFile C:TempTemplate.txt -Debug

In this topic, we will walk you through the features of Package Management. This is another great feature of Windows Management Framework 5.0. This is introduced in Windows 10, and formerly, Package Management was known as OneGet.
Using Package Management, we can automate software discovery, installation of software, and inventorying. Do not think about Software Inventory Logging (SIL) for now; we will cover that later in Chapter 3, Exploring Desired State Configuration.
As we know, the Windows software installation technology has its own way of installing, for example MSI, MSU and so on. It is a real challenge for IT professionals and DevOps to think about unique automation of software installation / deployments. Now, we can do it using the Package Management module.
To begin with, let's take a look at the Package Management module using the following code:
Get-Module -Name PackageManagement
The output is illustrated in the following image:

Well, we've got an output showing that it's a binary module. So, how do we find the available cmdlets and their usage? PowerShell always has the simplest way of doing things! Execute the following code:
Get-Module -Name PackageManagement
The available cmdlets are shown in the following image:

Package providers are nothing but providers connected to Package Management (OneGet), and package sources are registered for the providers. To view the list of providers and sources, we will use the following cmdlets:

Now, let's take a look at the packages available. In the following example, I will select the first 20 packages just for an easy view:

Now, we have 20 packages; using the Install-Package cmdlet, let's install WindowsAzurePowerShell on our Windows 2012 Server.
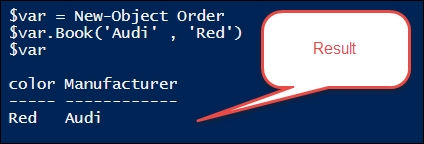
We need to ensure that the source is available prior to any installations. To do that, simply execute the Get-PackageSource cmdlet. If the source, chocolatey, doesn't show up in the output, simply execute the following code; however, do not change any values. This code will install chocolatey in your machine. Once the installation is done, we need to restart PowerShell:
Invoke-Expression ((New-Object System.Net.WebClient).DownloadString('https://chocolatey.org/install.ps1'))
Find-Package -Name WindowsAzurePowerShell | Install-Package -Verbose
The preceding command shows the confirmation dialog for chocolatey, which is the package source, as shown in the following screenshot:
Click on Yes to install the package.

The points marked in the figure are explained in the following list:
- 1: Here, the prerequisites are installed
- 2: Here, a temp folder is created
- 3: Here, the package is installed successfully
Windows Server 2012 has .NET 4.5 in the box by default, so the verbose will turn up as False for .NET 4.5. This means that .NET 4.5 will be skipped while enacting the configuration, but WindowsAzurePowerShell will be installed successfully. Take a look at the following image:

If you try to install the same package and the same version that is available in your system, the cmdlet will skip the installation. Execute the following code:
Find-Package -Name PowerShellHere | Install-Package -Verbose
VERBOSE: Skipping installed package PowerShellHere 0.0.3
Explore all the Package Management cmdlets and automate your software deployments.
PowerShellGet is a module available in the Windows PowerShell 5.0 preview. You can do the following using this:
- Search through the modules in the Gallery with
Find-Module - Save modules to your system from the Gallery with
Save-Module - Install modules from the Gallery with
Install-Module - Update your modules to the latest version with
Update-Module - Add your own custom repository with
Register-PSRepository
The following screenshot shows the additional cmdlets that are available:

You can refer to this link for more information about PowerShell Gallery:
https://www.powershellgallery.com
This will allow us to find a module from PowerShell Gallery and install it in our environment. PSGallery is a repository of modules. Using the Find-Module cmdlet, we can obtain a list of the modules available in PS Gallery. Pipe and install the required module. Alternatively, we can save the module and examine it before installation; to do this, you need to use the Save-Module cmdlet.
The following image illustrates the installation and uninstallation of the xJEA module:

We can also publish a module in PSGallery, which will be available over the internet for others.
This is not a great module; all it does is get user information from active directory for the same given account name, so you can create a function and save it as PSM1 in the module folder. In order to publish the module in PSGallery, we need to ensure that the module manifests. We will take a look at the details of the modules in the next chapter.
- Create a PSM1 file.
- Create a PSD1 file which is a Manifest Module—data file.
- Get your NuGet API key from the PSGallery link shared before.
- Publish your module using the
Publish-Modulecmdlet.
We get the following output:

Following figure shows the published module:
