
We explored the basics of WMI and CIM; and yes, that was just the basics. After completing the XML topic, we will discuss cmdlet definition XML (CDXML), which is used to map the PowerShell cmdlets, and the CIM class operations or methods.
I have seen most developers create XML files using Visual Studio and use some tools to compare XML. It's not a wrong method, but we have a much more convenient way to play with XML using PowerShell.
XML is the type accelerator for System.Xml.Document.
Let's take a look at the basic structure of an XML document:
<?xml version="1.0" encoding="utf-8"?>
<Custom>
<Computers>
  <Manufacturers>Fujitsu</Manufacturers>
  <Model>Lifebook S 700 Series</Model>
</Computers>
<Computers>
  <Manufacturers>Fujitsu</Manufacturers>
  <Model>Lifebook S 800 Series</Model>
</Computers>
</Custom>
XML is case-sensitive, so it's always better to use some tools to create XML documents. I used Visual Studio 2013 to create this demo XML document.
Now, let's use the Get-Content cmdlet to call the XML document in PowerShell, as shown in the following image:

Yeah! We can read this, but let's do in the XML way. So, let's use a type accelerator and perform our tasks, such as XML document manipulations, as in the following command:
[XML]$XML = Get-Content .File1.XML
$XML
This outputs as shown in the following image:

The points marked in the figure are explained in the following list:
We can quickly read the XML document with PowerShell using the following code:
[XML]$XML = Get-Content .File1.xml
$XML.Custom.Computers
The output we need is illustrated in the following image:
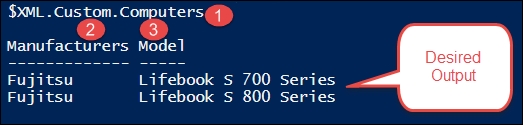
The points marked in the figure are explained in the following list:
- The
$XMLvariable contains the XML document information, and now it is an object Manufacturersis a property that can be get and setModelis a property that can be get and set
Using PowerShell, we can read and manipulate the output as we need.
Now, let's take a look at the available properties, methods, and so on. Run the following command:
$XML.Custom.Computers | GM
This will output all the methods, properties, code methods, and parameterized properties, as shown in the following image:

Before we use methods, let's do an exercise using the XML file as the configuration file that passes the parameters to the PowerShell scripts. The reason we need this is to simplify automation in environments. Based on our requirements, we can customize and code the script.
In this exercise, let's send an e-mail, where the parameters are preconfigured in an XML file, and the script reads the XML file to do the task.
The XML code is shown as follows:
<?xml version="1.0" encoding="utf-8"?>
<Settings>
  <SMTP>SMTP NAME</SMTP>
  <MailFrom>From Address</MailFrom>
  <MailTO>To Address</MailTO>
  <Subject>XML Demo</Subject>
</Settings>
Using the following PowerShell code we can trigger emails:
[XML]$email = Get-Content .File2.XML
$mail = @{
  FROM = $email.Settings.MailFrom
  TO = $email.Settings.MailTO
  SMTP = $email.Settings.SMTP
  Subject = $email.Settings.Subject
}
Send-MailMessage @mail
PowerShell has a few commands to use XML; to find them, you can simply try the following code:
Get-Command *XML
The output is as shown in the following image:

The points marked in the figure are explained in the following list:
- 1:
Microsoft.PowerShell.Utilityis the name of the module - 2: Starting from PowerShell 5.0, the version appears in the output
- 3: Name shows all the available commands for XML
- 4: Command types, here shown as cmdlet
The ConvertTo-Xml cmdlet creates an XML-based representation of an object, and its a .NET-based object. Try the following code in your system:
$hash = @{
  ServiceName = (Get-Service -Name Bits).Name
  Status = (Get-Service -Name Bits).Status
  CanStop = (Get-Service -Name Bits).CanStop
  CanPauseandContinue = (Get-Service -Name Bits).CanPauseAndContinue
}
$value = New-Object PSOBject -Property $hash
($value | Convertto-xml -NoTypeInformation).save("C:TempData.xml")
[xml]$xml = Get-Content C:TempData.xml
$xml.Objects.Object.Property
In the preceding code, we created a hash table using the $hash variable; then, we created a PSObject object and converted it to XML using the ConvertTo-XML command. The output is illustrated in the following image:

This is similar to ConvertTo-XML; we can use the Export-CliXml command, and this does more or less the same job, except that this saves the results as an XML file. To import, we will use the Import-CliXml command. The Export-CliXml command is very helpful when we use credentials in the scripts, while exporting the credentials as XML and importing it to use in the scripts.
Before we start our next exercise, we need to set up the MSOnline module in our machine. The installation involves just clicking on next and finish—we need to follow the installation wizard.
Perform the following steps:
- First and foremost, download and install Microsoft Online Services Sign-In Assistant from http://go.microsoft.com/fwlink/?linkid=236300.
- Then, download and install Microsoft Online Services Module for Windows PowerShell from http://go.microsoft.com/fwlink/?linkid=236297.
As we are done with the installation, let's connect to the Exchange Online session using PowerShell. Perform the following steps:
- Export the credential using the
Export-CliXmlcommand, as follows:$credentials = Get-Credential $credentials | Export-Clixml C:TempSeccureString.xml
- Import the credential using the
Import-CliXmlcommand, as follows:$o365Cred = Import-Clixml C:TempSeccureString.xml - Connect to the Exchange Online session using the following code:
$o365Cred = Import-Clixml C:TempSeccureString.xml
Import-Module MSOnline
$O365Session = New-PSSession –ConfigurationName Microsoft.Exchange -ConnectionUri https://outlook.office365.com/powershell-liveid/?proxymethod=rps `
-Credential $O365Cred -Authentication Basic -AllowRedirection
Import-PSSession $O365Session
Connect-MsolService –Credential $O365Cred
As we passed the XML file as the value for the credential parameter, we don't need to enter the credential every time we connect to the Exchange Online session. Try to save the credential in a secured location.
It's really very handy and easy to create XML on the fly. For example, using the following code, we can create simple user XML:
[xml]$xmlUsers='<Configuration Description="Users">
<Customers>
<user surname="V" firstname="Chen"></user>
<user surname="Venkatesan" firstname="Chendrayan"></user>
</Customers>
</Configuration>'
$xmlUsers.Configuration.Customers.user
Take a look at the following image:

Here, we can see that Surname and FirstName are the properties of
User. User is the property of Customers and Customers is the property of Configuration.
Component Object Model (COM) is a binary interface used by developers to create reusable software components. The .NET framework and COM interfaces allow us to perform many admin tasks. New-Object is a magical command we use to create an instance of the COM object; similarly, we can create an instance of the Microsoft .NET Framework.
Windows PowerShell 5.0 includes a new COM implementation, which offers significant performance improvements.
Over the internet, we come across many COM Automation examples for Internet Explorer. So, in this exercise, we will explore MS Excel and MS Word Automation using PowerShell, which is also popular. IT managers need data in an Excel or Word format. Indeed, we can export to CSV and manipulate it as required. However, here, we need to exercise the usage of the COM object. So, let's use an Excel COM object for the same.
Perform the following steps:
- Use
New-Objectto create an Excel COM object, this is a Program ID. Run the following command:$Excel = New-Object -ComObject Excel.Application - Now, let's take a look at the events, methods, properties, and parameterized properties. Run the following command:
$Excel = New-Object -ComObject Excel.Application
"Excel Object has {0} events , {1} methods , {2} properties and {3} parameterizedproperty" -f (($Excel | GM -MemberType Event).Count ,
($Excel | GM -MemberType Method).Count , ($Excel | GM -MemberType Property).Count , ($Excel | GM -MemberType ParameterizedProperty).Count)
The output is illustrated in the following image:

The points marked in the figure are explained in the following list:
- 1: This shows that there are 43 events
- 2: This shows that there are 171 methods
- 3: This shows that there are 225 properties
- 4: This shows that there are 9 parameterized properties
- Simply pipe and get members such as in the following command:
$Excel | GM - Invoke the
Speakmethod from theSpeechproperty. Run the following command:$Excel = New-Object -ComObject Excel.Application $Excel.Speech.Speak("Opening Excel please wait!")
This will not open Excel for now, but we can listen to the audio—just for the purpose of this demo.
- Now, set the visible property to
$trueto open Excel. Run the following command:$Excel = New-Object -ComObject Excel.Application $Excel.Visible
This returns
False. Run the following command:$Excel = New-Object -ComObject Excel.Application $Excel.Visible = $true
This opens Excel in your localhost, as shown in the following screenshot:

Here, we opened Excel using the PowerShell
ComObjectproperty. - Now, let's add a workbook. Run the following command:
$Excel = New-Object -ComObject Excel.Application $Excel.Visible = $true $Wb = $Excel.Workbooks.Add()
- After this, name the Work Sheet through the following command:
$Excel = New-Object -ComObject Excel.Application $Excel.Visible = $true $Wb = $Excel.Workbooks.Add() $worksheet = $Wb.Worksheets.Item(1) $worksheet.Name = "System Information"
The output is illustrated in the following image:

- Insert some values in the cells. Run the following command:
$Excel = New-Object -ComObject Excel.Application $Excel.Visible = $true $Wb = $Excel.Workbooks.Add() $worksheet = $Wb.Worksheets.Item(1) $worksheet.Cells.Item(1,1) = "ComputerName" $worksheet.Cells.Item(2,1) = $env:COMPUTERNAME $worksheet.Cells.Item(1,2) = "DomainName" $worksheet.Cells.Item(2,2) = $env:USERDOMAIN
The output is illustrated in the following image:

Now that we have inserted some names for the localhost and domain name in the Excel sheet, let's change the color of this text. Run the following command:
$Excel = New-Object -ComObject Excel.Application
$Excel.Visible = $true
$Wb = $Excel.Workbooks.Add()
$worksheet = $Wb.Worksheets.Item(1)
$worksheet.Cells.Item(1,1) = "ComputerName"
$worksheet.Cells.Item(1,1).Font.Bold = $true
$worksheet.Cells.Item(1,1).Font.ColorIndex = 53
$worksheet.Cells.Item(2,1) = $env:COMPUTERNAME
$worksheet.Cells.Item(1,2) = "DomaiName"
$worksheet.Cells.Item(1,2).Font.Bold = $true
$worksheet.Cells.Item(1,2).Font.ColorIndex = 53
$worksheet.Cells.Item(2,2) = $env:USERDOMAIN
The output is illustrated in the following image:

The points marked in the figure are explained in the following list:
- 1: This shows that background color is set to index 53, which is brown color, and font weight is bold
- 2: This shows that same styles are applied as 1
- Invoke the
SaveAsmethod to save the Excel file through the following command:$Excel = New-Object -ComObject Excel.Application $Excel.Visible = $false $Wb = $Excel.Workbooks.Add() $worksheet = $Wb.Worksheets.Item(1) $worksheet.Cells.Item(1,1) = "ComputerName" $worksheet.Cells.Item(1,1).Font.Bold = $true $worksheet.Cells.Item(1,1).Font.ColorIndex = 53 $worksheet.Cells.Item(2,1) = $env:COMPUTERNAME $worksheet.Cells.Item(1,2) = "DomaiName" $worksheet.Cells.Item(1,2).Font.Bold = $true $worksheet.Cells.Item(1,2).Font.ColorIndex = 53 $worksheet.Cells.Item(2,2) = $env:USERDOMAIN $Wb.SaveAs('C:TempOutput.xlsx')
In the preceding code, we have set the Excel visible property to false.
Using an Excel COM object, we can insert graphs, manipulate information, merge cells, and so on. Explore all the objects and create your code as required.
Now, let's explore the Microsoft Word object. This is similar to an Excel COM object exercise, so we will not cover each step. Instead, let's consider a sample code using the Word COM object. Always remember to release the COM object because it runs in the background. Before we begin, let's discuss the steps to release the COM object.
This is how the background chunk appears in your system:

Let's kill this process using the Stop-Process command. The result is illustrated in the following image:

While exploring the members, I observed that it uses the Quit method, so I used it to close Word. Take a look at the following image:

Here, we can see that nothing's turned up, and there are still two Word processes running. One of the processes is running in the background, and the other has opened up because I am writing this book in MS Word.
With reference to the MSDN documentation, I tried to use the following method:
$word = New-Object -ComObject Word.Application
[System.Runtime.Interopservices.Marshal]::ReleaseComObject($word)
Remove-Variable -Name word -Verbose
As expected, it didn't turn up. The result is illustrated in the following image:

Finally, the following code worked as we expected it to:
$Word = New-Object -ComObject Word.Application
[System.Runtime.InteropServices.Marshal]::ReleaseComObject([System.ComObject]$Word) | out-null
[System.GC]::Collect()
[System.GC]::WaitForPendingFinalizers()
Now, let's try to create a Word document that has a report executed date, computer name, and domain name. Run the following command:
$word = New-Object -ComObject "Word.application"
$word.visible = $true
$doc = $word.Documents.Add()
$doc.Activate()
$word.Selection.Font.Name = "Calibri"
$word.Selection.Font.Size = "10"
$word.Selection.TypeText("Report Executed on " + (Get-Date).ToShortDateString())
$word.Selection.TypeParagraph()
$word.Selection.TypeText("Computer Name is $env:computerName")
$word.Selection.TypeParagraph()
$word.Selection.TypeText("Domain Name is $env:USERDOMAIN")
$word.Selection.TypeParagraph()
$word.Quit()
The output of the preceding code output is shown in the following image:

The points marked in the figure are explained in the following list:
Let's create a small Word document that will retrieve information from active directory and build a Word document. The desired output will be similar to the following screenshot:

Let's take a look at how this works. Perform the following steps:
- Create a variable to save the username and filename as required. Run the following command:
$FileName = $Env:USERNAME
$savepath="C:$FileName.docx"
- Create an instance of a Word application using the
Word.Applicationcommand. Add the document using theAdd()property and select the document using theSelectionproperty. Run the following command:$word = New-object -ComObject "Word.Application" $doc=$word.documents.Add() $Resume=$word.Selection
- Set the style and use the
Get-ADUsercommand to fetch the AD properties. Run the following command:$Resume.Style="Title" $UserName = Get-ADUser -Identity $ENV:USERNAME -Properties * $Picture = Get-ADUser -Identity $ENV:USERNAME -Properties thumbnailphoto
- Save the picture in the desired location with the following command:
$Picture.thumbnailphoto | Set-Content "C:Photo.jpg" -Encoding Byte
$Resume.TypeText("$($UserName.Name)")
$Resume.InlineShapes.AddPicture("C:Photo.jpg")
- Retrieve the required information from AD using the following command:
$Resume.TypeParagraph()
$Resume.Style="Normal"
$Resume.TypeText("Department: $($UserName.Department), Office Phone: $($UserName.OfficePhone), Email: $($UserName.mail)")
- Type out the text as required using the following code:
$Resume.TypeParagraph()
$Resume.Style="SubTitle"
$Resume.TypeText(("Objective"))
$Resume.TypeParagraph()
$Resume.Style="SubTitle"
$Resume.TypeText(("Skills"))
$Resume.TypeParagraph()
$Resume.Style="SubTitle"
$Resume.TypeText(("Education"))
$Resume.TypeParagraph()
$Resume.Style="SubTitle"
$Resume.TypeText(("Projects"))
$Resume.TypeParagraph()
$Resume.TypeParagraph()
$Resume.TypeParagraph()
$Resume.Style="SubTitle"
$Resume.TypeText(("I hereby declare that the above written particulars are true to the best of my knowledge and belief."))
$Resume.TypeParagraph()
$Resume.TypeParagraph()
$Resume.TypeParagraph()
$Resume.Style="Strong"
$Resume.TypeText("Name    :    $($UserName.Name)")
$Resume.TypeParagraph()
$Date = Get-Date
$Resume.TypeText("Date    :    $($Date)")
- Save the file. Run the following command:
$doc.SaveAs([ref]$savepath)
$doc.Close()
- Run the following command to quit Word and open the file:
$word.quit()
Invoke-Item $savepath
You can use the complete code, which is as follows:
$FileName = $Env:USERNAME
$savepath="C:$FileName.docx"
$word = New-object -ComObject "Word.Application"
$doc=$word.documents.Add()
$Resume=$word.Selection
$Resume.Style="Title"
$UserName = Get-ADUser -Identity $ENV:USERNAME -Properties *
$Picture = Get-ADUser -Identity $ENV:USERNAME -Properties thumbnailphoto
$Picture.thumbnailphoto | Set-Content "C:Photo.jpg" -Encoding Byte
$Resume.TypeText("$($UserName.Name)")
$Resume.InlineShapes.AddPicture("C:Photo.jpg")
$Resume.TypeParagraph()
$Resume.Style="Normal"
$Resume.TypeText("Department: $($UserName.Department), Office Phone: $($UserName.OfficePhone), Email: $($UserName.mail)")
$Resume.TypeParagraph()
$Resume.Style="SubTitle"
$Resume.TypeText(("Objective"))
$Resume.TypeParagraph()
$Resume.Style="SubTitle"
$Resume.TypeText(("Skills"))
$Resume.TypeParagraph()
$Resume.Style="SubTitle"
$Resume.TypeText(("Education"))
$Resume.TypeParagraph()
$Resume.Style="SubTitle"
$Resume.TypeText(("Projects"))
$Resume.TypeParagraph()
$Resume.TypeParagraph()
$Resume.TypeParagraph()
$Resume.Style="SubTitle"
$Resume.TypeText(("I hereby declare that the above written particulars are true to the best of my knowledge and belief."))
$Resume.TypeParagraph()
$Resume.TypeParagraph()
$Resume.TypeParagraph()
$Resume.Style="Strong"
$Resume.TypeText("Name    :    $($UserName.Name)")
$Resume.TypeParagraph()
$Date = Get-Date
$Resume.TypeText("Date    :    $($Date)")
$doc.SaveAs([ref]$savepath)
$doc.Close()
$word.quit()
Invoke-Item $savepath