


Basic disposition case study
This chapter provides a case study for using basic disposition schedules, scheduling and running the basic disposition sweep, and processing the basic disposition workflow.
This chapter describes the following tasks:
15.1 Create a new record category with a basic disposition schedule
In this section, we demonstrate how to add a new record category with a basic disposition schedule.
In this scenario, ADM120 is a record category in our sample file plan that contains the subcategories for each organization unit using this record series, as shown in Figure 6-14 on page 173 where the parent record category represents the record series.
Figure 15-1 shows this file plan structure with three basic schedules that already exist for three of the business units using ADM120. We will add a fourth category for a new business unit.

Figure 15-1 ADM120 record category has one basic schedule category for each business unit
In this case study example, we add a record category with a basic schedule to the parent record category ADM120.
To add the record category, follow these steps.
1. Browse to the ADM120 - Project Management record category.
2. Click Add Record Category.
3. Complete the properties pertaining to this record category, such as Record Category Name, Record Category Identifier, and Description as shown in Figure 15-2. In this example, both the Record Category Name and Record Category Identifier use a standardized naming convention that indicates the record series and which business unit is responsible for the records in that category.

Figure 15-2 Record category name and record category identifier are required properties for a new record category
4. Under Disposition (Figure 15-3), select Basic disposition schedule to fill in the required properties.

Figure 15-3 Configuring the required basic disposition schedule properties
Select the appropriate retention trigger property name from the drop-down menu and fill in the appropriate retention period values for Years, Months, and Days. as shown in Figure 15-3. In this example, we select RetentionTriggerDate and configure a retention period of 3 years.
|
Note: The RetentionTriggerDate property is a custom date property that was added to the default data model as part of the case study object store configuration. This property was added to a valid record class definition, making it available for use with Enterprise Records.
|
5. Click Add to create the new record category.
The new record category appears in the file plan with the basic schedule configured, as shown in Figure 15-4 on page 313.

Figure 15-4 A new record category is added to the file plan with a basic disposition schedule
15.2 Schedule a basic disposition sweep for report only
In this section, we demonstrate how to schedule a basic disposition sweep to generate retention due reports for the record series ADM120 without running any disposition process.
In this scenario, we want to generate the retention due reports for each of the organization units that have records in the ADM120 record series. We want to see which records will be due for disposition 30 days from today (the day we run the sweep).
15.2.1 Schedule the sweep
To schedule a basic disposition sweep for a report only, follow these steps:
1. Open Tasks View from the Enterprise Records desktop.

Figure 15-5 Schedule a basic disposition sweep from the Tasks view
3. Select the parameters for the basic disposition sweep, as shown in Figure 15-6. In this case, we select the file plan repository, the ADM120 records category for containers for sweep, a report review period of 30 days, and set Report Only to Yes.

Figure 15-6 Set the parameters for a basic disposition sweep
4. Click Next to set the schedule.
5. Enter a name and a description for the sweep. The name is required so that you can identify the sweep after it has completed.
6. Select Run once and Start immediately as the run options.

Figure 15-7 Setting the sweep schedule and running the sweep
15.2.2 View the sweep results
To view the sweep results, follow these steps:
1. Refresh the tasks lists to verify that the sweep has completed.
In this example, we see that there are two separate reports generated for each of the record categories that included records ready for destruction because we have configured different values for the Reviewer property. These retention due reports include records that will be ready for destruction 30 days from the date that the sweep was run.

Figure 15-8 View the results of a completed basic disposition sweep configured for report only
15.3 Schedule a basic disposition sweep for immediate destruction
In this section, we demonstrate how to schedule a basic disposition sweep to generate the retention due reports that will be used for immediate destruction of records. We complete the basic disposition process by reviewing the resulting deleted records reports.
15.3.1 Schedule the sweep
To schedule a basic disposition sweep for destruction, follow these steps:
2. From the Schedule menu, select Schedule Basic Disposition Sweep.
3. Select the parameters for the basic disposition sweep, as shown in Figure 15-9.

Figure 15-9 Set the sweep parameters for immediate destruction
In this case, we select the file plan repository, the ADM120 records category for containers for sweep, a report review period of 0 days, set Report Only to No, and Set Need Approval to No.
4. Then, click Next to set the schedule.
5. Enter a name and a description for the sweep. The name is required so that you can identify the sweep after it has completed.
7. Click Schedule Sweep to schedule the sweep. It will start immediately.
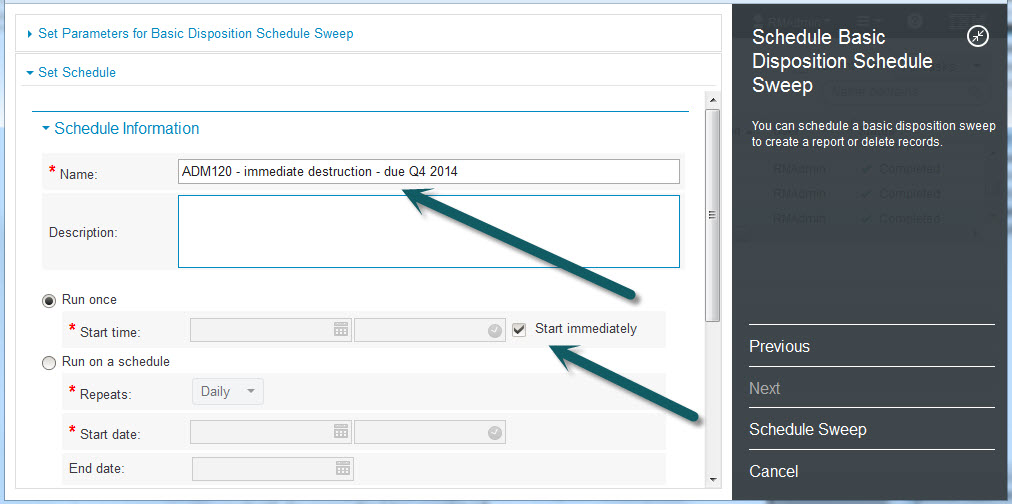
Figure 15-10 Schedule the sweep for immediate destruction
15.3.2 View the sweep results
The basic disposition sweep results in retention due reports for records that are ready for destruction. Separate workflows are launched to complete the destruction process depending on how the Reviewer property has been set on each record category being processed for basic disposition.
To view the sweep results, follow these steps:
1. Refresh the tasks lists to verify that the sweep has completed.
2. View the results of the sweep by clicking the Results tab.
As shown in Figure 15-11, the retention due reports are generated by the sweep and a separate workflow is launched for each reviewer.

Figure 15-11 View the sweep results to see the retention due reports and verify workflow launched
15.3.3 Verify the destroy results
The results of the destroy workflow would typically be reviewed by a different user than the user who scheduled the sweep.
To verify the destroy results for each workflow, follow these steps:
1. Log in to the Enterprise Records desktop with a user account that has permissions to view and process work.
2. Open Work View from the desktop.
3. Expand the process application space for Records Management.
4. For Basic Schedule Workflow Reviewer, select Public Inboxes to see the work items that are available for review.
Figure 15-12 shows the Work View with the two work items highlighted. These work items have automatically completed the Destroy process and are awaiting Destroy Results review.

Figure 15-12 Use the work view to display the Basic Schedule Workflow Reviewer inbox
5. Open each work item to view the ResultReview step.
6. Click the Attachments tab.
7. Click DestroyResultReports to see the list of destroy result reports.
As shown in Figure 15-13, the ResultReview step lists the Destroy Result Reports, which include both a Deleted Records report and a Not Deleted Records report. These reports are transcript files that are stored in the FPOS and, optionally, can be declared as records.
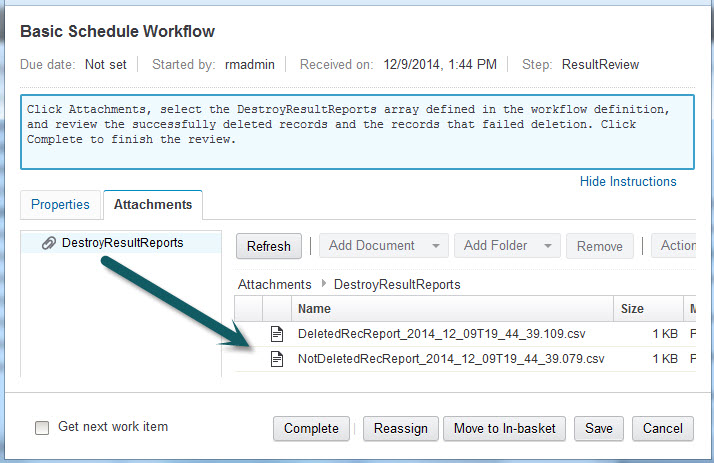
Figure 15-13 ResultReview step shows the destroy results
You can open and view each report if you choose.
8. Click Complete to finish the workflow.
15.4 Schedule a basic disposition sweep for approval before destruction
This section explains how to schedule a basic disposition sweep to generate the Retention Due reports that are used for approval before the records are destroyed. We complete the approval step and verify the resulting Destroy reports.
15.4.1 Schedule the sweep
To schedule a basic disposition sweep for approval before destruction, follow these steps:
2. From the Schedule menu, select Schedule Basic Disposition Sweep.
3. Select the parameters for the basic disposition sweep to indicate that approval is required before records are destroyed.
Figure 15-14 shows the parameters used in this example to select the file plan repository, the ADM120 record category, set Report Only as No, set Report Review Period at 0 days, and set Need Approval as Yes.

Figure 15-14 Configure the basic disposition sweep for approval before destruction
4. Click Next to set the schedule.
5. Enter a name and a description for the sweep. The name is required so that you can identify the sweep after it has completed.
7. Click Schedule Sweep to schedule the sweep. The sweep starts immediately.
15.4.2 View the sweep results
The basic disposition sweep results in retention due reports for records that are ready for destruction. Separate workflows are launched to complete the destruction process depending on how the Reviewer property has been set on each record category being processed for basic disposition.
To view the sweep results, follow these steps:
1. Refresh the tasks lists to verify that the sweep has completed.
2. View the results of the sweep by clicking the Results tab.
Figure 15-15 shows the results of the basic disposition sweep. In this example, there is only one retention due report for one reviewer. The Approval step is part of the Basic Schedule workflow that is launched.

Figure 15-15 Basic disposition sweep results
15.4.3 Approve the records for destruction
When configured for approval, the Basic Schedule workflow includes an approval step that requires user approval before the records in the Retention Due Report are destroyed.
To approve the records for destruction, follow these steps:
1. Log in to the Enterprise Records desktop with a user account that has permissions to view and process work.
2. Open the Work view from the desktop.
3. Expand the process application space for Records Management.
4. Select Public Inboxes for Basic Schedule Workflow Reviewer to see the work items available for review.
Figure 15-16 shows the Work View with one work item awaiting approval. The workflow will not destroy any records until the Approval step has been completed.

Figure 15-16 Work item awaiting approval before records are destroyed
5. Open the work item to view the retention due report and complete the Approval step.
6. Click the Attachments tab.
7. Click the RetentionDueReport attachment to see the report listed.
Figure 15-17 shows the Retention Due Report. You can view the details of this report if needed before completing the Approval step.
The Approval steps allow the users who are responsible for the records being destroyed an opportunity to place any records on hold before the system destroys the records. If any of the records listed in the retention due report are placed on hold before the Approval step is completed, those records will not be destroyed upon approval. Only the records that are not on hold will be destroyed.

Figure 15-17 Approval step for the basic disposition process
8. Click Complete to approve the destruction of the records in the Retention Due Report.
15.4.4 Verify the destroy results
After the Approval step has been completed, the Basic Schedule workflow automatically destroys all records in the retention due report that have not been placed on hold.
To verify the Destroy results, follow these steps:
1. Log in to the Enterprise Records desktop with a user account that has permissions to view and process work if not already logged in.
2. Open Work View from the desktop.
3. Expand the process application space for Records Management.
4. Select the Public Inboxes for Basic Schedule Workflow Reviewer to see the work items available for review, or click Refresh if already displaying the Basic Schedule Workflow Reviewer inbox.
5. Open the work item to view and complete the ResultReview step.
6. Click the Attachments tab.

Figure 15-18 ResultReview step shows the destroy results after approval
As shown in Figure 15-18, the ResultReview step lists the Destroy Result Reports, which include both a Deleted Records report and a Not Deleted Records report. These reports are transcript files that are stored on the FPOS and can be declared as records (optional).
..................Content has been hidden....................
You can't read the all page of ebook, please click here login for view all page.