


Physical records
This chapter provides an overview of working with physical records in
IBM Enterprise Records. It describes the key features that are available to use in physical records management and explains how to use those features in your environment.
IBM Enterprise Records. It describes the key features that are available to use in physical records management and explains how to use those features in your environment.
This chapter covers the following topics:
•Overview of physical records management
•Enterprise Records physical records capabilities
11.1 Overview of physical records management
Even in this electronic era, most organizations still have physical items that need to be managed as records. IBM Enterprise Records provides additional features, beyond pure electronic records management, for the management of physical records within a single application.
Physical records are those artifacts that capture or represent a business decision or decisions, which exist in a non-digital format, or where there is value or significance associated with the non-digital format. Some examples of physical items you will be familiar with include articles of incorporation, certificates of title, photographic plates, original audio tapes, crime scene evidence, historical books and artifacts, and so on.
Figure 11-1 provides a simple overview of some basic management requirements for physical records.

Figure 11-1 Basic management requirements for working with physical records
A user receives or identifies a physical record which should be managed as an organizational record. The user adds the new physical record to the system and nominates where the item should be filed. Eventually, the item’s file might be placed into a box and the box might be moved to a storage location. If another user in the same or different location wants to retrieve the item, they submit a request for the item. On approval of the request, the item is delivered to the requester. After the requester is done with the item, they return it to the storage location.
This simple scenario highlights that, aside from the obvious format differences between electronic and physical records, the management requirements of physical records includes the following attributes, at a minimum:
•Physical records have a home location, which is where they are normally stored.
•Physical records might be moved to another location for a period of time, so they must support recording of a temporary location.
•Users might request access to physical records.
•Physical records are typically stored or managed in containers (this might not have relevance for electronic records).
•To aid movement requests, physical items might use bar code labels.
|
Note: To work with physical items in Enterprise Records, users are required to have access to an Enterprise Records desktop.
|
11.2 Enterprise Records physical records capabilities
Enterprise Records includes features to support the requirements of managing physical records in the same application as you manage your electronic records. For management of physical records, the application includes the following feature constructs:
•Boxes
•Physical and hybrid folders and folder volumes
•Physical records
•Bar code support
•Workflow to support requests for records
– Reservations
– Charge outs
Each of these items is described further in this section.
11.2.1 Containers: Boxes
When working with physical items, it is common to see people filing paper into folders and storing the folders on shelves or in file drawers. In situations with large collections, the ongoing management of the physical items might be outsourced to external parties, and you might see folders placed in boxes that are then shipped to the external party.
Enterprise Records models a container construct for physical records and provides a mechanism to model physical entities that contain other physical entities. Although more material is handled digital today, many organizations still have requirements to manage physical records. This can be managed in Enterprise Records.
These physical items persist for two main reasons:
•It is not practical to store the item on a shelf in a record folder for any of these reasons:
– Due to the type of record, such as audio or video cassettes or photographic plates
– Because original items that have historical significance, such as original company logo or advertising materials, might have different formats and sizes
– Because the material is bulky, such as crime scene evidence
•It is organizational policy to add the physical records to a folder and then store the folders in boxes, before moving them to off-site storage.
In Enterprise Records, unlike other types of record folders, a box can contain other folders. These entities are physical folders and boxes, but not electronic or hybrid folders and records. Boxes do not use volumes.
There are two methods for creation of new file plan containers in Enterprise Records, both of which support the creation of boxes, hybrid record folders, and physical record folders:
•In the first method, a user submits a workflow request for a new box to be created.
•The second method relies on the user having permission to create the container in the Enterprise Records desktop.
Workflow request for creation of a new box
The request for a new box to be created is initiated by a user working in the
Content Navigator desktop.
Content Navigator desktop.
1. Initiate the Create Folder request by selecting the Request Record Folder option from the drop-down menu on the toolbar, as shown in Figure 11-2.

Figure 11-2 Request Record Folder
2. After you select this option, complete the details of the request in the next window, as shown in Figure 11-3 on page 258, where you provide the name of the box that you want to create, where the box should be in the file plan, and stipulate to identify the item as a box. Figure 11-3 on page 258 illustrates that the Physical Container item was expanded to show the Box option, which is highlighted.
In completing the required fields on this submission interface, all of the data fields are preceded by a red asterisk, which indicates all fields are mandatory and require completion before the Launch Workflow button is activated. Also, you can select only items that are not shown as inactive.

Figure 11-3 Details required to submit a Request Record Folder creation submission
3. Select Box then OK. If all of the required fields are completed, the Launch Workflow button is activated, allowing you to submit the request. After the request for a Box was submitted, the Records Administrator reviews the request and, if approved, creates the Box container in the specified location of the File Plan.
The Records Administrator then notifies you, as the requester, through the workflow.
Manual creation of a box, using the desktop
To manually create a box in Enterprise Records, you need access to an Enterprise Records desktop. In our environment, we have created a desktop for the Records Management Privileged User (RMPriviliegedUser), which provides a desktop interface for our privileged user (potentially, the department Information Coordinator).
1. To create a new box, access the file plan, navigate to the category where you want to create the box (0300-130 Installation in Figure 11-4 on page 259), and select Add Record Folder.

Figure 11-4 Initiate manual creation of a new Box
2. In the manual box creation window, shown in Figure 11-5 on page 260, you must complete required information in all fields that are preceded by an asterisk to complete the task.
To start with, select the Class drop-down menu, expand the Physical Container element, and then select the Box element. After you click the Box element, the OK button becomes active, and you can click OK to complete the other details.
To start with, select the Class drop-down menu, expand the Physical Container element, and then select the Box element. After you click the Box element, the OK button becomes active, and you can click OK to complete the other details.
One of the items that you must complete for the box to be created is the Home Location field. Choose Select next to the Home Location field to see the list of available locations. The Home Location is where the box will be stored.

Figure 11-5 Manual box creation window
The details of the disposal schedule in Figure 11-5 were inherited from the preceding container in the file plan. In this example, our RMPriviliegedUser does not have authorization to modify the disposal schedule, so the Disposal Schedule button is inactive.
3. When all of the details are correct, you can select Add to complete the creation of the box. Notice that the part of the screen captured in Figure 11-5 does not display the Add button, which is in the lower-right of the window.
|
Note: The preferred practice is to provide only privileged users with modification access to those file plan nodes for which they require such access, and that these users be familiar with the organization's recommended naming conventions for the file plan.
|
11.2.2 Containers: Physical and hybrid folders and folder volumes
Enterprise Records supports physical and hybrid folder types for management of physical folders. Within Enterprise Records, a physical folder stores physical records, and contains one or more volumes. A physical folder is a virtual entry for a paper folder. Based on the physical storage structure of your organization records, you can model the hierarchy of physical folders in Enterprise Records.
Within Enterprise Records, a hybrid folder is similar to an electronic folder but it can contain both electronic and physical records, and contains one or more volumes. There are no behavioral differences between an electronic folder and a hybrid folder. However, a hybrid folder has additional metadata that describes a physical entity, including Home Location.
Figure 11-6 shows the various icons representing physical containers in Enterprise Records. The first icon represents a hybrid folder, the second a box, and the third icon represents a physical folder.
Figure 11-6 IBM Enterprise Records physical container icons
In Enterprise Records, when you create a record folder, the volume is automatically created for you, and when you add a new volume, any existing open volume is closed. Record volumes inherit their values from their parent folders. Boxes do not contain volumes.
Enterprise Records supports the movement of all of these container types in charge out requests. This is covered in “Charge outs and reservations” on page 275.
Physical record folder creation
The creation of a physical record folder or a hybrid record folder in Enterprise Records is similar to the creation of a Box, and accessed through the same interfaces. You can request the creation of a physical record folder or hybrid record folder from within the IBM Content Navigator records-enabled desktop or from within an Enterprise Records desktop, as described in 11.2.1, “Containers: Boxes” on page 256.
Figure 11-7 shows the window for adding a physical record folder. The fields prefaced by an asterisk are mandatory fields. Notice in the figure that the physical record folder being created is added to a box (0300-130-100 - Installation New Plant - Costa Mesa), and it uses the ready-for-use Physical Record Folder class. This metadata, defined at the record folder level, can be extended by creating a new folder class based on this class (subclass) and adding the additional metadata values that are required by your organization.

Figure 11-7 Physical Record Folder creation
When creating a physical folder inside a box, some of the values are inherited from the box, such as the Disposal Schedule, Home Location, and (current) Location fields.
In an electronic records management system, the requirement to partition the information contained in records management folders into volumes is not as obvious as it is in a physical records management environment. While it is possible to model the physical hierarchy of folders within Enterprise Records, any folder hierarchy modeled in the application should be modeled to meet business requirements. Our preferred practice is to model a simpler file plan to eliminate confusion in when classifying records in the file plan.
11.2.3 Bar codes
Enterprise Records provides ready-for-use support for storing the value of a bar code in fields on all of these physical item entities:
•Boxes
•Physical record folders
•Hybrid record folders
•Marker records
•Home location and current location
Figure 11-8 illustrates how all of these items can have their own bar code.

Figure 11-8 Physical items supporting bar codes
If your organization is equipped to print bar codes, by storing the value of a field in the bar code metadata, you can use a bar code print to generate labels to attach to your physical items or locations. If your organization also has suitable hardware, you can use this hardware to monitor, track, and update individual items in Enterprise Records.
Bar codes in IBM Enterprise Records
To work with bar codes in Enterprise Records, you need access to the Physical Items feature in your Enterprise Records desktop, as shown in Figure 11-9.

Figure 11-9 Physical Items feature in the IBM Enterprise Records desktop
When you select the Open Physical Items View menu, a window opens that enables you to enter values for physical items or, if you have appropriate hardware, to scan the items’ bar codes. In Figure 11-9, we typed the value 1, which has retrieved all items that containing a “1” in the Location field. You can also enter values in the Entity Bar Code field or in the Location Description field.
Creating bar codes
When adding a new Marker item to Enterprise Records you have the option to add a bar code, as shown in Figure 11-10. When you enter the bar code value in this window, you type in the readable value of the bar code, which is the value you print when generating a bar code label.

Figure 11-10 Marker item creation
In the diagram, you can see the Barcode field, but completing it is not required. You can change the attributes of the field to Required, if necessary, in the document class for marker items.
|
Note: Any restrictions on the field value applied to barcodes fields are bar codes dependent upon the bar code font used. To print bar codes you must have a bar code font installed, and you will need access to a bar code printer.
|
Enterprise Records also supports bar codes for locations, so the location items also have a Barcode field, as shown in Figure 11-11. Enter the value in the bar code field according to your organizations naming conventions.
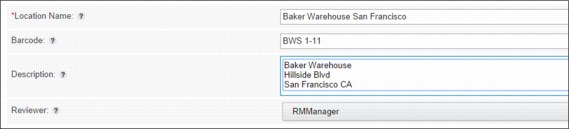
Figure 11-11 Location properties pane
The metadata shown in Figure 11-11 on page 265 is a sample of what can be captured for locations and can be extended to meet the requirements of your organization.
|
Note: Only users authorized to use the Enterprise Records desktop Configuration feature can create locations.
|
11.2.4 Searching
Searching for Physical Items in Enterprise Records uses the underlying search features of IBM Content Navigator and IBM Content Foundation applications. Physical items do not have content elements available for full-text retrieval in the system, so we focus here on metadata and keyword searching.
Some of the distinguishing features of physical items are the Home Location, Location, and bar code details that are stored as metadata for physical items. You can use one of these details when searching across broad record types, such as looking for all types of record folders, to ensure that your results are narrowed to physical items only. The example that follows shows how to create a search for a broad set of physical items and choose the properties to display to return a small meaningful search result set.
When the search results set is displayed, you can select one or more items and export the results for use in ad hoc reporting.
|
Note: To search for physical items, users must have access to an Enterprise Records user desktop.
|
When your system administrator creates a desktop, they can define whether to allow the desktop users to create new searches or to limit the search capabilities of the desktop users to running only predefined searches. Limiting access for defining new searches and to creating searches with predefined fields ensuresthat users cannot run inefficient searches over large collections. Enterprise Records presents users only with result sets that containing materials that the user has rights to view or modify.
Create a new search example
Figure 11-12 on page 267 shows a sample desktop for a Privileged users. From the Search View feature, you get access to create a new search or to re-use an existing search.
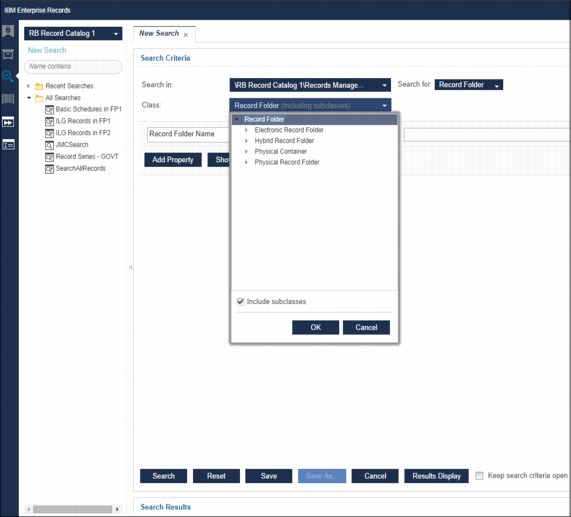
Figure 11-12 Searching for boxes, hybrid folders, or physical record folders
To search for boxes, hybrid folders, and physical folders in a particular part of a file plan, and to present back the results with disposal schedules, rules, and reviewers, you must create a new search and choose the following items:
1. The scope of your search. State how much of the FPOS or file plan you want to search.
2. The type of item that you are searching for. In this example, you can select Record Folder.
3. If you want to search for a particular class of item, which in this example is all record folder types, make sure that you check Include subclasses.
4. To refine the search and exclude electronic record folders, select the Record Folder Name. From the drop-down menu, click the Location property, as shown in Figure 11-13, and select Is Not Empty from the Operator drop-down menu.

Figure 11-13 Refining the search for boxes, hybrid folders, and physical folders
5. Choose the criteria to display in the search results by selecting Results Display. In the Search Results Display view, select the following fields from the Available list:
– Disposition Authority
– Disposition Instructions
– Reviewer
– Home Location
– Bar code
6. From the Selected list, use the left arrow to remove the Modified On and Modified By fields (see Figure 11-14, and then click OK.

Figure 11-14 Choosing the results display details
7. When you automatically return to the previous window, shown in Figure 11-12 on page 267, you ready to run the search and view the results, so select Search.
Figure 11-15 on page 270 shows the search results.
Figure 11-15 on page 270 shows the search results.

Figure 11-15 Search results looking for boxes, hybrid folders and physical record folders
The search results have identified several physical items, including a box, physical record folders, and a hybrid record folder. By selecting multiple items, the Actions menu becomes active, and you can choose to export the results, which are exported in a comma-delimited format. Figure 11-16 on page 271 shows an export of the search results.

Figure 11-16 Exporting search results
|
Note: When exporting search results, you can extend or refine the results.
|
If the search will be used again, you can choose to save the search for reuse. When saving the search for reuse, the subsequent user will not be prompted to re-enter or change any of the search criteria. Selecting the search from the saved searches automatically runs the same search.
In this example, the search results provide a view of physical item information as it was populated in our controlled environment. The values displayed in your environment might differ, largely dependent on how you use these fields.
11.2.5 Reporting
The Search and Export Results feature in Enterprise Records can be used to address rudimentary reporting on physical items.
Although Enterprise Records does not provide preconfigured report templates for physical items, it is possible to create Cognos reports about physical items. For more information, see Chapter 10, “Reporting” on page 243.
11.2.6 Auditing
To enable auditing on physical items in Enterprise Records, it is necessary to configure auditing on the relevant physical items classes for your organization in the file plan object store (FPOS). Enabling auditing is typically done by an administrator of your system, using the administrative console for Content Platform Engine. After configured, changes and updates to physical items appear in the History tab of the item, under the Update Events option in the Enterprise Records desktop.
For more information about auditing, see Chapter 9, “Audit requirements” on page 235.
11.3 Tracking physical records
Enterprise Records uses the workflow features of the Content Platform Engine to handle the processing requirements for managing physical items.
11.3.1 Workflow subscriptions for physical records management
The physical records management workflow is launched through workflow subscriptions. Use the following steps to create a workflow subscription:
1. In the Administration Console for Content Platform Engine (ACCE), select and open your file plan object store from the Object Stores folder.
2. In the tree view, under your Object Store, expand the folders by selecting Data Design → Classes → Document → Record.
3. Right-click Marker Record and select New Subscription.
4. Enter a subscription name, such as Marker Subscription, and click Next.
5. Under Subscription Behavior, check Create a workflow subscription, and click Next.
6. Click Next in the Select Triggers window, because no triggers are used.
7. Under Workflow Information, Workflow definition, select the Physical Record Management workflow. Check Allow manual launching, and click Next.
8. Click Next in the Build Property Map window.
9. Under Additional Options, check Include subclasses, and click Next.
10. Click Finish.
11. Repeat steps 4 to 10 after right-clicking the following Folder classes, and selecting New Subscription:
– Data Design → Classes → Folder → RM Folder → Record Folder → Hybrid Record Folder
– Data Design → Classes → Folder → RM Folder → Record Folder → Physical Container → Box
– Data Design → Classes → Folder → RM Folder → Record Folder → Physical Record Folder
– Data Design → Classes → Folder → RM Folder → Volume
11.3.2 Accessing physical records
Within the Enterprise Records desktop, authorized users may be given access to the work view feature, as illustrated in Figure 11-17 on page 274. Within this interface, a user can see three options, depending upon their access privileges:
My Inbox This provides you access to any work items that require action by you.
Public Inboxes This provides you access to public work queues that you have been granted access to and which you may act on.
Tracker This gives you access to a diagrammatic representation of a workflow, which you have been granted access to view, which includes the workflows that you initiated.

Figure 11-17 Work view interface in an Enterprise Records desktop
To open an item in any of these queues, you have the following options:
•Select the item and choose the Open action from the toolbar.
•Choosing the Open option action toolbar or from the menu on the item.
•Simply double-click the item.
You can generally find instructions for what you are required to do to act on the item within the Work Item Action interface.
|
Note: Users must have access to the Open Work View feature in the Enterprise Records desktop to charge out physical items, because those are displayed in their My Inbox views.
|
11.3.3 Locations, reservations, and charge outs
All physical items in Enterprise Records have two location fields, Home Location and Location, in their metadata. The Home Location field specifies where the item usually is held, and the Location field specifies where the item is held currently. To add or edit locations in Enterprise Records, you need access to the Open Configuration View feature on the desktop, as shown in Figure 11-18 on page 275.
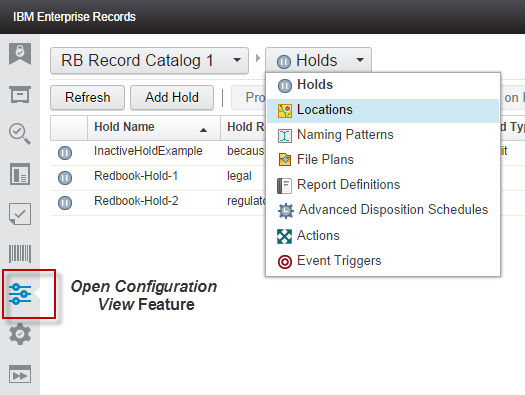
Figure 11-18 Configuration View feature
Access to location maintenance is available from the drop-down menu by selecting the Locations menu option. This provides access to the administration feature for Locations, from which you can choose the action to take, such as adding a new location, viewing and editing the properties of a location, or deleting a location. Figure 11-19 shows a snippet of the interface that a user sees when adding a new location

Figure 11-19 Add a new location
The Location profile contains a minimal set of metadata, which might be extended if you have a business requirement for more details to be collected.
Charge outs and reservations
When a user requires access to the item, the user needs to “charge out” the item. This initiates a movement of the item to a new location, which updates the Location value in the physical item’s metadata.
To charge out a physical item from an Enterprise Records desktop, navigate or search for the item in the desktop, select it when you find it, and then click Charge Out on the toolbar Actions menu or from the menu for the item. When the interface opens, it shows details about the availability of the item and, if the item is presently charged out, who has the item.
The Charge Out workflow does not involve any overseeing roles. When a request is initiated, a notification is sent to the current holder of the item who can decide whether to release the item to the requester, to hold the item longer (delay), or to report the item as lost. If the user agrees to release the item to the requester, the user must specify how it will be delivered, either manually or through a delivery service.
If it is manually delivered to the receiver, the recipient is notified and must confirm upon receiving the item. After receiving the item, the user who sent the item receives a second notification for release of the item and can nominate how to release the item (manually or through a delivery service). They can also delay release of the item for a period of time, depending on content management rules.
When a delivery service is chosen, the software creates a work item that requires an authorized user to access the Physical Entities Delivery Inbox. The authorized user can then select the Deliver option on the interface, and the software sends a notification to a nominated user (recipient) in the new location. The user in the new location can then receive the item.
Another mechanism for processing the notifications for physical items is to use the Open Physical Items View feature, locate the item, and then process the item. This is illustrated in Figure 11-20 on page 277. To act on a task, such as approve item in the Physical Items Workflow pane, select the item, and click Open to open the item for processing.

Figure 11-20 Working with physical item workflows
|
Note: Do not modify the Physical Records Management workflow.
|
If a user requests a physical container item (for example, a box) which contains items that are charged out, the physical container item cannot be charged out.
A reservation is a variation of the Charge Out workflow, where you specify a date in the future that you would like to receive the item. When a physical item is reserved, the workflow is launched, and the workflow item is held in a Reservations inbox until the date of the reservation.
If auditing is enabled for the physical item classes in Enterprise Records, updates to the location are recorded in the Update Event entry for the item.
|
Note: The Physical Records Management Charge Out workflow does not support the selection of multiple items.
|
Preferable practices typically involve creation of a custom Charge Out workflow that allows users to request multiple items for delivery.
..................Content has been hidden....................
You can't read the all page of ebook, please click here login for view all page.