16. Exporting PDF Documents
In this chapter, you learn how to choose PDF export settings and save them as presets.
These days, creating a layout solely for print isn’t enough. As a graphic designer, you’re expected to also create a PDF version. Not only do PDFs provide an easy and practical way to send proofs to your clients, but you can also post a PDF of a finalized layout for download and reach a much larger audience. You can also create interactive PDFs that include hyperlinks, bookmarks, buttons, and even movie and sound files.
Choosing Export as PDF Settings
The PDF export settings in InDesign are similar in some respects to the Print dialog box settings you saw in Chapter 15. The main differences are the Compression panel settings, which only apply to exporting and not printing.
To access the Export dialog box, choose File, Export. In the Export dialog box that appears, enter a name for the PDF in the Save As field and specify where you’d like to save it on your disk. At the bottom of the dialog box, choose Adobe PDF (Print) from the Format list (Mac) or the Save as Type list (Win) and click Save (see Figure 16.1).
Figure 16.1. Choose a save location and format option from the Export dialog box.

When you do, InDesign launches the Export Adobe PDF dialog box, which contains seven panels: General, Compression, Marks and Bleeds, Output, Advanced, Security, and Summary. Whenever you export a document as an Adobe PDF for the first time, you should inspect each panel of the dialog box to make sure the proper settings are applied. You can display any of these panels in the dialog box by clicking its name in the category list on the left.
If you’d like to use a default or custom Adobe PDF Preset, choose it from the Adobe PDF Preset drop-down list located at the top of the dialog box. To export as PDF/X (a type of secure PDF designed specifically for the reliable exchange of prepress information), choose one of the PDF/X presets or select a PDF/X option from the Standard list. You can also choose to make the PDF compatible with older versions of Acrobat by selecting an option (versions 4 through 9) from the Compatibility list.
The Export Adobe PDF General Panel
The General panel is the first to appear when you open the Export Adobe PDF dialog box (see Figure 16.2). You can access it by selecting General in the category list or by pressing Cmd-1 (Mac) or Ctrl+1 (Win).
Figure 16.2. Choose the preferred settings from the General panel of the Export Adobe PDF dialog box.

There are quite a few relevant options in the General panel of the Export Adobe PDF dialog box. The following list describes what each one controls:
• Description: In this section of the General panel, InDesign displays a description of the Adobe PDF preset that you currently have selected.
• Pages: Choose to export the entire document or a range of specific pages. In the Range field, enter the page numbers in numerical order, separated either by commas (to indicate individual pages) or dashes (to indicate a series of pages).
• Spreads: Enable this option to export each spread on a single PDF page. (A spread is two pages that face each other.)
• Embed Page Thumbnails: Enable this option to create a preview image for each page or spread you export. Note that embedding thumbnails increases the overall PDF file size.
• Optimize for Fast Web View: When creating PDFs for online viewing, enable this option to reduce the file size of the PDF without changing the appearance of the pages. Enabling this option also creates PDFs that can be downloaded one page at a time from a web server, rather than all at once.
• Create Tagged PDF: You can use XML (Extensible Markup Language) in InDesign to repurpose data in a file or automate the process of replacing data from one file with data from another. Enable this option to automatically add an XML structure to a generated PDF by tagging elements to each story in the document.
• Export Layers: From the drop-down list, choose whether to export all layers (including hidden and nonprinting layers), only visible layers (including nonprinting layers), or only visible and printable layers (per the options chosen in the Layer Options dialog box).
• View PDF After Exporting: Enable this option to open the PDF in Acrobat or Reader immediately after exporting from InDesign.
• Create Acrobat Layers: Enable this option to convert all InDesign document layers (including hidden layers) into Acrobat layers. Any added printer’s marks are placed on a separate layer as well. This option is available only when exporting PDFs compatible with Acrobat 6 and later.
• Bookmarks: Enable this option to include any bookmarks created using the Bookmarks panel or the table of contents feature.
• Hyperlinks: Enable this option to include any hyperlinks created using the Hyperlinks panel, or the table of contents or index features. You can click hyperlinks to visit other pages in the same document, different documents, or a website.
• Nonprinting Objects: Enable this option to override the Nonprinting Objects option (objects on the page that will not print) chosen in the Attributes panel and export every object placed on the specified pages.
• Visible Guides and Grids: Enable this option to export any visible margin guides, page guides, and baseline grids, but not the document grid.
• Interactive Elements: Enable this option to include any buttons, movies, or sounds contained in the document.
The Export Adobe PDF Compression Panel
The options in the Compression panel enable you to specify how you would like to downsample document images when generating the PDF. To display the Compression panel (see Figure 16.3), select Compression from the category list or press Cmd-2 (Mac) or Ctrl+2 (Win).
• Downsampling lists: Choose a downsampling option for color, grayscale, and monochrome images. Downsampling reduces the number of pixels in an image.
• Choose Do Not Downsample to maintain the original resolution of the image.
• Choose Average Downsampling to decrease image resolution. This is accomplished by converting an area of pixels into one large pixel. The quality is controlled by the value you enter in the Downsampling To and For areas.
• Choose Subsampling to convert the specified pixel area into one large pixel based on a single pixel located in the center. Doing so results in faster conversion times but poorer image results.
• Choose Bicubic Downsampling to use a more precise average. Doing so provides the smoothest tonal gradations but takes longest to convert.
• Compression lists: Choose a compression option for color, grayscale, and monochrome images. This is a compression scheme that reduces the number of pixels in an image.
• Choose None to leave images uncompressed.
• Choose the Automatic (JPEG) or Automatic (JPEG 2000) options to allow InDesign to determine the best compression quality for grayscale and color images. The Automatic (JPEG 2000) option is available only when exporting PDFs that are compatible with Acrobat 6 or later.
• Choose the JPEG option to apply a lossy compression (loss of image data) to grayscale and color images. This option reduces image quality while decreasing file size and conversion time.
• Choose ZIP to apply lossless compression to grayscale and color images. This option works best with images containing large solid color areas and sharp edges (such as screen captures).
• Choose the JPEG 2000 option to compress grayscale and color images to an even smaller size while producing a higher-quality image. JPEG 2000 is available only when exporting PDFs compatible with Acrobat 6 or later.
• Choose CCIT Group 4 to achieve the highest quality monochrome images. Choose CCITT Group 3 to apply compression to monochrome images one row at a time.
• Choose Run Length compression for monochrome images containing large areas of solid black or white.
• Image Quality lists: Choose the amount of JPEG or JPEG 2000 compression to apply to grayscale and color images. Options include Minimum, Low, Medium, High, and Maximum.
• Compress Text and Line Art: Enable this option to compress all text and paths in the document.
• Crop Image Data to Frames: Enable this option to export the data for the visible areas of a cropped image in the document. Doing this can greatly reduce the file size of an exported PDF.
Figure 16.3. Choose the preferred settings from the Compression panel of the Export Adobe PDF dialog box.

The Export Adobe PDF Marks and Bleeds Panel
To display the Marks and Bleeds panel (see Figure 16.4), select Marks and Bleeds from the category list or press Cmd-3 (Mac) or Ctrl+3 (Win).
Figure 16.4. Choose the preferred settings from the Marks and Bleeds panel of the Export Adobe PDF dialog box.

When you export a document as a PDF, you might want to include several marks to determine where the paper trims when printing, how color plates should align, and so on. Selecting any of these options expands the page area to allow for these marks. Bleeds are the parts of text or images that extend past the page, such as a color or graphic that you want to extend to the very edge of the page. The slug area contains instructions for your commercial printer and is located on the outside area of the page.
• All Printer’s Marks: Includes all printer’s marks in the exported PDF.
• Crop Marks: Includes lines that define the page area (also referred to as trim marks).
• Bleed Marks: Includes lines that define the bleed area.
• Registration Marks: Includes small targets around the edge of each page; used for lining up color separations.
• Color Bars: Includes small square color samples outside the bleed area; used for matching colors on a printing press.
• Page Information: Includes the filename and publication date on every page of the PDF.
• Type: From the drop-down list, select additional sets of printer’s marks created by other developers (InDesign ships with only one default set of printer’s marks).
• Weight: To change the stroke weight (width) of the printer’s marks, choose 0.125 pt., 0.25 pt., or 0.50 pt. from the Weight drop-down list.
• Offset: Determines how far from the page edge the printer’s marks should print.
• Use Document Bleed Settings: Applies the Bleed settings entered in the Document Setup dialog box.
• Bleed: Defines the amount of bleed area off the top, bottom, left, and right edges of the page. Click the chain link icon to apply the same setting in every field.
• Include Slug Area: Includes the slug area defined in the Document Setup dialog box.
The Export Adobe PDF Output Panel
The Output panel contains options for applying color management when exporting the PDF or PDF/X file. To display the Output panel (see Figure 16.5), select Output from the category list or press Cmd+4 (Mac) or Ctrl+4 (Win).
Figure 16.5. Choose the preferred settings from the Output panel of the Export Adobe PDF dialog box.
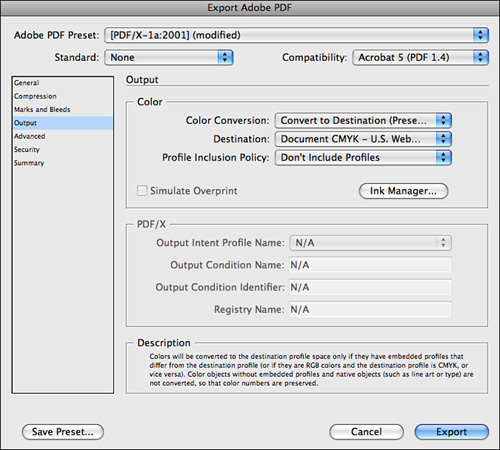
• Color Conversion: From the drop-down list, choose how you would like to convert process colors in the PDF.
• Choose No Color Conversion to leave the color as is.
• Choose Convert to Destination to convert the document colors to the profile selected in the Destination list (described in the next main bullet).
• Choose Convert to Destination (Preserve Numbers) to convert only document colors that differ from the profile. This option is available only when color management is enabled.
• Destination: Select a profile for the target output device (such as a monitor or inkjet printer). InDesign converts the document’s source profile (defined in the Working Spaces section of the Color Settings dialog box) to the profile chosen here.
• Profile Inclusion Policy: Choose whether to include a color profile in the PDF. Options vary depending on which Color Conversion setting is chosen, whether color management is enabled, and if one of the PDF/X standards is selected.
• Simulate Overprint: Enable this option to create a simulated overprint PDF. This simulates the appearance of printing separations in your composite output. This option is available only when choosing Convert Colors to Destination or Convert Colors to Destination (Preserve Numbers) from the Color Conversion list. To enable this option, you must also choose Acrobat 4 from the Compatibility list.
• Ink Manager: Click this button to open the Ink Manager dialog box, where you can manage spot color conversion.
• Output Intent Profile Name: This drop-down list and the field below are available only when exporting a PDF/X file. When color management is disabled, the list is limited to profiles that match the destination profile’s color space. When color management is enabled, the output intent profile matches the destination profile.
• Output Condition Name: Describes the intended printing condition. This area can be useful for the person who receives the PDF document.
• Output Condition Identifier: Indicates a pointer to more information on the printing condition. InDesign automatically enters the identifier when choosing one of the default PDF/X presets.
• Registry Name: Enter the web address for the registry. InDesign automatically enters the web address for ICC (International Color Consortium) registry names. The ICC registry provides a way for organizations to identify sets of characterization data for standard printing processes.
• Description: Position the cursor over any Output panel option to view a description of it in this area.
The Export Adobe PDF Advanced Panel
The Advanced panel contains options for outputting transparency, working with an OPI Image Replacement workflow, and creating a Job Definition Format (JDF) file. To display the Advanced panel (see Figure 16.6), select Advanced from the category list or press Cmd-5 (Mac) or Ctrl+5 (Win).
Figure 16.6. Choose the preferred settings from the Advanced panel of the Export Adobe PDF dialog box.

• Subset Fonts When Percent of Characters Used Is Less Than: Enter a value to set the threshold (in percentage of characters used in the document) for embedding complete fonts in the PDF. When the specified percentage is exceeded, InDesign embeds the complete font, which adds to the file size.
• Omit for OPI: Choose which image formats to replace with low-resolution links: EPS, PDF, and/or Bitmap Images. InDesign must have access to a disk containing high-resolution versions of these images in order to link to them.
• Transparency Flattener: Preset: From the drop-down list, choose a transparency flattener preset to apply. Flattening is necessary when you print, save, or export to other formats that don’t support transparency.
• Ignore Spread Overrides: Enable this option to tell InDesign to disregard any Transparency Flattener settings applied via the Pages panel override option.
• Create JDF File Using Acrobat: Enable this option to automatically launch Acrobat 7.0 Professional or later and create a Job Definition Format file for the exported PDF. To use this option, Acrobat 7.0 or later must be previously installed on your system. A JDF is an XML-based file format that embeds all the job information that is usually communicated to the other members of your design team, as well as your commercial printer, via email or phone. Working with JDF files can help eliminate any miscommunication that can happen during each stage of production.
The Export Adobe PDF Security Panel
The options in the Security panel enable you to specify password permissions. By doing so, you can control who is allowed to open, print, and edit the exported PDF. To display the Security panel (see Figure 16.7), select Security from the category list or press Cmd-6 (Mac) or Ctrl+6 (Win).
Figure 16.7. Choose the preferred settings from the Security panel of the Export Adobe PDF dialog box.

• Require a Password to Open the Document: Enable this option to turn on document password protection, requiring that users enter a password to open the PDF.
• Document Open Password: Enter the password required to open the PDF.
• Use a Password to Restrict Printing, Editing and Other Tasks: Enable this option to turn on password protection, requiring that you enter a password to print, make changes to, or copy content from the PDF (depending on which options you select from the lists).
• Permissions Password: Enter the password required to print, make changes to, or copy content from the PDF (depending on which options you select from the lists).
• Printing Allowed: Choose the print resolution allowed after the user enters the password. Options include None (to prohibit printing), Low Resolution, and High Resolution. If Acrobat 4 is selected in the Compatibility field, Low Resolution is not an option.
• Changes Allowed: Choose the editing actions allowed after the user enters the password: None (to prohibit editing); Commenting, Filling in Form Fields, and Signing; Page Layout, Filling in Form Fields and Signing; and Any Except Extracting Pages.
• Enable Copying of Content and Access for the Visually Impaired: Enable this option to allow users to access PDF content using tools for the visually impaired.
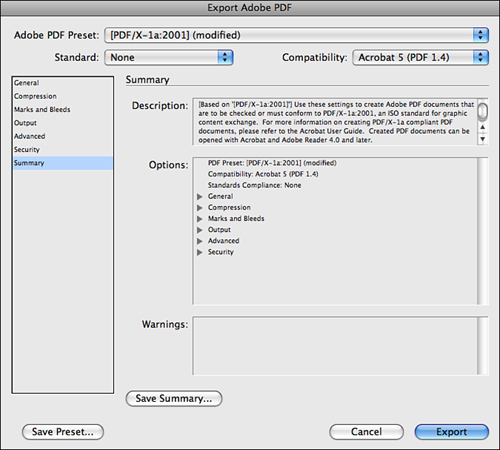
The Export Adobe PDF Summary Panel
To display the Summary panel (see Figure 16.8), select Summary from the category list or press Cmd-7 (Mac) or Ctrl+7 (Win). InDesign displays a description of the Adobe PDF preset that you currently have selected in the Description section. The Options section of the panel displays a summary of every setting made from the Export Adobe PDF dialog box. The Warnings section of the panel displays an explanation whenever the settings of a PDF preset cannot be honored.
Figure 16.8. You can view a list of the chosen export settings in the Summary panel of the Export Adobe PDF dialog box.
Saving a PDF Preset
After the Export Adobe PDF dialog box setup is complete, you can save it as an Adobe PDF Preset to use again and again, without having to reenter any settings.
![]() LET ME TRY IT
LET ME TRY IT
Save a Preset from the Export Adobe PDF Dialog Box
To create a preset directly from the Export Adobe PDF dialog box, apply the following steps:
- Click the Save Preset button located at the bottom of the dialog box.
- In the Save Preset dialog box that appears, enter a name for the setup.
- Click OK to add the preset to the Adobe PDF Preset menu (see Figure 16.9).
Figure 16.9. Enter a name for the PDF preset and click OK.

Show Me: Media 16.1—Saving a Preset from the Export Adobe PDF Dialog Box
![]()
Access this video file through your registered Web edition at my.safaribooksonline.com/9780132174541/media.
You can also save PDF export settings as a preset without displaying the Export Adobe PDF dialog box. To do so, choose File, Adobe PDF Presets, Define. In the Adobe PDF Presets dialog box that appears, click New. Doing so displays the New PDF Export Preset dialog box. Use the different panels to choose the preferred export settings, just as you would with the Export Adobe PDF dialog box (see Figure 16.10).
Figure 16.10. Choose the preferred settings via the panels available in the New PDF Export Preset dialog box.

When you are finished choosing the preferred PDF export settings, enter a name for the preset in the Name field and click OK. InDesign adds the new PDF export preset to the Presets list.
Show Me: Media 16.2—Saving a PDF Preset Without Displaying the Export Adobe PDF Box
![]()
Access this video file through your registered Web edition at my.safaribooksonline.com/9780132174541/media.