CHAPTER 55. Migration and Integration Issues: Windows NT, Windows 2000, Windows 2003, Unix, and Linux
SOME OF THE MAIN TOPICS IN THIS CHAPTER ARE
Windows Server Support for Unix Protocols and Utilities 1018
Managing the FTP Service on Windows Server 2003 1028
Microsoft Windows Services for Unix 3.5 1033
Sun Network Information System 1043
It would be difficult to find two operating systems that differ more from each other than Unix and Windows. Unix has been around for a much longer time than Windows and has yielded an offspring: Linux. What started out as a developer’s operating system (Unix) has evolved over the years into a stable platform that runs on more hardware platforms than perhaps any other operating system, from Alpha Servers and Sparc Stations and to even “Intel Inside” systems.
Many large Web sites use either Unix or Linux to run their Web servers. Even Microsoft has been known to use Unix/Linux to run some of its Web services, until users discovered it. After that, these servers were replaced with Windows servers!
Windows NT/2000/2003/XP, on the other hand, are graphically oriented operating systems that now run on only one platform: Intel-compatible chips (such as AMD). If you want to run Windows 2000/2003 or Windows XP, you’ll have to replace those very good Alpha Server systems (which also run Unix, Linux, and OpenVMS, by the way—so you might be able to put them to other uses).
The alternative is to stay with using Windows NT 4.0 on those older systems, if they still provide the capabilities you need and if you don’t have any application requirements that require you to upgrade to a newer version of the operating system. If this is the case with your network, it’s time for you to map out a long-term strategy to remove obstacles that keep you from upgrading, such as applications that will not run on a newer version of the operating system, whether it be a Microsoft OS or a Unix/Linux OS.
Microsoft usually does not support its own legacy operating systems for a long time. For example, certification examinations are phased out rather quickly so that Microsoft Certified Systems Engineers (MSCE) are required to upgrade their skills every couple of years to keep pace with the releases of the latest OS versions. Although the same can be said, to some extent, for the Unix/Linux community, an upgrade path is generally easier for these operating systems. The kernel of the Unix/Linux operating system might change to enhance performance, but the administrative tools you’re familiar with can easily be recompiled and used on newer versions of Unix/Linux.
Note
If you’re stuck with a vertical market application, such as a doctor or lawyer’s office application, you can usually skip a generation of an operating system. A vertical market application is one that serves a specific purpose, often available as a packaged (or turnkey) solution that includes hardware, operating system and, application(s). In many cases, the vendor of this type of application software will continue to provide upgrades as operating system upgrades come to market. However, that isn’t always the case. As the old saying goes, if it isn’t broke, don’t fix it. It’s common to see vertical market applications skip one or two generations of an operating system. If this is the case with your applications, the vendor will most likely provide an upgrade path because vertical market applications and the support costs are not inexpensive, and retaining existing customers is important.
Windows Server Support for Unix Protocols and Utilities
Windows operating systems now support many protocols and utilities that were originally created for the Unix Environment. The first that comes to mind, and perhaps the most important, is the TCP/IP protocol suite. This includes not just the TCP/IP protocols, but other associated protocols and utilities.
Many of the technologies that began in the Unix world have evolved into standards that have been implemented on other platforms over the years. For an example, see the lpr/lpd printing system and TCP/IP stream printing. Both of these started out on Unix platforms and are now supported not only by Windows, OpenVMS, and other operating systems, but also by printers from Hewlett-Packard (and most other major printer vendors) and print server appliances made by a number of other vendors. When adding Windows computers to a network that consists mainly of Unix or Linux servers, printing can be the least of a network administrator’s worries. It’s a simple matter to configure Windows Server operating systems to direct printer output to a Unix system that manages print queues. It’s also a simple task to configure clients to use a printer that understands the lpr/lpd protocols or TCP/IP stream method. And, of course, you can also configure Windows 2000 Server and Windows Server 2003 to operate as a print server using these protocols.
![]() If you need to learn more about printing protocols, such as
If you need to learn more about printing protocols, such as lpr/lpd or TCP stream printing, refer to Chapter 40, “Network Printing Protocols.”
Other technologies that were either first developed in or adopted by the Unix world, which Windows and Linux also support, include the following, among others:
![]() The TCP/IP networking protocol suite, including the standard utilities and troubleshooting tools
The TCP/IP networking protocol suite, including the standard utilities and troubleshooting tools
![]() BOOTP and the Dynamic Host Configuration Protocol (DHCP)
BOOTP and the Dynamic Host Configuration Protocol (DHCP)
![]() Support for the Network Information System (NIS), developed by Sun Microsystems, and adopted by many other Unix/Linux vendors (refer to Chapter 29, “Network Name Resolution”)
Support for the Network Information System (NIS), developed by Sun Microsystems, and adopted by many other Unix/Linux vendors (refer to Chapter 29, “Network Name Resolution”)
![]() The Domain Name System (DNS)
The Domain Name System (DNS)
This chapter covers the protocols and utilities that these diverse operating systems have in common as well as tools that can be used to fill in the gaps in a multiprotocol environment.
TCP/IP
When Windows NT 3.5x was first brought to the market, the default network protocol was IPX/SPX. Basic TCP/IP protocols and utilities were there if you wanted to use them, but at that time Microsoft perceived its main competitor in the client/server market to be Novell’s NetWare. When NT 4.0 was released, the default networking protocol had been changed to TCP/IP. Because the Internet had begun to take on a higher degree of importance during the time frame in which NT 4.0 was being marketed, this was a natural path for the operating system to take. TCP/IP is the network protocol suite that’s used throughout the Internet to connect computers from a wide range of manufacturers running many different operating systems. For example, you can find TCP/IP on every Unix or Linux variant currently on the market as well on most every operating system from IBM, from OS/2 to mainframes, along with any other major operating system vendor. Of course, by the time Windows 2000 was released, TCP/IP had become the de facto standard networking protocol for all Microsoft products. It’s included with Windows Server, the Windows client operating systems, Me and XP, as well as the client version for Windows NT and Windows 2000.
Note
Novell’s Open Enterprise Server combines NetWare 6.5 and SUSE Linux Enterprise Server. This provides backward compatibility for existing customers who cannot at this time upgrade to a Linux-based version of NetWare, as well as offer new functionality to NetWare, because Linux is a fast-rising star in the operating system community.
In a network that consists of Unix servers, TCP/IP can be used by Windows clients to access resources on these servers. The most common method provided by the TCP/IP suite of applications for executing commands on another computer is Telnet. For exchanging files, use the FTP utility. Other applications, such as the SSH (Secure Shell) utilities, can be incorporated into the network to allow for additional security.
Telnet
Windows comes with a Telnet client. Although Windows XP does not come with a Telnet server application, you can add this functionality by installing Services for Unix (SFU version 3), which is discussed later in this chapter. SFU can be installed on Windows NT, 2000, 2003, and XP. So, for those who operate a small LAN, you can install a Telnet server on Windows XP Professional, along with many other Unix utilities and commands, for a small fee.
Windows XP, which has now been available for about five years, has gone through two major service packs and is now widely replacing older Windows 2000, Windows NT 4.0, and Windows 9x clients.
Tip
If you’re considering an upgrade to Windows Server 2003, you might want to wait before jumping onto the bandwagon. When any new major version of an operating system is released, there are problems. This is inevitable due to the complexity of writing code for an operating system, much less performing extensive beta testing for a wide variety of applications. It’s best to wait until at least the first service pack is released. It’s also a good idea to subscribe to the many Windows/Unix/Linux newsgroups so that you can find out about features/bugs early adopters are experiencing.
Server versions of Windows NT, 2000, and 2003 do provide a Telnet service, but it isn’t enabled by default. You must have the TCP/IP protocol networking components installed in order to use the server. This can be done during the system installation or by using the Components button in the Add/Remove Software Control Panel utility. To start the service on a Windows Server 2003 computer, use the following steps:
Note
The examples and figures in this chapter are based on Windows 2003. Windows 2000 might look a little different, but the steps described in the examples are pretty much the same.
1. Click Start, All Programs, Administrative Tools, and then Services. A list of services available on the computer is displayed in the right pane.
2. Scroll down in the right pane until you find the Telnet service.
3. Right-click on the Telnet service and select Properties (or just double-click on the Telnet service).
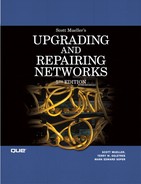
4. From the General properties tab (see Figure 55.1) you can select how you want to start the Telnet service. The drop-down menu labeled Startup Type enables you to select Automatic (start when the system is booted), Manual (start the service when you want to use it), or Disabled (to prevent the Telnet service from being used). In this example, the Automatic option has been selected.
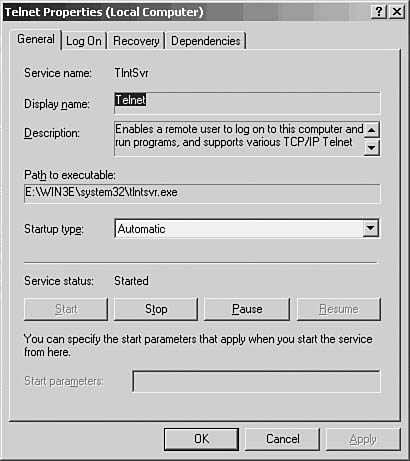
Figure 55.1. You can choose how to start the Telnet service using the General tab.
If you’ve selected either Automatic or Manual to start the service, you must start the service by clicking on the Start button shown in Figure 55.1. If you have chosen the Manual option, then you can close the dialog box and then re-open it and start the service when you wish by using the Start button. If you’ve chosen the Automatic option, the service will automatically start the next time you reboot the server. Notice also that there are Stop/Pause and Resume buttons on this General tab. The Start and Stop buttons do exactly what they say: They stop and start the service. However, if you use the Pause button, administrators and members of the Server Operators group can still use the service and establish a Telnet connection with the server. This can be useful when you don’t want ordinary users making Telnet connections to the machine while you’re performing maintenance chores, for example. Use the Resume button to allow the service to continue servicing other users (provided you haven’t stopped the service).
Also in Figure 55.1, you can see that there are several tabs, each of which is used for a different set of properties that you can configure for the service. Using the General tab, you can change the display name for the service and the description of the service.
Tip
If one or more of the options (start, stop, pause, and so on) appear grayed out (unavailable), it’s because the current state of the Telnet server does not enable you to make the selection. For example, if the Telnet service has already been started, the Start button will not be available. Similarly, if the service is stopped, the Stop button will be grayed out and not available.
The Log On tab functions the same as for other services. You should be familiar with how services work on Windows Server before using this tab or the Recovery tab. For example, using the Log On tab, you can select the user account that the service is run under. The AUTHORITYLocalService account is typical for the Telnet service as well as many other services for Windows Server 2003. For Windows 2000 Server, the LocalSystem account is generally used for running services. At the bottom of the Log On tab, you can choose a hardware profile for which the service can be enabled or disabled. Select the particular hardware profile you want to modify and use the Enable or Disable button.
The Recovery tab, shown in Figure 55.2, determines how the service will be restarted if the service fails for some reason.
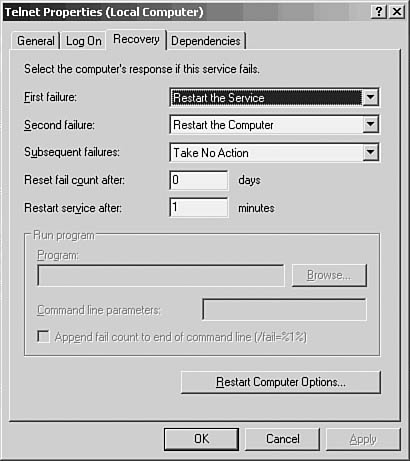
Figure 55.2. You can use the Recovery tab to decide what actions to take if the Telnet service fails.
The options available on the Recovery tab are
![]() First failure—Your options are to take no action (leave the service unavailable), restart the service, run a program (one other than the Telnet service, for example), or restart the computer. Using the restart option, Windows Server 2003 will attempt to restart the service. Selecting the Restart the Service option can be used if you suspect that the service was stopped because of some other problem with the server, and if you’ve selected the automatic startup type for this service.
First failure—Your options are to take no action (leave the service unavailable), restart the service, run a program (one other than the Telnet service, for example), or restart the computer. Using the restart option, Windows Server 2003 will attempt to restart the service. Selecting the Restart the Service option can be used if you suspect that the service was stopped because of some other problem with the server, and if you’ve selected the automatic startup type for this service.
![]() Subsequent failure—The options here are the same as for the First Failure drop-down list. However, the option you choose here will be used for each failure that occurs after the first failure. This can be modified by setting a value for the next field.
Subsequent failure—The options here are the same as for the First Failure drop-down list. However, the option you choose here will be used for each failure that occurs after the first failure. This can be modified by setting a value for the next field.
![]() Reset fail count after—If you leave this value at the default of 0, after the second failure, the next failure will take the action specified in the First Failure field. Otherwise, you can set the number of days that the service must run successfully before the failure count is reset to the First Failure field. A higher number of days will cause the service to use the action set in the Subsequent Failure field for that number of days. After the number of days you specify, the First Failure option will be used.
Reset fail count after—If you leave this value at the default of 0, after the second failure, the next failure will take the action specified in the First Failure field. Otherwise, you can set the number of days that the service must run successfully before the failure count is reset to the First Failure field. A higher number of days will cause the service to use the action set in the Subsequent Failure field for that number of days. After the number of days you specify, the First Failure option will be used.
![]() Restart service after—Use this field to set the number of minutes that the system will wait before attempting to restart the service. This value applies to both the First Failure and Subsequent Failure options, provided that you’ve selected the Restart the Service option.
Restart service after—Use this field to set the number of minutes that the system will wait before attempting to restart the service. This value applies to both the First Failure and Subsequent Failure options, provided that you’ve selected the Restart the Service option.
![]() Run Program—If you’ve selected Run a Program for either the First or Subsequent Failure fields, you can enter a program or a script file that will be run after a failure. This can be useful if you want to write a script file that notifies you that the service has failed, for example. You can use the Browse button to select a program or script file to run or just fill in the field labeled Program.
Run Program—If you’ve selected Run a Program for either the First or Subsequent Failure fields, you can enter a program or a script file that will be run after a failure. This can be useful if you want to write a script file that notifies you that the service has failed, for example. You can use the Browse button to select a program or script file to run or just fill in the field labeled Program.
![]() Command line parameters—Use this field to provide command-line parameters that will be passed to the program or script file, if you have chosen the Run Program option.
Command line parameters—Use this field to provide command-line parameters that will be passed to the program or script file, if you have chosen the Run Program option.
![]() Append fail count to end of command line—The number of failures can be passed to the program or script file using this field. For example, you might want the script file or program to know how many times the service has failed and take a different action based on this value.
Append fail count to end of command line—The number of failures can be passed to the program or script file using this field. For example, you might want the script file or program to know how many times the service has failed and take a different action based on this value.
The Restart Computer Options button enables you to specify the number of minutes after which the computer will restart, if you have chosen that option in the preceding fields. In Figure 55.3, you can see that you can also enter a message to display to users on the network who are using the Telnet service to inform them that the service is either not available or being restarted, depending on the options you selected on the Recovery tab. Use the Restart Computer Options button on the Recovery tab to display this dialog box.
Figure 55.3. Select the number of minutes after which the computer will be rebooted after the service fails, and enter a text message to send to users currently using the Telnet service.
The last tab, Dependencies, is used to list the other services that must be running before the Telnet service can be started. If one of these services fails, for example, the Telnet service itself can fail. And if there is a problem in restarting one of these services after the computer reboots (if you chose that option), the Telnet service will not restart. In this case, you should check the Event Viewer to determine the reason that a service that Telnet depends on isn’t restarting. If the Telnet service fails because a dependent service fails, you might consider using a script file to check for and restart dependent services.
Managing on Windows 2000 Server Telnet Server
After you’ve started the Telnet server service on the Windows 2000 Server, you can manage the server by using the Telnet Server Administration utility found in the Administrative Tools folder. As you can see in Figure 55.4, the interface to the Windows 2000 Server service utility is simple. You have the options of listing connected users or terminating users and the ability to start or stop the service.

Figure 55.4. The standard Windows 2000 Telnet server uses a simple interface for management purposes.
Option number 3 enables you to view current default settings that are stored in the Registry for the server. This option can be used to allow trusted domains access to the server, provide a logon script, and set the number of log failures before a user is locked out. An important feature you can use is one that forces users to use the more secure Windows NT NTLM authentication instead of the typical clear-text username/password method that is found in many typical Telnet server implementations. This should definitely be used in an all-Windows environment. However, Unix clients do not, by default, support this authentication method.
Note
The default Telnet server that comes with Windows 2000 Server allows for a maximum of two simultaneous Telnet sessions. If you need to allow more users to establish Telnet connections to the server, you’ll have to use the Telnet server provided by the Microsoft Services for Unix (SFU) package instead. SFU is discussed later in this chapter and supports as many as 63 client sessions.
There are excellent third-party Telnet servers you can use with Windows. If you intend to make heavy use of Telnet on your network, it’s worth investigating these competing products to determine which Telnet server is right for your needs. Don’t forget, however, to look first at the server that you can get from SFU. Because SFU is available for about $100—and you can install the products on as many Windows computers in your LAN as you want, with no additional fee—this more robust Telnet server (along with many other Unix-based utilities) is a bargain.
Telnet provides a character-cell terminal emulation that can be used to run applications that do not depend on the features provided by either the Windows GUI or its equivalent in the Unix world, the X Window System. For example, it’s easy to telnet into a Unix system to perform system administration tasks using a command-line interface provided by a shell. Script files can be edited and run remotely by using a Telnet session. Telnet is pretty much the standard for many operating systems for remote administration on a command-line basis. You can telnet to many different systems, each using a different operating system, and execute commands that are specific to that system. For example, from a Windows or Unix/Linux computer, you can telnet to an OpenVMS server, another Windows server, as well as all the various flavors of Unix/Linux. After the Telnet session has been established, just remember to use the commands that are appropriate for the operating system of the host you’ve established a session with. Telnet is a powerful application for system/network administrators who manage computers in the network that use different operating systems. Telnet servers have been imbedded in the firmware of many devices other than computers. For example, most printers, print servers, switches, and so on can be accessed using Telnet. This capability usually presents you with a menu to perform tasks specific to that device.
However, not all Windows administrative utilities have a command-line counterpart. And even when they do, you often find that the command-line version doesn’t provide the full capabilities that the GUI version does. The same, of course, applies to other operating systems. For example, although you can telnet to a Linux box from a Windows system, you might not be able to use all the system utilities offered in the KDE/Gnome and other X Window System GUI interfaces that can be used on Linux.
However, Telnet and FTP are perhaps the two most useful applications now available on most operating system platforms.
Managing Telnet on Windows Server 2003
When using the Windows 2000 Server Telnet server application, you saw that the Command Prompt was used with a menu to enable you to manage the Telnet server. For Windows Server 2003, a command-line interface is also used, but you’ll have to specify the option you want to manage instead of using a menu. The basic command used for all of these options is the tlntadmn command. If you enter just the tlntadmn command at the Command Prompt, with no qualifiers, a display (see Figure 55.5) shows you the current configuration of the Telnet server.

Figure 55.5. Use the tlntadmn command with no command-line parameters to display the current configuration of the Telnet server.
The syntax for this command varies depending on the function you want to perform. In the following examples, brackets are used to indicate optional components. You can use one or more of the command-line options listed here. The basic functions are
tlntadmn [\remoteserver] [start] [stop] [pause] [continue] [-u username -p password] [-s]
[-k (sessionid | all)] [-m (sessionid | all) "message"]
![]()
\remoteserver—Specifies another server that you want to administer instead of the local computer’s Telnet server.
![]()
start/stop/pause/continue—These options operate in the same manner as detailed previously when using the Administrative Tools Telnet service tool.
![]()
-u username and -p password—These command-line parameters can be used to specify a username and password that’s valid on the remote server. Note that the user account must be an administrator account or an account that’s a member of the Server Operators group.
![]()
-s sessionid—Use this parameter to list information about a session.
![]()
-k sessionid | all—Kill a session or use all to kill all sessions.
![]()
-m sessionid | all "message"—Send a message to a particular user (using the session ID) or to all users. Enclose the message in quotation marks.
There are other command-line options you can use in addition to these basic ones. Use the help function to see all the possible options you can use with the tlntadmn utility.
Figure 55.6 shows an example of using two of these commands. The first command (-s) lists the current session of a remote user who has used Telnet to connect to the server. The second command (-k sessionid) shows an example of how to use the session ID (under the column ID) to kill that connection. You can also see information about the session, such as the domain name of the initiator of the session, the username, the IP address, as well as the date/time that the session was established and the amount of idle time (time that no commands were being used by the remote user).

Figure 55.6. This is an example of using the -s and -k command-line options.
The File Transfer Protocol
Like the Telnet server, Windows NT/2000/2003/XP comes with an FTP client. For Windows NT 4.0 through Windows Server 2003, the FTP server is provided by installing Internet Information Services (IIS).
![]() Chapter 25, “Basic TCP/IP Services and Applications,” covers the actual mechanics of FTP in greater detail.
Chapter 25, “Basic TCP/IP Services and Applications,” covers the actual mechanics of FTP in greater detail.
The FTP Client
The FTP client can be utilized easily from the Command Prompt and uses the standard syntax that’s common to other FTP clients, with a few exceptions that you might not notice. For example, although many Unix/Linux servers require that you log in by using the command User <username>, the Windows version prompts you for the username after you issue the FTP command as well as the password for the account name you enter. This is a minor difference, but it’s important to note that although FTP is defined by a set of RFCs, some vendors add their own features to make the utility simpler to use.
The FTP server for Windows NT through Windows Server 2003 is a component of IIS, which is included as part of the installation procedure for Windows 2000. For Windows NT, you can use the icon that appears on the desktop of a Windows NT Server to install IIS or, better yet, download the newest version from Microsoft. IIS has been enhanced many times since its first release. Windows 2000 Server users will find that IIS is included on the server installation CD, but again, check for a newer version at Microsoft’s Web site. An important reason for this is that newer versions have fixed problems with previous ones. Of course, the reverse is also true in some cases. One problem is fixed by a newer version, but might introduce a new set of problems! In Figure 55.7, you can see an example of using the Windows 2000 FTP client.

Figure 55.7. The FTP client enables you to upload or download files from another server.
In this example, you can see that the command FTP is followed by the site you want to make a connection to. If the site is available only to authenticated users who have an account on the server, you have to enter a valid username and password for that server. Another method for logging into many sites is to use the username anonymous. The convention for using this login is to use your email address for the password prompt. After you’ve logged in to the FTP server, you can issue commands that are available on that server. For example, the commands ls and dir will usually produce a listing of files and directories for the main directory that’s set up for your login type. When using Unix/Linux or Windows clients, you can use the CD command to change to another directory until you find the data that you need to use. Notice that for most implementations of FTP, you must use lowercase characters for the commands and use the exact lowercase or uppercase syntax for a particular file. You can then use commands such as the following:
![]()
get—Use this command to retrieve a file from a remote server. For example, get filename.
![]()
put—Use this command to send a file to a remote server. For example, put filename.
![]()
mget—This command can be used with wildcards (such as * and ?) to retrieve multiple files that match the wildcards.
![]()
mput—This command works like mget, but enables you to send multiple files to the FTP server using wildcards.
![]()
hash—If you care to watch the progress of an operation such as sending or receiving a file, this command will print hash marks (#) to show you the progress of the operation.
![]()
binary/ascii—These commands specify the type of file you want to receive or send. ASCII files consist of simple text files, whereas binary files are usually executable files (application files, word processing files, and so on).
![]()
prompt—This command might not be available on all implementations of FTP. This command is generally used with the mget or mput commands. When using these commands with wildcards, you might be prompted to specify yes or no (Y/N) before sending a file. The prompt command eliminates these prompts and just downloads or uploads all files matching the file specification.
![]()
quit—This command is used to exit the FTP client.
Tip
Wildcards are used by many operating systems to indicate that you’re specifying certain characters that a filename must contain and at the same time specifying that other characters can be anything. The asterisk (*) wildcard means that any characters (and any number of characters) can be substituted for the filename. For example, using the filename of Yoko*.txt will retrieve (or send) any file that starts with Yoko, ends with .txt, and contains any number of characters between Yoko and the dot (.) delimiter.
Another wildcard, the question mark (?) can be used to specify a specific number of characters that can be used to match a get or put operation. For example, the filename secret???.txt means that the file must start with the text secret and be followed by just three characters and the filename extension .txt. Contrast this with the * wildcard which allows for any number of characters following those you specify.
Additionally, you can specify the * wildcard in a manner such as *.mpeg2 to send or receive any file that ends with the file extension of .mpeg2, no matter how many characters make up the first part of the filename. The same goes for using the ? wildcard, although it still specifies that only filenames that contain the same number of question marks will be sent or retrieved.
Managing the FTP Service on Windows Server 2003
To manage the basic FTP server on a Windows Server 2003 system, follow these steps:
1. Click Start, All Programs (Programs for Windows 2000) Administrative Tools, Internet Services (IIS) Manager.
2. The MMC console starts with the IIS snap-in. Click on the IIS server you want to manage (in this example, FTP sites).
3. Right-click on the FTP site you want to manage (the Default FTP site in our example) and select Properties.
4. The properties pages for the FTP server can then be used to configure the server (see Figure 55.8).

Figure 55.8. You can configure the FTP server using these properties sheets.
The Default FTP Site Properties page appears in this figure with the first tab (FTP Site) selected. You can use the Description field to change this from default to a more meaningful name. This can be useful if you’re using the MMC to manage multiple FTP sites on the same server or on other servers. The IP Address field can be used to select an IP address that the FTP service will use when listening for incoming requests, and the TCP Port field can be used to set which TCP port will be used for the service. In this example, the standard TCP port number of 21 is shown.
Other fields on this tab are fairly self-explanatory, enabling you to set the maximum number of users that can be connected to the server simultaneously and the number of seconds after which an idle session will be automatically disconnected from the server. At the bottom of this first property page, you can also enable logging for the service. The Active Log Format drop-down menu enables you to choose from
![]() Microsoft IIS Log File Format—This is a standard ASCII text file format. If you use this format, the information that’s stored in the log file is fixed.
Microsoft IIS Log File Format—This is a standard ASCII text file format. If you use this format, the information that’s stored in the log file is fixed.
![]() W3C Extended Log File Format—This also is an ASCII text file, but one that you can customize to select what events to log. This is the default format for the IIS FTP server.
W3C Extended Log File Format—This also is an ASCII text file, but one that you can customize to select what events to log. This is the default format for the IIS FTP server.
![]() ODBC Logging—This can be used to direct logging data to an ODBC-compliant database.
ODBC Logging—This can be used to direct logging data to an ODBC-compliant database.
The Properties button to the right of this drop-down menu enables you to further configure properties for the log file. For the Microsoft IIS log file format, there’s not much you can configure. The data that is written to the log file is a standard set of data. You can use the Properties button to configure when a new log file is created—this can range from hourly, daily, weekly, or monthly. Or you can set a maximum size to which the file can grow before a new file is created. Additionally, you can set the location of the log file. The default is %WinDir%System32LogFiles, where %WinDir% is a variable that resolves to the Windows system directory.
For the W3C extended log file format, you have many more options. In addition to being able to configure the same options about how or when a new log file is created and the location of the log file, this format has an additional tab labeled Advanced.
There are far too many data items to discuss in this chapter, but you need to be aware that you can create a customized log file that stores just the information you need. You might find that on an anonymous FTP server, you don’t care much about what data is stored in the log file, whereas on a server that provides for a secure logon, you might want to collect extensive data about the users of your system. To find out the meaning of each of these logging options, click the Help button and a brief description of each item will be displayed.
Caution
When using an FTP server that requires authentication using a username/password, you can usually be sure that a malicious user won’t abuse your site. However, when using anonymous FTP, you need to be aware that a simple hack is to use this anonymous account to fill up the allocated space so that other users cannot use the anonymous login. For more information about this topic, see Chapter 42, “Basic Security Measures Every Network Administrator Needs to Know.”
Other tabs on the FTP Site Properties page include
![]() Security Accounts—Use this tab to allow or disallow anonymous access to the FTP server. If you allow anonymous FTP connections, you also can configure the user account that will be used for these connections.
Security Accounts—Use this tab to allow or disallow anonymous access to the FTP server. If you allow anonymous FTP connections, you also can configure the user account that will be used for these connections.
![]() Messages—This tab enables you to input text that’s presented to the user when logging in to and upon exiting the service. You also can enter a message that will be displayed to users who try to log on to the server when the maximum number of user sessions has already been reached.
Messages—This tab enables you to input text that’s presented to the user when logging in to and upon exiting the service. You also can enter a message that will be displayed to users who try to log on to the server when the maximum number of user sessions has already been reached.
![]() Home Directory—This tab enables you to configure the home directory for this FTP service. You can select a directory that’s local to the server or a directory that’s offered as a file share from another computer. If you choose the file share option, you’ll be prompted to enter authentication information needed to connect to the file share. The default directory is
Home Directory—This tab enables you to configure the home directory for this FTP service. You can select a directory that’s local to the server or a directory that’s offered as a file share from another computer. If you choose the file share option, you’ll be prompted to enter authentication information needed to connect to the file share. The default directory is c:inetpub ftproot. Here you can select whether the directory can be read, written to, or both. You also can select to allow logging for this directory. Finally, this tab can be used to specify how directory listings are displayed to users. You can choose between the standard MS-DOS format and the standard Unix format.
![]() Directory Security—This tab is important because it enables you to decide which computers (or IP addresses) will be allowed to connect to the service. You can choose to allow all computers access and then specify a number of specific computers to exclude from access, or you can choose to deny access to all computers and then add in only those specific addresses you want to allow to use the service.
Directory Security—This tab is important because it enables you to decide which computers (or IP addresses) will be allowed to connect to the service. You can choose to allow all computers access and then specify a number of specific computers to exclude from access, or you can choose to deny access to all computers and then add in only those specific addresses you want to allow to use the service.
Note
When using the Directory Security tab to allow or deny access to the FTP service, remember that some computers use a proxy server. This is typically found when the computer to which you want to grant access is on the other side of a firewall. In this case, the address of the firewall (acting as a proxy server) uses its address when sending connection requests instead of the actual address of the client computer. If you allow (or deny) access in this manner, any computer that uses the proxy server will be allowed (or denied) access.
As you can see, the FTP service enables you to control who can access your server and to log each visit in detail. You can create additional FTP sites on the same computer. For example, if you have multiple network adapters or if you assign multiple IP addresses to the same adapter, you can create additional FTP sites on the same server. To add additional FTP sites on this server:
1. Highlight the computer server’s name in the left pane of the MMC console.
2. Click on Action, select New, and then FTP Site.
3. A wizard appears and prompts you through creating the site, enabling you to enter the necessary information, such as a description of the site, the IP address to use, and so on.
Of course, after you’ve created an additional site, you can further refine how it operates by using the properties pages for that site.
The Dynamic Host Configuration Protocol and BOOTP
Most Unix environments, which use TCP/IP for networking, use DHCP servers to provide network configuration information to clients on the network. DHCP is not a proprietary solution, but is based on standards that are defined in RFCs 2131 and 2132. Microsoft clients using TCP/IP can also use DHCP servers. Additionally, Windows Server (2000 and 2003) has a highly configurable DHCP server that supports options provided for in the RFCs as well as a few that are specific for Microsoft clients.
Tip
There are a few other proposed standards RFC documents that apply to DHCP. For more information, search the database at www.rfc-editor.org.
If you’re bringing Windows-based client systems into an existing Unix environment, configuring each Windows client with the address of a DHCP server will be simple. In an existing Windows network, you might want to stick with the Microsoft DHCP server. Because DHCP is based on Internet standards, most of the implementations you find will be compatible with both operating systems.
Bringing Unix clients into a network that uses Microsoft DHCP servers can cause even some seasoned Unix administrators to worry. DHCP servers have been around for quite a while on Unix networks, running on Unix servers, and Microsoft’s DHCP server is a relatively new creature on the market. However, because Microsoft’s DHCP server is built using the standards set forth in the relevant RFC documents, you should have no reason to worry. The graphical interface Microsoft’s version offers makes it even easier to manage the server and should be considered an advantage over some other products.
The DHCP server that you can install on Windows NT 4.0 through Windows Server 2003 is a full featured implementation that can be used to support clients no matter what their operating system. The configuration information that a DHCP server sends to clients is itself configurable through the use of DHCP options. Each option describes a parameter that can be configured for the client from information the DHCP server can provide.
![]() For more information about how BOOTP and DHCP function and how they can greatly simplify network administration tasks, refer to Chapter 28, “BOOTP and Dynamic Host Configuration Protocol (DHCP).”
For more information about how BOOTP and DHCP function and how they can greatly simplify network administration tasks, refer to Chapter 28, “BOOTP and Dynamic Host Configuration Protocol (DHCP).”
Microsoft’s DHCP server provides support for the options defined in RFC 1533, “DHCP Options and BOOTP Vendor Extensions.” In addition, it enables the administrator to define custom options when needed. This ability to create customized options makes the server flexible in a networking environment that consists of different client types. Additionally, it’s possible to set up the Microsoft DHCP service to run on a Windows 2000/2003 cluster, and thus provide redundancy for the network without having to divide the address space into separate scopes and place each scope on a separate server.
Before there was DHCP, there was BOOTP, which functions in a manner similar to DHCP. The BOOTP protocol is mainly used by diskless workstations, usually in a Unix network, to request addressing configuration information and to download an operating system. Microsoft’s DHCP server enables the administrator to create records in a BOOTP table that can be used to satisfy requests from this kind of client. When the DHCP server receives a BOOTP request from a client, it looks up the client in the table. If a record for that client is found, the server returns three pieces of information to the client:
![]() Boot Image—A generic filename for the boot file
Boot Image—A generic filename for the boot file
![]() File Name—The path to the boot image on a TFTP (Trivial File Transfer Protocol) server
File Name—The path to the boot image on a TFTP (Trivial File Transfer Protocol) server
![]() TFTP Server—The server from which the client can download the boot file
TFTP Server—The server from which the client can download the boot file
The Microsoft DHCP server responds to BOOTP clients with the information they need to download a boot file from another server. Unlike the standard DHCP lease, the BOOTP client does not have to renew the IP address periodically as regular DHCP clients do. Instead, a BOOTP client is managed like clients who use reserved DHCP addresses. Additionally, the DHCP server allows for many other options that can be used by BOOTP clients, as provided for in the RFCs.
DNS
DNS is the standard method used on the Internet to resolve host IP addresses to friendly names that humans find easier to remember. Microsoft NT 4.0/2000/2003 provide a DNS server that is based on RFC 1053 and can be used by both Microsoft clients and other clients that have been created based on this standard. This includes, of course, most Unix and Linux clients. Additionally, with Windows 2000 Server and Server 2003, Microsoft’s DNS server supports dynamic DNS, which is defined in RFC 2136, “Dynamic Updates in the Domain Name System (DNS UPDATE).” This enables clients to use DHCP to obtain an address, and then have that address automatically registered with the DNS server. This feature can be very useful if you have many mobile clients that move among different subnets. Manually updating a DNS server for every move could be a daunting task in a large network.
![]() Chapter 29 covers the implementation of DNS.
Chapter 29 covers the implementation of DNS.
If you already have a DNS server running on your network, you might wonder why you would want to use Microsoft’s DNS server when you add clients that are not running Unix or Linux. The answer is simple: In addition to providing support for dynamic DNS, Microsoft’s DNS server provides a WINS (Windows Internet Name Service) lookup feature that can further simplify network administration chores. It provides a service similar to what DNS does, but with an interesting twist. Microsoft’s DNS server has the capability to query a WINS server when it cannot resolve a name or address based on the information contained in its database.
Although DNS is basically used to perform IP address/name translations, WINS was developed to provide name resolution services for NetBIOS names. When a WINS client computer boots, it registers its NetBIOS name(s) with the WINS server along with its current network address. Sounds a lot like dynamic DNS, doesn’t it? If you incorporate DHCP into the network, you’ll be relieved of having to keep track of IP addresses for Microsoft clients as well as maintaining an address space when clients move or new clients are added to the network. Enabling Microsoft clients to use the WINS service eliminates the manual task of administering a name server to keep track of additions or changes to the network.
If you plan to move your network toward using only Windows 2000 Server or Windows Server 2003 and Windows XP, you probably won’t need WINS any more. It’s provided with Windows Server only for backward compatibility with earlier Microsoft operating systems. It’s possible to use both WINS and DNS in the same network with Windows Server and earlier systems. However, in a network that includes Unix, Linux, and Windows clients, you really don’t need WINS any more if the Windows clients are all Windows 2000 or above.
Applications
Does every user need a desktop computer in the first place? Years ago, when typewriters were the main “word processor,” they weren’t deployed on every desktop—that’s what administrative assistants were used for. Today, other applications, such as email, are essential for many users. However, that isn’t always true for every employee. For managers who have administrative assistants, a single desktop computer can suffice in many cases. And the administrative assistant—who is often already responsible for receiving emails and passing on important ones to the managers—can perform this function. Is it really necessary to put a computer on every desktop?
I’ve found it to be typical in many corporate environments to deploy a wide array of applications to all desktops, or to segmented groups of user desktops, that are never used and aren’t required for the user to perform his job function. Does every user in your company need every application for which you have purchased a site license? But the downside to this is that it might be more expensive to tailor desktops on a user-by-user basis than by groups or the entire enterprise as a whole. It’s a balancing act. Which is less expensive? Configuring (and paying for) applications that not every user needs, or spending your budget for administrative and help desk personnel to determine just what applications a user does need? I like to refer to this as application overload.
Both the Windows and Unix/Linux operating systems have their own strengths and weaknesses, and each can be used to solve certain problems more effectively than the other. By integrating these two systems into the same network, you can take advantage of each one’s best capabilities and enhance performance of the services provided to users.
For example, Microsoft makes the majority of its profits based on sales of operating systems and the Microsoft Office suite of products. There are many alternatives. One of these is offered by two different organizations. The OpenOffice initiative is an open source suite of applications that, although not as sophisticated as Microsoft Office, is free. And the spreadsheet and word processor applications can read/write files based on Microsoft formats, for the most part. In a recent test, I found that the OpenOffice spreadsheet program does a better job of printing these files to fit-to-page than Microsoft Office does in some cases.
Visit the Web site http://www.openoffice.org. You’ll even find a Mac OS X version at this site. If you want to purchase similar software, with enhancements and support from the vendor, you can contact Sun Microsystems using the URL www.sun.com. There you’ll find StarOffice, which can be installed on Solaris, Linux, as well as Windows systems. This product isn’t free, but does have a respected vendor backing it, so you can expect to get a good amount of support if you decide to adopt it in your network.
Whichever you choose, OpenOffice and StarOffice both provide a subset of the functionality of Microsoft’s Office product. Unless you need all the bells and whistles provided by Microsoft Office, consider this alternative. And because Microsoft Office products continue to incorporate new features that many users don’t need, you might find that OpenOffice and StarOffice are all that you need for your business. This book was written using all three.
There are two approaches you can take to integrating these two kinds of systems in one network. First, you can use the features Microsoft provides for the Windows environment, which were derived from standards that were developed in the Unix world—such as TCP/IP and the standard suite of utilities that have been written around it (FTP and Telnet, for example). Second, you can use third-party applications, such as Samba, that have been created to allow Windows Server Message Block (SMB) and Common Internet File System (CIFS) functionality to be installed on Unix/Linux platforms. This last approach seems to be the path that Microsoft will be taking in the near future, heralded by the release of the Microsoft Services for Unix (SFU) version 3.0. SFU provides components from Microsoft and other vendors that can make life easier for a Unix administrator who inherits a network of Windows clients.
![]() Refer to Chapter 31, “File Server Protocols,” for more about Samba, SMB, and CIFS.
Refer to Chapter 31, “File Server Protocols,” for more about Samba, SMB, and CIFS.
Microsoft Windows Services for Unix 3.5
Instead of trying to tackle the enormous job of developing still more applications to make it easier to integrate Unix and Windows into a cohesive network, Microsoft chose to take advantage of developments by other vendors and instead released the Windows NT Services for Unix Add-On Pack. This set of applications contains in-house applications developed by Microsoft as well as products licensed and bought from other companies. Now simply called Services for Unix (SFU) Version 3.5, this optional software, which can be downloaded for free, contains applications that were developed by Microsoft and other vendors, but that can be downloaded as a single package.
Not all the services available in SFU 3.0 are discussed in this chapter, but Table 55.1 can give you an idea of what types of software are available in SFU 3.0 and which platforms they can be used on.
Table 55.1. Services Provided by the SFU 3.5 Package

Tip
To download SFU 3.5, go to the “Windows Services for UNIX” page at www.microsoft.com/technet/interopmigration/unix/sfu/default.mspx. This page contains white papers and other documentation for SFU 3.5 and older versions of SFU. Windows 2000 must be updated to Service Pack 4, and Windows XP must be updated to Service Pack 1 or greater to support SFU 3.5.
SFU 3.5 has been tested to work with Solaris 7 and 8, HP-UX 11i, Redhat Linux 8.0, and IBM AIX 5L 5.2, although it is likely to work with other UNIX implementations as well.
In addition, you’ll find many other components, such as support for Sun’s Network Information System (NIS) among others.
SFU 3.5 can be run on Windows 2000 and Server 2003, and even Windows XP Professional. In this chapter, Windows XP will be the example. Perhaps the best thing about SFU, besides its price (free!), is that you can install it on as many computers in your network as you want. You don’t have to buy a license or additional copies of the software for each computer.
Installing SFU 3.5
Installing SFU 3.5 is a simple task, as explained in this section. Note that some of the dialog boxes and steps in the following text might not appear during your installation. This example is based on installing all components of SFU 3.5. If you select less than all components, only dialog boxes for those components will appear. To begin the installation:
1. Browse to the download location (it’s a 217MB file) and double-click it to start. Click Run if prompted. Use Browse to specify a location for the uncompressed files. Click Unzip when prompted to extract the files. Click OK when prompted, then Close.
2. Browse to the location you selected for the files in Step 1. Double-click Setup. Click Next to continue.
3. The next wizard dialog box asks you to enter customer information (your name and organization name). After you click Next, the End User License Agreement (EULA) dialog box appears. Read the licensing information, click the I Accept The Agreement radio button, and then click Next.
4. You’re then presented with a dialog box asking whether you want to select the standard installation or a custom installation. I suggest you select the custom installation because doing so gives you the ability to select just the components you want to install. Using the Custom Installation radio button, you can make choices in the next dialog box.
5. In Figure 55.9, you can see the Selecting Components dialog box (if you chose to perform a custom installation). Some of the entries in this dialog box can be expanded by clicking on the plus sign (+) to reveal additional components. To get a brief description of each component, click once and read the text that appears at the bottom of the dialog box under the Description label.

Figure 55.9. This dialog box enables you to select which components to install when performing a custom installation.
6. Use the arrow button (pointing downward) to reveal the options for each component. The options you can select are a) Will be installed on local hard drive, b) Entire feature (including all subfeatures if any) will be installed on the local hard drive, or c) Entire feature will not be available. An icon that looks like a hard drive will be displayed for each component you select to install. A red X will appear by a component you’ve chosen not to install. Click Next.
7. If you chose to install the Interix GNU SDK (software development kit), the next wizard dialog box gives you information about the GNU license. If you accept these licensing terms, click Next. If you don’t accept them, click Back and deselect that option.
8. Figure 55.10 shows another license dialog box; this one appears if you chose to install ActiveState Perl. This license is presented as an option because the component is provided by a third-party software developer instead of Microsoft. Click I Accept the Agreement radio button and then click Next to continue. Otherwise, click the Back button to deselect this option.
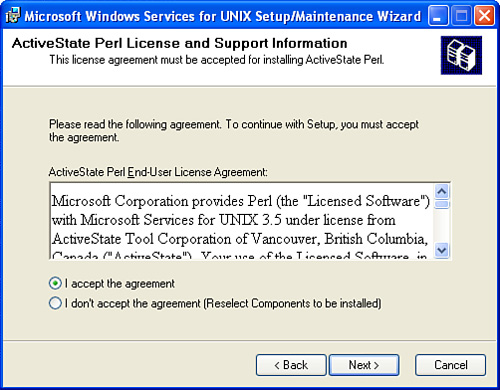
Figure 55.10. Some components of SFU 3.5 are provided by third-party software developers and require you to accept the terms of their license before you can install that component of SFU.
9. Figure 55.11 shows an important dialog box that might be displayed, depending on which components you chose to install. You can enable the setuid options for programs that run under the Interix system, and change Windows default from case-insensitive behavior to case sensitive. This is because the Unix and Linux operating systems use case-sensitive filenames. For example, MyFile.txt is not the same file as MYFILE.TXT.

Figure 55.11. Select options that enable certain features to behave the same as if they were running on a Unix/Linux computer.
10. If you’ve decided to install username mapping, a dialog box will ask you to enter the name of the server that runs this service. You can enter the server name here or enter it at a later time if you don’t know the name of the server. Click Next.
11. If you chose to install the NIS/Password Synchronization component, the next wizard screen informs you that this feature will need to be installed on all replicas of domain controllers in your domain and that the Active Directory schema will be changed. Remember that changes to the schema cannot be deleted, although they can be disabled.
12. In Figure 55.12, the wizard lets you choose the hard drive and directory path that will be used to install the SFU components. Make your choices and click Next.

Figure 55.12. Select the drive and directory path for the SFU installation.
13. A wizard screen will show the progress as the installation of SFU components are installed. After the selected components have been installed, the services for SFU will be started. This can take a few minutes, depending on the services chosen and the hardware of your server.
14. Finally, a wizard screen will inform you that the SFU components have been installed, and that some services, such as cron and some of the Interix daemons (background processes similar to services in Windows operating systems), have not been started. To start these, use Start/Administrative Tools/Services for Windows XP or Windows Server 2003 (or Start/Programs/Administrative Tools/Services for Windows 2000) to start or stop the new services that have now been added to Windows.
After the installation has finished, you have to restart your server to make all components available.
Network File System
The NFS client allows Windows clients to connect to NFS file systems hosted on Unix servers. The client can connect to the file system exported by a Unix server using several methods. The simplest method is to use the Windows Explorer Accessory; click on My Network Places, and select the server you want to connect to from the right-side pane. Then use Tools, Map Network Drive to make a drive letter to the NFS file share. You also can use the command line to connect to NFS file systems. To make matters simpler for a network that’s composed of both Unix and Windows users, several syntaxes are supported:
![]()
net use—The standard Windows net use command can be used to connect just as you can to a normal Windows file share. The specification of the resource to which you want to connect can be expressed as a standard Windows file share (net use * \serversharename), or you can use a format that’s similar to using the Unix mount command (net use * server/sharename). Note, however, that the second (Unix) syntax will result in the connection being set up more quickly.
![]()
mount—Those of you more familiar with NFS might prefer to use the mount command. Again, you can use either the Windows or Unix format to specify the resource to which you want to connect; for example, mount server/sharename * or mount \serversharename.
In the preceding syntax examples, the asterisk character causes the next available drive letter to be assigned to the resource. You also can specify a particular drive letter. In either case, after the connection has been made to the NFS resource, you can then use Windows applications to access files on the resource just as if they were Windows file shares.
SFU also provides for these:
![]() Server for NFS—Use this to allow Unix clients to access file shares on Windows NT through Windows 2003 computers using standard Unix NFS commands. After this component is installed, you can offer a Windows directory as a file share by clicking on the NFS Sharing tab that’s located on the properties page for a directory using Windows Explorer. Alternatively, you can use the command line to offer a directory on a Windows server to create the NFS share. The syntax for this is
Server for NFS—Use this to allow Unix clients to access file shares on Windows NT through Windows 2003 computers using standard Unix NFS commands. After this component is installed, you can offer a Windows directory as a file share by clicking on the NFS Sharing tab that’s located on the properties page for a directory using Windows Explorer. Alternatively, you can use the command line to offer a directory on a Windows server to create the NFS share. The syntax for this is nfsshare sharename=drive:path.
![]() Gateway for NFS—Use this when your Windows clients need to make only moderate use of Unix NFS file systems. By using a gateway, you need to load SFU on only a single server, and it acts as a gateway, making the connections to Unix NFS file systems for Windows clients. The Windows clients connect to a file share offered by the gateway. If your Windows clients will be using NFS resources heavily, load the SFU client software instead so that the gateway does not become a bottleneck in a bandwidth-limited network.
Gateway for NFS—Use this when your Windows clients need to make only moderate use of Unix NFS file systems. By using a gateway, you need to load SFU on only a single server, and it acts as a gateway, making the connections to Unix NFS file systems for Windows clients. The Windows clients connect to a file share offered by the gateway. If your Windows clients will be using NFS resources heavily, load the SFU client software instead so that the gateway does not become a bottleneck in a bandwidth-limited network.
![]() Server for PCNFS—This component enables a Windows NT or Windows Server to act as a PCNFSD server. This provides for authentication when connecting to NFS resources.
Server for PCNFS—This component enables a Windows NT or Windows Server to act as a PCNFSD server. This provides for authentication when connecting to NFS resources.
Using these components, you can grant access to both sets of clients—Unix or Windows—to files stored on the other’s systems. One limitation you should note for the gateway service is that you’re still stuck with the drive letter limitation. Suppose that your network has a large number of Unix servers and each exports an NFS file system. For each connection, the gateway server will use one of its drive letters that could normally be mapped to a regular Windows file share.
The Korn Shell
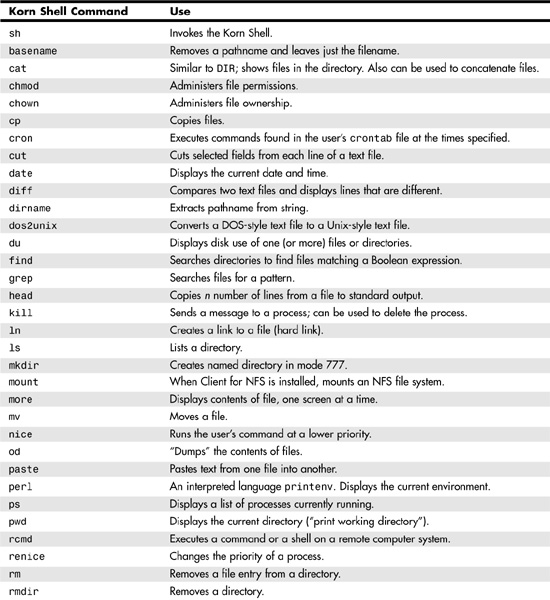
The Korn Shell commands that SFU gives to Windows NT/2000/2003 and Windows XP enable you to use existing script files that run on Unix systems. For users trained on Unix systems, the Korn Shell commands make it much easier to add Windows computers to their flock of computers that must be administered. Table 55.2 lists the most useful commands provided by SFU.
Table 55.2. Korn Shell Unix Commands Provided by the Add-On Pack

Tip
Although SFU 3.5 provides a great deal of functionality to Windows that appeals to Unix/Linux administrators, there are other products that can offer similar functionality. Some are comprehensive, such as SFU, whereas others offer partial solutions. For example, see http://www.cygwin.com for a Linux set of utilities that you might find more useful in your Windows environment.
Some of these commands, such as mkdir and find, are already familiar to Windows NT users. However, their functions in the Korn Shell might differ from those provided by the standard Windows implementation. For Unix administrators, the addition of these commands can make moving into managing Windows NT and Windows Server computers a simpler transition. You can use the Unix commands listed in Table 55.1 and, at the same time, become familiar with the Windows Script Host (WSH). WSH enables you to create scripts using VBScript or JScript so that you aren’t stuck using only the familiar MS-DOS commands that have been the mainstay for creating script files on Windows systems for more than 20 years. In addition, SFU provides an implementation of Perl that can be used with WSH.
Password Synchronization
In Version 1 of SFU, the password synchronization feature enabled you to configure a group of Unix servers so that when a user’s password was changed on a Windows NT server, the change was propagated to the user’s accounts on those target Unix servers. Because the application ran only on the Windows NT computer, it was a one-way service. That is, changes made on the Unix servers were not sent back to the Windows NT computer.
Versions 2 and 3 of SFU now make this functionality a two-way street. To use this SFU component, you’ll need to load the Password Synchronization service on the Windows Server (or NT) and, additionally, you’ll have to run a daemon (called a Single Sign-On Daemon, or SSOD for short) on each Unix box that will participate in the password-update process. SFU Version 3.5 comes with versions of the daemon that have been compiled for the following variants of Unix:
![]() HP-UX 11i
HP-UX 11i
![]() Sun Solaris 7, 8
Sun Solaris 7, 8
![]() IBM AIX 5L 5.2
IBM AIX 5L 5.2
![]() Red Hat Linux
Red Hat Linux
However, if your Unix isn’t in this list, you can still use the synchronization daemon. SFU comes with the source code and make-files that you can use to compile a version for your particular system. The SSOD daemon is the background process that receives password changes from Windows computers. Another program, called the Password Authentication Manager (PAM), is used on the Unix server to send password changes made on the Unix system to Windows systems.
There are a few things about the synchronization process to consider before you deploy this service in your network. First, if your Windows computers are participating in a domain, you’ll have to run the service on all the domain controllers in that domain. If you use Windows NT or Windows 2000 in a workgroup (or simply as standalone computers), you’ll have to run the service on each computer if you want the passwords to stay synchronized among all the Windows computers.
Note
Although most large Windows NT and Windows Server networks use the Active Directory to make managing network users, computers, and resources an easier task, you can still run Windows NT/2000/2003 as standalone computers. In that situation, each computer stores user and computer account information locally instead of in the Active Directory. That’s why you must run the Password Synchronization service on each Windows computer if you don’t use a domain or an Active Directory model for your network. Each computer must be capable of receiving password changes and applying them to the local database. In a domain-based environment, where users log on to the domain, only the domain controllers need to run the service.
Another caveat you must keep in mind is that Unix account names and passwords are case sensitive. Therefore, you’ll have to create accounts on your Windows and Unix systems that are exactly the same. If you already have accounts set up in your network that have users with different account names on different systems, you’ll have to pick a single account name for the user and then re-create the account on each computer so that they all match.
Finally, in addition to providing the capability to synchronize passwords between the Windows systems and those that are stored on individual Unix computers (in the /etc/passwd file, for example), you also can synchronize passwords with Unix networks that use the Network Information Service (NIS). Just install the SSOD on a master NIS or NIS+ server.
User Name Mapping
If you have an environment in which users already have accounts on both Unix and Windows servers that aren’t the same, SFU provides a component that can be used to map the different usernames. You can map usernames in a one-to-one manner or in a one-to-many manner. For example, you can create an entry that maps the name togletree to TOGLETREE. Or if you want the user to be able to access multiple user accounts, you can map the user’s account name to several different account names. This second feature proves very useful if you have an assortment of Unix servers and each server has a different name used for an administrative account. You can map a single Windows user account name to each of the user accounts on the various Unix servers. Or you can use this multiple-mapping feature to map the typical Unix account called root to more than one Windows administrative account.
The advantages of multiple mappings might not seem very intuitive at first, but let’s consider an example. Suppose that you want to enable the Unix administrator in your network to manage some, but not all, of your Windows-based systems. You can create a user account on each Windows computer and grant it the necessary rights and permissions. Then map the root account to these new account names. That way you don’t have to simply map root to Administrator, which would give access to all computers in the domain.
One final note about username mapping: It isn’t a substitute for password synchronization. Remember that password synchronization, discussed in the previous section, requires that user account names be exactly the same on the computers that are participating in the synchronization process. User Name Mapping is simply another tool you can use to manage users who have accounts on both systems. If you’re creating a network from scratch or if you can easily create user accounts on all of your systems that are the same, you probably won’t need to use User Name Mapping and simply can let the users have a single account name on all systems, keeping passwords synchronized. Password synchronization will not work to synchronize passwords for accounts that are linked using User Name Mapping!
New Telnet Server and Client
SFU also includes a Telnet server for Windows servers, and a character-cell–style client application that greatly improves on the simple GUI Telnet client that comes with the standard Windows client operating systems. That makes it easy to use Telnet to log in to Windows server computers to perform system administration tasks or run character-cell–based user applications.
However, if you’re using Windows Server computers, this new Telnet client is already on your computer. It’s now the standard client for Windows 2000 computers. Simply use the telnet command at the Command Prompt. Alternatively, click Start, Run, enter telnet, and click OK. If you use the telnet command at the Command Prompt, you can specify a target computer on which you want to establish a session. If you use the Start, Run method, you’ll find the client starts up in console mode, as shown in Figure 55.13.

Figure 55.13. The new Telnet client will start in console mode if you use the Start/Run method to start the program.
For those not familiar with console mode, it simply means that the client is ready to accept configuration commands or open a session with a remote system. In Figure 55.13, you can see that the ? character has been used to display the help text that you can access while in console mode. If you simply want to telnet to a remote system, use the open <remotesystem> command. After you exit the remote system, you can return to console mode by holding down Ctrl and then the right-bracket (]) key.
Note
After you use the open command to start a Telnet session with a remote computer, you can use the Ctrl+] key sequence to escape to console mode. This can be useful if you need to use the display command to show your current configuration, such as the terminal emulation type. Suppose that you open a session and find that certain keys don’t seem to work as you expect. You can escape to console mode, check your current settings (using the display command), and then use the set command to change to a different terminal type. Then simply use the close command to close the session you started, and use the open command to re-establish a session with the remote system. The terminal types that you can emulate using the set command are ANSI, VT100, VT52, and VTNT.
Some users who are accustomed to using the GUI Telnet client might not appreciate you giving them a simple character cell type of Telnet client. However, the new version is actually faster than the older GUI client and offers more features than its predecessor.
Although Windows server operating systems come with an excellent Telnet server (as described earlier in this chapter), SFU also provides a Telnet server that will run on Windows servers. The new server also supports logging to the Windows event log or to a separate log file, and you can choose which events you want to store in the log file. Instead of using the Internet Services Manager to manage and configure the Telnet server, you can load the SFU snap-in for the Microsoft Management Console (MMC) or you can use a command-line utility, tnadmin. Both methods enable you to configure the standard options discussed earlier in this chapter. This includes selecting which authentication method to use, enabling logging, setting the maximum number of connections (remember that the Windows server versions allow for only 2 simultaneous connections, whereas this SFU version allows for up to 63), and other parameters.
Caution
You should only use Secure Shell (SSH), now up to version 2, for remote administration. Telnet is sent in clear-text and your credentials can easily be sniffed off your network segment and used to enter the devices you are trying to protect.
ActiveState ActivePerl 5.8
Web site administrators will be glad to see this SFU component because it’s used on a lot of Web servers. Additionally, Perl can be used for other functions, such as automating system management procedures. The version included with SFU is Perl 5.8 (including Perl Script), ported to the Windows platform. Your Windows clients also will be pleased because this port of Perl provides support for the Windows Script Host (WSH). By including Perl with the SFU package, it becomes easier for Unix or Web administrators who are already familiar with the language to manage systems or Web sites that run on Windows servers. WSH enables those coming from the Windows camp to continue to use JScript, VBScript, and other procedural languages with which they are used to working.
Samba
Samba is a set of applications that’s freely available on the Internet. Samba enables you to set up Unix servers that can act as file servers for Microsoft clients that use the older SMB (server message block) protocol.
![]() Chapter 31 covers the Microsoft Server Message Block (SMB) protocol along with Samba.
Chapter 31 covers the Microsoft Server Message Block (SMB) protocol along with Samba.
Using Samba, you can make resources running on high-performance Unix/Linux servers available to Microsoft clients on the same network. The reverse is also true. You can offer file shares to Windows clients when those files (or printer) shares exist on Unix/Linux systems.
You can obtain Samba, as well as documentation for Samba, from www.samba.org.
Sun Network Information System
NIS is used on Unix networks to keep important system files, such as the password file, synchronized among a group of servers. Remember that on Unix systems, each server has a password file, a user group file, and other important files that are managed locally on each server by default. This is similar to using a Windows computer in a standalone manner where each Windows computer has its own user account database.
NIS uses a database of maps that contain entries for the files the system administrator chooses to keep synchronized. For redundancy purposes, a master NIS server can be used along with slave NIS servers that receive updates from the master server.
SFU version 3.5 contains a component that can be used to allow a Windows Server domain controller to operate as a NIS server. The Windows server can operate as either a master or slave NIS server. However, if it is to operate as a slave server, the master NIS server on the network must also be a Windows server. This is due to the way NIS is implemented in Windows Server: The information that Unix NIS servers store in a map database is stored in the Active Directory. The Active Directory schema is extended to include a class for each NIS map. Then objects are created based on this class for each map entry.
NIS uses its own protocol to send updates from a master NIS server to slave servers. The Active Directory, on the other hand, has its own method for replication information to other Active Directory replicas. The two methods are not compatible. That’s the reason why a Windows domain controller cannot be made a slave NIS server to a Unix master NIS server. However, Microsoft does provide support for the NIS protocol so that Unix systems can become slaves to a Windows 2000 master NIS server! So, if you decide to integrate NIS into the Windows 2000 portion of your network, you’ll have to make a Windows domain controller the master NIS server.
The advantages of using NIS should be obvious. On Unix networks, NIS relieves the administrator of having to manually coordinate important system files on multiple servers. By incorporating the SFU NIS server into the network on a Windows domain controller, you can use the tools designed around the Active Directory to manage not only your Windows users but also users on your Unix systems.
Another advantage to using a Windows-based NIS server is that the Active Directory is a hierarchical database, whereas the NIS database format is a flat namespace. You can place NIS maps into any container in the Active Directory, such as an organizational unit (OU). You can probably figure out from this that you can support multiple NIS domains in the same Active Directory database.