

The mm Macros
A macro package provides a way of describing the format of various kinds of documents. Each document presents its own specific problems, and macros help to provide a simple and flexible solution. The mm macro package is designed to help you format letters, proposals, memos, technical papers, and reports. A text file that contains mm macros can be processed by either nroff or troff, the two text formatting programs in UNIX. The output from these programs can be displayed on a terminal screen or printed on a line printer, a laser printer, or a typesetter.
Some users of the mm macro package learn only a few macros and work productively. Others choose from a variety of macros to produce a number of different formats. More advanced users modify the macro definitions and extend the capabilities of the package by defining their own special-purpose macros.
Macros are the words that make up a format description language. Like words, the result of a macro is often determined by context. That is, you may not always understand your output by looking up an individual macro, just like you may not understand the meaning of an entire sentence by looking up a particular word. Without examining the macro definition, you may find it hard to figure out which macro is causing a particular result. Macros are interrelated; some macros call other macros, like a subroutine in a program, to perform a particular function.
After finding out what the macro package allows you to do, you will probably decide upon a particular format that you like (or one that has evolved according to the decisions of a group of people). To describe that format, you are likely to use only a few of the macros, those that do the job. In everyday use, you want to minimize the number of codes you need to format documents in a consistent manner.
▪ Formatting a Text File ▪
To figure out the role of a macro package such as mm, it may help to consider the distinction between formatting and format. Formatting is an operation, a process of supplying and executing instructions. You can achieve a variety of results, some pleasing, some not, by any combination of formatting instructions. A format is a consistent product, achieved by a selected set of formatting instructions. A macro package makes it possible for a format to be recreated again and again with minimal difficulty. It encourages the user to concentrate more on the requirements of a document and less on the operations of the text formatter.
Working with a macro package will help reduce the number of formatting instructions you need to supply. This means that a macro package will take care of many things automatically. However, you should gradually become familiar with the operations of the nroff/troff formatter and the additional flexibility it offers to define new formats. If you have a basic understanding of how the formatter works, as described in Chapter 4, you will find it easier to learn the intricacies of a macro package.
Invoking nroff/troff with mm
The mm command is a shell script that invokes the nroff formatter and reads in the files that contain the mm macro definitions before processing the text file(s) specified on the command line.
$ mm option(s) filename(s)
If more than one file is specified on the command line, the files are concatenated before processing. There are a variety of options for invoking preprocessors and postprocessors, naming an output device, and setting various number registers to alter default values for a document. Using the mm command is the same as invoking nroff explicitly with the -mm option.
Unless you specify otherwise, the mm command sets nroff’s -T option to the terminal type set in your login environment. By default, output is sent to the terminal screen. If you have problems viewing your output, or if you have a graphics terminal, you may want to specify another device name using the -T option. For a list of available devices, see Appendix B. The mm command also has a -c option, which invokes the col filter to remove reverse linefeeds, and options to invoke tbl(-t) and eqn(-e).
When you format a file to the screen, the output usually streams by too swiftly to read, just as when you cat a file to the screen. Pipe the output of the mm command through either of the paging programs, pg or more, to view one screenful at a time. This will give you a general indication that the formatting commands achieved the results you had expected. To print a file formatted with mm, simply pipe the output to the print spooler (e.g., lp) instead of to a screen paging program.
Many of the actions that a text formatter performs are dependent upon how the document is going to be printed. If you want your document to be formatted with troff instead of nroff, use the mmt command (another shell script) or invoke troff directly, using the -mm option. The mmt command prepares output for laser printers and typesetters. The formatted output should be piped directly to the print spooler (e.g., lp) or directed to a file and printed separately. You will probably need to check at your site for the proper invocation of mmt if your site supports more than one type of laser printer or typesetter.
If you are using otroff, be sure you don’t let troff send the output to your terminal because, in all probability, it will cause your terminal to hang, or at least to scream and holler.
In this chapter, we will generally show the results of the mm command, rather than mmt—that is, we’ll be showing nroff rather than troff. Where the subject under discussion is better demonstrated by troff, we will show troff output instead. We assume that by now, you will be able to tell which of the programs has been used, without our mentioning the actual commands.
Problems in Getting Formatted Output
When you format an mm-coded document, you may only get a portion of your formatted document. Or you may get none of it. Usually, this is because the formatter has had a problem executing the codes as they were entered in the input file. Most of the time it is caused by omitting one of the macros that must be used in pairs.
When formatting stops like this, one or more error messages might appear on your screen, helping you to diagnose the problems. These messages refer to the line numbers in the input file where the problems appear to be, and try to tell you what is missing:
ERROR:(filename) line numberError message
Sometimes, you won’t get error messages, but your output will break midway. Generally, you have to go in the file at the point where it broke, or before that point, and examine the macros or a sequence of macros. You can also run a program on the input file to examine the code you have entered. This program, available at most sites, is called checkmm.
Default Formatting
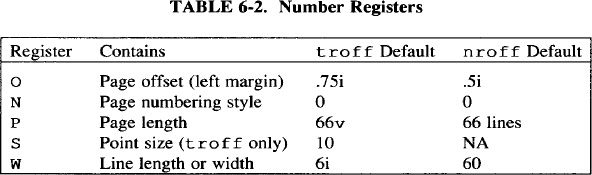
In Chapter 4, we looked at a sample letter formatted by nroff. It might be interesting, before putting any macros in the file, to see what happens if we format letter as it is, this time using the mm command to read in the mm macro package.
Refer to Figure 6-1 and note that
- a page number appears in a header at the top of the page;
- the address block still forms two long lines;
- lines of input text have been filled, forming block paragraphs;
- the right margin is ragged, not justified as with
nroff; - the text is not hyphenated;
- space has been allocated for a page with top, bottom, left, and right margins.

Fig. 6-1. A Raw mm-formatted File
▪ Page Layout ▪
When you format a page with mm, the formatter is instructed to provide several lines at the top and the bottom of the page for a header and a footer. By default, a page number appears on a single line in the header and only blank lines are printed for the footer.
There are basically two different ways to change the default header and footer. The first way is to specify a command-line parameter with the mm or mmt commands to set the number register N. This allows you to affect how pages are numbered and where the page number appears. The second way is to specify in the input file a macro that places text in the header or footer. Let’s look at both of these techniques.
Setting Page Numbering Style
When you format a document, pages are numbered in sequence up to the end of the document. This page number is usually printed in the header, set off by dashes.
-1-
Another style of page numbering, used in documents such as technical manuals, numbers pages specific to a section. The first page of the second section would be printed as:
2-1
The other type of change affects whether or not the page number is printed in the header at the top of the first page.
The number register N controls these actions. This register has a default setting of 0 and can take values from 0 through 5. Table 6-1 shows the effect of these values.
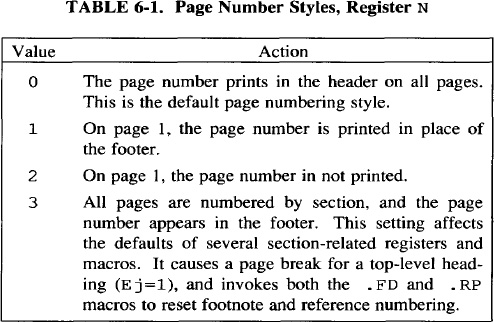
The register N can be set from the command line using the -r option. If we set it to 2, no page number will appear at the top of page 1 when we print the sample letter:
$ mm -rN2 letter | lp
Header and Footer Macros
The mm package has a pair of macros for defining what should appear in a page header (.PH) and a page footer (.PF). There is also a set of related macros for specifying page headers and footers for odd-numbered pages (.OH and .OF) or for even-numbered pages (.EH and .EF). All of these macros have the same form, allowing you to place text in three places in the header or footer: left justified, centered, and right justified. This is specified as a single argument in double quotation marks, consisting of three parts delimited by single quotation marks.
’left’center’right’
For example,  we  could place the name of  a client, the

title of the  document, and the date in the page header,

and we could place the page number in the footer:
.PH "’GGS’Alcuin Project Proposal’*(DT’"

.PF "’’Page % ’’"
You may notice that we use the string DT to supply today’s date in the header. The following header appears at the top of the page.
GGS Alcuin Project Proposal April 26, 1987
In the footer, we use a special symbol (%) to access the current page number. Only text to be centered was specified; however, the four delimiters were still required to place the text correctly. This footer appears at the bottom of the page:
The header and footer macros override the default header and footer.
Setting Other Page Control Registers
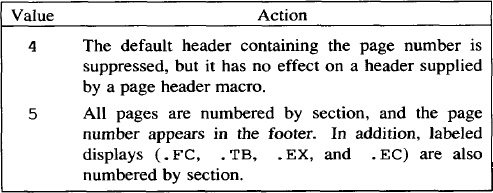
The mm package uses number registers to supply the values that control line length, page offset, point size, and page length, as shown in Table 6-2.
These registers must be defined before the mm macro package is read by nroff or troff. Thus, they can be set from the command line using the -r option, as we showed when we gave a new value for register N. Values of registers O and W for nroff must be given in character positions (depending on the character size of the output device for nroff, .5i might translate as either 5 or 6 character positions), but troff can accept any of the units descibed in Chapter 4. For example:
$ mm -rN2 -rW65 -r10 file
but:
$ mmt -rN2 -rW6.5i -rOli file
Or the page control registers can be set at the top of your file, using the .so request to read in the mm macro package, as follows:
.nr N 2

.nr W 65

.nr O 10

.so /usr/lib/tmac/tmac.m
If you do it this way, you cannot use the mm command. Use nroff or troff without the -mm option. Specifying -mm would cause the mm macro package to be read twice; mm would trap that error and bail out.
Paragraphs
The .P macro marks the beginning of a paragraph.
.P

In our conversation last Thursday, we discussed a
This macro produces a left-justified, block paragraph. A blank line in the input file also results in a left-justified, block paragraph, as you saw when we formatted an uncoded file.
However, the paragraph macro controls a number of actions in the formatter, many of which can be changed by overriding the default values of several number registers. The .P macro takes a numeric argument that overrides the default paragraph type, which is a block paragraph. Specifying 1 results in an indented paragraph:
.P 1

Going through a demo session gave me a much better
The first three paragraphs formatted for the screen follow:
In our conversation last Thursday, we discussed a

documentation project that would produce a user’s manual

on the Alcuin product.  Yesterday, I received the product

demo and other materials that you sent me.
Going through a demo session gave me a much better

understanding of the product. I confess to being amazed

by Alcuin. Some people around here, looking over my

shoulder, were also astounded by the illustrated

manuscript I produced with Alcuin. One person, a student

of calligraphy, was really impressed.
In the next couple of days, I’ll be putting together a

written plan that presents different strategies for

documenting the Alcuin product. After I submit this plan,

and you have had time to review it, let’s arrange a

meeting at your company to discuss these strategies.
The first line of the second paragraph is indented five spaces. (In troff the default indent is three ens.) Notice that the paragraph type specification changes only the second paragraph. The third paragraph, which is preceded in the input file by .P without an argument, is a block paragraph.
If you want to create a document in which all the paragraphs are indented, you can change the number register that specifies the default paragraph type. The value of Pt is 0 by default, producing block paragraphs. For indented paragraphs, set the value of Pt to 1. Now the .P macro will produce indented paragraphs.
.nr Pt 1
If you want to obtain a block paragraph after you have changed the default type, specify an argument of 0:
When you specify a type argument, it overrides whatever paragraph type is in effect.
There is a third paragraph type that produces an indented paragraph with some exceptions. If Pt is set to 2, paragraphs are indented except those following section headings, lists, and displays. It is the paragraph type used in this book.
The following list summarizes the three default paragraph types:
0 Block1 Indented2 Indented with exceptions
Vertical Spacing
The paragraph macro also controls the spacing between paragraphs. The amount of space is specified in the number register Ps. This amount differs between nroff and troff.
With nroff, the .P macro has the same effect as a blank line, producing a full space between paragraphs. However, with troff, the .P macro outputs a blank space that is equal to one-half of the current vertical spacing setting. Basically, this means that a blank line will cause one full space to be output, and the .P macro will output half that space.
The .P macro invokes the .SP macro for vertical spacing. This macro take a numeric argument requesting that many lines of space.
Sincerely,

.SP 3

Fred Caslon
Three lines of space will be provided between the salutation and the signature lines.
You do not achieve the same effect if you enter .SP macros on three consecutive lines. The vertical space does not accumulate and one line of space is output, not three.
Two or more consecutive .SP macros with numeric arguments results in the spacing specified by the greatest argument. The other arguments are ignored.
.SP 5

.SP

.SP 2
In this example, five lines are output, not eight.
Because the .P macro calls the .SP macro, it means that two or more consecutive paragraph macros will have the same effect as one.
The .SP Macro versus the .sp Request
There are several differences between the .SP macro and the .sp request. A series of .sp requests does cause vertical spacing to accumulate. The following three requests produce eight blank lines:
.sp 5

.sp

.sp 2
The argument specified with the .SP macro cannot be scaled nor can it be a negative number. The .SP macro automatically works in the scale (v) of the current vertical spacing. However, both .SP and .sp accept fractions, so that each of the following codes has the same result:
.sp .3v .SP .3 .sp .3
▪ Justification ▪
A document formatted by nroff with mm produces, by default, unjustified text (an uneven or ragged-right margin). When formatted by troff, the same document is automatically justified (the right margin is even).
If you are using both nroff and troff, it is probably a good idea to explicitly set justification on or off rather than depend upon the default chosen by the formatter. Use the .SA macro (set adjustment) to set document-wide justification. An argument of 0 specifies no justification; 1 specifies justification.
If you insert this macro at the top of your file:
.SA 1
both nroff and troff will produce right-justified paragraphs like the following:
In our conversation last Thursday, we discussed

a documentation project that would produce a user’s

manual on the Alcuin product. Yesterday, I received the

product demo and other materials that you sent me.
▪ Word Hyphenation ▪
One way to achieve better line breaks and more evenly filled lines is to instruct the formatter to perform word hyphenation.
Hyphenation is turned off in the mm macro package. This means that the formatter does not try to hyphenate words to make them fit on a line unless you request it by setting the number register Hy to 1. If you want the formatter to automatically hyphenate words, insert the following line at the top of your file:
Most of the time, the formatter breaks up a word correctly when hyphenating. Sometimes, however, it does not and you have to explicitly tell the formatter either how to split a word (using the .hy request) or not to hyphenate at all (using the .nh request).
▪ Displays ▪
When we format a text file, the line breaks caused by carriage returns are ignored by nroff/troff. How text is entered on lines in the input file does not affect how lines are formed in the output. It doesn’t really matter whether information is typed on three lines or four; it appears the same after formatting.
You probably noticed that the name and address at the beginning of our sample file did not come out in block form. The four lines of input ran together and produced two filled lines of output:
Mr. John Fust Vice President, Research and Development

Gutenberg Galaxy Software Waltham, Massachusetts 02159
The formatter, instead of paying attention to carriage returns, acts on specific macros or requests that cause a break, such as .P, .SP, or a blank line. The formatter request .br is probably the simplest way to break a line:
Mr. John Fust

.br

Vice President, Research and Development
The .br request is most appropriate when you are forcing a break of a single line. For larger blocks of text, the mm macro package provides a pair of macros for indicating that a block of text should be output just as it was entered in the input file. The .DS (display start) macro is placed at the start of the text, and the .DE (display end) macro is placed at the end:
.DS

Mr. John Fust

Vice President, Research and Development

Gutenberg Galaxy Software

Waltham, Massachusetts 02159

.DE
The formatter does not fill these lines, so the address block is output on four lines, just as it was typed. In addition, the .DE macro provides a line of space following the display.
Our Coding Efforts, So Far
We have pretty much exhausted what we can do using the sample letter. Before going on to larger documents, you may want to compare the coded file in Figure 6-2 with the nroff-formatted output in Figure 6-3. Look them over and make sure you understand what the different macros are accomplishing.
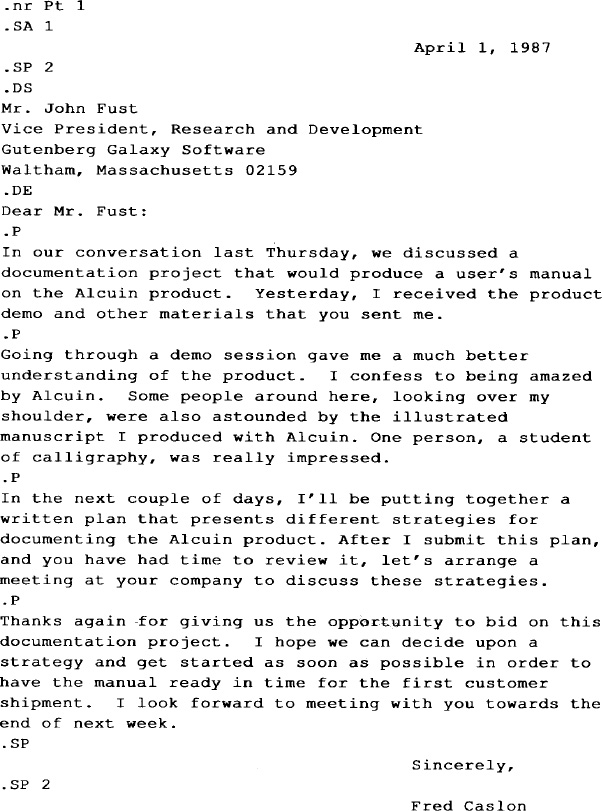
Fig. 6-2. Coded File
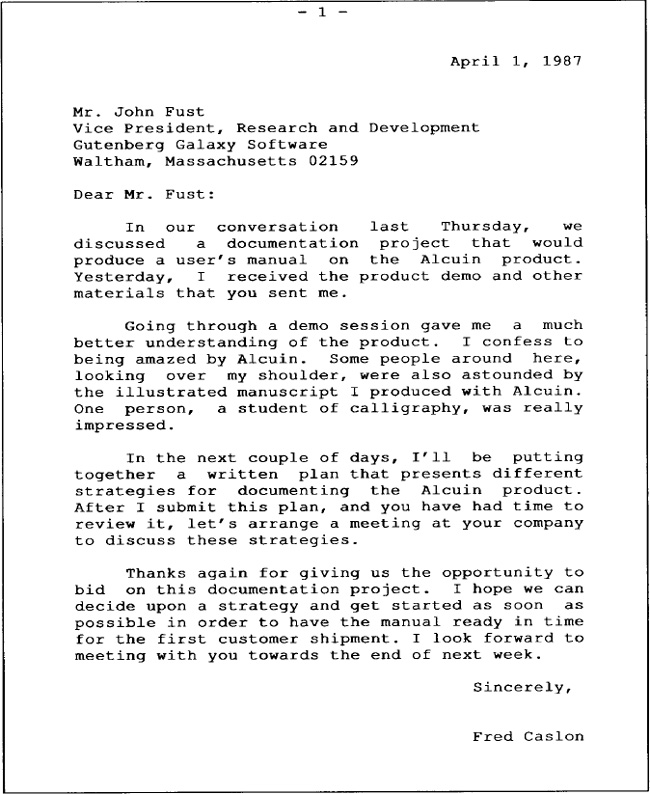
Fig. 6-3. Formatted Output
We have worked through some of the problems presented by a very simple one-page letter. As we move on, we will be describing specialized macros that address the problems of multiple page documents, such as proposals and reports. In many ways, the macros for more complex documents are the feature performers in a macro package, the ones that really convince you that a markup language is worth learning.
▪ Changing Font and Point Size ▪
When you format with nroff and print on a line printer, you can put emphasis on individual words or phrases by underlining or overstriking. When you are using troff and send your output to a laser printer or typesetter, you can specify variations of type, font, and point size based on the capabilities of the output device.
Roman, Italic, and Bold Fonts
Most typefaces have at least three fonts available: roman, bold, and italic. Normal body copy is printed in the roman font. You can change temporarily to a bold or italic font for emphasis. In Chapter 4, you learned how to specify font changes using the .ft request and inline f requests. The mm package provides a set of mnemonic macros for changing fonts:
.B Bold.I Italic.R Roman
Each macro prints a single argument in a particular font. You might code a single sentence as follows:
.B Alcuin

revitalizes an

.I age-old

tradition.
The printed sentence has a word in bold and one in italic. (In nroff, bold space is simulated by overstriking, and italics by underlining.)
Alcuin revitalizes an age-old tradition.
If no argument is specified, the selected font is current until it is explicitly changed:
The art of

.B

calligraphy

.R

is, quite simply,

.I

beautifu1

.R

handwriting;
The previous example produces:
The art of calligraphy is, quite simply, beautiful handwriting;
You’ve already seen that the first argument is changed to the selected font. If you supply a second argument, it is printed in the previous font. Each macro takes up to six arguments for alternating font changes. (An argument is set off by a space; a phrase must be enclosed within quotation marks to be taken as a single argument.) A good use for the alternate argument is to supply punctuation, especially because of the restriction that you cannot begin an input line with a period.
its opposite is

.B cacography .
This example produces:
its opposite is cacography.
If you specify alternate arguments consisting of words or phrases, you must supply the spacing:
The ink pen has been replaced by a

.I light " pen."
This produces:
The ink pen has been replaced by a light pen.
Here’s an example using all six arguments:
Alcuin uses three input devices, a

.B "light pen" ", a " "mouse" ", and a " "graphics tablet."
This produces:
Alcuin uses three input devices, a light pen, a mouse, and a graphics tablet.
There are additional macros for selecting other main and alternate fonts. These macros also take up to six arguments, displayed in alternate fonts:
.BR Alternate bold and roman.IB Alternate italic and bold.RI Alternate roman and italic.BI Alternate bold and italic.IR Alternate italic and roman.RB Alternate roman and bold
If you are using nroff, specifying a bold font results in character overstrike; specifying an italic font results in an underline for each character (not a continuous rule). Overstriking and underlining can cause problems on some printers and terminals.
Changing Point Size
When formatting with troff, you can request a larger or smaller point size for the type. A change in the point size affects how much vertical space is needed for the larger or smaller characters. Normal body copy is set in 10-point type with the vertical spacing 2 points larger.
You learned about the .ps (point size) and .vs (vertical spacing) requests in Chapter 4. These will work in mm; however, mm also has a single macro for changing both the point size and vertical space:
.S [point size] [vertical spacing]
The values for point size and vertical spacing can be set in relation to the current setting: + increments and − decrements the current value. For example, you could specify relative point size changes:
.S +2 +2
or absolute ones:
.S 12 14
By default, if you don’t specify vertical spacing, a relation of 2 points greater than the point size will be maintained. A null value ("") does not change the current setting.
The new point size and vertical spacing remain in effect until you change them. Simply entering the .S macro without arguments restores the previous settings:
.S
The mm package keeps track of the default, previous, and current values, making it easy to switch between different settings using one of these three arguments:
D DefaultP PreviousC Current
To restore the default values, enter:
.S D
The point size returns to 10 points and the vertical spacing is automatically reset to 12 points. To increase the vertical space to 16 points while keeping the point size the same, enter:
.S C 16
In the following example for a letterhead, the company name is specified in 18-point type and a tag line in 12-point type; then the default settings are restored:
.S 18

Caslon Inc.

.S 12

Communicating Expertise

.S D
The result is:
Caslon Inc.
Communicating Expertise
You can also change the font along with the point size, using the .I macro described previously. Following is the tag line in 12-point italic.
Communicating Expertise
A special-purpose macro in mm reduces by 1 point the point size of a specified string. The .SM macro can be followed by one, two, or three strings. Only one argument is reduced; which one depends upon how many arguments are given. If you specify one or two arguments, the first argument will be reduced by 1 point:
using

.SM UNIX ,

you will find
The second argument is concatenated to the first argument, so that the comma immediately follows the word UNIX:
using UNIX, you will find
If you specify three arguments:
.SM [ UNIX ]
The second argument is reduced by one point, but the first and third arguments are printed in the current point size, and all three are concatenated:
▪ More about Displays ▪
Broadly speaking, a display is any kind of information in the body of a document that cannot be set as a normal paragraph. Displays can be figures, quotations, examples, tables, lists, equations, or diagrams.
The display macros position the display on the page. Inside the display, you might use other macros or preprocessors such as tbl or eqn. You might simply have a block of text that deserves special treatment.
The display macros can be relied upon to provide
- adequate spacing before and after the display;
- horizontal positioning of the display as a left justified, indented, or centered block;
- proper page breaks by keeping the entire display together.
The default action of the .DS macro is to left justify the text block in no-fill mode. It provides no indentation from the current margins.
You can specify a different format for a display by specifying up to three arguments with the .DS macro. The syntax is:
.DS [format] [fill mode] [right indent]
The format argument allows you to specify an indented or centered display. The argument can be set by a numeric value or a letter corresponding to the following options:
0 L No indent (default)1 I Indented2 C Center each line3 CB Center entire display
For consistency, the indent of displays is initially set to be the same as indented paragraphs (five spaces in nroff and three ens in troff), although these values are maintained independently in two different number registers, Pi and Si. (To change the defaults, simply use the .nr request to put the desired value in the appropriate register.)
A display can be centered in two ways: either each individual line in the display is centered (C) or the entire display is centered as a block based on the longest line of the display (CB).
For instance, the preceding list was formatted using tbl, but its placement was controlled by the display macro.
.DS CB

.TS
table specifications
.TE.DEThe fill mode argument is represented by either a number or a letter.
0 N No-fill mode (default)1 F Fill mode
The right indent argument is a numeric value that is subtracted from the right margin. In nroff, this value is automatically scaled in ens. In troff, you can specify a scaled number; otherwise, the default is ems.
The use of fill mode, along with other indented display options, can provide a paragraph indented on both sides. This is often used in reports and proposals that quote at length from another source. For example:
.P

I was particularly interested in the following comment

found in the product specification:

.DS I F 5

Users first need a brief introduction to what the product

does.  Sometimes this is more for the benefit of people

who haven’t yet bought the product, and

are just looking at the manual.

However, it also serves to put the rest of

the manual, and the product itself, in the proper context.

.DE
The result of formatting is:
I was particularly interested in the following comment

found in the the product specification:
Users first  need  a  brief  introduction to

what the product  does.   Sometimes  this is

more for the  benefit of people  who haven’t

yet bought the product, and are just looking

at the manual.  However, it  also  serves to

put the rest of the manual,  and the product

itself, in the proper context.
The use of tabs often presents a problem outside of displays. Material that has been entered with tabs in the input file should be formatted in no-fill mode, the default setting of the display macros. The following table was designed using tabs to provide the spacing:
.DF I

Dates          Description of Task


June 30        Submit audience analysis

July 2         Meeting to review audience analysis

July 15        Submit detailed outline

August 1       Submit first draft

August 5       Return of first draft

August 8       Meeting to review comments

.DE
This table appears in the output just as it looks in the file. If this material had not been processed inside a display in no-fill mode, the columns would be improperly aligned.
Static and Floating Displays
There are two types of displays, static and floating. The difference between them has to do with what happens when a display cannot fit in its entirety on the current page. Both the static and the floating display output the block at the top of the next page if it doesn’t fit on the current page; however, only the floating display allows text that follows the display to be used to fill up the preceding page. A static display maintains the order in which a display was placed in the input file.
We have already used .DS and .DE to mark the beginning and end of a static display. To specify a floating display, the closing mark is the same, but the beginning is marked by the .DF macro. The options are the same as for the .DS macro.
In the following example of an input file, numbers are used instead of actual lines of text:
1

2

3

4

5

.DF
Long Display
.DE

6

7

8

9

10
The following two formatted pages might be produced, assuming that there are a sufficient number of lines in the display to cause a page break:
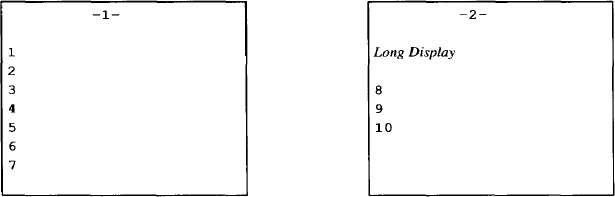
If there had been room on page 1 to fit the display, it would have been placed there, and lines 6 and 7 would have followed the display, as they did in the input file.
If a static display had been specified, the display would be placed in the same position on page 2, and lines 6 and 7 would have to follow it, leaving extra space at the bottom of page 1. A floating display attempts to make the best use of the available space on a page.
The formatter maintains a queue to hold floating displays that it has not yet output. When the top of a page is encountered, the next display in the queue is output. The queue is emptied in the order in which it was filled, (first in, first out). Two number registers, De and Df, allow you to control when displays are removed from the queue and placed in position.
At the end of a section, as indicated by the section macros .H and .HU (which we will see shortly), or at the end of the input file, any floating displays that remain in the queue will be placed in the document.
Display Labels
You can provide a title or caption for tables, equations, exhibits, and figures. In addition, the display can be labeled and numbered in sequence, as well as printed in a table of contents at the end of the file. The following group of macros are available:
.EC Equation.EX Exhibit.FG Figure
All of these macros work the same way and are usually specified within a pair of .DS/.DE macros, so that the title and the display appear on the same page. Each macro can be followed by a title. If the title contains spaces, it should be enclosed within quotation marks. The title of a table usually appears at the top of a table, so it must be specified before the .TS macro that signals to tbl the presence of a table (see Chapter 8).
The label is centered:
Table 1. List of Required Resources
If the title exceeds the line length, then it will be broken onto several lines. Additional lines are indented and begin at the first character of the title.
Table 1. List of Required
Resources Provided by Gutenberg Galaxy Software
The label for equations, exhibits, and figures usually follows the display. The following:
.FG "Drawing with a Light Pen"
produces a centered line:
Figure 1. Drawing with a Light Pen
The default format of the label can be changed slightly by setting the number register Of to 1. This replaces the period with a dash.
Figure 1 — Drawing with a Light Pen
Second and third arguments, specified with the label macros, can be used to modify or override the default numbering of displays. Basically, the second argument is a literal and the third argument a numeric value that specifies what the literal means.
If the third argument is
0 then the second argument will be treated as a prefix;1 then the second argument will be treated as a suffix;2 then the second argument replaces the normal table number.
Thus, a pair of related tables could be specified as la and lb using the following labels:
.TB "Estimated Hours: June, July, and August" a 1

.TB "Estimated Hours: September and November," lb 2
(These labels show two different uses of the third argument. Usually, you would consistently use one technique or the other for a given set of tables.)
For tbl, the delimiters for tables are .TS/.TE. For eqn, the delimiters for equations are .EQ/.EN. For pic, the delimiters for pictures or diagrams are .PS/.PE. These pairs of delimiters indicate a block to be processed by a specific preprocessor. You will find the information about each of the preprocessors in Chapters 8 through 10. As mentioned, the preprocessor creates the display, the display macros position it, and the label macros add titles and a number.
Although it may seem a minor point, each of these steps is independent, and because they are not fully integrated, there is some overlap.
The label macros, being independent of the preprocessors, do not make sure that a display exists or check whether a table has been created with tbl. You can create a two-column table using tabs or create a figure using character symbols and still give it a label. Or you can create a table heading as the first line of your table and let tbl process it (tbl won’t provide a number and the table won’t be collected for the table of contents).
In tbl, you can specify a centered table and not use the .DS/.DE macros. But, as a consequence, nroff/troff won’t make a very good attempt at keeping the table together on one page, and you may have to manually break the page. It is recommended that you use the display macros throughout a document, regardless of whether you can get the same effect another way, because if nothing else you will achieve consistency.
▪ Forcing a Page Break ▪
Occasionally, you may want to force a page break, whether to ensure that a block of related material is kept together or to allow several pages for material that will be manually pasted in, such as a figure. The .SK (skip) macro forces a page break. The text following this macro is output at the top of the next page. If supplied with an argument greater than 0, it causes that number of pages to be skipped before resuming the output of text. The “blank” pages are printed, and they have the normal header and footer.
On the next page, you will find a sample page from an

Alcuin manuscript printed with a 16-color plotter.

.SK 1
▪ Formatting Lists ▪
The mm macro package provides a variety of different formats for presenting a list of items. You can select from four standard list types:
- bulleted
- dashed
- numbered
- alphabetized
In addition, you have the flexibility to create lists with nonstandard marks or text labels. The list macros can also be used to produce paragraphs with a hanging indent.
Each list item consists of a special mark, letter, number, or label in a left-hand column with a paragraph of text indented in a right-hand column.
Structuring a List
The list macros help to simplify what could be a much larger and tedious formatting task. Here’s the coding for the bulleted list just shown:
.BL

.LI

bulleted

.LI

dashed

.LI

numbered

.LI

alphabetized

.LE
The structure of text in the input file has three parts: a list-initialization macro (.BL), an item-mark macro (.LI), and a list-end macro (.LE).
First, you initialize the list, specifying the particular macro for the type of list that you want. For instance, BL initializes a bulleted list.
You can specify arguments with the list-initialization macro that change the indentation of the text and turn off the automatic spacing between items in the list. We will examine these arguments when we look at the list-initialization macros in more detail later.
Next, you specify each of the items in the list. The item-mark macro, .LI, is placed before each item. You can enter one or more lines of text following the macro.
.BL

.LI

Item 1

.LI

Item 2

.LI

Item 3
When the list is formatted, the .LI macro provides a line of space before each item. (This line can be omitted through an argument to the list-initialization macro if you want to produce a more compact list. We’ll be talking more about this in a moment.)
The .LI macro can also be used to override or prefix the current mark. If a mark is supplied as the only argument, it replaces the current mark. For example:
If a mark is supplied as the first argument, followed by a second argument of 1, then the specified mark is prefixed to the current mark. The following:
.LI - 1
Item 5
would produce:
• Item 5
A text label can also be supplied in place of the mark, but it presents some additional problems for the proper alignment of the list. We will look at text labels for variable-item lists.
The .LI macro does not automatically provide spacing after each list item. An argument of 1 can be specified if a line of space is desired.
The end of the list is marked by the list-end macro .LE. It restores page formatting settings that were in effect prior to the invocation of the last list-initialization macro. The .LE macro does not output any space following the list unless you specify an argument of 1. (Don’t specify this argument when the list is immediately followed by a macro that outputs space, such as the paragraph macro.)
Be sure you are familiar with the basic structure of a list. A common problem is not closing the list with .LE. Most of the time, this error causes the formatter to quit at this point in the file. A less serious, but nonetheless frequent, oversight is omitting the first .LI between the list-initialization macro and the first item in the list. The list is output but the first item will be askew.
Here is a sample list:
.BL
.LI
Item 1
.LI
.Item 2
.LI
.Item 3
.LI o

Item 4
.LI - 1

Item 5
.LE
The troff output produced by the sample list is:
• Item 1
• Item 2
• Item 3
• Item 4
• Item 5
Complete list structures can be nested within other lists up to six levels. Different types of lists can be nested, making it possible to produce indented outline structures. But, like nested if-then structures in a program, make sure you know which level you are at and remember to close each list.
For instance, we could nest the bulleted list inside a numbered list. The list-initialization macro .AL generates alphabetized and numbered lists.
.AL

.LI

Don’t worry, we’ll get to the list-initialization macro .AL.

You can specify five different variations of

alphabetic and numbered lists.

.BL

.LI

Item 1

.LI

Item 2

.LI

Item 3

.LE

.LI

We’ll also look at variable-item lists.

.LE
This input produces the following formatted list from troff:
1. Don’t worry, we’ll get to the list-initialization macro .AL. You can specify five different variations of alphabetic and numbered lists.
• Item 1
• Item 2
• Item 3
2. We’ll also look at variable-item lists.
You may already realize the ease with which you can make changes to a list. The items in a list can be easily put in a new order. New items can be added to a numbered list without readjusting the numbering scheme. A bulleted list can be changed to an alphabetized list by simply changing the list-initialization macro. And you normally don’t have to be concerned with a variety of specific formatting requests, such as setting indentation levels or specifying spacing between items.
On the other hand, because the structure of the list is not as easy to recognize in the input file as it is in the formatted output, you may find it difficult to interpret complicated lists, in particular ones that have been nested to several levels. The code-checking program, checkmm, can help; in addition, you may want to format and print repeatedly to examine and correct problems with lists.
Marked Lists
Long a standby of technical documents, a marked list clearly organizes a group of related items and sets them apart for easy reading. A list of items marked by a bullet (•) is perhaps the most common type of list. Another type of marked list uses a dash (—). A third type of list allows the user to specify a mark, such as a square (![]() ). The list-initialization macros for these lists are:
). The list-initialization macros for these lists are:
.BL [text indent][1].DL [text indent][1].ML [mark][text indent][1]
With the .BL macro, the text is indented the same amount as the first line of an indented paragraph. A single space is maintained between the bullet and the text. The bullet is right justified, causing an indent of several spaces from the left margin.
As you can see from this nroff-formatted output, the bullet is simulated in nroff by a + overstriking an o:
Currently, the following internal documentation is available on the Alcuin product:
⊕ GGS Technical Memo 3200
⊕ GGS Product Marketing Spec
⊕ Alcuin/UNIX interface definition
⊕ Programmer’s documentation for Alcuin
If you specify a text indent, the first character of the text will start at that position. The position of the bullet is relative to the text, always one space to its left.
If the last argument is 1, the blank line of space separating items is omitted. If you want to specify only this argument, you must specify either a value or a null value ("") for a text indent.
.BL "" 1
It produces a much more compact list:
⊕ GGS Technical Memo 3200
⊕ GGS Product Marketing Spec
⊕ Alcuin/UNIX interface definition
⊕ Programmer’s documentation for Alcuin
Because the bullets produced by nroff are not always appropriate due to the overstriking, a dashed list provides a suitable alternative. With the .DL macro, the dash is placed in the same position as a bullet in a bulleted list. A single space is maintained between the dash and the text, which, like the text with a bulleted list, is indented by the amount specified in the number register for indented paragraphs (Pi).
The nroff formatter supplies a dash that is a single hyphen, and troff supplies an em dash. Because the em dash is longer, and the dash is right justified, the alignment with the left margin is noticeably different. It appears left justified in troff; in nroff, the dash appears indented several spaces because it is smaller.
The third chapter on the principles of computerized font design should cover the following topics:
- Building a Font Dictionary
- Loading a Font
- Scaling a Font
You can specify a text indent and a second argument of 1 to inhibit spacing between items.
With the .ML macro, you have to supply the mark for the list. Some possible candidates are the square (enter (sq to get ![]() ), the square root (enter
), the square root (enter (sr to get √), which resembles a check mark, and the gradient symbol (enter (gr to get ∇). The user-specified mark is the first argument.
.ML (sq
Not all of the characters or symbols that you can use in troff will have the same effect in nroff.
Unlike bulleted and dashed lists, text is not automatically indented after a user-specified mark. However, a space is added after the mark. The following example of an indented paragraph and a list, which specifies a square as a mark, has been formatted using nroff. The square appears as a pair of brackets.
[ ] Remove old initialization files.
[ ] Run install program.
[ ] Exit to main menu and choose selection 3.
The user-supplied mark can be followed by a second argument that specifies a text indent and a third argument of 1 to omit spacing between items.
The following example was produced using the list-initialization command:
.ML (sq 5 1
The specified indent of 5 aligns the text with an indented paragraph:
Check to see that you have completed the following steps:
[ ] Remove old initialization files.
[ ] Run install program.
[ ] Exit to main menu and choose selection 3.
Numbered and Alphabetic Lists
The .AL macro is used to initialize automatically numbered or alphabetized lists. The syntax for this macro is:
.AL [type] [text indent] [1]
If no arguments are specified, the .AL macro produces a numbered list. For instance, we can code the following paragraph with the list-initialization macro .AL:
User-oriented documentation recognizes three things:

.AL

.LI

that a new user needs to learn the system in stages,

getting a sense of the system as a whole while becoming

proficient in performing particular tasks;

.LI

that there are different levels of users, and not every

user needs to learn all the capabilities of the system

in order to be productive;

.LI

that an experienced user must be able to rely on the

documentation for accurate and thorough reference

information.

.LE
to produce a numbered list:
User-oriented documentation recognizes three things:
1. that a new user needs to learn the system in stages, getting a sense of the system as a whole while becoming proficient in performing particular tasks;
2. that there are different levels of users, and not every user needs to learn all the capabilities of the system in order to be productive;
3. that an experienced user must be able to rely on the documentation for accurate and thorough reference information.
The number is followed by a period, and two spaces are maintained between the period and the first character of text.
The level of text indent, specified in the number register Li, is 6 in nroff and 5 in troff. This value is added to the current indent. If a text indent is specified, that value is added to the current indent, but it does not change the value of Li.
The third argument inhibits spacing between items in the list. Additionally, the number register LS can be set to a value from 0 to 6 indicating a nesting level. Lists after this level will not have spacing between items. The default is 6, the maximum nesting depth. If Ls were set to 2, lists only up to the second level would have a blank line of space between items.
Other types of lists can be specified with .AL, using the first argument to specify the list type, as follows:
1 1, 2, 3 NumberedA A, B, C Alphabetic (uppercase)a a, b, c Alphabetic (lowercase)I I, II, III Roman numerals (uppercase)i i, ii, iii Roman numerals (lowercase)
You can produce various list types by simply changing the type argument. You can create a very useful outline format by nesting different types of lists. The example we show of such an outline is one that is nested to four levels using I, A, 1, and a, in that order. The rather complicated looking input file is shown in Figure 6-4 (indented for easier viewing of each list, although it could not be formatted this way), and the nroff-formatted output is shown in Figure 6-5.
Another list-initialization macro that produces a numbered list is .RL (reference list). The only difference is that the reference number is surrounded by brackets ([]).
.RL [text indent][1]
The arguments have the same effect as those specified with the .AL macro. To initialize a reference list with no spacing between items, use:
.RL "" 1
It produces the following reference list:
[1] The Main Menu
[2] Menus or Commands?
[3] Error Handling
[4] Getting Help
[5] Escaping to UNIX
Variable-Item Lists
With a variable-item list, you do not supply a mark; instead, you specify a text label with each .LI. One or more lines of text following .LI are used to form a block paragraph indented from the label. If no label is specified, a paragraph with a hanging indent is produced. The syntax is:
.VL text indent [label indent][1]
Unlike the other list-initialization macros, a text indent is required. By default, the label is left justified, unless a label indent is given. If you specify both a text indent and a label indent, the indent for the text will be added to the label indent.
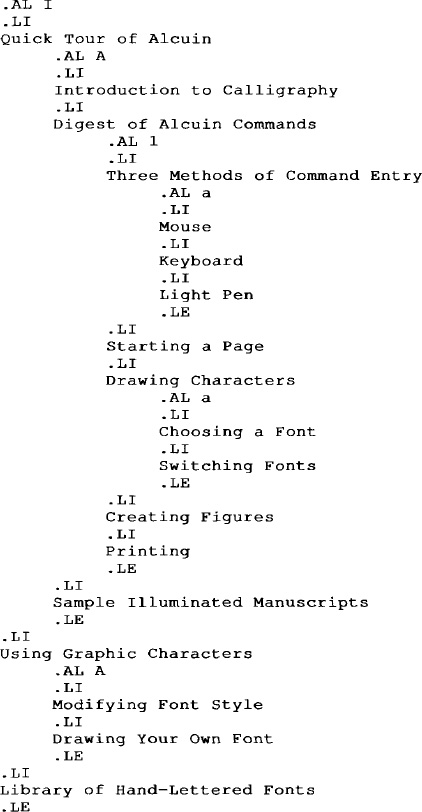
Fig. 6-4. Input for a Complex List

Fig. 6-5. Output of a Complex List
Variable-item lists are useful in preparing command reference pages, which describe various syntax items, and glossaries, which present a term in one column and its definition in the other. The text label should be a single word or phrase. The following example shows a portion of the input file for a reference page:
.VL 15 5

.LI figure

is the name of a cataloged figure.  If

a figure has not been cataloged, you need to use

the LOCATE command.

.LI f:p

is the scale of the

figure in relation to the page.

.LI font

is the two-character abbreviation or

full name of one of the available fonts

from the Alcuin library.

.LE
The following variable-item list is produced:
figure    is the name of a cataloged figure.  If a

          figure has not been cataloged, you need to

          use the LOCATE command.


f:p       is the scale of the figure in relation to

          the page.


font      is the two-character abbreviation or full

          name of one of the available fonts from the

          Alcuin library.
If you don’t provide a text label with .LI or give a null argument (""), you will get a paragraph with a hanging indent. If you want to print an item without a label, specify a backslash followed by a space ( ) or � after .LI. Similarly, if you want to specify a label that contains a space, you should also precede the space with a backslash and enclose the label within quotation marks:
.LI "point size"
or simply substitute a � for a space:
.LI point�size
The first line of text is left justified (or indented by the amount specified in label indent) and the remaining lines will be indented by the amount specified by text indent. This produces a paragraph with a hanging indent:
.VL 15

.LI

There are currently 16 font dictionaries in the Alcuin

library.  Any application may have up to 12 dictionaries

resident in memory at the same time.

.LE
When formatted, this item has a hanging indent of 15:
There are currently 16 font dictionaries in the Alcuin

               library.  Any application may have up to

               12 dictionaries resident in memory at the

               same time.
▪ Headings ▪
Earlier we used the list macros to produce an indented outline. That outline, indented to four levels, is a visual representation of the structure of a document. Headings perform a related function, showing how the document is organized into sections and subsections. In technical documentation and book-length manuscripts, having a structure that is easily recognized by the reader is very important.
Numbered and Unnumbered Headings
Using mm, you can have up to seven levels of numbered and unnumbered headings, with variable styles. There are two heading macros: .H for numbered headings and .HU for unnumbered headings. A different style for each level of heading can be specified by setting various number registers and defining strings.
Let’s first look at how to produce numbered headings. The syntax for the .H macro is:
.H level [heading text] [heading suffix]
The simplest use of the .H macro is to specify the level as a number between 1 and 7 followed by the text that is printed as a heading. If the heading text contains spaces, you should enclose it within quotation marks. A heading that is longer than a single line will be wrapped on to the next line. A multiline heading will be kept together in case of a page break.
If you specify a heading suffix, this text or mark will appear in the heading but will not be collected for a table of contents.
A top-level heading is indicated by an argument of 1:
.H 1 "Quick Tour of Alcuin"
The result is a heading preceded by a heading-level number. The first-level heading has the number 1.
1. Quick Tour of Alcuin
A second-level heading is indicated by an argument of 2:
.H 2 "Introduction to Calligraphy"
The first second-level heading number is printed:
1.1 Introduction to Calligraphy
When another heading is specified at the same level, the heading-level number is automatically incremented. If the next heading is at the second level:
.H 2 "Digest of Alcuin Commands"
it produces:
1.2 Digest of Alcuin Commands
Each time you go to a new (higher-numbered) level, .1 is appended to the number representing the existing level. That number is incremented for each call at the same level. When you back out of a level (for instance, from level 5 to 4), the counter for the level (in this case level 5), is reset to 0.
An unnumbered heading is really a zero-level heading:
. H 0 "Introduction to Calligraphy"
A separate macro, .HU, has been developed for unnumbered headings, although its effect is the same.
.HU "Introduction to Calligraphy"
Even though an unnumbered heading does not display a number, it increments the counter for second-level headings. Thus, in the following example, the heading “Introduction to Calligraphy” is unnumbered, but it has the same effect on the numbering scheme as if it had been a second-level heading (1.1).
1. Quick Tour of Alcuin
Introduction to Calligraphy
1.2 Digest of Alcuin Commands
If you are going to intermix numbered and unnumbered headings, you can change the number register Hu to the lowest-level heading that is in the document. By changing Hu from 2 to a higher number:
.nr Hu 5

.H 1 "Quick Tour of Alcuin"

.HU "Introduction to Calligraphy"

.H 2 "Digest of Alcuin Commands"
the numbering sequence is preserved for the numbered heading following an unnumbered heading:
1. Quick Tour of Alcuin
Introduction to Calligraphy
1.1 Digest of Alcuin Commands
Headings are meant to be visible keys to your document’s structure. If you are using unnumbered headings, it becomes even more important to make headings stand out. A simple thing you can do is use uppercase letters for a first-level heading.
Here is a list of some of the other things you can do to affect the appearance of headings, although some of the items depend upon whether you are formatting with nroff or troff:
- change to roman, italic, or bold font
- change the point size of the heading
- adjust spacing after the heading
- center or left justify the heading
- change the numbering scheme
- select a different heading mark
The basic issue in designing a heading style is to help the reader distinguish between different levels of headings. For instance, in an outline form, different levels of indent show whether a topic is a section or subsection. Using numbered headings is an effective way to accomplish this. If you use unnumbered headings, you probably want to vary the heading style for each level, although, for practical purposes, you should limit yourself to two or three levels.
First, let’s look at what happens if we use the default heading style.
The first two levels of headings are set up to produce italicized text in troff and underlined text in nroff. After the heading, there is a blank line before the first paragraph of text. In addition, a top-level heading has two blank lines before the heading; all the other levels have a single line of space.
1.2 Introduction to Calligraphy
Alcuin revitalizes an age-old tradition. Calligraphy, quite simply, is the art of beautiful handwriting.
Levels three through seven all have the same appearance. The text is italicized or underlined and no line break occurs. Two blank lines are maintained before and after the text of the heading. For example:
To change the normal appearance of headings in a document, you specify new values for the two strings:
HF Heading fontHP Heading point size
You can specify individual settings for each level, up to seven values.
The font for each level of heading can be set by the string HF. The following codes are used to select a font:
1 Roman2 Italic3 Bold
By default, the arguments for all seven levels are set to 2, resulting in italicized headings in troff and underlining in nroff. Here the .HF string specifies bold for the top three levels followed by two italic levels:
.ds HF 3 3 3 2 2
If you do not specify a level, it defaults to 1. Thus, in the previous example, level 6 and 7 headings would be printed in a roman font.
The point size is set by the string HP. Normally, headings are printed in the same size as the body copy, except for bold headings. A bold heading is reduced by 1 point when it is a standalone heading, as are the top-level headings. The HP string can take up to seven arguments, setting the point size for each level.
.ds HP 14 14 12
If an argument is not given, or a null value or 0 is given, the default setting of 10 points is used for that level. Point size can also be given relative to the current point size:
.ds HP +4 +4 +2
A group of number registers control other default formats of headings:
Ej Eject pageHb Break follows headingHc Center headingsHi Align text after headingHs Vertical spacing after heading
For each of these number registers, you specify the number of the level at which some action is to be turned on or off.
The Ej register is set to the highest-level heading, usually 1, that should start on a new page. Its default setting is 0. This ensures that the major sections of a document will begin on their own page.
.nr Ej 1
The Hb register determines if a line break occurs after the heading. The Hs register determines if a blank line is output after the heading. Both are set to 2 by default. Settings of 2 mean that, for levels 1 and 2, the section heading is printed, followed by a line break and a blank line separating the heading from the first paragraph of text. For lower-level headings (an argument greater than 2), the first paragraph follows immediately on the same line.
The Hc register is set to the highest-level heading that you want centered. Normally, this is not used with numbered headings and its default value is 0. However, unnumbered heads are often centered. A setting of 2 will center first- and second-level headings:
.nr Hc 2
With unnumbered headings, you also have to keep in mind that the value of Hc must be greater than or equal to Hb and Hu. The heading must be on a line by itself; therefore a break must be set in Hb for that level. The Hu register sets the level of an unnumbered heading to 2, requiring that Hc be at least 2 to have an effect on unnumbered headings.
There really is no way, using these registers, to get the first and second levels left justified and have the rest of the headings centered.
The number register Hi determines the paragraph type for a heading that causes a line break (Hb). It can be set to one of three values:
0 Left justified1 Paragraph type determined by Pt2 Indented to align with first character in heading
If you want to improve the visibility of numbered headings, set Hi to 2:
.nr Hi 2
It produces the following results:
4.1 Generating Output
An  Alcuin manuscript  is a computer  representation

that has to be converted for output on various kinds

of devices, including plotters and laser printers.
Changing the Heading Mark
Remember how the list-initialization macro .AL allowed you to change the mark used for a list, producing an alphabetic list instead of a numbered list? These same options are available for headings using the .HM macro.
The .HM macro takes up to seven arguments specifying the mark for each level. The following codes can be specified:
1 Arabic001 Arabic with leading zerosA Uppercase alphabetica Lowercase alphabeticI Uppercase romani Lowercase roman
If no mark is specified, the default numbering system (arabic) is used. Uppercase alphabetic marks can be used in putting together a series of appendices. You can specify A for the top level:
.HM A
and retain the default section numbering for the rest of the headings. This could produce sections in the following series:
Marks can be mixed for an outline style similar to the one we produced using the list macros:
.HM I A 1 a i
Roman numerals can be used to indicate sections or parts. If you specify:
.HM I i
the headings for the first two levels are marked by roman numerals. A third-level heading is shown to demonstrate that the heading mark reverted to arabic by default:
I. Quick Tour of Alcuin
I.i Introduction to Calligraphy
I.ii Digest of Alcuin Commands
I.ii.1 Three Methods of Command Entry
When you use marks consisting of roman numerals or alphabetic characters, you might not want the mark of the current level to be concatenated to the mark of the previous level. Concatenation can be suppressed by setting the number register Ht to 1:
.HM I i

.nr Ht 1
Now, each heading in the list has only the mark representing that level:
I. Quick Tour of Alcuin
i. Introduction to Calligraphy
ii. Digest of Alcuin Commands
1. Three Methods of Command Entry
▪ Table of Contents ▪
Getting a table of contents easily and automatically is almost reason enough to justify all the energy, yours and the computer’s, that goes into text processing. You realize that this is something that the computer was really meant to do.
When the table of contents page comes out of the printer, a writer attains a state of happiness known only to a statistician who can give the computer a simple instruction to tabulate vast amounts of data and, in an instant, get a single piece of paper listing the results.
The reason that producing a table of contents seems so easy is that most of the work is performed in coding the document. That means entering codes to mark each level of heading and all the figures, tables, exhibits, and equations. Processing a table of contents is simply a matter of telling the formatter to collect the information that’s already in the file.
There are only two simple codes to put in a file, one at the beginning and one at the end, to generate a table of contents automatically.
At the beginning of the file, you have to set the number register Cl to the level of headings that you want collected for a table of contents. For example, setting Cl to 2 saves first- and second-level headings.
Place the .TC macro at the end of the file. This macro actually does the processing and formatting of the table of contents. The table of contents page is output at the end of a document.
A sample table of contents page follows. The header “CONTENTS” is printed at the top of the page. At the bottom of the page, lowercase roman numerals are used as page numbers.
1. Quick Tour of Alcuin
1.1 Introduction to Calligraphy
1.2 Digest of Alcuin Commands
1.3 Sample Illuminated Manuscripts
2. Using Graphic Characters
2.1 Scaling a Font
2.2 Modifying Font Style
2.3 Drawing Your Own Font
3. Library of Hand-Lettered Fonts
- i -
One blank line is output before each first-level heading. All first-level headings are left justified. Lower-level headings are indented so that they line up with the start of text for the previous level.
If you have included various displays in your document, and used the macros .FG, .TB, and .EX to specify captions and headings for the displays, this information is collected and output when the .TC macro is invoked. A separate page is printed for each accumulated list of figures, tables, and exhibits. For example:
LIST OF TABLES
TABLE 1. List of Required Resources
TABLE 2. List of Available Resources
If you want the lists of displays to be printed immediately following the table of contents (no page breaks), you can set the number register Cp to 1.
If you want to suppress the printing of individual lists, you can set the following number registers to 0:
Lf If 0, no figuresLt If 0, no tablesLx If 0, no exhibits
In addition, there is a number register for equations that is set to 0 by default. If you want equations marked by .EC to be listed, specify:
.nr Le 1
There are a set of strings, using the same names as the number registers, that define the titles used for the top of the lists:
Lf LIST OF FIGURESLt LIST OF TABLESLx LIST OF EXHIBITSLe LIST OF EQUATIONS
You can redefine a string using the .ds (define string) request. For instance, we can redefine the title for figures as follows:
.ds Lf LIST OF ALCUIN DRAWINGS
▪ Footnotes and References ▪
Footnotes and references present special problems, as anyone who has ever typed a term paper knows. Fortunately, mm has two pairs of specialized macros. Both of them follow a marker in the text and cause lines of delimited text to be saved and output either at the bottom of the page, as a footnote, or at end of the document, as a reference.
Footnotes
A footnote is marked in the body of a document by the string *F. It follows immediately after the text (no spaces).
in an article on desktop publishing.*F
The string F supplies the number for the footnote. It is printed (using troff) as a superscript in the text and its value is incremented with each use.
The .FS macro indicates the start, and .FE the end, of the text for the footnote. These macros surround the footnote text that will appear at the bottom of the page. The .FS macro is put on the line immediately following the marker.
.FS

"Publish or Perish: Start-up grabs early page language lead,"

fIComputerworldfR, April 21, 1986, p. 1.

.FE
You can use labels instead of numbers to mark footnotes. The label must be specified as a mark in the text and as an argument with .FS.
...in accord with the internal specs.[APS]

.FS [APS]

"Alcuin Product Specification," March 1986

.FE
You can use both numbered and labeled footnotes in the same document. All the footnotes are collected and output at the bottom of each page underneath a short line rule. If you are using troff, the footnote text will be set in a type size 2 points less than the body copy.
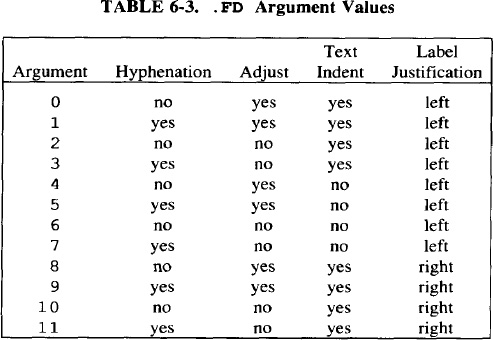
If you want to change the standard format of footnotes, you can specify the .FD macro. It controls hyphenation, text adjustment, indentation, and justification of the label.
Normally, the text of a footnote is indented from the left margin and the mark or label is left justified in relation to the start of the text. It is possible that a long footnote could run over to the next page. Hyphenation is turned off so that a word will not be broken at a page break. These specifications can be changed by giving a value between 0 and 11 as the first argument with .FD, as shown in Table 6-3.
The second argument for .FD, if 1, resets the footnote numbering counter to 1. This can be invoked at the end of a section or paragraph to initiate a new numbering sequence. If specified by itself, the first argument must be null:
.FD "" 1
References
A reference differs from a footnote in that all references are collected and printed on a single page at the end of the document. In addition, you can label a reference so that you can refer to it later.
A reference is marked where it occurs in the text with *(Rf. The formatter converts the string into a value printed in brackets, such as [1]. The mark is followed by a pair of macros surrounding the reference text. The .RS macro indicates the start, and .RF the end, of the text for the reference.
You will find information on this page description language

in their reference manual, which has been published

as a book.*(Rf

.RS

Adobe Systems, Inc. PostScript Reference Manual.

Reading, Massachusetts: Addison-Wesley; 1985.

.RF
You can also give as a string label argument to .RS the name of a string that will be assigned the current reference number. This string can be referenced later in the document. For instance, if we had specified a string label in the previous example:
.RS As
We could refer back to the first reference in another place:
The output itself is a readable file which you can interpret

with the aid of the PostScript manual.*(As
At the end of the document, a reference page is printed. The title printed on the reference page is defined in the string Rp. You can replace “REFERENCES” with another title simply by redefining this string with .ds.
REFERENCES
1. Adobe Systems, Inc.; PostScript Reference Manual. Reading, Massachusetts: Addison-Wesley; 1985.
In a large document, you might want to print a list of references at the end of a chapter or a long section. You can invoke the .RP macro anywhere in a document.
.RP

.H 1 "Detailed Outline of User Guide"
It will print the list of references on a separate page and reset the reference counter to 0. A reset argument and a paging argument can be supplied to change these actions. The reset argument is the first value specified with the .RP macro. It is normally 0, resetting the reference counter to 1 so that each section is numbered independently. If reference numbering should be maintained in sequence for the entire document, specify a value of 1.
The paging argument is the second value specified. It controls whether or not a page break occurs before and after the list. It is normally set to 0, putting the list on a new page. Specifying a value of 3 suppresses the page break before and after the list; the result is that the list of references is printed following the end of the section and the next section begins immediately after the list. A value of 1 will suppress only the page break that occurs after the list and a value of 2 will suppress only the page break that occurs before the list.
If you want an effect opposite that of the default settings, specify:
.RP 1 3
The first argument of 1 saves the current reference number for use in the next section or chapter. The second argument of 3 inhibits page breaks before and after the list of references.
▪ Extensions to mm ▪
So far, we have covered most but not all of the features of the mm macro package.
We have not covered the Technical Memorandum macros, a set of specialized macros for formatting technical memos and reports. Like the ones in the ms macro package, these macros were designed for internal use at AT&T’s Bell Laboratories, reflecting a company-wide set of standards. Anyone outside of Bell Labs will want to make some modifications to the macros before using them. The Technical Memorandum macros are a good example of employing a limited set of user macros to produce a standard format. Seeing how they work will be especially important to those who are responsible for implementing documentation standards for a group of people, some of whom understand the basics of formatting and some of whom do not.
Writing or rewriting macros is only one part of the process of customizing mm. The mm macros were designed as a comprehensive formatting system. As we’ve seen, there are even macros to replace common primitive requests, like .sp. The developers of mm recommend, in fact, that you not use nroff or troff requests unless absolutely necessary, lest you interfere with the action of the macros.
Furthermore, as you will see if you print out the mm macros, the internal code of mm is extraordinarily dense, and uses extremely un-mnemonic register names. This makes it very difficult for all but the most experienced user to modify the basic structure of the package. You can always add your own macros, as long as they don’t conflict with existing macro and number register names, but you can’t easily go in and change the basic macros that make up the mm package.
At the same time, the developers of mm have made it possible for the user to make selective modifications—those which mm has allowed mechanisms for in advance. There are two such mechanisms:
mm’s use of number registers to control all aspects of document formattingmm’s invocation of undefined (and therefore user-definable) macros at various places in themmcode
The mm package is very heavily parameterized. Almost every feature of the formatting system—from the fonts in which different levels of heading are printed to the size of indents and the amount of space above and below displays—is controlled by values in number registers. By learning and modifying these number registers, you can make significant changes to the overall appearance of your documents.
In addition, there are a number of values stored in strings. These strings are used like number registers to supply default values to various macros.
The registers you are most likely to want to change follow. Registers marked with a dagger can only be changed on the comand line with the -r option (e.g., -rN4).
There are also some values that you would expect to be kept in number registers that are actually kept in strings:
HF Fonts used for each level of heading (1=roman, 2=italic, 3=bold)HP Point size used for each level of heading
For example, placing the following register settings at the start of your document:
.nr Hc 1

.nr Hs 3

.nr Hb 4

.nr Hi 2

.ds HF 3 3 3 3 2 2 2

.ds HP 16 14 12 10 10 10 10
will have the following effects:
- Top-level headings (generated by
.H1) will be centered. - The first three levels of heading will be followed by a blank line.
- The fourth-level heading will be followed by a break.
- Fifth- through seventh-level headings will be run-in with the text.
- All headings will have the following text indented under the first word of the heading, so that the section number hangs in the margin.
- The first five levels of heading will be in bold type; the sixth and seventh will be italic.
- A first-level heading will be printed in 16-point type; a second-level heading in 14-point type; a third-level heading in 12-point type; and all subsequent levels in 10-point type.
There isn’t space in this book for a comprehensive discussion of this topic. However, a complete list of user-settable mm number registers is given in Appendix B. Study this list, along with the discussion of the relevant macros, and you will begin to get a picture of just how many facets of mm you can modify by changing the values in number registers and strings.
The second feature—the provision of so-called “user exit macros” at various points—is almost as ingenious. The following macros are available for user definition:
.HX .HY .HZ .PX .TX .TY
The .HX, .HY, and .HZ macros are associated with headings. The .HX macro is executed at the start of each heading macro, .HY in the middle (to allow you to respecify any settings, such as temporary indents, that were lost because of mm’s own processing), and .HZ at the end.
By default, these macros are undefined. And, when troff encounters an undefined macro name, it simply ignores it. These macros thus lie hidden in the code until you define them. By defining these macros, you can supplement the processing of headings without actually modifying the mm code. Before you define these macros, be sure to study the mm documentation for details of how to use them.
Similarly, .PX is executed at the top of each page, just after .PH. Accordingly, it allows you to perform additional top-of-page processing. (In addition, you can redefine the .TP macro, which prints the standard header, because this macro is relatively self-contained.)
There is a slightly different mechanism for generalized bottom-of-page processing. The .BS/.BE macro pair can be used to enclose text that will be printed at the bottom of each page, after any footnotes but before the footer. To remove this text after you have defined it, simply specify an empty block.
The .VM (vertical margins) macro allows you to specify additional space at the top of the page, bottom of the page, or both. For example:
.VM 3 3
will add three lines each to the top and bottom margins. The arguments to this macro should be unscaled. The first argument applies to the top margin, the second to the bottom.
The .TX and .TY macros allow you to control the appearance of the table of contents pages. The .TX macro is executed at the top of the first page of the table of contents, above the title; .TY is executed in place of the standard title (“CONTENTS”).
In Chapter 14, you will learn about writing macro definitions, which should give you the information you need to write these supplementary “user exit macros.”