

A Miscellany of UNIX Commands
In this chapter, we present a miscellany of UNIX programs with text-processing applications. In addition, we introduce several UNIX utilities for communications and for reading and writing to tapes and floppy disks. These utilities are not specifically designed for text processing, but we have found them necessary for working in the UNIX environment. Although you can find more detailed information on these utilities in books aimed at a general audience, we’ve included brief discussions of them to encourage you to learn them.
UNIX has many standard programs, as a run-down of the table of contents for the UNIX Reference Manual will demonstrate. The challenge of UNIX is knowing which programs are appropriate for a specific situation. No one learns all the commands, but becoming familiar with a great number of them can be helpful. It is rather like those of us who collect far more books on our shelves than are “needed,” knowing the reward of finding the right book for the right occasion.
At times, you will be surprised when you discover a program with rather unusual or specialized capabilities; at other times, you may be frustrated by a demanding program or confused by inconsistencies from one program to the next. These qualities seem to originate from the open design of UNIX, and serve to distinguish this text-processing environment from the closed systems of most word processors.
In some ways, what we are trying to do in this chapter is to address problems that arise in typical documentation projects and show how one or more UNIX programs can be applied as solutions to these problems. The emphasis is on the interactive use of these programs, although many of them can be used effectively in shell scripts or as parts of other programs. (In the next chapter, we go into more detail about shell scripts.) The commands are presented in sections, grouped by function.
▪ Managing Your Files ▪
One of the realities of using a computer is that you begin to think of a document in terms of files, rather than chapters or sections. You edit and print files; create and copy files; delete files accidentally and lose your edits; and look through files to find the information that is contained in them. Increasingly, files contain the goods that you trade. You exchange not only printed copies of documents, but using floppy disks, tapes, or modems, you take files off one system and put them on another system. Learning to organize and maintain files is essential to working on a computer.
Using the File System to Your Advantage
One obvious feature of UNIX that makes it easy to handle large numbers of files is the hierarchical file system. With carefully named files and directories, the pathname, which specifies a file’s unique place in the file system hierarchy, can tell a lot about not only how to get at the file, but its contents as well.
For example, on our system, we keep all source files for various books in progress on a file system called /work; work for a given client is kept in a directory named for the client, with a subdirectory for each separate manual. Within each manual’s subdirectory, individual chapters are named consistently, ch01, ch02, and so on. As a result, it is easy both to locate a file (Chapter 1 of the FORTRAN manual for ABC Corp. can predictably be found in /work/abc/fortran/ch01) and to guess its contents.
If you are using the C shell, you can create an alias that provides a shorthand way of entering a command. In the following example, the alias allows you to think in terms of manuals instead of directories:
% alias fortran "cd /work/abc/fortran; pwd"

% pwd

  /work/fred

% fortran

  /work/abc/fortran
You can place an alias definition in your .cshrc file so that it becomes part of your environment.
In the Bourne shell, you achieve a similar result by using an environment variable called CDPATH to define a search path for the cd command. For example:
$ CDPATW=/work/abc:/work/textp:/usr

$ cd fortran

/work/abc/fortran

$ cd jane

/usr/jane

$ cd ch03

/work/textp/ch03
When you issue a cd command, the shell searches for a subdirectory with that name under any of the directories in the path, changes to it, and prints the full directory name.
The search directories in CDPATH are specified between colons. Directories listed in CDPATH are searched in order from left to right.
Shell Filename Metacharacters
Even with files organized into directories, you can still accumulate a lot of files. Developing some consistent naming conventions that take advantage of shell metacharacters (wildcards) can save you a lot of trouble. Most users are familiar with metacharacters but many don’t make full use of them.
In UNIX, you can match any part of a filename with a wildcard. Remember that* matches zero or more characters. This gives you more power to select a specific group of files out of a directory. In the following example, assume that you want to delete the files lock, filelocks, and lock.release, but ignore the files filelist, lecture, and stocks.c.
$ ls

filelist

filelocks

lecture

lock

lock.release

stocks.c

$ rm *lock*
Because * can match zero characters, *lock* will match lock as well as filelocks.
The shell interprets the pattern-matching character ? to match any single character, and the construct [m-n] to match a range of consecutive characters.
If you name your files consistently, you can use these characters to select groups of files. For example, in a directory containing a BASIC manual, you might have the following list of files:
$ ls

appa

appb

changes

ch01

ch01.old

ch02

ch03

ch03.examples

ch03.out

ch04

ch04.examples

ch05

letter.613
As usual in any directory, there are a number of auxiliary files. Some of these files apply to the work on this project, but they are not actually part of the book. If you’ve carefully chosen the names of related files, you can use metacharacters to select only the files in a particular group. For example:
You could select a range of files, using brackets:
$ ls ch0[3-5]

ch03

ch04

ch05
If you had entered ch0*, miscellaneous files such as ch01.old would have been included. (Note that whenever you use numbers in filenames, as shown here, to consistently name a group of related files, you should begin the numbering sequence with 01, 02 . . . rather than 1, 2. . . . This will cause ls to list the files in proper alphabetical order. Otherwise, ls will list ch1, then ch11, ch12 . . . ch2, ch20 . . . and so on.)
Metacharacters have broader applications than for simply listing files. Look at this example of running spell on an entire book:
$ spell ch0? app? > spell.out
(We’ll be looking at the spell command later in the section “Proofing Documents.”) This command is run on the seven files that match one of the two patterns specified on the command line.
Metacharacters are also useful in moving and copying files from one directory to another:
$ cp basic/ch0? /work/backup
Locating Files
Although a hierarchical file system with consistent naming conventions helps a lot, it is still easy to lose track of files, or just to have difficulty specifying the ones you want to manipulate. The number of files contained on even a small hard disk can be enormous, and complex directory hierarchies can be difficult to work with.
It is possible to lose a file on the file system when you have forgotten in which directory you put it. To look through an entire file system or a large directory hierarchy, you need a utility called find. The find utility looks at the external characteristics of a file—who created it, when it was last accessed, its name, and so on.
The find utility probably wins top honors for having the most cumbersome command-line syntax in UNIX. It’s not that find is a difficult command; its syntax is simply difficult to recall. You might expect that all you have to enter is find and the name of the file that you want to look for. This is not the way it works, however, which is a nuisance to new users. The find command requires repeated trips to the UNIX Reference Manual before you grasp its atypical format.
To use find, specify the pathnames of the directories that you want to search; then place one or more conditions upon the search. The name of a particular file that you want to search for is considered one of these conditions. It is expressed as:
-name filename
To obtain a listing of the pathnames of files that are found, you have to specify the -print condition as well (-name must precede -print).
If you wanted to find any file named notes on the /work file system, here’s the command to enter:
$ find /work -name notes -print

/work/alcuin/notes

/work/textp/ch02/notes
The output is the pathname (starting with the specified file system or directory) of each file that is found. More than one pathname can be supplied. A slash (/) represents the root directory and thus is used if you want to search the entire file system. Note that the search can take some time, and that if you do not have read permissions to a directory you will get a message saying that it cannot be opened.
In the next example, we add another condition, -user, and limit the search to files named memo that are owned by the user fred. This is helpful when you are searching for a file that has a fairly common name and might exist in several users’ accounts. Filename metacharacters can be used but they must be protected from the shell using backslashes or single quotation marks. (If you don’t do this, the metacharacters will be interpreted by the shell as referring to files in the current directory, and will not be passed to the find command.)
$ find /work /usr -name 'memo*' -user fred -print

/usr/fred/alcuin/memo

/work/alcuin/memo.523

/work/caslon/memo.214
Two directory hierarchies are searched, /work and /usr. If you did not specify the -name condition, this command would locate all the files owned by fred in these two file systems.
Many find conditions have uses for other tasks besides locating files. For instance, it can be useful to descend a directory hierarchy, using find to print the complete pathname of each file, as in the following example:
$ find /work/alcuin -print

/work/alcuin

/work/alcuin/ch01

/work/alcuin/ch01.old

/work/alcuin/commands/open

/work/alcuin/commands/stop

 ...
This usage provides a kind of super ls that will list all files under a given directory, not just those at the current directory level. As you’ll see, this becomes very useful when it comes time to back up your files.
The longer you work with a UNIX system, the more you will come to appreciate find. Don’t be put off by its awkward syntax and many options. The time you spend studying this command will be well repaid.
File Characteristics
Most of us are concerned only with the contents of a file. However, to look at files from UNIX’s point of view, files are labeled containers that are retrieved from storage and soon put back in the same place. It might be said that the operating system reads (and writes) the label but doesn’t really care to look inside the container. The label describes a set of physical or external characteristics for each file. This information is displayed when the ls command produces a long listing.
$ ls -1 /work/textp/ch01

total 20

-rw-rw-r--    1 fred   doc    9496 Jun 10 15:18 ch01
To the operating system, the file (ch01) contains a certain number of bytes (9496), each representing a character. The date and time (Jun 10 15:18) refer to the last time the file was modified. The file has an owner (fred), who is usually the person who created the file. The owner belongs to a group of users (doc) who can be given different permissions from all other users. The operating system keeps track of the file permissions (-rw-rw-r--) for the owner, group, and other users—determining who can read, write, or execute the file.
All of these characteristics can be modified either by use of the file or by commands such chmod (change permissions) and chown (change owner). You may need to become a super-user to change these characteristics.
There are some options for ls that allow you to make use of this information. For instance, if you had recently made some changes to a set of files, but couldn’t remember which ones, you could use the -t option to sort a list of files with the most recently modified files first. The -r option reverses that order, so that ls -rt produces a list with the oldest files first.
In addition, find has a number of options that make use of external file characteristics. As we’ve seen, you can look for files that belong to a particular user. You can also look for files that are larger than a particular size, or have been modified more recently than a certain date.
Don’t get stuck thinking that the only handle you can pick a file up with is the file’s name.
▪ Viewing the Contents of a File ▪
You are probably familiar with a number of UNIX commands that let you view the contents of a file. The cat command streams a file to the screen at a rate that is usually too swift. The pg and more commands display a file one page at a time. They are frequently used as filters, for instance, to supply paging for nroff output.
You can also use these commands to examine unformatted files, proofing formatting codes as well as text. Although these are frequently used commands, not everyone is aware that they have interactive subcommands, too. You can search for a pattern; execute a UNIX command; move to another file specified on the command line; or go to the end of the file.
You can list these subcommands by entering h when the program pauses at the bottom of a page. Here’s the help screen pg provides:
-------------------------------------------------------

   h               help

   q or Q          quit

   <blank> or
   next page

   l               next line

   d or ^D         display half a page more

   . or ^L         redisplay current page

   f               skip the next page forward

   n               next file

   p               previous file

   $               last page

   w or z          set window size and display next page

   s savefile      save current file in savefile

   /pattern/       search forward for pattern

   ?pattern? or

   ^pattern^       search backward for pattern

   !command        execute command

Most commands can be preceded by a number, as in:

+1
 (next page); -1
 (previous page); 1
 (page 1).

See the manual page for more detail.

-------------------------------------------------------
One advantage of pg is that you can move backward as well as forward when going through a file. A special feature of more is the ability to invoke vi at the current point in the file. When you quit vi, more resumes paging through the rest of the file.
Another command used for examining a file is pr. Its most common use is to perform minor page formatting for a file on the way to a line printer. It breaks the input file into pages (66 lines to a page) and supplies a header that contains the date, the name of the file, and the current page number. Top, bottom, and side margins are also added.
The pr command also has many options that can be used to perform some odd-ball tasks. For example, the -n option adds line numbers:
$ pr -n test
The following is displayed:
You can adjust the page length using the -l option. If you are printing to a terminal, the -p option specifies a pause at the beginning of each page. You can also display an input file in -n columns.
The -m option simultaneously merges two or more files and prints each of them, one per column:
$ pr -m -t test*
In this example, we display four files side-by-side:
apples          apples       apples        oranges

oranges         oranges      oranges       walnuts

walnuts         walnuts      grapes        chestnuts

chestnuts
The test* file specification is expanded to four filenames: test, test1, test2, and test3. The -t option suppresses the heading and does not print linefeeds to fill a page, which is especially useful when you are sending the output of pr to a file or the terminal.
We found a use for pr when working on this book. We wanted to include nroff-formatted examples in the text. We had difficulty because nroff inserts tabs, instead of spaces, to optimize horizontal positioning on printers. To remove the tabs, we used pr with the -e option to expand the tabs to their equivalent in blank spaces. The following shell script implements this process so that it can be invoked as a single command:
$ nroff -mm -roo examples/$1 | pr -e -t
The pr command works as a filter for nroff. The -r option is used with nroff to set register O (page offset or left margin) to zero.
Sometimes it can be useful to examine just the beginning or the end of a file. Two commands, head and tail, print the first or last ten lines of a file. The head command can be used to look at the initial settings of number registers and strings that are often set at the top of a file.
$ head ch02

.nr W 65

.nr P 3

.nr L 60

.so /usr/lib/tmac/tmac.m

.nr Pt 2

.ds Ux s-2UNIXs0

.ds HP 3321

.H1 "Product Overview"

.ds HM 11A

.
This output could be redirected to a file as a way of starting a new chapter. The tail command has the same syntax; it can save time when you want to check the end of a large file.
▪ Searching for Information in a File ▪
The many benefits provided by grep to the user who doesn’t remember what his or her files contain are well known. Even users of non-UNIX systems who make fun of its obscure name wish they had a utility with its power to search through a set of files for an arbitrary text pattern, known as a regular expression. We have already discussed regular expressions and their use in search and replace commands in vi (see Chapter 7). In this section, we show some of the ways to perform pattern-matching searches using grep and its siblings, egrep and fgrep.
The main function of grep is to look for strings matching a regular expression and print only those lines that are found. Use grep when you want to look at how a particular word is used in one or more files.
$ grep "run[- ]time" ch04

This procedure avoids run-time errors for not-assigned

and a run-time error message is produced.

run-time error message is produced.

program aborts and a run-time error message is produced.

DIMENSION statement in BASIC is executable at run time.

This means that arrays can be redimensioned at run time.

accessible or not open, the program aborts and a run-time
This example lists the lines in the file ch04 that contain either run-time or run time.
Another common use is to look for a specific macro in a file. In a file coded with mm macros, the following command will list top-level and second-level headings:
$ grep "^.H[12]" ch0[12]

ch01:.H1 "Introduction"

ch01:.H1 "Windows, Screens, and Images"

ch01:.H2 "The Standard Screen-stdscr"

ch01:.H2 "Adding Characters"

...

ch02:.H1 "Introduction"

ch02:.H1 "What Is Terminal Independence?"

ch02:.H2 "Termcap"

ch02:.H2 "Terminfo"
In effect, it produces a quick outline of the contents of these files. When more than one file is specified, the name of the file appears with each line. Note that we use brackets as metacharacters both in the regular expression and when specifying the filename. Because metacharacters (and spaces) have meaning to the shell, they will be interpreted as such unless the regular expression is placed within quotation marks.
There are several options commonly used with grep. The -i option specifies that the search ignore the distinction between uppercase and lowercase. The -c option tells grep to return only a count of the number of lines matched. The -l option returns only the name of the file when grep finds a match. This can be used to prepare a list of files for another command.
The shell construct command1 ‘command2’ causes the output of command2 to be used as an argument to command1. For example, assume that you wanted to edit any file that has a reference to a function call named getcursor. The command:
$ vi 'grep -l getcursor *'
would invoke vi on all of the files in the current directory containing the string getcursor. Because the grep command is enclosed in single backquotes (' '), its output becomes the list of files to be edited.
The grep command can work on the results of a find command. You can use find to supply a list of filenames and grep to search for a pattern in those files. For example, consider the following command, which uses find to look for all files in the specified directory hierarchy and passes the resulting names to grep to scan for a particular pattern:
$ find /work/docbook -exec grep "[aA]lcuin" {} ;

Alcuin product. Yesterday, I received the product  demo

Alcuin.  Some people around here, looking over my shoulder,

with Alcuin. One  person,  a  student  of  calligraphy,

presents different strategies for documenting the Alcuin

The development of Alcuin can be traced to our founder's

the installation file "alcuin.install"> and the font

configuration file "alcuin.ftables."
The -exec condition allows you to specify a command that is executed upon each file that is found ({ } indicates the pathname of the file). The command must end with an escaped semicolon.
Although this is a good way to introduce the very useful -exec option to find, it is actually not the best way to solve the problem. You'll notice that even though grep is working on more than one file, the filenames are not printed because the data is actually passed to grep from a pipe. The reason is that grep is being invoked many times (once for each file that is found), and is not really working on many files at once. If you wanted to produce a list of the selected files, you could use the -l option with grep. But more to the point, this is a very inefficient way to do the job.
In this case, it would be preferable to write:
$ grep "[aA]lcuin" 'find /work/docbook -print'
Because grep is invoked only once, this command will run much faster.
There is a potential danger in this approach. If the list of files is long, you may exceed the total allowable length of a command line. The best approach uses a command we haven't shown yet—xargs. This command provides an extended version of the same function the shell provides with backquotes. It converts its input into a form that can be used as an argument list by another command. The command to which the argument list is passed is specified as the first argument to xargs. So, you would write:
$ find /work/docbook -print | xargs grep "[aA]lcuin"
Or you could generalize this useful tool and save it as the following shell script, which could be called mfgrep (multifile grep). This script takes the pathname for find as the first argument and the pattern for grep as the second. The list of files found is passed to grep by xargs:
find $1 | xargs grep "$2"
The fgrep (fast grep)* command performs the same function as grep, except it searches for a fixed string rather than a regular expression. Because it doesn't interpret metacharacters, it often does a search faster than grep. For interactive use, you may not find enough difference to keep this command in your active repertoire. However, it may be of more benefit inside shell scripts.
The egrep command is yet another version of grep, one that extends the syntax of regular expressions. A + following a regular expression matches one or more occurrences of the regular expression; a ? matches zero or one occurrences. In addition, regular expressions can be nested within parentheses.
$ egrep "Lab(oratorie)?s" name.list

AT&T Bell Laboratories

AT&T Bell Labs
Parentheses surround a second regular expression and ? modifies this expression. The nesting helps to eliminate unwanted matches; for instance, the word Labors or oratories would not be matched.
Another special feature of egrep is the vertical bar (|), which serves as an or operator between two expressions. Lines matching either expression are printed, as in the next example:
$ egrep "stdscr|curscr" ch03

into the stdscr, a character array.

When stdscr is refreshed, the

stdscr is refreshed.

curscr.

initscr() creates two windows: stdscr

and curscr.
_______________
*Despite what the documentation says, egrep is usually the fastest of the three grep programs.
Remember to put the expression inside quotation marks to protect the vertical bar from being interpreted by the shell as a pipe symbol. Look at the next example:
$ egrep "Alcuin (User|Programmer) ('s)? Guide" docguide

Alcuin Programmer's Guide is a thorough

refer to the Alcuin User Guide.

Alcuin User's Guide introduces new users to
You can see the flexibility that egrep’s syntax can give you, matching either User or Programmer and matching them if they had an ’s or not.
Both egrep and fgrep can read search patterns from a file using the -f option.
▪ Proofing Documents ▪
There are no computer tools that completely replace the close examination of final printed copy by the human eye. However, UNIX does include a number of proofing aids, ranging from a simple spelling checker to programs for checking style and diction, and even sexist usage.
We'll look at some of these programs in this section. Not all of the programs we'll discuss are available on all UNIX systems. Keep in mind, though, that grep is also a very powerful proofing aid, which you can use to check for consistent usage of words and phrases.
Looking for Spelling Errors
The spell command reads one or more files and prints a list of words that are possibly misspelled. You can redirect the output to a file, then use grep to locate each of the words, and vi or ex to make the edits. In the next chapter, though, we introduce a shell script named proof for running spell interactively and correcting spelling errors in place in a file. You will probably prefer to use spell in that manner rather than invoking it manually.
Even if you do build that script, you can use spell on its own if you are unsure about which of two possible spellings is right. Type the name of the command, followed by a RETURN, then type the alternative spellings you are considering. Press ^D (on a line by itself) to end the list. The spell command will echo back the word(s) in the list that it considers to be in error.
$ spell

misspelling

mispelling

^D

mispelling
You can invoke spell in this way from within vi, by typing the ex colon prompt, an exclamation point, and the name of the spell command.
When you run spell on a file, the list of words it produces usually includes a number of legitimate words or terms that the program does not recognize. You must cull out the proper nouns and other words spell doesn't know about to arrive at a list of true misspellings. For instance, look at the results on this sample sentence:
$ cat sample

Alcuin uses TranScript to convert ditroff into

PostScript output for the LaserWriter printerr.

$ spell sample

Alcuin

ditroff

printerr

LaserWriter

PostScript

TranScript
Only one word in this list is actually misspelled.
On many UNIX systems, you can supply a local dictionary file so that spell recognizes special words and terms specific to your site or application. After you have run spell and looked through the word list, you can create a file containing the words that were not actual misspellings. The spell command will check this list after it has gone through its own dictionary.
If you added the special terms in a file named dict, you could specify that file on the command line using the + option:
$ spell +dict sample

printerr
The output is reduced to the single misspelling.
The spell command will also miss words specified as arguments to nroff or troff macros, and, like any spelling checker, will make some errors based on incorrect derivation of spellings from the root words contained in its dictionary. If you understand how spell works, you may be less surprised by some of these errors.
The directory /usr/lib/spell contains the main program invoked by the spell command along with auxiliary programs and data files.
$ ls -1 /usr/lib/spell

total 604

-rwxr-xr-x   1 bin    bin    20176 Mar  9  1985 hashcheck

-rwxr-xr-x   1 bin    bin    14352 Mar  9  1985 hashmake

-rw-r--r--   1 bin    bin    53872 Mar  9  1985 hlista

-rw-r--r--   1 bin    bin    53840 Mar  9  1985 hlistb

-rw-r--r--   1 bin    bin     6328 Mar  9  1985 hstop

-rw-rw-rw-   1 root   root  102892 Jul 12 16:l0 spellhist

-rwxr-xr-x   1 bin    bin    23498 Mar  9  1985 spellin

-rwxr-xr-x   1 bin    bin    27064 Mar  9  1958 spellprog
The spell command pipes its input through deroff -w and sort -u to remove formatting codes and prepare a sorted word list, one word per line. (The deroff and sort commands are discussed later in this chapter.) Two separate spelling lists are maintained, one for American usage and one for British usage (invoked with the -b option to spell). These lists, hlista and hlistb, cannot be read or updated directly. They are compressed files, compiled from a list of words represented as nine-digit hash codes. (Hash-coding is a special technique for quick search of information.)
The main program invoked by spell is spellprog. It loads the list of hash codes from either hlista or hlistb into a table, and looks for the hash code corresponding to each word on the sorted word list. This eliminates all words (or hash codes) actually found in the spelling list. For the remaining words, spellprog tries to see if it can derive a recognizable word by performing various operations on the word stem, based on suffix and prefix rules. A few of these manipulations follow:
+ness
-y+i+less
+less
-y+ies
-t+ce
-t+cy
The new words created as a result of these manipulations will be checked once more against the spell table. However, before the stem-derivative rules are applied, the remaining words are checked against a table of hash codes built from the file hstop. The stop list contains typical misspellings that stem-derivative operations might allow to pass. For instance, the misspelled word thier would be converted into thy using the suffix rule -y+ier. The hstop file accounts for as many cases of this type of error as possible.
The final output consists of words not found in the spell list, even after the program tried to search for their stems, and words that were found in the stop list.
You can get a better sense of these rules in action by using the -v or -x option.
The -v option eliminates the last lookup in the table, and produces a list of words that are not actually in the spelling list along with possible derivatives. It allows you to see which words were found as a result of stem-derivative operations, and prints the rule used.
$ spell -v sample

Alcuin

ditroff

LaserWriter

PostScript

printerr

Transcript

+out  output

+s    uses
The -x option makes spell begin at the stem-derivative stage, and prints the various attempts it makes to find the word stem of each word.
$ spell -x sample

...

=into

=LaserWriter

=LaserWrite

=LaserWrit

=laserWriter

=laserWrite

=laserWrit

=output

=put

...

LaserWriter

...
The stem is preceded by an equals sign. At the end of the output are the words whose stem does not appear in the spell list.
One other file you should know about is spellhist. Each time you run spell, the output is appended through a command called tee into spellhist, in effect creating a list of all the misspelled or unrecognized words for your site. The spellhist file is something of a “garbage” file that keeps on growing. You will want to reduce it or remove it periodically. To extract useful information from this spellhist, you might use the sort and uniq -c commands shown later in this chapter to compile a list of misspelled words or special terms that occur most frequently. It is possible to add these words back into the basic spelling dictionary, but this is too complex a process to describe here.
Checking Hyphenation
The hyphen command is used on nroff-formatted files to print a list of words that have been hyphenated at the end of a line. You can check that nroff has correctly hyphenated words.
$ hyphen ch03.out

ch03.out:

applica-tion

pro-gram

charac-ter
If you disagree with the hyphenation of a word, you can go back into your source file and use either the .hw request to specify hyphenation points or the .nh request to inhibit hyphenation of the word.
If you don’t have the hyphen command on your system, you can print the lines ending in hyphens using grep:
$ grep '-$' ch03.out
This will not display the second half of the hyphenated word on the following line, but it should give you enough of an idea. Alternatively, you could use awk or sed, described in the next chapter, to create a version of this command that would print both lines.
Counting Words
In the past, writers were paid by the word. The wc command will count words for you:
$ wc ch01

180   1529   9496 ch01
The three numbers printed represent the number of lines, words, and characters, respectively. (The presence of formatting commands in the input file will make this measurement somewhat inaccurate.)
Writer’s Workbench
No book on UNIX text processing can avoid some discussion of Writer’s Workbench (WWB), a collection of programs for the analysis of writing style.
Unfortunately, unlike most of the programs described in this book, the Writer’s Workbench is not available on all UNIX systems. It was originally developed for internal use at Bell Labs, and was available in early releases of UNIX to the academic community. But it was made into a separate product when UNJX was commercially released.
The three original programs, style, diction, and explain, are available in Berkeley UNIX systems and in Xenix, but not in System V.
AT&T has released a greatly improved and expanded version, including additional programs for proofreading, that is controlled from a master program called wwb. However, this version is only available as a separately priced package for 3B2 and 3B5 computers. The unfortunate result is that one of UNIX’s most unusual contributions to text processing is not officially part of UNIX and has never been ported to many UNIX systems.
In this section, we’ll describe the original style and diction programs, with a brief discussion of wwb.
The style program analyzes a document’s style and computes readability indexes based on several algorithms widely accepted in the academic community. For example, when run on a draft of this section, style gave the following report:
readability grades:

       (Kincaid) 11.1   (auto) 11.6   (Coleman-Liau)  11.0

      (Flesch) 11.5 (52.7)

sentence info:

      no. sent 53 no. wds 1110

      av sent leng 20.9 av word leng 4.79

      no. questions 0 no. imperatives 0

      no. nonfunc wds 624  56.2%   av leng 6.25

      short sent (<16) 34% (18) long sent (>31)  17% (9)

      longest sent 46 wds at sent 4;

        shortest sent 5 wds at sent 47

sentence types:

      simple  32% (17) complex  47% (25)

      compound   4% (2) compound-complex  17% (9)

word usage:

      verb types as % of total verbs

      tobe  29% (33) aux  28% (32) inf  15% (17)

      passives as % of non-inf verbs   9% (9)

      types as % of total

      prep 12.0% (133) conj 3.6% (40) adv 5.0% (56)

      noun 26.8% (298) adj 15.5% (172) pron 7.3% (81)

      nominalizations   3 % (30)

sentence beginnings:

      subject opener: noun (22) pron (5) pos (1) adj (2)

                        art (4) tot  64%

      prep  17% (9) adv   9% (5)

      verb   0% (0)  sub_conj   6% (3) conj   0% (0)

      expletives   4% (2)
Even if you aren’t an English teacher and don’t know the Kincaid algorithm from the Flesch, this report can be very useful.
First, regardless of the differences between the algorithms, they all give you a general idea of the required reading level for what you have written. It is up to you to adjust your style according to the audience level you want to reach. This may not be a trivial task; however, it may be a vital one if you are writing a book for a specific audience. For example, if you were writing an instruction manual for heavy equipment to be used by people reading at the sixth-grade level, a style report like the one shown would be a dire warning that the manual would not be successful.
In general, to lower the reading level of a document, use shorter sentences and simpler constructions. (Incidentally, most writing in newspapers and general circulation magazines is at the sixth-grade level. But you shouldn’t get the impression that text written for a lower reading level is better. Writing can be clear and effective at any level of complexity. At the same time, each of us must recognize, and adjust for, the skills of our intended reader.)
The analysis of reading level is only a small part of what style offers. The detailed analysis of sentence length and type, word usage, and sentence beginnings can give you considerable insight into your writing. If you take the time to read the report carefully at the same time as you reread your text, you will begin to see patterns and can make intelligent decisions about editorial changes.
As an exercise, run style on a short passage you have written, read the report carefully, then rewrite your work based on the report. See what difference this makes to the style report. You will eventually get a feel for what the program provides.
In some cases, diction, the other major program in the Writer’s Workbench, can also help you find areas to change.
The diction program relies on a library of frequently misused words and phrases. It relentlessly searches out these words and flags them as inappropriate by enclosing them in brackets. For example, when run on a previous draft of this section, diction made the following recommendations:
wwb

 style performs stylistic analysis of a document  and

 computes readability indexes based on a[ number of ]

 algorithms widely accepted in the academic community.


 this may not be a trivial  task  however it may be a

 [ vital ] one if you are writing a book  with a specific

 target audience.


 for example  if you were  writing an instruction manual

 for heavy equipment to be used by  people reading at the

 sixth grade level a style report like the one shown above

 would be a dire warning that the manual would not be

 [ very ]successful.


 [ in some cases ] diction  the other  major program in the

 writer s workbench can help you  to find possible areas to

 change.


 in the latest official release of wwb there are a

 [ number of ] additional programs  including  .


 morestyle  which looks for abstract words as well as

 listing the  frequency with which each word is used

 and the word diversity the[ number of ]different words

 divided by the total[ number of ] words .


 morestyle also gives a count of the[ number of ]negative

 constructions contained in your writing.


 spellwwb  which lists possible spelling errors in a

 slightly more  usable format than the standard spell

 program  and spelladd   which allows you to build a local

 dictionary word of spelling  exceptions  words that spell

 regards as errors  but[ which ]you  know to be correct .


 you can run these programs individually  or using one of

 several [ overall ]control programs.


 running wwb will run[ all of ]these programs.


 number of sentences 37 number of hits 10
The diction program lists “problem” sentences from your source file, with words or phrases it has taken exception to enclosed in brackets. You can redirect this output to a file, or page through it on the screen. Punctuation and macros are first stripped by the deroff program, which explains the odd appearance of the text.
We find that we ignore diction's advice much of the time—the exception list is applied across the board, without regard for context. For example, you'll notice that it flagged the phrase number of several times, though that was exactly what we meant in all but one case. However, the twenty percent of its recommendations that we agree with are worth the effort of running the program.
If you don't understand why diction complains about a phrase, you can use explain to ask for help. For example:
$ explain

phrase?

which

use "that" when clause is restrictive" for "which"

use "when" for "at which time"

phrase?

number of

use "many" for "a large number of"

use "several, many, some" for "a number of"

use "usually" for "except in a small number of cases"

use "some" for "in a number of cases"

use "enough" for "sufficient number of"

use "often" for "in a considerable number of cases"

phrase?

perform

use "do" for "perform"

use "measure" for "perform a measurement"

phrase?

^D
The official release of WWB for 3B computers contains improved versions of style and diction, as well as many additional programs. These programs include
abst, which evaluates the abstractness of your writing.acro, which looks for acronyms (any word printed in all capital letters) so you can check that they have been properly defined.dictadd, which allows you to add to the dictionaries used bydiction, spell, andsexist.double, which looks for double words.findbe, which looks for syntax that may be difficult to understand.morestyle, which looks for abstract words and lists the frequency with which each word is used and the word diversity (the number of different words divided by the total number of words). Themorestyleprogram also gives a count of the number of negative constructions contained in your writing.org, which prints the first and last sentence of each paragraph, so you can analyze paragraph transitions and the flow of ideas within your writing.punct,which checks punctuation (e.g., the placement of commas and periods with quotation marks).sexist,which checks your writing against a dictionary of sexist words and phrases.spellwwb,which lists possible spelling errors in a slightly more usable format than the standard spell program, andspelladd,which allows you to build a local dictionary of spelling exceptions (words thatspellregards as errors, but that you know to be correct).splitrules,which finds split infinitives.syl,which prints the average number of syllables in the words you use.
You can run these programs individually or use one of several control programs. The wwb program will run just about everything. The proofr program will run those programs that help you proofread (such as spell, double, punct, and diction). The prose program will run those that analyze style (such as style and sexist).
There is also an interactive version of proofr called proofvi, which stores its output in a temporary file and then allows you to edit your original, stepping through each flagged problem.
▪ Comparing Versions of the Same Document ▪
UNIX provides a number of useful programs for keeping track of different versions of documents contained in two or more files:
- the
difffamily of programs, which print out lines that are different between two or more files - the SCCS system, which lets you keep a compact history of differences between files, so that you can go back and reconstruct any previous version
- the
makeprogram, which keeps track of a predefined list of dependencies between files
Checking Differences
The diff command displays different versions of lines that are found when comparing two files. It prints a message that uses ed-like notation (a for append, c for change, and d for delete) to describe how a set of lines has changed. This is followed by the lines themselves. The < character precedes lines from the first file and > precedes lines from the second file.
Let’s create an example to explain the output produced by diff. Look at the contents of three sample files:
| TEST1 | TEST2 | TEST3 |
| apples | apples | oranges |
| oranges | oranges | walnuts |
| walnuts | grapes | chestnuts |
When you run diff on these files, the following output is produced:
$ diff test1 test2

3c3

< walnuts

---

> grapes
The diff command displays the only line that differs between the two files. To understand the report, remember that diff is prescriptive, describing what changes need to made to the first file to make it the same as the second file. This report specifies that only the third line is affected, exchanging walnuts for grapes. This is more apparent if you use the -e option, which produces an editing script that can be submitted to ed, the UNIX line editor. (You must redirect standard output to capture this script in a file.)
$ diff -e test1 test2

3c

grapes

.
This script, if run on test1, will bring test1 into agreement with test2. (Later in this section, we’ll look at how to get ed to execute this script.) If you compare the first and third files, you find more differences:
$ diff test1 test3

ld0

< apples

3a3

> chestnuts
To make test1 the same as test3, you’d have to delete the first line (apples) and append the third line from test3 after the third line in test1. Again, this can be seen more clearly in the editing script produced by the -e option. Notice that the script specifies editing lines in reverse order; otherwise, changing the first line would alter all succeeding line numbers.
You can use the diff3 command to look at differences between three files. For each set of differences, it displays a row of equals signs (====) followed by 1, 2, or 3, indicating which file is different; if no number is specified, then all three files differ. Then, using ed-like notation, the differences are described for each file.
$ diff3 test1 test2 test3

====3

1:1c

2:1c

  apples

3:0a

====3

1:3c

2:3c

  grapes

3:2, 3c

  walnuts

  chestnuts
With the output of diff3, it is easy to keep track of which file is which; however, the prescription given is a little harder to decipher. To bring these files into agreement, you would have to add apples at the beginning of the third file; change line 3 of the second file to line 3 of the first file; and change lines 2 and 3 of the third file, effectively dropping the last line.
The diff3 command also has a -e option for creating an editing script for ed. It doesn’t quite work the way you might think. Basically, it creates a script for building the first file from the second and third files.
$ diff3 -e test1 test2 test3

3c

walnuts

chestnuts

.

lc

.

w

q
If you reverse the second and third files, a different script is produced:
$ diff3 -e test1 test3 test2

3c

grapes

.

w

q
As you might guess, this is basically the same output as doing a diff on the first and third files. (The only difference in the output is the result of a rather errant inconsistency between diff and diff3. The latter produces an ed script that ends with the commands that save the edited version of the file; diff requires that you supply them.)
Another useful program is sdiff (side-by-side diff). Its most straightforward use is to display two files in two columns on the screen. In a gutter between the two columns, the program displays a < if the line is unique to the first file, a > if the line is unique to the second file, and a | if the line is different in both files. Because the default line length of this program (130 characters) is too wide for most terminals, it is best to use the -w option to specify a smaller width. Here are the results of running sdiff on two different pairs of files:
$ sdiff -w60 test1 test2

apples                           apples

oranges                          oranges

walnuts                       |  grapes

$ sdiff -w60 test1 test3

apples                        <

oranges                          oranges

walnuts                          walnuts

                              >  chestnuts
The -s option to the sdiff command only shows the differences between the two files. Identical lines are suppressed. One of the most powerful uses of sdiff is interactive, building an output file by choosing between different versions of two files. You have to specify the -o option and the name of an output file to be created. The sdiff command then displays a % prompt after each set of differences. You can compare the different versions and select the one that will be sent to the output file. Some of the possible responses are l to choose the left column, r to choose the right column, and q to exit the program.
$ sdiff -w60 -o test test1 test3

apples                         <

% l

oranges                           oranges

walnuts                           walnuts

                               >  chestnuts

% r

$ cat test

apples

oranges

walnuts

chestnuts
Having looked at these commands in simplified examples, let’s now consider some practical applications for comparing documents.
When working on a document, it is not an uncommon practice to make a copy of a file and edit the copy rather than the original. This might be done, for example, if someone other than the writer is inputting edits from a written copy. The diff command can be used to compare the two versions of a document. A writer could use it to proof an edited copy against the original.
$ diff brochure brochure.edits

49c43,44

< environment for program development and communications,

---

> environment for multiprocessing, program development

> and communications, programmers

56c51

< offering even more power and productivity for commericial

---

> offering even more power and productivity for commercial

76c69

< Languages such as FORTRAN, COBOL, Pascal, and C can be

---

> Additional languages such as FORTRAN, COBOL, Pascal, and
Using diff in this manner is a simple way for a writer to examine changes without reading the entire document. By capturing diff output in a file, you can keep a record of changes made to any document.
As another example, suppose a company has a number of text files that comprise its help facility. These files are shipped with the product and maintained online by the customer. When there is a documentation update, these files also need to be updated. One way to accomplish this is to replace each text file in its entirety, but that involves distributing a lot of material that remains unchanged. Another way is to use diff and simply send a record of changes between the old and the new. The -e option creates an editing script for ed that can be used to recreate the second file from the first.
$ diff -e help.txt help.new > help.chgs

$ cat help.chgs

153,199d

65c

$INCLUDE {filename} program.name

.

56a

.Rh 0 "" "$CHAIN Statement"

.Rh "Syntax"

.in 5n

.nf

$CHAIN {filename} program.name

.fi

.in 0

.Rh "Description"

Use the $CHAIN statement to direct the compiler to read

source code from program.name and compile it along

....
The company could ship the file help.chgs with instructions on how to input this editing script to ed. You’d want to create a shell script to automate this process, but that is really an extension of knowing how it might be done from the command line. The following command pipes the editing script to ed:
$ (cat help.chgs; echo 'w' ) | ed - help.txt
To save the changes, a w command is submitted through echo. (In fact, if you have any concern about sparing the original file, you could change the w to 1, $p, which will cause the edited contents to be printed to standard output, but not saved in the file. Redirect standard output to a new file to keep both copies.)
As a further example, let’s take the instance where two people have made copies of a file and made changes to their own copies, and now you want to compare them both against the original. In this example, ch01 is the original; ch01.tom contains edits made by Tom; and ch01.ann contains changes made by Ann.
$ diff3 ch01 ch01.ann ch01.tom

====3

1:56a

2:56a

3:57,103c

  .mc |

  .Rh 0 "" "$CHAIN Statement"

  .XX "BASIC statements, $CHAIN"

  .XX "$CHAIN statement"

  .Rh "Syntax"

  .UN

  .in 5n

  .nf

  $CHAIN {file) program.name

  .fi

  .in 0

  .Rh "Description"

  Use the $CHAIN statement to direct the compiler to read

  source code from program.name and compile it along

  ....

====3

1:65c

2:65c

  $INCLUDE { file }

3:112c

  $INCLUDE { file } program.name

====2

1:136c

2:136c

  Nesting of $INSERT statements is not permitted.

3:183c

  Nesting of $INSERT statements is permitted.

====

1:143,144c

  program.name is converted to a valid UNIX filename.

  .LP

2:143,152c

  program.name is converted to a valid UNIX filename using

  the following conversion rules:

  .TS

  center, tab(@);

  c l c.

  /@is converted to@?

  ?@is converted to@??

  Null@is converted to@?0

  An initial .@is converted to@?.

  .TE

3:190,191c

  program.name is converted to a valid UNIX filename using

  a set of conversion rules.
You often find that one version has some things right and another version has other things right. What if you wanted to compile a single version of this document that reflects the changes made to each copy? You want to select which version is correct for each set of differences. One effective way to do this would be to use sdiff.
We'll use the -s option to suppress the printing of identical lines. To make the example fit on the printed page, we specify a 45-character line length. (You would generally use an 80-character line length for the screen.) Because the total line length is limited to 45 characters, sdiff will be able to display only the first 15 or so characters of the line for each file; the rest of the line will be truncated.
$ sdiff -w45 -s -o ch01.new ch01.ann ch01.tom

56a57,103

                          >  .Rh 0 "" "$CHAIN Statement"

                          >  .XX "BASIC statements, $CHAIN"

                          >  .XX "$CHAIN statement"

                          >  .Rh "Syntax"

                          >  .UN

                          >  .in 5n

                          >  .nf

                          >  $CHAIN {fIfilefP} fI

                          >  .fi

                          >  .in 0

                          >  .Rh "Description"

                          >  Use the $CHAIN statement to de

                          >  code from fIprogram.namefP

                       .......

% r

65c112

$ INCLUDE {fIfilefP)    |  $INCLUDE {fIfilefP}

% r

% 143,152c190,191

fIprogram.namefP is     |  fIprogram.namefP is

following rules.          |  following rules.

.TS                       <

center, tab (@);          <

c l c.                    <

/@is converted to@?       <

?@is converted to@??      <

Null@is converted to@?0   <

An initial .@is converted <

.TE                       <

% 1
The file ch01.new contains the portions of each file that were selected along with all the lines that both files have in common.
Another program worth mentioning is bdiff (big file diff). It is used on files too large for diff. This program breaks up a large file into smaller segments and then passes each one through diff. It maintains line numbering as though diff were operating on one large file.
SCCS
We’ve shown an example using diff to produce a file that described the changes made to a text file for a help facility. It allowed the distribution of a smaller file describing changes instead of a wholly new version of the file. This indicates a potential application for diff, which is fully realized in the Source Code Control System or SCCS. SCCS is a facility for keeping track of the changes to files that take place at different stages of a software development or documentation project.
Suppose you have a first draft of a manual. (This is referred to as a delta when it is saved in a special SCCS format.) The second draft, of course, is based on changes to the first draft.
When you make the delta for the second draft, SCCS, instead of keeping a separate copy for each draft, uses diff to record the changes to the first draft that resulted in the second draft. Only the changes, and the instructions for having an editor make them, need to be maintained. SCCS allows you to regenerate earlier drafts, which saves disk space.
SCCS is quite complex—too complex to describe here—but we seriously suggest that you investigate it if you are working on a large, frequently-revised or multiple-author writing project.
Using make
The make program is a UNIX facility for describing dependencies among a group of related files, usually ones that are part of the same project. This facility has enjoyed widespread use in software development projects. Programmers use make to describe how to “make” a program—what source files need to be compiled, what libraries must be included, and which object files need to be linked. By keeping track of these relationships in a single place, individual members of a software development team can make changes to a single module, run make, and be assured that the program reflects the latest changes made by others on the team.
We group make with the other commands for keeping track of differences between files only by a leap of the imagination. However, although it does not compare two versions of the same source file, it can be used to compare versions such as a source file and the formatted output.
Part of what makes UNIX a productive environment for text processing is discovering other uses for standard programs. The make utility has many possible applications for a documentation project. One such use is to maintain up-to-date copies of formatted files that make up a single manual and provide users with a way of obtaining a printed copy of the entire manual without having to know which preprocessors or nroff/troff options need to be invoked.
The basic operation that make performs is to compare two sets of files, for example, formatted files and unformatted files, and determine if any members of one set, the unformatted files, are more recent than their counterpart in the other set, the formatted files. This is accomplished by simply comparing the date or time stamp of pairs of files. If the unformatted source file has been modified since the formatted file was made, make executes the specified command to “remake” the formatted file.
To use make, you have to write a description file, usually named makefile (or Makefile), that resides in the working directory for the project. The makefile specifies a hierarchy of dependencies among individual files, called components. At the top of this hierarchy is a target. For our purposes, you can think of the target as a printed copy of a book; the components are formatted files generated by processing an unformatted file with nroff.
Here’s the makefile that reflects these dependencies.
manual: ch01.fmt ch02.fmt ch03.fmt

      lp ch0[1-3].fmt

ch01.fmt: ch01

      nroff -mm ch01 > ch01.fmt

ch02.fmt: ch02

      tbl ch02 | nroff -mm > ch01.fmt

ch03.fmt: ch03a ch03b ch03c

      nroff -mm ch03? > ch03.fmt
This hierarchy can be represented in a diagram:
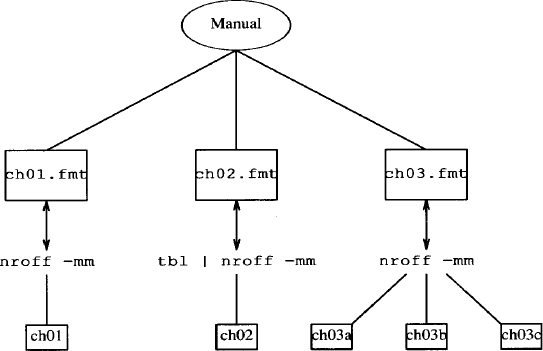
The target is manual and it is made up of three formatted files whose names appear after the colon. Each of these components has its own dependency line. For instance, ch01.fmt is dependent upon a coded file named ch01. Underneath the dependency line is the command that generates ch01.fmt. Each command line must begin with a tab.
When you enter the command make, the end result is that the three formatted files are spooled to the printer. However, a sequence of operations is performed before this final action. The dependency line for each component is evaluated, determining if the coded file has been modified since the last time the formatted file was made. The formatting command will be executed only if the coded file is more recent. After all the components are made, the lp command is executed.
As an example of this process, we’ll assume that all the formatted files are up-to-date. Then by editing the source file ch03a, we change the modification time. When you execute the make command, any output files dependent on ch03a are reformatted.
$ make

nroff -mm ch03? > ch03.fmt

lp ch0[1-3].fmt
Only ch03.fmt needs to be remade. As soon as that formatting command finishes, the command underneath the target manual is executed, spooling the files to the printer.
Although this example has actually made only limited use of make’s facilities, we hope it suggests more ways to use make in a documention project. You can keep your makefiles just this simple, or you can go on to learn additional notation, such as internal macros and suffixes, in an effort to generalize the description file for increased usefulness. We’ll return to make in Chapter 18.
▪ Manipulating Data ▪
Removing Formatting Codes
The deroff command removes nroff/troff requests, macros, inline backslash sequences, and eqn and tbl specifications.
$ cat temp

.CH 11 “A Miscellany of UNIX Commands”

In this chapter, we present a miscellany of s-2UNIXs0

programs with text-processing applications.

.P

In addition, we introduce several s-2UNIXs0 utilities

$ deroff temp

   Miscellany  UNIX Programs

In this chapter, we present a miscellany of UNIX programs

with text-processing applications.

In addition, we introduce several UNIX utilities
Special rules are applied to text specified as arguments to a macro so that they are not passed through deroff. A word in a macro call must contain at least three letters. Thus, A and of are omitted.
The deroff -w command is used by spell to remove troff requests and place each word on a separate line. You can use deroff in a similar manner to prepare a word list.
$ deroff -w temp

Miscellany

UNIX

Programs

In

this

chapter

we

present

miscellany

of

UNIX

programs

with

text

processing

applications

In

addition
Again, not all “words” are recognized as words. The deroff command requires that a word consist of at least two characters, which may be letters, numerals, ampersands, or apostrophes. (As mentioned above, it applies slightly different rules to text specified as an argument to a macro.)
We had hoped deroff might be useful for our clients who wanted online copies of a document but used a word processor. Because deroff drops words, it was not practical for stripping out troff-specific constructs. Perhaps the best way to do this is to use nroff to process the file, and then use a combination of terminal filters to strip out tabs, backspaces (overstrikes), and reverse linefeeds.
The sort and uniq Commands
The sort command puts lines of a file in alphabetic or numeric order. The uniq command eliminates duplicate lines in a file.
The sort command works on each line of a text file. Normally, it is used to order the contents of files containing data such as names, addresses, and phone numbers. In the following example, we use grep to search for index entries, coded with the macro. XX or .XN, and sort the output in alphabetic order.
$ grep ".X [XN]" ch04 | sort -df

.XX "ABORT statement"

.XX "ASSIGNMENT statement"

.XX "BASIC statements, ABORT"

.XX "BASIC statements, ASSIGNMENT"

.XX "BASIC statements, BEGIN CASE"
The −f option folds uppercase and lowercase words together (that is, it ignores case when performing the sort). The -d option sorts in dictionary order, ignoring any special characters.
The uniq command works only on sorted files, comparing each adjacent line. The sort command has a -u option for removing all but one indentical set of lines. Usually this is sufficient, but uniq does have several options, which gives you additional flexibility. For example, here’s the sorted output of four files:
$ sort test*

apples

apples

apples

chestnuts

chestnuts

grapes

oranges

oranges

oranges

oranges

walnuts

walnuts

walnuts
The -d option prints one line for each duplicate line, but does not print lines that are unique.
In this example, grapes has been filtered out. The -u option prints only unique lines. If we used the -u option, only grapes would appear.
You wouldn’t expect sort to be useful on a document containing long lines of text. However, if you bothered to start sentences on a new line when creating the input file (as we recommended in Chapter 3), scanning a sorted file can produce some interesting things. The following command sorts the contents of ch03 and pipes the output through pg:
$ sort -u ch03 | pg
Looking at the results gives you a slightly turned about view of your document. For instance, you might notice inconsistencies among arguments to formatter requests:
.sp

.sp .2i

.sp .3v

.sp .5
Or you could check the frequency with which sentences begin in the same manner:
It is dangerous t o use mvcur()

It is designed so that each piece of code

It is possible that some programs
In the next example, we use deroff to create a word list. Then we sort it and use uniq to remove duplicates. The -c option with uniq provides a count of the occurrences of identical lines. (It overrides -u and -d.)
$ deroff -w ch03 | sort -fd | uniq -c

   1 abort

   1 aborted

   3 about

   4 above

   1 absolute

   1 absorb

   1 accepting

   1 accomplishes

   1 active

   2 actual

   5 actually

   2 Add

   7 add

...

  68 you

   3 Your
  13 your

   2 zero
In the next example, we repeat the previous command, this time adding another sort at the end to order the words by frequency. The -r option is used to reverse the comparison, putting the greatest number first.
$ deroff -w ch03 I sort -fd | uniq -c | sort -rfd

 666 the

 234 to

 219 is

 158 window

 156 of

 148 and

 114 in

 111 screen

 105 that

  83 character

  76 are

...

   1 aborted

   1 abort
You will find other examples of sort in the next section, where we look at sorting particular fields. Be sure to read the UNIX command pages for sort and uniq and experiment using different options.
The join Command
The join command compares lines contained in separate files and joins lines that have the same key. (When you use sort or join, each line is separated into fields by blanks or tabs. Normally, the first field is the key field, on which the sort or join is performed. However, there are options that allow you to change the key field.) The file must be sorted in ascending ASCII sequence before being processed by join.
$ cat 85

jan    19

feb    05

mar    14

apr    15

may    15

jun    18

jul    19

aug    20

sep    19

nov    18

dec    18

$ cat 86
jan    09

feb    15

mar    04

apr    06

may    14

jun    13

jul    13

aug    10

sep    14

nov    13

dec    12

$ sort 85 >85.temp; sort 86 >86.temp
First we sort both of these files, creating temporary files. Then we perform the join, followed by a sort with the –M option, to reorder them by month.
$ join 85.temp 86.temp | sort –M > joiner

$ cat joiner

jan  19  09

feb  05  15

mar  14  04

apr  15  06

may  15  14

jun  18  13

jul  19  13

aug  20  10

sep  19  14

nov  18  13

dec  18  12

$
After the data is joined in this manner, it can be sorted by field. Fields are separated by blank spaces or tabs. The sort can be performed on specific fields, using + to indicate the first sort field and – to indicate the last sort field. The first field is +0. To sort on the second field, use +1.
$ sort +1 joiner

feb  05  15

mar  14  04

apr  15  06

may  15  14

dec  18  12

jun  18  13

nov  18  13

jan  19  09

jul  19  13

sep  19  14

aug  20  10
The comm Command
The comm command reads the contents of two sorted files and produces for output a three–column listing of lines that are found
- only in the first file;
- only in the second file;
- in both the first and second files.
For example, let’s suppose that we had generated a list of UNIX commands found in Berkeley 4.2 and another list of commands found in AT&T System V.2. We can use comm to produce a compact listing of commands found exclusively in one version and commands common to both. For obvious reasons, this example uses only the beginning of the list.
$ cat bsd4.2

adb

addbib

apply

apropos

ar

as

at

awk


$ cat attV.2

adb

admin

ar

as

asa

at

awk
Note that both files have already been sorted.
$ comm bsd4.2 attV.2
| adb | ||
| addbid | ||
| admin | ||
| apply | ||
| apropos | ||
| ar | ||
| as | ||
| asa | ||
| at | ||
| awk |
Commands found only on systems running Berkeley 4.2 are in the left–hand column, and those found only on AT&T System V.2 are in the center column. Commands found in both versions are listed in the right–hand column.
You can also suppress the display of one or more columns. For instance, if you wanted to display only the commands that were found on both systems, you’d enter:
$ comm –12 bsd4.2 att V. 2
Only the third column would be shown.
By specifying – instead of a filename, you can also use standard input. In the next example, we produce a listing of filenames from two directories on the system, sort them, and compare them against the commands named in the bsd4.2 file. This allows us to compare commands found on our system with those on the list of Berkeley commands.
$ ( cd /bin ls cd /usr/bin ;ls ) | sort | comm - bsd4.2
| acctcom | ||
| adb | ||
| adbbid | ||
| admin | ||
| apnum | ||
| apply | ||
| abropos | ||
| ar | ||
| as | ||
| assa | ||
| at | ||
| awk |
Parentheses are used to group a series of commands, combining their output into a single stream; we want a list of command names without pathnames from several directories. Because a new shell is created to execute these commands, notice that we do not change our current working directory when the commands in parentheses have finished executing.
The cut and paste Commands
The cut and paste commands modify a table or any other data in fields or columns. You can extract specific columns of data using cut, and join them horizontally using paste.
For our examples, we’ll make use of a portion of a table of ASCII characters that specifies their decimal and hexadecimal values. (This example is probably unnecessarily complex; you can use cut and paste for much simpler jobs than this!) Here’s what the table looks like to begin with:
$ cat appc

.TS

center, box;

cb cb cb
n n 1.

Decimal     Hexadecimal   ASCII

=
| 000 | 00 | NUL |
| 001 | 01 | SO |
| 002 | 02 | STX |
| 003 | 03 | ETX |
| 004 | 04 | EOT |
| 005 | 05 | ENQ |
| 006 | 06 | ACK |
| 007 | 07 | BEL |
| 008 | 08 | BS |
| 009 | 09 | HT |
| . TE |
Each column is separated by a tab. A tab is the default field delimiter for cut; the -d option can be used to change it. The -c option allows you to specify character positions or ranges. The command cut -c6 - 80 would print characters beginning at position 6 through 80, truncating the first five characters. The -f option is used to specify one or more fields that are passed to standard output. (Given the name of the command, one might reasonably think you’d specify the fields or column position you wanted cut out, but….)
In the next example we extract the third field, which contains the ASCII names:
$ cut -f3 -s appc

ASCII

NUL

SO

STX

ETX

EOT

ENQ

ACK

BEL

BS

HT
We use the -s option to remove all lines that do not have any delimiters, thus dropping the tbl constructs from the output. Normally, cut passes lines without delimiters straight through, and that is what we really want for our next feat. We are going to reorder the table so that it can be referenced by the ASCII name rather than by decimal number. All of this can be done from the command line, with only a brief entry into the editor at the end.
We’ll look at this in stages. First, we extract the third column and send it along to paste:
$ cut - f3 appc | paste - appc

-TS     .TS

center,   box; center,  box;

cb cb cb       cb cb cb

n n l.n n 1.

ASCII Decimal        Hexadecimal   ASCII
| = | = | ||
| NUL | 000 | 00 | NUL |
| SO | 001 | 01 | SO |
| STX | 002 | 02 | STX |
| ETX | 003 | 03 | ETX |
| EOT | 004 | 04 | EOT |
| ENQ | 005 | 05 | ENQ |
| ACK | 006 | 06 | ACK |
| BEL | 007 | 07 | BEL |
| BS | 008 | 08 | BS |
| HT | 009 | 09 | HT |
| .TE | .TE |
The paste command reads one or more files or standard input (the – option) and replaces the newline with a tab in all but the last file. This gives us four columns. (Yes, it doubled the tbl specifications, but we have an editor.) Now, all we have to do is extract the first three columns from the output. Only cut –f1, 2, 3 has been added to the previous command, and the output is redirected to a file.
$ cut -f3 appc | paste - appc | cut -f1,2,3 > ascii.table

$ cat ascii.table

.TS    .TS

center, box; center, box;

cb cb cb     cb cb cb

n n 1.n n 1.

ASCII Decimal      Hexadecimal
| = | = | |
| NUL | 000 | 00 |
| SO | 001 | 01 |
| STX | 002 | 02 |
| ETX | 003 | 03 |
| EOT | 004 | 04 |
| ENQ | 005 | 05 |
| ACK | 006 | 06 |
| BEL | 007 | 07 |
| BS | 008 | 08 |
| HT | 009 | 09 |
| .TE | .TE |
This gives us three columns in the correct order. We can go into vi to rearrange the tbl constructs and execute a sort command on just the data portion of the table to bring it all together.
$ cat ascii.table

.TS

center, box;

cb cb cb

n n 1.

ASCII Decimal     Hexadecimal

=
| ACK | 006 | 06 |
| BEL | 007 | 07 |
| BS | 008 | 08 |
| ENQ | 005 | 05 |
| EOT | 004 | 04 |
| ETX | 003 | 03 |
| HT | 009 | 09 |
| NUL | 000 | 00 |
| SO | 001 | 01 |
| STX | 002 | 02 |
| -TE |
The paste command can be used in several interesting ways. Normally, in order to merge two files, paste replaces the newline in the first file with a tab. The -d option allows you to specify a substitute for the tab. This can be any single character or a list of characters. Special characters can be represented as follows: newline (
), tab ( ), backslash (\), and empty string (�). Each character in the list i s assigned in sequence to replace a newline, and the list is recycled as many times as necessary. We can use paste to present our three–column table in six columns:
$ paste -s -d"
" appci

.TS     center,  box;

cb cb cb       n n 1.

Decimal        Hexadecimal     ASCII  =

000     00     NUL     001     01     SO

002     02     STX     003     03     ETX

004     04     EOT     005     05     ENQ

006     06     ACK     007     07     BEL

008     08     BS      009     09     HT

.TE
The -s option is used when only a single file is specified. It tells paste to merge subsequent lines in the same file rather than to merge one line at a time from several files. In this example, the first line’s newline is replaced by a tab while the second line retains the newline. To get nine columns out of three–column input, you’d specify -d“
”.
A little work needs to be done to the tbl specifications. You could also execute the paste command from within vi so that it only affects the data portion.
You would probably want to go to this much trouble for a large table (or many small tables) rather than the small examples shown here. A more practical example that uses paste alone would be to construct a multi–column table from a single long list of words. Simply split the list into equal–sized chunks, then paste them together side by side.
The tr Command
The tr command is a character translation filter, reading standard input and either deleting specific characters or substituting one character for another.
The most common use of tr is to change each character in one string to the corresponding character in a second string. (A string of consecutive ASCII characters can be represented as a hyphen–separated range.)
For example, the command:
$ tr "A-Z" "a-z" < fire
will convert all uppercase characters in file to the equivalent lowercase characters. The result is printed on standard output.
As described in Chapter 7, this translation (and the reverse) can be useful from within vi for changing the case of a string. You can also delete specific characters. The -d option deletes from the input each occurrence of one or more characters specified in a string (special characters should be placed within quotation marks to protect them from the shell). For instance, the following command passes to standard output the contents of file with all punctuation deleted:
$ cat file| tr -d ",.!?;:"
The -s (squeeze) option of tr removes multiple consecutive occurrences of the same character. For example, the command:
$ tr -s " " < file
will print on standard output a copy of file in which multiple spaces in sequence have been replaced with a single space.
We’ve also found tr useful when converting documents created on other systems for use under UNIX. For example, one of our writers created some files using an IBM PC word processor. When we uploaded the files to our system, and tried to edit them with vi, we got the message:
Not an ascii file
and a blank screen. The vi editor could notread the file. However, using a programming utility that lists the actual binary values that make up the contents of a file (od, or octal dump), we were able to determine that the word processor used nulls (octal 000) instead of newlines (octal 012) to terminate each line.
The tr command allows you to specify characters as octal values by preceding the value with a backslash, so the command:
$ tr ' �00' ' �12'
was what we needed to convert the file into a form that could be edited with vi.
Splitting Large Files
Splitting a single large file into smaller files can be done out of necessity—when you come across a program that can’t handle a large file—or as a matter of preference—when you find it easier to work with smaller files. UNIX offers two different programs for breaking up files, split and csplit.
The split command divides a file into chunks, consisting of the same number of lines. This is 1000 lines, unless specified differently. In the following example of split, we break up a 1700-line file into 500-line chunks. The wc command supplies a summary of the number of lines, words, and characters in a text file.
$ wc ch03

1708   8962  59815  ch03

$ split -500 ch03

$ wc ch03*

500    2462    16918  ch03aa

500    2501    16731  ch03ab

500    2976    19350  ch03ac

208    1023     6816  ch03ad

1708   8962    59815  ch03
The split command created four files. It appended aa, ab, ac, etc. to the end of the original filename to create a unique filename for each file. You can also specify, as a third argument, a different filename to be used instead of the original filename.
Look at the end of one of these files:
$ tail ch03ac

.Bh  "Miscellaneous  Functions"

.in 5n

.TS

tab (@);

1 1 1.
Unfortunately, the file breaks in the middle of a table. The split command pays no attention to content, making it inadequate for breaking a file into manageable, but complete, sections.
The csplit command offers an alternative, allowing you to break a file in context. There are two ways to use it. The first is to supply one or more line numbers. You could enter the following command:
$ csplit ch03 100 145 200
Four files would be created (0-99, 100-144, 145-199, 200–end). The naming convention for files created by csplit is different than split. Files are named xx00, xx01, xx02, and so on. If you want to specify a prefix that is different than xx, you can do so with the -f option.
Because we do not know in advance which line numbers to specify, we can use grep to get this information. The -n option to grep causes line numbers to be returned. In this example, we specify a pattern to match the section header macros, Ah and Bh:
It produces the following listing:
   5: .Ah  “Introduction"

  30: .Ah  “Using  the  Curses  Library"

 175: .Ah  “The  Curses  Functions"

 398: .Bh  “Adding  Characters  to  the  Screen  Image“

 638: .Bh  “Standout 398: .Bh   398: .Bh  Mode"

 702: .Bh  “Getting Characters from the Terminal"

 777: .Bh  “Input  Modes"

 958: .Bh  “Erasing and Clearing"

1133: .Bh  ““Creating and Removing Multiple Windows"

1255: .Bh  “Window–Specific Functions"

1301: .Bh  “Manipulating Multiple windows"

1654: .Bh  “Terminal Manipulation”
From this listing, we select the appropriate places at which to split the file and supply these numbers to split. The -f option is used to supply a filename prefix.
$  csplit –f ch03. ch03 175 1133

6803                       Number of bytes in each segment

32544

20468

$ ls ch03.*

ch03.00

ch03.01

ch03.02
The csplit command prints a character count for each of the three files it created. (This count can be suppressed using the -s option.)
The second way to use csplit is to supply a list of patterns. For instance, if you had prepared an outline that you wanted to break into files correponding to sections I, II, and III, you could specify:
$ csplit -s -f sect. outline /I./  /II./  /III./

$ ls sect.*

sect.01

sect.02

sect.03
You can also repeat a pattern. In one project we were working on, one large file contained a number of commands in reference page format. We decided it would be easier if we put each command in its own file. The beginning of a reference header was marked by the macro .Rh 0. First, we used grep to determine the number of times this macro occurred.
$ grep -c".Rh 0" ch04

43
We reduce this number by 1 and surround it with braces:
The pattern is enclosed within double quotation marks because it contains a space. (If you use the C shell, you must protect the braces from being interpreted by placing them in double quotation marks as well.) This command creates 43 files:
$ ls ch04*

ch04

ch04.00

ch04.01

ch04.02

ch04.03

...

ch04.39

ch04.40

ch04.41

ch04.42

ch04.43
The only task remaining is to rename the files, using the name of the command listed as the first argument to the .Rh macro. (We’d have to write an awk or shell script to do this automatically.)
After you have divided a large file into a number of smaller files, you might organize them in a subdirectory. Let’s look at a small example of this:
$ mkdir ch04.files

$ mv ch04.?? ch04.files
Again, the usefulness of filename metacharacters is apparent, giving us the ability to move 43 files without typing 43 filenames.
Encryption
The cloak-and-dagger set and the security conscious will find uses for the encryption facilities of UNIX. (These facilities are not available on UNIX systems sold outside the United States.) The crypt command reads a file from standard input, asks you to supply a key for encoding the file, and passes to standard output an encrypted version of the file. You should redirect standard output to a new file because the encrypted file is not readable text.
$ cat message | crypt > encrypted.msg

Enter key:alabaster
Just as when you enter a password, the key does not appear on the screen as you enter it. If you prefer, you can enter the key as an argument to crypt. To decode an encrypted file, you simply cat the file to crypt and supply the key.
The UNIX editors ed, ex, and vi, can be invoked with the -x option to read or edit an encrypted file. (Some versions of these programs recognize this option but do not support the encryption feature.) Of course, you have to supply the correct key.
▪ Cleaning Up and Backing Up ▪
In this section, we show some procedures for backing up active files to some other medium such as tape or floppy disk. At many sites, backups are the responsibility of one person, who performs these tasks on a regular basis to ensure that users can recover much of their data in case there is a serious system crash. At other sites, individual users might be responsible for doing their own backups, especially if there are only a few users on the system. Whoever does it must ensure that backups of important files are made periodically.
A second reason for learning a backup procedure is to enable you to store files on an off–line medium. For users of PCs, this is the standard method of operation (and therefore much simpler to do), but all UNIX systems have hard disks as the primary storage medium. No matter how large a disk drive is, sooner or later, users will fill it to capacity. Frequently, there are useless files that can be deleted. Other inactive files, such as an early draft of a document, might be removed from the system after you have made a copy on floppy disk or tape. After a project is finished, you probably want to make several copies of all important files. At a later time, should you need files that have been stored off–line, you can easily restore them to the system.
We are going to describe how to use the cpio command for backing up one or more working directories. There are other UNIX commands that might be used as well (tar and dd, for instance). At your site, you may even have simpler shell scripts that prevent you from having to deal with cpio directly. Ask an expert user at your site about backup procedures and go through it once or twice. Apart from learning about cpio, you will need:
- The UNIX filename of the device (
/dev/xxxx) to which you are directing the output of thecpiocommand. - Familiarity with operating the device, such as being able to load a tape in the tape drive and knowing how to format a floppy disk prior to use.
You can use cpio in two basic ways, either to back up or to restore files. You use cpio with the -o option and > to redirect output to the device for backup, or with the -i option and < to redirect input from the device to restore files.
Unlike many of the commands we’ve looked at, cpio depends exclusively on reading a list of filenames from standard input. This list identifies the files that will be backed up. For practical purposes, this involves doing an ls command on the directory you want backed up and piping the results to cpio.
You need to know the UNIX filename for the backup device. This name is site specific, so you need to check with a knowledgeable user. At our site, we have a floppy disk drive named /dev/rfp021. A tape drive might be named /dev/mt0.
After you have loaded the tape in the tape drive or placed the floppy disk in the disk drive, you can perform the backup using your own version of this command:
The -v (verbose) option prints a list of filenames on the screen.
The -i option to cpio reads or restores files from a tape or floppy disk device. Sometimes, before you actually restore files, you want to list the contents of the tape or disk. The -t option prints a table of contents but does not actually read these files onto the system.
$ cpio -it < /dev/rfp021

384 blocks

sect3

dict

shellstuff

...
Using the -v option along with the -t option produces a long (verbose) listing of files, as if you had entered ls -l.
You don’t have to extract all the files from disk or tape. You can specify certain files, using filename metacharacters to specify a pattern.
$ cpio -iv "sect?" < /dev/rfp021

No match.
Remember to refer to the full pathname if the files were saved using a complete pathname, and to put pathnames that include metacharacters within double quotation marks.
$ cpio -i "/work/docbook/chl3/sect?" < /dev/rfp021

384 blocks

sect3

sect2

sect1
Before restoring a file, cpio checks to see that it won’t overwrite an existing file of the same name that has been modified more recently than the file being read.
You can also use the find command with the -cpio condition to do a back up. The advantage of using find is that it descends all the way down a directory hierarchy.
$ find /work/docbook/ch13 -cpio /dev/rfp021
To restore a directory hierarchy, use the -d option to cpio. Administrators frequently use find to generate a list of files that have been modified within a certain time period. The conditions -mtime (modification time) and -atime (access time) can be followed by a number indicating a number of days. This number can be preceded by a plus sign, indicating more than that number of days, or a minus sign, indicating less than that many days. If there is no sign, the condition indicates exactly that number of days.
This example uses find to produce a list of files that have been modified within the last seven days. These active files are good candidates for backups.
$ find /work/docbook -mtime -7 -print

/work/docbook

/work/docbook/oshell

/work/docbook/ch01

...
Don’t forget you have to specify -print to see the results of a find command.
You could work up your own version of this command to look for your own files that have not been accessed in the last 21 days. Add the option -atime with an argument of +21 to list the files and directories that have not been accessed in over 21 days. Add the -user option to look only for your own files, the -cpio option to backup these files, and the -ok option to execute an rm command to delete them from the system after they’ve been backed up.
$ find /work -atime +21 -user -cpio /dev/rfp021 -ok rm {} ;
The -ok option is the same as the -exec option; however, instead of executing the command specified within parentheses on all files selected by find, it prompts you first to approve the command for each file.
▪ Compressing Files ▪
You can conserve the amount of disk space that text files take up by storing some of your files in a compressed form. The pack command can be used to compress a file. It generally reduces a text file by 25 to 40 percent.
$ ls -l ch04/sect1

-rw-rw-rw-    1 fred   doc   29350 Jun 10 15:22 ch04/sect1

$ pack ch04/sectl

pack: ch04/sect1: 39.9% Compression
The original file is replaced by a packed file with a .z appended to the original filename.
$ ls -l ch04/sect1.z

-rw-rw-rw-    1 fred   doc   17648 Jun 10 15:29 ch04/sect1.z
The pack command reduced the size of this file from 29K to 17K bytes. If used system-wide, it could save a significant amount of disk space, although the amount of compression will vary from file to file. Obviously, there is less benefit in packing small files.
To expand a packed file, use the unpack command. You can specify the name of the file with or without the .z suffix.
$ unpack ch04/sect1

unpack: ch04/sect1: unpacked
Another way to temporarily unpack a file is to use a special version of cat for packed files, called pcat. Use this command to view a packed file (pipe it through more or pg) or send it as input to another command, as in the following example:
$ pcat ch04/sect1 | nroff -mm
▪ Communications ▪
More and more, we find that our projects require us to work on several different computer systems, some of them UNIX systems, some not. Given this situtation, the ability to work remotely on other systems and to transfer files has been essential. Fortunately, a number of useful communications programs are part of the standard UNIX shipment.
Two basic types of connections between computer systems are a dial-up line, using a modem to communicate across phone lines, and a direct line, when two computer systems are in close proximity and can be connected by a single cable. The uucp and cu commands establish communication links using both types of connections.
The cu command (Berkeley’s version is called tip) is a UNIX program for conducting a login session on a remote computer system. UUCP (UNIX-to-UNIX copy) is a series of related programs for transferring files between UNIX systems. Its main program is called uucp.
We cannot provide full descriptions of these facilities here. A good way to learn is to ask an expert user to help you transfer files or begin a remote login session. Keep notes on the procedure and when following it, if things don’t work as expected, get more help.
The UUCP programs are quite straightforward and easy to use after you are accustomed to the conventions. Each system on the UUCP network has a file that describes the other systems linked to it and what types of links are available. This file is created by the system administrator of each system. You can find out the names of these remote systems by entering the uuname command. If your system is properly configured and you have a login on a remote system, such as boston, you can begin a remote session by entering:
$ cu boston
After you are connected to the remote system, you should get a login message. To quit a remote session, log out and then enter ~. (tilde dot) to return to your own machine.
There are a number of commands you can enter while under the control of cu, permitting, for instance, the execation of commands on the local system while you are still logged in to the remote system. Check the reference page in your UNIX documentation.
You can also dial direct to a non-UNIX system by specifying a telephone number on the command line (providing, of course, that the files accessed by these communications programs have been properly configured by the system administrator).
You can send mail to users on these remote systems and transfer files. Generally, file transfers take place between public directories on both systems, usually /usr/spool/uucppublic. File transfers between other directories will contend with file and directory access permissions as well as uucp permissions set by the system administrator. The character ~ serves as a shorthand for the public directory.
For instance, when working on site for a client, we often create files that we want to send to our own system. If we are logged in on their system, we can send the file outline to our system named ora by entering:
$ uucp -m outline ora!~/fred/
The UUCP facility is batch oriented, accepting requests and acting upon them in the order in which they are received. Although it may execute your request immediately, if it is busy or encounters difficulty making the connection, UUCP will carry out the request at a later time.
The -m option is used so that we are sent mail when the copy is actually completed. The system name is followed by an exclamation mark (if you use the C shell, escape ! with a backslash). Then you specify a tilde (~) followed by the user’s name. Putting a slash after the user name (fred) ensures that the user name will be interpreted as a directory (or a directory will be created if one does not exist).
Occasionally, you will need to transfer a large number of files or, perhaps, an entire directory hierarchy. There are some simple tricks you can use to combine multiple files into a single file, making it easier to transmit to another system. They are especially helpful when you transfer between public directories.
You must first create a list of the files to be included. (You can do this either manually or with a command like ls or find.) Then use cpio to create what we can call a file archive on standard output rather than on a backup device. Redirect standard output to a file, then use UUCP to send the archive. Use the same backup program on the target system to restore the archive. For example, if you had a book made up of files ch01, ch02, etc., you could “package” that book for transfer to another system using cpio:
boston$ cd /usr/proj/book

boston$ find . -name 'ch0?' -print | cpio -oc > book.archive
or using a manually generated list of filenames:
boston$ ls ch0? > filelist

boston$ cpio -oc < filelist > book.archive
Then, after transferring book.archive (instead of numerous individual files) to the remote system with UUCP, a user can restore the archive:
calif$ mkdir /usr/proj/book

calif$ mv /usr/spool/uucppublic/book.aschive /usr/proj/book

calif$ cd /usr/proj/book

calif$ cpio -icd < book.archive
(The -c option of cpio writes header information in ASCII for portability; -d tells cpio to create directories if needed when doing the restore.)
(On Berkeley UNIX systems, you can do something similar with tar. See your UNIX manual for details.)
▪ Scripts of UNIX Sessions ▪
Throughout this chapter, we have provided examples of UNIX commands. These examples were made using a command called script (which is not a standard System V command). The script command allows you to make a file copy of a UNIX session. Without this facility, we’d have to simulate the examples by hand.
After you invoke script, your input and output is copied to a file. By default, the name of this file is typescript, but you can supply a different name on the command line.
$ script

Script started on Thu Jul 10 12:49:57 1987

$ echo hello

hello

$
To quit, you enter CTRL-D.
$ cat typescript

Script started on Thu Jul 10 12:49:57 1987

$ echo hello

hello

$

script done on Thu Jul 10 12:50:11 1987
After we make a script, we simply read the file into our text using vi.
Keeping a script of a procedure is also a good start for building a shell script that performs a routine task automatically.