
 Gear & Settings
What to Take (What to Leave Behind) and Which Settings to Use
When you’re planning your trip, you might be tempted to travel light, with just a small camera bag and maybe one or two lenses, so you’re able to take great photos and still enjoy your trip. You might be thinking how much easier and more convenient it would be if you didn’t have to lug a bunch of gear around, and worry about it getting stolen, and how much easier hopping on and off of buses, subways, or trolleys would be. Heck, it would probably make your entire travel experience better and you’d still come home with some fantastic shots! But, what if you’re on your trip—let’s say you went to Vienna, Austria (make sure you try the McDonald’s at Singerstraße 4. Their Big Mac tastes exactly like it does back home. Amazing, and totally worth the whole trip)—and you’re taking photos of the Hofburg Palace, and you think to yourself, “Ya know, I could use a wider lens”? Yeah, then what, right? So, you’d better bring another, even wider lens, but then what if you see something far off, like the bell tower at Stephansdom, now what? Shoulda brought that longer lens, too. And, even though you did bring a backup body (just in case), what if that backup goes down? Then what? That’s right, you’ll need a third body as a backup to your backup. Well, it looks like you’re going to need one of those big backpack-style camera bags so you can stuff it full with all your lenses and gadgets, and a ton of accessories. This is exactly what I recommend. Yes! Load that sucker up to where you can barely move once you hoist it on your shoulders, so at the end of each day of lugging that thing around, it has totally kicked your butt. Plus, it won’t fit in the overhead bin on that one leg of your trip where you have to go on a smaller jet, so you have to gate check it, and then some of your stuff gets damaged, but it’s okay because you have a backup, right? Yes, this sounds like a sensible plan. Let’s totally go with this.
Which Camera Mode to Shoot In

There is no official “right” mode to shoot in, but when it comes to travel, I always shoot in aperture priority mode (most of my pro travel shooting friends do, as well). On most cameras, if you have a mode dial on top, you would set it to A (not the green one that says “AUTO” or a green “A”—just “A”) to shoot in aperture priority mode. On Canon cameras, you’d set the dial to Av. When you shoot in aperture priority mode, you choose the f-stop you want to shoot at, and the camera does the rest to get you a proper exposure. I love this mode because I only have to really worry about one thing (especially if I use the trick on page 46). So, I use one f-stop if I’m shooting travel portraits, and a different one if I’m shooting a cityscape or landscape, and my camera takes care of the rest. It’s easy, it’s efficient, and it leaves me free to get creative because I’m not messing with the settings a bunch. I don’t change off of aperture priority mode at all during the trip—I set it before I leave, and I don’t mess with it. I only change my f-stop—that’s it (more on that in a minute).
Getting Sharp Hand-Held Shots

A woman once brought me her camera at a seminar. She was sure something was wrong with it because nearly all of her shots from her “trip of a lifetime” were either kind of, or really, out of focus. I looked at them, recognizing immediately what it was (it was heartbreaking to tell her). It wasn’t her camera; it was her camera settings. When she was shooting outdoors in direct sun, the shots were sharp. Any other time (indoors, when it was overcast, in a cathedral or train station, when she was shooting in the shade, or in an alley, or a market, etc.), they were all blurry. In short, if it’s sunny out, there’s so much light that your camera uses really fast shutter speeds, which freezes everything (it even freezes movement from not holding it really still). But, when you shoot in less than bright light, it has to use slower shutter speeds, which means unless you’re shooting on a tripod or you are an absolute wizard at holding your camera still (most folks aren’t), you’re going to have blurry, out-of-focus photos. So, how do we get sharp shots in lower light? We use a tripod (see page 65). But, that’s not always convenient, and in many situations, it’s simply not allowed, so we raise our ISO setting. This makes your camera more sensitive to light, which raises your shutter speed. How high do you need to raise your shutter speed, so you can hand-hold and not get blurry shots? For most folks, it’s 1/125 of a second. You’ll find people who can shoot at 1/60, and even 1/30, and still get sharp shots because they can hold their cameras incredibly still, but for most of us, our magic number is 1/125. So, start by raising your ISO to 200, then hold your camera up and look at the shutter speed in the viewfinder. If it’s not to 1/125 yet, try raising the ISO to 400, 800, and so on until it gets there. Once there, you’ll still need to hold your camera pretty steady, but you’ll have enough shutter speed to freeze things even if you’re not absolutely rock solid.
Insurance Against Blurry Shots

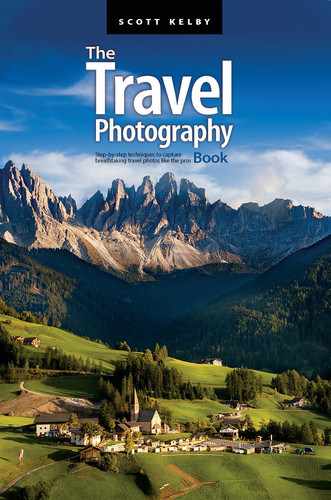
You just learned that you need to be at 1/125 of a second or higher to get sharp hand-held shots (well, most of us do anyway, right?). However, here’s what’s likely to happen: something really interesting or unusual happens while we’re walking through town, and we quickly turn to capture the shot without actually looking to see if our shutter speed is high enough, and…we experience total heartbreak when we open that image later on our computer and it’s soft (a bit out of focus). I’ve had it happen too many times. Well, at least I used to, until I turned this feature on that makes sure, no matter what, I never shoot a shot at below 1/125 of a second. It’s called “Auto ISO” and when you turn this on, if you take a photo where your shutter speed would fall below 1/125 of a second, your camera instantly boosts your ISO to get it back to 1/125 of a second. It’s brilliant, and it has saved my butt more times than I can count because I don’t get any hand-held travel shots at 1/60 or 1/30 or 1/15 or slower. They’re all at least 1/125. Turning this feature on is a simple two-step process: (1) go to your ISO menu and choose Auto, then (2) go to your Minimum Shutter Speed menu and choose 1/125 of a second, and now your camera won’t take a shot slower than that. This means your ISO will be increased, which means you might have more noise visible in your image than normal, but if you have a choice between (a) a sharp shot with a little noise, or (b) a blurry shot with no noise, I think you’ll take the sharp shot every time. Also, a bit of good news: unlike your ISO menu, where you can only choose 100, 200, 400, 800, 1600, 3200, and so on, when you use Auto ISO, it only uses the exact amount of ISO needed to get you to 1/125 of a second. So, if you look at the camera data after you take the shot, you’ll see weird ISOs, like 140 or 365—these choices don’t appear in the menu, but the camera can choose just what it needs to get you to 1/125 of a second. How cool is that?!
Which F-Stop to Use
This is one of those things that photographers tend to overthink to death, but it’s actually pretty simple because this is actually a creative decision you get to make. Let’s say you’re in a museum, and you see a stand with a beautiful vase on top, and you want to take a photo. The creative question is: “Do you want the background out of focus and blurry, or do you want everything behind the vase in focus?” There is no wrong answer here—it’s totally up to you. Let’s say you decide you want the background out of focus. Easy. You’d use the lowest-numbered f-stop your lens will allow, like f/2.8, f/3.5, f/4, or f/5.6. If, instead, you decide you want everything in focus behind the vase, you’d choose a high-numbered f-stop, like f/11 or f/16. So, since higher numbers put everything in focus from front to back, is that what you would use for cityscape or landscape shots? Yup. I actually use f/11 for all those types of shots where I want everything in focus. Well, why don’t we use even higher numbers, like f/22 or f/32? While technically they should provide even more depth, there’s a technical trade off that happens at those really high numbers that actually winds up making the images a bit softer. So, f/11 is my sweet spot, but some folks prefer f/16, and either one will definitely do the trick without a visible loss of quality. Okay, what if you’re just walking around a town, shooting street scenes? Then, I would set my f-stop to my lowest number and leave it there. If I’m shooting wide with my travel lens, like my 24mm or 35mm, even with a low-numbered f-stop, everything will be in focus. But, if I see something interesting (maybe a flower) and I zoom in tight on it, that low-numbered f-stop will make the background behind it out of focus. I get the best of both worlds.
Getting Your Color Right

You don’t want to get back from your trip and see that in lots of your photos people look kind of blue, or in indoor shots, everything looks really yellow. You want your color to be right, and most of the time just keeping your camera’s white balance (it’s what controls the color of your photo) set to Auto will do the trick. However, if you take photos on a cloudy day, or in the shade, or indoors, it fools the Auto white balance feature and you wind up with blueish tints if you shoot in the shade, or lots of yellow indoors, or even green in an office with fluorescent lighting. Luckily, fixing these color problems is easy while you’re shooting (yes, in many cases, you can fix white balance problems later in Lightroom or Photoshop, but it’s easier if you fix it now in-camera). If you notice your color doesn’t look right, simply change your White Balance setting to match the lighting you’re shooting under, and the secret to that is simply to look up. If you look up and you see tree branches or you’re standing under an awning, choose Shade (your White Balance settings are in your camera’s menu, but we use these so often that most cameras have a shortcut, using the buttons on the back of your camera). If you look up and see clouds, change your white balance to Cloudy. If you’re shooting indoors, like at a restaurant, switch your white balance to Incandescent (Tungsten). In a factory or office, switch it to Fluorescent and it gets rid of the color cast from that lighting. Usually, this is all you have to do to get your color right all the time. So, what’s the big thing to watch out for? Remembering to switch your white balance back to Auto once you go back outside. For some reason, the older we get, the harder it is. Not for me, of course, because I’m very young and youthful and youngish, but you know, other people. ;-)
How to Check Your Sharpness

Just about every shot looks in focus on that tiny 3” screen on the back of your camera, but then later, when you open it on your computer and see it at a larger size, the heartbreak begins because now it’s too late—you’re not at that amazing location, in that amazing light, while that amazing thing happened. You’re looking at a blurry image and your heart just sinks. I would love to tell you this happened to me once, but sadly, it has happened to me many, many times. Well, that is until I learned to check my sharpness right then and there, while I was still standing in front of that amazing location, in that amazing light, while that amazing thing was still happening. You do this by pressing the magnifying glass button on the back of your camera, which zooms in on your photo, so you can check to see if the photo actually is in focus. Each time you press that button, it zooms in further, and then you can use the joystick or rocker switch (or whatever they call that dial on the back of your camera) to move around the image once you’re zoomed in tight (for portraits, make sure you check the eyes—that’s the part that has to be sharp!). Now, most cameras will allow you to set the center button on the dial on the back of your camera so it zooms in to any magnification you want, which is better than having to press the magnifying glass button again and again to zoom in, and then again and again to zoom back out. It’s just one press and it zooms in tight; one press and it zooms back out. I set mine to zoom in to 8x magnification (check your manual to find out how to set your button to be your zoom-to-a-specific-magnification button when you’re in playback mode). This is a biggie and it will make a difference (and save you from so much heartbreak. Well, the photo kind anyway).
Which Type of Lens to Use

If you and I were sitting at the bar, and you asked me which lens you should get for travel, I would, without hesitation, tell you to take just one lens. Take more than one, and you’ll find this sad, sobering truth: whichever lens you have on your camera will always be the “wrong” one. You’ll turn a corner and be like, “Oh man, I need my other lens!” So, you’ll switch lenses to get that shot, then you’ll keep walking and you’ll see another shot, but (wait for it…) you’ll think it would look better with the other lens, and now you’re changing lenses again to take that shot. You turn the corner and…you see where this is going. I call it the “two-lens tango” and it’s pretty brutal. However, if you have one lens that pretty much covers it all (from wide to portrait to telephoto), then you’re not switching lenses—ever. In fact, you’re not even lugging around a camera bag because you don’t need one to carry your other lens. You can put a cleaning cloth in your pocket or purse, and if you need a filter, it’ll fit in your pocket, too. Plus, they can’t steal your camera bag because you’re not carrying one. So, which lens would I tell you to buy? Either a 24–240mm or a 28–300mm. I prefer the 24–240mm because it’s wider (Canon and Sony both make one), and you’d think that extra 4mm wider wouldn’t make that big a difference, but it does. Plus, I can crop the 240mm to make it like I shot it with a longer lens. Just a small crop and I’m at a 300mm equivalent, but you can’t make a shot wider, so I like the wider choice. If you’re a Nikon mirrorless shooter, Nikon makes a 24–200mm that lots of folks like (I don’t know why they didn’t go to 240mm), and if you shoot a Nikon DSLR, they have an excellent 28–300mm (I used to have one when I shot Nikon—sharp, lightweight, and priced right). In short, if you have one lens, everything is easier, more convenient, you avoid the “two-lens tango,” and you’ll enjoy your vacation more without having to lug around, and worry about, that other lens.
When to Take Two Lenses

Okay, I will admit there may—may—possibly be times when a second lens is okay to take with you on a trip. So, what would be the scenario? Well, let’s say that you’re traveling to La Palma in the Spanish Canary Islands to shoot the Milky Way (it’s supposed to be one of the top destinations for shooting the Milky Way). In that case, you’d need to take a specialized lens just for that (like the Rokinon 14mm f/2.8—a popular choice with Milky Way mavens). Or, if you’re going to be shooting a particular interior, like an amazing cathedral or opera house, you might need something wider than a 24mm (like a 12mm or 14mm). In those cases, bringing a second lens makes sense, but it also ups the complexity of your trip because now you’re carrying a camera bag (or a lens bag at the very least), and you have to worry about it getting snatched off your shoulder (oh man, I have stories), or leaving it somewhere, or dropping it or your lens (like I did in Lisbon, where I dropped my 70–200mm f/2.8 while changing lenses—it totally messed up the lens, with a repair to the tune of about $800). Anyway, I would need a seriously legitimate reason to haul another lens, and a bag, and all that entails, around anywhere. Now, if you’re 24 years old, like my son, who can carry a packed backpack all day without breaking a sweat, all I can say is…that will change in time. LOL!!! But, for the rest of us, when it comes to lenses, less is more.
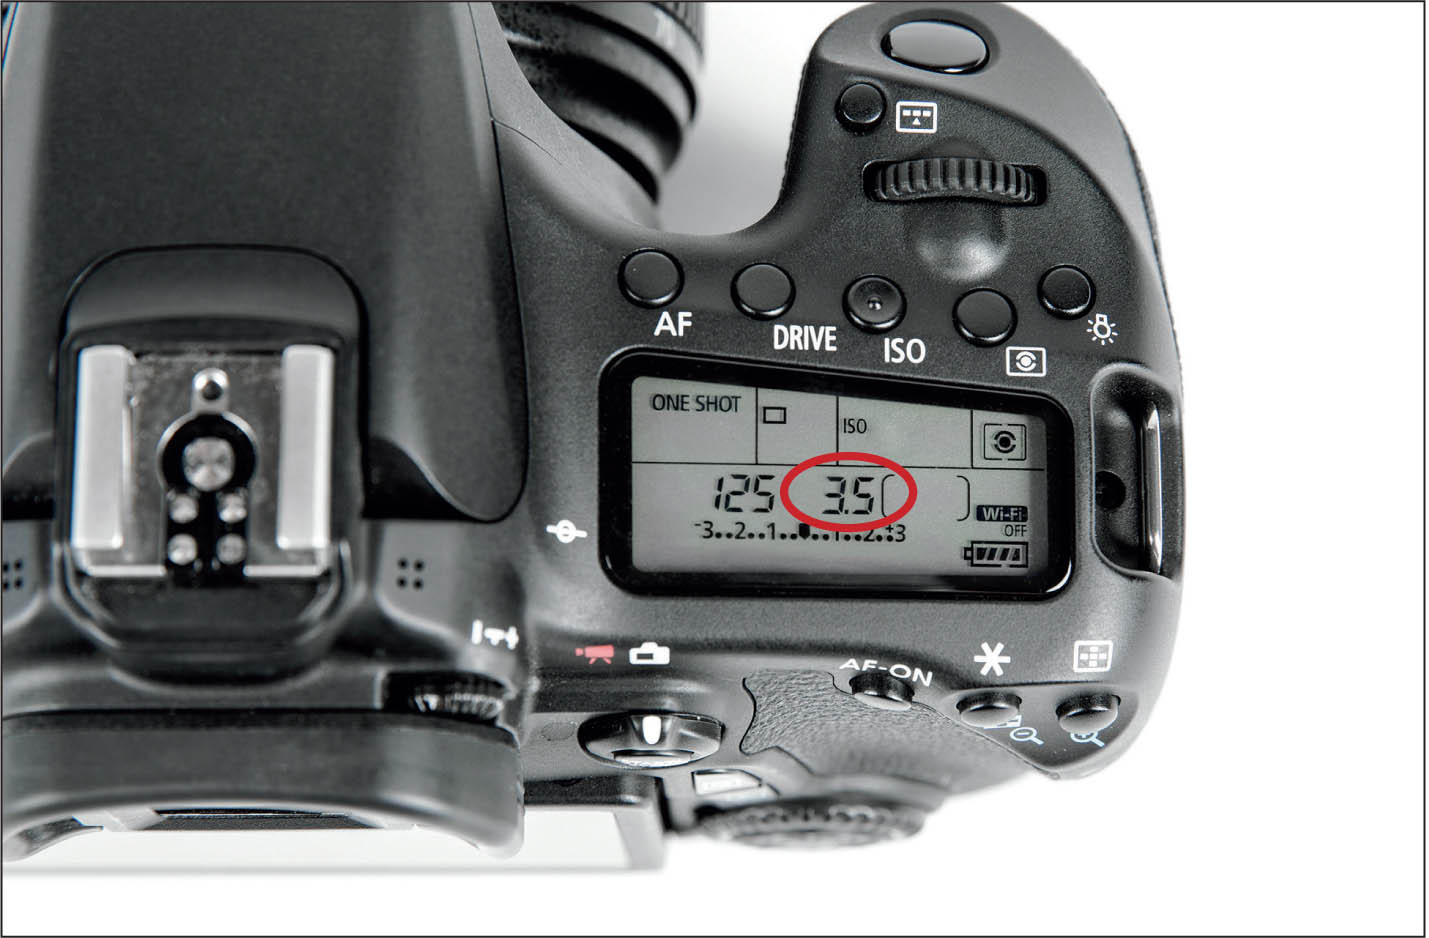
Picking the Right Focus Mode
By default, your camera assumes you’re photographing objects that are not moving, like a building, or your meal in a restaurant, or the person sitting across from you. This is called single focus mode (or something similar, depending on your camera’s make and model). However, if you decide to shoot a moving object, like a taxi or tuk-tuk on a busy street, some horses running along the beach, or a bird flying by, you’ll need to change your camera’s focus mode to a mode expressly made for focusing on moving objects—not just focus on them, but automatically track along with the moving object. This mode is called “AI Servo” on Canons, “Continuous AF” on Sonys, and “Continuous Auto Focus” on Nikon cameras, and all you have to do is turn it on and it starts tracking the object as soon as you hold the shutter button halfway down. Note: While many cameras make an audible “beep” sound when you normally lock focus (letting you know it’s locked on), when you turn on a continuous focus mode, it no longer beeps. Anyway, if your subject is moving, switch to this continuous mode. When you’re done, switch back to single focus mode (these modes are found either in your camera’s menus, or there’s a shortcut button or dial on the back of your camera. To find exactly where, check the PDF version of your owner’s manual).
Turn Off Your Flash!

You know that pop-up flash you have on the top of your camera? You might think that’s there for you to use. It is not. It’s not to be used if there’s not enough light. It’s not to be used in an emergency situation. It’s never to be used in any situation. It’s trash. The only situation you should consider using that pop-up flash in is if you want to make your photo look as bad as possible, maybe as a gag. Better yet, if you see another photographer buddy leave their camera on the table when they go to the counter to get a coffee, pop up their flash, and take a quick shot of anything. They’ll see the shot in their downloaded images and wonder if it’s time to send their camera into the shop. Yes, it’s that bad. Don’t use that pop-up flash, no matter what, and you’ll have better images.
An Easy Way to Brighten/Darken Your Photo

If you’re out shooting and you take a shot that looks too dark to you (or too bright), there’s a simple way to change the exposure. It’s a dial, usually on the back of your camera, that controls exposure compensation, and it simply lets you make your image darker if you turn it one way, or brighter if you turn it the other way. This exposure compensation works perfectly if you shoot in a mode like aperture priority (like I do), where the camera makes the exposure for you. Once you take a shot, look at it on the back of your camera and if you think it’s too dark or too bright, now you know what to do—move that dial, reshoot, and then look at the shot again to see if it’s where you want it to be. If not, move the dial again, and try another shot. It’s a process, but it’s a quick and easy—and really important—one (especially if you get a highlight clipping warning, letting you know some parts of your image are so bright that there’s a lack of pixels and detail. You can darken the image and retake the shot to see if that cured your clipped highlights issue). When I’m shooting travel, exposure compensation is a feature I use every day, all day.
Should You Shoot in RAW or JPEG?

If an advanced user were to turn to this page, they might smirk and think, “Of, course, you shoot in RAW. No question,” and that’s because when you shoot in RAW your camera captures a greater range of tone (that right there is pretty big). Another advantage is that the RAW format is more forgiving if you’re way off on your exposure and you need to make some big changes, or if you don’t like your white balance, you can change it after the fact. There are a number of advantages, but those are the biggies. Now, shooting in RAW isn’t for everyone because RAW photos don’t look nearly as good as JPEG photos coming straight out of the camera. That’s because when you shoot in JPEG, your camera sharpens your image, it adds contrast, noise reduction, color saturation, and so on. When you shoot in RAW, you’re telling your camera to turn off all those wonderful things and just give you the flat-looking RAW image, and you’ll add that stuff yourself in Lightroom, Photoshop, or a plug-in. That’s great if you’re really good at those programs, but if you’re not really comfortable with your post-processing, then you might want to shoot in JPEG. The files look better (it helps if you nail your white balance—see page 48), they’re sharper, more vivid, and you’ll have much less to do in post, which some folks will forgo altogether because the images look pretty good. Plus, the file sizes are much smaller, so you can fit a ton more images on a memory card, and they take up less room on your computer, or iPad, or external hard drive. So, the decision comes down to this: If you’re comfortable with your post-processing, I would shoot in RAW to take advantage of its benefits. If you’re not comfortable with the post-processing end of things, shoot in JPEG and don’t sweat it. Great images don’t come from your choice of file format. Some of the greatest photos in history were shot in JPEG, including the covers of the biggest, most prestigious magazines.