
7 Adding dynamic elements
- Adding dynamic elements back into static web pages
- Processing form submissions via multiple providers
- Creating a search interface to a static site
In the old days (you know, two or three years ago), what we know now as the Jamstack was a bit simpler. Typically we referred to static sites and static site generators. The problem with these terms is that they implied a static, unchanging site that couldn’t respond to users’ needs. That wasn’t the case then and isn’t the case now.
There are numerous options (some free, some commercial) that aim to provide interactivity to web pages. In this chapter, you will see different examples of these services as well as how they can be integrated in some of the previous demos. We’ll discuss tradeoffs, prices, and other considerations that developers need to be aware of before selecting a particular product.
7.1 Forms, forms, and more forms
One of the first tasks I did as a professional web developer in the ancient days of the 1990s was form processing. Back then, our sites were much like now, simple HTML, and in order to add functionality to a site, like processing a form, we would use programs written in Perl. I had a knack for Perl, so in many projects, I’d focus on that area. Forms have been around since the beginning of the web, and so has the need to process those forms. Let’s look at a few different options for adding processing to your Jamstack site. Broadly, we’re going to look at two different ways of doing this: with forms hosted elsewhere and embedded on your site, and as services that simply handle receiving the data of a form.
7.1.1 Using Google Forms
Google Forms (http://forms.google.com/) is a free offering from Google related to the more generic Google Docs service. Developers can create forms with multiple types of questions and different styles. Form data is automatically stored in a Google Sheet (their version of Microsoft Excel) and can also be emailed directly to whomever needs to get the results.
Using Google Forms in the Jamstack means creating and designing your form on Google’s site, and then adding the embed code to an HTML file. This can be done in non-HTML files as well. For example, if you are using Liquid in your SSG, you can add the embed code there, which will be a part of the final HTML file output when building your site. Let’s walk through creating a basic form that will mimic the typical Contact Us form seen on websites.
Begin by going to the Google Forms site (you will need a Google account to use this service). You should see a list of templates and any recent forms (figure 7.1).

Figure 7.1 The Google Forms home page, listing templates and previous forms (if any)
Start by clicking the Blank template for now. The included templates are pretty nice, but it’s best to start off simple. This will take you to the Google Forms editing experience (figure 7.2).
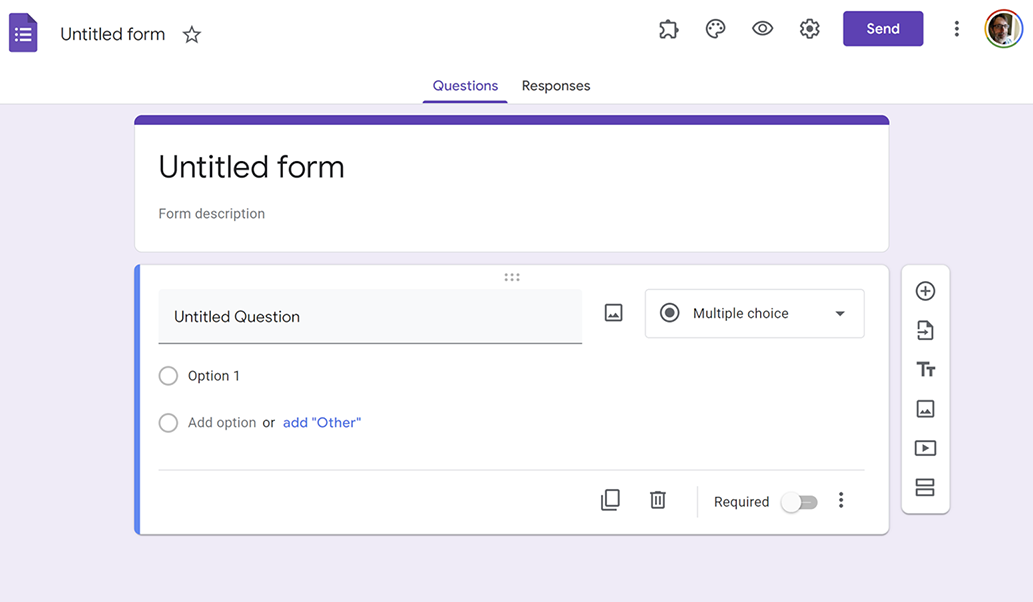
Figure 7.2 The initial blank form
Google’s form editor is incredibly well done. You can choose between different types of questions (short answer, longer form, multiple choice, etc.) and are free to enter the question-and-answer text as you see fit. Google does some pretty amazing parsing of your questions as well, enabling you to write answers quicker. For example, if your question implies a yes or no answer, Google picks up on that and suggests them for answers.
As we said, our first example is going to be a contact form. These have been around forever and typically follow a format of asking for your contact information and providing a place to ask your question or send your feedback.
The design of forms can be a complex topic. How many questions do you ask? What questions are required? What language do you use for a particular question? Get any of these wrong and your users may simply go away, or even worse, spend time writing answers and give up halfway. For this particular example, let’s use the following questions:
-
What is your name? This will be a short text answer and will be required.
-
What is your email address? This will also be a short text answer and will be required, and it is important so that we have a way to reach the user and respond to their comments.
-
Do you like our site? This will not be required and will be used as a quick way to gauge if users are enjoying using our site. It’s optional, so users can skip it, but we should be prepared for results to skew negative. Why? If a user is happy using our site and has no problems, they probably won’t bother contacting us to tell us this, so it’s fair to assume that a good portion of users who take the time to fill out this form have a problem of some sort and are probably not happy. Again, this is where the complexity of forms comes into play: you not only have to think of the user experience of the person filling out the form but also the psychology of why they are doing so.
-
Your comments. The final field will be a long text field that is required and will be used by the site visitor to either ask a question or provide feedback.
To begin, first set a name for the form, replacing “Untitled form” with “Contact Form.” Optionally, you can enter a form description, but don’t worry about that now. Then enter the text of the first question in the first field of the form builder. Be sure to set it to Required. You’ll notice that as soon as you enter the text of the question, that intelligence will fire, and Google will default the type to short answer. This is just Google trying to help, but and you can change this to whatever you want. Figure 7.3 shows how this should look when done.

Figure 7.3 The form after a bit of editing
Repeat this step to ask for the user’s email address. To add a new question, click the + icon on the right-hand side, as shown in figure 7.3. Then add the question about whether the user likes the site. Not only will Google determine that this is a yes/no question, it will suggest those answers along with “maybe.” You can click the suggestions to quickly add them (figure 7.4).

Figure 7.4 Google’s intelligent form editor recognizing your question and suggesting answers
After adding yes and no as answers, add the final question. Google should suggest “Paragraph” as the type, but be sure to set it to Required. When done, click the Preview icon on top (it’s an eyeball), and a new tab will open with your form (figure 7.5).

This preview is a fully functioning form that you can use right now and submit. You can see how the validation logic works by intentionally leaving things out. Go ahead and submit your form. When you do, you’ll get a simple confirmation (figure 7.6).

Figure 7.6 What users see after submitting the form
Do this a few times and then return to the tab where you’re editing the form. You’ll see the Responses tab will notice that submissions have been received (figure 7.7).

Figure 7.7 Highlighting the Responses tab
Clicking on the Responses tab will show you a summary of the responses (figure 7.8). Google does an admirable job of displaying this data and recognizes that the “Do you like our site?” question makes sense as a pie chart, but oddly displays email addresses as a bar chart.
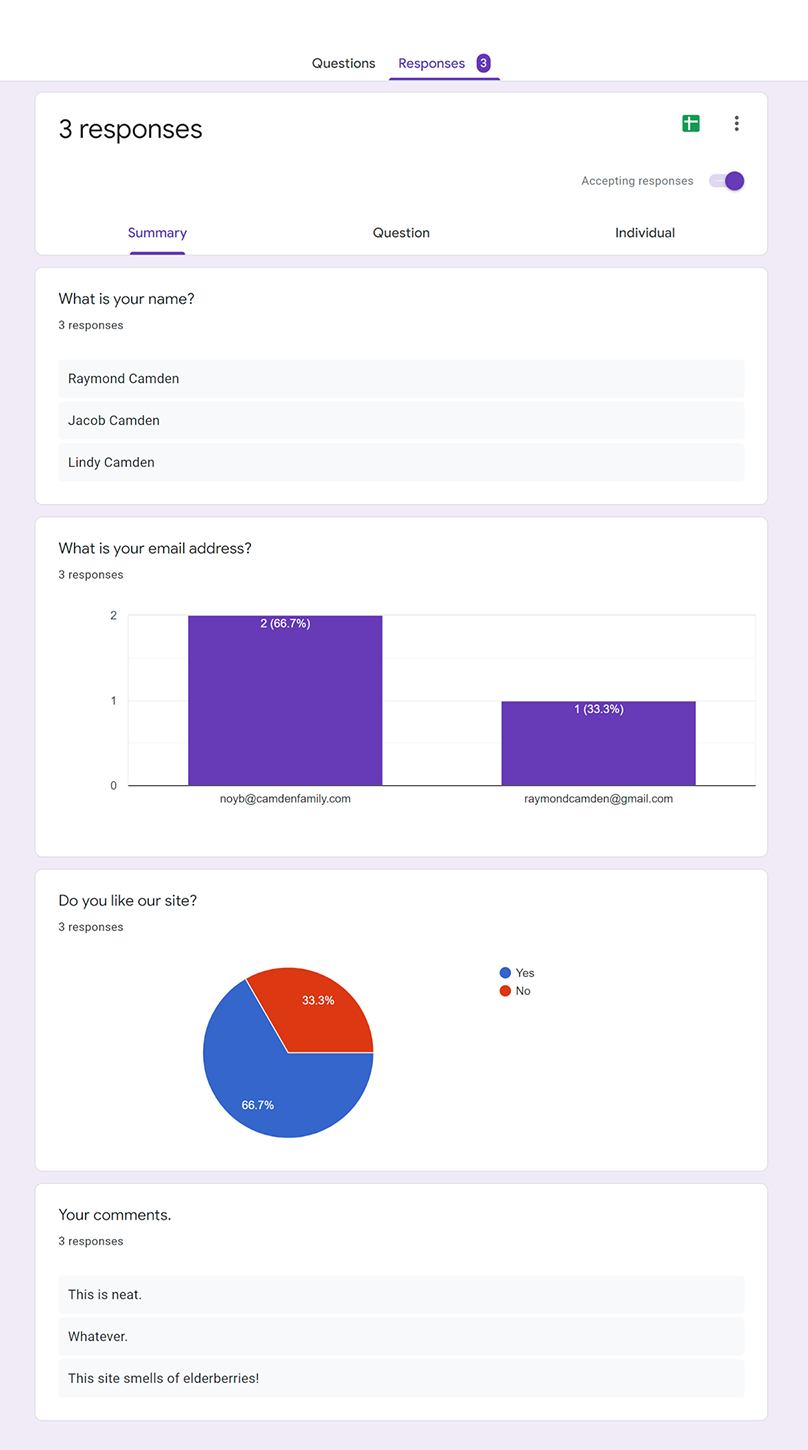
Figure 7.8 Summary of form responses
Clicking on the Question tab will let you look at results for one question at a time, whereas Individual shows you one complete response at a time. The green icon on the top lets you create a Google Sheet and automatically connects the response (and future ones too!) to a spreadsheet. In most cases, though, a developer (or the owner of the website) will prefer to get an email response. To set this up, click the three-dot menu to the right of the green spreadsheet icon, and in the pop-up menu, select Get email notifications for new email responses (figure 7.9).

Figure 7.9 Setup and configuring email responses
Clicking this will enable email notifications for future submissions, but note that it will go to the owner of the Google account. Now, if you fill out the form again, you’ll receive an email (figure 7.10).

Figure 7.10 Email received after the form has been submitted
Unfortunately you still have to click to get to the responses, but at least you know a response was submitted.
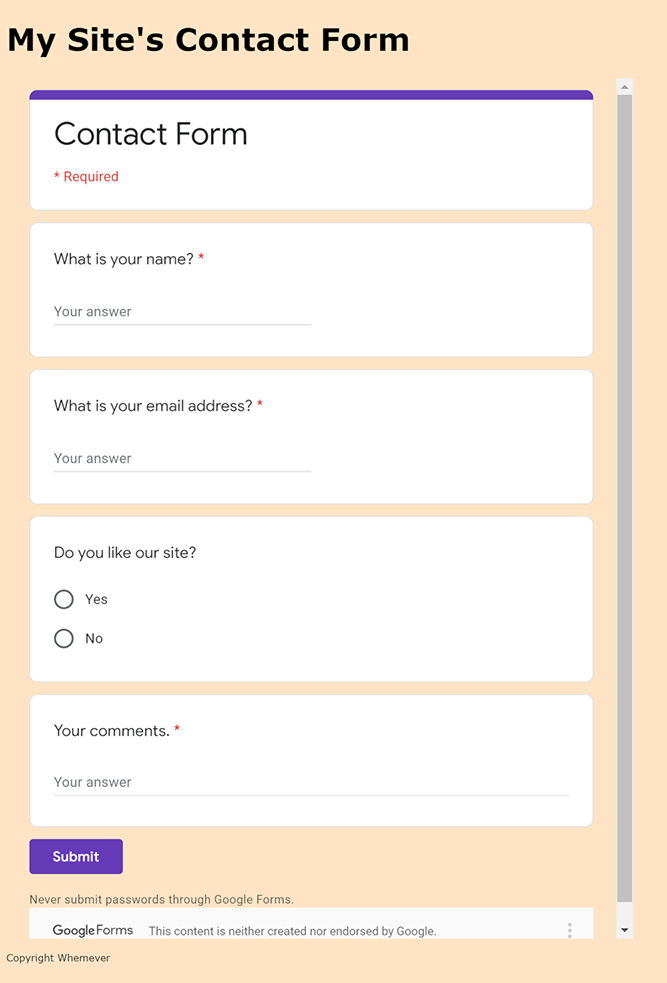
Now that your form is built and it can take in submissions, what’s the next step? While our website could simply link to the form, that would mean the user is leaving our site, and generally that’s not a desirable thing. Instead, we can put the form directly on our site. This can be done via an iframe embed code. It’s not terribly obvious where you get that code, but it’s found via the Send button on the top of the form editor. Clicking this opens a dialog that defaults to sending the form via email, but clicking the “<>” icon will show you the iframe code (figure 7.11).

Figure 7.11 The Send dialog’s HTML option
With this code, you can now embed it in any web page you want, including within a Jamstack site. But let’s begin with a simple example using a typical HTML page with layout. The embed code from Google Forms is included as part of the page. Be sure to replace this with your own embed code.
Listing 7.1 A Google Form embed example (/chapter7/forms/test1.html)
<!DOCTYPE html>
<html>
<head>
<title>A Regular Page</title>
<style>
body {
    background-color: bisque;
    font-family: Verdana, Geneva, Tahoma, sans-serif;
}

footer {
    margin-top: 10px;
    font-size: 10px;
}
</style>
</head>

<body>

    <h1>My Site's Contact Form</h1>

    <iframe src="https://docs.google.com/forms/d/e/1FAIpQLSc-
    ➥ 2J3cgrJE22fbVJKBOtZFlmzpiqE36SE-eAmJHqTh6NZHrA/viewform?embedded=true"
    ➥ width="640" height="879" frameborder="0" marginheight="0"
    ➥ marginwidth="0">Loading...</iframe>

    <footer>
    <p>Copyright Whenever</p>
    </footer>

</body>
</html>
This is a rather short template with a header and footer and the iframe from Google Forms inside. We also use a bit of CSS here to style the page. The only reason for this is to show how the form looks when added to a page that has its own unique style. Google Forms allows for some customization in look and feel, so you can expect to have to work with that a bit, but we wanted to demonstrate an out-of-the-box integration with no customization. Figure 7.12 shows how this renders on a page.
As you can see, it integrated just fine. There is a scrollbar, but that could be adjusted by modifying the iframe’s height attribute or using CSS. If you submit this form, the process is done entirely within the iframe, and the user never leaves the site. While it definitely sticks out a bit on the page, this is a quick and simple solution. Even better, the form could be edited by a nontechnical user, and since it’s an embed, nothing would need to change on your site to reflect their changes. Now that you’ve seen an example of a remote, hosted form, let’s consider something a bit more integrated.
7.1.2 Integrating FormCake
While Google Forms works via an external host displayed in an iframe, developers may want more control over the design and setup of their forms. Multiple services now exist that provide an endpoint, or a place to send your form data to, that will then take in the data, do “stuff” (what they do depends on the service), and then redirect the user back to your site. For most people, they have no idea what’s happening. They simply clicked your Submit button and then were presented with a thank you or confirmation page. But behind the scenes, the service in question parsed the form, did something with that data, and then redirected the website visitor right back to your site.
One of these services is FormCake (https://formcake.com). This service provides form processing and includes things like file upload support, spam protection, and the ability to perform actions on the data. At a minimum, it can email the data to you (or the owner of the site), but it can also integrate with solutions like Zapier (an automation service that lets you connect different apps in workflows, for example, on a form submission sending information to Salesforce). FormCake currently has three different tiers of pricing (see more at https://formcake.com/pricing), but their free tier allows for unlimited forms, 100 submissions, and basic spam protection. This is enough for us to test, so let’s give it a shot.
Begin by signing up (you can use either an email and password combination or your GitHub account). After you’ve done that, you are taken to a dashboard with one form already created (figure 7.13).

Figure 7.13 The forms dashboard at FormCake
Clicking into the form gives you many settings and integration instructions for working with it (figure 7.14).

Figure 7.14 Instructions on how to use the form
The instructions mostly boil down to ensuring your form uses POST and copying the action endpoint shown in the first step. Let’s build our form that uses this action. The iframe from the Google form has been replaced by a form entirely written by hand and using the endpoint provided by FormCake. It asks the same questions as before.
NOTE The endpoint is specific to the author and should be replaced with the one you get from FormCake.
Listing 7.2 The FormCake form (/chapter7/forms/test2.html)
<!DOCTYPE html>
<html>
<head>
<title>A Regular Page</title>
<style>
body {
    background-color: bisque;
    font-family: Verdana, Geneva, Tahoma, sans-serif;
}

footer {
    margin-top: 10px;
    font-size: 10px;
}
</style>
</head>

<body>

    <h1>My Site's Contact Form</h1>

    <form method="post" action =
    "https://api.formcake.com/api/form/451d4b55-3e2a-4eee-b7c4-
     ➥ 1b54041a5365/submission">

    <p>
    <label for="name">What is your name?</label>
    <input name="name" id="name" required>
    </p>

    <p>
    <label for="email">What is your email address?</label>
    <input name="email" id="email" type="email" required>
    </p>

    <p>
    Do you like our site?<br/>
    <input name="like" id="likeyes" value="yes" type="radio">
    <label for="likeyes">Yes</label><br/>
    <input name="like" id="likeno" value="no" type="radio">
    <label for="likeno">No</label><br/>
    </p>

    <p>
    <label for="comments">Your comments</label>
    <textarea name="comments" id="comments" required></textarea>
    </p>

    <p>
    <input type="submit">
    </p>

    </form>


    <footer>
    <p>Copyright Whenever</p>
    </footer>

</body>
</html>
If you fire up a local web server to test this (I suggest https://www.npmjs.com/package/httpster), you can view the form, submit it, and then end up on a default submission page for FormCake (figure 7.15).
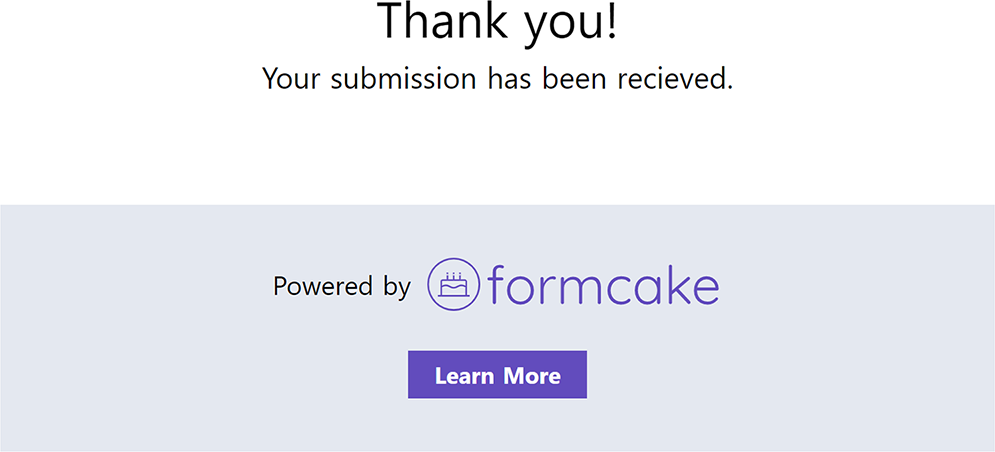
Figure 7.15 The default FormCake response
If you go back to the FormCake dashboard, you can click on the Submissions tab and see your response (you may need to refresh). Clicking on it will give you a detailed view (figure 7.16).
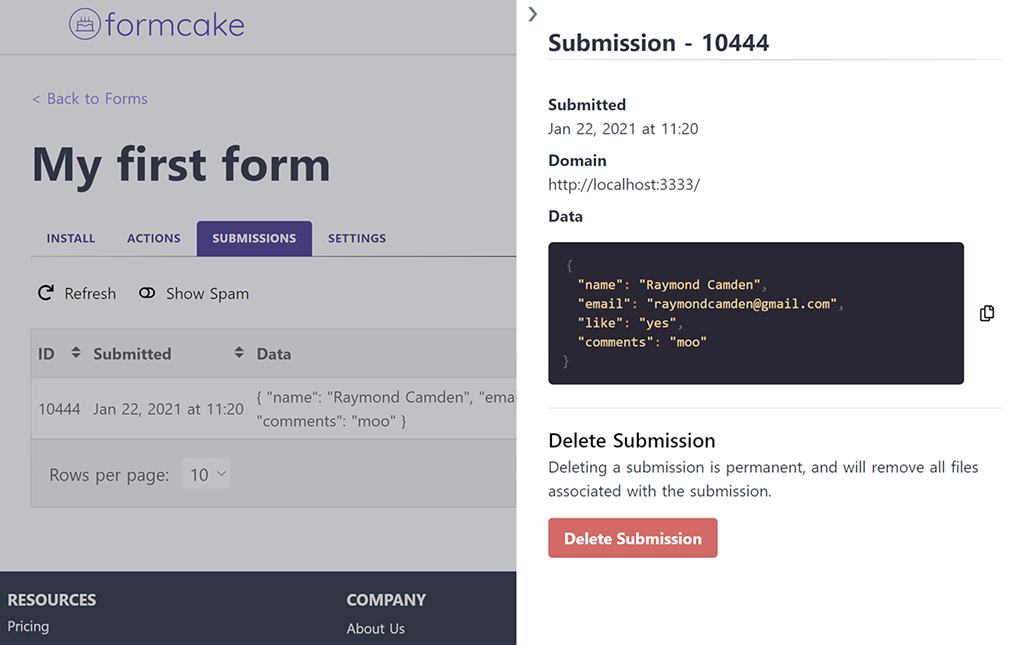
Figure 7.16 FormCake’s submission view
To make this form a bit nicer, let’s make two changes in the form settings. In the Settings tab, scroll down to “Success Redirect” and add a URL to redirect the user back to where they submitted the form. Right now we’re testing locally, so we can use a localhost URL, but that would not work in production. In my environment, my form was available at http://localhost:3333/chapter7/forms/test2.html. I created a new file named test2_thankyou.html (you can find this in the GitHub repository for the site. It isn’t really important what’s in the file; it just needs to exist), and then used this as the redirect value: http://localhost:3333/chapter7/forms/test2_thankyou.html (figure 7.17).
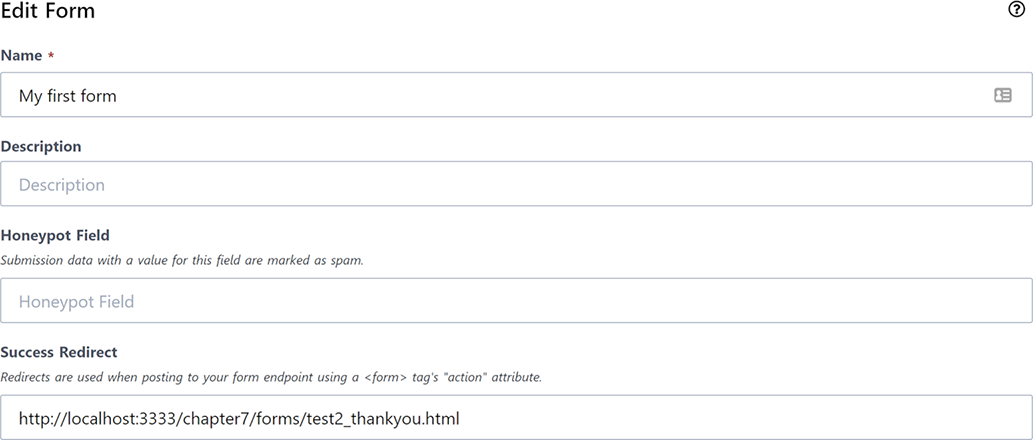
Figure 7.17 Form settings with the redirect specified
Next, we need to set it up so you can get an email every time the form is submitted. Click on the Actions tab, and in the Add an Action drop-down menu, select Email Notification Action. This will prompt you for a name for the action, an email address to send the information to, and a subject. Enter “Email Notification” for name, your own email address, and “Form Submission” for the subject. Now you can fill out your form again, and after submitting, you will be redirected to your thank-you page. The end user will not see a FormCake site and won’t even know you’re using the service. To be clear, it isn’t hidden, and developers could easily monitor the network traffic, but casual users won’t know (or care). Soon after, you’ll get an email notification (figure 7.18).

Figure 7.18 Email copy of the form submission
If you want something a bit more custom, FormCake even allows you to define an email template that uses Liquid for variable replacement. This is a pretty powerful feature!
7.1.3 Other options
There are, of course, other options for working with forms. There are numerous ones similar to FormCake, where you simply use a specific action for your form. There’s also Wufoo (https://www.wufoo.com/), which acts more like Google Forms but has powerful design and editing features. As mentioned in the previous chapter, Netlify as a Jamstack host has built-in form processing. In the next chapter, we’ll discuss serverless functions, and that’s yet another way you could respond to a form post.
7.2 Adding search
After processing basic form input, search is probably one of the most important features for a Jamstack site. If your site has more than a few pages, giving users the ability to quickly find what they want becomes important. In this section, we’ll discuss two different options for search and will follow a format much like the previous section. We’ll begin with a “drop into place” solution, once again from Google: Programmable Search Engine (https://programmablesearchengine.google.com/about/).
Google’s Programmable Search Engine was previously known as Custom Search Engine, so if you follow up the tutorial in this book with more research, you may find articles referring to that, or CSE. This is a service from Google that lets you define, essentially, a portion of Google’s search engine to use within your own site.
To begin, simply click the Get Started button from the Programmable Search Engine site and log in with your Google credentials. Once logged in, you’ll be taken to the dashboard (figure 7.19).

Figure 7.19 The Programmable Search dashboard
Begin working with this service by clicking the Add button. The first prompt you’ll be presented with is the sites to search, and here’s where things get interesting. You can enter any site you want here. That’s right—even if you are building your own site at a domain X, you can enter domain Y (and more) for your search engine. You’ll probably want to use your own domain, but Google lets you decide whatever makes sense. Note (as seen in figure 7.20) that you can enter subdirectories as well.

Figure 7.20 The initial screen for setting up a programmable search engine
As we said, you can enter anything you’d like here. If you’ve already deployed your own Jamstack site, even to a temporary location, you can enter the URL. For the purposes of this book, and to give us a lot of content to use, we’ll use my blog at raymondcamden.com. For the name of the search engine, let’s use JamstackSearch1. That’s purely arbitrary and is only used to help differentiate one of your programmable search engines from another. In a real-world scenario, I would typically use the same name as the site itself. After you’ve entered your values, click the Create button. You’ll then see a success message (figure 7.21).

Figure 7.21 Congratulations, you’ve built your own search engine (well, Google did, to be honest).
At this point, note the three options. The first (Get code) will give you the code needed to add the search to your site, and we’ll get to that in a second. The third option (Control Panel) is where you’ll configure options; we’ll demonstrate that too. The one in the middle (Public URL), though, is something else. As soon as you build a programmable search engine, Google provides a URL that lets you use your search engine right away. This is great if you want to test how well it’s working, how it ranks results, and so forth. You could also share this with your client while you are building your site so they can see it as well.
For now, click on Get code. In listing 7.3, you’ll be presented with a short code snippet. You’ll take this code and drop it into a simple HTML page. The same basic shell from the previous section was used.
Listing 7.3 A search test page (/chapter7/search/test1.html)
<!DOCTYPE html>
<html>
<head>
<title>A Regular Page</title>
<style>
body {
    background-color: bisque;
    font-family: Verdana, Geneva, Tahoma, sans-serif;
}

footer {
    margin-top: 10px;
    font-size: 10px;
}
</style>
</head>

<body>

    <h1>Search</h1>

    <script
    async src="https://cse.google.com/cse.js?cx=9fda4c9699117d517"></script>❶
    <div class="gcse-search"></div>                                         ❷

    <footer>
    <p>Copyright Whenever</p>
    </footer>

</body>
</html>
❶ The beginning of the snippet from Google
As with Google Forms, you can drop in the snippet where it makes sense to you. Fire up a local web server and then run the page. You’ll see a basic form experience completely powered by Google (figure 7.22).
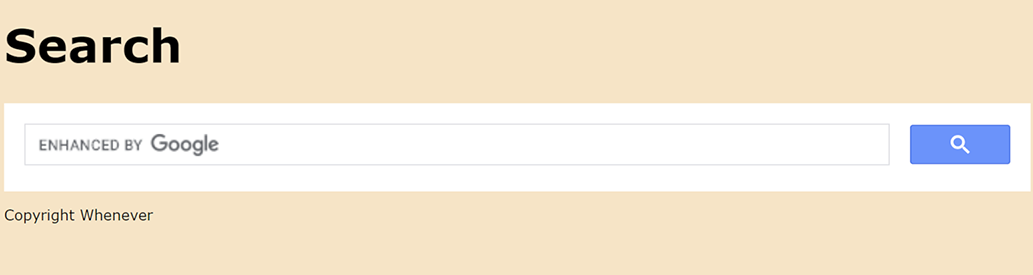
Figure 7.22 The default search experience provided by Google
Enter something in the search. Depending on what domain you entered, you should try something that makes sense. If you used my domain (raymondcamden.com), you can try “vue.js” as your input. Figure 7.23 demonstrates what you may see.

Figure 7.23 Results from searching the programmable search engine
Right away you’ll notice that the UI is a bit different from what you may expect. Instead of displaying the results on the page, a floating modal is used. If you don’t like that (I certainly do not), we can tweak it, and we’ll do so in a moment. The next thing you may notice, especially in figure 7.23, is that every visible result is an advertisement. Yep, just like the main Google.com site, you’ll get ads in your result. Not shown in the figure is that if you scroll past the four ads (yes, four, and your results may vary, of course), you do get good results with snippets, and images at times (figure 7.24).
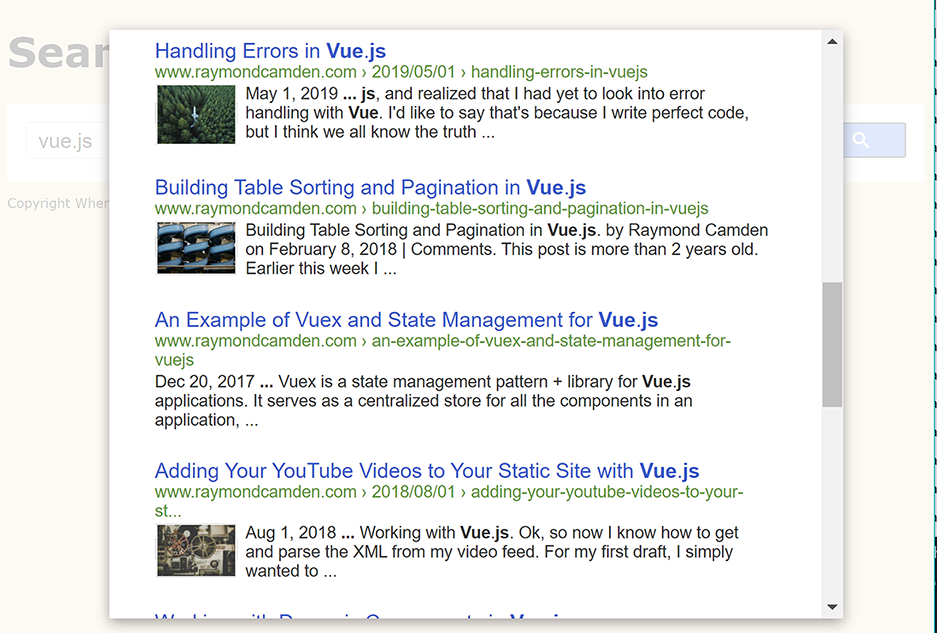
Figure 7.24 “Real” results can be found after the ads. Google does need the money, you know.
Let’s start customizing the search engine. Back in the dashboard, click on Look and feel. Here you will find multiple options for customizing how the search engine is displayed, but let’s start by changing the layout from “Overlay” to “Full width” (figure 7.25).

Figure 7.25 Specifying a new layout for your search engine
Not shown in figure 7.25, but handy to use, is a live example of your search engine on the right-hand side of the dashboard. You can test there if you want, or simply click Save and test back in the simple HTML page. Your changes are shown immediately (figure 7.26).
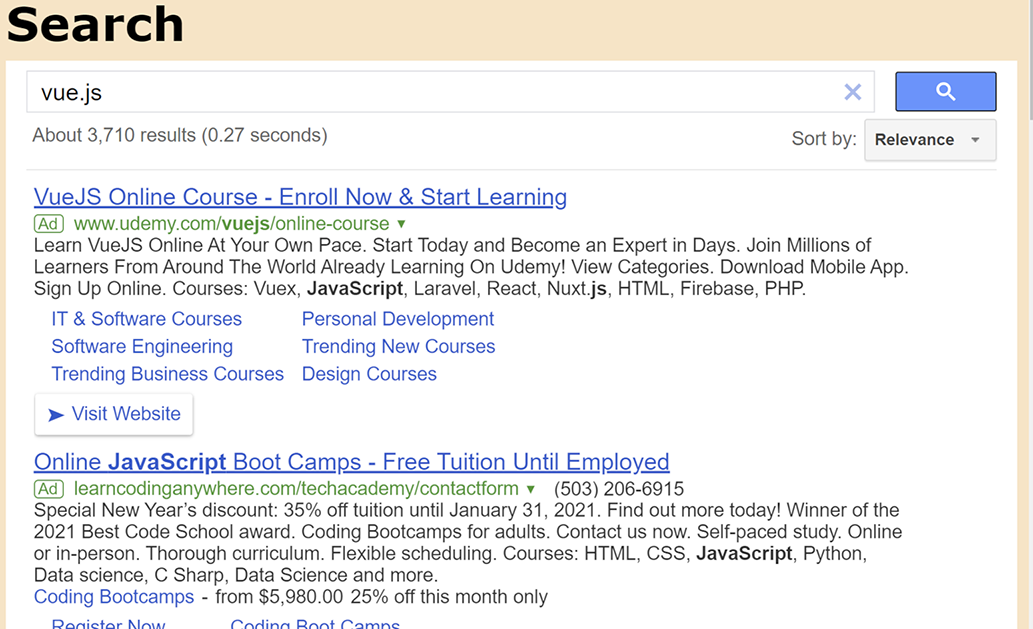
Figure 7.26 The search engine with inline results
Let’s make another tweak. If you click on one of the results, you’ll see that it opens in a new tab. While that’s certainly something you may want, let’s change that to load in the current tab instead. In the dashboard, go to “Search features,” then “Advanced,” then “Websearch settings.” In the Link Target field enter “_self” (figure 7.27).

Figure 7.27 Modifying search results behavior via the dashboard
As before, save and reload your test HTML file and click on a result. It should load in the same tab.
Google’s Programmable Search Engine is even more customizable if you want to modify the HTML of the snippet. The Developer Guide (https://developers.google .com/custom-search/docs/overview) goes into detail on what can be accomplished. You can also make use of an API that returns results in pure JSON, but this is a commercial feature only. Now that we’ve considered a plug-and-play solution, let’s again look at a more integrated option.
7.2.1 Searching with Lunr
In the previous search example, the search service itself was entirely handled by a third party. You can most likely count on Google being around for a few more years, but what if you want an entirely self-hosted, self-contained solution? One example of this is Lunr (https://lunrjs.com/) (figure 7.28).
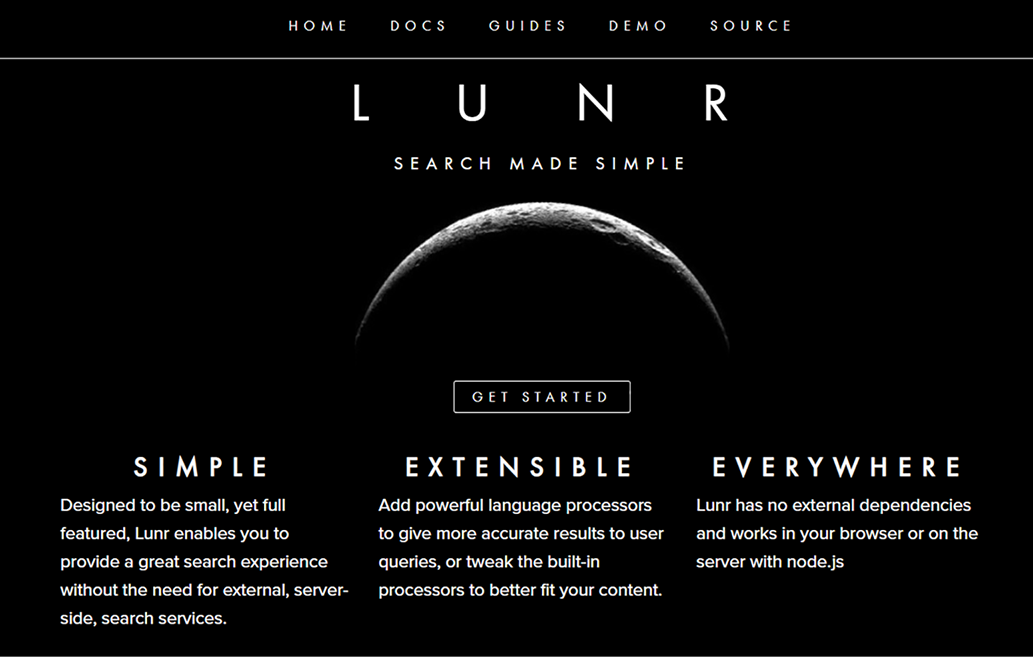
Figure 7.28 Lunr’s gloriously simple web page
Lunr is an entirely client-side solution (it can be used server side, but in general this isn’t the typical use case) for adding searches to a website. It begins with the creation of an index. This is where you decide what you want to search. For example, a developer service website may contain a few marketing pages and then a deep set of documentation. While you could create an index of everything, you may want to instead focus your index just on the developer documentation.
Even after you’ve figured out what to search, you still need to consider the size of your index and how you can keep it smaller. Going back to the previous example, if your developer documentation covers hundreds of pages of docs, perhaps you may consider only indexing the first paragraph of each page of docs.
Once you’ve figured out what content you want to index, you give this information to Lunr. Lunr will parse the text and do magic with it. Okay, not magic, but it will parse the content to make it much more searchable. Once the index is created, you can then search against it using either a simple search term or perhaps a more complex search query (“find all docs that mention cats that are in the API category”). The results can then be filtered by their quality (Lunr will score every result), if you wish. Let’s look at how Lunr could be added to a Jamstack site.
Adding Lunr to an Eleventy site
In chapter 2, you were introduced to the static site generator Eleventy (https://www.11ty.dev/). To test adding search to the Jamstack, we’re going to begin with an existing Eleventy site. This site makes use of text from the GI Joe wiki (http://mng.bz/laAB), an online resource for everything related to the GI Joe franchise. I copied part of the description of six different characters to build a very basic site of GI Joe personalities (figure 7.29).

Figure 7.29 The site’s home page, which just lists characters
Clicking an individual character link shows some basic text and a picture (figure 7.30).

Figure 7.30 An individual character page
The initial code to create this site consists of a few basic pages. (Remember that you can find this in the book’s GitHub repository.) First, the home page loads in all the characters and displays them in a list.
Listing 7.4 Home page for the site (/chapter7/search/lunr/index.liquid)
---
layout: main
---

<h1>Characters</h1>

<ul>
{% for character in collections.characters %}
  <li><a href="{{ character.url }}">{{ character.data.title }}</a></li>
{% endfor %}
</ul>
One of the ways Eleventy creates collections of related content is by using tags. You can see the source for one of the characters. In the front matter on top, the tag’s value is set to characters. This is repeated throughout all the characters. (Note that we’ve trimmed some of the text to save space.)
Listing 7.5 Example character page (/chapter7/search/lunr/characters/destro.md)
---
layout: character
title: Destro
faction: Cobra
tags: characters
image:
➥ https://vignette.wikia.nocookie.net/gijoe/images/c/ca/RAH_Destro02.jpg/
➥ revision/latest?cb=20080730134919
---

Destro is one of the most cunning foes the Joe Team has ever faced. He is
the power behind M.A.R.S. (Military Armament Research Syndicate), one of
the largest manufacturer of state-of-the-art weaponries. His business is
fueled by inciting unstable countries to wage wars against each other and
then getting them to purchase weapons from him. To him, war is simply man's
expression of his most natural state. It is the perfect example of where the
fittest survive and where many technological advances are made. His biggest
client, thus far, is Cobra with whom he maintains an alliance of
convenience. Despite being a manipulative person, Destro maintains a sense
of honor and actually respects the Joe Team for their skills and
expertise, if not their motivation.
The templates used to display characters and the home page itself can both be found in the GitHub repository inside chapter7/search/lunr/_includes. These files handle the header and footer and display of the character but don’t relate to the search feature we’re about to add. We will, however, show the main template shortly when we add support for the client-side aspects of Lunr.
As stated earlier, Lunr requires you to create an index of your data. This is a data-friendly view of the content on your site that you want to search. Our site consists of a home page, multiple character pages, and, eventually, a search page. But we only want to search our character data. In listing 7.4, you saw that you can loop over that information in a collection. We can use the same logic to create a JSON version of the site that Lunr can eventually use to create an index, shown next.
Listing 7.6 Creating a JSON list of characters (/chapter7/search/lunr/lunr.liquid)
---
permalink: /index.json                                    ❶
---

[
{% for character in collections.characters %}
{
    "title":"{{character.data.title}}",
    "url":"{{character.url}}",
    "content":"{{ character.templateContent | json }}"    ❷
} {% if forloop.last == false %},{% endif %}              ❸
{% endfor %}
]
❶ Specifying the destination of the template output
❷ Using a filter to output the content in a JSON-safe way
❸ Including a comma for every item except the last
The first thing to note in this template is the use of permalink in the front matter. This tells Eleventy to change its normal file-naming behavior for this template and to store the result in a file in the root of the site named index.json. In the template, we use Liquid to dynamically output an array of characters. For each character we output the title, the URL to the character (Eleventy provides this for us in the collection), and then the content. Note that we use a filter, json, to manipulate the output. The templateContent value provided by Eleventy includes the rendered content of the character. That includes HTML and line breaks, neither of which we want. We’ll create that filter shortly. Lastly, notice that we use a Liquid feature of loops that detects if we’re on the last iteration. We do this because we need a comma between each item in the array but do not want one after the last item. It may help to see how this JSON looks when done.
Listing 7.7 The generated JSON file
[

{
    "title":"Baroness",
    "url":"/characters/baroness/",
    "content":"The Baroness serves as..."
} ,

{
    "title":"Cobra Commander",
    "url":"/characters/cobra_commander/",
    "content":"Not much is known of the ..."
}


]
In order to support the JSON safe filter used in listing 7.6, we have to define this in the Eleventy configuration file.
Listing 7.8 The Eleventy configuration (/chapter7/search/lunr/.eleventy.js)
module.exports = function(eleventyConfig) {

    eleventyConfig.addPassthroughCopy("css");      ❶

    eleventyConfig.addFilter("json", value => {
        //remove html and line breaks
        return value.replace(/<.*?>/g, '').replace(/
/g,'');
    })
};
❶ This line simply tells Eleventy to copy over the CSS used for this simple site.
The filter works by first removing any and all HTML and then line breaks. Note that other methods could be used here as well. For example, what if the character description was incredibly long? Or what if we had way more than six characters? In order to keep the size of the JSON smaller, you could make the call to only return the first thousand letters of the character’s description. In the end, Lunr doesn’t care, but the more data you send to it the more it will have to work!
Now that we have a data file to use as our source, it’s time to build the actual search engine. Figure 7.31 shows how this is going to look. We’ve got a simple field on top, a button, and that’s it, at least initially.

Figure 7.31 The initial search form
After entering some input and clicking Search, the results with links to respective pages will then be displayed (figure 7.32).

Figure 7.32 Displaying search results below the form
The following listing shows how this is built.
Listing 7.9 The search page (/chapter7/search/lunr/search.liquid)
---
layout: main
---

<h1>Search</h1>

<input type="search" id="search">
<button id="searchBtn">Search</button>

<div id="results">
</div>

<script src="https://unpkg.com/lunr/lunr.js"></script>       ❶
<script>
document.addEventListener('DOMContentLoaded', init, false);
let searchField, searchButton, resultsDiv;
let docs, idx;

async function init() {                                      ❷
    searchField = document.querySelector('#search');
    searchButton = document.querySelector('#searchBtn');
    resultsDiv = document.querySelector('#results');

    let result = await fetch('/index.json');
    docs = await result.json();

    // assign an ID so it's easier to look up later,
    // it will be the same as index
    idx = lunr(function () {                                 ❸
        this.ref('id');
        this.field('title');
        this.field('content');

        docs.forEach(function (doc, idx) {
            doc.id = idx;
            this.add(doc);
        }, this);
    });

    searchButton.addEventListener('click', search, false);
}

function search() {                                          ❹
    let term = searchField.value;
    if(!term) return;
    console.log('search for '+term);

    let results = idx.search(term);

    console.log(results);

    // we need to add title, url from ref
    results.forEach(r => {
        r.title = docs[r.ref].title;
        r.url = docs[r.ref].url;
    });

    let result = '<h2>Results</h2><ul>';
    results.forEach(r => {
        result += `
<li><a href="${r.url}">${r.title}</a></li>
        `;
    });

    result += '</ul>';

    resultsDiv.innerHTML = result;
}
</script>
❷ This code runs when the page loads in the browser.
❸ This is where the Lunr index is defined.
❹ This handles user input and performs the search.
The template begins with a very short bit of HTML. We’ve got the search field, the button, and then an empty div block beneath them. This block will be used to render results. The bulk of the listing is the JavaScript.
Before we get into the JavaScript, we have to add support for Lunr itself. This is done by pointing to the library on a CDN at unpkg.com. We could have also downloaded the library and placed it in our site.
Our code begins by specifying a function to run (init) when the page has loaded. Some globally used variables are also defined here to be used later.
The init function does a variety of things. First, it creates pointers to the things in the DOM we need to work with: the search field, button, and empty div.
Next, it uses the fetch API to load the JSON we defined earlier. It loads this and converts to JavaScript data by parsing the JSON. Once we have that, we can create the Lunr index. We begin by defining the primary key for our data. This is a unique identifier for every item in the index. We’ve named this “id.” Then we then define what’s going to be searchable. That will be the title and content fields from our data.
At this point, the index behavior is defined, but isn’t actually filled with anything. To do that, we loop over each item from our JSON array and add it to the index. To create the primary key, we simply use the loop index. This is added to our doc object, which is then added to the index.
The final thing done in the init function is adding an event handler for the Search button. When users click that button, we first see if they typed anything, and, if not, simply exit the search function.
Searching against Lunr is incredibly easy; it’s literally one line:
let results = idx.search(term);
This provides us an array of results if anything matched. Note the use of console.log immediately after. This lets us use the browser’s developer tools to examine the results. This is a handy way to figure out how to work with what Lunr found (figure 7.33).

Figure 7.33 Browser dev tools showing the Lunr search results
Now that we have results, we’ve got to work with them so that we can display what was found. One thing that may be surprising about Lunr is that the search results do not actually contain the document itself. In figure 7.33, you can see that a ref value exists. Remember when we defined a primary key for our content and manually added the loop index? This is how we’ll be able to display the results. Lunr’s use of ref basically requires you to associate the result with the original data. This is what the loop is doing after the search. For each result, we add in the title and URL from the original set of documents. With that in place, we can then display the results using some simple HTML.
There is, of course, more that you can do in this template. We could add support for letting the user know nothing was found. We could add support for searching against one particular part of our content (GI Joe characters are divided in teams, and our search interface could let you specify one to search against). Lunr is very flexible in this regard and can support pretty much anything your site needs.
7.2.2 Other options
As with forms, you’ve got many other options to consider when adding search. One in particular stands out that may be of interest to Jamstack developers: Algolia (https://www.algolia.com/). Algolia is a commercial service (with a generous free tier) that uses an index like Lunr. Unlike Lunr, Algolia hosts your index on its servers and provides API to edit that index and search against it. It also provides powerful analytics about how your visitors search on your site.
If you prefer something similar to Google’s service, but would rather not use Google, Microsoft has similar services with Bing Custom Search (https://www .customsearch.ai/). Like Google, it also provides a free version of this service.
7.3 Other dynamic options
In this chapter, we focused on two particular ways of adding dynamic content back into your Jamstack site. Obviously there are a multitude of other ways you can do that. In chapter 5, you saw how to add e-commerce to your website. In the next chapter, you’ll see how to do nearly anything by adding serverless features. Some other forms of dynamic content include the following:
-
Calendars—Google Calendar (http://calendar.google.com/) lets you embed full calendars into an HTML page. Like other Google services, you get some basic styling options. You can also use open source libraries like FullCalendar (https://fullcalendar.io/) to provide completely unique designs to your calendars, which still can be driven by Google Calendar data.
-
Comments—While typically only used on blogs, you may wish to add comments to your Jamstack site. Probably the most well known is Disqus (https://disqus.com/). This is a pretty standard utility used for commenting across the internet and can be used for free. Other options include Commento (commento.io) and FastComments (fastcomments.com) if you are willing to roll your own solutions, but be prepared to do a bit of work. An article by Matt Mink (https://css-tricks .com/jamstack-comments/) describes just such a system.
-
Chat—Another common tool on sites (typically commercial sites) is a chat box. This is usually a little talk balloon in the lower right of the site that lets a user click to speak to a person managing a site. A commercial example of such a service is LiveChat (https://www.livechat.com/). Such services can be programmed with canned responses (“When asked about foo, respond with goo”), as well as be connected to living, breathing humans.
-
APIs—The A in Jamstack stands for API, which means any remote resource (weather, stock data, etc.) that can be called with JavaScript and can be called within your Jamstack site.
Summary
-
A site that is simple static HTML, CSS, and JavaScript can still contain dynamic elements (forms, search, calendars, and more).
-
Many services exist that make it incredibly easy to add dynamic aspects into your static site. For example, Google has multiple services (forms, search, calendars) where all you need to do is copy some HTML and paste it into your template. Services like WuFoo, FormCake, and FormKeep are just a few options for working with form input, one example of dynamic support.
-
Determining which service to use will depend on your needs, your budget, and which best provides the result you need.