
5 Building an e-commerce site
- Establishing the needs of a typical e-commerce site
- Comparing headless e-commerce systems for managing products and checkout
- Choosing a static site generator for an e-commerce site
- Creating and configuring a new site using Next.js
- Building a product listing, product detail, and shopping cart in Next.js
- Importing and using Markdown content in a Next.js site
An e-commerce site has many requirements that might make it seem ill-suited for an architecture based on static assets, as the Jamstack is. While the content aspects, such as product listings and detail pages, can be made to fit easily within a statically generated site, things like shopping carts, checkout processing, and order histories appear too dynamic and interactive to function without server-side rendering.
Up until only a three or four years ago, this is exactly the advice I would give: static site generators were not a good fit for e-commerce sites. However, the Jamstack does more than just build sites with static site generators. A core piece of the Jamstack is its ability to use JavaScript and APIs on the client side to enable dynamic functionality that would otherwise be impossible using static site tooling. Thus, it is entirely possible today to build fully functioning e-commerce sites using the Jamstack.
Saying something is possible does not necessarily mean it is right. However, I’d argue that, in many if not most cases, adopting the Jamstack for e-commerce is the right idea. This is because there is a whole cottage industry of research showing the impact performance can have on conversion rates and, therefore, sales. For instance, one analysis found that “if a site makes $100,000/day, [a] one second improvement in page speed brings $7,000 daily” (http://mng.bz/Nxj7). In other words, the performance improvements that Jamstack offers will not only improve your users’ experiences, but that improved experience can improve your bottom line.
5.1 Requirements of an e-commerce site
E-commerce sites can vary greatly in complexity. Some sites provide only a handful of products or services and a simple checkout process, without any real feature frills. Others offer all kinds of dynamic content, such as user reviews, personalized recommendations, wish lists, and more. All these features are possible using the Jamstack, and some of the tools that we’ll discuss even offer special APIs for achieving them.
Let’s look at a few core requirements for a typical e-commerce site:
-
An e-commerce site has a list of products or services. This content should be easily updated and managed through some form of content management system to allow for quick and easy updates by nontechnical users tasked with maintaining the site.
-
E-commerce sites have regular content pages beyond the product listings for things like the About page or terms of service. In most cases, these are infrequently updated, so they may not require integration within external content management.
-
E-commerce sites generally have a shopping cart where users can dynamically add and remove items and proceed to the checkout process.
-
An e-commerce site must have a checkout process to complete the purchase. In most cases this is integrated within the site, but in some cases the final checkout process can be offloaded to a third party for processing and confirmation.
5.1.1 The example site requirements
The example we’re going to build for this chapter is a simple storefront, called the Jam Store, for selling toy figures and rubber ducks. It includes all the basic requirements discussed. Currently, we have a limited inventory of only four items, but we expect it to expand (see figure 5.1).

Figure 5.1 The final result of our example e-commerce project is a store that sells toy figures.
Our site will integrate with content management for adding and editing our product listings. However, our other content page—our About page—will be infrequently updated, so it will be managed as simply a Markdown file.
Users will be able to add items to their shopping cart from the product detail page. They’ll be able to modify quantities or delete items from their cart via the My Cart page before proceeding to checkout. Since we’re small (and for the sake of simplicity), the checkout process will be offloaded to a third party to manage final shipping and order confirmation details.
5.2 Choosing the right tools
There are myriad ways to build a Jamstack e-commerce site, including building a custom solution from scratch. However, there are a lot of complexities in e-commerce that can make this a bit of a daunting task. The Jamstack generally favors leveraging existing services wherever possible to simplify development, and in this case, we’ll use a type of service called headless e-commerce.
5.2.1 What is headless e-commerce?
In chapter 4, we learned about a concept called a headless CMS, wherein the CMS provides the backend content management tools that are decoupled from the frontend presentation. Headless e-commerce is the same concept applied to e-commerce tooling. A headless e-commerce solution provides the tools for managing a shopping cart, orders, shipping, and, in many cases, products/services and inventory that are not tied to a specific frontend solution, allowing you to customize the frontend to suit your needs.
I’d argue there is even more variation in the types of headless e-commerce than in headless CMS, where we had just two primary types (API-based and Git-based). There are no commonly accepted categories of headless CMSs, but—borrowing from the work of François Lanthier Nadeau (https://snipcart.com/blog/headless-ecommerce)—CEO of SnipCart (one of the solutions we’ll discuss), here are the broad types:
-
All-in-one solutions—As the name implies, these provide full packages to manage every aspect of an e-commerce site, from content to products, to orders, shipping, and so on. In most cases, these tools are more geared toward a full-stack solution (coupled) that provides both the front- and backend for the site, but they also offer APIs to access the backend as a decoupled headless alternative that can be used in a Jamstack site.
-
Add-on solutions—These tools offer a complete shopping cart and checkout solution that effectively lie on top of your site. This is typically done by including a script that embeds an overlay. These tools usually don’t manage content and don’t necessarily require that you manage your product listings through their service.
-
API-based solutions—Like their headless CMS counterparts, all of the functionality from these services is available only via API calls. While the backend manages everything from products to shopping carts, orders, and shipping, they make no assumptions on how the frontend is built. Everything from adding and removing items from a cart to the checkout process is handled via calls to the API, using JavaScript in the case of a Jamstack site.
From a Jamstack perspective, both the all-in-one solutions and the API-based solutions will be consumed the same way: a Jamstack site will use the APIs provided by the all-in-one solution rather than rely on any of the frontend development tools.
The add-on solutions generally require the least amount of development effort, but the tradeoff is usually in ease of customizability. Once you’ve built a site with product/ service listings, you can simply connect it with the headless e-commerce tool that manages the rest. On the other hand, the all-in-one and API-based solutions both require more development effort, as the frontend for things like the cart and checkout need to be custom built, but by relying on only APIs, the developer can create the frontend however they choose.
TIP For a more in-depth look at a range of headless e-commerce options, check out this detailed post by Bejamas: https://bejamas.io/blog/jamstack-ecommerce/.
5.2.2 Headless e-commerce options
Before we get into which option we’ll choose, let’s look at a few of the most popular headless e-commerce solutions, one from each category.
Shopify (https://shopify.dev/) is one of the most popular all-in-one e-commerce options on the market. Shopify’s services can be used in a Jamstack site via their Storefront API (https://shopify.dev/api/storefront). This is a GraphQL API that offers access to the full range of Shopify’s services for product information, orders, and checkout. Shopify also offers a JavaScript SDK (http://mng.bz/Dxja) for the Storefront API, which simplifies the code needed to interact with their API. Butcher Box (see figure 5.2) and Victoria Beckham Beauty are two storefronts built with the Jamstack and that access the Shopify’s Storefront API.

Figure 5.2 Butcher Box is an example of an online store built with the Jamstack and that uses Gatsby to access the Storefront API.
Snipcart (https://snipcart.com/) is an example of an add-on e-commerce solution. At its most basic, enabling a site to work with Snipcart only requires that it include the Snipcart JavaScript and CSS files and then add custom HTML attributes to an Add to Cart button. That’s it. The link will trigger the Snipcart cart overlay to appear with all of the cart management and checkout features built in. Snipcart does include a number of customization options as well as a JavaScript SDK if you want to access any of its features programmatically rather than via the embedded cart and checkout.
NOTE For a quick tutorial on setting up a Jamstack site built with Hugo that uses Snipcart for e-commerce functionality, check out this tutorial and sample app: https://www.stackbit.com/blog/ecommerce-jamstack/.
Commerce.js (https://commercejs.com/) is an example of an API-based headless e-commerce solution that has been used to build sites like INGMARSON, shown in figure 5.3. It provides all of the tools for building an e-commerce site—product management, discounts, shopping cart, checkout, and more—that can be managed via a web-based backend but are accessed within your application through the JavaScript SDK and command-line tool. To help you get started, they also provide prebuilt example sites using popular web frameworks like React and Vue. Our sample application will use Commerce.js.

Figure 5.3 INGMARSON is an online clothing retailer that used the Jamstack with Gatsby and Snipcart to enable its e-commerce features.
5.2.3 Why Commerce.js?
The decision to use commerce.js wasn’t purely driven by the technical requirements of our sample application. The goal of the sample application, beyond being functional, is to teach some of the underlying concepts required to use Jamstack tools and frameworks. By requiring more custom code, using an API-based solution will allow us to explore more of the code needed to build a Jamstack application.
If you are evaluating which type of solution to choose, here are my recommendations:
-
Choose an add-on solution if your priority is building your site quickly and easily over customizing the shopping cart or checkout process.
-
Choose an API-based solution if your priority is to maintain control over the design and user experience, including the shopping cart and checkout, and you are comfortable with the additional code it will require.
-
From a technical Jamstack point of view, you’ll choose an all-in-one solution for the same reasons you choose an API-based solution. However, in some cases there may be additional features offered or existing business relationships that may make an all-in-one option a better fit.
5.2.4 Static site generator options
There aren’t any specific static site generators (SSGs)—that I am aware of—that are geared toward e-commerce, so really any SSG will work. Nonetheless, we’re planning on integrating with APIs both at build time—to populate product listings—and on the client-side—to enable shopping cart functionality. JavaScript-based SSGs make it easy to integrate with APIs during build time, and, more specifically, the JavaScript framework-based options can offer tools that make some of the client-side scripting easier. Let’s look at a few of these options:
-
Gatsby—Gatsby is a very popular React-based SSG. Some things that make Gatsby unique are its use of GraphQL for accessing data, including things like content and other internal data structures, as well as its plug-in system. Gatsby’s large community has created thousands of plug-ins (over 2,500 as of this writing) that cover nearly any functionality or integration you might need.
-
Next.js—Next.js is a React-based meta framework (a framework on top of a framework). It is not purely a static site generator. Next.js can be used for creating a standard React single-page application (SPA) with server-side rendering (SSR). It also provides tools to generate sites as static assets for a Jamstack application, but it even allows a site to determine whether a specific route (i.e., a path within the application) should be dynamic or static. This allows developers to build applications that are “hybrid,” combining both SSR and static.
-
Nuxt.js—As the name might imply, Nuxt.js shares a lot of similarities with Next.js, including the ability to use it for either SSR or static (and Nuxt 3 has added support for the hybrid SSR/SSG approach). However, Nuxt.js uses the Vue framework rather than React.
-
Gridsome—Gridsome has a lot in common with Gatsby. It includes a lot of core features that define Gatsby—its use of GraphQL, its focus on generating static assets for Jamstack, and its plug-in ecosystem—but uses Vue instead of React.
-
Scully—While there are numerous React-based and Vue-based SSGs, Scully is, as of this writing, the only option for developers who prefer to use the Angular framework. It is geared toward developing pure static-based Jamstack applications and has a plug-in ecosystem like Gatsby and Gridsome.
We’ll be using Next.js to build our sample application.
5.2.5 Why Next.js?
So which static site generator should you use? Honestly, it mostly comes down to personal preference. Unless your e-commerce site has a specific need that is addressed by the availability of SSR in either Next.js or Nuxt.js, any of the options listed will work just as well. The question then becomes: do you prefer React, Vue, or Angular? Beyond that, it is simply a matter of features (GraphQL, plug-ins) or style preference.
Recent versions of Next.js also offer a new form of rendering called incremental static regeneration (ISR) that can be particularly useful for e-commerce sites with a large number of products and therefore lots of pages. ISR essentially defers the rendering of a page until it is first requested by a user. This means that an e-commerce site with thousands of products might only need to generate the most popular 200 product pages and render the remaining pages when they are first requested. This means that the first user who requests a page may see a small delay in receiving the page, but subsequent users will receive the page as if they were statically generated. You can learn more about ISR in the Vercel docs (http://mng.bz/lanB).
5.3 Getting set up to build the example e-commerce site
Now that we’ve made our tool choices—Commerce.js for e-commerce and Next.js for the SSG—let’s get started building the sample application. The first thing we need to do is get everything set so that we can begin coding.
5.3.1 Setting up Next.js
Next.js doesn’t install like some of the examples in prior chapters that used binaries or global npm installs. Instead, Next.js provides a tool called Create Next App (https://nextjs.org/docs/api-reference/create-next-app) to generate a new site, either a blank or one from a long list of starter templates. This doesn’t require you install anything but instead a npx command: a package runner built into npm that can run an npm script without requiring an install. You can run npx create-next-app without any parameters, and it will create a simple one-page web app with the basic default Next.js application files and folder structure.
Create Next App can also use a template. This can be any GitHub repo, but the Next.js team already provides over 250 examples (https://github.com/vercel/next.js/ tree/main/examples) that you can use. We’ll use one of these examples, with-tailwindcss, as the basis for our example e-commerce store that sells toy figurines. We’re going to build a product listing page, product detail page, and shopping cart, but to make this easier, we’ll take advantage of the starter templates that Next.js provides. The particular starter we’ve chosen includes the Tailwind CSS library that will give us some basic styling building blocks to work with. This is a huge help: while I am many things, a designer is not one of them. To learn more about Tailwind, check out tailwindcss.com.
Let’s get started by running create-next-app and specifying the Tailwind CSS example. Run the following command wherever you keep your web projects:
npx create-next-app -e with-tailwindcss
Create Next App will ask you for a project name. This will be used as the name of the folder that the project will be placed within. For this example, let’s use next-ecommerce. Create Next App will not only generate the project files, but also install all the dependencies for us. All we need to do is change the directory into the project folder and run it:
cd next-ecommerce
yarn dev
If you prefer to use npm instead of Yarn, you can alternatively run npm run dev.
By default, the site will be running at http://localhost:3000. If you open that in the browser, you should see the standard Next.js start shown in figure 5.4.

Figure 5.4 The default Next.js site that is generated when running npx create-next-app
Let’s start by adding a basic navigation component for this site (listing 5.1). The pages we’ll link to aren’t created yet, but we’ll fix that soon enough. First, create a components folder in the root of your site and create a file named nav.js inside that folder. We’ll have two navigation items that are set in the links variable as “My Cart” and “About.” These will link to /cart and /about, respectively. We loop through the links in this array using the JavaScript map() function to create the navigation.
Listing 5.1 The updated navigation in /components/nav.js
import Link from 'next/link';

const links = [
  { href: '/cart', label: 'My Cart' },
  { href: '/about', label: 'About' },
];

export default function Nav() {
  return (
    <nav>
      <ul className="flex items-center justify-between p-8">
        <li>
          <Link href="/">
            <a className="text-blue-500 no-underline text-accent-1 dark:text-
            ➥ blue-300">
              Jam Store
            </a>
          </Link>
        </li>
        <ul className="flex items-center justify-between space-x-4">
          {links.map(({ href, label }) => (
            <li key={`${href}${label}`}>
              <Link href={href}>
                <a className=" no-underline px-4 py-2 font-bold text-white
                ➥ bg-blue-500 rounded">{label}</a>
              </Link>
            </li>
          ))}
        </ul>
      </ul>
    </nav>
  );
}
We’ll use this component to display the navigation across our pages. Let’s start by clearing out much of the default content on the default site’s home page and include the navigation component. For now, the page only imports the nav.js component and displays it above the main section that, for now, contains some dummy text.
Listing 5.2 Including the navigation in /pages/index.js
import Nav from '../components/nav';

export default function IndexPage({ products }) {
  return (
    <div>
      <Nav />
      <section className="text-gray-700 body-font">
        <div className="container px-5 py-24 mx-auto">
          <div className="flex flex-wrap -m-4">
            The product list will go here.
          </div>
        </div>
      </section>
    </div>
  );
}
Now that our project code is set, we need to set up and populate Commerce.js so that we can populate the data on the page.
5.3.2 Setting up Commerce.js
To get started, we’ll need to sign up for a Commerce.js account via commercejs.com. Don’t worry: the free account is generous enough for the purposes of this example. Once you’re signed up, you’ll be brought to the dashboard. This is where we’ll create the categories and products that will populate our e-commerce store. I’ll provide you some guidance on what to populate these with, but I should note that you are free to use whatever you choose; there is nothing in the code we’ll write that requires that you use the products and categories I use.
In order for our e-commerce toy figurine store to work, it will need some products, each of which will be assigned to a category. We’ll need to populate these within Commerce.js via their web-based backend.
Let’s start by creating some categories. As you saw in figure 5.1, our store is comprised of some toys, figurines, and rubber ducks. Thus, we’ll create two categories: Figures and Ducks. To create categories, click the Products navigation item on the left-hand side of the Commerce.js dashboard and then choose Categories. We’ll need to provide a category name, and it will auto-fill a slug for us. We can use the default that it provides (figure 5.5).

Figure 5.5 Create a new product category within the Commerce.js dashboard.
Next, let’s create some products. Click the Products item on the left-hand navigation and then click Products. There is a lot of detail we can provide (see figure 5.6), but, for our purposes, we don’t need to fill in all of them.
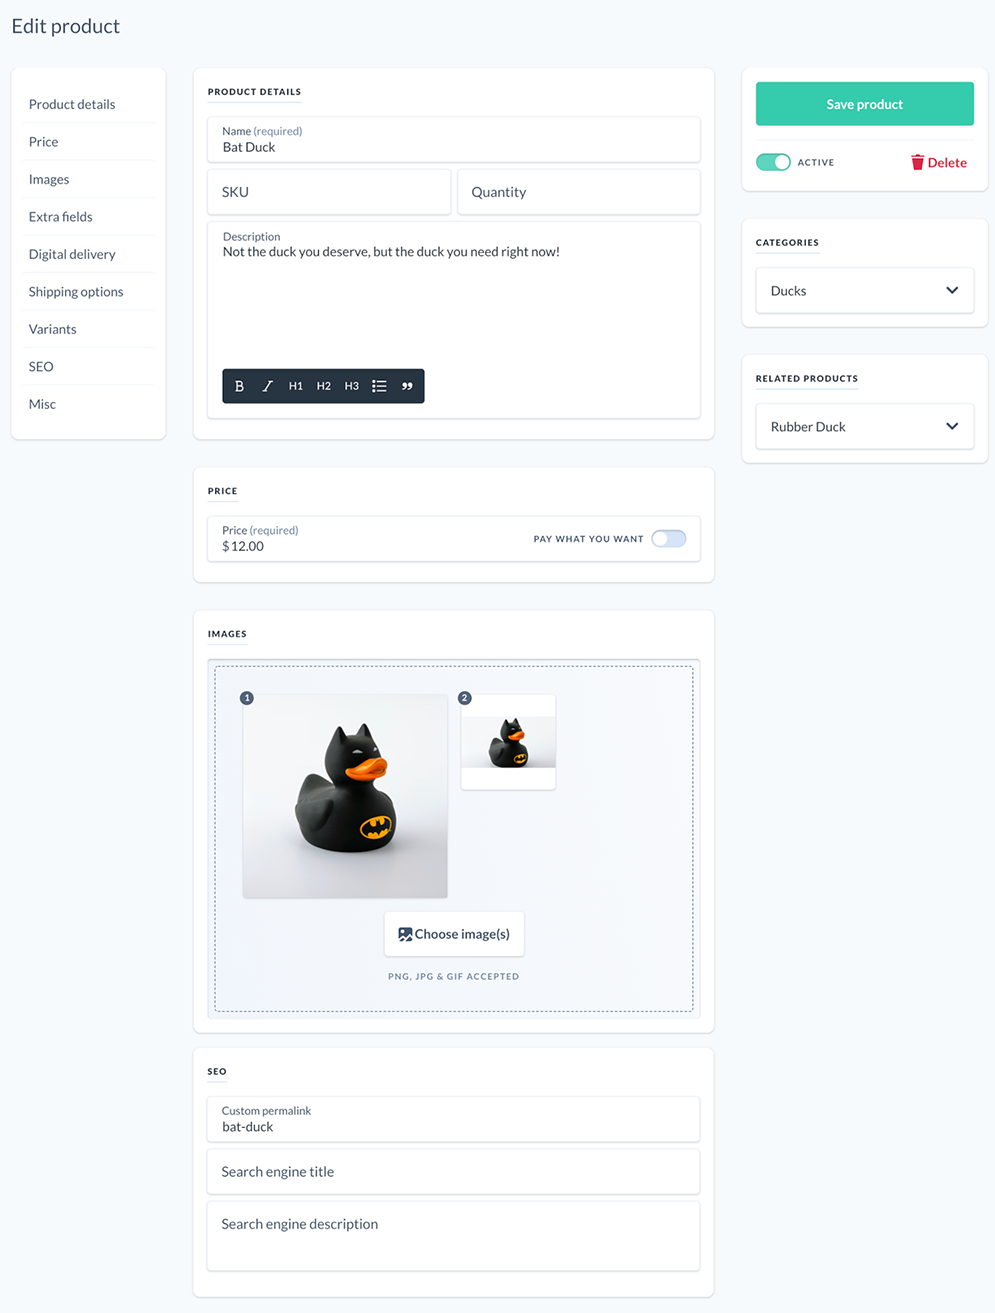
Figure 5.6 Create a new product within the Commerce.js dashboard. Please note that, for readability purposes, only the relevant sections of the page are displayed.
As we create new products, the key items to complete are as follows:
-
Description—Again, feel free to add whatever type of description you choose.
-
Categories—Assuming you used the suggested categories, this will be either Figures or Ducks.
-
Images—I’ve provided some sample images in the book’s GitHub repository (https://github.com/cfjedimaster/the-jamstack-book). For our design, we’ll need two images for each product: one that is 400 × 400 px and one that is 350 × 192px.
-
Custom permalink—A random permalink will be generated automatically if you don’t provide one, but it’s best that we do. This will be used within the application to construct the path to view the product.
Once we’ve created some products, we’re ready to go back to the project we generated and start coding. But first, we’ll need our API key to allow our project to access the data in Commerce.js. Click the Developer item on the left-hand navigation menu and then choose API keys. We’ll just need to copy the public key.
5.3.3 Setting Next.js environment variables
If you still have the local web server running your site, go ahead and stop it for now, as we’ll be making changes to the site’s configuration.
In order to connect to the Commerce.js API from our site, we’ll need the API key. However, we need to keep that key in a place that doesn’t expose it directly in our code, which will be checked into GitHub. Next.js includes the ability to automatically load environment variables (see https://nextjs.org/docs/basic-features/environment-variables), which can be used to keep secrets like API keys or general configuration variables that you intend to reuse throughout your application. We will store our Commerce.js public API key as an environment variable.
Create a file named .env.local in the root of your project. By default, any variable we store in this file will be accessible via process.env.ENV_VARIABLE_NAME. For instance, a variable named CHEC_PUBLIC_KEY would be accessible as process.env .CHEC_PUBLIC_KEY. This is only accessible in the Node.js environment, either on the server in the case of an SSR application or in the build when using Next.js as an SSG. If you need to access this variable via client-side JavaScript, you can prefix the name of the variable with NEXT_PUBLIC_.
We’ll need this variable to configure the Commerce.js SDK at build time, so we do not need it to be public. Let’s put the following contents in .env.local, replacing {{MY_API_KEY}} with your Commerce.js public API key:
CHEC_PUBLIC_KEY={{MY_API_KEY}}The .env file is useful for keeping things like API keys that you don’t want to publish in your project repository. While this is intended to be a public key and will be accessible for people who inspect any API calls we make from the client, it’s still advisable to keep it out of your published code. Plus, this gives us a single place to store the variable and reuse it wherever necessary within the application. The .env.local should already be in the .gitignore file that was generated with the project.
5.3.4 Loading the Commerce.js SDK
Commerce.js provides a Commerce.js SDK (https://commercejs.com/docs/) that helps make it easier for us to interact with the Commerce.js API via JavaScript. Let’s install the SDK via Yarn. Run the following command. Be sure you are in the root of your site when running this command:
yarn add @chec/commerce.js
To configure the SDK, we need to pass the API key that we stored as an environment variable in the previous section. We don’t want to have to pass this on every page that uses the SDK, so let’s create a lib file that configures the SDK we can reuse throughout the application.
Create a folder named lib in the root of your project and then a file named commerce.js. This file will import the SDK and set the API key within a new instance of the Commerce object:
import Commerce from '@chec/commerce.js';

export default new Commerce(process.env.CHEC_PUBLIC_KEY);
Now, whenever we need to use the Commerce.js SDK, we only need to import lib/commerce, and we’ll have access to the already configured Commerce.js SDK object.
5.4 Building the Jam Store e-commerce site
Everything is set up for our example e-commerce site that sells toy figurines. We’ve run create-next-app to generate a project with some basic site code for us to start with, which includes Tailwind CSS for some styling. We’ve also populated Commerce.js with some sample products and categories that will populate our store. Finally, we set up the Commerce.js SDK within our project and the API key stored as an environment variable so that we can connect to Commerce.js from our site. Now we can begin to create our product listing page, product detail page, and shopping cart to make our e-commerce site complete.
We’re going to cover a lot of code in the upcoming sections. The goal here is to explore some of the key aspects you’ll need to understand how to build sites using Next.js. It isn’t critical that you understand every line of each code listing. I’ll call out any of the critical concepts and portions that you need to pay attention to.
5.4.1 Creating the product listing component
Let’s build the home page that will list all of the available products pulled from Commerce.js. We’ll get some help from Tailblocks (https://tailblocks.cc/), a repository of ready-to-use code blocks built for Tailwind. Our product listing and product detail pages will be based on some of the code samples from their e-commerce category.
The product listing will loop over the products and display a product card. Let’s create the product card as a reusable component. Create a folder named products within the components directory, and then create a file named ProductList.js inside the folder.
Let’s look at the code for the ProductList.js component that will be used to generate each product card in the product listing. This component takes a product object that is passed via props and populates the values in the product card.
We’ll write ProductList to accept properties (props) that we’ll pass in when we use this component. This is how we’ll pass in the product that will populate the page.
The component will return the HTML that will be rendered by the component, populating the various dynamic elements using the product details in the product property that is passed.
Listing 5.3 The product card component in /components/products/ProductList.js
import Link from 'next/link';

export default function ProductList({ ...props }) {
  const thumbnail = props.product.assets.filter((item, index) => {
    return (item.image_dimensions.width === 350);
  })[0];

  return (
    <div className="lg:w-1/4 md:w-1/2 p-4 w-full">
      <Link href={'/product/' + props.product.permalink}>
        <a className="block relative h-48 rounded overflow-hidden">
          <img
            alt={props.product.name}
            className="object-cover object-center w-full h-full block"
            src={thumbnail.url}
          />
        </a>
      </Link>
      <div className="mt-4">
        <h3 className="text-gray-500 text-xs tracking-widest title-font mb-1
        ➥ uppercase">
          {props.product.categories[0].name}
        </h3>
        <h2 className="text-gray-900 title-font text-lg font-medium">
          {props.product.name}
        </h2>
        <p className="mt-1">{props.product.price.formatted_with_symbol}</p>
      </div>
    </div>
  );
}
You may notice that we import the next/link component (https://nextjs.org/docs/api-reference/next/link). This is a helper component that is built into Next.js for client-side route transitions that are common in most single-page applications, enabling faster page loads. In this component, we use the link component to link to the product detail page using the permalink property we set on the product in Commerce.js.
One other thing worth noting is that each product returned by Commerce.js will have an array of images associated with it—in our case two because we’ve added two images for each product. For the product listing, we need the smaller thumbnail that is 350 pixels wide. In order to get this, we use a JavaScript array filter function (http://mng.bz/Bx8r) to loop through the product assets array and filter any images that are not 350 pixels wide. We set the thumbnail variable to the first item in the returned array.
5.4.2 Building the product listing
Let’s combine the ProductList component and the commerce lib file to create the home page listing. Let’s look at the final code for index.js. This code replaces the existing contents of index.js that we created earlier. This page calls the Commerce.js API within a special method of Next.js called getStaticProps().
The getStaticProps()method is one of Next.js’ built-in data-fetching methods. It is called at build time, so it is specifically designed for static routes within your Next.js application. Because we are building a typical Jamstack application, all of our routes are generated as static assets. We can use getStaticProps() to get any data our page needs and add it to the props object. In this case, we only need the array of products that will be passed into our output, where we will loop though the products, passing each product to the ProductList component we created earlier to output the product card.
Listing 5.4 The home page, including the product listing in /pages/index.js
import Nav from '../components/nav';
import commerce from '../lib/commerce';
import ProductList from '../components/products/ProductList';

export default function IndexPage({ products }) {
  return (
    <div>
      <Nav />
      <section className="text-gray-700 body-font">
        <div className="container px-5 py-24 mx-auto">
          <div className="flex flex-wrap -m-4">
            {products.map((product, index) => (
              <ProductList product={product} key={index} />
            ))}
          </div>
        </div>
      </section>
    </div>
  );
}

export async function getStaticProps() {
  const products = await commerce.products.list();

  return {
    props: {
      products: products.data,
    },
  };
}
It is worth noting that you need to import both /lib/commerce.js, which sets up our Commerce.js SDK to connect to the API, and /components/products/ProductList.js, which is the component for the product card that we created earlier. As we loop through, passing each product as a property into ProductList, we also set a unique key property. This helps React identify changes within the virtual DOM.
You may also notice that our getStaticProps() method is set as async. This is done so that we can use the JavaScript await operator. This allows us to reduce the amount of code needed by waiting for the result of an API call that returns a JavaScript promise, as the Commerce.js SDK does. Thus, our products constant waits for the commerce.products.list() method to return a result, preventing us from trying to return the value in the props before the API response is received.
If we restart the server and reload the page in our browser, we should now see the products we entered via the Commerce.js dashboard listed. It should look like the image we saw in figure 5.1.
5.4.3 Building the Product Detail page
We’ll need to generate a product detail page dynamically for each product returned by Commerce.js (see listing 5.5). To do this, we’re going to use a feature of Next.js called dynamic routes (https://nextjs.org/docs/routing/dynamic-routes). A dynamic route is recognizable because the file name is surrounded by square brackets. The text between the brackets will be the parameter we’ll use to generate the page. Let’s see how this works.
If you recall from when we created the ProductList component, we want the path to our product detail page to be /product/[permalink], where [permalink] is the permalink value we set in the product’s properties in Commerce.js. We’ll do this by creating a /pages/products folder and creating a [permalink].js file within that folder.
There will be a number of things happening on this page that we’ll need to work out so that items can be added to the shopping cart, but, for now, let’s focus on getting the detail pages to display. We render the product that we will pass to the component (we’ll get to that in a moment), which pulls the proper image for the page based on the image width.
Listing 5.5 The Product Detail page in /pages/product/[permalink].js
import Nav from "../../components/nav";

export default function ProductDetail({ product }) {
  const fullImage = product.assets.filter((item, index) => {
    return item.image_dimensions.width === 400;
  })[0];

  return (
    <div>
      <Nav />

      <section className="text-gray-700 body-font overflow-hidden">
        <div className="container px-5 py-24 mx-auto">
          <div className="lg:w-4/5 mx-auto flex flex-wrap">
            <img
              alt="ecommerce"
              className="..."
              src={fullImage.url}
            />
            <div className="...">
              <h2 className="...">
                {product.categories[0].name}
              </h2>
              <h1 className="...">
                {product.name}
              </h1>
              <div
                className="leading-relaxed"
                dangerouslySetInnerHTML={{
                  __html: product.description,
                }}
              ></div>
              <div className="flex">
                <span className="...">
                  {product.price.formatted_with_symbol}
                </span>
                <button
                  className="..."
                >
                  Add to Cart
                </button>
              </div>
            </div>
          </div>
        </div>
      </section>
    </div>
  );
}
Perhaps you saw the strange property we used called dangerouslySetInnerHTML. Because the product description can contain HTML formatting, we need to render it using innerHTML in the DOM. However, in simple terms, since React uses a virtual DOM, we need to notify React that we are setting the innerHTML, which requires the use of the dangerouslySetInnerHTML method. (You can read this article [http://mng.bz/doYv] for a more in-depth explanation.)
At this point, all we’ve done is render the HTML, but, because this is a dynamic route, we need to tell Next.js what pages to render when it outputs the static files for our site. In our case, we plan on rendering one for each product using the permalink for each to determine the file name of the page. To do this, we’ll need to add another special method built into Next.js for generating static sites called getStaticPaths(), as seen in listing 5.6.
Listing 5.6 The getStaticPaths() and getStaticProps() methods
export async function getStaticPaths() {
  const products = await commerce.products.list();

  // create paths with `permalink` param
  const paths = products.data.map((product) => `/product/${product.permalink}`);
  return {
    paths,
    fallback: false,
  };
}

export async function getStaticProps({ ...ctx }) {
  const { permalink } = ctx.params;
  const product = await commerce.products.retrieve(permalink, {
    type: 'permalink ',
  });

  return {
    props: {
      product: product,
    },
  };
}
The getStaticPaths() method returns an array of path strings. We’ll use Commerce.js to return a list of products and then populate these path strings with the product permalinks. The only other thing we need to return is a fallback key. When this key is false, as we’ve set, any path not returned by this method will return a 404. If it is true, Next.js will return a fallback version of the page instead of a 404. This would be useful if we were generating a large number of pages, causing a slow build. For any page not yet rendered, the user would see a loading indicator while getStaticProps() is called to populate the page.
Speaking of getStaticProps(), we need to create that function to populate the product details that will be rendered. In order to get the specific product details for this page, we’ll use the permalink variable that is passed in via the page context variable (ctx). This is populated with the value from /product/[permalink] path that we generated using the product permalink. We can then use the permalink to query Commerce.js to give us the product detail that it matches.
Add both these methods to the [permalink].js page we created. You can place them below the code from listing 5.5.
The product detail we’ve created so far looks like figure 5.7.
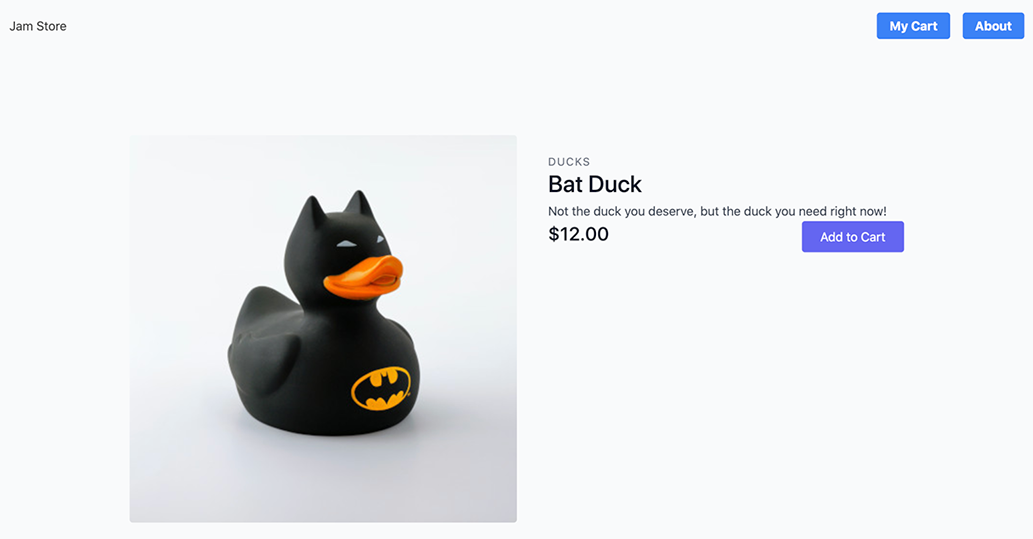
Figure 5.7 The product detail listing for one of our products
5.4.4 Enabling add-to-cart functionality
So far, all the code we’ve written runs at build time, but each cart is unique to each user. Therefore, the add-to-cart functionality cannot be statically prerendered and needs to run on the client (i.e., the browser). To do this, we’ll need to use the environment variable to configure the Commerce.js client-side script with our API key, which is currently only available at build time.
To make our CHEC_PUBLIC_KEY environment variable accessible to this script, we need to create a Next.js configuration file as next.config.js in the root of our project. In this file, we will tell Next.js to make this environment variable available on the client.
Listing 5.7 The Next.js configuration file in next.config.js
module.exports = {
  env: {
    CHEC_PUBLIC_KEY: process.env.CHEC_PUBLIC_KEY,
  }
};
Note that we could not use the NEXT_PUBLIC_ shortcut that Next.js provides because Commerce.js expects the key using a specific variable name.
If you have your local server still running, you’ll need to stop and restart it after making a configuration change.
Let’s go back to our /pages/product/[permalink].js file and add some methods to enable the add-to-cart functionality. Because of our configuration change, we can now call Commerce.js from the client. Let’s add a new method to the ProductDetail function in [permalink].js. Before we do that though, we need to import the Commerce.js library at the top of the file:
import commerce from "../../lib/commerce";
You can place the code for our handleAddToCart() function prior to the return. This method will tell Commerce.js to add the current product to our cart. For now, we’ll just dump the complete cart contents into the browser console so that we can see that it’s working:
const handleAddToCart = async (e) => {
  let cart = await commerce.cart.add(product.id, 1);
  console.log(cart);
};
Each time we call this method, we’re telling Commerce.js to add one item of this product to the cart. This will either add a new product or increment the product if it already exists in the cart. Within the same file, let’s call this method by modifying the Add to Cart button to call this function. Replace the current button code that is within the render() method with the following code:
<button
  onClick={handleAddToCart}
  className="..."
>
  Add to Cart
</button>
Once you save the file and it refreshes in your browser, open your browser developer tools console. When you click the Add to Cart button, you should receive something like the following response:
{success: true, event: "Cart.Item.Added", line_item_id:
➥ "item_7RyWOwmK5nEa2V", product_id: "prod_Op1YoV9x4wXLv9", product_name:
➥ "Bat Duck", ...}
Of course, dumping results into the browser console isn’t the ideal user interaction. What we need to do instead is let the user know that the item was successfully added. We’ll use a state variable to do this that will be set via React’s useState hook. First, we need to add an import for the hook at the top of the file:
import { useState } from "react";Now we can create the cartText state variable and the setCartText() function that will allow us to change the value of this state variable using this hook. State variables in React should not be changed directly, thus the need for the setter method. In addition, the useState hook allows us to pass in a default value, which, in this case, will be “Add to Cart.” Add this line directly beneath the export default function line:
const [cartText, setCartText] = useState("Add to Cart");Next, let’s update the button again to use that variable instead of hardcoded text:
<button
  onClick={handleAddToCart}
  className="..."
>
  {cartText}
</button>
This by itself won’t display anything differently than we were already displaying because we aren’t updating the value on any state changes. To do that, we need to modify our handleAddToCart() method by removing the console log and adding some code to change the cartText state variable when the item is successfully added. We do not modify the state directly but instead use the setCartText() method to update it:
const handleAddToCart = async (e) => {
  let cart = await commerce.cart.add(product.id, 1);

  let cartText = "Added! (" + cart.quantity + ")";
  setCartText(cartText);
};
Now, if we try the page out, our cart text will display that the item was added and display the quantity of that item in the cart. Clicking the Add to Cart button should display “Added (1)” or, if the product was already in your cart, “Added (2).”
5.4.5 Building the shopping cart
At this point, users can view all of our products, click through to view specific products details, and add products to their cart. Next, let’s allow them to view the items that are in their cart. To do that, we’re going to borrow the design and layout from this pen in Codepen: https://codepen.io/abdelrhman/pen/BaNPVJO.
Create a /pages/cart.js file. This page will be different than prior pages, as it will not use getStaticProps(). Why? Because none of the properties that populate this page can be statically prerendered. The contents of the cart must be retrieved on the client, as it is tied to the specific user.
Instead of props, we’ll make extensive use of state to populate the page with the user’s cart details. This will allow us to update the state when the cart contents are retrieved and as the user interacts with the page to modify or remove items from their cart. Let’s begin by creating the structure for our component and setting the state variables we’ll need.
Listing 5.8 Creating the initial cart page in /pages/cart.js
import { useState, useEffect } from "react";
import Nav from "../components/nav";
import commerce from "../lib/commerce";

export default function ShoppingCart() {
  const [items, setItems] = useState([]);
  const [subtotal, setSubtotal] = useState({});
  const [total, setTotal] = useState({});
  const [checkoutURL, setCheckoutURL] = useState("");

  return (

  );
}
Next, let’s populate the return().The contents of our return()as it creates the shopping cart by looping through the items array that will contain our cart items and populating the remaining pieces of the output with other state variables are shown. Please note this leaves out some portions for readability purposes (denoted by a “...”). You can find the full code in the GitHub repository (http://mng.bz/8lRB).
Listing 5.9 The contents of the render() method in /pages/cart.js
return (
  <div>
    <Nav />
    <div className="container mx-auto mt-10">
      <div className="flex shadow-md my-10">
        <div className="w-3/4 bg-white px-10 py-10">
          ...
          {items.map((item, index) => (
            <div ... key={index}
            >
              <div className="flex w-2/5">
                <div className="w-20">
                  <img className="h-24" src={item.media.source} alt="" />
                </div>
                <div className="...">
                  <span className="font-bold text-sm">
                    {item.product_name}
                  </span>
                    <a href="#" ...>Remove</a>
                </div>
              </div>
              <div className="flex justify-center w-1/5">
                <button>...</button>
                <input className="..." type="text" value={item.quantity} />
                <button>...</button>
              </div>
              <span className="text-center w-1/5 font-semibold text-sm">
                {item.price.formatted_with_symbol}
              </span>
              <span className="text-center w-1/5 font-semibold text-sm">
                {item.line_total.formatted_with_symbol}
              </span>
            </div>
          ))}
        ...

        <div id="summary" className="w-1/4 px-8 py-10">
          <h1 className="...">Order Summary</h1>
          <div className="flex justify-between mt-10 mb-5">
            <span className="...">{items.length} items</span>
            <span className="font-semibold text-sm">
              {subtotal.formatted_with_symbol &&
                subtotal.formatted_with_symbol}
            </span>
          </div>
          <div className="border-t mt-8">
            <div ...>
              <span>Total cost</span>
              <span>
                {total.formatted_with_symbol && total.formatted_with_symbol}
              </span>
            </div>
            <button ...>Checkout</button>
          </div>
        </div>
      </div>
    </div>
  </div>
);
We’ve set up the layout and the necessary state variables, but if you browse to the cart by clicking the My Cart navigation button, you’ll see that the page has no contents—even if you have items in your cart (figure 5.8).

Figure 5.8 The statically prerendered cart page has no details. These must be loaded for each user via the browser.
What we need to do next is load the contents of a user’s cart from Commerce.js when the page is ready. For this, we’ll use the useEffect() hook, which tells React to perform some action after the render is complete.
Our useEffect() hook will call Commerce.js to get the user’s cart and then update the component state variables to populate the page with the user’s cart items and quantities. We’ve placed this code in a separate method contained within the hook because we need to call it asynchronously. (This is because asynchronous methods always return a promise, but useEffect() can only return a function, thus we cannot make useEffect() asynchronous.) Let’s place this directly above the return:
useEffect(() => {
  async function fetchCart() {
    let cart = await commerce.cart.retrieve();
    console.log(cart);
    setItems(cart.line_items);
    setSubtotal(cart.subtotal);
    setTotal(cart.subtotal);
    setCheckoutURL(cart.hosted_checkout_url);
  }
  fetchCart();
}, []);
When the page reloads, you should now see the items you’ve added to your cart listed (figure 5.9).

Figure 5.9 The contents of the cart are loaded on the client using the useEffect() hook and populated on the page.
So far so good, but the user is unable to add or subtract (and ultimately remove) items from the cart. Let’s add a method right above our useEffect() method to handle that. This method will call Commerce.js to update the quantity and then update the relevant state variables:
const handleUpdateQuantity = async (id, quantity) => {
  let res = await commerce.cart.update(id, { quantity: quantity });
  let items = res.cart.line_items;
  setItems(items);
  setSubtotal(res.cart.subtotal);
  setTotal(res.cart.subtotal);
};
Our handleUpdateQuantity method will handle adding, subtracting, or even manually supplying the quantity. First, call it from the Remove link. Removing it is simply a matter of setting the quantity to zero:
<a
  href="#"
  onClick={() => handleUpdateQuantity(item.id, 0)}
  className="..."
>
  Remove
</a>
Next, we’ll add it to the subtract button by subtracting one from the current quantity:
<button
  onClick={() =>
    handleUpdateQuantity(item.id, item.quantity - 1)
  }
>
Finally, add it to the plus button by adding one to the current quantity:
<button
  onClick={() =>
    handleUpdateQuantity(item.id, item.quantity + 1)
  }
>
We have to handle the input field that allows a user to manually specify a new quantity differently. We need a method that will be called when the value is changed and, if the value provided is a number, update the quantity. This method can go under the handleUpdateQuantity() method:
const handleQuantityChange = (id, e) => {
  const quant = parseInt(e.target.value.trim());
  if (!isNaN(quant)) handleUpdateQuantity(id, e.target.value.trim());
};
We’ll need to call the method when the user changes the value in the text box by adding an onChange event handler to the input field:
<input
    className="mx-2 border text-center w-8"
    type="text"
    value={item.quantity}
    onChange={(e) => handleQuantityChange(item.id, e)}
/>
You should now be able to increase, decrease, remove, and update the inventory of any item in your cart.
The last thing we need to do is enable the checkout process. Commerce.js offers the ability to use a hosted checkout option. This means that when a user clicks the Checkout button, they will be guided through the process on Commerce.js rather than through a customized checkout. Of course, should you want to, you can create a custom checkout, but, for the sake of simplicity, we’re going to use the hosted option.
To do this, all we need is one simple handler function that we can place under the handleQuantityChange() method. This method simply opens a new window using the checkout URL that Commerce.js provides:
const handleCheckout = () => {
  // for now we're just opening a new window to the hosted checkout
  window.open(checkoutURL);
};
Then we need add the click event to the Checkout button so that it triggers that method when the button is clicked:
<button
  onClick={handleCheckout}
  className="..."
>
    Checkout
</button>
Clicking the Checkout button will now open a new tab with the hosted checkout on Commerce.js (figure 5.10).

Figure 5.10 Our e-commerce store uses a hosted checkout on Commerce.js rather than a customized checkout.
5.4.6 Adding Markdown content
Our e-commerce experience is complete, but we still have one final touch to put on our site: the About page that will be driven by file-based Markdown content. Next.js does not have Markdown support built in, but it’s relatively easy to add. Let’s see how.
We’re going to need three npm plug-ins to enable this support:
-
raw-loader—This package will enable us to import the raw Markdown files as strings within our Webpack configuration.
-
gray-matter—Our Markdown files will contain front matter metadata. This library will allow us to easily parse that metadata.
-
react-markdown—As we’ve discussed, React applications use a virtual DOM, and this library will render the Markdown within React’s virtual DOM, meaning that React will be able to properly update only the changed DOM elements.
If you’re still running your local site, you’ll need to stop it first. Next, install all three libraries:
yarn add raw-loader gray-matter react-markdown
Let’s use raw-loader first. To do this, we need to edit the Webpack configuration of our Next.js site. Webpack is a popular module bundler for building web apps that Next.js uses to bundle its JavaScript files for the browser. To edit the Webpack configuration, open next.config.js and add a new rule that looks for files with the .md extension and loads them with the raw-loader.
Listing 5.10 The Next.js configuration file at next.config.js to load Markdown files
module.exports = {
  env: {
    CHEC_PUBLIC_KEY: process.env.CHEC_PUBLIC_KEY,
  },
  webpack: function (config) {
    config.module.rules.push({
      test: /.md$/,
      use: 'raw-loader',
    });
    return config;
  },
};
Create a new file at /pages/about.js for our About page. Within the getStaticProps() method, we can use the filesystem to load the raw Markdown file from /content/ about.md. We’ll then use the gray-matter library to read raw Markdown and separate the front matter metadata from the content. We’ll pass the front matter and Markdown content as props to the page, where ReactMarkdown is used to render the Markdown as React components.
Listing 5.11 The About page that loads Markdown content at /pages/about.js
import fs from 'fs';
import Nav from '../components/nav';
import matter from 'gray-matter';
import ReactMarkdown from 'react-markdown';

export default function About({ frontmatter, content }) {
  return (
    <div>
      <Nav />
      <div className="content container px-5 py-24 mx-auto">
        <h1>{frontmatter.title}</h1>
        <ReactMarkdown children={content} />
      </div>
    </div>
  );
}

export async function getStaticProps() {
  const file = fs.readFileSync(`${process.cwd()}/content/about.md`, 'utf8');
  const data = matter(file);

  return {
    props: {
      frontmatter: data.data,
      content: data.content,
    },
  };
}
As you may have guessed from the code, before this page will work, we need to create a Markdown file at /content/about.md. Placing content files in a /content folder is a typical structure of Next.js sites that load Markdown content. My about.md file is pretty simple, but feel free to experiment by adding more Markdown markup of your own:
---
title: About the Jam Store
---

The Jam Store is built with:
* Next.js
* Commerce.js.
Let’s restart our local site using yarn dev and see our About page by clicking on the About navigation item (figure 5.11).

Figure 5.11 Our About page renders a title and body of the page from a combination of Markdown front matter and Markdown markup in the about.md file.
5.5 What’s next?
We now have a fully functional e-commerce site, but there are a number of ways we can continue to improve it. The first and probably most obvious is to build the checkout process as custom rather than utilize the hosted checkout. We also never tackled issues such as discounts, sales tax, and shipping. These are things that can be managed and customized via the Commerce.js dashboard and then integrated into the site.
An e-commerce site has a lot of potential complexity that we don’t have space to cover here. We chose to use Commerce.js as an API-based headless CMS in part because it helps illustrate many of the requirements for building a site with Next.js. However, one of the biggest decisions you’ll make when building your own Jamstack e-commerce site is how much to favor the granular customizability of an API-based tool like Commerce.js over an add-on solution such as Snipcart that is faster to implement. There’s no correct answer; it all depends on the requirements of your site.
Summary
-
The dynamic user interface requirements of an e-commerce site make a perfect fit for the JavaScript-framework-based SSGs. JavaScript frameworks like React come with tools that make it easier to dynamically update the DOM in the browser, which can help you build highly dynamic page components like a shopping cart.
-
A headless e-commerce system provides the backend to a Jamstack e-commerce site. There are three types of headless e-commerce systems:
-
All-in-one solutions are typically used for building both the frontend and backend of an e-commerce site, but generally provide headless options.
-
An add-on solution is designed to be easy to implement by providing both the UI and management for the entire cart and the checkout process.
-
An API-based solution allows granular customization by accessing all of its data and management capabilities via an API, but it requires more code to implement.
-
-
Next.js is a React-based meta framework that provides tools for building either server-side rendering or static prerendering—or even a combination of both. Next.js makes it relatively simple to integrate with external API-based data sources like Commerce.js using built-in functions like getStaticPaths() and getStaticProps().
-
Next.js doesn’t have built-in support for loading Markdown content, but it can be achieved through the use of multiple npm libraries. The raw-loader library provides the ability to import raw text files via Webpack. The gray-matter library reads the front matter metadata from a Markdown file. Finally, the react-markdown component renders Markdown within the React virtual DOM.