Overview
In modern software development, most logic is served through distinct web services. This is essential to be able to both call and make new web services as a developer.
In this chapter, you will be creating your own RESTful web service using the ASP.NET Core Web API template. You will learn not only how to do it but also some of the best practices for designing and building a Web API. You will also learn how to protect an API using Azure Active Directory (AAD), centralize error handling, troubleshoot errors, generate documentation, and more.
By the end of this chapter, you will be able to create professional Web APIs that are secured with AAD, hosted on the cloud, scalable, and able to serve thousands of users.
Introduction
ASP.NET Core is a part of the .NET Core framework that is targeted at creating web apps. Using it, you can create both frontend (such as Razor or Blazor) and backend (such as Web API or gRPC) applications. However, in this chapter, you will be focusing on creating RESTful Web APIs. Creating a new web service for the first time might sound like a daunting task, but don't worry too much; for most scenarios, there is a template to get you started. In this chapter, you will create a few Web APIs using ASP.NET Core 6.0.
ASP.NET Core Web API
In Chapter 8, Creating and Using Web API Clients, you learned how to call RESTful APIs. In this chapter, you will be making one. Web API is a template for creating RESTful Web APIs in .NET. It contains routing, Dependency Injection (DI), an example controller, logging, and other useful components to get you started.
Creating a New Project
In order to create a new Web API, follow these steps:
- Create a new directory.
- Name it after a project you want to create.
- Navigate to that directory using the cd command.
- Execute the following at the command line:
dotnet new webapi
That is all it takes to get started.
- To see whether this is executing as expected, run the following and see your application come to life (Figure 9.1):
dotnet run --urls=https://localhost:7021/

Figure 9.1: Terminal window showing the port the application is hosted on
In Figure 9.1, you will see port 7021 for the https version of the application. There may be multiple ports, especially if you are hosting both HTTP and HTTPs versions of an application. However, the key thing to remember is that you can the port where an application runs (for example, through the command line).
A port is a channel through which you allow a certain application to be called by all other applications. It is a number that appears after a base URL and it allows a single application through. Those applications don't have to be outsiders; the same rules also apply to internal communication.
Localhost refers to an application hosted locally. Later in this chapter, you will configure the service to bind to whatever port you want.
Note
There are 65,535 ports available on a single machine. Ports zero through 1023 are called well-known ports because usually, the same parts of the system listen on them. Typically, if a single application is hosted on one machine, the port will be 80 for http and 443 for https. If you are hosting multiple applications, the ports will vary drastically (usually starting from port 1024).
Web API Project Structure
Every Web API is made of at least two classes—Program and one or more controllers (WeatherForecastController in this case):
- Program: This is the starting point of an application. It serves as a low-level runner of an application and manages dependencies.
- Controller: This is a REST API endpoint in .NET. It usually follows a pattern of [Model]Controller. In this example case, WeatherForecastController will be called using a /weatherforecast endpoint.

Figure 9.2: The newly created MyProject structure in VS Code with key parts highlighted
An In-Depth Look at WeatherForecastController
The controller from the default template is preceded by two attributes:
- [ApiController]: This attribute adds common, convenient (yet opinionated) Web API functionality.
- [Route("[controller]")]: This attribute is used to provide a routing pattern of a given controller.
For example, in cases where these attributes are absent or the request is complex, you would need to validate an incoming HTTP request yourself without routing out of the box:
[ApiController]
[Route("[controller]")]
public class WeatherForecastController : ControllerBase
{
This controller has /WeatherForecast as the route. The route is usually made of the word that precedes the word Controller unless specified otherwise. When developing APIs professionally, or when you have a client- and server-side application, it is recommended to preappend /api to the route, making it [Route("api/[controller]")].
Next, you'll learn about the controller class declaration. Common controller functions come from a derived ControllerBase class and a few components (usually a logger) and services. The only interesting bit here is that, instead of Ilogger, you use ILogger<WeatherForecastController>:
private readonly ILogger<WeatherForecastController> _logger;
public WeatherForecastController(ILogger<WeatherForecastController> logger)
{
_logger = logger;
}
The reason behind using the generic part is solely for getting the context from the place where the log was called. Using a generic version of a logger, you use a fully qualified name of a class that is supplied as a generic argument. Calling logger.Log will prefix it with a context; in this case, it will be Chapter09.Service.Controllers.WeatherForecastController[0].
Lastly, look at the following controller method:
[HttpGet]
public IEnumerable<WeatherForecast> Get()
{
return new List<WeatherForecast>(){new WeatherForecast()};
}
}
The [HttpGet] attribute binds the Get method with the root controller endpoint's (/WeatherForecast) HTTP GET method. There is a version of that attribute for every HTTP method, and they are HttpGet, HttpPost, HttpPatch, HttpPut, and HttpDelete. To check whether the service works, run the application using the following command:
dotnet run --urls=https://localhost:7021/
Here, the -urls=https://localhost:7021/ argument is not a requirement. This argument simply makes sure that the port picked by .NET is the same as is indicated in this example during execution.
To see the output, navigate to https://localhost:7021/weatherforecast/ in the browser. This will return a single default WeatherForecast upon calling HTTP GET:
[{"date":"0001-01-01T00:00:00","temperatureC":0,"temperatureF":32,"summary":null}].
Note
When https://localhost:7021/weatherforecast/ displays an error message (localhost refused to connect), it means that the application is likely running, but on a different port. So, always remember to specify a port as described in the Creating a New Project section (Step 5).
Responding with Different Status Codes
Find out what status codes can public IEnumerable<WeatherForecast> Get() respond with. Using the following steps, you can play around with it and inspect what happens in the browser:
- Navigate to https://localhost:7021/weatherforecast/ in the browser.
- Click on More tools.
- Select the Developer tools option. Alternatively, you can use the F12 key to launch the developer tools.
- Next, click on the Network tab.
- Click on the Headers tab. You will see that https://localhost:7021/weatherforecast/ responds with 200 Status Code:

Figure 9.3: Dev tools Network tab—inspecting response headers of a successful response
- Create a new endpoint called GetError that throws an exception if a rare circumstance arises while a program is running:
[HttpGet("error")]
public IEnumerable<WeatherForecast> GetError()
{
throw new Exception("Something went wrong");
}
- Now, call https://localhost:7021/weatherforecast/error. It responds with a status code of 500:

Figure 9.4: Dev tools Network tab—inspecting a response with an exception
What should you do if you want a different status code to be returned? For that, the BaseController class contains utility methods for returning any kind of status code you require. For example, if you wanted to explicitly return an OK response, instead of returning a value right away, you could return Ok(value). However, if you try changing the code, you will get the following error:
Cannot implicitly convert type 'Microsoft.AspNetCore.Mvc.OkObjectResult' to 'Chapter09.Service.Models.WeatherForecast'
This does not work because you do not return an HTTP status code from a controller; you either return some value or throw some error. To return any status code of your choice, you need to change the return type. For that reason, a controller should never have a return type of some value. It should always return the IActionResult type—a type that supports all status codes.
Create one more method for getting the weather for any day of the week. If the day is not found (a value less than 1 or more than 7), you will explicitly return 404 – not found:
[HttpGet("weekday/{day}")]
public IActionResult GetWeekday(int day)
{
if (day < 1 || day > 7)
{
return NotFound($"'{day}' is not a valid day of a week.");
}
return Ok(new WeatherForecast());
}
Here, you added one new {day} at the end of the endpoint. This is a placeholder value, which comes from a matching function argument (in this case, day). Rerunning the service and navigating to https://localhost:7021/weatherforecast/weekday/8 will result in a 404 – not found status code because it is more than the max allowed day value, which is 7:
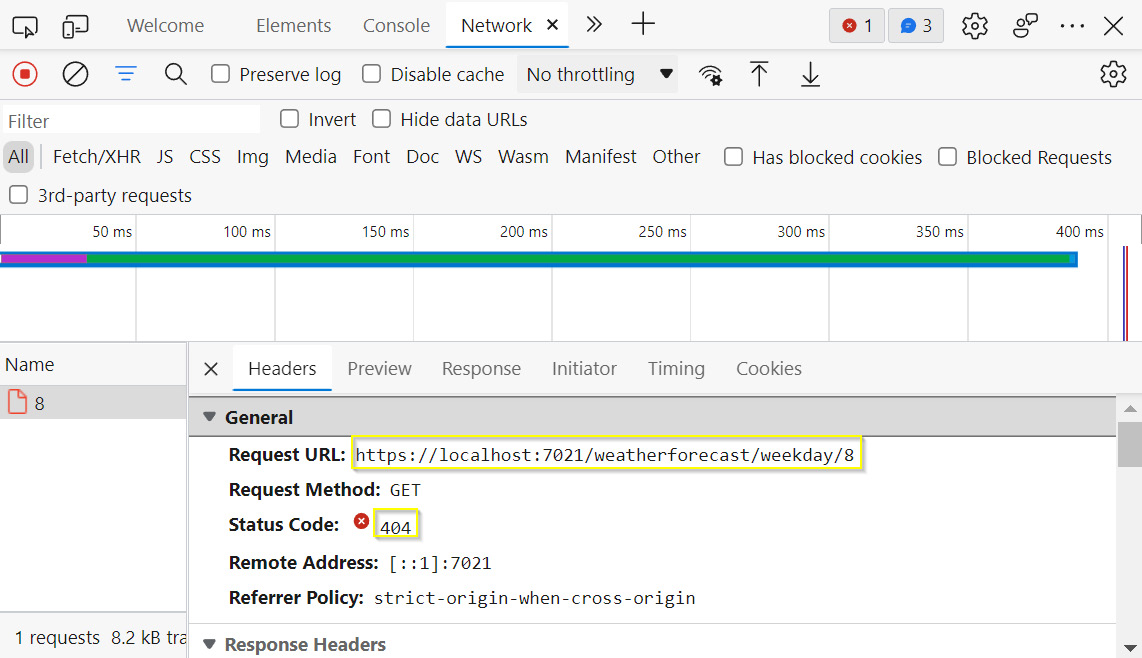
Figure 9.5: The response to finding a weather forecast for a non-existent day of the week
Note
You can find the code used for this example at https://packt.link/SCudR.
This concludes the theoretical portion of this topic. In the following section, you will put this into practice with an exercise.
Exercise 9.01: .NET Core Current Time Service
Once you have managed to run a Web API once, adding new controllers should be trivial. Often, whether a service is running or not, it is checked using the most basic logic; whether it is returning OK or getting the current DateTime value. In this exercise, you will create a simple current time service returning the current time in ISO standard. Perform the following steps to do so:
- Create a new controller called TimeController to get the local time and further add functions for testing purposes:
[ApiController]
[Route("[controller]")]
public class TimeController : ControllerBase
{
The controller shown here isn't just for testing; it acts as business logic too.
- Add an endpoint for HTTP GET called GetCurrentTime that points to the time/current route. You will use it to get the current time:
[HttpGet("current")]
public IActionResult GetCurrentTime()
{
- Return the current DateTime converted to a string in ISO format:
return Ok(DateTime.Now.ToString("o"));
}
}
- Navigate to https://localhost:7021/time/current and you should see the following response:
2022-07-30T15:06:28.4924356+03:00
As mentioned in the Web API Project Structure section, you can use the endpoint to determine whether a service is running or not. If it is running, then you will get the DateTime value, which you saw in the preceding output. If it is not running, then you would get a response with a status code of 404 – not found. If it is running but with problems, then you would get the 500 status code.
Note
You can find the code used for this exercise at https://packt.link/OzaTd.
So far, all your focus was on a controller. It's time you shift your attention to another crucial part of a Web API—the Program class.
Bootstrapping a Web API
The Program class wires up the whole API together. In layman's terms, you register the implementations for all the abstractions used by controllers and add all the necessary middleware.
Dependency Injection
In Chapter 2, Building Quality Object-Oriented Code, you explored the concept of DI. In Chapter 7, Creating Modern Web Applications with ASP.NET, you had a look at an example of DI for logging services. In this chapter, you will get hands-on experience in DI and the Inversion of Control (IoC) container—a component used to wire up and resolve all the dependencies in a central place. In .NET Core and later, the default container is Microsoft.Extensions.DependencyInjection. You will learn more about that a bit later.
Program.cs and Minimal API
The simplest Web API in .NET 6 looks like this:
var builder = WebApplication.CreateBuilder(args);
builder.Services.AddControllers();
// Add middleware
var app = builder.Build();
if (builder.Environment.IsDevelopment())
{
app.UseDeveloperExceptionPage();
}
app.MapControllers();
app.Run();
This is a minimal API because it makes use of the top-level statements feature. Prior to .NET 6, you would have two methods within a Startup class (Configure and ConfigureService) and a Program class. Now you have a single file, Program.cs, and no classes or methods. You can still use the old way of starting an application. In fact, .NET 6 will generate similar classes under the hood. However, if you are making a new app in .NET 6, then using a minimal API should be preferred.
Break down the preceding code snippet. To start the application, you first need to build it. So, you will create a builder using the following line of code:
var builder = WebApplication.CreateBuilder(args);
builder.Services specifies which services are to be injected. In this case, you registered the implementation of the controllers. So, here you have just one controller calling—that is, WeatherForecastController:
builder.Services.AddControllers();
When you use builder.Build(), you can access the app object and further configure the application by adding middleware. For example, to add controller routing, call the following:
app.MapControllers();
Lastly, builder.Environment.IsDevelopment() checks whether the environment is developed. If it is developed, it calls app.UseDeveloperExceptionPage();, which adds detailed errors when something fails.
Logging is not mentioned anywhere; yet you still use it. A common pattern is to group all the related injections under the same extension method for IServiceCollection. An example of an extension method for all the controller-related functionality, including logging, is the AddControllers method.
You already saw the logging messages sent through the console logger right after you ran the API. Under the hood, the builder.Services.AddLogging method is called. This method clears all the logging providers:
builder.Services.AddLogging(builder =>
{
builder.ClearProviders();
});
If you run the application now, you will not see anything appear in the console (Figure 9.6):

Figure 9.6: Running an application with no logs displayed
However, if you modify AddLogging to include Console and Debug logging in the following way, you will see the logs as in Figure 9.7:
builder.Services.AddLogging(builder =>
{
builder.ClearProviders();
builder.AddConsole();
builder.AddDebug();
});
Now, add an error logging functionality to the error endpoint of WeatherForecastController. This will throw an exception when a rare circumstance arises while a program is running:
[HttpGet("error")]
public IEnumerable<WeatherForecast> GetError()
{
_logger.LogError("Whoops");
throw new Exception("Something went wrong");
}
Restart the API with the following command:
dotnet run --urls=https://localhost:7021/
Now, call https://localhost:7021/weatherforecast/error and this will show the logged message (compare Figure 9.6 and Figure 9.7):

Figure 9.7: The error message, Whoops, displayed on the terminal
The Inner Workings of the AddLogging Method
How does the AddLogging method work? The decompiled code of the AddLogging method looks like this:
services.AddSingleton<ILoggerFactory, LoggerFactory>();
It is best practice not to initialize loggers by yourself. ILoggerFactory provides that functionality as a single place from which you may create loggers. While ILoggerFactory is an interface, LoggerFactory is an implementation of that interface. AddSingleton is a method that specifies that a single instance of LoggerFactory will be created and used whenever ILoggerFactory is referenced.
Now the question arises: why wasn't ILoggerFactory used in a controller? ILoggerFactory is used under the hood when resolving an implementation of a controller. When exposing a controller dependency such as a logger, you no longer need to care about how it gets initialized. This is a great benefit because it makes the class holding a dependency both more simple and more flexible.
If you do want to use ILoggerFactory instead of Ilogger, you could have a constructor accepting the factory, as follows:
public WeatherForecastController(ILoggerFactory logger)
You can then use it to create a logger, as follows:
_logger = logger.CreateLogger(typeof(WeatherForecastController).FullName);
This latter logger functions the same as the former.
This section dealt with the AddSingleton method for managing service dependencies in a central place. Proceed to the next section to solve dependency complexities with DI.
The Lifetime of an Injected Component
The AddSingleton method is useful because complex applications have hundreds, if not thousands, of dependencies often shared across different components. It would be quite a challenge to manage the initialization of each. DI solves that problem by providing a central place for managing dependencies and their lifetimes. Before proceeding further, you'll need to learn more about DI lifetimes.
There are three injected object lifetimes in .NET:
- Singleton: Object initialized once per application lifetime
- Scoped: Object initialized once per request
- Transient: Object initialized every time it is referenced
To better illustrate DI and different service lifetimes, the next section will refactor the existing WeatherForecastController code.
DI Examples within a Service
A service is a holder for logic at the highest level. By itself, a controller should not do any business logic and just delegate a request to some other object that is able to handle it. Apply this principle and refactor the GetWeekday method using DI.
First, create an interface for the service to which you will move all the logic. This is done to create an abstraction for which you will later provide an implementation. An abstraction is needed because you want to move out as much logic as possible from the controller into other components:
public interface IWeatherForecastService
{
WeatherForecast GetWeekday(int day);
}
As you move a portion away from a controller, you would like to handle error scenarios as well. In this case, if a provided day is not between 1 and 7, you will return a 404 – not found error. However, at the service level, there is no concept of HTTP status codes. Therefore, instead of returning an HTTP message, you will be throwing an exception. For the exception to be handled properly, you will create a custom exception called NoSuchWeekdayException:
public class NoSuchWeekdayException : Exception
{
public NoSuchWeekdayException(int day)
: base($"'{day}' is not a valid day of a week.") { }
}
Next, create a class that implements the service. You will move your code here:
public class WeatherForecastService : IWeatherForecastService
{
public WeatherForecast GetWeekday(int day)
{
if (day < 1 || day > 7)
{
throw new NoSuchWeekdayException(day);
}
return new WeatherForecast();
}
}
The only difference here as compared to the previous code is that, instead of returning NotFound, you have used throw new NoSuchWeekdayException.
Now, inject the service into a controller:
private readonly IWeatherForecastService _weatherForecastService;
private readonly Ilogger _logger;
public WeatherForecastController(IloggerFactory logger, IWeatherForecastService weatherForecastService)
{
_weatherForecastService = weatherForecastService;
_logger = logger.CreateLogger(typeof(WeatherForecastController).FullName);
}
The cleaned-up controller method, in the Responding with Different Status Codes section, with minimum business logic, now looks like this:
public IActionResult GetWeekday(int day)
{
{
var result = _weatherForecastService.GetWeekday(day);
return Ok(result);
}
catch(NoSuchWeekdayException exception)
{
return NotFound(exception.Message);
}
}
It might still seem like the same code; however, the key point here is that the controller no longer does any business logic. It simply maps results from the service back to an HTTP response.
Note
In the Error Handling section, you will return to this and further remove code from the controller, making it as light as possible.
If you run this code, you would get the following exception when calling any of the controller's endpoints:
Unable to resolve service for type 'Chapter09.Service.Examples.TemplateApi.Services.IweatherForecastService' while attempting to activate 'Chapter09.Service.Examples.TemplateApi.Controllers.WeatherForecastController'
This exception shows that there is no way that WeatherForecastController can figure out the implementation for IWeatherForecastService. So, you need to specify which implementation fits the needed abstraction. For example, this is done inside the Program class as follows:
builder.Services.AddSingleton<IWeatherForecastService, WeatherForecastService>();
The AddSingleton method reads this as for the abstraction of IWeatherForecastService, register the WeatherForecastService implementation. In the following paragraphs, you will learn how exactly it works.
Now that you have a service to be injected, you can explore what effect each injection has on service calls when calling the following controller method. For that point, you will slightly modify WeatherForecastService and WeatherForecastController.
Within WeatherForecastService, do the following:
- Inject a logger:
private readonly ILogger<WeatherForecastService> _logger;
public WeatherForecastService(ILogger<WeatherForecastService> logger)
{
_logger = logger;
}
- When the service is initialized, log a random Guid that changes the constructor to look like this:
public WeatherForecastService(ILogger<WeatherForecastService> logger)
{
_logger = logger;
_logger.LogInformation(Guid.NewGuid().ToString());
}
Within WeatherForecastController, do the following:
- Inject the second instance of WeatherForecastService:
public class WeatherForecastController : ControllerBase
{
private readonly IWeatherForecastService _weatherForecastService1;
private readonly IWeatherForecastService _weatherForecastService2;
private readonly ILogger _logger;
public WeatherForecastController(ILoggerFactory logger, IWeatherForecastService weatherForecastService1, IWeatherForecastService weatherForecastService2)
{
_weatherForecastService1 = weatherForecastService1;
_weatherForecastService2 = weatherForecastService2;
_logger = logger.CreateLogger(typeof(WeatherForecastController).FullName);
}
- Call both instances when getting a weekday:
[HttpGet("weekday/{day}")]
public IActionResult GetWeekday(int day)
{
try
{
var result = _weatherForecastService1.GetWeekday(day);
result = _weatherForecastService1.GetWeekday(day);
return Ok(result);
}
catch (NoSuchWeekdayException exception)
{
return NotFound(exception.Message);
}
}
The GetWeekday method is called twice because it will help illustrate DI lifetimes better. Now it is time to explore different DI lifetimes.
Singleton
Register the service as a singleton in Program.cs in the following way:
builder.Services.AddSingleton<IWeatherForecastService, WeatherForecastService>();
After calling the application, you will see the following logs generated while running the code:
info: Chapter09.Service.Services.WeatherForecastService[0]
2b0c4e0c-97ff-4472-862a-b6326992d9a6
info: Chapter09.Service.Services.WeatherForecastService[0]
2b0c4e0c-97ff-4472-862a-b6326992d9a6
If you call the application again, you will see the same GUID logged:
info: Chapter09.Service.Services.WeatherForecastService[0]
2b0c4e0c-97ff-4472-862a-b6326992d9a6
info: Chapter09.Service.Services.WeatherForecastService[0]
2b0c4e0c-97ff-4472-862a-b6326992d9a6
This proves that the service was initialized only once.
Scoped
Register the service as scoped in Program.cs in the following way:
builder.Services.AddScoped<IWeatherForecastService, WeatherForecastService>();
After calling the application, you will see the following logs generated while running the code:
info: Chapter09.Service.Services.WeatherForecastService[0]
921a29e8-8f39-4651-9ffa-2e83d2289f29
info: Chapter09.Service.Services.WeatherForecastService[0]
921a29e8-8f39-4651-9ffa-2e83d2289f29
On calling WeatherForecastService again, you will see the following:
info: Chapter09.Service.Services.WeatherForecastService[0]
974e082d-1ff5-4727-93dc-fde9f61d3762
info: Chapter09.Service.Services.WeatherForecastService[0]
974e082d-1ff5-4727-93dc-fde9f61d3762
This is a different GUID that has been logged. This proves that the service was initialized once per request, but a new instance was initialized on a new request.
Transient
Register the service as transient in Program.cs in the following way:
builder.Services.AddTransient<IWeatherForecastService, WeatherForecastService>();
After calling the application, you should see the following in the logs generated while running the code:
info: Chapter09.Service.Services.WeatherForecastService[0]
6335a0aa-f565-4673-a5c4-0590a5d0aead
info: Chapter09.Service.Services.WeatherForecastService[0]
4074f4d3-5e50-4748-9d6f-15fb6a782000
That there are two different GUIDs logged proves that both services were initialized using different instances. It is possible to use DI and IoC outside of the Web API. DI through IoC is just another library with a few extras given by the Web API template.
Note
If you want to use IoC outside of ASP.NET Core, install the following NuGet (or other IoC container): Microsoft.Extensions.DependencyInjection.
TryAdd
So far, you have wired implementations to their abstractions using an Add[Lifetime] function. However, that is not the best practice in most cases. Usually, you'll want a single implementation to be wired for a single abstraction. However, if you repeatedly call Add[Lifetime], for example, the AddSingleton function, you will create a collection of implementing instances (duplicates) underneath. This is rarely the intention and therefore you should protect yourself against that.
The cleanest way to wire dependencies is through the TryAdd[Lifetime] method. In the case of a duplicate dependency, it will simply not add a duplicate. To illustrate the difference between the two versions of DIs, compare the injected service counts using different methods. Here, you will inject two identical services as a singleton.
Here you are using the Add[Lifetime] service as a singleton:
builder.Services.AddSingleton<IWeatherForecastService, WeatherForecastService>();
Debug.WriteLine("Services count: " + services.Count);
builder.services.AddSingleton<IWeatherForecastService, WeatherForecastService>();
Debug.WriteLine("Services count: " + services.Count);
The command will display the following output:
Services count: 156
Services count: 157
Here you are using the TryAdd[Lifetime] service as a singleton:
builder.Services.TryAddSingleton<IWeatherForecastService, WeatherForecastService>();
Debug.WriteLine("Services count: " + services.Count);
builder.Services.TryAddSingleton<IWeatherForecastService, WeatherForecastService>();
Debug.WriteLine("Services count: " + services.Count);
The command will display the following output:
Services count: 156
Services count: 156
Observe that Add[Lifetime] added a duplicate in the output, while TryAdd[Lifetime] did not. Since you don't want duplicate dependencies, it's recommended that you use the TryAdd[Lifetime] version.
You can do an injection for a concrete class as well. Calling builder.Services.AddSingleton<WeatherForecastService, WeatherForecastService>(); is a valid C# code; however, it does not make much sense. DI is used to inject an implementation into an abstraction. This will not work when bootstrapping the service because the following error will be displayed:
Unable to resolve a controller
The error occurs because there is still an abstraction-implementation binding to be provided. It would only work if a concrete implementation, rather than an abstraction, were exposed in the constructor of the controller. In practice, this scenario is rarely used.
You have learned that the cleanest way of wiring dependencies is through the TryAdd[Lifetime] method. You will now create a service that accepts primitive arguments (int and string) and see how it manages its non-primitive dependencies in an IoC container.
Manual Injection Using an IoC Container
There are scenarios in which you will need to create an instance of a service before injecting it. An example use case could be a service with primitive arguments in a constructor, in other words, a weather forecast service for a specific city with a configured interval for forecast refreshes. So, here, you cannot inject a string or an integer, but you can create a service with an integer and a string and inject that instead.
Modify WeatherForecastService with the said features:
public class WeatherForecastServiceV2 : IWeatherForecastService
{
private readonly string _city;
private readonly int _refreshInterval;
public WeatherForecastService(string city, int refreshInterval)
{
_city = city;
_refreshInterval = refreshInterval;
}
Return to the Program class and try to inject a service for New York with a refresh interval of 5 (hours):
builder.Services.AddSingleton<IWeatherForecastService, WeatherForecastService>(BuildWeatherForecastService);
static WeatherForecastServiceV2 BuildWeatherForecastService(IServiceProvider _)
{
return new WeatherForecastServiceV2("New York", 5);
}
In order to inject the service, as always, you use a version of the builder.Services.Add[Lifetime] method. However, on top of that, you provided an argument—a delegate specifying how a service should be created. The service provider can be accessed by calling the BuildServices method on IServiceCollection. This delegate takes IServiceProvider as input and uses it to build a new service.
In this case, you did not use it and thus named the argument after the discard operator (_). The remaining contents of the function are just a simple return with the values from the previous paragraph (for brevity, you will not add any extra logic to use the new values). If you had a more complex service, for example, a service that requires another service, you could call the .GetService<ServiceType> method from IServiceProvider.
Build and Create are two common method names. However, they should not be used interchangeably. Use Build when building a single dedicated object, while Create is used when the intention is to produce many objects of diverse types.
Note
You can find the code used for this example at https://packt.link/fBFRQ.
Exercise 9.02: Displaying Current Time in a Country API Time Zone
In this exercise, you are tasked with creating a Web API that provides the date and time at different time zones of UTC. Through a URL, you will pass a number between -12 and +12 and return the time in that time zone.
Perform the following steps:
- Create an interface called ICurrentTimeProvider with a method called DateTime GetTime(string timezone):
public interface ICurrentTimeProvider
{
DateTime GetTime(string timezoneId);
}
- Create a class called CurrentTimeUtcProvider implementing ICurrentTimeProvider to implement the logic required for the application:
public class CurrentTimeUtcProvider : ICurrentTimeProvider
{
- Implement the method of converting the current DateTime to Utc and then offsetting that based on the time zone passed:
public DateTime GetTime(string timezoneId)
{
var timezoneInfo = TimeZoneInfo.FindSystemTimeZoneById(timezoneId);
var time = TimeZoneInfo.ConvertTimeFromUtc(DateTime.UtcNow, timezoneInfo);
return time;
}
}
- Create a CurrentTimeProviderController controller to make sure it accepts ICurrentTimeProvider in the constructor:
[ApiController]
[Route("[controller]")]
public class CurrentTimeController : ControllerBase
{
private readonly ICurrentTimeProvider _currentTimeProvider;
public CurrentTimeController(ICurrentTimeProvider currentTimeProvider)
{
_currentTimeProvider = currentTimeProvider;
}
- Create an HttpGet endpoint called IActionResult Get(string timezoneId), which calls the current time provider and returns the current time:
[HttpGet]
public IActionResult Get(string timezoneId)
{
var time = _currentTimeProvider.GetTime(timezoneId);
return Ok(time);
}
}
Please note that {timezoneId} is not specified in the HttpGet attribute. This is because the pattern is used for REST parts on an endpoint; however, in this scenario, it is passed as an argument of a query string. If a string contains whitespaces or other special characters, it should be encoded before being passed. You can URL-encode a string using this tool: https://meyerweb.com/eric/tools/dencoder/.
- In the Program class, inject the service:
builder.Services.AddSingleton<ICurrentTimeProvider, CurrentTimeUtcProvider>();
Here, you injected the service as a singleton because it is stateless.
- Call the https://localhost:7021/CurrentTime?timezone=[yourtimezone] endpoint with a timezoneid value of your choice. For example, you can call the following endpoint: https://localhost:7021/CurrentTime?timezoneid=Central%20Europe%20Standard%20Time.
You will get the response showing the date and time at that time zone:
"2021-09-18T20:32:29.1619999"
Note
You can find the code used for this exercise at https://packt.link/iqGJL.
OpenAPI and Swagger
OpenAPI is a REST API description format. It is a specification of an API with the endpoints it has, the authentication methods it supports, the arguments it accepts, and the example requests and responses it informs. The REST API works with both JSON and XML formats; however, JSON is chosen frequently. Swagger is a collection of tools and libraries implementing the OpenAPI standard. Swagger generates two things:
- A web page to make calls to your API
- Generate client code
In .NET, there are two libraries for working with Swagger:
- NSwag
- Swashbuckle
Using Swagger Swashbuckle
In this section, you will use Swashbuckle to demonstrate one of many ways to test APIs and generate API documentation. So, install the Swashbuckle.AspNetCore package by running the following command:
dotnet add package Swashbuckle.AspNetCore
Just before the builder.Build() call, add the following line of code in Program.cs:
builder.Services.AddSwaggerGen();
This injects the Swagger services needed to generate the Swagger schema and the documentation test page.
After builder.Build() in Program.cs, add the following:
app.UseSwagger();
app.UseSwaggerUI(c => { c.SwaggerEndpoint("/swagger/v1/swagger.json", "My API V1"); });
The first line supports reaching the OpenAPI Swagger specification and the second one allows accessing the specification on a user-friendly web page.
Now, run the program as follows:
dotnet run --urls=https://localhost:7021/
When you navigate to https://localhost:7021/swagger/, you will see the following screen:

Figure 9.8: A user-friendly Swagger endpoint
Clicking on any of the endpoints will allow you to send an HTTP request to them. This page can be configured to include common information about the project, such as the contact information, licenses it is under, description, terms of services, and more.
The benefits of Swagger do not end here. If you had comments, you could include them on this page as well. You could also include all the possible response types that the endpoint produces. You can even include example requests and set them as defaults when calling an API.
Create a new endpoint to save a weather forecast and then another one to retrieve it. Document both the methods one by one. So, first, update the IWeatherForecastService interface to include the two new methods, GetWeekday and GetWeatherForecast, as follows:
public interface IWeatherForecastService
{
WeatherForecast GetWeekday(int day);
void SaveWeatherForecast(WeatherForecast forecast);
WeatherForecast GetWeatherForecast(DateTime date);
}
Next, add implementations of those methods to WeatherForecastService. To save the weather forecast, you will need storage, and the simplest storage would be IMemoryCache. Here, you will need a new field for IMemoryCache:
private readonly IMemoryCache _cache;
Now, update the constructor to inject IMemoryCache:
public WeatherForecastService(ILogger<WeatherForecastService> logger, string city, int refreshInterval, IMemoryCache cache)
{
_logger = logger;
_city = city;
_refreshInterval = refreshInterval;
_serviceIdentifier = Guid.NewGuid();
_cache = cache;
}
Then, create the SaveWeatherForecast method to save a weather forecast:
public void SaveWeatherForecast(WeatherForecast forecast)
{
_cache.Set(forecast.Date.ToShortDateString(), forecast);
}
Create a GetWeatherForecast method to get a weather forecast:
public WeatherForecast GetWeatherForecast(DateTime date)
{
var shortDateString = date.ToShortDateString();
var contains = _cache.TryGetValue(shortDateString, out var entry);
return !contains ? null : (WeatherForecast) entry;
}
Now, go back to WeatherForecastController and create an endpoint for each method so that you can test it using the HTTP requests:
public IActionResult GetWeatherForecast(DateTime date)
{
var weatherForecast = _weatherForecastService1.GetWeatherForecast(date);
if (weatherForecast == null) return NotFound();
return Ok(weatherForecast);
}
[HttpPost]
public IActionResult SaveWeatherForecast(WeatherForecast weatherForecast)
{
_weatherForecastService1.SaveWeatherForecast(weatherForecast);
return CreatedAtAction("GetWeatherForecast", new { date = weatherForecast.Date.ToShortDateString()}, weatherForecast);
}
Please note that when creating a new weather forecast, you return a CreatedAtAction result. This returns an HTTP status code of 201 with a URI used to get the created resource. It was specified that, in order to get the created forecast later, you can use GetWeatherForecast. The anonymous new { date = weatherForecast.Date.ToShortDateString()} object specifies the arguments needed to call that action. You passed Date.ToShortDateString() and not just a date because a full DateTime contains more than what you need. Here, you need only a date; therefore, you explicitly cut what you don't need.
Document each method by describing what it does and what status codes it can return. You will then add this information above each endpoint:
/// <summary>
/// Gets weather forecast at a specified date.
/// </summary>
/// <param name="date">Date of a forecast.</param>
/// <returns>
/// A forecast at a specified date.
/// If not found - 404.
/// </returns>
[HttpGet("{date}")]
[ProducesResponseType(StatusCodes.Status404NotFound)]
[ProducesResponseType(StatusCodes.Status200OK)]
public IActionResult GetWeatherForecast(DateTime date)
/// <summary>
/// Saves a forecast at forecast date.
/// </summary>
/// <param name="weatherForecast">Date which identifies a forecast. Using short date time string for identity.</param>
/// <returns>201 with a link to an action to fetch a created forecast.</returns>
[HttpPost]
[ProducesResponseType(StatusCodes.Status201Created)]
public IActionResult SaveWeatherForecast(WeatherForecast weatherForecast)
You have now added XML docs to the two endpoints. Using ProducesResponseType, you specified what status codes the endpoints could return. If you refresh the Swagger page, you will see the SaveWeatherForecast endpoint in Swagger:

Figure 9.9: SaveWeatherForecast endpoint in Swagger
If you refresh the Swagger page, you will see the GetWeatherForecast endpoint in Swagger:

Figure 9.10: GetWeatherForecast endpoint in Swagger
You can see the status code addition, but where did the comments go? By default, Swagger does not pick XML docs. You need to specify what it has to do by configuring your project file. To do so, add the following piece of code inside <Project> below the property group of a target framework:
<PropertyGroup>
<GenerateDocumentationFile>true</GenerateDocumentationFile>
<NoWarn>$(NoWarn);1591</NoWarn>
</PropertyGroup>

Figure 9.11: Swagger configuration to include XML docs
Lastly, go to the Program.cs file and replace service.AddSwaggerGen() with this:
builder.Services.AddSwaggerGen(cfg =>
{
var xmlFile = $"{Assembly.GetExecutingAssembly().GetName().Name}.xml";
var xmlPath = Path.Combine(AppContext.BaseDirectory, xmlFile);
cfg.IncludeXmlComments(xmlPath);
});
This is the last piece of code needed to include XML comments in the Swagger docs. Now, refresh the page and you should see the comments included:

Figure 9.12: WeatherForecast Swagger docs with XML docs included
Note
You can find the code used for this example at https://packt.link/iQK5X.
There is a lot more that you can do with Swagger; you can include an example request and response and give default values to parameters. You can even create your own API specification standards and decorate a project namespace to apply the same conventions to every controller and their endpoints, but that is beyond the scope of this book.
The last thing to mention is the ability to generate a client out of the Swagger docs. To do so, follow these steps:
- In order to download the swagger.json OpenAPI documentation artifact, navigate to https://localhost:7021/swagger/v1/swagger.json.
- Right-click anywhere on the page and select the Save as option.
- Then, press the Enter key.
- Next, you will use this JSON to generate client code. So, register and log in to https://app.swaggerhub.com/home (you can use your GitHub account).
- In the new window, click the Create New button (1):

Figure 9.13: SwaggerHub and the Import API window
- Select the Import and document API option.
- Select the Swagger file you have just downloaded by clicking the Browse button (2).
- Then, hit the UPLOAD FILE button:
Note
When you select the file, the IMPORT button (3 in Figure 9.13) changes to the UPLOAD FILE button (3 in Figure 9.14).

Figure 9.14: SwaggerHub IMPORT button changed to UPLOAD FILE button
- On the next screen, leave the name of the service and the version with default values.
- Next, click the IMPORT DEFINITION button:

Figure 9.15: SwaggerHub import Swagger service definition
- Now that the Swagger.json API scheme is imported, you can use it to generate a strongly typed C# client code to call the API. So, click the Export option (1).
- Then, click the Client SDK option (2).
- Select the csharp option (3):

Figure 9.16: Exporting a new client in the C# client from SwaggerHub
A csharp-client-generated.zip file will be downloaded.
- Extract the csharp-client-generated.zip file.
- Navigate the extracted folder and open the IO.Swagger.sln file. You should see the following:

Figure 9.17: Files generated for the client using SwaggerHub
The generated client code not only has a strongly typed HTTP client but also includes tests. It also has a README.md file on how to call the client and many more common development scenarios.
Now, the question that arises is whether you should use Swagger when you already have Postman. While Postman is one of the most popular tools used for testing different kinds of Web APIs, Swagger is so much more than just a client to test whether the API works. Primarily, Swagger is a tool for documenting the API. From a conventional code, it allows you to generate all that you might need to:
- Test page
- Test the client code
- Test the documentation page
Till now, you have learned that Swagger is a collection of tools and libraries implementing OpenAPI standards that are helpful for testing and documenting your APIs. You can now proceed to grasp error handling.
Error Handling
You have already learned that the code within a controller should be as minimalistic as possible due to it being the highest level in code (direct call). Specific error handling should not be included in the controller code because it adds complexity to already-complex code. Fortunately, there is a way to map exceptions to HTTP status codes and set up all of them in one place—that is, via the Hellang.Middleware.ProblemDetails package. To do so, first install the package by running this command:
dotnet add package Hellang.Middleware.ProblemDetails
Map NoSuchWeekdayException to HTTP status code 404. In the Program.cs file, before builder.Build(), add the following code:
builder.Services.AddProblemDetails(opt =>
{
opt.MapToStatusCode<NoSuchWeekdayException>(404);
opt.IncludeExceptionDetails = (context, exception) => false;
});
This not only converts an exception to the right status code but also uses ProblemDetails—a standard response model based on RFC 7807—to provide faults in an HTTP response. Also, this excludes exception details in the error message.
When developing a service locally, knowing what went wrong is invaluable. However, exposing the stack trace and other information needed to determine the error can expose exploits of your Web API. Thus, it's better to hide it when moving toward the release stage. By default, the Hellang library already excludes the exception details in upper environments, so it is better that you don't include that line. For demo purposes and a simplified response message, it was included here.
Before you build a demo, you also need to turn off the default developer exceptions page because it overrides the exceptions in ProblemDetails. Simply remove the following block of code from the Configure method:
if (builder.Environment.IsDevelopment())
{
app.UseDeveloperExceptionPage();
}
Since you already have a central place for handling NoSuchWeekdayException, you can simplify the controller method for getting WeatherForecast for a given date:
[HttpGet("weekday/{day}")]
public IActionResult GetWeekday(int day)
{
var result = _weatherForecastService.GetWeekday(day);
return Ok(result);
}
When calling the endpoint with an invalid day value (for example, 9), you get the following response:
{
"type": "/weatherforecast/weekday/9",
"title": "Not Found",
"status": 404,
"traceId": "|41dee286-4c5efb72e344ee2d."
}
This centralized error handling approach allows the controllers to be rid of all the try-catch blocks.
Note
You can find the code used for this example at https://packt.link/CntW6.
You can now map exceptions to HTTP status codes and set them all up in one place. This next section will take a look at another addition to an API, which is request validation.
Request Validation
Another useful addition to an API is request validation. By default, ASP.NET Core has a request validator based on the required attributes. However, there might be complex scenarios where a combination of properties results in an invalid request or a custom error message for which validation is required.
.NET has a great NuGet package for that: FluentValidation.AspNetCore. Perform the following steps to learn how to carry out request validation. Before you continue, install the package by running the following command:
dotnet add package FluentValidation.AspNetCore
This package allows registering custom validators per model. It makes use of existing ASP.NET Core middleware, so all you must do is inject a new validator. Create a validator for WeatherForecast.
A validator should inherit the AbstractValidator class. This is not obligatory, but it is highly recommended because it implements the common methods for functionality and has a default implementation for generic validation:
public class WeatherForecastValidator : AbstractValidator<WeatherForecast>
Through a generic argument, you specified that this is a validator for WeatherForecast.
Next is the validation itself. This is done in a constructor of a validator:
public WeatherForecastValidator()
{
RuleFor(p => p.Date)
.LessThan(DateTime.Now.AddMonths(1))
.WithMessage("Weather forecasts in more than 1 month of future are not supported");
RuleFor(p => p.TemperatureC)
.InclusiveBetween(-100, 100)
.WithMessage("A temperature must be between -100 and +100 C.");
}
FluentValidation is a .NET library and is all about fluent API, with self-explanatory methods. Here, you require a weather forecast date to be no more than one month in the future. The next validation is to have the temperature between -100 C and 100 C.
If you ping your API through Swagger, the following request gets displayed:
{
"date": "2022-09-19T19:34:34.511Z",
"temperatureC": -111,
"summary": "string"
}
The response will be displayed as follows:
{
"type": "https://tools.ietf.org/html/rfc7231#section-6.5.1",
"title": "One or more validation errors occurred.",
"status": 400,
"traceId": "|ade14b9-443aaaf79026feec.",
"errors": {
"Date": [
"Weather forecasts in more than 1 month of future are not supported"
],
"TemperatureC": [
"A temperature must be between -100 and +100 C."
]
}
}
You don't have to use FluentValidation, especially if your API is simple and does not have complex rules. But in an enterprise setting, it is highly recommended that you do use it because the level of detail you can add to your validation is unlimited.
You learned about FluentValidation and the scenarios where it is useful. The next section will touch upon the two options for reading configuration in ASP.NET.
Note
You can find the code used for this example at https://packt.link/uOGOe.
Configuration
In ASP.NET Core Web API, you have two options for reading configuration:
- IConfiguration: This is a global configuration container. Even though it allows access to all the configuration properties, injecting it directly into other components is inefficient. This is because it is weakly typed and has a risk of you trying to get a non-existing configuration property.
- IOptions: This is strongly typed and convenient because the configuration is fragmented into just the pieces that a component needs.
You can choose either of the two options. It is best practice to use IOptions in ASP.NET Core, as the configuration examples will be based on it. Whichever option you choose, you need to store the configuration in the appsettings.json file.
Move the hardcoded configuration from a constructor (weather forecast city and refresh interval) and move it into a configuration section in the appsettings.json file:
"WeatherForecastConfig": {
"City": "New York",
"RefreshInterval": 5
}
Create a model representing this configuration section:
public class WeatherForecastConfig
{
public string City { get; set; }
public int RefreshInterval { get; set; }
}
You no longer have to inject the two primitive values into the component. Instead, you will inject IOptions<WeatherForecastConfig>:
public WeatherForecastService(Ilogger<WeatherForecastService> logger, Ioptions<WeatherForecastConfig> config, ImemoryCache cache)
Before the JSON section is useable, you need to bind to it. This can be done by finding the section through IConfiguration (via the builder.Configuration property):
builder.Services.Configure<WeatherForecastConfig>(builder.Configuration.GetSection(nameof(WeatherForecastConfig)));
In this case, WeatherForecastConfig has a matching section in the configuration file. Therefore, nameof was used. So, nameof should be preferred when using the alternative string type. That way, if the name of a type changes, the configuration will change consistently (or else the code won't compile).
Remember the BuildWeatherForecastService method you used previously? The beauty of it all is that the method can be removed altogether because the service can be created without the need for custom initialization. If you compile and run the code, you will get the same response.
Note
You can find the code used for this example at https://packt.link/xoB0K.
ASP.NET Core Web API is just a collection of libraries on top of the .NET Core framework. You can use appsettings.json in other types of applications as well. It is better to use individual libraries regardless of the project type you choose. In order to use the configuration through JSON, all you need to do is to install the following NuGet packages:
- Microsoft.Extensions.Configuration
- Microsoft.Extensions.Configuration.EnvironmentVariables
- Microsoft.Extensions.Configuration.FileExtensions
- Microsoft.Extensions.Configuration.Json
- Microsoft.Extensions.Options
In this section, you learned how to use IConfiguration and IOptions. Your API is now ready, and it already includes many standard components of a typical Web API. The next section will detail how you can handle this complexity in code.
Development Environments and Configuration
Applications often need to have two environments—production and development. You want the application development environment to have premade settings, more detailed error messages (if possible), more detailed logging, and lastly, debugging enabled. All of that is not needed for a production environment and you would want to keep it clean.
Other than the build configuration, you manage environments through different configuration files. The appsettings.json file is a base configuration file and is used across all environments. This configuration file should contain the configuration you would like for production.
The Appsettings.development.json file is a configuration file that will be applied when you build your application in debug mode. Here, applied doesn't mean a complete overwrite of settings; appsettings.json will still be used with the development settings overriding the matching sections. A common example is described here.
Say appsettings.json has the following:
{
"Logging": {
"LogLevel": {
"Default": "Information",
"Microsoft": "Information",
"Microsoft.Hosting.Lifetime": "Information"
}
},
"AllowedHosts": "*",
"WeatherForecastConfig": {
"City": "New York",
"RefreshInterval": 5
},
"WeatherForecastProviderUrl": "https://community-open-weather-map.p.rapidapi.com/",
"AzureAd": {
"Instance": "https://login.microsoftonline.com/",
"ClientId": "2d8834d3-6a27-47c9-84f1-0c9db3eeb4bb",
"TenantId": "ddd0fd18-f056-4b33-88cc-088c47b81f3e",
"Audience": "api://2d8834d3-6a27-47c9-84f1-0c9db3eeb4bb"
}
}
And appsettings.development.json has the following:
{
"Logging": {
"LogLevel": {
"Default": "Trace",
"Microsoft": "Trace",
"Microsoft.Hosting.Lifetime": "Trace"
}
}
}
Then, the settings used will be the merged file with override matching sections, as shown here:
{
"Logging": {
"LogLevel": {
"Default": "Trace",
"Microsoft": "Trace",
"Microsoft.Hosting.Lifetime": "Trace"
}
},
"AllowedHosts": "*",
"WeatherForecastConfig": {
"City": "New York",
"RefreshInterval": 5
},
"WeatherForecastProviderUrl": "https://community-open-weather-map.p.rapidapi.com/",
"AzureAd": {
"Instance": "https://login.microsoftonline.com/",
"ClientId": "2d8834d3-6a27-47c9-84f1-0c9db3eeb4bb",
"TenantId": "ddd0fd18-f056-4b33-88cc-088c47b81f3e",
"Audience": "api://2d8834d3-6a27-47c9-84f1-0c9db3eeb4bb"
}
}
In the next section, you will learn how to manage DI more cleanly.
Bootstrapping
Complexity needs to be handled and the complexity referred to here is the Program class. You'll need to break it out into smaller pieces and form a Bootstrapping directory specifying the components the service is made of.
When breaking down code within Program.cs, it is recommended to use a fluent API pattern. This is a pattern where you can chain multiple function calls from a single root object. In this case, you will create several extension methods for the IServiceCollection type and chain all the module injections one by one.
To reduce the complexity of the Program class, move the DI of different logical sections into different files. Each step that follows will do just that. So, split the controller and API baseline setup to a new file named ControllersConfigurationSetup.cs:
public static class ControllersConfigurationSetup
{
public static IserviceCollection AddControllersConfiguration(this IserviceCollection services)
{
services
.AddControllers()
.AddFluentValidation();
return services;
}
}
Now, move the code for logging to a new file named LoggingSetup.cs:
public static class LoggingSetup
{
public static IServiceCollection AddLoggingConfiguration(this IServiceCollection services)
{
services.AddLogging(builder =>
{
builder.ClearProviders();
builder.AddConsole();
builder.AddDebug();
});
return services;
}
}
Next, move the request validation logic to a new file named RequestValidatorsSetup.cs:
public static class RequestValidatorsSetup
{
public static IServiceCollection AddRequestValidators(this IServiceCollection services)
{
services.AddTransient<Ivalidator<WeatherForecast>, WeatherForecastValidator>();
return services;
}
}
Move the Swagger setup logic to a new file named SwaggerSetup.cs:
public static class SwaggerSetup
{
public static IServiceCollection AddSwagger(this IServiceCollection services)
{
services.AddSwaggerGen(cfg =>
{
var xmlFile = $"{Assembly.GetExecutingAssembly().GetName().Name}.xml";
var xmlPath = Path.Combine(AppContext.BaseDirectory, xmlFile);
cfg.IncludeXmlComments(xmlPath);
});
return services;
}
}
Move the injection of the WeatherForecast-related classes' code to a new file named WeatherServiceSetup.cs:
public static class WeatherServiceSetup
{
public static IServiceCollection AddWeatherService(this IServiceCollection services, IConfiguration configuration)
{
services.AddScoped<IWeatherForecastService, WeatherForecastService>(BuildWeatherForecastService);
services.AddSingleton<ICurrentTimeProvider, CurrentTimeUtcProvider>();
services.AddSingleton<ImemoryCache, MemoryCache>();
services.Configure<WeatherForecastConfig>(configuration.GetSection(nameof(WeatherForecastConfig)));
return services;
}
private static WeatherForecastService BuildWeatherForecastService(IserviceProvider provider)
{
var logger = provider
.GetService<IloggerFactory>()
.CreateLogger<WeatherForecastService>();
var options = provider.GetService<Ioptions<WeatherForecastConfig>>();
return new WeatherForecastService(logger, options, provider.GetService<ImemoryCache>());
}
}
Finally, move the exception mapping of HTTP status codes to a new file named ExceptionMappingSetup.cs:
public static class ExceptionMappingSetup
{
public static IServiceCollection AddExceptionMappings(this IServiceCollection services)
{
services.AddProblemDetails(opt =>
{
opt.MapToStatusCode<NoSuchWeekdayException>(404);
});
return services;
}
}
Now move all the new classes under /Bootstrap folder:

Figure 9.18: Bootstrap folder with the fragmented services injection
Figure 9.18 displays the Bootstrap folder. This project structure itself demonstrates what the API is made up of. So, DI becomes as simple as the following:
builder.Services
.AddControllersConfiguration()
.AddLoggingConfiguration()
.AddRequestValidators()
.AddSwagger()
.AddWeatherService(builder.Configuration)
.AddExceptionMappings();
In some cases, you may want to pass the configuration or environment from a builder to other bootstrap methods or app methods multiple times. If you find yourself repeatedly calling builder.X, then consider storing each property in a local variable, as shown here:
var services = builder.Services;
var configuration = builder.Configuration;
var environment = builder.Environment;
With this, you will no longer repeatedly access the builder and will instead be able to use the needed builder properties directly. This is especially useful if you migrate from .NET Core to .NET 6. Environment and Configuration used to be properties of a Program class, while Services would be injected into the ConfigureServices method. In .NET 6, Services is accessed through a builder object. However, with this approach, you can still use those properties or arguments as they were.
From now on, when referring to services, environments, or configurations, you will assume that you are accessing them from builder.Services, builder.Environment, and builder.Configuration, accordingly.
Note
You can find the code used for this example at https://packt.link/iQK5X.
Calling Another API
A working product is usually made of many APIs communicating with each other. To communicate effectively, one web service often needs to call another service. For example, a hospital may have a website (frontend) that calls a Web API (backend). This Web API orchestrates things by making calls to a booking Web API, a billing Web API, and a staff Web API. A staff Web API may make calls to an inventory API, holidays API, etc.
RapidAPI
As discussed in Chapter 8, Creating and Using Web API Clients, there are various ways of making HTTP calls to other services (though HTTP is not the only way to call another service). This time, you will try to get weather forecasts from an existing API and format it in your way. For doing so, you will use the RapidAPI Weather API, which can be found at https://rapidapi.com/visual-crossing-corporation-visual-crossing-corporation-default/api/visual-crossing-weather/.
Note
RapidAPI is a platform that supports many APIs. The site https://rapidapi.com/visual-crossing-corporation-visual-crossing-corporation-default/api/visual-crossing-weather/ is just one example. Many of the APIs present there are free; however, be aware that an API that is free today might become paid tomorrow. If that happens by the time you read this chapter, go through the examples, and explore the Weather APIs section at https://rapidapi.com/category/Weather. You should be able to find similar alternatives there.
This API requires a GitHub account for use. Perform the following steps to use the RapidAPI Weather API:
- Log in to the website https://rapidapi.com/community/api/open-weather-map/.
Note
You can navigate to https://rapidapi.com/community/api/open-weather-map/ only if you are logged in. So, signup at https://rapidapi.com/ and create an account. This is required if you need an API key. Next login and select Weather category and choose Open Weather link.
After you log in to the website, you will see the following window:

Figure 9.19: Unsubscribed test page of the Visual Crossing Weather API on rapidapi.com
- Click the Subscribe to Test button to get access (for free) to making calls to the Web API. A new window will open.
- Select the Basic option, which will allow you to make 500 calls a month to that API. For educational purposes, the basic plan should be enough:

Figure 9.20: RapidAPI subscription fees with a free Basic plan highlighted
You will be redirected to the test page with the Test Endpoint button available (instead of the Subscribe to Test button).
- Now, configure the request. The first configuration asks you to enter the intervals for getting the weather forecast. You want an hourly forecast, so enter 1 hour beside aggregateHours (1).
- Next up is the location address (2).
In Figure 9.21, you can observe that the city, state, and country are specified. These fields ask you to enter your address. However, typing your city name would also work.
- Choose the default contentType option as csv for this API (3):

Figure 9.21: GET weather forecast data request configuration
This API is interesting because it allows you to return data in different formats—JSON, XML, and CSV. It is still a Web API and not so RESTful because the data response type is natively CSV. If you choose JSON, it will look unnatural and significantly more difficult to work with.
- On the next screen, click Code Snippets (1) and then (C#) HttpClient (2) to see the example client code generated for you.
- Next, click Test Endpoint (3) to send a request.
- Click the Results tab (4) to view the response (in Figure 9.22, other endpoints are collapsed):

Figure 9.22: rapidapi.com with test request page and example code in C# for making the request
This window provides a nice API. It is also a great way to learn how to make calls to it by giving multiple examples of creating clients using a variety of languages and technologies.
As always, you will not initialize this client directly in a client but inject the client somehow. In Chapter 8, Creating and Using Web API Clients, it was mentioned that to have a static HttpClient over one constantly disposed is an efficient practice. However, for a Web API, there is an even better alternative—HttpClientFactory.
- Before you do all that, you need to prepare a few things. First, update the appsettings.json file with the inclusion of the base URL of an API:
"WeatherForecastProviderUrl": "https://visual-crossing-weather.p.rapidapi.com/"
Next, you will need to create another class for fetching the weather details from the said API. For that purpose, you will need an API key. You can find it in the example code snippet on the API website:

Figure 9.23: RapidAPI API key in the example code snippet
- Save the API key as an environment variable because it is a secret and storing secrets in code is bad practice. So, name it as x-rapidapi-key.
- Lastly, the returned weather forecast might be quite different from yours. You can see the example response by clicking the Test Endpoint button:

Figure 9.24: RapidAPI example response from GET current weather data endpoint
- Copy the results received after clicking the Test Endpoint button.
- Paste the results in https://toolslick.com/generation/code/class-from-csv.
- Give the class name as WeatherForecast and leave the rest of the settings as the defaults.
- Finally, press the GENERATE button:

Figure 9.25: Response content pasted to https://toolslick.com/generation/code/class-from-csv
This will create two classes, WeatherForecast and WeatherForecastClassMap:

Figure 9.26: Generated data model and mapping classes (simplified for brevity)
WeatherForecast represents the object to which the data from this API will be loaded.
- Create a file called WeatherForecast.cs under the Dtos folder (DTO will be described in detail in the DTO and Mapping Using AutoMapper section) and paste the class there.
- Remove the bits that do not have a connection to an already-existing WeatherForecast model. The cleaned-up model will look as follows:
public class WeatherForecast
{
public DateTime Datetime { get; set; }
public string Temperature { get; set; }
public string Conditions { get; set; }
}
You should know that WeatherForecastClassMap is a special class. It is used by the CsvHelper library, which is used for parsing CSV files. You could parse CSV files yourself; however, CsvHelper makes it a lot easier to parse.
- To use CsvHelper, install its NuGet package:
dotnet add package CsvHelper
WeatherForecastCsv represents a mapping from a CSV to a C# object.
- Now, create a file called WeatherForecastClassMap.cs under the ClassMaps folder and paste the class there.
- Keep only the mappings that match the WeatherForecast class that was edited in Step 17:
public class WeatherForecastClassMap : ClassMap<WeatherForecast>
{
public WeatherForecastClassMap()
{
Map(m => m.Datetime).Name("Date time");
Map(m => m.Temperature).Name("Temperature");
Map(m => m.Conditions).Name("Conditions");
}
}
Note
You can find the code used for this example at https://packt.link/dV6wX and https://packt.link/mGJMW.
In the previous section, you learned how to get weather forecasts from an existing API and format them your way using the RapidAPI Weather API. Now it is time to proceed to the service client and use the models created, along with the settings, parse the API response, and return the current time weather.
Service Client
Now you have all the ingredients that are needed to create the provider class. You learned in Chapter 8, Creating and Using Web API Clients, that when communicating with another API, it's best to create a separate component for it. So, here you will start from an interface abstraction, IWeatherForecastProvider:
public interface IWeatherForecastProvider
{
Task<WeatherForecast> GetCurrent(string location);
}
Next, create an implementation of that interface—that is, a class taking HttpClient for DI:
public class WeatherForecastProvider : IWeatherForecastProvider
{
private readonly HttpClient _client;
public WeatherForecastProvider(HttpClient client)
{
_client = client;
}
To implement an interface, start with writing a method definition for getting the current weather:
public async Task<WeatherForecast> GetCurrent(string location)
{
Next, create a request to call HTTP GET with a relative URI for getting a forecast of the CSV type at a given location:
var request = new HttpRequestMessage
{
Method = HttpMethod.Get,
RequestUri = new Uri($"forecast?aggregateHours=1&location={location}&contentType=csv", UriKind.Relative),
};
Now, send a request and verify that it was a success:
using var response = await _client.SendAsync(request);
response.EnsureSuccessStatusCode();
If the status code is not in the range of 200-300, the response.EnsureSuccessStatusCode(); throws an exception. Set up a CSV reader to prepare for deserializing weather forecasts:
var body = await response.Content.ReadAsStringAsync();
using var reader = new StringReader(body);
using var csv = new CsvReader(reader, CultureInfo.InvariantCulture);
csv.Context.RegisterClassMap<WeatherForecastClassMap>();
You are adding a using statement to StringReader and CsvReader because both implement the IDisposable interface for disposing unmanaged resources. This happens when you use the using statement within a function after it returns.
Lastly, deserialize the forecasts:
var forecasts = csv.GetRecords<WeatherForecast>();
This way, you request the API to return forecasts starting from today and stopping a few days in the future with 1-hour intervals. The first returned forecast is the forecast of the current hour—that is, the forecast that you need:
return forecasts.First();
}
Now, you will use Newtonsoft.Json for deserialization. Install the following package to do so:
dotnet add package Microsoft.AspNetCore.Mvc.NewtonsoftJson
Update the AddControllersConfiguration method by appending the following line on the services object:
.AddNewtonsoftJson();
This line replaces the default serializer with Newtonsoft.Json. Now, Newtonsoft.Json doesn't have to be used; however, it is a much more popular and complete library for serialization compared to the default one.
Note
You can find the code used for this example at https://packt.link/jmSwi.
Till now, you have learned how to create a service client and make basic HTTP calls using it. It's effective for grasping the basics; however, the classes the API uses should be coupled with the classes of the APIs it consumes. In the next section, you will learn how to decouple the API from third-party API models using a DTO and mapping via AutoMapper.
DTO and Mapping Using AutoMapper
The weather forecast model from RapidAPI is a Date Transfer Object (DTO)—a model used just for transferring data and convenient serialization. RapidAPI may change its data model and, if that happens, the DTO will change as well. If you are just presenting the data you had received and don't need to perform any logical operations on it, then any change may be alright.
However, you will usually apply business logic to a data model. You already know that references to a data model are scattered across multiple classes. With every change to a DTO, a class may have to change as well. For example, the DTO property that was called weather has now changed to weathers. Another example is of a property that was previously called description will now be called a message. So, renaming a DTO property like this will require you to make changes everywhere they are referenced. The bigger the project, the worse of an issue this becomes.
The advice of the SOLID principles is to avoid such changes (refer to Chapter 2, Building Quality Object-Oriented Code). One of the ways to achieve this is by having two kinds of models—one for domain and the other for outside calls. This will require a mapping between foreign objects (coming from outside APIs) into your own.
Mapping can be done either manually or by using some popular libraries. One of the most popular mapping libraries is AutoMapper. It allows you to map from one object to another using property names. You can also make your own mappings. Now, you will use this library to configure a mapping between a weather forecast DTO and a weather forecast model.
So, first install NuGet:
dotnet add package AutoMapper.Extensions.Microsoft.DependencyInjection
This library allows you to inject AutoMapper into ServiceCollection. Here, AutoMapper uses the Profile class to define a mapping.
A new mapping should inherit the Profile class. So, inside the constructor of the new profile, use a CreateMap method to provide a mapping:
public class WeatherForecastProfile : Profile
{
public WeatherForecastProfile()
{
CreateMap<Dtos.WeatherForecast, Models.WeatherForecast>()
Next, in order to map every property from the CreateMap method, call the ForMember method and specify how to do a mapping:
.ForMember(to => to.TemperatureC, opt => opt.MapFrom(from => from.main.temp));
Here, the value of TemperatureC comes from main.temp inside the DTO.
For the other property, you will concatenate all the weather descriptions into one string and call that a summary (BuildDescription):
private static string BuildDescription(Dtos.WeatherForecast forecast)
{
return string.Join(",",
forecast.weather.Select(w => w.description));
}
Now, use the lambda method, ForMember, when building a weather forecast summary mapping:
.ForMember(to => to.Summary, opt => opt.MapFrom(from => BuildDescription(from)))
Create a MapperSetup class and inject AutoMapper from the AddModelMappings method to provide different mapping profiles:
public static class MapperSetup
{
public static IServiceCollection AddModelMappings(this IServiceCollection services)
{
services.AddAutoMapper(cfg =>
{
cfg.AddProfile<WeatherForecastProfile>();
});
return services;
}
}
Append .AddModelMappings() to the services object calls. With this, you can call mapper.Map<Model.WeatherForecast>(dtoForecast);.
Note
You can find the code used for this example at https://packt.link/fEfdw and https://packt.link/wDqK6.
The AutoMapper mapping library allows you to map from one object to another by default mapping matching property names. The next section will detail how you can use DI to reuse HttpClient.
HttpClient DI
Continuing with DI, you now want to get into the habit of using the fragmented ConfigureServices approach. So, first, create a class called HttpClientsSetup and then create a method for adding the configured HttpClients:
public static class HttpClientsSetup
{
public static IServiceCollection AddHttpClients(IServiceCollection services)
{
Next, for the injection itself, use the AddHttpClient method:
services.AddHttpClient<IWeatherForecastProvider, WeatherForecastProvider>((provider, client) =>
{
In the preceding section, it was mentioned that the keys should be hidden and stored in environment variables. To set a default start URI of every call, set BaseAddress (WeatherForecastProviderUrl used in Step 10 of the RapidAPI section).
To append the API key on every request, get the API key that you stored in environment variables and assign it to default headers as x-rapidapi-key:
client.BaseAddress = new Uri(config["WeatherForecastProviderUrl"]);
var apiKey = Environment.GetEnvironmentVariable("x-rapidapi-key", EnvironmentVariableTarget.User);
client.DefaultRequestHeaders.Add("x-rapidapi-key", apiKey);
});
To finish the injection-builder pattern, you need to return the services object, as follows:
return services;
Now, go back to services in Program and append the following:
.AddHttpClients(Configuration)
To integrate the client you have just set up, go to WeatherForecastService, and inject the mapper and provider components:
public WeatherForecastService(..., IWeatherForecastProvider provider, IMapper mapper)
Change the GetWeatherForecast method to either get the cached forecast of this hour or fetch a new one from the API:
public async Task<WeatherForecast> GetWeatherForecast(DateTime date)
{
const string DateFormat = "yyyy-MM-ddthh";
var contains = _cache.TryGetValue(date.ToString(DateFormat), out var entry);
if(contains){return (WeatherForecast)entry;}
var forecastDto = await _provider.GetCurrent(_city);
var forecast = _mapper.Map<WeatherForecast>(forecastDto);
forecast.Date = DateTime.UtcNow;
_cache.Set(DateTime.UtcNow.ToString(DateFormat), forecast);
return forecast;
}
This method, just like the preceding one, first tries to get a value from the cache. If the value exists, then the method returns a value. However, if the value does not exist, the method calls the API for the preconfigured city, maps the DTO forecast to the model forecast, and saves it in the cache.
If you send an HTTP GET request to https://localhost:7021/WeatherForecast/, you should see the following response:
{"date":"2021-09-21T20:17:47.410549Z","temperatureC":25,"temperatureF":76,"summary":"clear sky"}
Calling the same endpoint results in the same response. However, the response times are significantly faster due to the cache being used rather than repeating a call to the forecast API.
Note
You can find the code used for this example at https://packt.link/GMFmm.
This concludes the theoretical portion of this topic. In the following section, you will put this into practice with an exercise.
Exercise 9.03: Performing File Operations by Calling Azure Blob Storage
A common task with a Web API is to perform a variety of operations on files, such as download, upload, or delete. In this exercise, you will reuse a portion of FilesClient from Activity 8.04 of Chapter 8, Building Quality Object-Oriented Code, to serve as a baseline client for calling Azure Blob storage and call its methods via REST endpoints to do the following operations on a file:
- Download a file.
- Get a shareable link with expiration time.
- Upload a file.
- Delete a file.
Perform the following steps to do so:
- Extract an interface for FilesClient and call it IFilesService:
public interface IFilesService
{
Task Delete(string name);
Task Upload(string name, Stream content);
Task<byte[]> Download(string filename);
Uri GetDownloadLink(string filename);
}
The new interface is simplified as you will work on a single container. However, as per the requirements, you have added a few new methods: Delete, Upload, Download, and GetDownloadLink. The Download method is for downloading a file in its raw form—that is, bytes.
- Create a new class called Exercises/Exercise03/FilesService.cs.
- Copy the following parts of https://packt.link/XC9qG there.
- Rename Client to Service.
- Also change the Exercise04 reference (used in Chapter 8, Building Quality Object-Oriented Code) to Exercise03 (a new one to be used for this chapter):
FilesService.cs
public class FilesService : IFilesService
{
private readonly BlobServiceClient _blobServiceClient;
private readonly BlobContainerClient _defaultContainerClient;
public FilesClient()
{
var endpoint = "https://packtstorage2.blob.core.windows.net/";
var account = "packtstorage2";
var key = Environment.GetEnvironmentVariable("BlobStorageKey", EnvironmentVariableTarget.User);
var storageEndpoint = new Uri(endpoint);
var storageCredentials = new StorageSharedKeyCredential(account, key);
_blobServiceClient = new BlobServiceClient(storageEndpoint, storageCredentials);
_defaultContainerClient = CreateContainerIfNotExists("Exercise03).Result;
}
private async Task<BlobContainerClient> CreateContainerIfNotExists(string container)
You can find the complete code here: https://packt.link/fNQAX.
The constructor initializes blobServiceClient to get blobClient, which allows you to do operations in the Exercice03 directory in the Azure Blob Storage Account. If the folder doesn't exist, blobServiceClient will create it for you:
{
var lowerCaseContainer = container.ToLower();
var containerClient = _blobServiceClient.GetBlobContainerClient(lowerCaseContainer);
if (!await containerClient.ExistsAsync())
{
containerClient = await _blobServiceClient.CreateBlobContainerAsync(lowerCaseContainer);
}
return containerClient;
}
Note
For the preceding step to work, you will need an Azure Storage Account. So, refer to Activity 8.04 of Chapter 8, Building Quality Object-Oriented Code.
- Create the ValidateFileExists method to validate whether a file exists in the storage, else throw an exception (a small helper method that did not exist before):
private static void ValidateFileExists(BlobClient blobClient)
{
if (!blobClient.Exists())
{
throw new FileNotFoundException($"File {blobClient.Name} in default blob storage not found.");
}
}
- Now, create the Delete method to delete a file:
public Task Delete(string name)
{
var blobClient = _defaultContainerClient.GetBlobClient(name);
ValidateFileExists(blobClient);
return blobClient.DeleteAsync();
}
Here, you will first get a client for the file and then check whether the file exists. If not, then you will throw a FileNotFoundException exception. If the file exists, then you will delete the file.
- Create the UploadFile method to upload a file:
public Task UploadFile(string name, Stream content)
{
var blobClient = _defaultContainerClient.GetBlobClient(name);
return blobClient.UploadAsync(content, headers);
}
Once again, you first get a client that allows you to perform operations on a file. Then, feed the content and headers to it to upload.
- Create the Download method to download a file in bytes:
public async Task<byte[]> Download(string filename)
{
var blobClient = _defaultContainerClient.GetBlobClient(filename);
var stream = new MemoryStream();
await blobClient.DownloadToAsync(stream);
return stream.ToArray();
}
This method creates a memory stream and downloads the file to it. Please note that this is not going to work on large files.
Note
If you would like to learn more on how to process large files, please refer to https://docs.microsoft.com/en-us/aspnet/core/mvc/models/file-uploads?view=aspnetcore-6.0#upload-large-files-with-streaming.
There is a way to present raw downloaded bytes as an image or JSON, rather than as generic downloadable content. With an HTTP request or response, you can send a header specifying the way the content should be interpreted. This header is called Content-Type. Each application will process this differently. In the context of Swagger, image/png will be displayed as an image, while application/json will be shown as JSON.
- Create a GetUri method to get a URI of blobClient:
private Uri GetUri(BlobClient blobClient)
{
var sasBuilder = new BlobSasBuilder
{
BlobContainerName = _defaultContainerClient.Name,
BlobName = blobClient.Name,
Resource = "b",
ExpiresOn = DateTimeOffset.UtcNow.AddHours(1)
};
sasBuilder.SetPermissions(BlobSasPermissions.Read);
var sasUri = blobClient.GenerateSasUri(sasBuilder);
return sasUri;
}
Getting a URI requires the use of BlobSasBuilder, through which you can generate a shareable URL to a blob. Through the builder, specify the kind of resource you are trying to share ("b" stands for blob) and the expiry time. You need to set the permissions (to read) and pass the sasBuilder builder to the blobClient client to generate sasUri.
- Now, use a filename to create a file download link:
public Uri GetDownloadLink(string filename)
{
var blobClient = _defaultContainerClient.GetBlobClient(filename);
var url = GetUri(blobClient);
return url;
}
- Inside the ExceptionMappingSetup class and the AddExceptionMappings method, add the following mapping:
opt.MapToStatusCode<FileNotFoundException>(404);
- Create an extension method to inject a module of FileUploadService:
public static class FileUploadServiceSetup
{
public static IServiceCollection AddFileUploadService(this IServiceCollection services)
{
services.AddScoped<IFilesService, FilesService>();
return services;
}
}
An extension method is a simplified way of showing a new method to an existing interface.
- Append it to services in Program.cs to use the FileUploadService module:
.AddFileUploadService();
- Now, create a controller for files:
[Route("api/[controller]")]
[ApiController]
public class FileController : ControllerBase
{
Controller creation is standard on MVC architecture, and this allows users to access FileService through HTTP requests.
- Then, inject IFilesService to provide an interface through which file-related functionality could be accessed:
private readonly IFilesService _filesService;
public FileController(IFilesService filesService)
{
_filesService = filesService;
}
- Next, create an endpoint to delete a file:
[HttpDelete("{file}")]
public async Task<IActionResult> Delete(string file)
{
await _filesService.Delete(file);
return Ok();
}
- Create an endpoint to download a file:
[HttpGet("Download/{file}")]
public async Task<IActionResult> Download(string file)
{
var content = await _filesService.Download(file);
return new FileContentResult(content, "application/octet-stream ");
}
- Create an endpoint for getting a shareable file download link:
[HttpGet("Link")]
public IActionResult GetDownloadLink(string file)
{
var link = _filesService.GetDownloadLink(file);
return Ok(link);
}
- Create an endpoint for uploading a file:
[HttpPost("upload")]
public async Task<IActionResult> Upload(IFormFile file)
{
await _filesService.UploadFile(file.FileName, file.OpenReadStream());
return Ok();
}
IFormFile is a common way of passing small files to a controller. However, from IFormFile, you need file contents as a stream. You can get this using the OpenReadStream method. Swagger allows you to use the File Explorer window to choose the file you want to upload.
- Now you run the API.
Your Swagger documentation will have a new section with the controller methods. Here are the responses of each:
- Upload file request:

Figure 9.27: Upload file request in Swagger
- Upload file response:

Figure 9.28: Upload file response in Swagger
- Get download link request:

Figure 9.29: Get download link request in Swagger
- Get download link response:

Figure 9.30: Get download link response in Swagger
- Download file request:

Figure 9.31: Download file request in Swagger
- Download file response:

Figure 9.32: Download file response in Swagger
- Delete file request:

Figure 9.33: Delete file request in Swagger
- Delete file response:

Figure 9.34: Delete file response in Swagger
This exercise illustrated the remaining aspects of what you can do with a Web API.
Note
You can find the code used for this exercise at https://packt.link/cTa4a.
The volume of functionality you can serve through the web is immense. However, this comes with its own big problem. How do you ensure that your API is consumed only by the intended identities? In the next section, you will explore how to secure a Web API.
Securing a Web API
Every now and then, you'll hear about a major security breach on the news. In this section, you will learn how to protect a public API using AAD.
Azure Active Directory
Azure Active Directory (AAD) is Microsoft's cloud identity and access management service that is used to sign in to well-known applications, such as Visual Studio, Office 365, and Azure, and to internal resources. AAD uses OpenID to provide user identity through a JavaScript Web Token.
JWT
A JavaScript Web Token (JWT) is a collection of personal data encoded and sent over as a mechanism of authentication. A single field encoded in a JWT is called a claim.
OpenID Connect
OpenID Connect (OIDC) is the protocol used for getting the ID token, which provides user identity or an access token. It's a layer on top of OAuth 2 to get an identity.
OAuth serves as a means of getting an access token on behalf of some user. With OIDC, you get an identity; this has a role and access comes from that role. When a user wants to log in to a website, OpenID might require them to input their credentials. This might sound exactly the same as OAuth; however, don't mix the two. OpenID is all about acquiring and verifying the user's identity and granting access coming with a role. OAuth, on the other hand, gives access to a user to do a limited set of functionalities.
A real-life analogy would be as follows:
- OpenID: You come to an airport and present your passport (which is issued by the government) confirming your role (passenger) and identity that way. You are granted a passenger role and allowed to board an airplane.
- OAuth: You come to an airport and the staff asks you to take part in an emotional state tracking event. With your consent, the staff (others) at the airport can now track more of your personal data.
The following is a summary:
- OpenID provides authentication and verifies who you are.
- OAuth is authorization that allows others to do things on your behalf.
Application Registration
The first step in securing a Web API using Azure is to create an application registration in AAD. Perform the following steps to do so:
- Navigate to Azure Active Directory by typing active dir in the search bar:
Figure 9.35: Azure Active Directory being searched in portal.azure
- In the new window, click the App registrations option (1).
- Then, click the New registration button (2):
Figure 9.36: Azure app registration
- In the new window, enter Chapter09WebApi as the name.
- Keep the other settings as the default and click the Register button:

Figure 9.37: The new app registration named Chapter09WebApi
- To access an API, you need at least one scope or role. In this example, you will create a scope called access_as_user.
- Scopes in general can be used to control which part of an API is accessible to you. For the scope to be available for all users, you will need to select Admins and users.
- In this trivial example, given the token is valid, you will allow access to everything. So, select the Access all as a user option. The exact values of the other fields do not matter:

Figure 9.38: The access_as_user scope available for all users
The first step in securing a Web API using Azure was to create an application registration in AAD. The next topic will cover how you can implement security within a Web API in .NET.
Implementing Web API Security
This section will focus on the details of how, programmatically, you can get the token and work with it. So, first, install NuGet, which does JWT validation using the Microsoft identity platform:
dotnet add package Microsoft.Identity.Web
In the Bootstrap folder, create the SecuritySetup class:
public static class SecuritySetup
{
public static IServiceCollection AddSecurity(this IServiceCollection services, IConfiguration configuration, IWebHostEnvironment env)
{
services.AddMicrosoftIdentityWebApiAuthentication(configuration);
return services;
}
}
Then, in Program.cs, append this to services:
.AddSecurity()
The injected services are needed by the authorization middleware. So, add the following on an app to add authorization middleware:
app.UseAuthentication();
app.UseAuthorization();
This will be triggered on all endpoints decorated with the [Authorize] attribute. Make sure the preceding two lines are placed before app.MapControllers(); or else the middleware will not be wired with your controllers.
Within appsettings.json, add the following configuration to link to your AzureAd security configuration:
"AzureAd": {
"Instance": "https://login.microsoftonline.com/",
"ClientId": "2d8834d3-6a27-47c9-84f1-0c9db3eeb4ba",
"TenantId": "ddd0fd18-f056-4b33-88cc-088c47b81f3e",
"Audience": "api://2d8834d3-6a27-47c9-84f1-0c9db3eeb4bb"
}
Lastly, add the Authorize attribute above each controller for any kind of security you choose:
[Authorize]
[ApiController]
[RequiredScope("access_as_user")]
[Route("[controller]")]
public class WeatherForecastController : ControllerBase
The Authorize attribute is essential for any type of security implementation. This attribute will perform the generic token validation, while [RequiredScope("access_as_user")] will check whether the access_as_user scope was included or not. What you now have is a secured API. If you try calling the WeatherForecast endpoints, you will get a 401 – Unauthorised error.
Note
You can find the code used for this example at https://packt.link/ruj9o.
In the next section, you will learn how to generate a token through the token generator app and use it to securely access your API.
Token Generator App
To call the API, you need to generate a token by creating a console application. Before you do that, however, you need to configure one more thing in your app registration. Your console application is considered a desktop app. So, when signing in, you need a redirect URI. This URI, returned with the code, is used to get the access token. To achieve this, perform the following steps:
- From the left pane in AAD, select the Authentication option (1) to view all configurations with outside applications.
- Next, click the Add a platform button (2) to configure a new application (token generator):

Figure 9.39: Authentication window with options to configure a new application
- In the Configure platforms section, select the Mobile and desktop applications button (3) to register a console application token generator:

Figure 9.40: Selecting the Mobile and desktop applications platform for authentication
A new window will open on the screen.
- Type your Custom redirect URIs that specify where you will return after the successful login to AAD when requesting the token. In this case, it doesn't matter so much. So, type any URL.
- Then, click the Configure button (4):
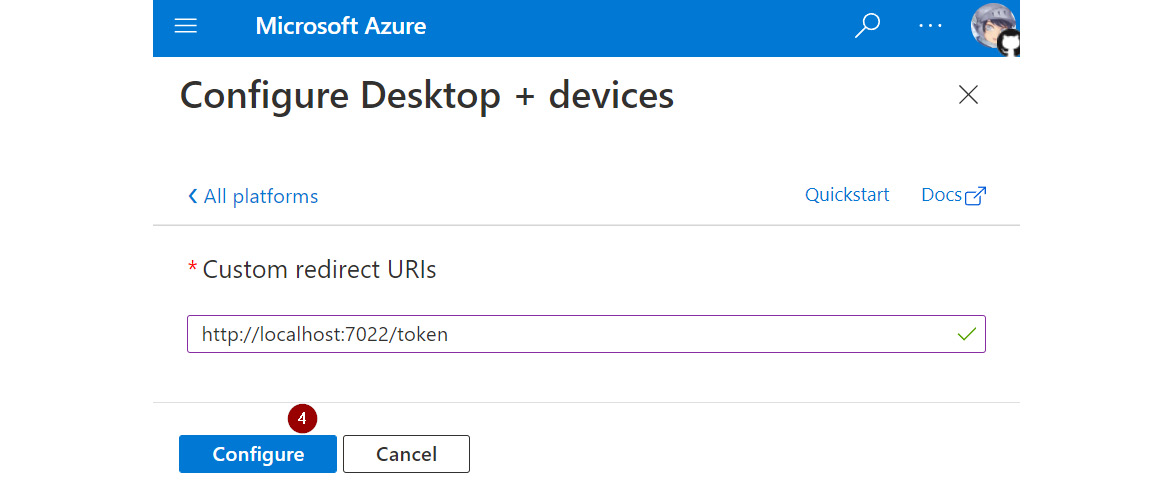
Figure 9.41: Configuring the redirect URI
That completes the configuration of AAD. Now that you have all the infrastructure for security, build a console application to generate an access token from AAD:
- First, create a new project called Chapter09.TokenGenerator. It will allow you to generate authorization tokens needed to call your API.
- Then, make it a console app on .NET Core to keep it simple and display a generated token.
- Add Microsoft.Identity.Client by running the following command:
dotnet add package Microsoft.Identity.Client
This will allow you to request a token later.
- Next, in Program.cs, create a method to initialize an AAD application client. This will be used to prompt browser login, as if you were to log in to the Azure portal:
static IPublicClientApplication BuildAadClientApplication()
{
const string clientId = "2d8834d3-6a27-47c9-84f1-0c9db3eeb4bb"; // Service
const string tenantId = "ddd0fd18-f056-4b33-88cc-088c47b81f3e";
const string redirectUri = "http://localhost:7022/token";
string authority = string.Concat("https://login.microsoftonline.com/", tenantId);
var application = PublicClientApplicationBuilder.Create(clientId)
.WithAuthority(authority)
.WithRedirectUri(redirectUri)
.Build();
return application;
}
Note
The values used in the preceding code will differ, depending upon the AAD subscription.
As you can see, the application uses the clientId and tenantId configured in AAD.
- Create another method to use the application that requires a user login on Azure to get an auth token:
static async Task<string> GetTokenUsingAzurePortalAuth(IPublicClientApplication application)
{
- Now, define the scopes you need:
var scopes = new[] { $"api://{clientId}/{scope}" };
Replace api://{clientId}/{scope} with your own application ID URI if you are not using a default value.
- Then, attempt to get a cached token:
AuthenticationResult result;
try
{
var accounts = await application.GetAccountsAsync();
result = await application.AcquireTokenSilent(scopes, accounts.FirstOrDefault()).ExecuteAsync();
}
The cached token retrieval is required if the login was done earlier. If you haven't signed in before to get a token, you will need to log in to Azure AD:
catch (MsalUiRequiredException ex)
{
result = await application.AcquireTokenInteractive(scopes)
.WithClaims(ex.Claims)
.ExecuteAsync();
}
- Return the access token as the result of a logged-in user so that you can use it later to access your APIs:
return result.AccessToken;
- Now, call the two methods and print the result (using the minimal API):
var application = BuildAadClientApplication();
var token = await GetTokenUsingAzurePortalAuth(application);
Console.WriteLine($"Bearer {token}");
- Finally, when you run the token app, it will ask you to sign in:
Figure 9.42: Sign-in request from Azure
A successful sign-in redirects you to a configured redirect URI with the following message:
Authentication complete. You can return to the application. Feel free to close this browser tab.
You will see that the token will be returned in the console window:

Figure 9.43: Generated token from the app registration in the console app
Now, you can inspect the token using the https://jwt.io/ website. The following screen is displayed, showing two parts: Encoded and Decoded. The Decoded part is divided into the following sections:
- HEADER: This contains a type of token and the algorithm used to encrypt the token.
- PAYLOAD: The claims encoded within the token contain information, such as who requested the token and what access has been granted:

Figure 9.44: Encoded and decoded JWT version on the jwt.io website using your app registration
In this section, you learned how to secure an unsecured API. Security is not limited to just an authorization token. As a professional developer, you must be aware of the most common vulnerabilities in APIs. A list of the top 10 most common security issues is updated every four years based on the trends in the industry. This list is called the Open Web Application Security Project (OWASP) and can be reached at https://owasp.org/www-project-top-ten/.
In the next section, you will apply the changes needed for Swagger to work with the authorization token.
Configuring Swagger Auth
To pass an authorization header through Swagger, you will need to add some configuration. Follow these steps to do so:
- In order to render an authorization button, add the following block of code inside the SwaggerSetup class, the AddSwagger method, and the services.AddSwaggerGen(cfg => section:
cfg.AddSecurityDefinition("Bearer", new OpenApiSecurityScheme()
{
Name = "Authorization",
Type = SecuritySchemeType.ApiKey,
Scheme = "Bearer",
BearerFormat = "JWT",
In = ParameterLocation.Header,
Description = $"Example: "Bearer YOUR_TOKEN>"",
});
- In order to forward the value of a bearer token with an authorization header, add the following code snippet:
cfg.AddSecurityRequirement(new OpenApiSecurityRequirement
{
{
new OpenApiSecurityScheme
{
Reference = new OpenApiReference
{
Type = ReferenceType.SecurityScheme,
Id = "Bearer"
}
},
new string[] {}
}
});
- When you navigate to https://localhost:7021/index.html, you will see that it now contains the Authorize button:

Figure 9.45: Swagger docs with Authorize button
- Click the Authorize button to allow you to input the bearer token:

Figure 9.46: Bearer token input after clicking the Authorize button
- Now, send a request:

Figure 9.47: Swagger-generated request with a status of 200 generated in response
You will see that the authorization header is added, and the ok response (HTTP status code 200) is returned.
In this section, you added some configuration to pass an authorization header through Swagger.
Note
You can find the code used for this example at https://packt.link/hMc2t.
If you make a mistake and your token validation fails, you will get either a 401 – unauthorized or 403 – forbidden status code returned (often without any details). Fixing this error might be a headache. However, it is not too difficult to get more information on what went wrong. The next section provides more details.
Troubleshooting Token Validation Errors
To simulate this scenario, try invalidating the client-id in appsettings.json by changing any single symbol (for example, the last letter to b). Run the request and see how the response is displayed as 401, with nothing else appearing in the logs.
All the validations and incoming and outcoming requests can be tracked through a pipeline. All you must do is change the default minimum logged level from info to Trace. You can do this by replacing the appsettings.development.json file contents with the following:
{
"Logging": {
"LogLevel": {
"Default": "Trace",
"Microsoft": "Trace",
"Microsoft.Hosting.Lifetime": "Trace"
}
}
}
Do not mix appsettings.development.json with appsettings.json. The former is used for configuration as a whole and the latter overrides the configuration but only in certain environments—development (local) in this case.
If you run the same request again, you will now see a verbose log in the console:
Audience validation failed. Audiences: 'api://2d8834d3-6a27-47c9-84f1-0c9db3eeb4bb'. Did not match: validationParameters.ValidAudience: 'api://2d8834d3-6a27-47c9-84f1-0c9db3eeb4bc' or validationParameters.ValidAudiences: 'null'.
Inspecting it deeper reveals the error as the following:
Audience validation failed; Audiences: 'api://2d8834d3-6a27-47c9-84f1-0c9db3eeb4bb'. Did not match validationParameters
This error indicates a mismatched audience configured in the JWT:

Figure 9.48: Token validation error with the error highlighted
Now it is time for you to learn about the SOA architecture where components of a system are hosted as separate services.
Service-Oriented Architecture
Software architecture has come a long way—evolving from monolithic to Service-Oriented Architecture (SOA). SOA is an architecture where major layers of applications are hosted as separate services. For example, there would be one or more Web APIs for data access, one or more Web APIs for business logic, and one or more client applications consuming it all. The flow would be like this: the client app calls the business Web API, which calls another business Web API or a data access Web API.
However, modern software architecture goes one step further to bring a more evolved architecture, called microservice architecture.
Microservice Architecture
Microservice architecture is SOA with a single-responsibility principle applied. This means that, instead of service-as-a-layer, you now have hosted self-contained modules that have a single responsibility. A self-contained service has both data access and business logic layers. Instead of many services per layer, in this approach, you have many services per module.
The purpose of those self-contained modules is to allow multiple teams to work on different parts of the same system simultaneously without ever stepping on each other's toes. On top of that, parts in a system can be scaled and hosted independently and there is no single point of failure. Also, each team is free to use whatever technology stack they are most familiar with, as all the communication happens through HTTP calls.
This concludes the theoretical portion of this topic. In the following section, you will put all that you have learned into practice with an activity.
Activity 9.01: Implementing the File Upload Service Using Microservice Architecture
A microservice should be self-contained and do just one thing. In this activity, you will sum up the steps needed for extracting a piece of code into a microservice that manages how you work with files through the web (delete, upload, and download). This should serve as an overall effective checklist of what needs to be done when creating a new microservice.
Perform the following steps to do this:
- Create a new project. In this case, it will be a .NET Core Web API project on the .NET 6.0 framework.
- Name it Chapter09.Activity.9.01.
- Now, add the commonly used NuGet packages:
- AutoMapper.Extensions.Microsoft.DependencyInjection
- FluentValidation.AspNetCore
- Hellang.Middleware.ProblemDetails
- Microsoft.AspNetCore.Mvc.NewtonsoftJson
- Microsoft.Identity.Web
- Swashbuckle.AspNetCore
- Next, include the Azure Blobs Client package as Azure.Storage.Blobs.
- Create one or more controllers for communication with the Web API. In this case, you will move FileController to the Controllers folder.
- In order to create one or more services for business logic, move FilesService to the Services folder and FileServiceSetup to the Bootstrap folder.
- Then document API using XML docs and Swagger.
- Update the csproj file to include XML docs.
- Copy SwaggerSetup to the Bootstrap folder.
- Configure Controllers. In this scenario, it will be a plain one-line services.AddControllers() under the ControllersConfigurationSetup class and the AddControllersConfiguration method.
- Configure the problem details error mappings. In this case, there are no exceptions that you will explicitly handle. So, you will keep it as a one-liner within the ExceptionMappingSetup class and the AddExceptionMappings and services.AddProblemDetails() methods.
- Secure the API.
- Create AAD app registration for the new service. Refer to the Application Registration subsection in the Securing the Web API section.
- Update the configuration of the new service based on the Azure AD app registration client, tenant, and app IDs.
- Inject the needed services and configure the API pipeline.
- Copy the Program class.
- Since the ConfigureServices method contains extra services, you don't need to remove them. Leave the Configure method as is.
- Run the service through Swagger and upload a test file. Don't forget to generate a bearer token first using the token generator app from the updated values learned earlier.
- After that, try to get a test file that you just uploaded. You should see the status code 200:
- Get download link request:

Figure 9.49: Get download link request in Swagger
- Get download link response:

Figure 9.50: Get download link response in Swagger
Note
The solution to this activity can be found at https://packt.link/qclbF.
All the services that have been created so far require considerations such as hosting, scaling, and availability. In the following section, you will learn about serverless and Azure Functions.
Azure Functions
In the preceding section, you learned that microservice architecture is a self-contained service with both data access and business logic layers. With this approach, you have many services per module. However, working with microservices, especially at the start, might seem like a hassle. It might raise doubts such as the following:
- What does not big enough mean?
- Should you host on different servers or on the same machine?
- Is another cloud hosting model better?
These questions might be overwhelming. So, a simple way of calling your code through HTTP is by using Azure Functions. Azure Functions is a serverless solution that allows you to call your functions on the cloud. Serverless does not mean that there is no server; you just do not need to manage it by yourself. In this section, you will try to port CurrentTimeController from Exercise 9.02 to an Azure Function.
Note
Before proceeding with the steps, install Azure Functions Core Tools first using the instructions here: https://docs.microsoft.com/en-us/azure/azure-functions/functions-run-local?tabs=v3%2Cwindows%2Ccsharp%2Cportal%2Cbash%2Ckeda#install-the-azure-functions-core-tools. Azure Functions Core Tools also requires the Azure CLI to be installed (if you want to publish an Azure Functions application and not on a server). Follow the instructions here: https://docs.microsoft.com/en-us/cli/azure/install-azure-cli-windows?tabs=azure-cli.
Perform the following steps to do so:
- In VS Code, click the Extenstions icon (1).
- Then search for azure function in the search text box (2).
- Then, install the Azure Functions extension (3):

Figure 9.51: Searching for the Azure Functions extension in VS Code
A new Azure tab will appear on the left.
- Click the new Azure tab.
- On the new page, click the Add button (1).
- Select the Create Function… option (2):

Figure 9.52: The new Azure Functions extension in VS Code with the Create Function… button
- In the Create Function window, select HTTP trigger.
- Enter the name GetCurrentTime.Get.
- Name the project where it is held Pact.AzFunction.
- On the last screen, select anonymous.
At this point, there is no need to go into too much detail about this configuration. The key point to be considered here is that the function will be reachable publicly, through HTTP requests. A new project created through these steps will include the new Azure Function.
- Now, navigate to the root of the new project folder to run the project.
- Next, press F5 or click the Start debugging to update this list… message:

Figure 9.53: Azure Extension window with the to-be-built project
You will notice that upon a successful build, the message changes to the function name:

Figure 9.54: Azure Extension window with post-build project
The terminal output window, displayed at the bottom of VS Code, shows the following details:

Figure 9.55: The terminal output after a successful build
- Next, in VS Code Explorer, open GetCurrentTime.cs:
- Note that in Exercise 9.01, you worked with the GetCurrentTime code. You will reuse the same code here:
namespace Pact.Function
{
public static class GetCurrentTime
{
[Function("GetCurrentTime")]
public static HttpResponseData Run([HttpTrigger(AuthorizationLevel.Anonymous, "get", "post")] HttpRequestData request,
FunctionContext executionContext)
The template names are generated based on your configuration from before. An Azure Function is bound to an HTTP endpoint through the [Function("GetCurrentTime")] attribute.
Before you proceed, you might have noticed that, even though the function for getting the current time consumed a variable for timezoneid, there is no such variable here (yet). Unlike the previous REST APIs you created to pass parameters to an Azure Function, here you pass it through either a request body or query variables. The only problem here is that you will have to parse it yourself, as there are no bindings through attributes just like with the controller methods. The argument you need is just a simple string that can be passed as a query argument. This line parses the URI from the request and gets a timezoneId variable from the query string.
- Use the timezoneId variable to get the current time in a specific zone:
{
var timezoneId = HttpUtility.ParseQueryString(request.Url.Query).Get("timezoneId");
- Next up is the business logic. So, use the timezoneId variable to get the current time in a specified time zone:
var timezoneInfo = TimeZoneInfo.FindSystemTimeZoneById(timezoneId);
var time = TimeZoneInfo.ConvertTimeFromUtc(DateTime.UtcNow, timezoneInfo);
- Finally, serialize the results in HTTP 200 Ok as the text/plain content type:
var response = request.CreateResponse(HttpStatusCode.OK);
response.Headers.Add("Content-Type", "text/plain; charset=utf-8");
response.WriteString(time.ToString());
return response;
}
- Run this code and navigate to http://localhost:7071/api/GetCurrentTime?timezoneId=Central%20European%20Standard%20Time.
You will get the current time of that time zone, as follows:
2022-08-07 16:02:03
You have now grasped the workings of Azure Functions—a serverless solution to call your functions on the cloud.
It has been a long path through this book, but with the conclusion of this final activity, you have mastered all the concepts and skills required to create your own modern C# applications.
Summary
In this chapter, you learned how to build your own REST Web API using the ASP.NET Core Web API template. You learned how to tackle the ever-growing complexity of configuration using bootstrap classes. You were introduced to the OpenAPI standard and Swagger, a tool used for calling an API to see whether it has successfully rendered the documentation. You also delved into mapping exceptions to specific HTTP status codes, along with how to map DTOs to domain objects and vice versa. In the second half of the chapter, you practiced securing the Web API using AAD, learned the concept of microservices, and created one yourself—both through a new dedicated Web API and through an Azure Function.
Knowing how to create and consume Web APIs is important because that's what most of the software development is all about. You either consume or create Web APIs at some point. Even if you don't have to create one yourself, grasping the ins and outs of it will help you as a professional developer.
This brings a close to The C# Workshop. Throughout this book, you have learned the basics of programming in C#, starting with simple programs that used arithmetic and logical operators, followed by the increasingly complex concepts of clean coding, delegates and lambdas, multithreading, client and server Web APIs, and Razor Pages applications.
This concludes the print copy of this book, but it is not the end of your journey. Visit the GitHub repository at https://packt.link/sezEm for bonus chapters—Chapter 10, Automated Testing, and Chapter 11, Production-Ready C#: From Development to Deployment—covering such topics as different forms of testing before you take an in-depth look at unit testing using Nunit (the most popular third-party testing library for C#), getting acquainted with Git and using GitHub to keep a remote backup of your code, enabling Continuous Deployment (CD) and deployment from your code to the cloud, studying the cloud using Microsoft Azure, in addition to learning how to use GitHub Actions to perform CI and CD to push application changes live in production.