
Overview
In this chapter, you will step into the world of HTTP practice by making calls to Web APIs. You will interact with Web APIs in a variety of ways using a web browser, your own HTTP client, and NuGet packages. You will learn the basics of security involved in Web APIs, use PayPal to make sandbox payments, and explore cloud services such as Azure Text Analytics and Azure Blob storage.
By the end of this chapter, you will be able to read HTTP requests and response messages, make calls to any Web API, and create your own HTTP client to simplify your work with complex APIs. You will also be able to dissect and learn both incoming HTTP requests and outgoing HTTP responses in any form and use development tools in the Chrome browser to inspect traffic moving back and forth when browsing your favorite websites.
Introduction
The World Wide Web (WWW) (or just the web) is a big store of all sorts of documents (XML, JSON, HTML, MP3, JPG, etc.) accessible through Uniform Resource Locators (URLs). A document in the context of the web is often called a resource. Some resources do not change. They are stored somewhere, and with every request, the same resource will be returned. Such resources are called static. Other resources are dynamic, which means they will be generated on demand.
Communication on the web happens through protocols. In the context of retrieving documents, you use Hypertext Transfer Protocol (HTTP). Hypertext is a special text that holds a link to a resource on the web. Clicking on it opens the resource it points to. HTTP is based on a client-server architecture. In simple terms, a client sends requests, and the server responds. An example of this in practice is the communication between a browser (client) and a website (hosted on a server). Usually, a single server serves many clients:

Figure 8.1: Client-server architecture
When you navigate to a website, you send an HTTP GET request, and the server responds by displaying the relevant site content in the browser. GET is an HTTP verb—a method identifying how a request should be treated. Common HTTP verbs are the following:
- GET: Get a resource.
- POST: Create a resource or send a complex query.
- PUT: Update all resource fields.
- PATCH: Update a single field.
- DELETE: Remove a resource.
Browser
A modern browser is more than just a tool to access content on the internet. It includes tools to dissect elements of a website, inspect traffic, and even execute code. This side of a browser is called developer tools. The exact key binds may vary but pressing F12 or Control + Shift + I should call up the Developer Tools tab. Perform the following steps to get to know it better:
- Open Google Chrome or any other browser.
- Navigate to google.com. Press the keys Control + Shift + I.
- Go to Network (1). The following window should be displayed:
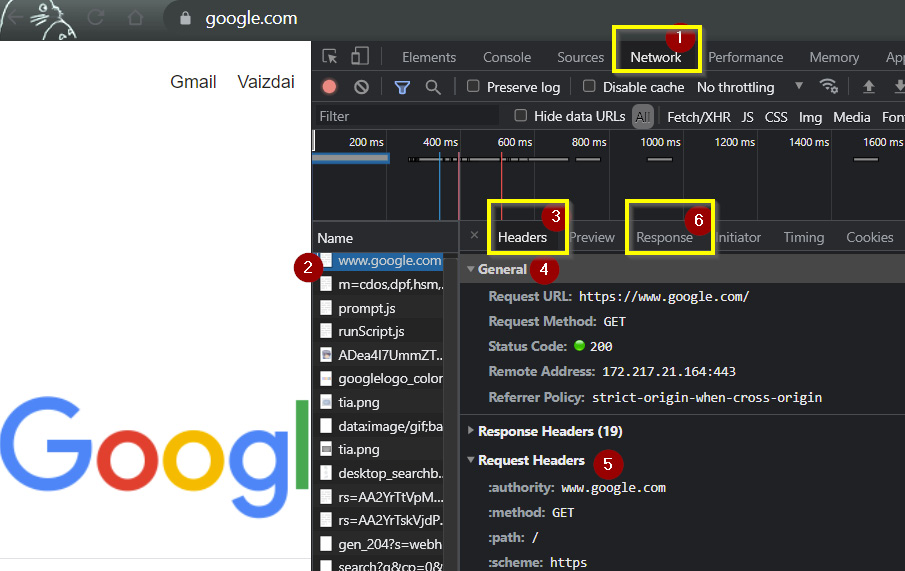
Figure 8.2: Chrome with developer tools open with google.com loaded
- Select the first entry, www.google.com (2).
- Click Headers (3).
- In the General (4) section, you can observe the effects when you navigated to google.com. The first thing that happened was HTTP GET request was sent to https://www.google.com/.
- In the Request Headers section (5), you can see the metadata sent with the request.
- To see how Google responded, click the Response section (6).
This flow is called the client-server architecture, and the following applies:
- The client is the Chrome browser that sends a request to google.com.
- The server is a machine(s) hosting google.com that responds with google.com website contents.
Web API
An Application Programming Interface (API) is an interface through which you can call some functionality using code. It could be a class or an interface in C#, or a browser (you can interact with it through code provided by its own interface), but in the context of HTTP, it is a web service. A web service is an API hosted on a remote machine that is accessible through HTTP. An access point used to invoke a single piece of functionality on a Web API is called an endpoint. The most commonly used Web API type is RESTful.
RESTful API
A Representational State Transfer (REST) API is an API built on the following six principles. Four principles are a given whatever framework you use implementing a RESTful API, and, as a client, they should be expected:
- Client-server: A connection is made between a client and server. The client sends a request in order to get a response from a server.
- Stateless: The server will be able to process requests regardless of prior requests. This means that each request should contain all the information, rather than relying on a server to remember what happened before.
- Cacheable: The ability to specify which requests can be cached using HTTP methods or headers.
- Code on demand (optional): REST allows scripts to be downloaded and executed on the client side. Back when the internet was made mostly of static pages, this was useful, but nowadays it is either not needed or is seen as a security risk.
However, the other two principles (Client-server and Stateless) depend on you, and thus you will want to pay more attention to them. A layered system is a system made of layers, and each layer communicates only with the layer directly below it. A typical example of this is a three-tier architecture, where you separate presentation, business logic, and the data store. From a practical point of view, this means that a RESTful API (business logic layer) should not send HTML as a response because the responsibility for rendering output lies with the client (the presentation layer).
The last principle is called a uniform interface. It defines a set of rules for an API:
- Identification of resources:
Some examples of these are get all instances of a resource (/resource), create a resource (/resource), get a single resource (/resource/id), and get all instances of a subresource in a resource (/resource/subresource/).
- Manipulation of resources through these representations:
Resources are manipulated using HTTP verbs representing Create, Read, Update, and Delete (CRUD)—GET, UPDATE, PUT, PATCH, DELETE.
- Self-descriptive messages:
A response that includes all the required information, without any extra documentation, and indicates how the message should be processed (headers, mime type, etc.).
- Hypermedia as the engine of application state (HATEOAS):
Hyperlinks are included in response to all the related resources so that you can navigate to them. This guideline is usually ignored.
REST is not the same as HTTP. REST is a set of guidelines, while HTTP is a protocol. The two might be confused because HTTP constraints heavily overlap with REST constraints (methods, headers, etc.). However, a RESTful API does not have to use HTTP to be RESTful, and at the same time HTTP can violate REST constraints by using a session or query parameters to provide actions to perform. A RESTful API can work with both XML and JSON data formats. However, almost all scenarios involve JSON.
Postman
Postman is one of the most popular tools used for testing different kinds of Web APIs. It is easy to set up and use. Postman, just like a browser, acts as an HTTP client. In order to download Postman, go to https://www.postman.com/. You will need to sign up and then download the installer. Once you have installed Postman, perform the following steps:
- Open Postman.
- Create your workspace by clicking Workspaces and then click on Create Workspace.
- In the new window, go to the Collections tab (2) and click the Create new Collection (+) button (3).
- Create a New Collection (4).
- Click on Add a request (5):

Figure 8.3: New Postman collection without requests
A new request window will open.
- Click the edit symbol beside New Request and name the new request Users (6).
- Select the GET HTTP verb and copy-paste the URL https://api.github.com/users/github-user (7).
Note
Here, and in all places that follow, replace github-user with your own GitHub username.
- Click the Send button (8).
- Now scroll down to see the response result returned (9):

Figure 8.4: GET GitHub user request in Postman
Postman is superior to a browser when it comes to acting as an HTTP client. It is focused on forming HTTP requests and displays response information compactly, offering multiple output formats. In Postman, you can use multiple environments, set up pre-and post-conditions for requests, automated calls, and a lot more, but going through those advanced features is beyond the scope of this chapter. For now, it is enough to learn that Postman is a go-to tool for testing Web APIs by hand.
Client
REST requires communication between a client and a server. In the previous examples, the client role was taken by either a browser or Postman. However, neither a browser nor Postman can replace a client in your code. Instead, you'll need to create an HTTP request using C#.
Popular Web APIs often have a client created for you (in most common languages as well). The purpose of a Web API client is to simplify interactions with the underlying API. For example, instead of sending a DELETE request on an endpoint that does not support it and getting the response Method Not Allowed, you won't even have such an option on a custom client.
Octokit
Octokit is a GitHub API client. It exposes a C# class through which you can pass objects to make calls to GitHub. The benefit of such a client is that you don't need to worry about which headers to pass or how to name things so that they are properly serialized. An API client handles all that for you.
You can install the Octokit client in your project by running the following command in the VS Code terminal or command prompt:
dotnet add package Octokit
Once you have the Octokit client installed, you can use it to create a GitHub client, as follows:
var github = new GitHubClient(new ProductHeaderValue("Packt"));
In the preceding snippet, you needed a new ProductHeaderValue because GitHub expects a UserAgent header. As mentioned earlier, custom HTTP clients prevent a mistake from happening before you can even make a request. In this case, not providing a UserAgent header (through ProductHeaderValue) is not an option.
To see whether the client works, try to get information on the username github-user:
const string username = "github-user";
var user = await github.User.Get(username);
Note
In GitHub, github-user is displayed as Almantask. It is better to change it to your individual GitHub username for the code to work.
To print the date when the user was created, type the following code:
Console.WriteLine($"{username} created profile at {user.CreatedAt}");
You will see the following output:
github-user created profile at 2018-06-22 07:51:56 +00:00
Every method available on the GitHub API is also available on GitHub client Octokit. You don't need to worry about the endpoint, mandatory headers, a response, or the request format; it is all defined by the strongly typed client.
Note
You can find the code used for this example at https://packt.link/DK2n2.
API Key
With many public free APIs, you may be faced with concerns such as the following:
- How can you control an overwhelming number of requests?
- At what point should which client be charged?
If all these public APIs offered only anonymous access, you would not be able to identify the clients or determine how many calls each of them has made. An API key serves as the most basic means of authentication (identifying the client) and authorization (granting them access to do something with an API). Simply put, an API key allows you to call an API. Without it, you would have little to no access to an API.
To help you grasp the use of API keys better, the next section will look at a Web API that requires one, that is, Azure Text Analytics.
Azure Text Analytics
Azure Text Analytics is an Azure API used to analyze text in the following ways:
- Identify named entities (people, events, organizations)
- Interpret the mood of the text (positive, negative, neutral)
- Produce a summary of a document or highlight key phrases
- Process unstructured medical data, such as recognizing people, classifying diagnoses, and so on
In order to demonstrate the Azure Text Analytics API, you will focus on sentimental analysis. This is the process of evaluating text according to a positive, negative, or neutral confidence score:
- The score of 1, which means 100%, is the probability that the prediction (negative, positive, neutral) is correct.
- The score of 0, which means 0%, is an impossible prediction.
Note
Using Azure Text Analytics is free until you analyze more than 5,000 words per 30 days.
Before you begin coding, you'll need to set up Azure Text Analytics on the Azure cloud. After all, you need both an endpoint and an API key to make a call to this API.
Note
Make sure you have set up an Azure subscription. If you don't have one, go to https://azure.microsoft.com/en-gb/free/search and follow the instructions there to create a free subscription. An Azure free trial offers many services for free. Some of those services will remain free even after a year. A student subscription is an option for getting Azure credits and free services for a longer period. A credit or debit card is required to create an Azure subscription; however, you won't be charged unless you exceed the given Azure credits of the free service limitations.
One way in which Azure Text Analytics could be used to sort positive and negative feedback is by determining whether what you wrote sounds passive-aggressive or friendly. To see this in action, follow the steps to create a small application that analyzes any text you input into a console:
- First, go to https://portal.azure.com/#create/Microsoft.CognitiveServicesTextAnalytics.
- Click Continue to create your resource without using any additional features:

Figure 8.5: Azure Text Analytics resource creation
- In the Create text analytics window, click the Basics tab. This is the first tab opened at the start of the creation of a new resource.
- Select an option in the Subscription and Resource group fields:

Figure 8.6: Entering the project details for new resource creation
- Then, select the region, for example, North Europe.
- Enter the name, for example, Packt-Test.
- After that, select the Free F0 pricing tier and click the Review + create button:
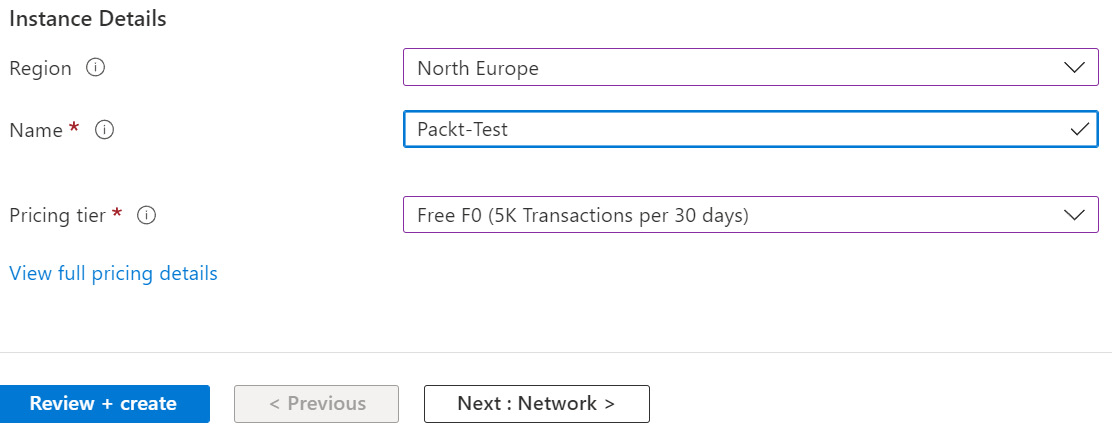
Figure 8.7: Azure Text Analytics pricing tier
A new window gets displayed confirming your input.
- Click the Create option. The Text Analytics API will start deploying. After the deployment of the service is done, a new window will open saying Your deployment is complete.
- Click on the Go to resource button:

Figure 8.8: The Text Analytics API showing the deployment as complete
The Text Analytics resource window gets displayed.
- Click the Keys and Endpoint option. You will see the Endpoint option along with KEY 1 and KEY 2 to make calls to this API. You can choose from either of the keys:

Figure 8.9: Azure Text Analytics quick start window with API key hyperlink
- Keep track of KEY 1 (an API key). An API key is a secret and should not be exposed in plain text. You will once again be using the environment variables to store it.
Create an environment variable with key and value pair. The value will be the endpoint API key required to connect to Azure Text Analytics. To help identify the missing environment variable, use a helper class. The GetOrThrow method will get a user environment variable, and if it doesn't exist, will throw an exception:
public static class EnvironmentVariable
{
public static string GetOrThrow(string environmentVariable)
{
var variable = Environment.GetEnvironmentVariable(environmentVariable, EnvironmentVariableTarget.User);
if (string.IsNullOrWhiteSpace(variable))
{
throw new ArgumentException($"Environment variable {environmentVariable} not found.");
}
return variable;
}
}
- Keep track of the Endpoint option. You will use it in the upcoming exercise to call the API you have just deployed.
This section helped you to set up Azure Text Analytics on the Azure cloud, in addition to setting both an endpoint and an API key to make a call to the API. In the following exercise, you will be using the Azure Text Analytics client to make calls to the API.
Exercise 8.01: Performing Sentimental Text Analysis on Any Text
Azure Text Analytics is just another REST API. Once again, you make HTTP calls to it and get a response. This time, you will send over a text to get its sentimental analysis. Do another practice run of using a strongly typed client and make calls to a RESTful API from C#.
Using a recently deployed Azure Text Analytics service (Pack-Test, in this case), perform sentimental analysis on any text you want. Perform the following steps to complete this exercise:
- Install the Azure.AI.TextAnalytics NuGet package to get an Azure Text Analytics API client as follows:
dotnet add package Azure.AI.TextAnalytics
- Add the TextAnalysisApiKey environmental variable.
- Then add the TextAnalysisEndpoint environmental variable.
- Create a Demo class and add references to the two environmental variables that you have recently added:
public class Demo
{
private static string TextAnalysisApiKey { get; } = EnvironmentVariable.GetOrThrow("TextAnalysisApiKey");
private static string TextAnalysisEndpoint { get; } = EnvironmentVariable.GetOrThrow("TextAnalysisEndpoint");
These properties are used to hide sensitive values of the API key and endpoint.
- Create a new BuildClient method to build an API client:
static TextAnalyticsClient BuildClient()
{
var credentials = new AzureKeyCredential(TextAnalysisApiKey);
var endpoint = new Uri(TextAnalysisEndpoint);
var client = new TextAnalyticsClient(endpoint, credentials);
return client;
}
The API client requires both a base URL—a kind of Unified Resource Identifier (URI)—and an API key to operate, both of which are passed to it during initialization.
- Using the client, create the PerformSentimentalAnalysis method to analyze the text:
private static async Task<DocumentSentiment> PerformSentimentalAnalysis(TextAnalyticsClient client, string text)
{
var options = new AnalyzeSentimentOptions { IncludeOpinionMining = true };
DocumentSentiment documentSentiment = await client.AnalyzeSentimentAsync(text, options: options);
return documentSentiment;
}
Here, you are using the configuration object AnalyzeSentimentOptions to extract targets and opinions on them. The client has both the AnalyzeSentimentAsync and AnalyzeSentiment methods. For public client libraries, exposing both async and non-async versions of the same method is a very common scenario. After all, not everyone will be comfortable with an async API. However, when making calls to another machine (DB, API, and similar) it's best to use an async API. This is because an async call will not block the thread on which the call is made while it is waiting for a response from an API.
- Now create a DisplaySentenceSymmary function to display the sentence's overall evaluation:
private static void DisplaySentenceSummary(SentenceSentiment sentence)
{
Console.WriteLine($"Text: "{sentence.Text}"");
Console.WriteLine($"Sentence sentiment: {sentence.Sentiment}");
Console.WriteLine($"Positive score: {sentence.ConfidenceScores.Positive:0.00}");
Console.WriteLine($"Negative score: {sentence.ConfidenceScores.Negative:0.00}");
Console.WriteLine($"Neutral score: {sentence.ConfidenceScores.Neutral:0.00}{Environment.NewLine}");
}
- Create a DisplaySentenceOpinions function to display the message Opinions for every target in a sentence:
private static void DisplaySentenceOpinions(SentenceSentiment sentence)
{
if (sentence.Opinions.Any())
{
Console.WriteLine("Opinions: ");
foreach (var sentenceOpinion in sentence.Opinions)
{
Console.Write($"{sentenceOpinion.Target.Text}");
var assessments = sentenceOpinion
.Assessments
.Select(a => a.Text);
Console.WriteLine($" is {string.Join(',', assessments)}");
Console.WriteLine();
}
}
}
The target of a sentence is a subject that has an opinion (grammatical modifier) applied to it. For example, with the sentence, a beautiful day, day would be a target and beautiful an opinion.
- To perform a sentimental analysis on text typed in a console, create a SentimentAnalysisExample method:
static async Task SentimentAnalysisExample(TextAnalyticsClient client, string text)
{
DocumentSentiment documentSentiment = await PerformSentimentalAnalysis(client, text);
Console.WriteLine($"Document sentiment: {documentSentiment.Sentiment} ");
foreach (var sentence in documentSentiment.Sentences)
{
DisplaySentenceSummary(sentence);
DisplaySentenceOpinions(sentence);
}
}
The analysis text, in the preceding code snippet, evaluates the overall text's sentiment and then breaks it down into sentences, evaluating each.
- To demonstrate how your code works, create a static Demo.Run method:
public static Task Run()
{
var client = BuildClient();
string text = "Today is a great day. " +
"I had a wonderful dinner with my family!";
return SentimentAnalysisExample(client, text);
}
With the environment variable set correctly, the following output should be displayed:
Document sentiment: Positive
Text: "Today is a great day."
Sentence sentiment: Positive
Positive score: 1,00
Negative score: 0,00
Neutral score: 0,00
Text: "I had a wonderful dinner with my family!"
Sentence sentiment: Positive
Positive score: 1,00
Negative score: 0,00
Neutral score: 0,00
Opinions:
dinner is wonderful
You did not hardcode the value of an API key here because an API key, exposed publicly, poses a risk of being used not the way it was intended to. If stolen, it could have disastrous consequences (for example, being overused, creating a false resource, leaking data, deleting data, etc.). That is why when dealing with secrets, use the minimal possible countermeasures, that is, environmental variables.
Another benefit of environment variables is the ability to have a different value in different environments (local, integration, system test, production, etc.). Different environments often use different resources. So, pointing to those resources through environment variables will not require any changes to the code.
In order to run this exercise, go to https://packt.link/GR27A and comment all lines within the static void Main(string[] args) body, except await Exercises.Exercise01.Demo.Run();. Similarly, uncomment the respective exercises'/examples'/activities' code lines in Program.cs before executing each of them.
Note
You can find the code used for this exercise at https://packt.link/y1Bqy.
This exercise is just one of the many in which you consumed a public Web API. Azure is full of services like this. Calling an API using a strongly typed client is simple; however, not all APIs have one. In the next section, you will learn how to create your own Web API client.
Your Own Client
So far, you've only used a premade client to consume a Web API. However, for less popular APIs, there will not be any client for you to use. In those cases, you will have to make HTTP calls yourself. In .NET, the way of making calls has evolved quite a lot. If you don't want any third-party libraries, you can use the HttpClient class.
HttpClient
In this section, you'll repeat the GitHub Users example (from the Postman section), but this time using HttpClient. The flow for this is quite simple and is described for you in detail in the following example:
- Within the GitHttp static class, create the GetUser method:
public static async Task GetUser()
- Within the GitExamples method, first, create a client:
client = new HttpClient { BaseAddress = new Uri("https://api.github.com") };
client.DefaultRequestHeaders.Add("User-Agent", "Packt");
Creating a client almost always involves specifying a specific base URL. Often, Web APIs require mandatory headers to be passed, or else they will invalidate the request (400 Bad Request). For GitHub, you need to send the User-Agent header identifying the client that calls the API. Adding the Packt user agent header to default headers will send that header with every request to the client.
- You then create a request as follows:
const string username = "github-user"; //replace with your own
var request = new HttpRequestMessage(HttpMethod.Get, new Uri($"users/{username}", UriKind.Relative));
Remember to replace github-user with your own GitHub username. Here, you've specified that you want to create a GET request. You did not specify a full path, but rather only the endpoint you want to hit; therefore, you had to flag UriKind as Relative.
- Next, send a request using the client:
var response = await client.SendAsync(request);
There is only an async version of sending an HTTP request message, so you need to wait for it. The result of sending HttpRequestMessage is HttpResponseMessage.
- Then, deserialize the content to a usable object as follows:
var content = await response.Content.ReadAsStringAsync();
var user = JsonConvert.DeserializeObject<User>(content);
Deserializing is the act of converting a structured text such as JSON into in-memory objects. For this, you need to convert the content to a string and then deserialize it. You could use a user model from Octokit NuGet. Since you are already making custom calls, you might as well use a custom model. For the bare minimum (only the fields you use), your model could look like this:
public class User
{
public string Name { get; set; }
[JsonProperty("created_at")]
public DateTime CreatedAt { get; set; }
}
The line [JsonProperty("created_at")], above public DateTime CreatedAt { get; set; }, binds the JSON field to the C# property. This binding is needed because the names don't match.
If you want to create your own client (for making GitHub calls), it's your responsibility to expose all data that the API returns and not just the data you may need for a particular scenario by letting the consumer choose.
- Use the message from a previous call from Postman to get the GitHub user response body to generate models to deserialize to. In this case, the response message is as follows (message truncated for clarity):
{
"login":"github-user",
"id":40486932,
"node_id":"MDQ6VXNlcjQwNDg2OTMy",
"name":"Kaisinel",
"created_at":"2018-06-22T07:51:56Z",
"updated_at":"2021-08-12T14:55:29Z"
}
There are many tools available that can convert JSON to the C# model.
- In this case, use https://json2csharp.com/ to convert JSON to the C# model code.
- Copy the response (GET github/user) and go to https://json2csharp.com/.
- Paste the response into the textbox on the left and click the Convert button:

Figure 8.10: Converting JSON to the C# model code
The left side displays a model for the JSON, while the right side displays the code (C# class) that is generated from JSON.
- Copy the content on the right and paste it into your code:
public class Root
{
public string login { get; set; }
public int id { get; set; }
public string node_id { get; set; }
public string name { get; set; }
public DateTime created_at { get; set; }
public DateTime updated_at { get; set; }
}
This is your model. Observe in the preceding code that Root is an unreadable class name. This is because the converter didn't have a way to know what class JSON represents. The Root class represents a user; therefore, rename it User.
Lastly, the converter was probably created prior to .NET 5, which is why it didn't have a feature for records. A record is a great class for serialization purposes and a great candidate for a data transfer object (DTO). A DTO is a class that has no logic but simply data, and sometimes attributes for binding serialization. The benefits you get are the following:
- Value equality
- ToString will return properties and their values
- The ability to define them with a less verbose syntax
So, use a record for defining DTOs in your applications whenever possible.
- Rename the (Root to User) and change the type from class to record. The code line looks like this with no changes needed to the properties:
public record User
- Finally, run the following line of code:
Console.WriteLine($"{user.Name} created profile at {user.CreatedAt}");
The output gets displayed as follows:
Kaisinel created profile at 2018-06-22 07:51:56
In order to run this exercise, go to https://packt.link/GR27A and comment all lines within the static void Main(string[] args) body, except await Examples.GitHttp.Demo.Run();. Similarly, uncomment the respective exercises'/examples'/activities' code lines in Program.cs before execution.
Note
You can find the code used for this example at https://packt.link/UPxmW.
Now that you have seen the benefits of using the HttpClient class in lieu of third-party libraries, you can now explore the IDisposable pattern in the following section.
HttpClient and IDisposable
HttpClient implements the IDisposable pattern. In general, right after you are done using an object that implements IDisposable, you should clean up and call the Dispose method or wrap the calls within a using block. However, HttpClient is special in that you should not frequently create and dispose of it all over again. The problem with disposing and re-initializing HttpClient is that HttpClient manages connections it makes to other APIs and disposing of HttpClient does not properly close those connections (or sockets).
The most dangerous part about that is that you will not notice any difference in developing your application locally, due to the massive number of connections available. However, when deploying an application to a live environment, you risk running out of free socket connections. Once again, avoid calling a Dispose method and reinitializing HttpClient. If you must, use HttpClientFactory. Not only does HttpClientFactory manage the lifetime of socket connections by managing HttpClientMessageHandler (the component responsible for sending the HTTP request and receiving the response) but it also provides logging capability, allows centralized management of clients' configuration, supports injecting middleware to clients, etc. The mentioned benefits are important if you use HttpClient in an enterprise setting. You can learn more about HttpClientFactory in Chapter 9, Creating API Services.
Ideally, you should have one static HttpClient, which you can reuse for calls to Web APIs throughout your application. However, you should not have a single HttpClient for everything. The point about not disposing of HttpClient and having a static one is not a hard rule. If you call many different APIs, they will have their own base addresses, mandatory headers, and so on. Having a single object for all is not a viable scenario.
The requests you've handled so far were publicly accessible and did not have security. However, expensive or private operations in Web APIs are usually protected. Typically, protection is set up using an Authorization header. In many cases, an Authorization header involves some sort of an ID and secret. In the case of the GitHub API, it involves a client ID and client secret. But to get them, you will need to create an OAuth app.
Before you can do this though, you need to get familiar with OAuth.
OAuth
OAuth is an open-standard authorization protocol that allows delegating access on behalf of a user. This section will explore two examples:
- Real-life analogy
- API analogy
Real-life Analogy
Imagine a child at school. The teacher of that child is organizing a trip to another city. A permission slip from the parents is needed. The parents give a note: It's okay for my child to go to place X. The child gives the note to the teacher and gets permission to travel to a field trip to destination X.
API Analogy
Many applications are interconnected, with integrations to each other. For example, the famous social platform Discord allows you to display whatever accounts you have on other social media. But to do that, you need to connect to the platform of social media you want to display. For example, when you are on Discord and try to link a Twitter account, you will be required to log in on Twitter. A login will require a certain scope of access (your profile name, in this case). A successful login is proof that access is given, and Discord will be able to display your profile information on Twitter on your behalf.
OAuth App for GitHub
Returning to the subject of GitHub, what is an OAuth app? It is a registration for a single point of security. It acts as your application identity. A GitHub user might have zero or more applications. As mentioned before, an OAuth app includes a client ID and secret. Through them, you can use the GitHub API. In other words, you can set it up to request access to secure features of GitHub, such as changing your personal data on GitHub.
GitHub has an interesting API limitation. If more than 60 unauthenticated requests come from the same IP, it will block subsequent requests for up to an hour. However, the rate limitation can be removed by authorizing requests. That is the prime reason why you will be using authorization for an otherwise public endpoint.
OAuth usually involves two client applications:
- One that requests permission on behalf of someone
- Another that grants that permission
Therefore, when setting up OAuth, you will most likely be required to create a URL to return to after the permission is granted from the client that can grant access. Setting up an OAuth app on GitHub involves these steps:
- In the top-right corner, click on your profile picture and click Settings:

Figure 8.11: Account settings in GitHub
- On the left side, scroll down almost to the bottom of the menu and click the Developer settings option:
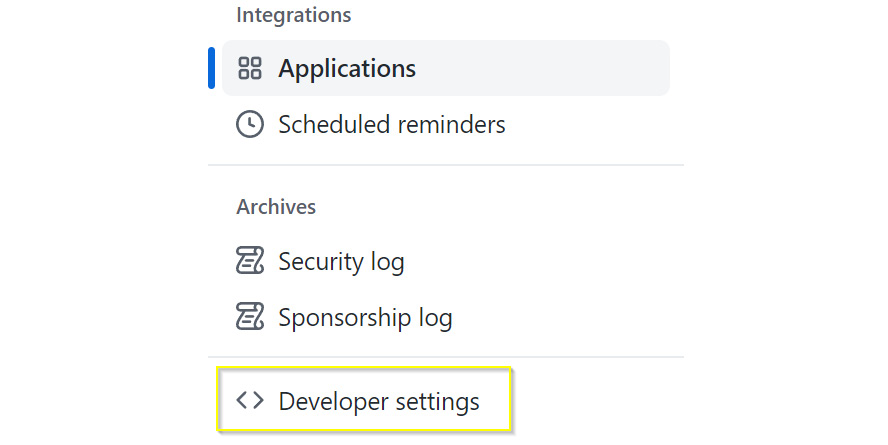
Figure 8.12: Developer settings in GitHub
- Now select the Oauth Apps option:

Figure 8.13: Selecting OAuth apps in Developer settings in GitHub
- Then click the Register a new application button:

Figure 8.14: Creating a new OAuth app in GitHub
Note
If you have previously created an OAuth app, then this window will display all those listed. In order to create a new one, you will have to click New OAuth App.
- In the next window, you will complete the form. Start by filling in Application name (5). Avoid using special characters.
- Next, fill in Homepage URL (6).
This URL usually points to a website that describes the use of OAuth for a particular case and why it is required. Even if you don't have a website that describes such a case, you can type a placeholder URL (in this case, myapp.com). The field accepts anything as long as it is a valid URL.
- Fill in the Authorization callback URL (7) field. This can be whatever you want. Here, myapp.com/home is used. Use a valid callback URL.
- Click Register application (8):

Figure 8.15: New OAuth app window in GitHub
- In the new window, you will see Client ID and Client secrets:

Figure 8.16: Details of a new OAuth app on GitHub with app credentials—Client ID and Client secrets
It is best to store a client secret in a safe place for future reference because you will see it only once on GitHub. If you forget it, you will have to create a new secret and delete the old one.
Now you have successfully created an OAuth app on GitHub. The client secret is partly hidden in this screenshot for a reason. You should never expose it publicly. In order to use it in a demo, you will use environmental variables first to hide them.
- So, store the values in environmental variables GithubClientId and GithubSecret.
- Then expose the two through static properties in Demo.cs (explained earlier) as follows:
private static string GitHubClientId { get; } = Environment.GetEnvironmentVariable("GithubClientId", EnvironmentVariableTarget.User);
private static string GitHubSecret { get; } = Environment.GetEnvironmentVariable("GithubSecret", EnvironmentVariableTarget.User);
This section covered the steps to set up an OAuth app in GitHub that can be used to request access to secure features of GitHub, such as changing your personal data. With this knowledge, you can now use a client ID and client secret to create authorized calls on the GitHub API, as demonstrated in the following section.
Authorization Header
Authorization headers come in three forms—basic, API key (or personal access token), and third-party authentication. The GitHub API does not allow an unlimited number of calls from the same source. Like the Azure Text Analytics client, it uses an API key as well. However, in this case, the API key is used for rate limiting (how many calls you can make in an hour). For anonymous calls, it only allows 60 calls an hour. However, by using a valid Authorization header, the amount is increased to 5,000.
In the following example, you'll make one more call than the rate limit allows (60 + 1 = 61). That way, you will get user information 61 times. For that to happen, you will also make sure that the CacheControl header is set to NoCache because you don't want a request to be ignored after 60 consecutive calls:
public static async Task GetUser61Times()
{
const int rateLimit = 60;
for (int i = 0; i < rateLimit + 1; i++)
{
const string username = "github-user";
var request = new HttpRequestMessage(HttpMethod.Get, new Uri($"users/{username}", UriKind.Relative));
request.Headers.CacheControl = new CacheControlHeaderValue(){NoCache = true};
var response = await client.SendAsync(request);
if (!response.IsSuccessStatusCode)
{
throw new Exception(response.ReasonPhrase);
}
This block of code is an adaptation of the GetUser method from the HttpClient section. There are three main adjustments here:
- The first is that everything in a loop runs 61 times.
- You have also added an error handler, which means if a response is not a success, you will print an error message returned by the API.
- Lastly, you add a CacheControl header to ignore caching (because you do want 61 calls to the server).
Running this code results in an error message on the sixty-first call, which proves the API rate limitation (the error message has been truncated for clarity):
60) Kaisinel created profile at 2018-06-22 07:51:56
Unhandled exception. System.Exception: rate limit exceeded
To fix this, you will need to add an Authorization header (you will add it just under the CacheControl header):
GitHttp.cs
public static async Task GetUser61Times(string authHeader)
{
const int rateLimit = 60;
for (int i = 0; i < rateLimit + 1; i++)
{
const string username = "github-user"; // replace with your own
var request = new HttpRequestMessage(HttpMethod.Get, new Uri($"users/{username}", UriKind.Relative));
request.Headers.CacheControl = new CacheControlHeaderValue(){NoCache = true};
request.Headers.Add("Authorization", authHeader);
var response = await client.SendAsync(request);
if (!response.IsSuccessStatusCode)
{
throw new Exception(response.ReasonPhrase);
}
The complete code can be found here: https://packt.link/1C5wb.
Due to GitHub's limitations on anonymous calls (for example, the fact that you can make only 60 requests per hour to get user profile information), you will find it more efficient to provide an Authorization header so that you are identified and therefore released from such strict constraints. In the examples that follow, you will get an authorization token that you will feed to this method, thus showing how authorization will help you overcome the rate limit.
When running the demo code placed at https://packt.link/Uz2BL, it is recommended that you run one example at a time (i.e., uncomment one line and comment the rest within the Run method). This is because the Demo.cs file is a mix of authorized and anonymous calls, and you might get unexpected results. However, keep the line where you get a token as it may be required by individual examples.
At the end of this section, you should have grasped the logic behind the Authorization header and its three forms—basic, API key (or personal access token), and third-party authentication—and learned that, like the Azure Text Analytics client, the GitHub API uses an API key. Now you can move on to basic authentication.
Basic Authentication
Basic authentication involves a username and password. The two are usually combined in a single string and encoded using the following format:
Basic username:password
Here is the code used to generate an authorization taken for basic authentication:
public static string GetBasicToken()
{
var id = GitHubClientId;
var secret = GitHubSecret;
var tokenRaw = $"{id}:{secret}";
var tokenBytes = Encoding.UTF8.GetBytes(tokenRaw);
var token = Convert.ToBase64String(tokenBytes);
return "Basic " + token;
}
Use a username and password to get a basic token. Then pass it to the GetUser61Times method:
var basicToken = GitExamples.GetBasicToken();
await GitExamples.GetUser61Times(basicToken);
Calling GetUser61Times no longer displays an error because the rate limitation is avoided by supplying an Authorization header.
Note
You can find the code used for this example at https://packt.link/Uz2BL and https://packt.link/UPxmW.
The next section will cover the more specialized API key and personal access token, which are similar as they both grant access to otherwise protected data.
API Key and Personal Access Token
A personal access token is limited to personal data. However, an API key can be used for the whole API. Other than the scope of what can be accessed, the two have no difference in how they are used. You can add an API key or a personal access token to an Authorization header as is.
But, of course, to use an access token of a certain API, you first need to create it. You can do this through the following steps:
- Go to GitHub's Developer settings option under Settings window.
- Navigate to Personal access tokens (1).
- Select Generate new token button (2):

Figure 8.17: Creating a new personal access token
- Next, enter your GitHub password.
- Add a note (this can be anything) and scroll down. This screen will help you to modify user data, so check the user checkbox (4) to get access to it.
- Click the Generate token button (5):
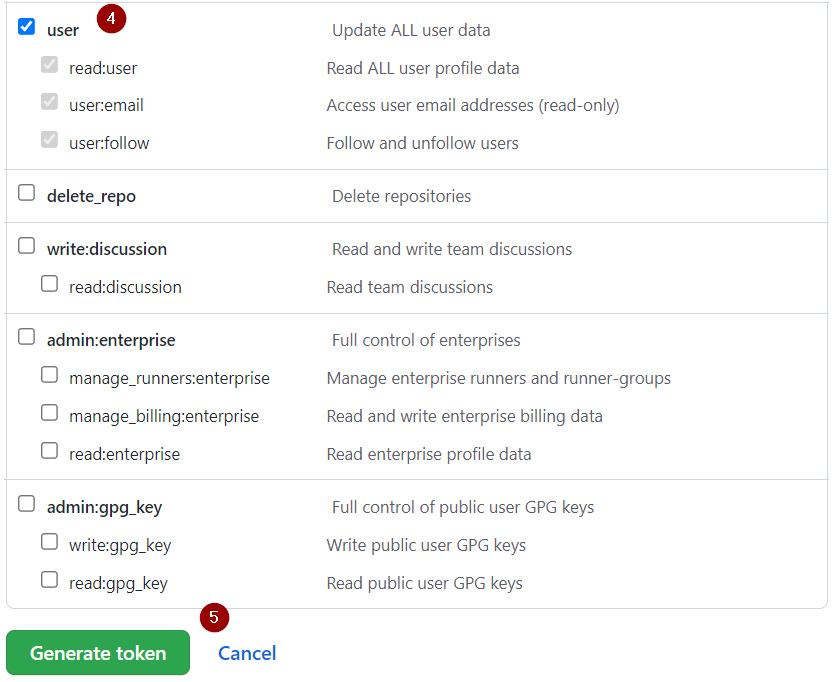
Figure 8.18: Scope of access configured for a personal access token
In the new window, you will see all the personal access tokens, along with the newly added ones:

Figure 8.19: A new personal access token created on GitHub
Note
Remember that you will see the value of a token only once. So, make sure you copy and store it securely. Also, be aware that the personal access token expires after a month, at which point you need to regenerate it.
- Create an environmental variable called GitHubPersonalAccess.
- Add the personal access token to Demo.cs:
private static string GitHubPersonAccessToken { get; } = Environment.GetEnvironmentVariable("GitHubPersonalAccess", EnvironmentVariableTarget.User);
- Run the following code:
await GetUser61Times(GitHubPersonAccessToken);
You will observe that calling the GetUser61Times method does not fail.
Access tokens, authorization tokens, API keys, and JWTs (which will be further covered in the following sections) are different means to prove to an API that you have been granted access to it and have rights to a resource you want. But regardless of which specific kind of authorization you use, they will usually all go to the same place—that is, the Authorization header.
The next section will detail an authorization protocol called OAuth2.
Third-Party Authentication—OAuth2
GitHub is an example of an authorization server. It allows access to a resource or functionality in the name of the owner. For example, updating the user's employment status is only available to a logged-in user. However, this can be done directly given the user has been granted the access to do so. A program getting access on behalf of someone is what OAuth2 is all about.
Perform the following steps to modify the user's employment status:
- Navigate to this URL or send an HTTP GET request:
https://github.com/login/oauth/authorize?client_id={{ClientId}}&redirect_uri={{RedirectUrl}}
Here, {{ClientId}} and {{RedirectUrl}} are the values that you have set in the OAuth2 GitHub app.
Note
Replace the placeholders {{ClientId}} and {{RedirectUrl}} with the ones from your GitHub OAuth app.
The following screen prompts you to log in to your GitHub app:

Figure 8.20: Signing in to OAuth2 GitHub app
- Complete Username and Password.
- Next, click the Sign in button to log in.
After a successful login, you will be redirected to a URL specified in your OAuth2 app.
- Create a request for the token by sending an HTTP POST request to a URI in the following format:
{tokenUrl}?client_id={clientId}&redirect_uri={redirectUri}&client_secret={secret}&code={code}:
The code for it is as follows:
private static HttpRequestMessage CreateGetAccessTokenRequest()
{
const string tokenUrl = "https://github.com/login/oauth/access_token";
const string code = "2ecab6ecf412f28f7d4d";
const string redirectUri = "https://www.google.com/";
var uri = new Uri($"{tokenUrl}?client_id={GitHubClientId}&redirect_uri={redirectUri}&client_secret={GitHubSecret}&code={code}");
var request = new HttpRequestMessage(HttpMethod.Post, uri);
return request;
}
In this case, the redirect URL was https://www.google.com. The URI you ended up with was https://www.google.com/?code=a681b5126b4d0ba160ba. The code= part is the code needed to get the OAuth access token. The token is returned in the following format:
access_token=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&scope=user&token_type=bearer
- Before this token can be used, you need to parse it from the response. So, create a function to parse the token response:
private static Dictionary<string, string> ConvertToDictionary(string content)
{
return content
.Split('&')
.Select(kvp => kvp.Split('='))
.Where(kvp => kvp.Length > 1)
.ToDictionary(kvp => kvp[0], kvp => kvp[1]);
}
This takes every = property and puts it into a dictionary. The string before = is a key and the string after = is a value.
- Use the GetToken function to create and send a request and parse a response, then format the token and return it:
private static async Task<string> GetToken()
{
HttpRequestMessage request = CreateGetAccessTokenRequest();
var response = await client.SendAsync(request);
var content = await response.Content.ReadAsStringAsync();
Dictionary<string, string> tokenResponse = ConvertToDictionary(content);
// ValidateNoError(tokenResponse);
var token = $"{tokenResponse["token_type"]} {tokenResponse["access_token"]}";
return token;
}
Here, you created a request, sent it to a client, parsed the response as a token, and then returned it. ValidateNoError is commented out for now. You will come back to it later. The returned token should look something like this:
bearer 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
This token is a bearer token, which is a token generated by an authorization server (in this case, GitHub) that grants access to GitHub on behalf of you (or any other username used for logging in to GitHub). You can use it to send requests that require special access. For example, update the employment status of a user.
- To update the employment status of a user, use the UpdateEmploymentStatus function:
public static async Task UpdateEmploymentStatus(bool isHireable, string authToken)
{
var user = new UserFromWeb
{
hireable = isHireable
};
var request = new HttpRequestMessage(HttpMethod.Patch, new Uri("/user", UriKind.Relative));
request.Headers.Add("Authorization", authToken);
var requestContent = JsonConvert.SerializeObject(user, new JsonSerializerSettings { NullValueHandling = NullValueHandling.Ignore });
request.Content = new StringContent(requestContent, Encoding.UTF8, "application/json");
var response = await client.SendAsync(request);
var responseContent = await response.Content.ReadAsStringAsync();
Console.WriteLine(responseContent);
}
This block of code sets the user's property isHireable to true and prints the updated user information. The important part here is content; when sending PUT, PATCH, or a POST request, you often need a body with a request (or content in other words).
The act of converting an in-memory object into structured text (for example, JSON) is called serialization. In this case, a body is a user update. You send a PATCH request because you only want to change the updated values. If a value is not provided in the content, it should not change. That's the key difference between a PATCH and POST request—a successful request overrides all values (even if you don't provide them).
You used new JsonSerializerSettings { NullValueHandling = NullValueHandling.Ignore } in order to avoid providing null values. This is because you do not want to update all the fields; just the ones you have supplied.
When creating HTTP content, you also need to supply a MIME type (a type of media sent over with the request). It is needed so that the server has a hint for how it is expected to process the request. A MIME type follows this format:
type/subtype
In this case, application/json means that the client should expect JSON from a server. application is the most common MIME type, which means binary data.
There is also StringContent, which is a type of serialized content, usually as JSON or XML. Alternatively, you could use StreamContent or ByteContent, but those are slightly rarer and are used when performance or the volume of data is of concern.
The following code shows the full demo:
public static async Task Run()
{
var oathAccessToken = await GitExamples.GetToken();
await GitExamples.UpdateEmploymentStatus(true, oathAccessToken);
}
In the GetToken method (used in Step 6 of the Third-Party Authentication (OAuth2) section), there was one commented line of code, ValidateNoError. Uncomment it and implement the GetToken method, because you won't always get a successful response, and parsing a token in that case will fail (i.e., it won't exist). Therefore, it is always a good idea to validate the server response and throw an exception when the unexpected happens. Look at the following GitHub error format:
error=bad_verification_code&error_description=The+code+passed+is+incorrect+or+expired.&error_uri=https%3A%2F%2Fdocs.github.com%2Fapps%2Fmanaging-oauth-apps%2Ftroubleshooting-oauth-app-access-token-request-errors%2F%23bad-verification-code
It is not very readable. ValidateNoError will format the response and throw that as an exception, instead of letting it fail silently:
private static void ValidateNoError(Dictionary<string, string> tokenResponse)
{
if (tokenResponse.ContainsKey("error"))
{
throw new Exception(
$"{tokenResponse["error"].Replace("_", " ")}. " +
$"{tokenResponse["error_description"].Replace("+", " ")}");
}
}
If you run the code again and it fails for the same reasons, the error message will now read as follows:
bad verification code. The code passed is incorrect or expired.
This section covered the basics of how to send HTTP requests with some sort of security in place. In the sections that follow (Restsharp and Refit), you will create clients using third-party libraries to remove some of the boilerplate code required by HttpClient.
Note
You can find the code used for this example at https://packt.link/UPxmW.
Request Idempotency
An idempotent HTTP request is a request that always results in the same outcome. Only GET, PUT, and PATCH requests are idempotent because they either make no change or make the same change all over again, but that change does not ever cause an error and results in the same data. DELETE is not idempotent because deleting an already deleted item will produce an error. POST may or may not be idempotent, but that solely depends on the implementation.
PUT, PATCH, or POST
The difference between PUT, PATCH, and POST can be summed up as follows:
- PUT is used for overriding fields in a model. Even if a single value is explicitly provided, the whole model will have the unprovided values (or at least that's the expectation). For example, if you wanted to update user details by first getting the old details and then sending a modified version, you would use PUT.
- PATCH is used for updating only a single value that was provided explicitly. For example, if you wanted to update a username, it would make sense to send PATCH over a PUT request.
- POST is used for creating items or sending a complex query. Either way, the default expectation of this verb is to have side effects. For example, if you wanted to create a user, you would use a POST request.
Exercise 8.02: HttpClient Calling a Star Wars Web API
You might be familiar with Star Wars. There are movies, games, and TV series. However, did you know that it also has multiple APIs to retrieve data? The upcoming exercise will introduce you to a different format of an API and will make you familiar with deserializing slightly more complex responses.
In this exercise, you will create a strongly typed API client that will, under the hood, use HttpClient. The client will be used to return Star Wars movies. You will be using Star Wars API (SWAPI) (https://swapi.dev/). The required endpoint is https://swapi.dev/api/films/. Perform the following steps to complete this exercise:
- Create a new class to hold HttpClient with a base URL:
public class StarWarsClient
{
private readonly HttpClient _client;
public StarWarsClient()
{
_client = new HttpClient {BaseAddress = new Uri("https://swapi.dev/api/")};
}
This will act as a strongly typed API client.
Note
The / at the end of the URI indicates that more text will be appended to the URI (after api rather than after dev).
- Create a type for representing a movie:
Film.cs
public record Film
{
public string Title { get; set; }
public int EpisodeId { get; set; }
public string OpeningCrawl { get; set; }
public string Director { get; set; }
public string Producer { get; set; }
[JsonProperty("release_date")]
public string ReleaseDate { get; set; }
public string[] Characters { get; set; }
public string[] Planets { get; set; }
public string[] Starships { get; set; }
public string[] Vehicles { get; set; }
public string[] Species { get; set; }
public DateTime Created { get; set; }
The complete code can be found here: https://packt.link/tjHLa.
This is a class you will use for deserializing movies within a response. The ReleaseDate property has [JsonProperty("release_date")] above it to specify that the "release_date" JSON field will map to the ReleaseDate C# property.
- Create a type for storing results:
public record ApiResult<T>
{
public int Count { get; set; }
public string Next { get; set; }
public string Previous { get; set; }
[JsonProperty("results")]
public T Data { get; set; }
}
This is also a type for deserializing a movie response; however, the Star Wars API returns results in paginated format. It contains Previous and Next properties pointing to previous and next pages. For example, if you don't provide the page you want, it will return a value of null. However, the next property will point to the next page only if there are any elements left (otherwise it will also be null). Querying the API using next or previous as a URI will return the resources of that page. You used the JsonProperty attribute above T Data to provide JSON-to-property mapping because the property and JSON names do not match (the JSON field name is results while Data is the property name).
Note
You could have changed ApiResult to have the Results property instead of Data. However, ApiResult.Results is a bit confusing. When writing code, instead of ease of automation (in this case, serialization), choose ease of maintainability and readability. For this reason, the name chosen in Step 3 is different but clearer.
- Now, create a method to get multiple films:
public async Task<ApiResult<IEnumerable<Film>>> GetFilms()
{
You've returned a task so that others can await this method. Almost all HTTP calls will be async Task.
- Create an HTTP request to get all movies:
var request = new HttpRequestMessage(HttpMethod.Get, new Uri("films", UriKind.Relative));
The URI is relative because you're calling it from HttpClient that already has a base URI set.
- To query the Star Wars API for movies, send this request:
var response = await _client.SendAsync(request);
- It returns HttpResponseMessage. There are two important parts to this: status code and response body. C# has a method to determine whether there were any errors based on the status code. To handle errors, use the following code:
if (!response.IsSuccessStatusCode)
{
throw new HttpRequestException(response.ReasonPhrase);
}
Error handling is important because a failed HTTP request will often result in an error status code rather than an exception. It's recommended you do something similar before trying to deserialize the response body as, if it fails, you might get an unexpected body.
- Now, call the ReadAsStringAsync method:
var content = await response.Content.ReadAsStringAsync();
var films = JsonConvert.DeserializeObject<ApiResult<Film>>(content);
return films;
}
The response has content that is more likely to be a kind of stream. To convert HttpContent to a string, call the ReadAsStringAsync method. This returns a string (JSON), which allows you to convert JSON to a C# object and deserialize the results. Lastly, you get the results by deserializing the response content body and converting it all to ApiResult<Film>.
- For a demo, create the client and use it to get all the Star Wars films, then print them:
public static class Demo
{
public static async Task Run()
{
var client = new StarWarsClient();
var filmsResponse = await client.GetFilms();
var films = filmsResponse.Data;
foreach (var film in films)
{
Console.WriteLine($"{film.ReleaseDate} {film.Title}");
}
}
}
If everything is fine, you should see the following result:
1977-05-25 A New Hope
1980-05-17 The Empire Strikes Back
1983-05-25 Return of the Jedi
1999-05-19 The Phantom Menace
2002-05-16 Attack of the Clones
2005-05-19 Revenge of the Sith
This exercise illustrates how to create strongly typed HTTP clients for simplicity.
Note
You can find the code used for this exercise at https://packt.link/2CHpb.
You might have noticed that sending an HTTP request and using an HTTP client is very similar to the way a simple text file is sent to the GitHub API. Even if it was different, endpoints throughout the same API usually share the same requirements. However, if you manually craft an HTTP request every time you need to call an API, you are not being very efficient. A better way is to create something reusable. A common approach is to create BaseHttpClient. You will put this into practice in the following activity.
Activity 8.01: Reusing HttpClient for the Rapid Creation of API Clients
The problem with HttpClient is that you still have to manage many things by yourself:
- Error handling
- Serializing and deserializing
- Mandatory headers
- Authorization
When working in a team or on a bigger project, you are likely to be making more than just one HTTP call. The consistency and same requirements between different calls need to be managed.
The aim of this activity is to show one of many ways you can simplify working with repetitive HTTP calls. You will be using the BaseHttpClient class, which you will create first. The class will generalize error handling and deserializing responses and requests, which will significantly simplify different HTTP calls that you make. Here, you will learn how to implement a base client by rewriting StarWarsClient using BaseHttpClient.
Perform the following steps to complete this activity:
- Create a base HttpClient class. A base client wraps HttpClient. Therefore, you will hold a private reference to it and allow it to be created from a URL. The inner HttpClient often also includes base headers, but they are not required in this case.
- Define a way to create requests for every method. For brevity, stick to a GET request. Within a GET request, it is a common practice to define the default headers, but once again, it is not mandatory in this example.
- Create a method to send requests and include error handling and deserialization.
- In SWAPI, if you are querying multiple results, you get back ApiResult<IEnumerable<T>> for pagination. Create a SendGetManyRequest method.
- Use the base client you have created and simplify the client from Exercise 8.02.
- Run the code through the same demo code but using the new version of StarWarsClient.
- If you run the demo once again with the new StarWarsClient, you should see the same films returned:
1977-05-25 A New Hope
1980-05-17 The Empire Strikes Back
1983-05-25 Return of the Jedi
1999-05-19 The Phantom Menace
2002-05-16 Attack of the Clones
2005-05-19 Revenge of the Sith
In order to run this activity, go to https://packt.link/GR27A and comment all lines within the static void Main(string[] args) body, except await Activities.Activity01.Demo.Run();.
Note
The solution to this activity can be found at https://packt.link/qclbF.
Reusing HttpClient like that is very useful because it removes code duplication. However, calling a Web API and removing duplicate code is a common problem and is likely to be solved in some way by some libraries. The following section will explore how to simplify calls to a Web API using two popular NuGet packages:
- RestSharp
- Refit
RestSharp
The idea behind RestSharp is very similar to the base HttpClient—reducing code duplicity. It simplifies the creation of a request and provides a lot of the utility for making HTTP calls. Redo StarWarsClient using RestSharp, but first, you'll install the RestSharp NuGet:
dotnet add package RestSharp
Now create a client that is very similar to the one you created in Activity 8.01:
public class StarWarsClient
{
private readonly RestClient _client;
public StarWarsClient()
{
_client = new RestClient("https://swapi.dev/api/");
}
Having RestSharp created gives you a response serialization out of the box. It is also able to guess which HTTP method you will use:
public async Task<ApiResult<IEnumerable<Film>>> GetFilms()
{
var request = new RestRequest("films");
var films = await _client.GetAsync<ApiResult<IEnumerable<Film>>>(request);
return films;
}
}
You passed the minimum required information to make an HTTP request (calling films, returning ApiResult<IEnumerable<Film>>) and the rest is done. This is very much like the base client you wrote previously.
Note
ApiResult is the same type used in Exercise 8.02.
However, if you run this code against your demo, you will notice that the Data property (on JSON) comes back as null. This is because you had a JsonProperty attribute on the response and film classes. RestSharp uses a different serializer, which does not know about those attributes. To make it work, you could either change all the attributes to what RestSharp comprehends or use the same serializer as before. You are using Newtonsoft.Json and, in order to use that in RestSharp, you need to call the UseSerializer method, selecting JsonNetSerializer:
public StarWarsClient()
{
_client = new RestClient("https://swapi.dev/api/");
_client.UseSerializer(() => new JsonNetSerializer());
}
On running the demo, the following output gets displayed:
1977-05-25 A New Hope
1980-05-17 The Empire Strikes Back
1983-05-25 Return of the Jedi
1999-05-19 The Phantom Menace
2002-05-16 Attack of the Clones
2005-05-19 Revenge of the Sith
The results are the same as those in Exercise 8.02; however, the difference is using the Newtonsoft serializer in the preceding example. RestSharp is probably the best abstraction for HttpClient as it minimizes the amount of code you need to write to make HTTP calls even while keeping its similarities with HttpClient.
Note
You can find the code used for this example at https://packt.link/f5vVG.
The example aims to communicate with Web APIs using HTTP requests. Even though the demo files look the same, they are using either a different library or design pattern. In the following activity, you will practice consuming more APIs using RestSharp.
Activity 8.02: The Countries API Using RestSharp to List all Countries
The address https://restcountries.com/v3/ is a public web API that provides a list of all existing countries. Suppose that using that API, you need to get a list of all countries, find a country by its capital city (for example, Vilnius), and find all the countries that speak in a given language (for example, Lithuanian). You need to print only the first two country names, their regions, and their capitals, and implement a strongly typed client to access this API using RestSharp.
The aim of this activity is to make you feel more comfortable using third-party libraries (RestSharp) when making HTTP calls. Using third-party libraries often saves a lot of time. It allows you to reuse something that is already available.
Perform the following steps to complete this activity:
- Create a base client class using the URL https://restcountries.com/v3/.
Note
Navigating to https://restcountries.com/v3/ will return the HTTP status code 404 with a Page Not Found message. This is because the base API URI doesn't contain any information on a resource; it is yet to be completed and is just the beginning of a full URI for a resource.
- Create models for serialization.
- Use the example https://restcountries.com/v3/name/peru to get a response.
- Copy the response and then use a class generator, such as https://json2csharp.com/, to make models out of JSON (response).
- Within the client, create the following methods: Get, GetByCapital, and GetByLanguage.
- Create a demo calling all three methods.
- Print the countries within each response.
The result should be as follows:
All:
Aruba Americas Oranjestad
Afghanistan Asia Kabul
Lithuanian:
Lithuania Europe Vilnius
Vilnius:
Lithuania Europe Vilnius
Note
The solution to this activity can be found at https://packt.link/qclbF.
You now know that RestSharp simplifies the creation of a request and provides a lot of the utilities for making HTTP calls. The next section will help you practice using Refit, which is another way to consume an API.
Refit
Refit is the smartest client abstraction because it generates a client from an interface. All you have to do is provide an abstraction:
- To use the Refit library, first install the Refit NuGet:
dotnet add package Refit
- To create a client in Refit, first create an interface with HTTP methods:
public interface IStarWarsClient
{
[Get("/films")]
public Task<ApiResult<IEnumerable<Film>>> GetFilms();
}
Please note that the endpoint here is /films rather than films. If you run the code with films, you will get an exception suggesting that you change the endpoint with a preceding /.
- To resolve the client, simply run the following code:
var client = RestService.For<IStarWarsClient>("https://swapi.dev/api/");
On running the demo, the following output gets displayed:
1977-05-25 A New Hope
1980-05-17 The Empire Strikes Back
1983-05-25 Return of the Jedi
1999-05-19 The Phantom Menace
2002-05-16 Attack of the Clones
2005-05-19 Revenge of the Sith
The results are the same as the ones you saw in Exercise 8.02; however, the difference is in the implementation.
Note
You can find the code used for this example at https://packt.link/cqkH5.
Use Refit only when your scenarios are trivial. Though Refit might seem like the easiest solution, it comes with its own complications when you need custom authorization for more complex scenarios. You will simplify the solution further in the following activity.
Activity 8.03: The Countries API Using Refit to List all Countries
The more different ways you know of doing the same thing, the easier you can make a choice and pick the best tool for the job. Different teams may use different tools and Refit is quite a unique, minimalistic approach that you may encounter. Others may say it complicates work because there is too much hidden in the client interface (less code often does not mean that you can grasp the code easily). It doesn't matter whether you are for Refit or against it; it's good to have practiced things first-hand and formed your own opinion. This activity will help you do exactly that. Here, you will access the Countries API to display all countries, countries by their language, and by their capital city.
The aim of this activity is to show how practical Refit can be for rapid prototyping when it comes to consuming simple APIs. The steps for this are as follows:
- Create models for serialization. For that, use the example https://restcountries.com/v3/name/peru to get a response.
- Now copy the response.
- Then use a class generator, such as https://json2csharp.com/, to make models out of JSON (response).
- Define an interface with methods: Get, GetByCapital, and GetByLanguage.
- Create a demo printing a country name, region, and country status.
The result will be displayed as follows:
All:
Aruba Americas Oranjestad
Afghanistan Asia Kabul
Lithuanian:
Lithuania Europe Vilnius
Vilnius:
Lithuania Europe Vilnius
Note
The solution to this activity can be found at https://packt.link/qclbF.
.NET has a few other native ways of creating HTTP requests, and for that, you can use HttpWebRequest or WebClient. The two are not deprecated and it is fine to use them, but they are older alternatives compared to the newer HttpClient. The next section covers all these.
In the following section, you'll find out about other libraries that solve the problem of code duplication when using HttpClient.
Other Ways of Making HTTP Requests
Refit and RestSharp are just two of many libraries solving the problem of code duplication when using HttpClient. Flurl and TinyRest are another two popular alternatives. New libraries are created every year and they are ever evolving. There is no one best way that suits all scenarios. To be sure you make the right choice, you'll want to do a little research first as there are some pitfalls to these alternatives to consider.
HttpClient was designed for the lowest-level HTTP calls in .NET. It is the safest option because it is well-documented, tested, and allows the most freedom. Though there are many libraries that are much simpler to use than HttpClient, they often target basic scenarios (no authorization, no dynamically set headers). When it comes to creating advanced HTTP calls, they often turn out to be quite complicated.
When it comes to choosing which client to use, first go for the one provided natively by the API. If there is no client for the API, think about the complexity and scope of your project. For simple, small-scope projects, use whatever NuGet HttpClient alternative you find the most convenient. But if the scope of a project is big and the calls are complex, use the native HttpClient offered by the framework.
In the next exercise, you will implement an example where using Refit will turn it into a complication. To fix that complication, you will use both HttpClient and RestSharp.
Exercise 8.03: A Strongly Typed HTTP Client for Testing Payments in a PayPal Sandbox
A common scenario in programming is making payments. However, during the development stage, you don't want to use a real bank account and thus look for ways to process payments in a test environment—that is, a sandbox. In this exercise, you will learn how to call a payments sandbox API. You will use PayPal's sandbox API (https://developer.paypal.com/docs/api/orders/v2/) to create an order and get the order that you have created.
This exercise will use Refit for the client interface and the implementation resolution. It will also use HttpClient to provide a way of getting auth headers for Refit. Lastly, you will use RestSharp to get an access token from within HttpClient. Perform the following steps to complete this exercise:
- Go to https://www.paypal.com/tt/webapps/mpp/account-selection.
- Create a PayPal account (either personal or business).
- Choose your location and click the Get Started button.
- Provide your mobile number.
- Click the Next button and enter the code.
- Set up your profile by entering an email address and password.
- Provide your address details.
- Now link your credit or debit card. You can also do this for free by following the instructions given at https://www.paypal.com/tt/webapps/mpp/account-selection.
Note
Creating an account on PayPal is free. The linking of credit (or debit) card requirement is just a part of account creation, and it doesn't charge you. The payment gets refunded as soon as the authentication is confirmed.
- Now log out of the account and go to https://developer.paypal.com/developer/accounts/.
- Click the Log in to Dashboard button and proceed ahead:

Figure 8.21: Log in to the PayPal dashboard to manage both sandbox and live environments
- Then enter the requested credentials and proceed to the next screen.
- Click the Accounts option under the Sandbox option. You will see two test accounts created for you:

Figure 8.22: Sandbox PayPal accounts for testing
You will use these accounts to do testing in the next steps.
Note
The PayPal sandbox is free.
- Go to https://developer.paypal.com/developer/applications to get your client ID and secret. Just like the GitHub example, PayPal uses an OAuth app to provide you with a client ID and a secret.
- For one of the default accounts, PayPal also generates a default OAuth app. So, click the Sandbox tab and select Default Application:

Figure 8.23: OAuth app creation for PayPal
- In the new window, inspect both Client ID and Secret.
- Take note of both and store them in environmental variables:

Figure 8.24: Default application details displaying Client ID and Secret
- Create properties for accessing the PayPal client ID and secret in a new empty class, Exercise03.AuthHeaderHandler.cs:
public static string PayPalClientId { get; } = EnvironmentVariable.GetOrThrow("PayPalClientId");
public static string PayPalSecret { get; } = EnvironmentVariable.GetOrThrow("PayPalSecret");
Here, the EnvironmentVariable.GetOrThrow helper methods are used to get the user's environment variable or throw it if it doesn't exist. You will use these properties to make a connection to the sandbox PayPal API.
Note
You can find the code used for environment variables at https://packt.link/y2MCy.
- In the Demo.cs class, add a const variable for the BaseAddress of a PayPal sandbox:
public const string BaseAddress = "https://api.sandbox.paypal.com/";
BaseAddress will be used for initializing different clients (RestSharp and Refit) with the PayPal URL.
- Use Refit to create a client with CreateOrder and GetOrder methods:
public interface IPayPalClient
{
[Post("/v2/checkout/orders")]
public Task<CreatedOrderResponse> CreateOrder(Order order);
[Get("/v2/checkout/orders/{id}")]
public Task<Order> GetOrder(string id);
}
To get a sample request, refer to the documentation of the API that you want to call. Usually, they have an example request. In this case, the PayPal CreateOrder request can be found at https://developer.paypal.com/docs/api/orders/v2/:
{
"intent":"CAPTURE",
"purchase_units":[
{
"amount":{
"currency_code":"USD",
"value":"100.00"
}
}
]
}

Figure 8.25: PayPal CreateOrder example request with highlighted body
In Figure 8.25, -d is an argument and does not belong to the request body.
- Use https://json2csharp.com/ and generate C# classes out of the JSON. The corresponding C# classes will be generated for you.
- Rename RootObject to Order and change all classes to the record type because it's a more suitable type for DTO:
IPayPalClient.cs
public record Order
{
public string intent { get; set; }
public Purchase_Units[] purchase_units { get; set; }
}
public record Name
{
public string name { get; set; }
}
public record Purchase_Units
{
public Amount amount { get; set; }
public Payee payee { get; set; }
The complete code can be found here: https://packt.link/GvEZ8.
- Using the same PayPal docs (https://developer.paypal.com/docs/api/orders/v2/), copy the example response:
{
"id": "7XS70547FW3652617",
"intent": "CAPTURE",
"status": "CREATED",
"purchase_units": [
{
"reference_id": "default",
"amount": {
"currency_code": "USD",
"value": "100.00"
},
"payee": {
"email_address": "[email protected]",
"merchant_id": "7LSF4RYZLRB96"
}
}
],
"create_time": "2021-09-04T13:01:34Z",
"links": [
{
"href": "https://api.sandbox.paypal.com/v2/checkout/orders/7XS70547FW3652617",
"rel": "self",
"method": "GET"
}
]
}
- Use https://json2csharp.com/ and generate C# classes out of the JSON. Here, you will get classes very similar to the ones from request JSON. The only difference is the response (simplified for brevity):
public class CreateOrderResponse
{
public string id { get; set; }
}
- Use AuthHeaderHandler to fetch an access token when you make a request and make sure it inherits DelegatingHandler:
public class AuthHeaderHandler : DelegatingHandler
{
To make calls to PayPal, you will need an auth header with every request. The auth header value is retrieved from yet another endpoint. Refit cannot just add a header on a whim. You can, however, set up Refit using a custom HttpClient with a custom HttpMessageHandler that fetches an access token whenever you make a request. The AuthHeaderHandler is used for that reason.
DelegatingHandler is a class that allows intercepting HttpRequest when it's being sent and doing something before or after it. In this case, before you send an HTTP request, you will fetch an auth header and add it to the request sent.
- Now, override SendRequest by adding a bearer token to AuthenticationHeader:
protected override async Task<HttpResponseMessage> SendAsync(HttpRequestMessage request, CancellationToken cancellationToken)
{
var accessToken = await GetAccessToken(CreateBasicAuthToken());
request.Headers.Authorization = new AuthenticationHeaderValue("Bearer", accessToken);
return await base.SendAsync(request, cancellationToken).ConfigureAwait(false);
}
- To get an access token, you first need to get an OAuth token using basic auth (the client ID and secret):
private static string CreateBasicAuthToken()
{
var credentials = Encoding.GetEncoding("ISO-8859-1").GetBytes(PayPalClientId + ":" + PayPalSecret);
var authHeader = Convert.ToBase64String(credentials);
return "Basic " + authHeader;
}
- Getting an access token will require an auth token. Use the RestSharp client and add an Authorization header to the request.
- Next, set content-type to application/x-www-form-urlencoded as per the PayPal API spec.
- Add the body content grant_type=client_credentials as follows:
private static async Task<string> GetAccessToken(string authToken)
{
var request = new RestRequest("v1/oauth2/token");
request.AddHeader("Authorization", authToken);
request.AddHeader("content-type", "application/x-www-form-urlencoded");
request.AddParameter("application/x-www-form-urlencoded", "grant_type=client_credentials", ParameterType.RequestBody);
- Execute the preceding request and return the response using the private nested class Response to simplify your work:
var response = await RestClient.ExecuteAsync<Response>(request, Method.POST);
return response.Data.access_token;
}
private class Response
{
public string access_token { get; set; }
}
}
Why is the nested class needed? Here, the access token is nested within the response. It's not just a string that it returns, but rather an object. To parse it yourself from JSON would be a little complicated. However, you already know how to deserialize objects. So, even if it's just one property, deserializing still helps.
- Now, create RestClient for the GetAccessToken method. Do so in the AuthHandler class:
private static readonly RestClient RestClient = new RestClient(baseAddress);
- In the Demo class, create the method Run:
public static async Task Run()
{
- Resolve a Refit client with a custom AuthHeaderHandler provider:
var authHandler = new AuthHeaderHandler {InnerHandler = new HttpClientHandler() };
var payPalClient = RestService.For<IPayPalClient>(new HttpClient(authHandler)
{
BaseAddress = new Uri(baseAddress)
});
- Assuming that a payment was made by creating an Order object, run the following code:
var order = new Order
{
intent = "CAPTURE",
purchase_units = new[]
{
new Purchase_Units
{
amount = new Amount
{
currency_code = "EUR", value = "100.00"
}
}
}
};
- Now, call PayPal API and create an order endpoint with the order you've just created.
- Get the created order to see if it works and print the retrieved order payment information:
var createOrderResponse = await payPalClient.CreateOrder(order);
var payment = await payPalClient.GetOrder(createOrderResponse.id);
var pay = payment.purchase_units.First();
Console.WriteLine($"{pay.payee.email_address} - " +
$"{pay.amount.value}" +
$"{pay.amount.currency_code}");
With the environment variables set correctly, you should see the following output:
[email protected] - 100.00EUR
As mentioned earlier, this is a sandbox API. However, a switch to a live environment with real money would just be a matter of setting up new PayPal accounts in that environment and calling a different endpoint: https://api-m.paypal.com.
Note
You won't be able to access https://api-m.paypal.com because it is for production PayPal use and is paid. However, that should be the only change in code (a different base URI) when you are ready to move on to real integration with PayPal.
Please make sure you have the environment variables set and are using your own client and secret. Otherwise, some unhandled exception errors may be displayed.
Note
You can find the code used for this exercise at https://packt.link/cFRq6.
You now know how to do simple CRUD operations with Web APIs. However, you have only worked with text so far. So, will calling an API with an image be any different? Find that out in the next activity.
Activity 8.04: Using an Azure Blob Storage Client to Upload and Download Files
Azure Blob Storage is a cloud service on Azure for storing different files (logs, images, music, and whole drives). Before you can use any Azure Storage services, you will need a storage account. Blobs are just files, but they cannot be directly stored within an account; instead, they need a container.
An Azure Storage Container is like a directory where other files are stored. However, unlike a directory, a container cannot contain other containers. Use an Azure Storage Account to create two containers, upload an image and a text file, and then download the uploaded files locally. All this will be done in your own client, which wraps around the Azure Blob storage client.
The aim of this activity is to familiarize yourself with working on files through cloud storage while putting all that you have learned so far to the test. Perform the following steps to complete this activity:
- Navigate to Azure Storage Accounts.
- Create a new Azure Storage Account.
- Store a blob storage access key in environmental variables with the name BlobStorageKey.
- Install the Azure Blob Storage client.
- Create the FilesClient class for storing fields for blobs client and default container client (where blobs will be stored by default).
- Create a constructor to initialize the two clients (to support access to different containers).
- Add a method to create a container or get an existing one if it already exists.
- Create a method to upload a file to a specific container.
- Create a method to download a file from a specific container.
- Create a Demo class with paths to download and upload directories.
- Add test data, namely the two files—that is, an image and a text file (Figure 8.26, Figure 8.27, and Figure 8.28):

Figure 8.26: Two Azure Storage containers, exercise04 and exercise04b, in your storage account
Text file:
Figure 8.27: Test1.txt file uploaded in exercise04 container
Image file:
Figure 8.28: Morning.jpg file uploaded in exercise04b container
- Create the method Run to upload a text file and then download it locally.
- Run the code. If you did everything correctly, you should see the following output with both files downloaded locally:

Figure 8.29: Morning.jpg and Test1.txt files downloaded from the two containers after the demo code execution
Note
The solution to this activity can be found at https://packt.link/qclbF.
It is near impossible to create a perfect client that is suitable for everyone. Therefore, even when there is a solution for some problem given to you, you will often still need to further abstract it away, adapting it to solve exactly the problem you have. The problem you had was in uploading and downloading a file from and to a specific folder. To solve the problem, you abstracted away layers of clients exposing just two functions—one for uploading a file and another for downloading a file.
Summary
No matter the kind of programmer you are, there will be many scenarios in which you will have to consume a web service. There are different kinds of services online, but the most common type is RESTful. REST is just a set of guidelines and should therefore not be mixed up with HTTP. REST APIs are simple, self-documented, well-structured, and are currently a golden standard of Web APIs. However, in most cases in the context of RESTful APIs, a request is sent over HTTP and your message contains JSON.
The main tool for making HTTP calls using C# is HttpClient, however, before you try to implement HTTP calls yourself, you should look for a NuGet package of the Web API you're trying to consume. Azure Blob storage, Azure Text Analytics, PayPal, and GitHub are just a few examples of Web APIs.
In this chapter, you learned about a lot of functionality on the web that is done for you. It's not hard to consume; all you need to know now is how to communicate with the third-party RESTful Web APIs. In the next chapter, you will learn how to create your own RESTful web services using the ASP.NET Core Web API template as well as being introduced to Azure Functions and the special tools Swagger and NuGet.