
9
Continuous Integration
In the previous chapters, we went through the software development process of a toy car model inventory solution. We followed the test-driven development process, and at this stage, we should now be familiar with it. However, there are still a lot of missing features in the software that we are building. In this chapter, we will start with an almost complete solution that you can get from the GitHub repository for this chapter. We will then make sure our solution works.
In this chapter, we’ll start with an almost complete software solution except for the missing last feature, which is to filter the table containing the toy car models. We have built a lot of tests; wouldn’t it be great if we could automatically trigger the execution of these tests whenever we created a pull request to the develop or main branch? Automatically triggering the test suites that we have spent so much time developing will help us catch bugs or defects before they even get merged into the main branch. This is where continuous integration will be able to help us.
In this chapter, we will go through the following topics:
- Running and passing all the Symfony application tests
- Using Bitbucket Pipelines for continuous integration
Technical requirements
In this chapter, you are expected to have basic knowledge of using Git version control for web applications. You should also use the development environment and solution code from this book’s GitHub repository: https://github.com/PacktPublishing/Test-Driven-Development-with-PHP-8/tree/main/Chapter%209.
Preparing the development environment for this chapter
First, download the code found at https://github.com/PacktPublishing/Test-Driven-Development-with-PHP-8/tree/main/Chapter%209.
To run the containers and execute the commands in this chapter, you should be inside the docker-server-web-1 container.
Run the following command to confirm the container name for our web server:
docker ps
To run the containers, run the following command from the /docker directory from the repository in your host machine:
docker-compose build && docker-compose up -d
docker exec -it docker-server-web-1 /bin/bash
Once inside the container, run the following commands to install the libraries required through Composer:
/var/www/html/symfony# ./setup.sh
/var/www/html/behat# ./setup.sh
Running and passing all the Symfony application tests
In the previous chapter, we started writing solution code by trying to follow the SOLID principles. To develop the other parts of the application, we can just continue following the same process. In this chapter, I have taken the liberty to complete all other tests and the solution code needed to pass those tests. We will go through the tests and make sure they pass.
Setting up the local environment
Check out the source code provided in the Technical requirements section into your local development machine and run the following commands from the host machine to configure your development environment:
$ cd docker
$ docker-compose build && docker-compose up -d
After running these commands, make sure that the containers we built earlier in this book are up and running by running the following command:
$ docker ps
You should see the following Docker container names:
docker_server-web_1
docker_app-phpmyadmin_1
docker_server-mysql_1
Now that the containers are running, we need to prepare the Symfony and Behat applications running inside the docker_server-web_1 container by installing the packages they depend on, as well as creating the database and tables that our example PHP application needs.
Preparing the Symfony application and tests
Now, let’s set up the required database tables and libraries needed by our Symfony application. While still inside the docker directory, run the following command from your host machine:
$ docker exec -i docker_server-web_1 /var/www/html/symfony/setup.sh
Alternatively, run the following command inside the docker_server-web_1 container:
/var/www/html/symfony# ./setup.sh
The setup.sh file is just a shell script I have added to easily configure our Symfony application and prepare the database and tables we need to run the tests.
If you open the following shell file, you will see that we are simply running some Doctrine commands and using Composer to install all the Symfony dependencies needed:
codebase/symfony/setup.sh
#!/bin/bash
composer install -d /var/www/html/symfony/
# Test DB
php /var/www/html/symfony/bin/console doctrine:database:create -n --env=test
php /var/www/html/symfony/bin/console doctrine:migrations:migrate -n --env=test
php /var/www/html/symfony/bin/console doctrine:fixtures:load -n --env=test
# Main DB
php /var/www/html/symfony/bin/console doctrine:database:create -n
php /var/www/html/symfony/bin/console doctrine:migrations:migrate -n
php /var/www/html/symfony/bin/console doctrine:fixtures:load -n
This shell script will come in handy once we are running the application in the continuous integration (CI) machine.
After running the setup.sh command, your development environment should be ready to run all the unit and integration tests from inside our Symfony application.
In Chapter 5, Unit Testing, we created a shell script called codebase/symfony/runCoverage.sh. This shell script will help us run all the tests and check how much test coverage we have against our solution code. Realistically speaking though, we don’t have to cover all the code inside our application since some of them are third-party libraries with no tests, or some of them might be just Plain Old PHP Object (POPO) classes. But for the code that we develop, we should add automated tests for them.
If you think you need to exclude some classes from the code coverage report, you can open the codebase/symfony/phpunit.xml configuration file and add the directories you want to exclude from the coverage report.
From within the docker_server-web_1 container, if you open the codebase/symfony/tests directory inside our Symfony application, you will see the following tests:
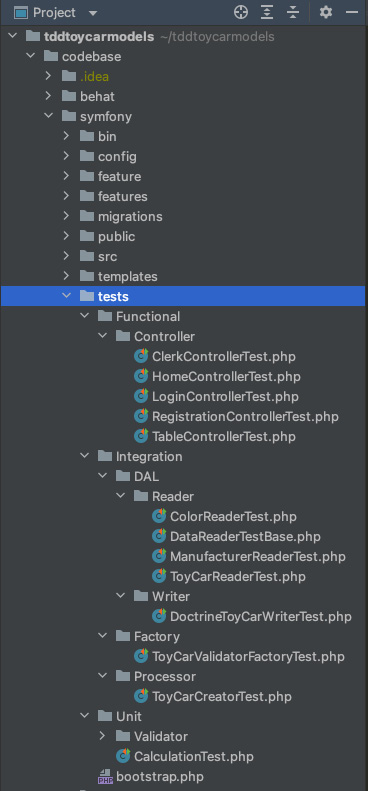
Figure 9.1 – Symfony tests directory
We have three main directories for the tests: Functional, Integration, and Unit. The Functional tests in this example are the controller tests, which are the tests that use HTTP requests; you can think of them as Integration tests as well but they cover more integrated code. The Integration tests are the tests that run through the different custom classes and how they interact with each other, making sure that they all work as expected. Finally, the Unit tests are simple tests that focus on single units or functions inside a specific class.
You can browse through the directories and classes inside codebase/symfony/src to check the actual classes our tests are testing against.
Let’s see whether the tests pass; from the host machine, run the following command:
$ docker exec -i docker_server-web_1 /var/www/html/symfony/runTests.sh
Alternatively, run the following command inside the docker_server-web_1 container:
/var/www/html/symfony# ./runTests.sh
Since we have configured the database and tables needed for the tests, you should see the following result:
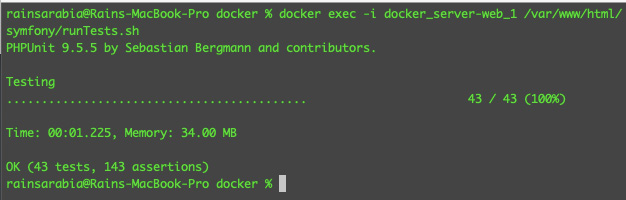
Figure 9.2 – Passing Symfony tests
It looks like we have a lot of passing tests, but let’s open one of the test classes and see exactly what we are testing for.
Open codebase/symfony/tests/Integration/DAL/Reader/ColorReaderTest.php; you will see the following content:
<?php
namespace AppTestsIntegrationDALReader;
use AppDALReaderDoctrineColorReader;
use AppEntityColor;
use AppModelToyColor;
class ColorReaderTest extends DataReaderTestBase
{
    public function testCanReadColors()
    {
        $reader = $this->getServiceContainer()->get(ColorReader::class);
        $colorsFromDb = $reader->getAll();
        /** @var Color $color */
        foreach ($colorsFromDb as $color) {
            $this->assertInstanceOf(ToyColor::class, $color);
            $this->assertIsInt($color->getId());
            $this->assertNotNull($color->getName());
        }
    }
}
You will notice that in this test class, we are reading data from the database and running some assertions against the results from the database. In Chapter 7, Building Solution Code with BDD and TDD, we created the databases we needed for both testing and the main database for the actual solution code.
We have the following databases inside the docker_server-mysql_1 container:
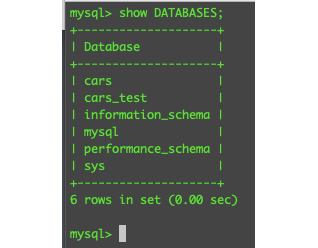
Figure 9.3 – MySQL databases
We are using the cars database for the actual solution code, and cars_test for the automated tests. This way, our automated tests won’t contaminate our main application database.
Now, finally, before we deploy to the CI solution, let’s run the runCoverage.sh shell script we built earlier.
Run the following command from the host machine:
$ docker exec -i docker_server-web_1 /var/www/html/symfony/runCoverage.sh
Alternatively, run the following command inside the docker_server-web_1 container:
/var/www/html/symfony# ./runCoverage.sh
Now, you should see the following test result:

Figure 9.4 – Test coverage report
Great! At this stage, we are sure that the tests are running properly and that they can also connect to the test database:

Figure 9.5 – Test data
If you check the toy_cars table inside the cars_test MySQL database, you should see some sample data created by the automated tests.
Next, let’s move on to our more elaborate functional tests defined inside the Behat application.
Preparing the Behat application and tests
In the previous section, we were able to run and pass all the Symfony application tests. Now, we’ll need to make sure that we have also passed our behavior-driven tests living inside the Behat application.
Run the following command from your host machine to set up the Behat application:
$ docker exec -i docker_server-web_1 /var/www/html/
behat/setup.sh
Alternatively, run the following command inside the docker_server-web_1 container:
/var/www/html/behat# ./setup.sh
Just like what we did earlier in the Symfony application, we first need to set up the Behat application and install its dependencies.
In Chapter 6, Applying Behavior-Driven Development, we created test features and scenarios using the Gherkin language. We also created some Context PHP classes that contain steps we have defined in the feature files we’ve created. These Context classes will be executed by Behat to serve as functional PHP tests.
The difference between the Symfony tests and the tests from our Behat application is that the Behat tests do not care about how we achieve the results or how specific PHP classes interact with other PHP classes. They only care about testing very high-level functional and behavioral scenarios.
That’s it – now, we are ready to run our behavior-driven tests.
Run the following command from the host machine and see whether you can pass our Behat tests:
docker exec -i docker_server-web_1 /var/www/html/behat/runBehatTests.sh
Alternatively, run the following command inside the docker_server-web_1 container:
/var/www/html/behat# ./runBehatTests.sh
You should see the following results:
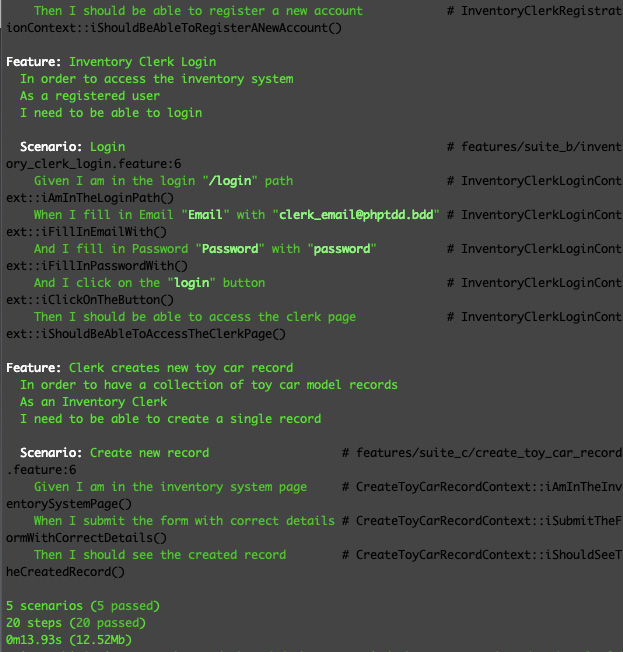
Figure 9.6 – Behat tests passing
Great! We have passed all the test scenarios that we have defined. If you want to check all the feature files and scenarios, you can open the files in codebase/behat/features.
Now that we are sure that our automated tests are working properly from our development machine, we are ready to use them in Bitbucket Pipelines for our CI solution.
Using Bitbucket Pipelines for CI
We’ve spent a lot of effort building our automated tests and solution code, and all these efforts are aimed to help us develop maintainable and more reliable software. CI is the practice of being able to integrate code changes from different sources. With the addition of automated tests, this is where our hard work will start to pay off on a bigger scale with all the tests we’ve been writing. This will help in preventing us from introducing regressions into the main code base. For example, the CI process can reject a git pull request if there are broken automated tests.
There are a lot of CI tools out there, but in this example, since I am using Bitbucket for the version control in the project, I’ll just use Bitbucket Pipelines as it’s already integrated well with Bitbucket Cloud. It is extremely easy to use, as you will see. Let’s get started:
- In the Bitbucket Cloud dashboard, select the repository you are using for your project, and click on the Pipelines link on the left menu:
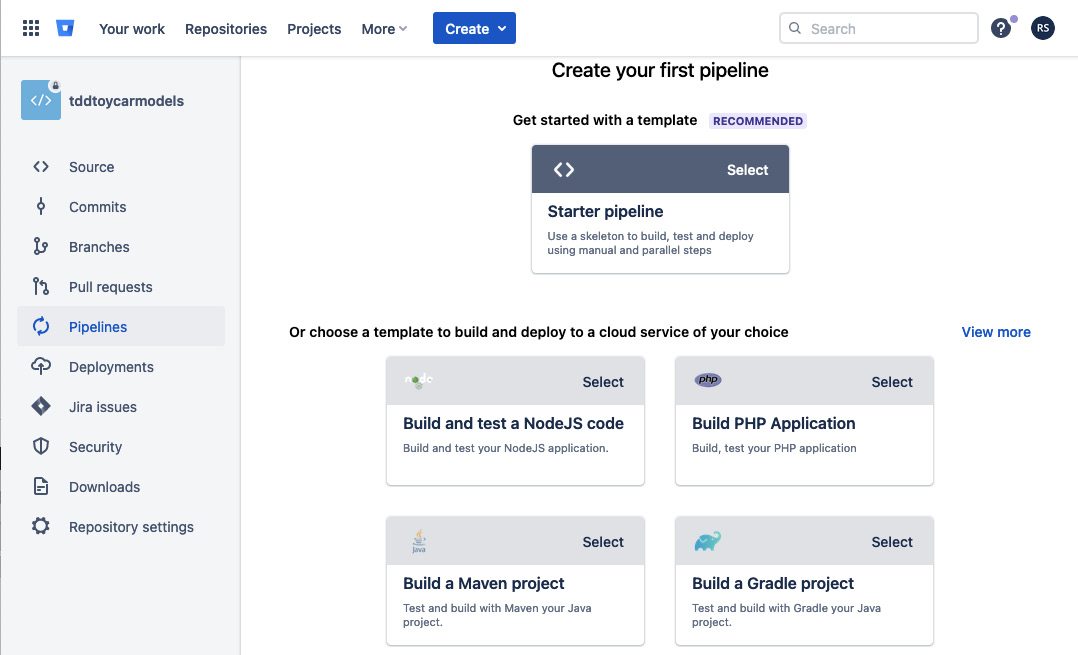
Figure 9.7 – Create your first pipeline
- Then, select the Build PHP Application box. You will see the example template for creating your first pipeline:
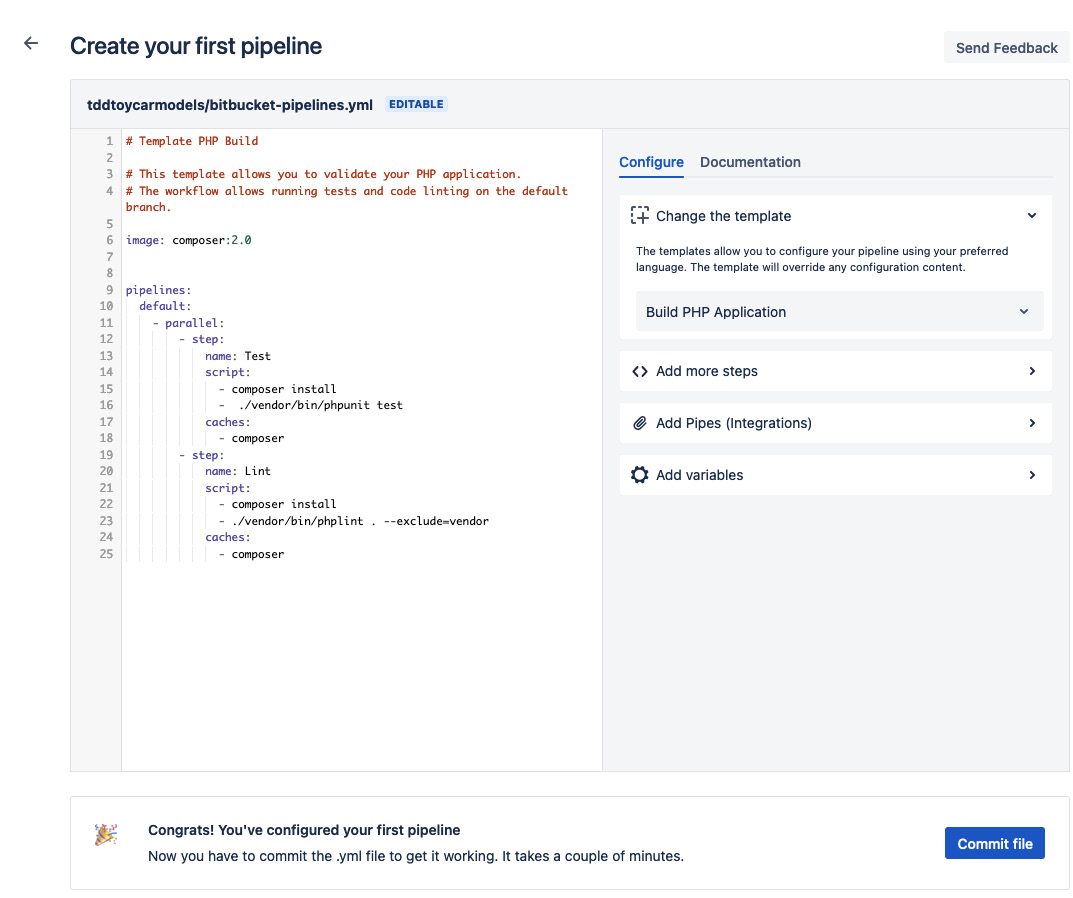
Figure 9.8 – Create your first pipeline
- Here, you will see a simple .yml file; you can edit it to run your script. For our example project, you can use the following content:
bitbucket-pipelines.yml
image: docker:stable
options:
  docker: true
pipelines:
  default:
    - parallel:
        - step:
            name: Prepare environment
            script:
              - set -eu
              - apk add --no-cache py-pip bash
              - apk add --no-cache gcc
              - apk add --update --no-cache --virtual
.tmp-build-deps gcc libc-dev linux-headers postgresql-dev && apk add libffi-dev
              - apk update && apk add python3-dev gcc libc-dev
              - pip install --upgrade pip setuptools wheel
              - pip install --no-cache-dir docker-compose
              - docker-compose -v
              - ls -lap
              - pwd
              - cd docker
              - docker-compose build && docker-compose up -d
              - docker exec -i docker_server-web_1 /var/www/html/symfony/setup.sh
              - docker exec -i docker_server-web_1
              /var/www/html/symfony/runCoverage.sh
              - docker exec -i docker_server-web_1
              /var/www/html/behat/setup.sh
              - docker exec -i docker_server-web_1
              /var/www/html/behat/runBehatTests.sh
            caches:
              - composer
As you can see, these are just some commands we want to run while setting up the Docker containers we need to use in the CI cloud. You will notice that we are using the codebase/symfony/setup.sh and codebase/behat/setup.sh files to install all the dependencies and libraries that our Symfony and Behat applications need. This includes creating the cars and cars_test databases we are using inside our Symfony application!
- Paste the script into the text area and click on the Commit File button. You’ll be redirected to the Pipelines page, where you will see your build running:
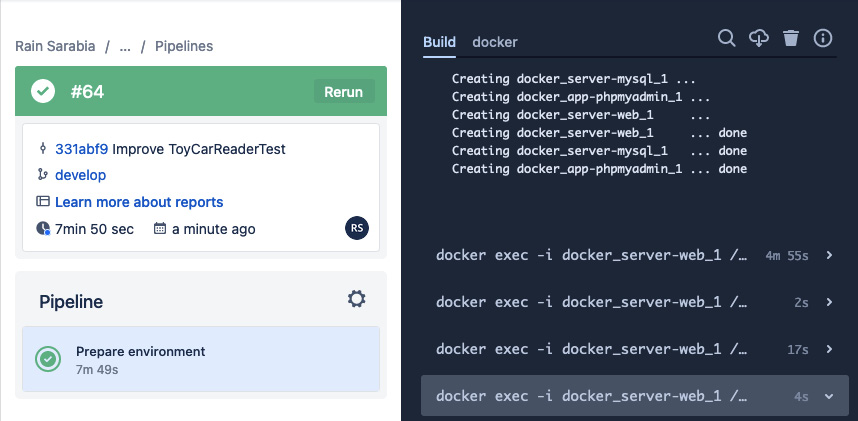
Figure 9.9 – Pipeline running
You will notice from the preceding screenshot that we were able to build the same containers we were working with from our local machine.
The build will take a few minutes to run. Here, we want the following to happen in the CI cloud:
- Create a host machine.
- Install the necessary libraries we need to run docker-compose.
- Build the Docker containers we are using for our solution.
- Install Composer packages for Symfony.
- Run the Doctrine Database migrations for Symfony.
- Execute the runCoverage.sh test script for Symfony.
- Make sure we pass all the Symfony tests.
- Install Composer packages for Behat.
- Execute the runBehatTests.sh test script for Behat.
- Make sure we pass all the Behat tests.
That’s a lot of steps! But we need to do all of these things to make sure we can run our automated tests as if we are just running them from our local machine. After a few minutes, check back on your Build and see whether we have passed the Symfony tests:

Figue 9.10 – CI pass Symfony tests
Great! By running the runCoverage.sh shell script from inside the CI, we can make sure that all the tests and code are still running as expected! Now, let’s see whether our Behat tests also pass. Keep scrolling down the build screen until you find the Behat test results:

Figure 9.11 – CI pass Behat tests
As you can see from the log, we passed the same five scenarios that we passed earlier from our local development machine!
At this stage, Pipelines will show a green bar with a check indicating that we have passed the entire build.
In Chapter 2, Understanding and Organizing the Business Requirements of Our Project, we created some Jira tickets and integrated our Bitbucket repository into the Jira project. Now, this is going to be very handy for Bitbucket Pipelines as it is also seamlessly integrated with Jira.
In the root directory of the solution code, as cloned from https://github.com/PacktPublishing/Test-Driven-Development-with-PHP-8/tree/main/Chapter%209, you will find a bitbucket-pipelines.yml file containing the scripts we have used to run our first pipeline. Now, each time you push an update into the Bitbucket branch that is connected to the Jira ticket that you’re working on, Jira will be automatically able to detect the Pipelines build that is running for your Jira ticket as well:

Figure 9.12 – Jira and Pipelines integrated
Click on the 1 build incomplete link below the Create pull request link area highlighted in the preceding screenshot; you will see a popup containing the list of builds that have been executed for that branch and ticket:
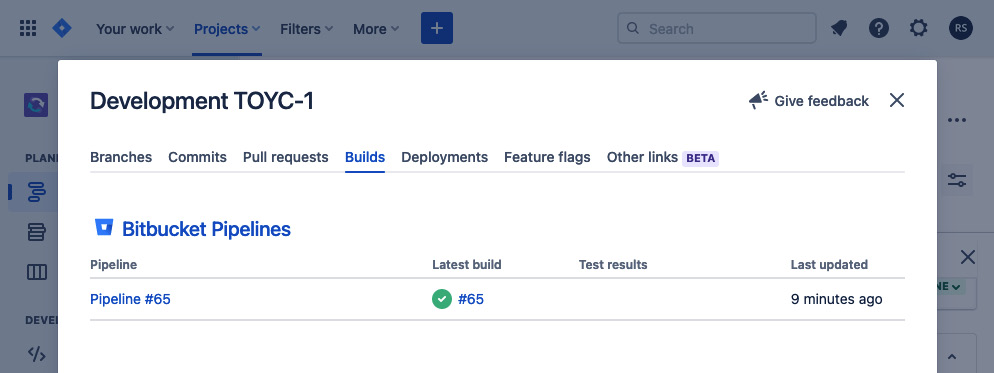
Figure 9.13 – Pipelines builds popup from the Jira page
This is a set of very powerful tools. Your team can monitor tasks using Jira, and you can make sure that the source code being pushed by you, or any other developer, is not detrimental to the existing software before you decide whether you want to deploy the solution.
If a developer pushes code that changes the behavior of your application negatively, and there are enough automated tests to cover it, then you’ll be able to catch the problem as it will fail the CI build.
Summary
In this chapter, we went through the process of setting up our updated development environment complete with all the test and solution code we need to build our example project. We created and used shell scripts to help us install dependencies, set up databases, and seed data, making sure that we have everything we need to easily run our tests from a local machine or in the cloud.
We also created our first Bitbucket Pipeline to help us implement continuous integration. By using CI, we can run all our automated tests in the cloud to make sure that we do not break anything in the code base each time we commit and push changes to a branch.
In the next chapter, we will deploy our solution into an external web server, where we will also be able to test the application using a web browser.