Chapter 6
Touching Your Music
The latest iPod touch is the best iPod that Apple has ever shipped. Despite that the iPod touch has become much more than just a music player, it still lets you rock out to your tunes better than any other multimedia device. This chapter introduces you to the iPod's music player and shows you how to get the most use out of it.
The Music Application
Your iPod's Music app brings all the functionality and ease of use you expect from a music player, but it delivers that functionality in a distinctive touch-based package. Figure 6–1 shows the Music application icon. It's easy to spot, since it is bright orange and marked with a music note. Tapping this icon launches the music player and allows you to access and play the songs you've synchronized to your iPod.
NOTE: Do not confuse the Music and iTunes applications on your iPod. Music is used to play your music tracks. iTunes connects you to the mobile iTunes Wi-Fi Music Store where you can shop for and purchase music and video tracks and is not a general music player.
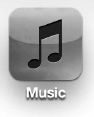
Figure 6–1. Launch the Music application by tapping its icon.
If you've used iPods before, expect to be pleasantly surprised. If you're new to the world of iPods, expect to be blown away. The iPod touch interface simplifies browsing, locating, and playing music and videos. Here are just a few ways the iPod touch gives you your best music experience yet:
Touch screen: With the iPod's touch screen, there's no need for scroll wheels. Flick through your lists, and tap the items you want to play.
Cover Flow: If you like Cover Flow in iTunes, you'll love it on the iPod.
Alphabet index tool: The iPod application uses the same kind of alphabet index you saw in Chapter 2 (see Figure 2-1). It makes searching through long alphabetized lists a breeze.
Customizable button bar: Do you prefer to search by genre or album, rather than artist or song? Just drag the items you use the most onto the configurable button bar.
And that's just a taste of the ways the Music app changes the way you use your iPod. Read on for more details on how this program works.
Browsing Media on the iPod
Tapping the orange Music icon on your Home screen takes you to the music player application. This program gives you access to all the audio media files you have synchronized to your iPod, including songs, podcasts, and audiobooks. At the bottom of the screen you'll see blue and black buttons labeled Playlist, Artists, Songs, Albums, and More (see Figure 6–2). Tapping any of these buttons enables you to sort through your music. Tapping the Store button in the top-left corner of the screen takes you to the iTunes Store app (discussed in the next chapter) where you can buy music and videos.
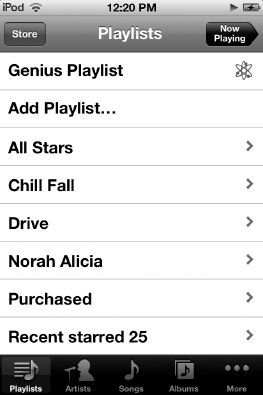
Figure 6–2. The music player screen
The More screen offers the best place to start exploring your media collection. Locate the More button at the bottom right of the screen, and tap it to load the screen shown in Figure 6–3.
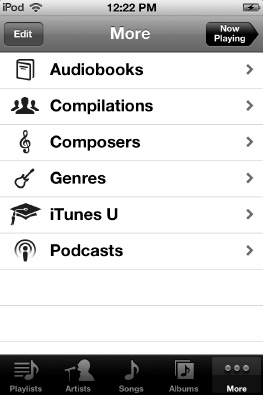
Figure 6–3. The More screen provides an excellent jumping-off point for exploring your media. The Now Playing button appears on all category screens, including this one, and instantly takes you to the track currently playing.
From the More screen, you can see every kind of category used to sort your songs: Playlists, Artists, Songs, Albums, Audiobooks, Compilations, Composers, Genres, iTunes U and Podcasts. Some of these appear in the black bar at the bottom of the screen, while others appear in the list in the center of the screen. Tap any item to open that collection. For example, tap Artists to see a list of your media sorted by artists, or tap Audiobooks to view the audiobooks loaded on your system.
The black bar is your shortcuts bar or, more officially, your browse buttons bar (a name I find especially awkward, so please bear with me when I refer to it as simply the shortcuts bar). The difference between the items in the shortcuts bar and the items in the previous list is that these shortcuts appear universally in every category view. Your iPod lets you select which items you want to keep handy in that bar, as described next.
Editing Your Browse Buttons
From the More screen, tap the Edit button to open the Configure screen, as shown in Figure 6–4. This screen allows you to customize your shortcuts bar.
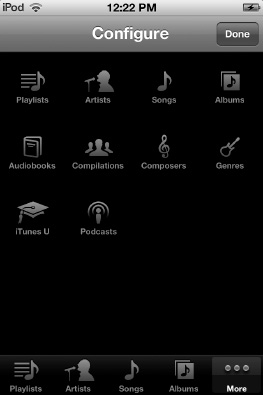
Figure 6–4. Use the Configure screen to choose which items appear in your shortcuts bar at the bottom of the screen.
To replace any item on the shortcuts bar, drag an icon from the center of the screen onto the item you want to replace in the bar at the bottom. Say you listen to podcasts and audiobooks more than you listen to music. Drag those two icons onto your bar to replace, for example, Artists and Albums. You'll see your shortcuts bar in every category view. Add whichever icons you use the most. You can also rearrange the icons in the bar by dragging them left or right within the bar.
The bar must always contain four—and only four—icons. You cannot drag icons off the bar, and you cannot set the bar to contain fewer than those four icons. You cannot add more than four shortcuts, and you cannot replace the More button with another item.
Here are the items you can choose from:
Albums: Every album on your iPod, ordered by album name.
Podcasts: A list of audio podcasts that you have chosen to sync to your iPod.
Audiobooks: Every audiobook on your iPod.
Genres: A list of every genre—such as Classical, Rock, Pop, Country, and so on—that appears on your iPod. Each item leads to a list of media that belongs to that genre.
Composers: A list of media sorted by their composers. My iPod contains listings for Bob Dylan, Wolfgang Amadeus Mozart, and more.
Compilations: A list of all media belonging to compilations—that is, albums that have been contributed to by various artists.
Playlists: A list of all the playlists you've chosen to sync to your iPod.
Artists: A list of your media sorted by the artist who recorded them.
Songs: Every song on your iPod, arranged alphabetically by song name.
iTunes U: A list of all your iTunes U lessons and lectures.
When you are finished making changes, tap Done to return to the More screen.
Navigating the Category Screens
All the category screens work in much the same way. The screen displays its members—whether podcasts, artists, or songs—as an alphabetically sorted scrolling list. If the list is long, you'll see an alphabet control on the right side of the screen, as shown in Figure 6–5. Tap a letter or scroll your finger down the alphabet to move to the section you want to view.
TIP: Many category screens offer a Shuffle option as their first item. Tap it to start playing that category in random order.
When the items listed are individual songs or videos, tap any name to play your selection. When the items listed are collections, such as genres or albums, tap to open a screen that displays each item of that collection. For example, you can tap an album to list its tracks and then tap a track name to play it.
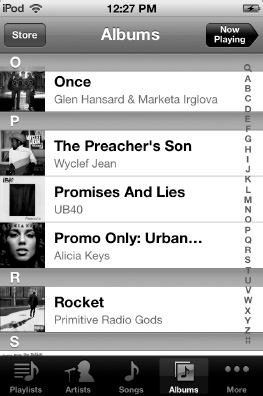
Figure 6–5. The Albums screen lists albums in alphabetical order. When you've downloaded album art, it appears in the squares marked by the music notes.
Playing Audio
Figure 6–6 shows the iPod's Now Playing screen. You arrive at this screen whenever you start playing a song. You can also jump to this screen from any category by tapping the Now Playing button at the top-right corner (see Figure 6–5).

Figure 6–6. The iPod's Now Playing screen provides an interactive screen that controls playback for the currently playing item. From this screen, you can adjust the volume, pause and resume playback, and loop the current track.
Here are the items you'll find on the Now Playing screen and what they do:
Play indicator: The right-pointing play indicator at the top right of the screen (just left of the battery status) appears universally when you're playing music. This tells you at a glance that music is playing. You'll find this especially helpful when you've removed your earbuds and placed the iPod on a table.
Back button: Tap the Back button at the top-left corner (the arrow pointing left) to return to the most recent album or playlist screen. Tapping Back does not stop playback. Your song continues to play as you browse through your categories or tap Home to do other things on your iPod.
Artist, song, and album: These items appear at the top middle of the screen and are for information only. Tapping them does nothing.
Album View button: This button looks like a three-item bulleted list and appears at the top right of the screen, just below the battery indicator. Tap this to switch between your Now Playing screen and its Album view (discussed in the next section).
Scrubber bar: The scrubber bar appears below the artist, song, and album name. Tap the album cover to make this control appear; tap again to hide it.
- The number at the left of the bar shows the elapsed playback time. The number at the right shows the remaining playback time.
- Drag the playhead to set the point at which your song plays back. You can do so while the song is playing so you can hear which point you've reached.
- Look just below the scrubber bar to see which album or playlist track is playing. In Figure 6–6, this is track 5 of 11.
Loop control: This control, which looks like a pair of arrows pointing to each other in a circle, appears when you tap album art.
- Tap once to loop the currently playing album or playlist. After the last song plays, the first song starts again.
- Tap a second time to loop just the current song. The number 1 appears on the loop, telling you that the loop applies to just this song.
- Tap once more to disable looping.
- A blue loop (both the regular loop and the loop with the number 1) indicates that looping is enabled. A white loop means looping is switched off.
Genius button: This button looks like an atom with electrons swirling around it and lies in the center of the bottom bar. Tapping this creates a Genius playlist based on the song that is currently playing. When you navigate back to the music library, you'll see a playlist labeled “Genius” along with several other options. We'll discuss those options in just a bit.
Shuffle: The shuffle control looks like two arrows making a wavy X. It appears to the right of the scrubber bar and, like the loop and scrubber controls, appears only after you tap the album cover.
- When the shuffle control is off (white), album and playlist songs play back in order.
When the shuffle control is selected (blue), the iPod randomly orders songs for shuffled playback.
Album art: When you've downloaded album art, the cover image appears just below the top bar and occupies most of your screen.
- Tap the art area to open the gray playback controls that appear just below the artist, song, and album name.
- Tap again to hide the controls.
- Double-tapping the album art sends you to the Album view.
- Swipe to the right to return to the most recent category screen.
Rewind: The Rewind button looks like a vertical line followed by two left-pointing triangles.
- Tap to move back to the beginning of the currently playing song.
- Double-tap to move to the previous song in the album or playlist. If you are already at the start of the song, a single tap moves you back; if you're already at the first song, this works as if you had pressed the Back button—you return to the most recent album or playlist screen.
- Touch and hold to rewind through the current song. You'll hear very short snippets as you move backward through the song. This feature proves especially handy while listening to audiobooks.
Play/Pause: Play looks like a right-pointing triangle. Pause looks like a pair of upright lines. Tap this button to toggle between playback and pause modes.
Forward: The Forward button looks like the Rewind button in a mirror. The line is to the right, and both triangles point right instead of left.
- Tap once to move to the next song in the album or playlist. If you're at the last song, tapping Forward moves you back to the album or playlist.
- Touch and hold to fast-forward through your song.
Volume: Drag along the slider at the bottom of the screen to adjust playback volume. If you've attached an external speaker or remote control, you can use its controls to control the playback volume as well.
Album View
Tapping the Album View button at the top-right corner of the Now Playing screen switches you to an overview of the current album or playlist, as shown in Figure 6–7. This screen shows a track list with item names and durations.
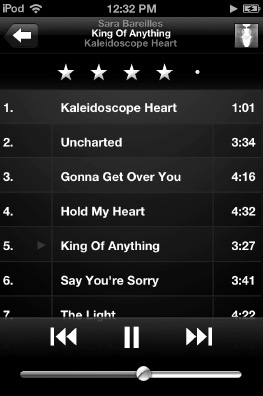
Figure 6–7. The Album view shows a list of tracks and durations for the current album or playlist.
Several items on this screen overlap with the Now Playing view and work in the same way. Here's a quick screen rundown:
Return to Now Playing: The icon at the top right (it looks either like a music note or, if you have album art, like a wee version of the album cover) switches you back to the Now Playing screen.
Rate your songs with the rating stars: Use the stars control to rate the current song, from zero to five stars. Drag your finger along the dots to form stars to set your rating. These ratings sync back to your computer, and you can use them when making Smart Playlists. For example, you might choose only your most favorably rated tracks to play. Set up this kind of playlist on your computer using iTunes. When you rate a song, it's personal and does not get sent back to the iTunes Store to be shared with the world.
View the entire track list: Scroll up and down the track list to see all the items on the current playlist or album. Tap any item to start playback.
TIP: When there's empty space on the track list—for example, when you have only one or two tracks—double-tap the empty areas to return to the Now Playing screen. Alternatively, double-tap either side of the rating stars display.
Cover Flow
Tilt your iPod onto its side when browsing or listening to music, and you instantly enter Cover Flow mode. Cover Flow is the iPod feature that allows you to view your media collection as a series of interactive album covers, as shown in Figure 6–8.
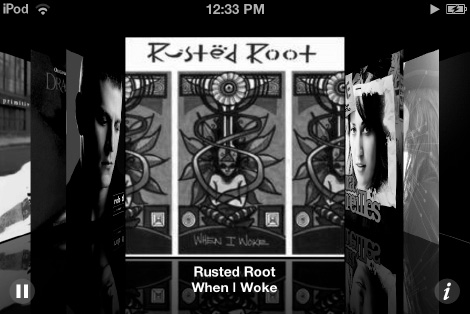
Figure 6–8. Cover Flow presents your media library as a series of album covers.
To use Cover Flow, simply flick your way through your collection to the left or right. The iPod provides animated, interactive feedback.
Here's what you can do in Cover Flow mode:
Album selection: Tap any album to bring it to the front. Tap again to enter Album view.
Play/Pause: Tap the small Play/Pause button at the bottom left of the Cover Flow screen to pause or resume the currently playing track.
Album view: To enter the Cover Flow version of Album view, tap the small i (Info) button or the album cover. The cover flips and displays a list of tracks.
- Tap a track name to start playback.
- Tap Play/Pause to pause or resume playback.
- Tap anywhere on the screen (other than the Play/Pause button or a track name) to leave Album view.
Turn your iPod back to portrait orientation (with the Home button pointing down) to exit Cover Flow mode. Unless the Home button is down, you'll remain in Cover Flow mode.
Creating Playlists
The Music app on the iPod allows you to create two kinds of playlists, Regular and Genius, right on the iPod itself—no iTunes required. Playlists allow you to build a selection of related songs that you can listen to without interruption, providing you with your own soundtrack throughout the day. You might want an exercise routine playlist or a “I feel depressed and want to hate the world” playlist, depending on your mood, of course. Playlists can be used for feelings, for tasks, for parties, and so on. Think of a playlist as burning your own CD of your favorite songs for a given event.
Creating a Regular Playlist
A regular playlist is simply a collection of songs of your choosing played one after the other. To create a regular playlist on the iPod, tap the Playlist button in the shortcuts bar at the bottom of the screen. Next, tap the Add Playlist… menu item (see Figure 6–9). A New Playlist pop-up appears asking you to name your playlist. Name the playlist whatever you like, and tap Save.
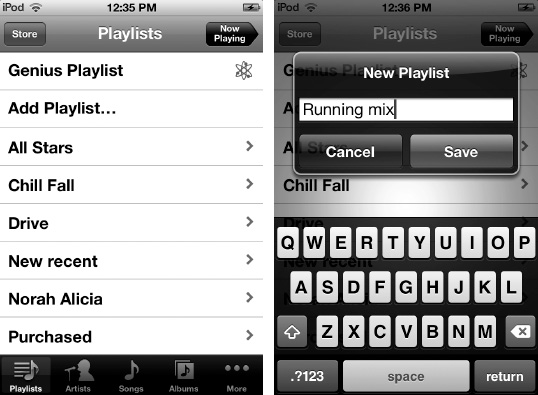
Figure 6–9. Creating a playlist with the Add Playlist… selection.
The song list appears next, as shown in Figure 6–10. Navigate through your entire collection, and pick which songs you want to add by tapping the plus sign (+) to the right of each track name. After making your selections, tap Done.
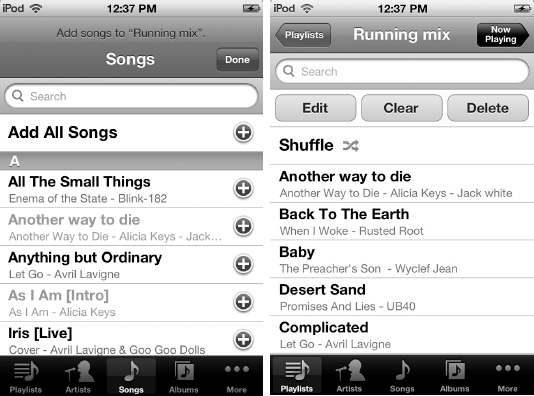
Figure 6–10. Add songs to your playlist with this Songs selection screen (left). Tap the blue button with the + to the right of each name to add a song. Tap Done to be taken to your new playlist (right).
Tapping Done sends you to the playlist. From here, you can tap Shuffle to begin a random playback of your playlist songs or tap Playlists to go back to the previous screen. You also have a search field to search by playlist songs if it's a long list. Finally, you can edit the playlist, clear it, or delete it by tapping the buttons above the Shuffle command. Tapping Clear removes all the songs from the playlist but leave the name and empty playlist intact. Tapping Delete deletes the playlist. Your songs still remain on your iPod. You are asked to confirm your Clear and Delete selections before the commands are carried out.
To edit the playlist, tap Edit to add or remove items from your playlist. The playlist Edit mode, shown in Figure 6–11, provides all the tools you need to manage your new playlist:
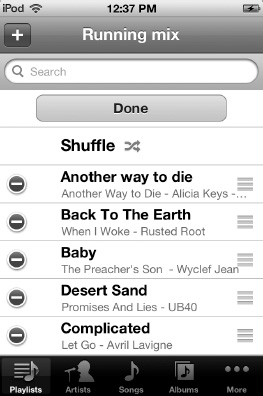
Figure 6–11. In Playlist Edit mode, tap – to delete a song or + to add a song. Use the grab bars to the right of each song to change its order in the playlist.
- Tap the plus sign (+) at the top left to add songs to your playlist.
- Tap Clear Playlist to remove all songs from the playlist. A confirmation dialog box appears. Confirm by tapping the red Clear Playlist option, or tap Cancel to leave your songs unchanged.
- Tap the minus sign (–) in the red circle to the left of any name to begin deletion. Tap Delete to confirm, or tap anywhere else to cancel.
- Drag the move bars (the three parallel gray lines to the right of each track name) to reorder items within your playlist. Grab a move bar, drag it to a new position, and then release.
- Tap Done to leave Edit mode and return to your playlist.
Any playlists created on the iPod will sync back to your iTunes library and appear in the iTunes playlist collection.
Creating a Genius Playlist
Genius is a feature in iTunes that finds songs in your music library that go together. It does this by matching rhythm, beat, artists, genres, and Internet data. A Genius playlist is a list of songs that result when you choose to run the Genius feature on a song you are playing.
Genius playlists can be created in iTunes on your computer or on the iPod touch. However, to enable the Genius feature, you need to enable it through iTunes on your computer first. To do this, launch iTunes on your computer, go to the Store menu, and select Turn on Genius. You'll need to log in with an iTunes Store account (see Chapter 7) or create an iTunes account to access the Genius features. Enter your user name and password, agree to the terms and conditions, and sit back as Apple analyzes your music library.
You can create a Genius playlist by tapping the Genius icon in the center of the bar (see Figure 6–6). The icon looks like an atom surrounded by electrons. The Music app scans all your songs and compiles a new Genius playlist that collects other songs on your iPod that go great with your chosen song.
A new playlist named “Genius” appears on the screen (see Figure 6–12). In its list of songs, you can scroll through to see what Genius has picked out. You then have three options via three buttons at the top of the song list:
New: Tap New if you don't like the Genius playlist compilation. You'll then be presented with a list of your songs to choose a new song from.
Refresh: Tap Refresh if you want to keep the Genius playlist based on the original song you chose but want to get other songs that go well with the original one. This is good when you have listened to a playlist already (for example, Motown) and want to refresh the music that fills it without changing the theme (songs like the Jackson 5's “ABC”).
Save: Tap Save once you are satisfied with the Genius playlist. After tapping Save, the Genius playlist labeled “Genius” disappears, and it is replaced by a Genius playlist that is named after the title of the song you chose to create the playlist. This playlist lives on your iPod and even sync back to iTunes on your computer.
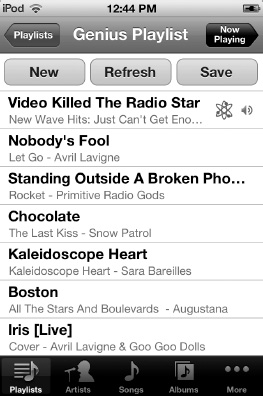
Figure 6–12. The Genius playlist creation screen. The song with the atom icon is that which the playlist was created from.
Editing a Genius Playlist
You have three options when editing a Genius playlist. The options appear as buttons above the song list when the Genius playlist is selected (see Figure 6–13).
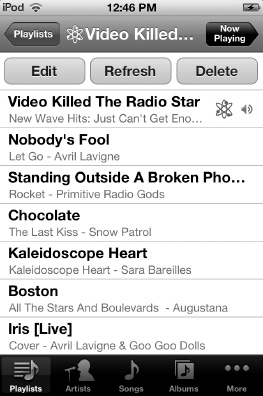
Figure 6–13. The Genius playlist edit screen
Edit: Tapping Edit lets you arrange your genius playlist songs in the order you want. You can also remove individual songs from the genius playlist.
Refresh: Tapping Refresh populates the Genius playlist with new songs that go well with the original one. The songs that were previously on the playlist are removed from it (but they'll still remain in the main music library).
Delete: Tapping Delete immediately deletes the saved Genius playlist. Its songs remain on your iPod.
NOTE: Once a Genius playlist is synced back to iTunes on your computer, you will not be able to delete it on your iPod. Your only option will be Refresh. If you want to delete the Genius playlist, you must do so through iTunes on your computer.
Searching
The Music app has a simple yet powerful search feature that enables you to find a song quickly. To begin searching for a song, just scroll all the way up to the top of any category view (playlists, songs, artists, and so on). You'll find a search field at the very top (see Figure 6–14).
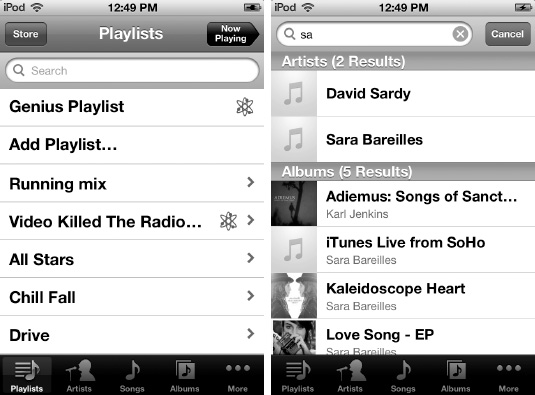
Figure 6–14. The Music app's search function lies at the top of any category view (left). Results are displayed according to category (right).
You can scroll through the search results as they are divided into categories by Songs, Artists, Albums, Composers, Podcasts, or Audiobooks. To play a song, simply tap it.
TIP: You can also search for songs without opening the Music app. Use the iPad's Spotlight feature to the left of the Home screen to search for a song, and then tap it to begin playing.
Going Beyond the Music App
As you've seen, the Music app lets you browse through your media and play audio. But you can also work with playback in a couple ways that go beyond the Music application.
Saving Energy
“Sleep” your iPod during music playback to save energy. Press the Sleep/Wake button once. This locks your iPod and turns off the screen but allows your music to keep playing.
To peek at the current album cover during playback, tap Sleep/Wake. When you've loaded album art for the track, the cover appears on your lock screen instead of your normal wallpaper. If your track has no art, you still see the current time and track name. Double-tap the Home button to view your playback controls, as shown in Figure 6–15.
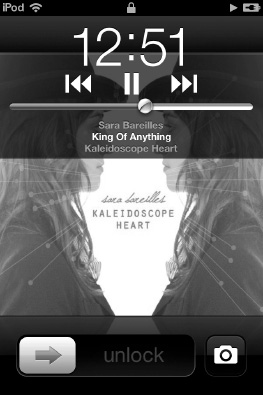
Figure 6–15. During audio playback, your iPod lock screen displays the currently playing song and, if album art is available, its album cover. The small playing icon just to the left of the battery indicates that audio is playing back.
Display Music Playback Controls When in Another App
We've already mentioned how your music, podcasts, and audiobooks keep playing even when you leave the Music app. The good news is that you don't need to go back into the iPod app to change tracks. Simply press the iPod's physical Home button twice in quick succession to bring up the iPod's multitasking bar (discussed in detail in Chapter 3). Swipe your finger from left to right until you see the Music controls slide onto the screen (see Figure 6–16). You can access these controls from any app or Home screen; they allow you to quickly play/pause a song, rewind or fast-forward, and skip to the next or previous song. To be taken immediately to the Music app, click the Music app icon.
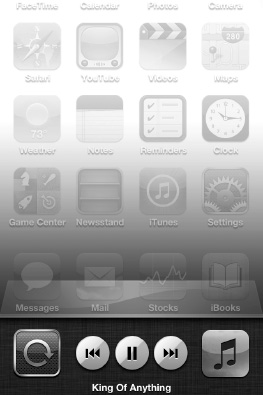
Figure 6–16. You can access the Music playback controls from any screen on the iPod by pressing the Home button twice.
Adding a Sleep Timer
Unlike the Sleep/Wake button, which switches off your iPod screen without interrupting music playback, the Clock application allows you to “sleep” your iPod and tell it to end playback after a set interval. This is handy for those who like to listen to music while falling to sleep.
To set the sleep timer, on the Home screen, tap Clock. Then tap the Timer icon at the bottom right of the Timer screen. Scroll the hours and minutes wheels to select a period of time after which you want the iPod to sleep. Tap When Timer Ends, and choose Sleep iPod from the options list, as shown in Figure 6–17. Tap Set to set your sleep timer, and then tap the big green Start button
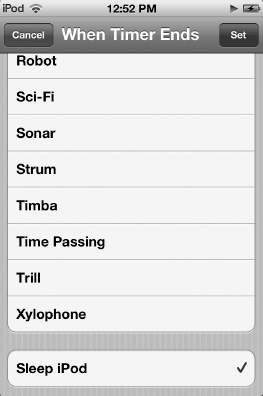
Figure 6–17. The Sleep iPod function automatically ends iPod playback and locks your iPod.
The iPod begins a timer countdown. When it reaches zero, it automatically stops iPod playback and locks your iPod.
Adjusting Music Settings
Surprisingly, for a feature-rich application like Music, the iPod touch provides just a few settings (see Figure 6–18). You'll find these in Settings ![]()
Music, and they work as follows:
Shake to Shuffle: When this is set to ON, you can physically shake your iPod to shuffle the current list of playing songs. You should make sure this is switched to OFF if you are going to be moving while listening to music. A friend of mine had his iPod in his pocket while walking around one day, and he couldn't figure out why his songs kept changing!
Sound Check: Say you're listening to a song that was recorded way too low so you crank up the volume during playback. Then when the next song starts playing back, boom!—there go your eardrums. Sound Check prevents this problem. When you enable Sound Check, all your songs play at approximately the same sound level.
TIP: You can also use Sound Check in iTunes. Choose Edit ![]()
Preferences ![]()
Playback ![]()
Sound Check (Windows) or iTunes ![]()
Preferences ![]()
Playback Sound Check (Mac).
EQ: The iPod offers a number of equalizer settings that help emphasize the way different kinds of music play. Select Settings ![]()
Music ![]()
EQ, and choose from Acoustic, Dance, Spoken Word, and many other presets. To disable the equalizer, choose Off.
Volume Limit: Face it—personal music players bring your audio up close and very personal. It's so up close, in fact, that your hearing may be in peril. We strongly recommend you take advantage of the iPod's built-in volume limit to protect your ears. Navigate to Settings ![]()
Music ![]()
Volume Limit, and adjust the maximum volume using the slider, as shown in Figure 6–18. All the way to the left is mute—sure, you'll protect your ears, but you won't be able to hear anything. All the way to the right is the normal, unlimited maximum volume. If you're super paranoid or, more usually, if children have access to your iPod, tap Lock Volume Limit to open a screen that allows you to set a volume limit passcode. No one may override your volume settings without the correct passcode.
Lyrics & Podcast Info: Some songs and podcasts have embedded lyrics and text. When this is set to ON, you'll see that embedded text over the cover art in Album view. To disable the text, set this setting to OFF.
Group By Album Artist: With this option set, if a song has multiple artists, the same song appears under both artists when you are navigating your music by Artist in the music app.
For Home Sharing, enter you Apple ID and password here to activate Home Sharing on your iPod touch. Home Sharing allows you to stream music from iTunes on your computer and listen them on your iPod touch. Your iPod touch and computer must be connected to the same wireless network and iTunes must be open on your computer for your iPod to see its music.
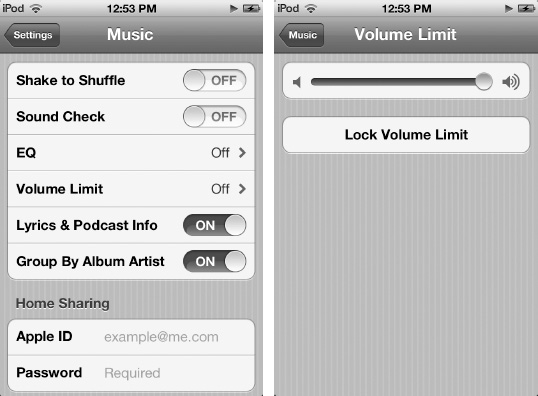
Figure 6–18. The Music app's settings (left). Set the maximum volume for your iPod (right) by dragging the slider on the Volume Limit settings screen.
Choosing Headphones
You can use virtually any headphones with your iPod touch, but reviewing every headphone here would fill more pages than War and Peace. Just know that you don't need to use the earbuds that came with the iPod touch. You could use any third-party headphone, from the cheap $2 kind you find at Walgreens to the $1,500 Shure noise-canceling earbuds.
You can also use wireless Bluetooth headphones that support A2DP (two-channel stereo audio streaming). Bluetooth headphones are great because you don't have a cord hanging over your body. On the other hand, the great thing about corded headphones is that they don't require power to work. Note that if you do use Bluetooth headphones and are going on a long jog or trip, make sure you have extra batteries or that the headphones are at least fully charged, or you could find yourself cut off from your music mid-song.
Summary
This chapter introduced all the ways you can browse and play media using the Music application. As you've seen, the new music player software is a lot more flexible and intuitive than the old click-wheel approach. With the iPod touch, you can flick through your entire collection and tap your way to the media you want to use. Here are a few points to think about before you move on to the next chapter:
- Cover Flow makes browsing through your media a simple visual pleasure. Tip your iPod on its side to enter Cover Flow mode.
- Don't be afraid to fill your shortcut bar with the items you use the most. It's easy to customize. It's also easy to put it back the way it started.
- Save your ears. Adjust your playback volume using the built-in volume controls and limiters.
- Don't forget about double-tapping the Home button to pull up music controls, regardless of your current application.