Chapter 3
Interacting with Your iPod touch
Your iPod touch uses an awesome way to interact with it. As its name suggests, it responds to the language of your touch. Its vocabulary includes taps, drags, pinches, and flicks. With these, you control your iPod as easily as using a mouse or trackpad to control your personal computer. And there's a lot more to interaction than just drags and double-clicks. Your iPod offers Multi-Touch technology. That means it can recognize and respond to more than one touch at a time.
In this chapter, you'll discover all the different ways you can interact with your iPod—from zooming into and out of pictures or using the iPod touch's built-in keyboard to playing with its sensors. You'll learn how all these features work and how to take advantage of some secret ways to interact with your iPod.
Interaction Basics
Personal computers have mice or trackpads. Old-fashioned personal digital assistants (PDAs…remember them?) have styluses. The iPod touch has your fingers. It does not work with mice or styluses. It requires real finger contact. Your iPod touch does not just sense pressure points. It detects the small electrical charge transferred from your fingers. That means you can use your iPod touch with your fingers, your knuckles, or even—if you're feeling up to it—your nose, but you cannot use it with pencil erasers, Q-tips, or those PDA styluses. The electrical charges in your touch make it possible for the iPod touch to detect and respond to one or more contacts at a time, that is, to use Multi-Touch technology.
TIP: If you're feeling really adventurous, you can use a frozen hotdog in place of your finger. Korean winters are very cold, and people were getting frostbite on their fingers from removing their gloves to use their iPhones outside. Some enterprising people in Korea discovered that you could use a frozen hotdog in lieu of your finger and still be able to interact with the iPhone's touch screen—all while keeping their gloves on. Theoretically, a frozen hot dog should work with the iPod touch's screen as well.
The iPod touch Language
How you touch your iPod touch's screen provides your communication vocabulary. Here's a quick rundown of the basic ways you can speak to your iPod touch:
Pressing the Home button: The Home button lives below the touchscreen and is marked with a small square. Press this button at any time while in an app to return to your home screen with its list of applications. Double-pressing the Home button while on another page of apps or inside an app will cause the screen to slide up, and you'll see a row of apps that are currently running in the background. We'll talk more about these multitasking features later in this chapter. While on any page of apps except the first page, pressing the Home button once returns you to the first page of apps. While on the first page of apps, pressing the Home button once takes you to the iPod touch's Spotlight search screen. We'll talk more about Spotlight search later in this chapter.
Tapping: Tap your iPod touch by touching your finger to the screen and removing it quickly. Tapping allows you to select web links, activate buttons, and launch applications. When typing text, you may want to tap with your forefinger or, if it's more comfortable, your thumb.
Double-tapping: Double-tapping means tapping your screen twice in quick succession. Double-clicking may be important on your personal computer, but double-tapping is not actually used all that much on your iPod touch. You can double-tap in Safari (the web browser that ships on your iPod touch) to zoom into columns and double-tap again to zoom back out. In Photos (the iPod touch's built-in photo viewer), use double-tapping to zoom into and out from pictures.
Two-fingered tapping and dragging: The iPod touch's Multi-Touch technology means you can tap the screen with more than one finger at a time. A few applications respond to two-fingered gestures. To do this, separate your forefinger and middle finger and tap or drag the screen with both fingers at once. For example, in Safari, a double-fingered drag allows you to scroll within a web frame without affecting the page as a whole.
Holding: At times, you'll want to put your finger on the screen and leave it there until something happens. For example, holding brings up the spyglass while you're typing, and in Safari, it brings up URL previews.
Dragging: Drag your finger by pressing it to the screen and moving it in any direction before lifting it. Use dragging to scroll up and down in Safari and Music (the application that plays back your iTunes songs). Some applications offer an index on the right side, like the one shown for the Music app in Figure 3–1. To use this index, drag along it until the item you want comes into view.
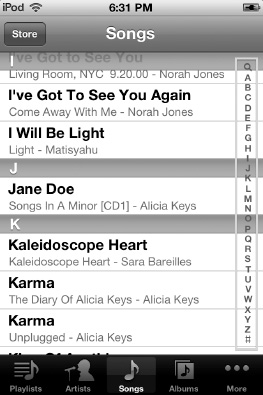
Figure 3–1. The index bar (boxed) to the right of the Music app
Flicking: When you're dealing with long lists, you can give the list a quick flick. Place your finger onto the screen and move it rapidly in one direction—up, down, left, or right. The display responds by scrolling quickly in the direction you've indicated. Use flicking to move quickly through your e-mail contacts list, for example.
TIP: Flicking and dragging will not choose or activate items on the iPod touch's display. Try this yourself by dragging and flicking on the home screen.
Stopping: During a scroll, press and hold your finger to the screen to stop scrolling. Apple's legal text provides a great place to practice flicking, dragging, and stopping. To get there, select Settings ![]() General
General ![]() About
About ![]() Legal. Have fun with its endless content of legalese that you can flick, drag, and stop to your heart's content. If you don't want to stop a scroll, just wait. The scroll will slow and stop by itself.
Legal. Have fun with its endless content of legalese that you can flick, drag, and stop to your heart's content. If you don't want to stop a scroll, just wait. The scroll will slow and stop by itself.
Swiping: To swipe your iPod touch, drag a finger from the left side of the screen toward the right. Swiping is used to unlock your iPod touch and to indicate you want to delete list items.
Pinching: On the iPod touch, you pinch by placing your thumb and forefinger on the screen with a space between them. Then, with your fingers touching the screen, move them together, as if you were pinching the screen. Pinching allows you to zoom out in many iPod touch programs, including Photos and Safari.
Unpinching: To unpinch, perform the pinch in reverse. Start with your thumb and forefinger placed together on your screen and, with the fingers touching the screen, spread them apart. Unpinching allows you to zoom into those same iPod touch applications where pinching zooms out.
The iPod touch Sensors
In addition to its touchscreen, your iPod contains two important sensors: a tilt sensor, called an accelerometer, and a light sensor. These sensors give your iPod some science-fiction–grade features that set it apart from the crowd of other MP3 players on the market.
Accelerometer Sensor
The iPod uses an accelerometer to detect when your iPod tilts. Some applications, including Safari, update their displays when you turn the iPod on its side. This allows you to use your iPod in both portrait and landscape modes.
If you feel like playing with the accelerometer sensor, try this:
- Go into Photos (tap its icon—the one with the sunflower on the bottom row of your home screen), and select a favorite picture.
- Hold the iPod up normally in portrait orientation.
- Press one finger on the screen, and then tilt the iPod into landscape orientation. The picture will not change.
- Tap the screen with your middle finger (or any other finger that you're not holding to the iPod). Presto—the iPod finally rotates the display.
TIP: If you've hacked your iPod for third-party software access, take a look at the Butterfly.app game (http://ericasadun.com). It uses the iPod's tilt sensor to manipulate a net around the iPod screen to catch butterflies. The Sensors.app demo displays an arrow that always points up, no matter how you hold your iPod.
Light Sensor
The light sensor is located at the top left of your iPod, on the front touchscreen. It's just below the Sleep/Wake button on the top of your unit, about a half-inch from the left edge of the screen, halfway between the edge and the start of the display. That's about a quarter-inch down. To see it, shine a flashlight beam at the iPod and look for a small, round, light-colored sensor just behind the glass.
This sensor detects whether the room you're in is bright or dark. Whenever you unlock the iPod, it samples the light and adjusts the overall brightness of the display to match. To interact with this sensor, either cover it with a finger or shine a bright light at it when you unlock your iPod. Your iPod adjusts to be very dim (the finger) or very bright (the light) to compensate.
You can toggle the autobrightness feature off and on by adjusting the settings in Settings ![]() Brightness. This screen also offers direct control over your iPod's brightness level. That's handy when you need immediate results instead of playing with unlocking, flashlights, and fingers.
Brightness. This screen also offers direct control over your iPod's brightness level. That's handy when you need immediate results instead of playing with unlocking, flashlights, and fingers.
NOTE: As a rule, I leave my brightness set to maximum and the autobrightness feature switched off. This bypasses all light-sensor functionality and leaves my screen bright and usable. The light sensor may be high-end technology, but it's actually pretty annoying in real life.
Gyro Sensor
Apple has added a gyroscope to the latest iPod touch. A gyroscope is a device that allows other devices to “know” where it is on a three-axis orientation. Simply put, the gyro sensor allows the iPod touch to know when you are rotating the device around on an x-, y-, or z-axis. Benefits include advanced motion control in games and superior augmented reality apps.
iPod Power Tricks
You have a lot of different ways to switch your iPod on and off. This section covers some of the most useful methods.
Unlocking Your iPod
If you've just turned on your iPod touch or when your iPod touch has been idle for a while, it automatically locks, and the screen goes dark. When this happens, press the Home button. The locked touchscreen appears, as shown in Figure 3–2. To unlock your iPod touch, swipe the slider from the left to the right. The locked screen clears, and the home screen springs into place.

Figure 3–2. The iPod touch lock screen
You can set how long the iPod touch should wait before locking itself. Go to Settings ![]() General
General ![]() Auto-Lock, and choose the number of minutes you want your iPod touch to wait before locking. To disable autolocking, choose Never—and make sure you have a good power source available nearby. Autolocking is a power-saving feature. Disabling it means your iPod touch runs through its battery more rapidly.
Auto-Lock, and choose the number of minutes you want your iPod touch to wait before locking. To disable autolocking, choose Never—and make sure you have a good power source available nearby. Autolocking is a power-saving feature. Disabling it means your iPod touch runs through its battery more rapidly.
For security, you can assign a simple passcode for your iPod touch. A simple passcode is just like a four-digit PIN you have for your debit cards. Go to Settings ![]() General, tap Passcode Lock, and then tap Turn Passcode On to establish a new simple passcode. Your iPod touch prompts you to enter a four-number code, as shown in Figure 3–3.
General, tap Passcode Lock, and then tap Turn Passcode On to establish a new simple passcode. Your iPod touch prompts you to enter a four-number code, as shown in Figure 3–3.

Figure 3–3. Setting your simple passcode
Enter a code, or tap Cancel to quit without entering a code. After you enter the code, the iPod touch prompts you to reenter it and then enables further passcode lock settings (see Figure 3–4). Those settings include how long the iPod touch needs to be idle before it's locked down; the ability to turn off the simple passcode and create a passcode using letters, numbers, and symbols (see Figure 3–5); and the option to erase all the data on the iPod touch after ten failed passcode attempts.
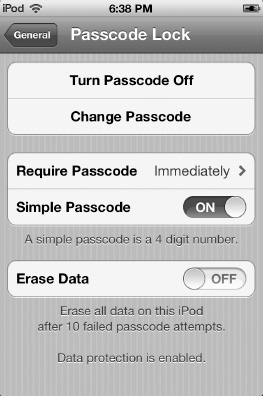
Figure 3–4. Additional passcode settings

Figure 3–5. Creating a more complex passcode
To test your passcode, click the Sleep/Wake button once (to put your iPod touch to sleep) and again (to wake it up). The passcode challenge screen greets you, as shown in Figure 3–6. Enter your passcode, and your iPod touch unlocks.
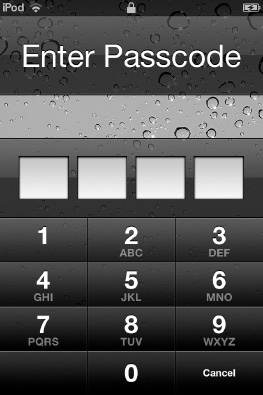
Figure 3–6. The passcode challenge screen
To remove the passcode from your iPod touch, go back to the Passcode Lock settings screen (Figure 3–4). Choose Turn Passcode Off, and reenter the passcode one more time to confirm that it's really you making this request.
So, what happens if you lose your passcode or a mean-spirited colleague adds one to your iPod touch without telling you? You'll need to connect the iPod touch to your home computer and use iTunes to restore the iPod touch software. You can restore your iPod touch by selecting the Summary tab in iTunes and clicking Restore. For more information about restoring your iPod touch, see Chapter 2.
The lock screen can also perform other functions including controlling the iPod touch's music player and camera. If music is playing on the iPod touch when the screen is locked, you can double-press the Home button to display music controls at the top of the screen. You can also quickly access the iPod touch's camera from the lock screen. You'll learn more about these controls in Chapters 6 and 13.
Putting Your iPod to Sleep
For iPods, sleep mode offers a power-saving way to use your device. Press the Sleep/Wake button once. The screen turns off, and your iPod locks and enters its low-power mode. You can still listen to music, and you can still double-tap the home screen to bring up your playback controls, but you cannot do much else.
To wake up your iPod again, press the Home button once, and then swipe to unlock.
Powering Your iPod Off and On
To power off your iPod, press and hold the Sleep/Wake button for about five seconds. The slider shown in Figure 3–7 appears. To power down, swipe the slider to the right. To cancel, either tap Cancel or just wait about ten seconds; the iPod automatically returns you to the previous screen if you don't power down within that time.

Figure 3–7. This screen appears after you hold down the Sleep/Wake and Home buttons for about five seconds. To power down, simply swipe the slider from left to right. Your iPod shuts itself down and powers off. To power back on, press and hold the Sleep/Wake button for about two seconds, until you see the white Apple icon.
When your iPod is powered off, it ceases to function. You cannot listen to music. You cannot surf the Internet. You must power your iPod back on for it to do these things.
To power on your iPod, press and hold the Sleep/Wake button for two to three seconds. Release the button when you see the white Apple icon. The iPod starts up and returns you to the home screen automatically.
Rebooting Your iPod
At times, you may need to reboot your iPod. The most common reason for doing this is that you have installed new software using third-party hacking tools.
Although you can reboot just by powering down and then powering back up, Apple provides a much easier way do this. Press and hold both the Home and Sleep/Wake buttons for 10 to 12 seconds. Ignore the power-off indicator (shown in Figure 3–7), and keep holding both buttons until the white Apple logo appears. Once it shows up, release both buttons, and let the iPod finish its reboot. You will return to the home screen automatically.
iPod Recovery Mode and Restoration
Your iPod has a secret setting called recovery mode. It's used to tell iTunes to restore your iPod to its factory-fresh condition. It's also used by a number of third-party hacking programs to gain access to your complete iPod file system so you can install software, wallpaper, and so forth.
Do not enter recovery mode lightly. Once you've entered that mode, you cannot change your mind and return to normal iPod use. You must know what you're doing. After you're in recovery mode, you'll need to restore your iPod firmware in iTunes and refresh your iPod's contents from its most recent backup.
To enter recovery mode, press and hold both the Sleep/Wake and Home buttons for about 25 seconds, until you see the screen with the iTunes logo and the end of the USB connector. You may want to watch a clock so you know when 25 seconds have elapsed. It can feel a lot longer when your fingers start getting tired.
You can restore your iPod either from recovery mode or directly in iTunes. When you connect an iPod in recovery mode to your computer, iTunes detects it and asks you to proceed with the restore process. If you want to restore your iPod without manually setting recovery mode, connect the iPod to your computer and launch iTunes. In iTunes, select the iPod from the Devices category in the sources list. Choose the Settings tab, and then click Restore.
When restoring, iTunes walks you through the entire process, offering extensive feedback and refreshing your iPod to a clean firmware installation. When iTunes is finished, it prompts you to decide whether you want to use the most recent backup. Agree if you want to return the iPod to its most previously backed-up state, or disagree if you want to retain the iPod's factory-fresh settings.
The Home Screen
As discussed, when you turn on your iPod touch, you'll be presented with a lock screen. Depending on whether you have a passcode set on your iPod touch, you'll either swipe the “slide to unlock” bar and be presented with a numeric keypad (or keyboard if you are using an alphanumeric password) or be immediately taken to your iPod touch home screen.
The iPod touch home screen (see Figure 3–8) is the first page of apps you have on your iPod touch. The home screen, whose unofficial name is Springboard, provides application-launching abilities. Depending on how many apps you have, you may have several pages that will show in subsequent order when you swipe to the left. The iPod's home screen allows you to launch any application with a single tap.
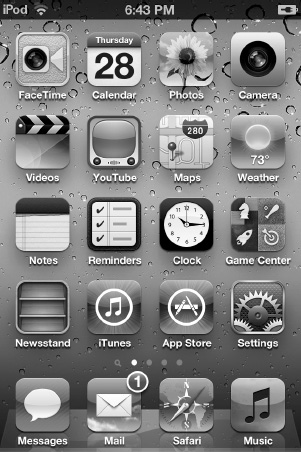
Figure 3–8. The iPod touch home screen
TIP: Since the home screen will be the first page you're taken to when you unlock your iPod touch, it makes sense to keep your most frequently used apps on the home screen for easy access.
From the top of the screen down, you'll see the following elements:
Status bar: A thin bar runs along the top of your iPod touch home screen. This status bar, shown in Figure 3–9, is visible on every page of your iPod touch home screen.
Figure 3–9. The status bar
The status bar can show many icons, but the standard layout you'll most likely see is the following. In the upper-left corner, you'll see the word iPod next to a Wi-Fi icon. The Wi-Fi icon shows that you are connected to a wireless hotspot and also displays the strength of your wireless signal. The current time is displayed in the middle of the status bar. On the right corner of the status bar is a battery meter icon.
The status bar can also show other status icons:
Airplane mode: An airplane icon designates that airplane mode is enabled. In airplane mode, Wi-Fi and Bluetooth are turned off. Other functions of your iPod touch are still available.
Padlock: A padlock icon tells you that your iPod touch is in orientation lock. We'll talk more about orientation lock in a bit.
Play: This icon, which looks like a triangle pointing to the right, indicates that a song, podcast, or audiobook is playing.
Location Services: This arrowhead-looking icon lets you know that a currently running app is using location services to determine your current location.
Apps page: Below the black status bar is a series of app icons (see Figure 3–10). Each page can hold up to 16 apps or folders in addition to the ones found in the dock. As I'll discuss shortly, apps can be deleted and rearranged without the need to sync your iPod touch with iTunes.
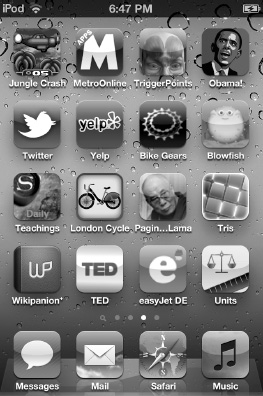
Figure 3–10. A page full of apps
Page dots: Just above the app icons in the dock is a series of small, white dots (see Figure 3–11). This series of dots begins with a tiny magnifying glass, which I'll get to shortly. The dots next to the magnifying glass signify the number of pages of apps you have on your home screen. If you see five dots, that means you have five pages of apps. The brightest dot signifies the location of the page you are currently on among all the pages of apps.
Figure 3–11. The dots signify how many pages of apps you have.
The dock: At the bottom of the Home screen and every additional page of apps is a long, gray slate known as the dock (see Figure 3–12). The dock can contain up to four apps. No matter what page of apps you swipe to, the dock always displays the same apps. The advantage of this is if you have many pages of apps but frequently check your e-mail, you'll always have quick access to the Mail app if you've placed it in the dock — no matter what page of apps you're on

Figure 3–12. The dock can hold between zero and four apps.
Manipulating the Home Screen
You can interact with the iPod touch home screen in several ways:
Navigating the apps pages: If you are on the first page of apps, swiping a finger to the left reveals the next page of apps. Keep swiping to the left to proceed navigating through all of the app pages. To go back to the previous page of apps, swipe your finger to the right. On any page of apps but the first, pressing the Home button once takes you back to the first home screen.
NOTE: Home screens move only left or right. Unlike in many apps, they do not move up or down.
Launching apps: To launch an app, tap its icon. To return to the home screen, press the round, physical home button on the iPod touch's bezel. The app continues to run in the background even though it is not visible.
Manipulating app icons: This is fun. Let's say you want to rearrange the icons on your home page but aren't near your computer to do it through the iPod touch's iTunes preferences page. Simply touch and hold any icon on the home screen. After a few seconds, you see all the icons on the page start to jiggle like they're little mounds of Jell-O (see Figure 3–13). Remove your finger from the app, and the icons continue to jiggle. While jiggling, you can touch and hold any app icon and then simply drag it to a new position on the page. You can also drag icons to and from the dock.

Figure 3–13. Jiggling icons. In this example, the app Yelp is being moved.
You can go ahead and swipe to a new page of apps while they are all jiggling and rearrange the apps on that page. You can also transfer apps between pages. Simply touch and hold the app you'd like to move to a different page, and drag it toward the side of the screen where the page is located. After a brief pause, the next page will automatically swipe over, and you can drop the app anywhere you want it. If that page is already full of 16 apps, the app in the lower-right corner will be pushed to the next page automatically.
NOTE: If your dock already has four apps on it, you must remove an app first before adding a new one to the dock. Unlike with home pages, apps in the dock will not automatically be pushed to a new page if you try to add a new app to a full dock.
Creating folders of apps: In Chapter 2 we told you how to create folders full of apps on your iPod touch using iTunes, but you can also create folders of apps right on your iPod. Simply touch and hold an app icon until all the apps are jiggling (see Figure 3–13). Once they are, drag an app onto another app icon and hold it there. After a second or two, an app folder appears. Drop the app inside the folder so it appears next to the app icon you held it over (see Figure 3–14).
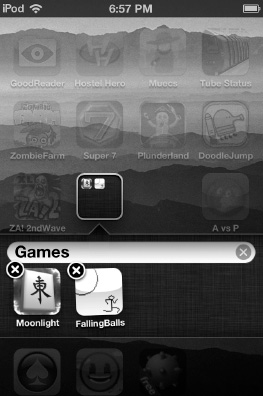
Figure 3–14. Creating a folder full of apps
You can arrange the apps in this new folder any way you want. You can also name the folder whatever you want. One cool thing Apple did was give the folder the ability to guess the name you want it to be. In the example in Figure 3–14, I created a folder with two games inside. The iPod touch knew both apps were games and appropriately named the folder Games. You can always change the name of the folder, however. Tap anywhere outside the folder to return to the normal apps screen. Drag any app to an existing folder to add it to that folder.
Folders appear as gray boxes with multiple app icons inside (see Figure 3–15). Folders can contain up to 12 applications, and you can have up to 20 folders on a page (16 on a page plus 4 in the dock). To open a folder, tap it, and its contents expand while the rest of the outside app icons are grayed out (see Figure 3–15). To exit a folder, tap anywhere outside of it.
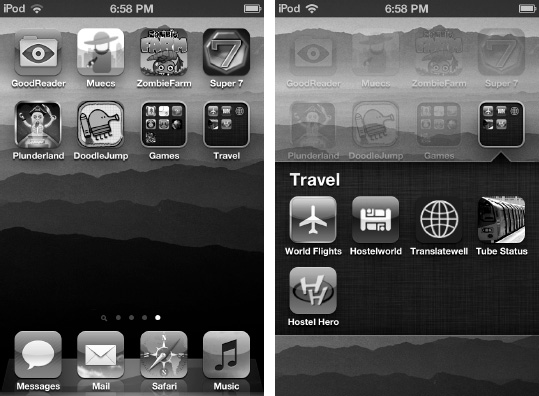
Figure 3–15. Left, an apps page with two folders, Games and Travel. Right, the same apps page with the Travel folder open.
Removing apps: In Chapter 2 I told you how to remove apps from your iPod touch using iTunes. You can also remove an app from the iPod touch right on the device. To do this, touch and hold any icon on the home screen, and wait for them all to begin jiggling like they did when you were rearranging apps (see Figure 3–13).
Notice how some of the apps have a little black-and-white X in their upper-left corner? Tapping that X deletes the app. Don't worry if you accidentally delete an app from your iPod touch. The apps are always stored in your iTunes library, and you can reinstall them at any time.
NOTE: You cannot delete any Apple apps that were factory-installed on your iPod touch, such as Stocks, Mail, and so on. You can, however, delete Apple apps that you installed yourself, such iBooks and Remote.
To delete an app, touch the X. A dialog appears on the screen asking whether or not you want to delete the selected application. You'll also see a note saying that deleting the app “will also delete all of its data,” as shown in Figure 3–16. This is important! If you've created a new document inside the app or achieved a new high score on a game and you delete the app before syncing it to iTunes, any new data associated with that app is deleted.

Figure 3–16. The deletion warning
NOTE: If you delete an app accidentally and need it back right away, but are not near your computer, use the iPod touch's built-in App Store app to download the app again. If it was a paid application, don't worry; you won't be charged a second time. Your iTunes account knows that you've already paid for it.
If you are sure you want to delete an app, go ahead and tap the Delete button. If you've changed your mind, tap Cancel. When an app is deleted, all the other apps on the page shift to fill the space of the deleted app.
Multitasking and Managing Background Apps
With iOS 4, Apple introduced multitasking features to the iPod touch. Multitasking means you can have more than one app running at a time. In other words, you might be browsing the Web in Safari, and in the background you can have an instant messaging app running. Even though your entire iPod touch screen is devoted to the Safari app, you are still online and notified of new instant messages in the IM app.
To leave an app, press the Home button to return to the home screen, and then find the next app that you want to launch and tap its icon. With the multitasking features built into iOS 5, you don't have to return to the home screen every time you want to launch a different app. Now, no matter what app you are in, pressing the Home button twice displays a row of all the apps that are currently running in the background (see Figure 3–17). These apps are referred to as background apps. Any app you have launched on the iPod since turning it on will run as a background app until you close the app for good (discussed in a few pages). This background app bar is a very handy feature, but there is one small caveat: all the apps you see there might not actually be running in the background. Apple also uses this bar to show recently used apps, so even after a reboot, you might see several apps in the bar even though you have not launched them since rebooting.

Figure 3–17. Some apps that are running in the background while I am in the Weather app
In Figure 3–17, you can see that I'm in the Weather app. By double-pressing the Home button, the multitasking bar slides the screen up, and you can scroll through all your other background apps. To see more currently running background apps, flick the row of apps left or right. To quickly switch to another background app, tap its icon, and it swaps places with the current app you are in (see Figure 3–18).
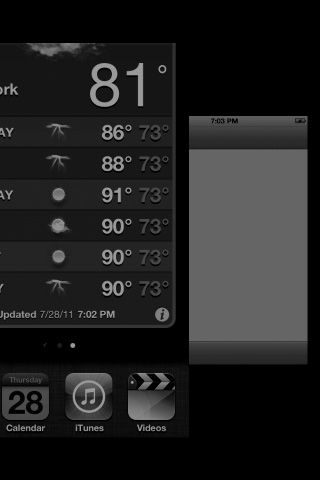
Figure 3–18. The Weather app swapping places with the Calendar app via the iPod touch's multitasking features
Quitting an App
The iPod touch's home screen allows you to launch any application with a single tap. Once you've launched that app, it remains open in the background even if you return to the Home screen. To quit the app, double-press the Home button to open the background apps bar. Swipe through the row of apps until you've found the one you want to quit. Now touch and hold the app's icon until it and the other apps in the bar start to jiggle. You'll notice red dots with a white minus sign have appeared in the corner of all the apps in the bar (see Figure 3–19). Tap the red dot to quit the app. To reopen the app, you'll need to launch it from the home screen again.
Quitting applications instead of letting them remain open in the background lowers your CPU usage, keeps your iPod slightly cooler, and puts a little less strain on your battery.
Remember how I mentioned that Apple also uses this background multitasking bar to show recently used apps? Well, if the app isn't running, tapping the minus sign removes the recently used app from the bar. The way Apple has implemented this, you can't really tell which apps are actually running and which are just recently used apps just by looking at the bar.

Figure 3–19. Tap the red and white minus sign to close an app for good.
Force Quitting an App
If for some reason an app hangs and your iPod touch becomes unresponsive, press and hold the Sleep/Wake button on the top of your iPod touch. Hold it until the red slider appears (Figure 3–7), release the Sleep/Wake button, and then press and hold the Home button. If all goes correctly, you should be returned to your home screen and can try launching the problematic app again.
TIP: A Back button appears in the upper-left corner of many iPod touch app. Tap this button to return to the previous screen in the app. This is different from pressing the Home button. The Back button moves you between screens within an app. The Home button leaves an app and returns you to the home screen.
Orientation
I mentioned the iPod touch accelerometer earlier in this chapter. In most images of the iPod touch, you'll notice that it is in portrait orientation with the physical Home button at the bottom of the device. Some apps let you hold the iPod touch in either a portrait or landscape orientation. Using different orientations to view an app can increase the usability of the app, depending on what you are doing. Using Safari in landscape mode, for example, provides a wider screen for reading a web page (Figure 3–20).

Figure 3–20. Safari in landscape and portrait modes
You've already read that to change orientation, you tilt the iPod to one side or the other. If the app has a landscape mode, it rotates on the screen to enter that mode automatically. The ability to change orientation is nice—except for those times when the orientation changes and you don't want it to, such as when you are reading a book on your iPod touch while laying in bed. A constantly shifting orientation can easily interrupt your reading enjoyment.
Thankfully, Apple has given users the ability to lock the iPod's screen orientation. You can only lock the iPod's orientation into portrait mode, however. To do this, double-press the Home button so the screen shifts up, just like it does when you are quickly changing between background apps. In the space below the dock, swipe your finger left to right until the rewind, play, and forward buttons appear (see Figure 3–21). Next to the rewind button is the orientation lock button. Tap it once to lock the orientation. Unwanted screen rotation solved! Tap the lock button again to disable orientation lock.

Figure 3–21. The orientation button unlocked (left) and locked (right)
Spotlight Search
At this point I've explained everything the iPod touch home screen offers, save for one very important feature. Earlier I mentioned a small gray magnifying glass icon next to the row of dots that represent pages of apps (see Figure 3–22). This magnifying glass icon represents the iPod touch's powerful search feature, named Spotlight.
Figure 3–22. The Spotlight magnifying glass icon (circled) is at the bottom of every home page
To access Spotlight, swipe to the right of the first page of your home screen. If you are on the first home screen, you can also press the Home button once to be taken to the Spotlight page. You'll be taken to a page that displays a small, white search field at the top with the words Search iPod in it. At the bottom of the page is the on-screen keyboard.
Begin typing a search query into the search field, and the space between the search field and the keyboard begins populating with results (see Figure 3–23).
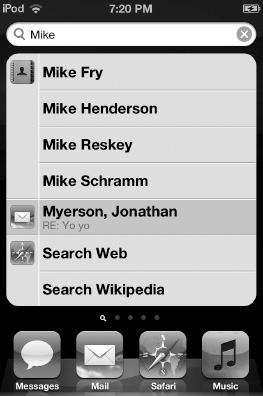
Figure 3–23. The Spotlight search results page
At this time, Spotlight isn't as powerful as it can be. If you own a Mac, you know that Spotlight is capable of searching within documents, not just by a document's file name. Currently, Spotlight is only capable of searching the following:
Contacts: First, last, and company names.
Mail: To, From, and Subject fields.
Calendar: Event titles, invites, and locations.
iPod: Song names, artists, and albums. Podcast and audiobook titles and names.
Notes: Although Spotlight can't search the text in the body of an e-mail message, it can search the text in a note from the Notes app.
To select a result, tap it, and you'll be taken to the document or file in the app that the result is found in. At the bottom of the Spotlight results you have the option to search the Web for your query or search Wikipedia. Tapping either option opens the Safari web browser and displays either the default search engine page or the Wikipedia search results page.
Although Spotlight is a nice feature, it does have some limitations. Perhaps the biggest limitation is that you can't search for text in the body of an e-mail. Also, Spotlight isn't smart enough to recognize misspellings, so anything that is mistyped in a note or e-mail subject won't be found.
NOTE: If you have dozens and dozens of apps, instead of swiping through all the home screen pages, just go to Spotlight and search for the name of the app. When the app icon appears, tap it to launch it.
Spotlight Settings
Go to Settings ![]() General
General ![]() Spotlight Search to find a few options for Spotlight. Here you can deselect items to eliminate them from Spotlight search (for example, tap Music to deselect it so song names won't show up when you're searching). You can also use the grip icon to the right of the screen to rearrange the order that search groupings appear in. The grip icon is a set of three horizontal lines that indicates you can drag something up or down in a list.
Spotlight Search to find a few options for Spotlight. Here you can deselect items to eliminate them from Spotlight search (for example, tap Music to deselect it so song names won't show up when you're searching). You can also use the grip icon to the right of the screen to rearrange the order that search groupings appear in. The grip icon is a set of three horizontal lines that indicates you can drag something up or down in a list.
The iPod Keyboard
Let's start talking about the iPod keyboard by quoting verbatim from one my earliest iPhone e-mail messages (the iPhone uses the same keyboard as the iPod):
I would like to sat that the iPhone has turned me into a tupong expert, but that would ne far far far from the truth. The fact is that I type on the iPhone like a cow, working with the iPhone keyboard is norm hard and frustrating. Foe all this Rhine is supposed to be smart and press five, I find that in actual use it is slow and mistake-prone. Will my accuracy improve as I get more experience? Probably. Will my fingers become smaller and less oqlike?almost certainly nor.
I sent that e-mail within the first 24 hours of iPhone ownership, and I was feeling pretty down on the whole iPhone/iPod keyboard thing. Within a week, however, my typing developed from horrible to readable and, within another week, from readable to pretty darn good.
Bluetooth Keyboard Support
You can use a physical Bluetooth keyboard with an iPod touch. To do so, go to Settings ![]() General
General ![]() Bluetooth, and make sure Bluetooth is turned on. Next, make sure your Bluetooth keyboard is turned on as well. Once it is, it should show up in the devices list on the Bluetooth settings page. Enter the pairing passphrase you see on your iPod touch screen using the Bluetooth keyboard. Once you do so, your Bluetooth keyboard is all set up and ready to use.
Bluetooth, and make sure Bluetooth is turned on. Next, make sure your Bluetooth keyboard is turned on as well. Once it is, it should show up in the devices list on the Bluetooth settings page. Enter the pairing passphrase you see on your iPod touch screen using the Bluetooth keyboard. Once you do so, your Bluetooth keyboard is all set up and ready to use.
Most people won't be using a Bluetooth keyboard with their iPod, but if you find yourself doing a lot of typing, a Bluetooth keyboard might be just the thing for you. With it, you can use some physical keyboard shortcuts such as Cmd+A to select all the text and Cmd+C to copy the selected text or Cmd+V to paste the selected text.
iPod Keyboard Basics
In this section, I'll look at using the on-screen keyboard in Apple's Notes app that comes on every iPod touch. I've opened Notes and clicked the + button in the upper-right corner to create a new note. The keyboard automatically appears at the bottom of the iPod touch screen (see Figure 3–24).
NOTE: Using the keyboard in portrait orientation gives you a smaller keyboard but more space to see what you're typing on the screen. If you switch to landscape orientation, you'll have a larger keyboard but less space to see what you've typed. Play around to see what works best for you.
Though Apple has outdone itself in designing the iPod touch's keyboard, many people still think it's the hardest thing to get used to on their new device. People are so used to typing on physical keyboards that making the switch to a touchscreen keyboard can be difficult, but it does get much better over a relatively short amount of time. The keyboard gets easier to use the more you use it, not just because you get used to it, but because it has a secret.
The secret is that the keyboard, shown in Figure 3–24, is smart. It's so smart that it corrects for a lot of typos and misaligned fingers. It automatically capitalizes the start of sentences. It suggests corrections for misspelled words. It uses predictive technology to make it easier to hit the right keys. So, within a few weeks, you'll master the keyboard's quirks.

Figure 3–24. The iPod keyboard grows easier to use with experience. Notice the Shift key (arrow pointing up) to the left of the Z key and the Backspace/Delete key (pentagram pointing left with an x in it) to the right of M key. The @123 key switches to a numbers and symbols layout. The Return key finalizes your changes. In some applications, a Return key lets you add carriage returns to your text.
Here are some of the key technologies that make the iPod touch keyboard work:
Dictionary: The iPod touch has a built-in dictionary that learns frequently used words as you type (see Figure 3–25). It also picks up names and spellings from your address book. This means it gets better at guessing your intentions as it builds its data.

Figure 3–25. An example of the iPod touch learning words and names from your contacts
Automatic correction: As you type, the iPod touch looks for words similar to what you're typing and guesses them, placing the guess just below the word you're typing (see Figure 3–26). To accept the suggestion, just tap the spacebar, and the full word is inserted. If you don't want to use the suggested word, tap the X next to the suggested word.
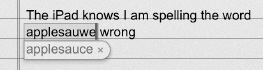
Figure 3–26. An example of the iPod touch's autocorrection features
Spell check: If you spell a word wrong or the iPod touch doesn't recognize it, a red line appears below the word. When you tap the word, one or more alternate spellings appear above it (see Figure 3–27). Simply tap the right word, and it inserts itself into the text.

Figure 3–27. An example of the iPod touch's spell-check feature
Predictive mapping: The iPod touch uses its dictionary to predict which word you're about to type. It then readjusts the keyboard response zones to make it easier for you to hit the right letters. Likely letters get bigger tap zones; unlikely letters get smaller ones.
More Keyboards
Thought the iPod touch had only one keyboard? Think again. It has more than a dozen (in different languages). It also has two other keyboards you'll frequently access from the primary keyboard on your screen.
On the primary keyboard (see Figure 3–28), you'll notice the .?123 key. Tapping the .?123 key switches your QWERTY keyboard into a numeric keyboard with further punctuation symbols and another keyboard modifier key labeled #+=.
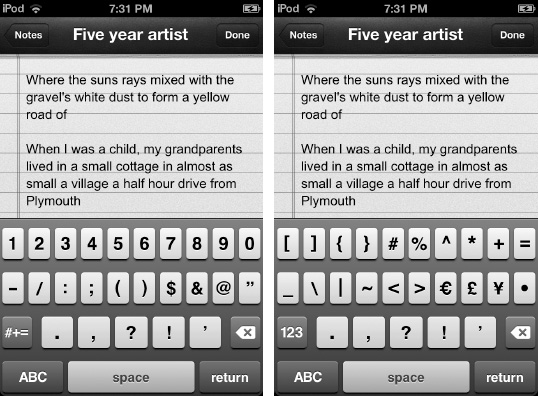
Figure 3–28. The.?123 and the #+= keyboards
Tapping the #+= key takes you to a third keyboard with more punctuation buttons. Tap the ABC button to return to the alphabetic keyboard.
Getting Started Typing
When you're new to the iPod, start by typing slowly. Pay attention to those confirmation pop-ups that appear every time you tap a key. I find it easiest to use my forefingers to type. Others prefer to use their thumbs. Whatever method you use, make sure to go at a pace that allows you to keep track of what you're typing and make corrections as you go. Here are a few typing how-tos:
Accepting or rejecting automatic corrections: The iPod displays suggested corrections just below the word you're typing, as shown in Figure 3–29. To accept the suggestion, tap the spacebar. (You don't need to finish typing the word; the iPod puts it in there for you.) To decline the correction, tap the word. The iPod will not make a substitution, even when you press the spacebar.
Using the spyglass: While you're typing, you can adjust the cursor by using the iPod's built-in spyglass feature, as shown in Figure 3–30. Hold your finger somewhere in the text area until the spyglass appears. Then use the magnified view to drag the cursor exactly where you need it.
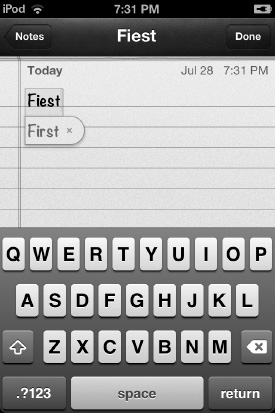
Figure 3–29. The iPod's suggestions appear just below the word you type. Tap the spacebar to accept the suggestion, or tap the word you're typing to disable automatic correction for that word.
Summoning the keyboard: To open the keyboard, tap in any editable text area.
Dismissing the keyboard: There is no standard way to dismiss the keyboard, but most programs offer a Done button that indicates you're finished typing. In Safari, press Go rather than Done.

Figure 3–30. The iPod's spyglass offers a magnified view that makes it easy to position the cursor exactly where you need it to be.
iPod touch Typing Tricks
Once you get the hang of the keyboard, the iPod touch offers several other ways to make typing easier. This section describes a few of these handy iPod touch typing tricks.
Contractions
When you want to type a contraction like can't or shouldn't, don't bother putting in the apostrophe. The iPod touch is smart enough to guess that cant is can't. (Of course, if you're typing about the British Thieves' language, make sure to tap the word itself to decline the change from the noun to the contraction.)
When you're typing in a word like we'll, where the uncontracted well is a common word, add an extra l. The iPod touch corrects welll to we'll and shelll to she'll (Figure 3–31).

Figure 3–31. Cant becomes Can't.
TIP: Other contraction tricks include itsa, which gets corrected to it's, and weree, which gets corrected to we're.
Punctuation
At the end of a sentence, tap the punctuation key, and then tap the item you want to use. If you plan to use only one item of punctuation at a time, such as a comma or period, save time by dragging. Drag from the punctuation key (it appears as .?123 in some applications and @123 in others) to the item you want to include. When you start the drag at .?123 or @123, the iPod switches momentarily to the numbers and punctuation view. After selecting your item, the keyboard automatically bounces back to the alphabet.
Another punctuation trick for the end of sentences is to tap the punctuation key, then tap the item you want to use (such as a question mark or period), and finally tap the spacebar. The iPod is smart enough to recognize the end of a sentence and put you back in alphabet mode. During normal typing, you can also double-tap the spacebar to add a period followed by a space. This double-tap trick is controlled in your settings via Settings ![]() General
General ![]() Keyboard
Keyboard ![]() “.” Shortcut.
“.” Shortcut.
Accents
Tap and hold any keyboard letter to view inflected versions of that letter. For example, tapping and holding n presents the options of adding n, ń, or ñ, as shown in Figure 3–32. This shortcut makes it much easier to type foreign words.
To select a non-English keyboard, go to Settings ![]() General
General ![]() International
International ![]() Keyboards, and choose from your iPod's long list of foreign-language variations.
Keyboards, and choose from your iPod's long list of foreign-language variations.
This accents trick also works with other keyboards. For example, when entering a URL in Safari, press and hold the .com button to bring up the .net, .edu, .org, and .us buttons.

Figure 3–32. Press and hold any key to view its common international alternatives.
Caps Lock
To enable the Caps Lock function, go to Settings ![]() General
General ![]() Keyboard. When this function is enabled, you can double-tap the Shift key to toggle the lock on and off.
Keyboard. When this function is enabled, you can double-tap the Shift key to toggle the lock on and off.
Word Deletion
When you press and hold the Delete key, the iPod touch starts off by deleting one letter and then the next. But if you hold it for longer than about a line of text, it switches to word deletion and starts removing entire words at a time.
Autocapitalization
Autocapitalization means the iPod touch automatically capitalizes the word at the beginning of a sentence. So, you can type the day has begun, and the iPod touch is smart enough to capitalize the, as in The day has begun. This means you don't need to worry about pressing the Shift key at the beginning of every sentence or even when you type i, because i went to the park will become I went to the park. Enable or disable autocapitalization in Settings ![]() General
General ![]() Keyboard.
Keyboard.
Shortcuts
iOS 5 allows you to specify text shortcuts that expand into full words or phrases. For example, typing “omw” expands into “On my way!” You can add any kind of text shortcuts you want. Go to Settings ![]() General
General ![]() Keyboard
Keyboard ![]() Add New Shortcut, and then type in the phrase you'd like to add and its shortcut text. Adding your own shortcuts can save time from retyping common phrases used in e-mail or text messages.
Add New Shortcut, and then type in the phrase you'd like to add and its shortcut text. Adding your own shortcuts can save time from retyping common phrases used in e-mail or text messages.
Copy and Paste
Apple has created an easy and intuitive way to select a word or block of words, copy them, and then paste them into another location.
Let's copy some text found on a web page in iPod touch's Safari web browser. Before you can copy a word, you'll need to select it. To do that, press and hold your finger over a word. A black contextual menu pops up that gives you Select and Select All options. Select highlights just the single word, while Select All highlights all the words on the page. No matter which you choose, you'll be presented with a grab point at the beginning and end of the selected text (see Figure 3–33). These grab points allow you to adjust which text is selected.

Figure 3–33. Grab points allow you to select a single word, a sentence, or a whole paragraph to be copied.
NOTE: If you've selected text to copy in an editable document, you'll see a contextual menu that says Cut, Copy, or Paste. Selecting Cut removes the text. Selecting Copy copies it, and if you already have text copied, you'll be able to paste it over your current selection.
Once you have selected your text, you'll see another contextual menu that says Copy. Tapping Copy will copy the text and make it available in any app that supports text input.
Now let's go back to our note in the Notes app. To paste text you copied from Safari into your note, simply press and hold your finger on the screen until the spyglass pops up. Use the spyglass to adjust the cursor to the location where you want to insert the copied text and let go. Another contextual menu pops up that gives you three options: Select, Select All, and Paste (see Figure 3–34). Tap Paste, and your copied text is instantly inserted.

Figure 3–34. Simply tap Paste, and your text is inserted automatically.
Undo and Redo
If you want to undo your last command, such as pasting text, shake your iPod, and the Undo pop-up appears; in this case, it will say Undo Paste (see Figure 3–35). Tap it to undo, which in this case would remove the pasted text.
Shake the iPod again to bring up the Redo pop-up (see Figure 3–35). Tapping Redo Paste repastes the text you just undid.

Figure 3–35. Shake your iPod to bring up the Undo and Redo pop-up commands.
Dictionary Lookup
iOS 5 allows you to look up any word in a Note, e-mail, or web page. Select the word and then tap Define from the contextual menu pop-up. The Dictionary panel displays a definition of the word (Figure 3–36). Click the Done button to exit the Dictionary panel.
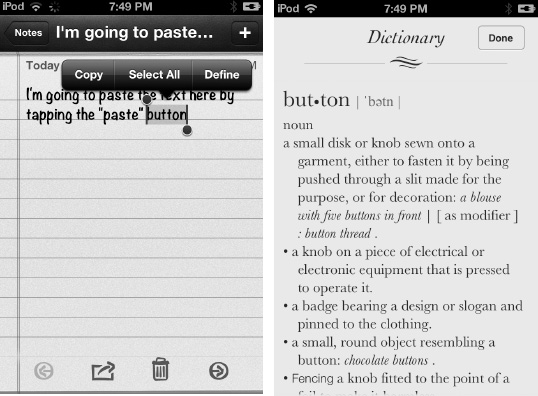
Figure 3–36. Looking up words with the built-in Dictionary.
iPod Typing Test
Track the progress of your iPod touch keyboard mastery with one of the iPhone-style typing tests available on the Internet. (Even though they are labeled for iPhones, they work great on your iPod as well.)
Google for iPhone typing tests wpm, and you'll find any number of sites offering a words-per-minute test. Load one of these into Safari on your iPod, and you're ready to see how your typing has improved.
Notification Center
The Notification Center is a central location where you can see all of your notifications in one place. These include new e-mails, reminders, tweets, messages, Facebook posts, and more. Basically, if an app can send you any kind of notification, it'll appear in the Notification Center. You can see what the Notification Center looks like in Figure 3–37.

Figure 3–37. The Notification Center
In Figure 3–37 you can see the Notification Center is displaying the weather and a stock ticker, as well as select notifications I have set up to be visible in the Notification Center. In this case, those notifications are FaceTime calls, Reminders, Calendar events, and Mail messages.
To access the Notification Center, swipe down with one finger from the top of your iPod touch's screen. It doesn't matter where you are; you can be on a Home screen, in an app or game, or even on the iPod's lock screen. Wherever you are, just swipe down with one finger, and the Notification Center appears.
To scroll through the Notification Center, swipe up or down with your finger. Tap any notification in the Notification Center to go directly to the app that sent the notification. For example, in Figure 3–37, tapping the FaceTime missed call notification launches the FaceTime app and initiates a return call. Tapping the stock ticker takes you to the Stocks app. Tapping an e-mail notification takes you right to that e-mail. Pretty cool, huh?
To close the Notification Center, touch the three grab bars at the bottom of its screen and swipe up.
Types of Notifications
There are many types of notifications in iOS 5 on the iPod touch. They all perform the same task (notifying you of an event), but they all notify you in a different way.

Figure 3–38. The banner type of notification
Banners: Banners appear at the top of your screen and go away automatically after a few seconds. They're a short visual cue that allows you to see you have a notification without interrupting your work. The banner notification in Figure 3–38 tells me I've just received an e-mail from “MacGP” and the subject of the e-mail is “Manuscript offer.”
Alerts: Alerts are more abrupt than banners. An alert is a pop-up dialog box that requires you to take action before the alert will disappear. You can see an example of an alert in Figure 3–16.
Badges: Badges are red icons that appear in the corner of an app icon. Badges always contain numbers. For example, in Figure 3–8 the “1” badge on the Mail icon means there is one new e-mail waiting.
Sounds: Sounds are audible notifications of an event. You might head a “ding!” when you receive a new e-mail, for example.
Now that you are familiar with the types of notifications, let's look at how to configure them for each app and set up which notifications appear in the Notification Center.
Setting Up Notifications and the Notification Center
To configure notifications, go to Settings ![]() Notifications (Figure 3–39). You're presented with a list of all the apps that offer notifications. Beneath an app's name are labels displaying what types of notifications the app is sending you. As you can see, a single app can send multiple types of notifications.
Notifications (Figure 3–39). You're presented with a list of all the apps that offer notifications. Beneath an app's name are labels displaying what types of notifications the app is sending you. As you can see, a single app can send multiple types of notifications.

Figure 3–39. Notifications settings
The notifications settings screen allows you to sort the order of the apps that appear in your Notification Center. Tap By Time to show the most recent notification at the top of the Notification Center. If you select Manually, you can then tap the Edit button and drag the apps up or down the list. The order that you put them in is identical to the order that they appear in the Notification Center.
The Notifications setting screen also displays two lists. The first is In Notification Center, and the second is Not in Notification Center. Apps appearing in the In Notification Center list appear in the Notification Center when you swipe down from the top of your screen. Apps appearing in the Not In Notification Center list still send you notifications; they just won't appear in the Notification Center list.
There's an advantage to not having all your notifications show in the Notification Center: it reduces clutter. You might not care to see all the Twitter @mentions you've received in your Notification Center, but you may want to still have badge notifications enabled for the Twitter app.
Each app has its own notifications settings. To access them, tap the name of the app in the notification settings (Figure 3–39). The app's individual notification settings appear (Figure 3–40).
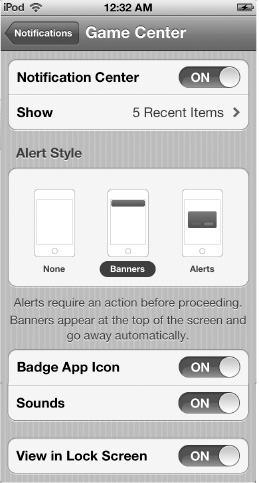
Figure 3–40. Selecting an app's notification settings
Figure 3–40 shows the notification settings for the Game Center app. These notification settings are a good representation of the settings you'll find for other apps, but the settings can vary from app to app.
Notification Center: Toggle this to show or hide the app notifications (Game Center in this case) in the Notification Center.
Show: select how many notifications from the app to show in the Notification Center.
Alert style: Choose from between none, banners, or alerts.
Badge App Icon: Toggle this to show or hide red badge notifications.
Sounds: Toggle this to hear/mute audible notifications.
View in Lock Screen: When set to on, an app's notifications appear in the Notification Center on the iPod touch lock screen. If this is set to app, the app's notifications will not appear in the Notification Center when viewed from the lock screen but do appear in the Notification Center when viewed from elsewhere in iOS. Apple gives users this option in order to hide sensitive information (such as e-mails) from prying eyes.
Summary
This chapter has explored most of the ways you can interact with your iPod touch, from taps to buttons to pinches. You've read about the touchscreen and how to communicate with it. You've discovered how to access your home screen, lock it, and rearrange its icons. You've explored your iPod touch's General settings, and you've learned tips and tricks for using the iPod touch's virtual keyboard and setting accessibility options. Finally, you've explored iOS 5's Notification Center. In short, you've been introduced to many of the basic ways you and your iPod touch can communicate with each other. Here are a few key lessons for you to carry away from this chapter: