
A Quick Tour of Big Sur
In later chapters I cover specific apps that have had significant changes, such as Maps and Safari, as well as new system-wide technologies like Control Center. Before we get to those details, though, let’s look around and get acquainted with the new environment.
Get Your Visual Bearings
When you start using Big Sur, you may feel a little disoriented because virtually every element on screen is at least a little different from what you’re accustomed to—and a few things may be downright confusing. So let’s take a moment to review some of the major visual differences compared to Catalina and help you get your bearings.
The Menu Bar
Starting at the top of the screen, we have the familiar Mac menu bar. It’s now even more translucent than before, letting your background image show through, with text that changes in shade depending on the color behind it. The menus themselves are also more translucent. (If you dislike this effect, see the sidebar Turn Off the Translucency.)
As always, the Apple menu is on the left, followed by other menus such as File, Edit, and View. Individual items on each menu are now more widely spaced, as are the icons for menu extras on the right.
Apple-provided menu extras such as the clock, Wi-Fi ![]() , Spotlight
, Spotlight ![]() , and Time Machine
, and Time Machine ![]() (each of which can be enabled or disabled on the appropriate pane of System Preferences) are still there. You’ll also see new icons for Battery
(each of which can be enabled or disabled on the appropriate pane of System Preferences) are still there. You’ll also see new icons for Battery ![]() (on laptops only; see Explore System Preferences Changes) and the new Control Center
(on laptops only; see Explore System Preferences Changes) and the new Control Center ![]() , which gives you quick access to system settings (see Work with Control Center).
, which gives you quick access to system settings (see Work with Control Center).
Not all menus are strictly vertical lists anymore! For example, the Wi-Fi menu has an on-off switch at the top, and the Fast User Switching menu may have multiple users listed in a single row. To the left of Apple’s menu extras you may see icons for third-party menu extras from apps you’ve added yourself.
The Dock
Your Mac’s Dock (Figure 11) is now more translucent than before (again, see the sidebar Turn Off the Translucency if that makes you unhappy). It looks much like the Dock on an iPad, in that it floats near the bottom of the screen (or near the left or right edge, if you’ve changed its position in System Preferences > Dock). I think it strains the metaphor to use the word dock for a thing that floats, but that’s me. In any case, the change in position is subtle; you’re more likely to notice the redesigned icons, about which I say more next.

Icons
Almost every icon for Apple software included with macOS—including the Finder, Siri, all the apps in the Applications folder, and most panes of System Preferences—has been updated. (Figure 12 shows some examples; you can see a few more in Figure 11, above, and still more below in Explore System Preferences Changes.)

Most of the icons are similar to, or derivatives of, their earlier versions, while others are dramatically different. For app icons, Apple has chosen to use the same design as on iOS and iPadOS, where each icon is a rounded rectangle. (So far, at least, that design requirement doesn’t extend to third-party apps for macOS as it does for iOS and iPadOS.) They’ve reduced the color palette, too, to favor just a handful of shades.
I think this insistence on uniformity is a mistake, as you can no longer use an icon’s overall shape or distinctive color as a quick visual cue, meaning you have to look more carefully to figure out what’s what. For example, the Messages icon and the FaceTime icon are now both the same shade of green, as well as being the same shape, so it’s much easier to get them confused than it was before, especially if they’re right next to each other on your Dock.
Windows
Windows, like menus, now have more widely spaced elements and are predominantly white (or translucent) with some gray accents. They also have much rounder corners than in earlier versions of macOS. And the disclosure triangle (![]() )—that little icon to the left of folders that you click to expand or collapse the view of what’s inside them—is now no longer a triangle: it’s more of a caret (
)—that little icon to the left of folders that you click to expand or collapse the view of what’s inside them—is now no longer a triangle: it’s more of a caret (![]() ).
).
But there are also two other significant changes to windows:
Toolbars: The toolbar is the area at the top of a window that typically contains icons for changing the view and performing actions on items in the window. In Catalina and earlier (Figure 13, top), it was a gray bar that extended across the entire window; in Big Sur (Figure 13, bottom), it’s a white area that begins to the right of the sidebar (if any) and has subtler icons without borders that make them look like buttons.

Figure 13: The toolbar of a Finder window in Catalina (top) and Big Sur (bottom). Sidebar: The sidebar (see Figure 14) in apps like the Finder, Mail, Notes, and Photos now extends all the way to the top of the window, and now features blue rather than gray icons for Favorites. (You can adjust the size of the text and icons in the sidebar by going to System Preferences > General and choosing Small, Medium, or Large from the “Sidebar icon size” pop-up menu.)
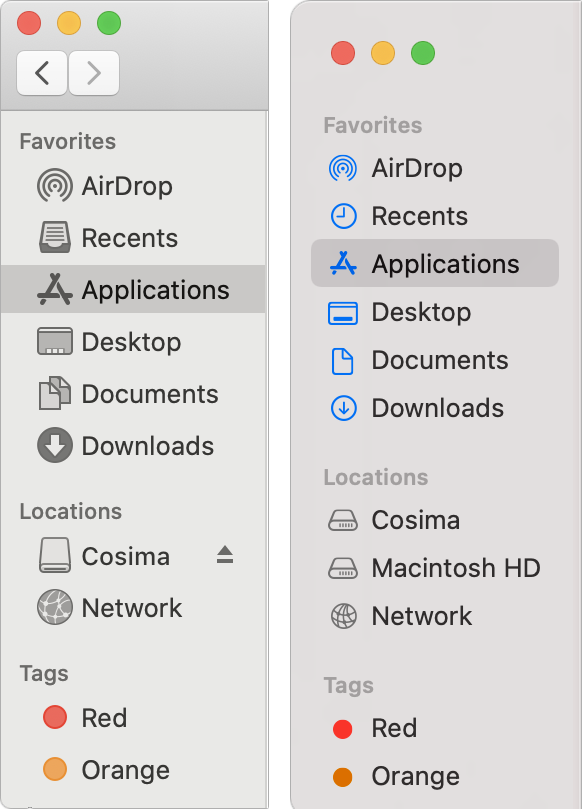
Figure 14: The sidebar of a Finder window as it appears in Catalina (left) and Big Sur (right).
Alerts and Sheets
The standard shape of alerts has changed from a horizontal orientation to a vertical orientation. Figure 15 shows the difference. Although some alerts (especially from third-party apps) may continue to have the old-style appearance for a while, the new standard is to make alerts look much like they do in iOS and iPadOS.

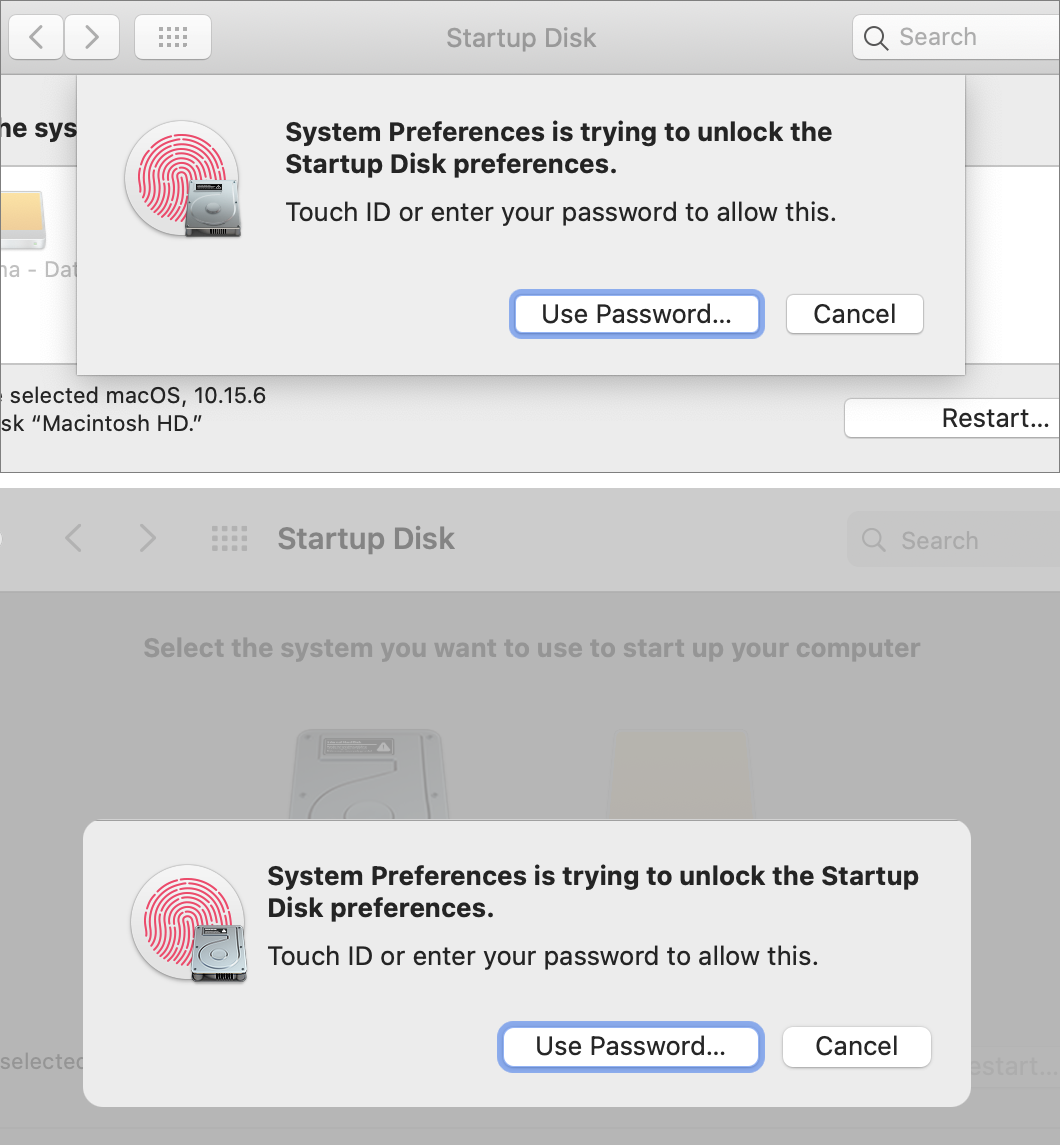
Sheets are special dialogs that are attached to windows rather than free-floating. Up through Catalina, these slid down from the window’s toolbar or title bar (Figure 16, top), but in Big Sur they’re centered within the window (Figure 16, bottom), and the rest of the window dims.
Explore System Preferences Changes
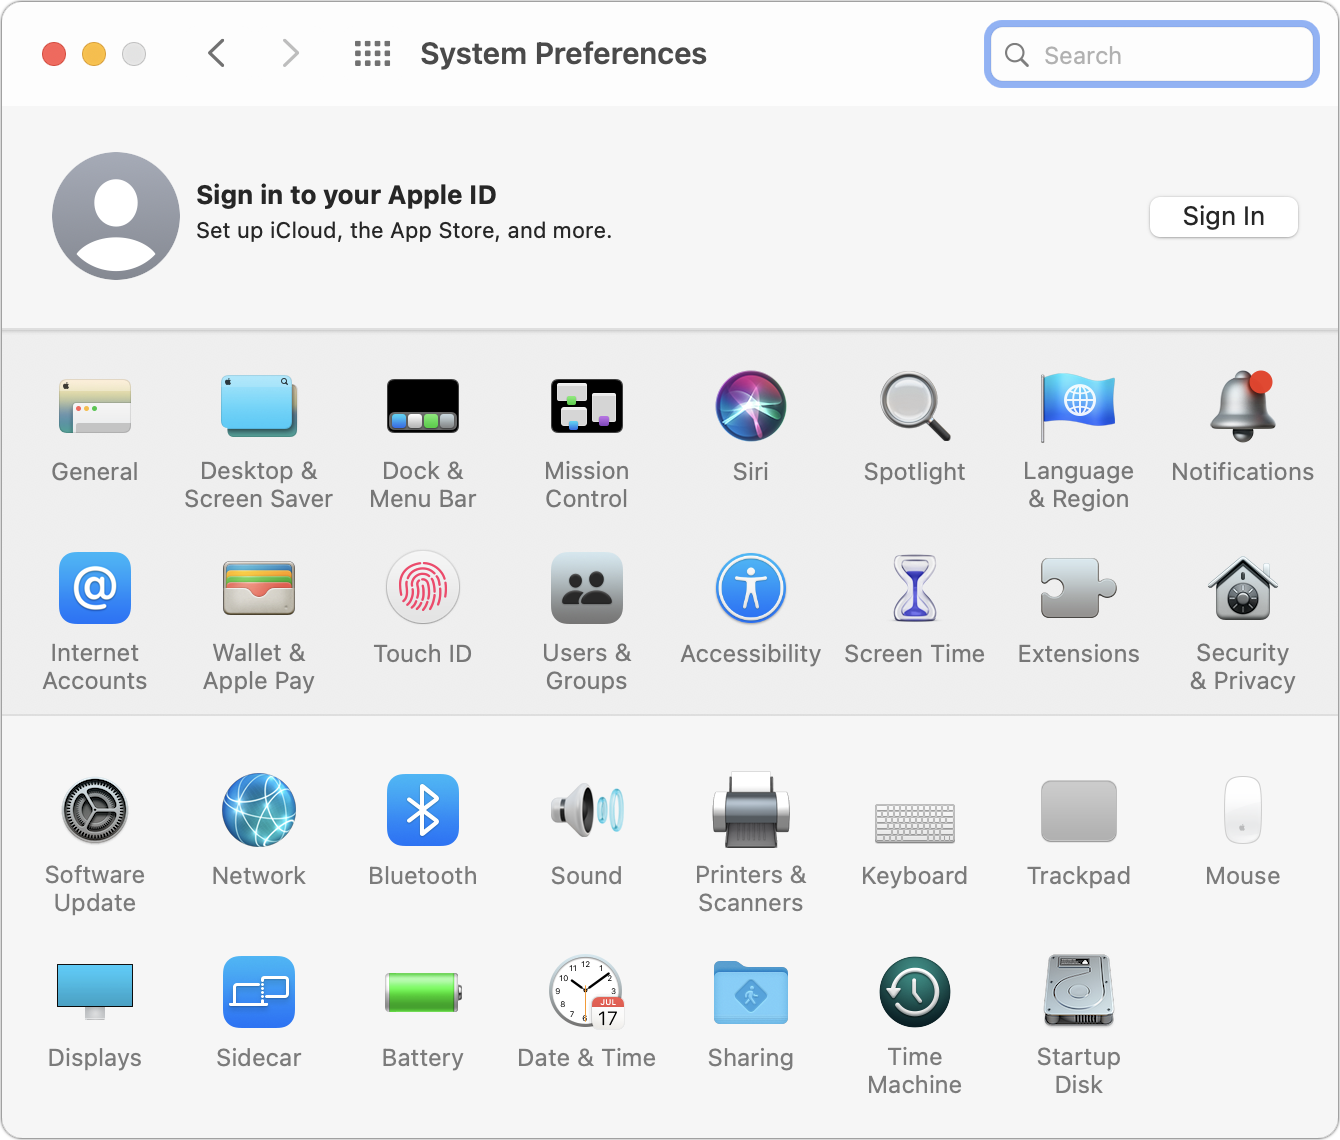
As I mentioned, Big Sur completely replaces most of the icons in System Preferences (Figure 17). Within the various panes, you’ll also see a variety of small cosmetic changes, along with some more significant ones. The following panes are either new or different in some way.
Accessibility
The Accessibility preference pane includes changes in these categories:
Spoken Content: This pane replaces Speech. Most of the capabilities are the same, but they’ve been moved around and renamed. Specifically:
“Speak announcements” replaces “Enable announcements.”
“Speak selection” replaces “Speak selected text when the key is pressed”; and instead of clicking Change Key to pick that key combination, you now click Options, which also lets you lets you choose how words and sentences are highlighted and how (if at all) the controller is shown.
Similarly, there’s now an Options button next to “Speak items under the pointer,” which lets you choose when such text is spoken, with how much of a delay, and with what level of verbosity.
A “Speak typing feedback” checkbox replaces what was previously “Enable Typing Feedback” on the Keyboard pane. As with the other controls in this category, click Options for additional settings.
Voice Control: A new Overlay pop-up menu lets you optionally display item numbers or a numbered grid to help you specify screen locations with your voice. There’s also a new “Show hints” checkbox to help you learn to operate your Mac by voice.
Keyboard: Per the preceding bullet, the “Enable Typing Feedback” checkbox moved to Spoken Content and was renamed “Speak typing feedback.”
Shortcut: New options in this category are Increase Contrast and Reduce Transparency.
Battery
This new pane replaces the Energy Saver pane on laptops. It gives you both more information about your battery and more control over how it charges. Select a category on the left to work with it:
Usage History: This new screen (Figure 18) shows you a graph of your battery’s overall level, time spent charging, and time with the screen turned on; select Last 24 Hours or Last 10 Days to show that time period.

Figure 18: See your battery’s recent usage here. Battery: This category (Figure 19) has the same options (though rearranged quite a bit) as the Battery tab in the old Energy Saver pane, with one addition: an “Optimized battery charging” checkbox, which is selected by default and intended to extend your battery’s useful life. It’s similar to the “Battery health management” option from Catalina that appeared when you clicked Battery Health at the bottom of the Energy Saver pane. (The exact options you see here depend on which laptop model you have.)
If you leave this setting enabled while your Mac is plugged in, macOS watches for daily usage patterns and recharges your battery beyond 80% only when it thinks you’ll be unplugging it soon. If you want your battery to charge fully all the time, even with the consequence of a shorter lifespan, uncheck this.
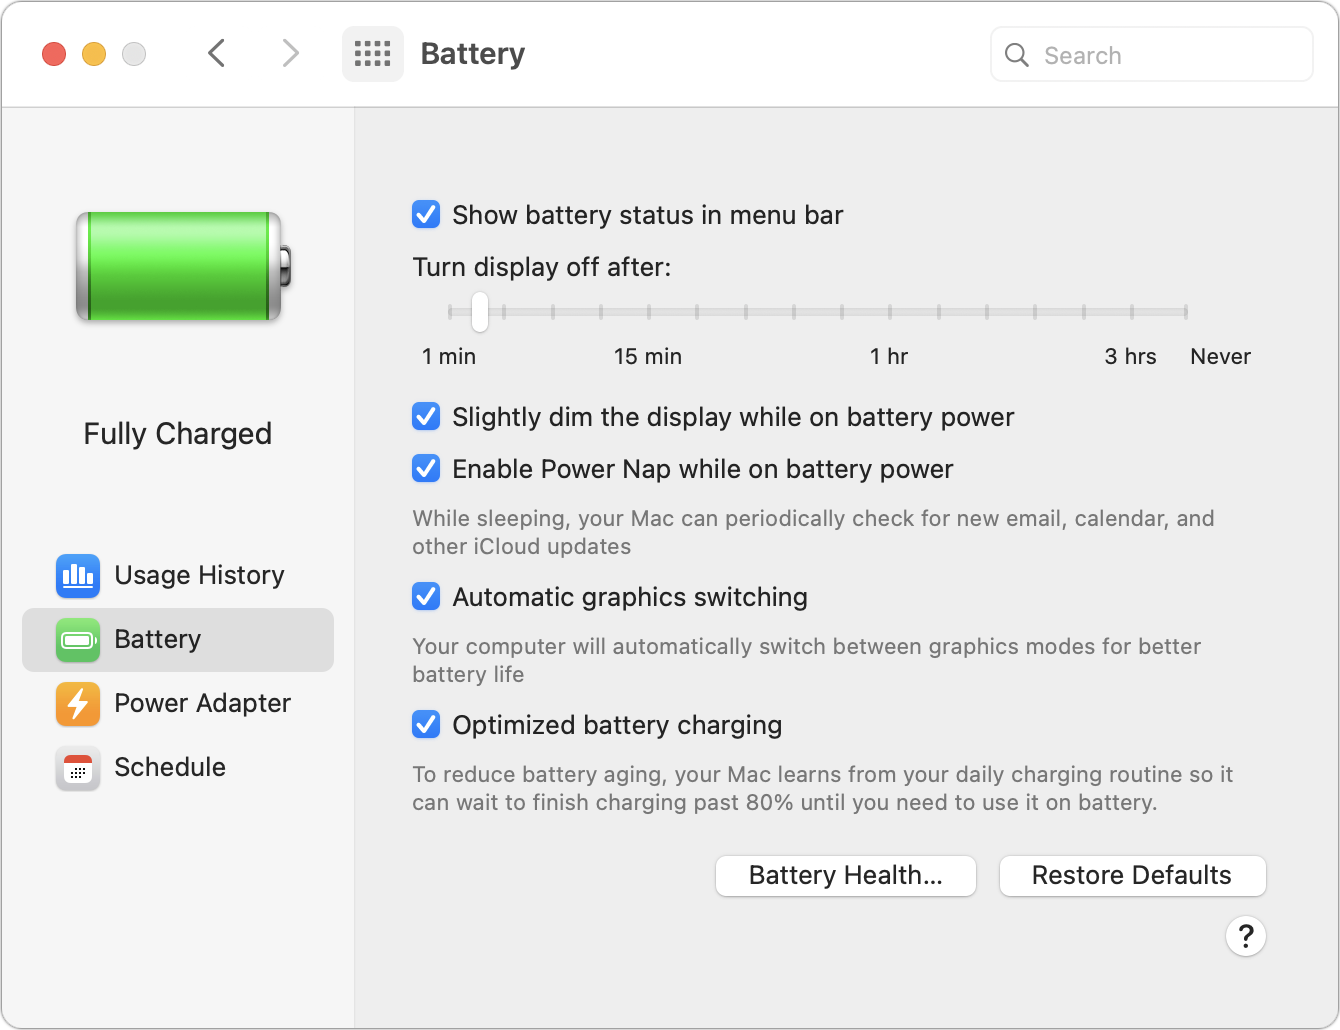
Figure 19: Set power options for when your laptop is running on battery here. Power Adapter: This category has all the same options as the Power Adapter tab in Energy Saver; it affects you laptop’s power usage while plugged in.
Schedule: Controls from the dialog that appeared when you clicked Schedule on the Energy Saver pane have been relocated here; this is where you can configure your Mac to turn on, wake, go to sleep, restart, or shut down at predetermined times.
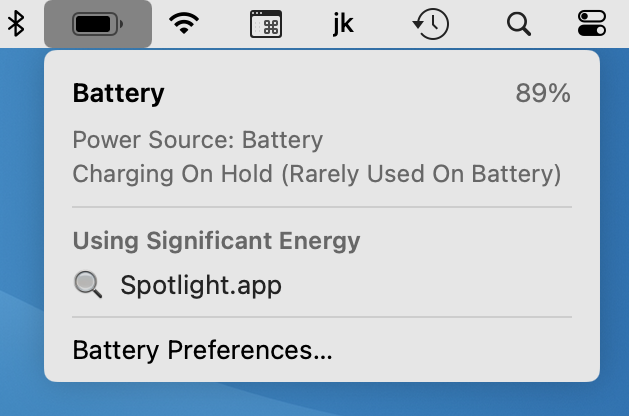
To go along with the new Battery pane, there’s also an optional Battery ![]() menu on your menu bar and in Control Center (see Customize Control Center). Click this to display a menu (Figure 20) that shows your battery’s current level and charging status, lists any apps currently using significant energy, and gives you a shortcut to open the Battery pane of System Preferences.
menu on your menu bar and in Control Center (see Customize Control Center). Click this to display a menu (Figure 20) that shows your battery’s current level and charging status, lists any apps currently using significant energy, and gives you a shortcut to open the Battery pane of System Preferences.
Desktop & Screen Saver
The Desktop & Screen Saver pane features new Big Sur desktop pictures as well as a Big Sur Dynamic Desktop.
Dock & Menu Bar
The Dock & Menu Bar preference pane replaces the Dock pane from earlier versions of macOS. Within this pane, the Dock & Menu Bar option in the sidebar has mostly the same options as the previous Dock pane, except that:
The “Prefer tabs when opening documents” pop-up menu has moved to the General pane.
The “Automatically hide and show the menu bar” checkbox, previously in General, has moved here.
The sidebar of Dock & Menu Bar gives you configuration options for Control Center categories (see Work with Control Center), plus several other categories you can opt to display in the menu bar and, in some cases, Control Center: Accessibility Shortcuts, Battery, Fast User Switching, Spotlight, Siri, and Time Machine.
Extensions
The Extensions preference pane still lets you enable or disable Apple and third-party system extensions of various kinds. The category “All” has been renamed “Added Extensions” and now shows only third-party extensions. And the “Today” category is gone, because there’s no Today category in the new Notification Center (see Manage Notifications).
General
A few minor changes occurred on the General pane:
“Accent Color” is now a choice on the “Highlight color” pop-up menu.
The “Automatically hide and show the menu bar” checkbox, previously located here, has moved to Dock & Menu Bar > Dock & Menu Bar.
A new “Prefer tabs ___ when opening documents” pop-up menu replaces “Prefer tabs when opening documents” from the Dock pane in earlier versions of macOS.
The “Use font smoothing when available” checkbox has been eliminated entirely.
Notifications
Notifications themselves have changed quite a bit, as I cover later in Manage Notifications. This pane, however, is different only in that the “Notification Center sort order” pop-up menu is gone, and in its place is a “Show previews” popup menu, which gives you global control (rather than per-app control, as previously) over whether notification previews appear when your screen is locked.
Security & Privacy
On the Privacy tab, there are new categories for Media & Apple Music, HomeKit, and Bluetooth. The Advertising category has been renamed Apple Advertising. And (at least on my Macs) the Developer Tools category appears to be gone.
Software Update
What’s new in the Software Update pane (pictured back in Figure 6) is not its appearance but its functionality. Assuming you have automatic downloads enabled, Big Sur can usually download smaller (“delta”) updaters, which means downloads and installation will go more quickly and with less intrusion to your work.
Sound
The Sound pane looks about the same as before, but it contains many new alert sounds, and all the existing sounds have been reworked. I’m glad to hear some variety; some of those old sounds have been around for eons. To try out the new and improved sounds, go to System Preferences > Sound > Sound Effects and click each sound’s name.
Update Your Backup Strategy
I hope that you’re backing up your Mac regularly! (If not, today is an excellent time to start.) For the most part, whatever backup strategy you may have used with Catalina should continue to work under Big Sur. For example, Time Machine backups should keep running as usual, as will online backup services such as Backblaze.
However, there are a couple of significant changes to Big Sur that may affect how you think about backups.
Time Machine on APFS
Up through Catalina, Time Machine could use only Mac OS Extended (HFS Plus) volumes as destinations, even when the source volume was formatted as APFS. (In some situations, Time Machine could use a disk image formatted as Mac OS Extended, where the image itself was stored on an APFS volume, but the actual volume Time Machine wrote to could not be APFS.) In Big Sur, however, Time Machine can for the first time store backups on APFS-formatted volumes.
Why would any of this matter? Well, APFS (see More About APFS) has advantages in both reliability and security. And, based on what I can tell from beta versions of Big Sur, it appears that when Time Machine backs up to an APFS volume, it uses space much more efficiently (copying only the portions of files that have changed, not the whole files). That means you can store more backups on a smaller drive.
This development is good news, but it won’t have any practical affect on most users, because:
Big Sur does not automatically convert Time Machine volumes from Mac OS Extended to APFS.
It may or may not be possible to convert a Time Machine volume from Mac OS Extended to APFS manually, using Disk Utility; I can’t draw reliable conclusions about this until Big Sur is close to shipping. (However, if you format a new, empty volume as APFS, Time Machine can definitely use it in Big Sur.)
Even if you can convert a volume to APFS, or start over from scratch with a newly formatted volume, you may not want to. For one thing, your Time Machine backup will then be usable only by Macs running Big Sur—this change is not backward-compatible to Catalina and earlier. For another thing, most backup drives are mechanical hard drives, which as I mentioned earlier, are extremely slow when formatted as APFS.
So, even though you can do this now, the only situation in which I currently recommend using APFS for Time Machine is when your backup drive is an SSD, it will be used only to back up Big Sur sources, and you’re starting fresh with a new Time Machine backup.
Bootable Duplicates in Big Sur
When it comes to bootable duplicates, which I have long recommended as one of the pillars of a complete backup strategy, you should be aware of a few gotchas (and perhaps one or two more if you’re upgrading from an operating system older than Catalina):
Split volumes: Mac backup apps designed to make bootable duplicates have generally evolved to handle the split-volume structure introduced in Catalina, in which there’s a read-only volume for system files and then a separate (but normally invisible) read-write volume for your data. However, as of August 2020, Carbon Copy Cloner (and perhaps other Mac backup apps) could not create duplicates of Macs running the Big Sur beta that included the system volume. I expect that Apple and third-party developers will sort this out before Big Sur ships, but until that happens, a workaround is to create a duplicate of just the Data volume and then install macOS onto the backup disk after the fact. (For details, read Creating and restoring data-only backups on the Carbon Copy Cloner site.)
Bootable duplicates over a network: Due to changes in Catalina, Carbon Copy Cloner can no longer create bootable duplicates over a network (with the destination volume on a drive connected to another Mac); your backup disk must now be directly connected to your Mac, via USB or Thunderbolt. I have not yet tested this capability in ChronoSync or Retrospect Desktop, the only other two backup apps that were previously capable of doing this.
No FireWire: If you’re upgrading from an operating system older than Catalina and are still using a FireWire hard drive to store your bootable duplicates, you’ll need to switch to a USB or Thunderbolt storage device, since Apple dropped support for booting from a FireWire device starting in Catalina.
Prepare for Apple Silicon
Big Sur has another important feature you can’t use yet: support for future Macs powered by Apple silicon. As I write this in August 2020, the only people outside Apple who have access to such Macs are a limited number of developers, who are working on moving their apps to the new architecture. But Apple says the first Macs to use the new chips will ship to the public by the end of the year, and within two years, all new Macs will use Apple-designed CPUs. By the time the next annual macOS update rolls around, a large number of us will be using the new hardware.
Since Big Sur itself will run on Macs with either Intel or Apple processors, very little will change about your experience of using a Mac once you move to the new platform—everything will look and act pretty much the same (see below for exceptions), while you’ll get some nifty new capabilities.
Many of us have gotten into the habit of thinking about major hardware and software compatibility issues only when it comes time for our annual macOS upgrade, but this next year could be different. Even though you’re at least a few months out from that transition, it’s worth familiarizing yourself with what will change and how to prepare for it now.
What Should Keep Working
First, the good news: the vast majority of your existing Mac software that runs on Big Sur will continue working just fine on the new chips, even without compatibility updates from the developers. This is thanks to an Apple technology called Rosetta 2, which works behind the scenes to translate code designed for Intel chips to run on Apple silicon. From preliminary reports, this seems to be an extremely efficient process, to the point that some existing Mac apps actually run faster on Apple silicon than on Intel, despite having to go through this extra code layer. Those apps that are slower shouldn’t be much slower.
However, many developers are already creating universal versions of their apps that will run natively on both kinds of processor. Indeed, some of the apps I use every day have already been updated in this fashion. Universal apps will certainly have better performance on Apple silicon, and will be more likely than non-native apps to continue working for years to come.
What Might Not Work
During major hardware transitions, some software always falls through the cracks. Despite the optimistic statements I’ve heard from both Apple and third-party developers, there will inevitably be some apps that, for one obscure reason or another, can neither work in their existing form on Apple silicon nor be adapted to become a universal app. In some cases, the reasons might be purely technical, while in others, there could be business or legal barriers. I don’t have any inside industry knowledge here, but I do want to prepare you for the possibility that something you use might not work.
One category of software I’m particularly concerned about is any tool that lets you run Windows (or, for that matter, other versions of macOS) on your Mac. To wit:
Boot Camp: Apple has stated that Macs based on Apple silicon will not support Boot Camp, which lets you put a separate Windows partition on your Intel-based Mac and switch operating systems by rebooting. That’s not the only way to run Windows, however.
Virtual machines: Virtualization software such as Parallels Desktop, VMware Fusion, and VirtualBox lets you install and run other operating systems on top of macOS, without rebooting. I use these all the time for running Windows 10, ChromeOS, Android, and older versions of macOS on my Macs. Apple said that their new chips will support virtualization, and made a big show in their Big Sur rollout of a Linux virtual machine running on Apple silicon in Parallels Desktop.
However, virtualization doesn’t involve any translation of processor architecture. That means the operating system you’re running in a virtual machine must be designed to run on the type of processor your computer has. There is a version of Windows that runs on ARM processors like Apple silicon, though it’s limited in features and currently unavailable as a standalone consumer product. So although it’s possible that Apple and Microsoft will work out all the technical and business elements that would be required to run (a form of) Windows 10 in a virtual machine on a Mac with Apple silicon, I don’t know for sure if or when this will happen.
I further suspect that running earlier versions of macOS in a virtual machine will be permanently impossible, since they were designed expressly for Intel processors.
If your day-to-day work requires you to use operating systems that don’t run natively on ARM processors, expect significant disruptions when moving to Apple silicon. I would be delighted for the Apple and Microsoft to prove me wrong here, because my own work requires several different operating systems. But I’m not optimistic.
New Capabilities You’ll See
Apple silicon is supposed to make Macs faster while reducing their power consumption, which should lead to both longer battery life and cooler enclosures. Beyond that, some of the great new things about a Mac with Apple silicon will be support for iOS and iPadOS apps.
With Big Sur running on Apple silicon, you’ll be able to install unmodified iOS or iPadOS apps on your Mac and run them just as you would on an iPhone or iPad. Well, maybe not just as you would, in that (barring a hypothetical future touch-screen Mac) you’ll have to use a mouse pointer instead of multi-touch display, and you won’t have access to iPhone- or iPad-specific hardware such as a gyroscope or accelerometer. Even so, this will open up a whole new world of software to Mac users.
How You’ll Migrate
If you’re running Big Sur on an Intel-based Mac and then you go buy a Mac with Apple silicon, I presume that the steps to move your apps and data over to the new Mac will be unchanged—you’ll use Migration Assistant, as I explain in my TidBITS article How to Migrate to a New Mac. Very likely this will work either over a network or with the two Macs connected via a USB-C or Thunderbolt 3 cable. In other words, I expect that transitioning to a new Mac will be just the same as it always has been. (I have, of course, been surprised before!)
Key Takeaways for Now
All this information is a bit theoretical until the day Apple starts selling new Macs with Apple silicon. But it does suggest some actions you can begin taking now:
Don’t panic. For most people, everything will be fine with the new Macs, and for everyone else, most things will be fine!
Identify the software that’s most important to you—the apps and tools without which you can’t get your work done—and find out whether universal versions are in the works. Good places to check include the developer’s blog, support page, or public discussion forums. If no update is expected, begin looking for an alternative (or plan to delay your purchase of a Mac with Apple silicon).
If you currently rely on running Windows (or earlier versions of macOS) on your Mac, begin considering alternatives in case this is impossible, delayed, or lacking crucial features on Apple silicon. You might, for example, opt to postpone buying an Apple silicon Mac, or keep an older Mac around indefinitely to run the other operating system. You might even—I shudder to suggest this—buy an actual Windows PC to supplement your Mac.