
Prepare Your Hard Drive
You’ve just unpacked your brand-new hard drive (or two), and you’re ready to get busy backing up. You might be able to plug in the drive and start working with it immediately, but it depends. Some hard drives come formatted for Windows computers, for example, while others might be formatted for a Mac—or not at all. Some come preloaded with utilities and demo software. Some might use the wrong partition map scheme for your computer, possibly preventing Time Machine from being able to see or use the drive. And if you’re not going to plug a hard drive directly into your Mac, but rather put it inside, or attach it to, a network storage device, still other considerations apply.
In short, because each situation is different, you should take a few minutes, before you do anything else, to make sure any new hard drives you’ve obtained are configured correctly for your needs.
If you have a NAS, Time Capsule, or other network device, its built-in drive(s) should come preconfigured as needed, so you don’t have to worry about anything in this chapter for that device (but skip ahead to Network Backups for additional factors to consider). However, you must still follow these steps for the external drive you use to store your bootable duplicate, and any external drive(s) you decide to attach to your Time Capsule or NAS.
Choose a Partition Map Scheme
Your hard drive contains a tiny block of information called a partition map or partition table that describes things like how many volumes the drive has, how large they are, and where they’re located. The way information is stored in this little block of data is called the partition map scheme, and the choice of scheme is crucial to how the drive can be used. Windows PCs generally use a scheme called the Master Boot Record (MBR) Partition Table; pre-Intel Macs used a scheme called Apple Partition Map; and Intel-based Macs by default use a newer and more advanced scheme, GUID Partition Map (or GUID Partition Table). The partition map scheme affects the entire drive, regardless of how many partitions it has or how those partitions are formatted.
The majority of hard drives are configured at the factory to use the MBR scheme, because that’s the norm on Windows. In most cases that’s fine; if you plug such a drive into your Mac, it will most likely work as a backup drive without any intervention. However, it’s worth noting that Time Machine can’t use volumes larger than 512 GB on an MBR-partitioned drive. (That’s because Time Machine requires the Mac OS Extended format, also known as HFS Plus, and HFS Plus volumes can’t be larger than 512 GB on an MBR-partitioned drive.)
You normally need not worry about this; if you select a disk to use as a Time Machine destination and it’s partitioned using the MBR scheme, macOS will offer to repartition it for you as a GUID disk automatically. But, if you don’t want to use the entire disk for Time Machine backups—for example, if, as I suggest, you want to divide the disk into a partition for Time Machine (or other versioned backups) and a partition to hold a bootable duplicate—then you should manually repartition the disk before handing it over to Time Machine. As you do, you should check the partition map scheme, because changing it requires erasing all the data on the disk; that’s obviously something best done before you’ve copied any of your personal files onto it.
Although there are a couple of ways to check your drive’s partition map scheme, I recommend using Disk Utility—and then just leaving it open, because you’ll be using it to format your drives in just a moment (see Configure Your Drive). Follow these steps:
Open Disk Utility (in
/Applications/Utilities).In High Sierra or later, choose View > Show All Devices.
In the list on the left, select your external drive. (The drive may have icons for one or more volumes, indented underneath it; if so, select the device’s topmost icon, representing the drive as a whole.)
Look near the bottom of the window next to “Partition Map” or “Partition Map Scheme” (Figure 2). It should say GUID Partition Map (or GUID Partition Table) or Master Boot Record.

Figure 2: Not sure which partition map scheme your drive uses? Look here. (Your version of macOS may look a bit different.)
Which partition map scheme do you want? The rules are as follows:
If your backup drive has a capacity of 512 GB or more, or if you plan to partition it such that any volume will be 512 GB or more, choose GUID. This is by far the most common choice for Mac users.
If your backup drive has a capacity of less than 512 GB—or if you plan to partition it such that each volume is less than 512 GB (see Decide How Many Partitions to Make, next)—any scheme, including MBR, is acceptable; however, if you use Time Machine keep in mind my earlier comments about it and MBR. And if you ever want to use a volume on this drive to boot a Windows PC, MBR is mandatory.
For now, simply keep in mind which scheme you chose, whether GUID or MBR. You’ll apply it, if necessary, in a few moments.
Decide How Many Partitions to Make
Wait, didn’t we already decide this? Well, yes. Back in Understand Joe’s Basic Backup Strategy, I described how you can partition your external drive into two volumes—one each for duplicates and versioned backups. However, in some cases you might want to have just one partition, or more than two:
NAS or Time Capsule: If you’re using a third-party NAS device or a Time Capsule to store your versioned backups, you’ll be using the external drive just to hold your duplicate, so it may need only one partition.
Lots of data: If you have so much data to back up that you can’t fit two adequately sized partitions on the drive, then you’ll stick with one, using separate drives for your duplicate and versioned backups.
Not so much data: If you have only a small amount of data to back up but a truly humongous drive, you might feel that you’ll never fill all that space with backups and you might therefore want to use some of it for something else. In that case, feel free to make three (or more) partitions, with the first two sized as I discussed in Decide on Capacity.
Bootable duplicates for multiple Macs: If you want to store bootable duplicates for more than one Mac on a single drive, you’ll need a separate partition for each, as I discuss later in this chapter, in Choose Local or Network Backups. Versioned backups for all your Macs, however, can live on a single partition.
Bootable duplicate with versioning: If you’re creating Bootable Duplicates with Versioning instead of separating the two (a less than ideal strategy, in my opinion), you’ll need just one partition.
Duplicate(s) of non-boot volume(s): If you choose to make non-bootable duplicates of external drives (see Duplicates of Non-Boot Volumes), you’ll need a partition for each of those, too.
Configure Your Drive
Now that you have those two vital pieces of information—which partition map scheme to use and how many partitions you need—you have only to click a few buttons to configure your drive.
The steps you’ll follow depend on your operating system version.
Configure a Drive in El Capitan or Later
Follow these steps:
If Disk Utility isn’t already running, open it now (it’s located in
/Applications/Utilities).In the list on the left, select your external drive.
Click Erase. A dialog (Figure 3) appears.

Figure 3: In El Capitan or later, choose the options for erasing a drive in this dialog (High Sierra version shown here). Type a name for your disk and choose your desired scheme (most likely GUID Partition Map) from the Scheme pop-up menu
Choose a format from the Format pop-up menu:
If you’re running High Sierra or later, and you’ll be using this partition for a bootable duplicate, and you intend to encrypt the duplicate with FileVault (see Encryption), and you might want to be able to boot a newer Mac containing a T2 chip with it (see full list here), choose APFS (not APFS Encrypted).
Otherwise (and especially if you’ll be using this partition for Time Machine), leave it set to Mac OS Extended (Journaled)—or, in El Capitan, OS X Extended (Journaled).
Click Erase. If you want your disk to have a single partition, you’re done; skip the remaining steps.
To add a partition, leave the drive selected on the left and click Partition. A dialog (Figure 4) appears with a pie chart showing a single partition on the disk (and, sometimes, an extra, tiny “uninitialized disk” that you don’t have to worry about at all—trust me).

Figure 4: Here’s where you partition a disk in El Capitan or later. Click the plus
 button to add a partition (Figure 5). Type a name for the second partition and follow step 5 again to choose the format. If necessary, adjust the size by dragging the handle on the pie chart or by typing a new number in the Size field. Repeat this step as desired to add more partitions.
Figure 5: Configure a secondary partition like so. Click Apply.
Disk Utility partitions your disk and applies the correct format to each partition. If you have more than one external drive, repeat all these steps for each one.
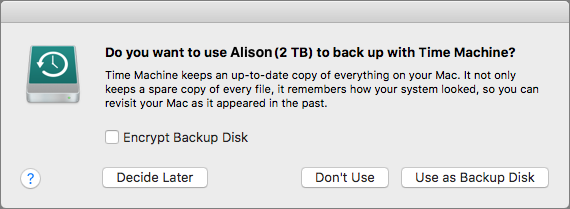
At this point, you may see a dialog like the one in Figure 6. (If the disk has more than one volume, the dialog also shows a pop-up menu that enables you to choose one of them.) If you’ve decided to use your new volume for Time Machine, feel free to select it and click Use as Backup Disk now. Or click Decide Later and wait until you’ve read Configure and Use Time Machine for details.
You’re now ready to use your drive(s) for bootable duplicates, Time Machine, or other versioned backups, as discussed in the next few chapters.
Configure a Drive in Yosemite or Earlier
Follow these steps:
If Disk Utility isn’t already running, open it now (it’s located in
/Applications/Utilities).In the list on the left, select your external drive.
On the Partition pane, choose the number of partitions you want to have from the Partition Layout pop-up menu. (Don’t leave it set to Current, even if you plan to keep the same number of partitions.)
Initially, the partitions will be sized equally. If you want them to be differently sized, drag the divider bar between them to resize them.
Click Options. In the dialog that appears, select the scheme you want to use (most likely GUID Partition Table) and click OK.
Click inside the first partition (initially named Untitled 1) to select it. Enter a name (which you can change later); be sure to use a name that’s different from your usual startup disk. From the Format pop-up menu, choose Mac OS Extended (Journaled).
Don’t worry about any of the other formats in that menu. The best all-around choice, for all but a handful of computer geeks who want to do something unusual or risky, is Mac OS Extended (Journaled). (Remember, Mac OS Extended is also known as HFS+.) Mac OS Extended (Case-sensitive, Journaled) will also work for Time Machine backups, but isn’t a good choice for bootable duplicates because some apps work unpredictably with a case-sensitive file system. Note that unlike the partition map scheme, which affects the whole drive, the format (or file system)—that is, the manner in which files are stored on disk—can vary from one individual partition to another. Therefore you must be sure to select a format for each partition on your disk.
Repeat step 6 for each partition.
Click Apply, and in the confirmation dialog that appears, click Partition.
Disk Utility sets the partition map scheme, partitions your disk, and applies the correct format to each partition. If you have more than one external drive, repeat all these steps for each one.
If you see an alert asking whether you want to use the new volume for Time Machine and you’re not sure you want to do so, click Decide Later; you can set that up later in Configure and Use Time Machine.
You’re now ready to use your drive(s) for bootable duplicates, Time Machine, or other versioned backups, as discussed in the following few chapters.