
Use 1Password for Web Browsing
A couple of chapters ago, in Learn How Logins Work, you learned how to save credentials for a few websites and use 1Password to fill them in. Although you can get lots of mileage out of the simple procedures I explained there, 1Password has lots of other options for working with websites. In this chapter I explain when you might need these extra features and how to use them when you do.
Among the things I cover here is generating new passwords, which you’ll probably need to do more often when browsing the web than in any other situation. I also discuss the way 1Password uses identities (sets of contact details) and credit cards, both of which you’re likely to use regularly while browsing.
Create and Save Logins
The more logins you store in 1Password, the more powerful and handy it becomes. The easiest way to add your existing logins to 1Password is to browse the web normally, enter your credentials for the sites that you encounter in whatever way you previously did, and then let 1Password’s automatic login saving feature add them one at a time, just as you did earlier in Learn How Logins Work. It’s also possible to add them manually to the main 1Password app (see Edit 1Password Items) or import them from certain other repositories (see Import and Export Data), but in my experience adding them as you go is the path of least resistance.
However, even though saving new logins is mostly self-explanatory, I want to cover a few less-obvious points. Then I’ll tell you how to Generate Random Passwords, which you’ll do when registering for new accounts (which you’ll also want 1Password to save for you).
Save New Logins
First things first: automatic login saving is enabled globally by default, but you can toggle it if the need arises.
On a Mac, go to 1Password 7 > Preferences > Browsers; or, on a Windows PC, go to 1Password > Settings > Browsers. Select or deselect “Detect new usernames and passwords and offer to save them.” If you want to save logins automatically most of the time but exclude certain domains (for example, when you’re testing a website you’re developing), you can type those domain names into the exceptions list just below that checkbox.
If you use multiple local vaults (see Work with Multiple Vaults), 1Password’s automatic login saving feature defaults to your primary vault; otherwise, the default is your personal vault in your 1Password account. To change the default, go to 1Password 7 > Preferences > Vaults (Mac) or 1Password > Settings > All Vaults (Windows) and choose a vault from the Vault for Saving pop-up menu.
Regardless of your default setting, you can choose a different vault when saving any particular login. (The current vault’s name appears in the Save Login dialog as a reminder.) To save the credentials to a different vault, choose its name from the pop-up menu in the Save Login dialog.
You can also disable automatic login saving for a particular domain on the fly. When you submit a login form and the 1Password Save Login dialog appears (much to your irritation), do this:
On a Mac, click the gear
 icon in the lower-left corner of the dialog and choose “Never Autosave for this Site” from the pop-up menu.
On a Windows PC, click the triangle on the right side of the Not Now button and choose “Never autosave for this site” from the pop-up menu.
This adds the domain in question to 1Password’s exceptions list on the Browsers preference pane.
Generate Random Passwords
When a site or service asks you to come up with a new password, 1Password is ready to supply one that meets your desired criteria. You can access the password generator in any of the following ways:
In 1Password mini on a Mac, whether you access it from a web browser or the menu bar, click Password Generator (Figure 17).

Figure 17: The password generator in 1Password mini on a Mac. Note that the button says Fill if you’re in a web browser, but Copy (as shown here) if you’re not. In 1Password mini on a PC, click the Generate Password
 icon.
icon.In the main 1Password app for Mac, choose File > New Item > Password or any other type of item that contains a password field (you can see a list in Other Data Types). Then click the gear
 icon to the right of the Password field.
In a Windows web browser, press Control- or click the 1Password
 icon to display the 1Password window, and then click the Generate Password icon.
In the 1Password app for Windows, click the plus
 button and choose Password or any other type of item that contains a password field and click the combination lock
  icon (Figure 18).
Figure 18: The password generator in 1Password for Windows.
If you’re happy with the password shown, you’ll do one of the following (depending on the context):
Fill: On a Mac, in 1Password mini within a web browser, click Fill to insert the generated password into the password field(s) on the page. (Fill isn’t an option, at least not yet, in 1Password for Windows; see Copy, below.)
Now enter any other data requested (such as a username or email address) and submit the form. When you do, be sure to click Save Login in the Save Login dialog (assuming it is enabled—see Save New Logins) to save a login item that includes your password (and any other data you entered) and the URL.
By default, 1Password also copies the newly generated password to the clipboard when you click Fill—just in case you need to paste it anywhere other than 1Password. On a Mac, if you want to avoid putting the password on your clipboard, click the arrow by the Fill button and choose Copy to Clipboard Before Filling from the pop-up menu to deselect it; to copy the password without filling it in, choose Copy from the same pop-up menu.
Copy: In 1Password mini outside a browser on a Mac, or in 1Password mini on a PC, click Copy (which replaces the Fill button on a Mac). You can then paste the password where it needs to go. 1Password also saves the newly generated password to your password history when you click Copy.
Save: In the main 1Password app on a Mac, click the Save button (after making any other desired changes to the login item). In Windows, click the X icon in the corner of the window to close the Generate Password window.
If you want to modify the new password before filling or saving it, you have lots of options. You can change any or all of the following password attributes before filling, copying, or saving it:
Length: Move the slider left or right. Passwords can have anywhere from 4 to 64 characters.
Digits: On a Mac, drag the slider to determine how many digits (from 0 to 10) your password contains. In Windows, select the “Allow digits” checkbox to include digits in your password. Digits are displayed in blue in 1Password for Mac to help them stand out.
Symbols: On a Mac, drag the slider to determine how many punctuation characters (from 0 to 10) your password contains. In Windows, select the “Allow symbols” checkbox to include symbols in your password.
1Password uses only common punctuation characters such as
,.;:/?<>()[]{}@!$&=*(which you should be able to type on any keyboard). Symbols are displayed in red in 1Password for Mac.Avoid ambiguous characters: Have you ever noticed how
0(zero) andO(uppercase o) are hard to tell apart in most fonts? Orl(lowercase L),1(the digit before 2), andI(uppercase i)? That ambiguity doesn’t matter if 1Password is filling in your passwords for you, but if you might ever need to retype a password manually, you’ll appreciate not having to wonder what’s what.Check “Avoid ambiguous characters” (Mac) or uncheck “Allow ambiguous characters” (Windows) to make sure the password omits these characters.
Words: Click Words (Figure 19 to generate a Diceware-style password (see the sidebar About Diceware Passwords, ahead), which consists of a user-defined number of ordinary words separated by spaces or punctuation. Drag the slider to specify the number of words. (I suggest six or more words for good security.)
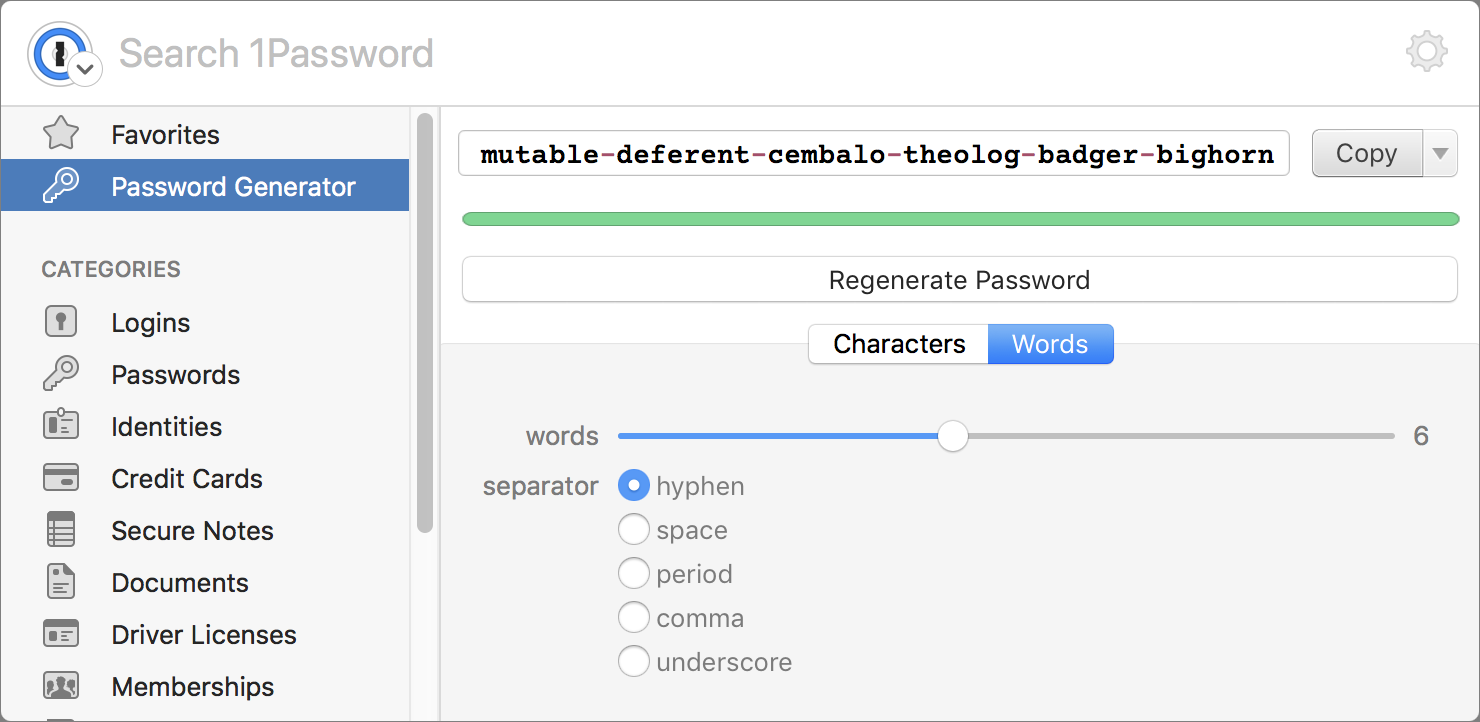
Figure 19: Controls for a Diceware-like password in 1Password mini on a Mac. Similar options appear in 1Password for Windows. With this method, you can click a button to choose which character will separate the individual words—hyphens, spaces, periods, commas, or underscores.
Every time you change any of these options—selecting or deselecting a checkbox, or moving a slider—1Password generates a new password. If you don’t like the initial suggestion, you can also click Regenerate Password on a Mac or Regenerate in Windows.
Add Multiple URLs to a Login
Although you should always use a unique password for each account, sometimes you can access a given account from more than one domain name. For example, I might use a single Apple ID at www.icloud.com as well as at developer.apple.com. I could create two completely separate logins in 1Password, but that would mean that if I changed my Apple ID password, I’d have to update it in two places.
In general, it makes more sense to have one login item per account (rather than one per site). You can do this by adding URLs to an existing login:
In the main 1Password app, select an item whose credentials apply to multiple domain names.
Click the Edit button.
In the website 2 field (Mac) or an empty website field (Windows), type or paste the URL for another domain that uses the same credentials (Figure 20). Repeat if necessary to add more URLs.

Figure 20: Enter each additional URL in its own website field. Click Save.
The next time you visit any of the sites listed in that item, 1Password will recognize it as using this set of credentials.
Use Multiple Logins for a Single Site
The previous topic was about using a single set of credentials for multiple sites. But you might also need to do the reverse—use multiple sets of credentials on a single site. For example, you may have multiple Gmail accounts or Apple IDs, each for a different purpose. That’s no problem in 1Password.
Once you’ve saved a login for one set of credentials, log out, manually fill in your second set of credentials and log in again. When the 1Password Save Login prompt appears, click Save Login. 1Password then stores two independent logins that happen to point to the same site. (You can edit their names and other characteristics later; see Edit Saved Items.)
When you next visit that site and press ⌘- (Mac) or Control- (Windows), instead of filling your credentials automatically, 1Password mini appears, showing a list of all the logins saved with the current domain name.
Use your pointer or the arrow keys (followed by Return or Enter) to select the one you want, and 1Password fills in the information for you.
Log In
Once you have a login stored in 1Password, you can use it to fill in your credentials automatically—but there are numerous ways to do so, each with its own advantages.
A Word About Autosubmit
Before I list the login methods, I want to take a moment to explain an important concept and how 1Password handles it: autosubmit. Logging in consists of two parts: filling in a form (usually with a username and password) and submitting the form, which is often done by clicking a Log In, Sign In, or Submit button, clicking an icon, or simply pressing Enter or Return. Autosubmit involves filling in and submitting (or, at least, attempting to submit) your credentials in a single step, rather than forcing you to manually submit the form.
As of publication time, 1Password for Windows supports autosubmit as an option, but 1Password for Mac, starting with version 7.2 (released in October 2018), no longer does. Which is to say: after pressing ⌘- on a Mac to fill in your credentials, you must now press Return (or click the relevant button, if you prefer) to submit the form. This change came about because of increased security measures Apple added in macOS 10.14 Mojave to prevent malware or phishing sites from potentially capturing your credentials. Although 1Password probably could have worked around this change in a different way, or made the new behavior applicable only in Mojave or later, AgileBits decided the safest move was to require the extra keystroke regardless of which version of macOS you’re running.
Although autosubmit is usually the most convenient approach in Windows, you might want to avoid using it in cases where you need to see a site in its logged-out state, or when using a site where 1Password’s form-filling features don’t work.
You can enable or disable autosubmit globally in 1Password for Windows, and you can override the global setting for any given login item:
To change the global setting, go to 1Password > Settings > Browsers (Windows) and select or deselect “Automatically sign in after filling usernames and passwords.”
To enable or disable autosubmit for a single login item, open the main 1Password app. First select the login and click Edit. Then choose one of the following from the Submit pop-up menu:
Submit When Enabled: Autosubmit only if the global Automatically Submit Logins after Filling option (described just previously) is selected.
Always Submit: Autosubmit regardless of the global setting.
Never Submit: Never autosubmit, regardless of the global setting.
After making a change, click Save.
Login Options
That explanation out of the way, here are your options for logging in with 1Password:
Double-click a login item in the main 1Password app: Double-click any login item, in any list view, to open that URL in your default browser and fill in your credentials.
Use a menu command in the main 1Password app: On a Mac, select a login item and choose Item > Fill Login in Browser (or press ⌘-Option-Return).
Click a URL in the main 1Password app: In the main 1Password app, select any login item. Then click the URL next to the website field. 1Password opens the page in your default web browser and fills in your credentials.
Use 1Password mini outside a browser: Press ⌘-Option- (Mac) or Control-Alt- (Windows) or click the 1Password
icon in the menu bar (Mac) or the Windows notification area (Windows) to display 1Password mini. Search for or navigate to the login item you want, and then either click it or, with the item highlighted, press Return or Enter. 1Password opens the page in your default browser and fills in your credentials.Use a browser extension: While viewing a login page in your web browser, press ⌘- (Mac) or Control- (Windows). If you have just one login item for that domain, 1Password fills in your credentials. If you have more than one login item for that domain, 1Password displays a list; select the credentials you want to use and 1Password fills them in.
Use a 1Click Bookmark (Mac only): A 1Click bookmark is like any other browser bookmark, except that it contains a unique identifier code that points to a specific 1Password login item. If you select such a bookmark in your favorite browser, that code tells the browser extension to ask 1Password for the credentials you stored for this site (after prompting you for your master password, if 1Password is locked) and then fill them in. That way, if you normally open websites using browser bookmarks, you can keep doing so, with the added benefit that 1Password will automatically fill in your credentials if needed, with no further effort from you.
To create a 1Click bookmark, make sure the main 1Password app and your browser are both visible on your screen. In 1Password, locate a login item you want to turn into a bookmark and drag that login item to your browser’s bookmark bar. Once it’s there, you can either click it to log in (you’ll have to click Allow to give your browser access to 1Password the first time you do this), or move it to another location using your browser’s bookmark management tools.
Deal with Multistep Logins
An increasing number of sites—especially sites for banks and other institutions that handle highly sensitive data—no longer offer a single page with username and password fields. Instead, they spread out logins over two or more consecutive pages. For example, fill in your username on the first page and click Submit; fill in your password on the second page and click Submit again; and then answer a randomly selected security question on the third page and click Submit one last time. Only then can you access your account.
These sites will tell you that they’ve made such changes to make it harder for automated attacks to break into their users’ accounts. Unfortunately, multistep logins of this sort also make it harder to use password managers such as 1Password, thereby making it harder for legitimate users to access their own accounts!
Although 1Password can’t help you with every tricky security feature out there (see Sites That Thwart Password Managers for other examples), there are two techniques that can help with a fair number of multistep logins.
Use a Combination Login
If you already have a single login that contains your username and password for a site, and the site later splits the login into two pages (one for each piece of information), your existing login may continue to work—so that’s what you should try first. Simply press ⌘- or Control- on each page in turn; as long as the field names still match, the correct information will be filled in. (1Password ignores any missing fields.)
Even if this technique doesn’t work, if you are of a suitably geeky disposition, you may be able to combine multiple logins (one per page, as described in the following technique) into a single login, as long as there’s only one option per field. (So, multiple possible answers to a security question would rule this out.) You’ll have to examine the web form details for each login (described in Edit Saved Items, later), figure out which field name is being used for which type of data, and then copy/paste/relabel fields as necessary. I can’t guarantee success, so it would be useless to spell out the exact details (which vary from one site to the next ), but it has occasionally worked for me, and if you enjoy tinkering, it may be worth a try.
Use a Different Login for Each Step
Another, more labor-intensive option is to create a different login item (and in some cases several) for each step—that is, for each page that appears during the login process. For example, say Acme Bank displays a page with just a username field. Go ahead and enter your username, let 1Password automatically save it, and label it “Acme 1” or “Acme Username.” Do the same thing with whatever appears on the next page—call that login “Acme 2” or “Acme Password” or whatever. Repeat until you run out of pages. Then, when it’s time to log in again, press ⌘- or Control- on each page and choose the correct step from the list that appears.
A variation on this technique is needed for sites that ask a randomly selected security question during the login process. For example, one of my banks asked me to select, and provide answers for, five different security questions, one of which it displays each time I log in. So I can’t have a single login item for “Bank Security Question.” Instead, for that step, I can create five different logins, like “Bank Mascot” and “Bank Singer,” and select the appropriate login when I get to a page that asks for my high school mascot or my favorite musician.
You can find a more detailed description of this technique on the AgileBits website.
Fill Web Forms Using Identities
So far, I’ve talked mainly about usernames and passwords as the information you’re most likely to fill in on web forms. But whenever you buy something online (and in numerous other situations), you’re also asked to supply contact info such as your name, address, phone number, and email address. 1Password can help with that, too, thanks to a category called identities. Like logins, identities can be filled in on any webpage with a click or keystroke. Unlike logins, they consist of personal contact details—as much or as little as you want to include.
To create a new identity, choose File > New Item > Identity (Mac) or plus button > Identity (Windows) in the main 1Password app.
1Password displays a form (Figure 21) that looks much like any contact manager, with fields for all the usual details, including birth date, occupation, Skype and instant messaging IDs, and so on.

If you want to include some piece of information that’s not already there, you can type it into any empty field marked “new field” and fill in a label of your choosing. Click Save and you’re done. You can repeat the process to create as many identities as you need.
When it comes time to fill in an identity—for example, you’re on the Billing and Shipping Info page of an online retailer—press ⌘- or Control-, or click the 1Password ![]() icon, navigate to the identity with your arrow keys or pointer, and click it or press Return. 1Password makes its best guess as to which pieces of information should go in which field; they may not always match up perfectly depending on how the form was constructed.
icon, navigate to the identity with your arrow keys or pointer, and click it or press Return. 1Password makes its best guess as to which pieces of information should go in which field; they may not always match up perfectly depending on how the form was constructed.
How many identities should you create? And what should you include in, or exclude from, each one? That’s entirely up to you, but I suggest one identity for each mailing or billing address that you use. If you maintain an alter ego online for any reason, that fake persona should also get its own identity with whatever information (email address, URL, etc.) you normally provide. In any case, for a given identity, include only the information you’re likely to fill in on a web form. For example, if you’d never reveal your birthday, don’t include it.
To more easily distinguish identities, you can add a custom icon—perhaps a picture of you with a baseball cap for “home” and with a tie for “work.” Make sure the identity is in edit mode and then, on a Mac, drag a graphic to the name badge icon; in Windows, click the little triangle to the right of the badge icon, choose “Change icon from file” from the pop-up menu, navigate to the graphic you want to use, and click Open.
Shop Online Securely
By now, you understand the pattern: 1Password stores various bits of information and then, when you press a keyboard shortcut or click a button, fills that information into matching fields in a web form. And just as that works for usernames, passwords, and contact details, it also works for credit card information, making it easier and safer to shop online.
Saving and entering credit card information follows exactly the same steps as login items and identities. I’m sure you can do this in your sleep by now: In the main 1Password app, choose File > New Item > Credit Card (Mac) or plus button > Credit Card (Windows), enter any relevant details, and click Save. Repeat for as many cards as you like. Later, when you’re looking at a webpage with fields for credit card info, invoke 1Password via your preferred method, navigate to the credit card you want to fill in and click it (or select its name in the menu with the arrow keys and press Return or Enter). 1Password fills in your information.
Although all of the above is reasonably obvious if you’ve been using 1Password already to set up logins, there are a few additional facts about credit cards in 1Password that aren’t so obvious:
In addition to filling in your credit card number, 1Password can usually fill in the card type, the expiration date (even if the billing page uses pop-up menus instead of conventional fields), the numeric CVV (or “verification”) number, and the cardholder’s name, assuming you included all that information in the credit card item.
Some websites design their payment pages in such a way that 1Password can’t access some or all of the fields. If you should encounter such a page, please report it to AgileBits (Mac users, email [email protected]; Windows users, email [email protected]). If technologically feasible—and, unfortunately, it isn’t always—AgileBits will attempt to support the site in a future update.
The back of your credit card probably has a phone number for reporting lost or stolen cards (sometimes two—for example, a toll-free number for within North America and a local number for people calling internationally). If your credit card is lost or stolen, however, you might have a hard time finding that number! So, take a moment to put it in 1Password, where you can find it easily in the event of a problem.
You might find it helpful to scan or photograph both sides of your card and store those images as attachments to your credit card item. Besides giving you another way to access the information printed on the card, that’ll make it easier if a vendor ever asks you to email, fax, or mail a copy of your physical card for verification purposes. (I encounter that situation about once a year.)