
The Production Process: Production
In the production process, there are four standard stages in the actual shooting of an electronic field production (EFP): setting up, rehearsing, shooting, and striking.
Setting Up
Assuming all of the preproduction steps were followed, the first step of the production stage is unloading the equipment and moving it to the first shooting location. Regarding security, professional video equipment is expensive and looks attractive to thieves. Never leave equipment unguarded and never leave the production vehicle unlocked.
Field Equipment Considerations
Field equipment is much more susceptible than studio equipment to damage and technical problems from the environment. Because the majority of the operating parts are electronic, at a certain level of humidity, the equipment becomes inoperative. This is particularly true of tape decks. In addition, keep all liquids away from electronic equipment. Severely cold weather slows parts of mechanical equipment, such as the motors that drive decks and zoom lenses. Extreme heat affects circuits inside the camera and decks and may damage tape stock. In most cases, these factors can be compensated for, but they must be taken into consideration when planning a field production. If the camera records directly onto a computer hard disk, memory card, or disc medium, the same considerations need to be taken to prevent moisture, dust, or both from entering the medium case. If the signal is recorded onto a chip, that process does not require any moving mechanical operations, making the camcorder much more rugged and impervious to temperature and humidity changes.
Camera
Once the camera’s position is set, the tripod is set up. Its legs need to be set in a wide enough stance to provide a stable base, but not spread so far apart that they are in the way of traffic or the operator. The tripod’s height should be adjusted to the eye level of the subject, unless the director requires a special angle.
Level the head of the tripod with the bubble level, and then mount the camera on the head. Make certain the pan and tilt locks are tight; if the tripod head does not have locks, tighten the drag controls so that the camera will not tilt out of control. Set the drag controls tight enough that there is enough back pressure to allow for a smooth, even pan or tilt, but not so tight as to cause a jerk when you try to pan or tilt.

As soon as the crew arrives at the location, the lighting director or gaffer should run the power cable to the camcorder or recorder and then string power cables to the lighting instrument locations. After the camera is in position, the gaffer can start placing the instruments. Power cables should be run where there is the least amount of foot traffic and out of sight of the camera, yet with as short a run as possible.
Proper lighting is an artistic endeavor. Although there is much science and practicality to lighting design, it is probably the most artistic portion of video production. There are no hard and fast rules, only guidelines. There are typical and traditional setups, but every lighting situation is unique and must be approached from an individualistic direction. The lighting depends partly on the director and writer’s concept of the production and partly on the requirements set by the location, budget, equipment, and amount of time allotted to create the desired lighting ambiance.
Three types of lighting are basic for EFP productions: realistic, abstract, and neutral. Dramatic productions and some types of commercials require as realistic a lighting setting as possible. Music videos, some commercials, and science fiction dramas may require abstract lighting that goes beyond realism. Neutral lighting is often used for game shows, some newscasts, situation comedies, and some commercials. Hard and fast rules defining each of these types of lighting do not exist, but the end result must match the director’s requirements.
Lighting for high-definition (HD) production requires greater attention to detail and the functions of highly critical cameras. It is not a matter of more light but rather a better placement of lighting instruments and the shadows and light patterns that follow. Because the better HD cameras can handle a broader range of contrast ratios, a matching wider range of effects may be obtained with lighting that is more difficult to achieve in standard definition (SD) production.
In addition to the director’s requirements for the lighting—that is, that it set the mood, time, and type of production—the lighting must provide enough base illumination for the camera to create a usable image. As discussed previously under “Lighting Instruments,” the camera or chips reproduce what is presented to them. The light must be of the correct color and intensity and within the contrast range of the particular type of camera in use. These three factors—color, intensity, and contrast—control the basic lighting setup. Once they have been satisfied, creative and innovative lighting techniques may be used.

Studio productions control color temperature by installing lamps with the same color temperature output in all lighting fixtures. In the field, controlling color temperature is not this simple. Windows, fluorescent lighting fixtures, and even standard incandescent fixtures create a variation in color temperature, even though all of the instruments may be lamped with the same Kelvin temperature bulbs. If possible, light a set only with lighting instruments lamped with the proper bulbs. Windows should be covered with drapes, blinds, or a large sheet of Wratten 85 (yellow–orange) filter material. This accomplishes two tasks. First, it changes the daylight entering the window, resulting in an effect similar to light produced by 3,200 K lamps. Second, it cuts the intensity of the bright daylight by one or two stops.
Another method of lighting with daylight entering a room is to convert the field lighting fixtures to approximate daylight by covering them with Wratten 82 (blue) filter material or a dichroic filter. This helps match the mixed lighting, but it does not help balance the difference in light intensity between the daylight and the lighting instruments. This is because the blue filter reduces the lighting instrument output by about half, requiring more powerful or a greater number of lamps.
If many incandescent fixtures are present and cannot be covered or turned off, the white balance circuits of most video cameras will reach white balance without a filter in place. A pale blue filter may be necessary to reach truer white.
When shooting in a location lit by existing office fluorescent lamps, there are several possible solutions. First, the process used to white balance when only fluorescent lamps are present is determined by the type of fluorescent tube. Newer tubes designed specifically for media production are designed to match either daylight or tungsten lighting Kelvin temperature. If these tubes are not available, a daylight (85) filter in the camera can bring the color close to normal. This reduces the light input, but not radically. If white balance cannot be reached, the tubes may be covered with a light magenta filter or specially manufactured filters that slip over the fluorescent tubes. Because fluorescent lights give off a nearly shadowless fill light, it is also possible to light a scene with fairly bright professional tungsten lamps as key lights and thus overpower the fluorescent fixtures. This is another example of mixed lighting. New portable fluorescent and liquid crystal display (LCD) lighting fixtures balanced close to daylight, which provide another method of field flat lighting, are currently available.
COMPENSATING LENS FILTERS
In a studio setting, the intensity of light is controlled in a variety of ways: by varying the voltage to each instrument through a dimmer board, by adding filters or scrims to the instruments, or by mounting or moving instruments closer or farther away from the subject.
In the field, light intensity controls are limited by the types of portable equipment available. These limitations are determined by the size and budget of the production. For the average EFP production, simpler means of light control than those used in the studio are necessary.
Generally, the lighting instruments used in the field are open-faced instruments; that is, the light is harsher and more difficult to control. Using scrims and filters and bouncing the light softens, diffuses, and reduces the light level to that required for fill lights. Key light levels and backlight levels may also be controlled by using scrims and filters.
Small, portable dimmers are available for field use, but decreasing the voltage of a tungsten lamp changes the color temperature approximately 100 degrees for each 10-volt variation. Portable dimmers tend to be heavy and bulky and often require an electrician to hook them up to a breaker box to obtain the necessary power.
The most practical way to control light intensity in the field is the placement of the lighting instruments. Because light levels follow the inverse square law, a relatively small movement of a lamp makes a major difference in the light level falling on the subject. If a lamp provides 100-foot candles of light at a distance of 10 feet from the subject, moving the lamp to 5 feet boosts the light level to 400-foot candles (the inverse square of ½ equals 4 times the original light level; therefore, 100 becomes 400). If the lamp is moved back to 20 feet, the light level decreases to 25-foot candles (the inverse square of 2 equals ¼ times the original light level of 100, resulting in 25-foot candles).
Most EFP lighting directors can achieve the light levels and effects required by the director with a combination of lighting instrument placement and the judicious use of scrims, filters, barn doors, and flags.
LAMP ACCESSORIES
The change in light level will vary at the inverse square of the changes in the distance:
Half the distance = 4 Lux (4 × 20 Lux = 80 Lux)
Double the distance = 1/4 Lux (1/4 of 20 Lux = 5 Lux)
The control for contrast is a little more complex. A reflected spotlight meter is needed to measure the amount of light reflected from the brightest and the darkest objects in the picture. These light measurements are called reflectance values. The tricky part of taking these measurements is that if there are either highly reflective or very dark objects in the frame, these should be excluded from the reading. A judgment must be made as to whether it is necessary to reproduce detail in either of those areas. If the amount of light reflected from the brightest portion of the frame in which detail is required is more than 30 to 40 times the light in the darkest area needed for detail, then additional full light is needed on the dark areas or some light needs to be taken off the lighter areas. By carefully lighting for the contrast range of the video camera, you can avoid important areas “blooming” or “flaring” into a white mass or large areas appearing so dark and black that they look “muddy.” The newest digital cameras equipped with the latest chips can handle a greater contrast range of up to 40 : 1, compared with 30 : 1 in cameras with older chips.
The most difficult situations for maintaining proper contrast range are those shot in the bright sunlight or at night with available light. During a cloudless, bright day, it is nearly impossible to balance the bright sun with any other light source to maintain contrast range. The best method for balancing the lighting is to use the sun as the backlight and reflect the sunlight back toward the subject.
Night lighting is more difficult. Some source of fill is needed to overcome the bright, harsh light from streetlights, automobile headlights, advertising signs, and other lights. The easiest method is to shoot at dawn or dusk, except that the period when there is enough light to shoot and still have it look like night is very short. Another method is to shoot day for night. This involves white balancing with a yellow rather than a white board and underexposing by two stops or using an 82 (dark blue) filter and underexposing by two stops. In day-for-night shots, streetlights, auto lights, and other light sources that are normally on at night must be turned on, even though the scene is actually being shot during the day.
Lighting practice is based on two suppositions: that there will be enough light for the camera to create a reasonably useful picture and that the appearance will fulfill the look that the director desires. Basic three-point lighting is designed to satisfy both of these requirements. Three-point lighting derives its name from the three lighting instruments used to achieve satisfactory levels and appearance: key lights, fill lights, and backlights. The key light duplicates the major light source in our lives—the sun; secondarily, it duplicates the overhead lighting present in most homes and workspaces. The fill light balances the key light, reducing the contrast ratio and softening the harsh look of a one-light source. The backlight adds a rim of light around the subject to separate it from the background and adds a third dimension to the two-dimensional video field.
Backlight
The backlight is usually the first instrument set in place, because once performers, set pieces, and props are in place, it is difficult to reach the proper position for a backlight. The next light to be set is the key light; then the fill, kickers, set, and extra lights are set. The backlight instrument is mounted above and slightly behind the major subject and directly opposite the camera position. Because this lamp is focused toward the camera, it is necessary to use barn doors or a flag to avoid having the backlight shine directly into the lens of the camera.
Key Light
The key light is the main source of light. It should always have motivation; that is, there should be a reason for its angle and position. If there is no apparent motivation, then set the key about 45 degrees above the camera and from 60 to 40 degrees to one side of the camera. The key should be the brightest light under normal circumstances. It can create shadows, adding depth to the picture, and should set the major color temperature for that shot or scene.
Fill Light
The fill light represents the reflected light from clouds, the sky, buildings, and multiple light sources found in buildings. In some ways, it is, like the backlight, an artificial light, but it is important in video production to bring the contrast ratio down to a level that a video camera can handle. The fill light should be mounted on the opposite side of the camera from the key, should be of a lower intensity, should be softer and more diffused, and should not create any visible shadows.
Fixed Single Subject
Kicker and Set Lights
A variety of other lighting instruments may be needed to create either realistic light or the effect desired in the scene. The two most common instruments are the kicker and the set light.
The kicker is a light mounted to one side of the subject so that it throws its light along the side of the subject. This light functions much like the backlight by helping separate the subject from the background, thus adding depth to the frame.
The set light is designed to highlight specific areas of the set. Sometimes it also separates the subject from the set, but more often it is designed to draw attention to particular areas of the set, such as a logo, an important set piece, or a lit area of an otherwise dark background.
Multiple and/or Moving Subjects
Lighting a single subject that does not move during the recording is relatively simple. The lighting process becomes complicated when there is more than one subject in the frame and those subjects begin to move about on camera.
Multiple subjects may be lit by spreading the light wider to take in more than one subject, but this method is usually unsatisfactory. Unless both subjects are facing the same direction and are an equal distance from the light source, they will be lit unevenly.
One solution is to cross-key light; that is, use the key light for the subject on one side as the fill for the subject on the other side and vice versa. Working with more than two subjects may require key lights for each subject and a widespread series of fill lights covering the entire area. The major problem with multiple key lights is the possibility that the lights will create multiple shadows. The multiple shadows may be avoided by washing out some of the shadows with fill and set lights or by focusing the keys so that the shadows fall outside of the area covered by the camera frame.
If subjects move, lighting becomes even more complex. One solution is to arrange key lights and backlights so that they throw a relatively even pattern of light over the area of movement at an equal distance from the light source. Fill is easily flooded out to cover the entire area. Another solution is to break the movement down into several shots. Each shot will cover only a small portion of the movement area and can be more easily lit because the subject can be lit in roughly the same intensity for each shot.
COMPLEX LIGHTING PLOTS

Beyond providing enough light for the camera to produce a usable picture, lighting is also a key creative visual element. It sets the mood and may be used to indicate the time, the date, and the location of a production.
Mood Lighting
From the first moment an audience sees the opening shots of a situation comedy, they are made aware that they are in for some lighthearted entertainment. Much of that realization comes from the high-key, low-contrast, nearly shadowless lighting used, known as Notan lighting. This term originated from Japanese artists who painted brightly lit scenes without any shadows. The brightly lit set without any dark areas lets the audience know the mood the director wants them to experience.
On the other hand, should the first shot of a scene be lit with low-key, high-contrast, heavy, dark shadows, the audience is made aware that a heavy drama follows. This type of lighting is called chiaroscuro; this term is borrowed from the Italian painters who used the same high contrast to set the mood of their paintings. The lighting (in addition to the set, costumes, coloring, and mannerisms of the actors) gives the audience the advance information that they probably will not spend much time laughing during this scene. Of course, all creative techniques may be used in contrast; a comedy scene may be lit in low key to make it funnier because it is unexpected.
Lighting for Time, Date, and Location
Using lighting to indicate time, date, and location is subtle but should always be taken into consideration when designing a scene. Early morning and late afternoon light is different from that at high noon. The colors are different (light is warmer/redder early and late in the day), and the angle of the light is lower. Winter sun is bluer and colder; the lights of summer, fall, and spring each have their own colors and contrast levels. A setting in the tropics has a higher key light than that of a northern European city or a slum setting.
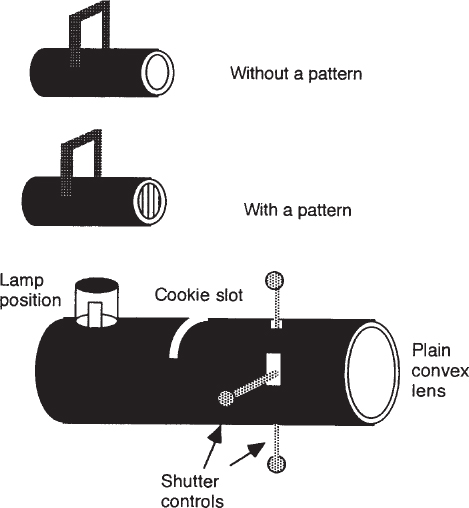
Light may also be used simply as an abstract creative object in and of itself. Light slashes across the background provide a feeling of prison bars, window slats, venetian blinds, or other setting not actually present. Cukaloris patterns on a plain background tell the audience an infinite number of characteristics about a scene. A cukaloris is a metal disc inserted into an ellipsoidal spotlight that creates a light pattern or mottled design on the background. Each location should be carefully analyzed for the proper light level, angle, color, and contrast settings to fit the intended mood desired by the director.
ELLIPSOIDAL SPOT and CUKALORIS (Cookie) PATTERNS
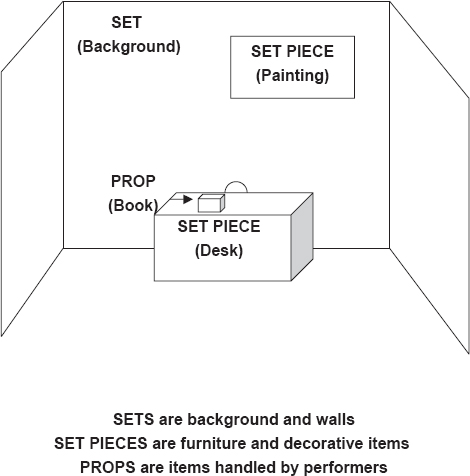
For most field productions, sets and properties (props) exist at the chosen location. The convenience of using already existing rooms, furniture, and other props may be one of the main reasons for shooting a production in the field. At the same time, the careful choice of a location is critical in the field production process.
There are three levels of items in this category: sets, set pieces, and hand props. Sets are backgrounds. They may be actual walls, trees, construction made of cloth or wood, or simply the actual location suitable for the particular production. Set pieces are items attached to or placed within a set. Generally, set pieces include paintings on walls, furniture, automobiles, or bookcases. Hand props are items small enough to be picked up and handled, but for the most part, they are items that need to be handled by the talent during the production.
Choices in each of the categories are made by the director and art director. They should match the tone, time period, quality, and attitude of the production. A beautiful painting should not hang in a set that is supposed to be a dingy office. At the same time, a cheap, poorly done painting should not be seen in a room designed to be the office of a Fortune 500 chief executive office (CEO). These choices must be made from knowledge of art, architecture, and interior design.
Designing for HD is much more critical than designing (and execution of design) for SD. The increased detail of HD shows every small defect in appearance; every sloppy paint job; and every poorly matched, worn, or outdated set pieces. Design for HD must be examined with a magnifying glass to check each and every detail in the completed design before cameras start rolling.
As in lighting design, set design sends a clearly defined message to the audience and must match the rest of the production to avoid confusing and misleading the audience. Set design decisions should be made during preproduction planning, but often they cannot be made until the setup period with the crew on location. Rearranging furniture, rehanging paintings, and removing unnecessary or conflicting items from a room being used as a location site should be accomplished during the setup period.
While the camera operator and gaffer are setting up their equipment, the audio operator strings mic cables or sets up the receivers for wireless mics. If a mixer is used, the cables are strung to the mixer and the output of the mixer to the recorder or camcorder. Levels are checked to ensure that the entire audio system is operating and is balanced.
If a boom mic is used, its position needs to be checked with the camera operator, lighting director, and director. If body mics are used, the operator needs to place them on the talent, show the talent how to turn them on, and check that a signal at the proper level is being received at the mixer or recorder.
If playback audio is required, the audio operator must set up the speakers, cables, and audio source, such as a tape deck or compact disc (CD) player. If the production involves live music, then the audio operator has the responsibility of miking the band, soloists, or other music sources. In some cases, the director will require that the audio be recorded on a separate recorder. This arrangement is also the audio operator’s responsibility.
Prompting
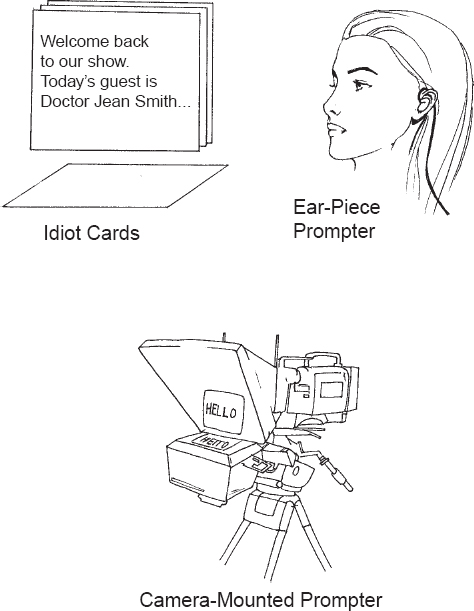
Often, some type of prompting device is needed, especially for commercial shoots. There are three basic types of prompters: handheld, camera-mounted, and in-ear devices.
Handheld prompters are pieces of poster board bearing either the entire copy lettered in large bold type or an outline of keywords around which the performer ad-libs.
The most common prompting device currently used is a monitor mounted above or below the camera lens with two angled mirrors reflecting the monitor image directly in front of the camera lens. This gives the audience the impression that the talent is looking directly at them, but in reality, the performer is looking at the image of the copy reflected from a mirror mounted in front of the camera lens. The source of the copy can be scripts that are taped together in a continuous sheet and passed under a black-and-white camera or scripts produced from a dedicated prompter computer or character generator.
The third method requires a special skill on the part of the talent. A small headset is placed in the ear of the talent, and a recording of the copy, previously made by the talent, is played back through the headset. Skilled announcers can repeat vast amounts of their own words slightly delayed from the original as if they were speaking from memory. Of course, the best option is to have a performer who has taken the time and trouble to memorize all of his or her lines.
Rehearsing and Preparing Talent
While the crew is setting up the equipment, the director works with the talent and supervises all of the other operations. The director also checks on all sets, props, prompting devices, and other materials to be used in the first sequence. The setup period blends into the rehearsal period, but actual rehearsal cannot take place until cameras, lights, and mics are in place and the crew has received preliminary production instructions. Those instructions should include a written sheet for each crew member or crew section. The lighting director and key grip receive the instructions if a full crew is used; the gaffer and grip receive the instructions if there is one crew member for each position.
For the lighting and stage crew, a plot shows the position of the camera for each setup, talent positions and movements, key furniture, and backgrounds or other set pieces. The camera operator receives a shot sheet, which lists the camera positions in the order of setup and the shots to be completed at each camera position in the order they will be shot. A plot also is helpful for the camera operator.
During setup, the director makes certain that all talent are present, in makeup and costume, and prepared to shoot their scenes. General discussions may be carried on about relationships between actors and other objects while the crew is completing the setup process.
Once the location is ready, the director walks the actors through their starting locations, blocking, and movements, if there are any. The director has the camera operator watch the blocking rehearsal so that he or she can visualize the camera movements needed for each shot. At this time, the talent should deliver their lines with their mics properly placed so that the audio operator can set levels.
The director plays the role of benevolent dictator to the cast and crew. The director must have absolute control but must also respect and listen to the members of the crew for the benefit of their knowledge and expertise. No crew or cast member should argue with the director; however, a professional difference of opinion leading to a discussion is permissible if time permits. At the end of the discussion, the director’s decision is final. The director’s decision should be based on his or her knowledge of the entire production, not on the relatively narrow view held by each individual cast and crew member.
After a walk-through rehearsal has been successfully completed, several camera rehearsals should be run. This involves everyone on the cast and crew completing their roles as if the shot is being taped. Once the director is satisfied with the performances of both cast and crew, he or she orders a take to be shot.
LIGHTING PLOT AND SHOT RUNDOWN

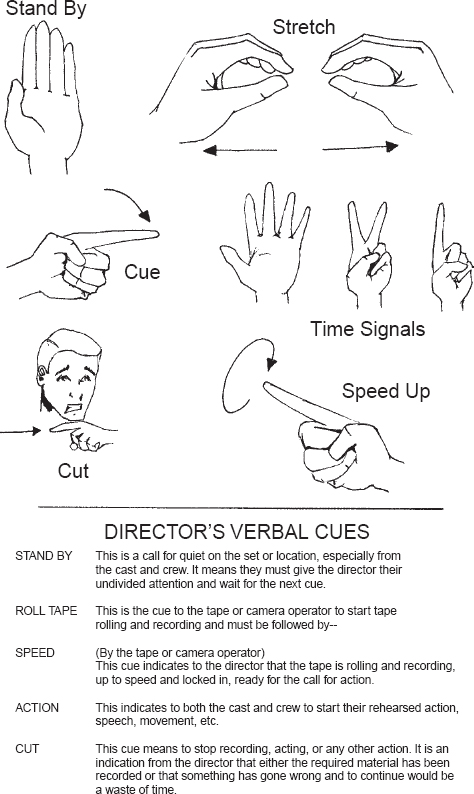
The actual process for shooting a take is as follows: The director calls for quiet on the set by calling out “Quiet” or “Stand by.” At that command, complete silence is expected from all cast and crew members. If the shoot is at a public location, a crew member may have to circulate through the adjacent crowd and quiet the crowd, unless the noise of the crowd is part of the audio ambiance. At the “Stand by” cue, all cast and crew assume their starting positions and prepare physically and mentally for the beginning of the shot.
When the director believes everyone is ready, he or she calls “Roll tape,” “Roll it,” or maybe even “Roll ‘em.” As soon as the tape deck is up to speed, either the camera operator, if a camcorder is used, or the tape operator, if a separate recorder is being used, calls out “Speed,” or “Locked in,” or “Framed.” The director performs a 5-second count, either silently or out loud, and then calls “Action.” This 5-second delay is necessary to ensure that the tape deck has recorded at least 5 seconds of clean synchronization (sync) and control track or time code, which is needed for editing purposes. Professional actors will pause for a beat and then start their movement or lines. The crew will follow the action as directed during rehearsals.
During a take, there are three people who may shout “Cut.” The major responsibility lies with the director, but the camera operator and the audio operator also may cut a shot. If the camera operator sees in the viewfinder a visual error bad enough to make the take unusable, he or she may yell “Cut.” It is best to quickly consult with the director before cutting a shot in the event that the audio portion of the take is usable, even though the video portion is not. The audio operator has the same responsibility in monitoring the recorded audio. If a noise is present that causes the take to be unusable, the audio operator may call “Cut”; again, because there is always a chance that the video portion is usable, the audio operator rarely cuts a take without a quick conference with the director. Also, an audio operator seldom cuts a take because, if necessary, most audio can be looped or rerecorded in a Foley session during postproduction. Any crew member may shout “Cut” if a situation occurs that may hurt a cast or crew member. A Foley session is a special postproduction sound effects session during which all of the various ambient and replacement sounds are created to match the action of the production.
During rehearsals and actual recording, standardized electronic media communication hand cues and signals should be used.
Once all of the physical setup procedures have begun, the director then concentrates on the human values that make up a production. Actual direction of actors is the most complex part of a director’s job. The performance of an actor depends on many variables beyond the director’s control. An actor’s training, background, experience (both in acting and in life), and mental state during the shoot all affect a performance. First, the director must get to know as many of the aforementioned factors as possible in the short time usually available on an EFP shoot. The director must then blend this knowledge with the results of an in-depth study of the script and the plan he or she has for how to accomplish his or her interpretation of that script.
Interpersonal communication is the key to working with actors, who are in a very vulnerable position. It is their faces and voices that will be viewed by the audience. If the production comes off poorly, it is the actors that the audience will remember. The director must clearly communicate to the actor exactly what is needed, how it fits into the overall production, and how the actor will look and sound. For most actors, the more precise the direction provided, the better their performance. Without being condescending, a parent–child relationship often is the most workable type of relationship between a director and an actor.
Getting an emotional performance is the most difficult task for both the director and the actor. Once again, the actor must trust the director’s judgment on how far to go in showing the type of emotion needed for a particular shot or scene. Often, actors are not aware that their reaction to other performers is as important as their own actions. This is the type of information a good director will impart to an actor as needed. Without delving into various acting approaches and methods, in general, actors perform better if they are aware of why they are doing what they have been asked to do. Supplying this motivation makes their job much easier and their acting much more realistic.

A relationship of trust and communication must also exist between the director and camera operator. The director must trust the camera operator to frame, focus, and expose the shot as the director wants. Detailed communication between the director and the camera operator provides the best first step toward accomplishing a good relationship. If the camera operator understands what the director wants and needs in a shot, he or she is better equipped to provide the desired result.
Standard Shot Names
Starting with motion pictures and continuing over the years, the different placements of objects in the field of the camera, called framing, have acquired specific names. As in every aspect of media production, there are some variations in these names. The definitions discussed in this section are accepted and understood by all media professionals.
When the angle of view varies from the narrowest angle (tightest shot), it is called an extreme close-up (ECU) or extra close-up (XCU). A wider angle is a close-up (CU); the next widest angle is a medium closeup (MCU), followed by a medium shot (MS), wide shot (WS), and extreme wide shot (EWS) or extra-wide shot (XWS), the widest shot. Some directors call shots by specific framing; for example, a head-to-toe shot often is an MCU. Others prefer to make their shot variations in reference to the widest and/or narrowest shot. For example, in a football game, a shot of the entire field from a blimp is obviously an XWS, whereas a shot of the quarterback from the waist up is an XCU. However, in a television commercial where a football player holds a product in his hand, the XWS is a head-to-toe shot, and the XCU is the shot of the label of the product.
Other shots are named for the objects included in the field of view. A two-shot contains two objects, usually two people; a three-shot contains three objects. An over-the-shoulder (OS) shot is a shot in which part of the interviewer’s shoulder appears in the foreground and the person being interviewed faces the camera. A point-of-view (POV) shot shows what a person in the scene sees from his or her position in the set.
An entire set of shots is named for their relative framing on the human body: head shot, bust shot, or waist shot. One caution on this type of nomenclature: No shot should cut objects off at logical cutoff points. If a human head is framed so that the bottom of the frame cuts off the head at the neck, it appears in the shot that the person has been decapitated. It is better to include just a small portion of the shoulders to indicate that the body continues.

CLOSURE THEORY

Aspect Ratio
The original video standard frame ratio has been 4 units wide by 3 units high (4 : 3 ratio). This means that to fill the video frame without exceeding its boundaries, the subject must fit into a horizontal rectangle 75% greater in width than height. This is an absolute. Turning the camera on its side to frame a predominately tall, slender subject results in an image that is laying on its side.
On the surface, this does not seem to offer much of a problem to a director or camera operator, but in reality, there are few objects that fit neatly into 4 : 3 space. Either some of the object must be cut off, or additional items must be added to the picture to create an acceptable composition. The 4 : 3 ratio becomes especially critical when shooting people. Unless a person is lying down, the human body does not fit into a 4 : 3 horizontal rectangle, nor do automobiles, most tall buildings, ships, airplanes, or any number of other everyday objects.
The new digital standard frame ratio currently in place for video is 16 : 9; that is, 16 units wide by 9 units high. This ratio is a compromise among several motion picture wide-screen frame ratios. Translation circuits are included in some cameras to enable equipment to be switched between ratios. As always with a major change in technology within an existing system, there will be a period for transition during which both ratios will be used. Digital equipment makes this transition much easier, because the ratio can be changed with a minor change in a digital circuit that controls the sweeps picking up the voltages from the camera chips. For the time being, most productions will be split between 4 : 3 ratio and some higher-quality network productions produced in 16 : 9 ratio. Digital Cinema is shot in 16 : 9, as are many commercials and music videos. All productions should be planned with both ratios in mind, because it will be several years before all receivers and consumer recording media will be able to view in both formats; therefore, all shooting should allow for conversion when necessary or required.
ASPECT RATIO – ESSENTIAL AREA

Critical Area
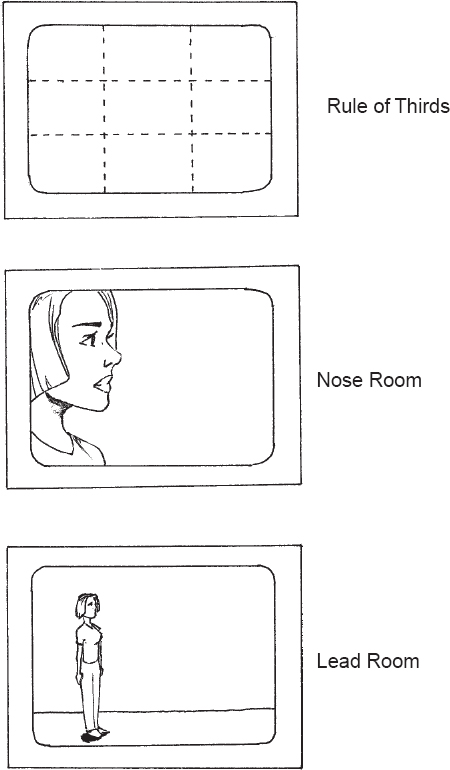
Besides the 4 : 3 or 16 : 9 horizontal aspect ratio, an additional framing problem exists in video. The entire video signal created by the camera does not reach the television receiver or monitor. In addition, the scanning sweeps of most receivers have increased because of age or misalignment. This means that as much as 5% to 10% of the picture cannot be seen by the audience. The 80% of the center portion of the frame is considered the critical or essential area (also called the safe title area). This 80% (allowing a 10% border on all four sides) is accepted by the industry as the critical area standard. All important information—names, addresses, phone numbers, and prices—should always be framed well within the critical area to ensure that all viewers receive it.
Any objects framed in the 10% border may be seen by some viewers, so unwanted objects should not be framed in this area, which is the edge bleed area. For sports or other action-oriented coverage, the acceptable framing limitations are slightly broader than the critical area, allowing approximately a 5% border. The center area for sports is called the safe action area. The difference in philosophy is that in an action sequence, closure fills in any portions of objects that momentarily appear beyond the critical area.
Lead Room or Edge Attraction
Psychological studies indicate that objects in the area near the edge of the frame create a different perception than those in the center of the frame. A major factor is called edge attraction theory, in which an object appears to move toward the edge, even if it remains stationary in the frame. This effect is increased when the object near the edge is a person’s face. This lack of nose room makes the audience uncomfortable and should be avoided. The attraction of the edge is compounded when the subject is moving toward the edge. This is why moving objects should be given plenty of space ahead of them as the camera follows on a pan or tilt.
The Rule of Thirds
Related to the edge attraction theory is the artist’s rule of thirds, which states that the most aesthetic location for a predominately vertical form is one third of the way in from either the left or right side of the frame. Conversely, the most aesthetic position for a predominately horizontal form is either one third of the way up from the bottom or down from the top of the frame. A quick review of classic artwork shows these framing rules being used extensively.
Even though video is a moving art form, the individual frame is essentially a still photograph. The manner in which each picture is framed can add to or subtract from its perceived movement. There are three basic means of creating movement in either video or film: by moving the subject, by moving the camera, and by editing. Within each of these three basic movements are ancillary movements.
Subject Movement
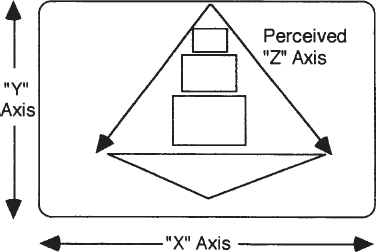
Subjects can move in three directions within the frame: on the horizontal (X-axis) or vertical (Y-axis) planes in front of the camera or moving toward or away (Z-axis) from the camera. Z-axis movements are the most powerful and should be used judiciously. Moving from left to right (X-axis) in our culture suggests moving ahead; conversely, moving to the left signifies returning or backing up. The Y-axis movements are more complex and less universally accepted, except that movement from the upper left to the lower right implies the most powerful movement forward, except for straight toward the camera.
Interestingly, the cultural values attributed to these movements also affect the relative value of positions within the frame. If the frame is divided into nine areas—upper left, upper center, upper right, middle left, center, middle right, lower left, lower center, and lower right—the position considered the most beneficial for passing information to the audience is the lower right. This conclusion is based on the philosophy that, in our culture, the eye starts at the upper left, proceeds to the lower right, and comes to rest there. For that reason, ego-centered television program hosts usually insist on being framed on the right; higher-quality newscasts place the visuals on the right; and, almost universally, prices, addresses, and other critical commercial information are framed on the right.
DOMINANT MOVEMENT

Camera Movement
The second way to create movement is by moving the camera: on its pan head, panning left or right, or tilting up or down. If the camera has a means of raising or lowering on a center shaft, this movement is called pedestaling up or down. Whether the camera base is a tripod on dolly wheels, a pedestal mount with wheels, a wheeled dolly, crab, or crane mount, the movements may be a dolly in or out, a truck left or right, or a combination of both to move in an arc. The crane mount also permits additional combinations of movement up, down, in, out, left, and right.
Movement through Zooms
Supplementary movement created within the lens is the zoom. A zoom movement is created by varying the focal length of the lens, which increases or decreases the angle of view. The zoom, especially with a motorized control, is an easy and flexible movement. However, it is an unrealistic movement and should be used with great caution. Amateur videographers use the zoom instead of planning in advance and using other aspects of professional video production open to those who have studied and learned to use them.
In addition, digital cameras can “digitally” zoom by enlarging the pixels. At a certain point in the zoom, the quality of the picture degenerates.
The zoom does not change the perspective of a shot, meaning that as the angle narrows and the picture appears to become larger, the camera’s angle is not closer. Instead, it shows a smaller portion of the picture. A dolly can achieve the same movement and is more realistic, because as the camera moves closer to the subject, the perspective also changes. Although even the most professional film and video camera operators now use zoom lenses, they do not use them during a shot. Instead, they use the zoom lens as it was intended to be used, as a way to vary the focal length of the lens without changing lenses.
Zooms during a shot may be used on a flat, two-dimensional object, because there is no perspective involved, or as a special effect. But like all special effects, a zoom should be used sparingly and with specifically planned intent other than just tightening or loosening a shot.

Video, like painting, photography, and cinematography, is a two-dimensional art form. The picture has only a height and width as received on a receiver/monitor or shown on a screen. The depth, or third dimension, of the picture is perceived; it does not actually exist as a third dimension, but it appears to exist. This three-dimensional appearance is important to any visual medium. Video particularly depends on the Z-axis to compensate for its smaller screen and lower resolution compared with photography or motion picture film.
Therefore, it is imperative that the camera operator and director specifically think about and design the shots so that the Z-axis is exploited to its maximum. Applying all the creative techniques disclosed in the preceding sections furnishes the means to do so.
Moving subjects in the frame or moving the camera around the subjects; arranging the objects in patterns that appear to be in perspective; using as short a focal length lens as possible; and arranging objects and subjects in the frame to create a background, middle ground, and foreground all help create a usable Z-axis. Lining up objects in front of the camera in neat rows, equal distance from the camera, and placing all objects on surfaces of the same height, size, and/or color decrease the appearance of the Z-axis.
Arranging objects in the frame so that, even at rest, there appears to be movement, by using the object’s graphic forces, also improves the three-dimensional perception. Do not shoot a person or object straight on. This is not only boring, but it adds weight and width to that person. Instead, rotate the person so that the camera is getting a three-quarter view, but do not turn the person so far that both eyes are no longer visible. Avoid having two people stand next to each other while talking to the camera or each other; place them so that they are facing each other, with the camera shooting past first one and then the other.

Another aesthetic theory to be considered when framing a shot is the graphic weight of the objects within the frame. Each discernible object has some graphic weight or value. A large, dark object has a greater weight than a small, light-colored object. An object with jagged, irregular edges has more weight than an object with smooth, rounded edges. Two small objects may equal the weight of one large one, even though their actual square measurement might be slightly smaller.
In addition to the perceived graphic weight of an object is its graphic force. The graphic force is derived partially from its graphic weight and also from its movement. An object at rest has less graphic force than an object moving across the frame. An object or series of objects that appear to be moving also have increased graphic weight. Objects shaped like an arrow, a row of objects arranged to lead the eye in a specific direction, or a series of shots that show an object in a position of potential movement carry more graphic force than an object of the same size without the same graphic forces present.
Color also becomes a factor in determining the weight of an object. Objects colored in “hot” colors such as red, yellow, orange, and light versions of other colors tend to extend toward the viewer. These colors appear to be lighter in graphic weight. The “cool” colors such as blue, violet, and green and darker versions of other colors tend to recede from the viewer. These colors appear to be heavier in graphic weight.
In the midst of all these “rules,” remember that there are no absolutes in any aesthetic field. All of the suggestions made in this section are intended to be used only as guidelines. Each individual production situation determines to what extent these suggestions are followed or ignored. The resulting final production will chronicle whether the best choices were made.
GRAPHIC FORCES

Shooting to Edit: The Third Movement
Regardless of the skill of the camera operator and director in planning and framing shots, unless the shots have been recorded to be edited together, all the aesthetic values will be lost. In EFP production, each shot is recorded separately and often out of order. To later assemble the shots in a meaningful manner close to the original intent of the production, they must be shot with editing in mind.
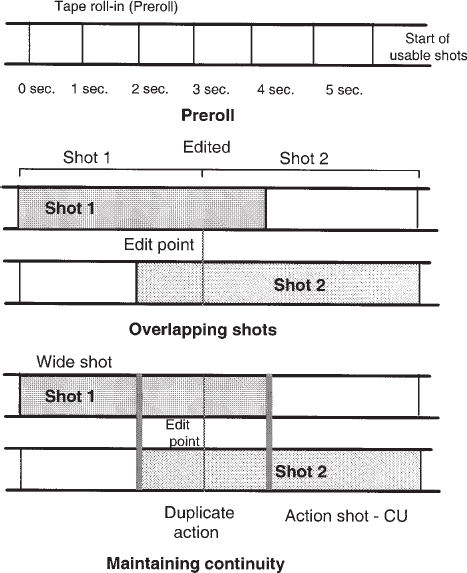
First, consider the electronic aspect. Because linear editors require some preroll space before making an edit, there must be at least 5 seconds of uninterrupted sync pulses and control track (if it is a CT editor) pulses preceding the edit entry point; that is, after the director has called for the tape to roll, a full 5 seconds must elapse before any usable action is recorded. At the end of the take, another 5 seconds should be recorded as protection after the director has called “Cut.” For nonlinear editing, preroll is not as critical, but head and tail footage is always appreciated by any editor, regardless of the editing method.
Second, consider the practical aspect. Each shot should be recorded so that its action overlaps both the preceding and the following shot. This allows the editor greater protection in the event that a shot did not start or end exactly as intended. This overlap also gives the director a wider range of choices as to the best segment of an action to cut.
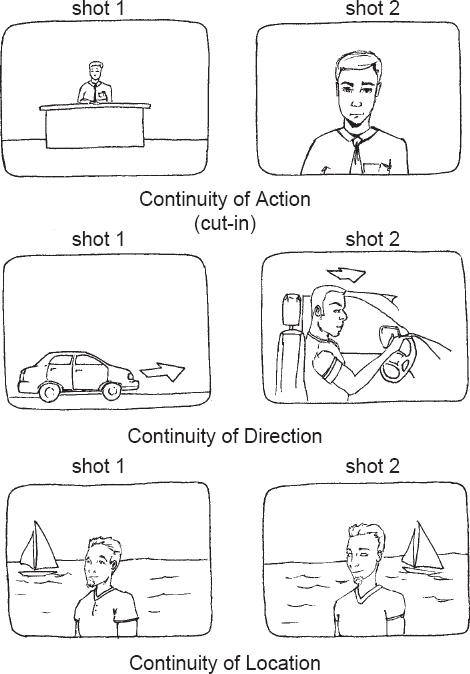
The third aspect to consider is the continuity aspect. To edit in a seamless fashion, continuity must be maintained. The action from one shot must flow into the action of the next shot, unless there is a transition or change of scene. To avoid discontinuity problems, shots are recorded overlapping each other to offer the editor a choice in where to make the edit. There are three basic types of continuity that generally must be matched in each edit: continuity of action, direction, and location.
Continuity of Action
As the actor picks up the pencil in the WS, the CU must be shot so that the rate of picking up the pencil is the same and the same hand and pencil are used. This seems like a logical action, but even the best directors and camera operators make action continuity mistakes. For that reason, a continuity assistant (CA), also known as a script supervisor, is an essential member of any major production crew. The CA watches every shot carefully and records the action on a script, or even takes digital still or instant photos of the beginning and ending of each shot to check continuity. Because most major productions are videotaped while being shot on film, a quick replay of the tape can answer most continuity questions.
Continuity of Direction
If the WS shows the actor facing to the left and the actor’s right hand reaches across the frame to the left, then the CU must show the hand moving to the left. If a shot shows an actor moving to the right, then the next shot must show the same actor still moving to the right, unless there is a change of direction shown on camera in the shot or a cutaway is inserted between the two shots. A cutaway can confuse the audience, however, if they remember that the actor was moving in one direction, but is then seen moving in the opposite direction in the next shot in which he or she appears. A straight-on shot from directly in front of or from the rear of the actor also can be used as a transition. This same rule applies to all movement, whether it involves automobiles; airplanes; people walking, running, or falling; or objects being thrown or dropped or moving on their own. Psychologically, movement from the left to right is a forward movement, whereas movement from right to left is a returning movement.
Continuity of Location
Continuity of location includes lighting, background, and audio. If the establishing shot is lit in low key with heavy shadows, then all of the CUs must be lit the same way. If one shot shows the ocean in the background, then, unless there is a change of direction shown on camera, all shots should indicate the ocean is the background. Audio continuity becomes an aesthetic tool, as well as a continuity rule. If the scene is in a large, empty hall, all the audio must sound as if it were recorded in the same ambiance. However, the ambiance of a WS in the same location sounds different from that of a tight CU of two people talking and standing close to each other.
There are three types of cover shots that are the friends and saviors of the editor: cover, cutaway, and cut-in shots. Any capable director will call for them to be recorded, and any professional camera operator will shoot them even if the director forgets to do so.
A cover shot is an illustration of what is being talked about or referred to. If an announcer speaks of the use of a product, then a shot of the product being used in that manner is a cover shot. The announcer does not need to and probably should not appear in the shot. Instead of a single shot, a series of shots or a sequence would better illustrate what the announcer is talking about.
Cutaway and cut-in shots are similar, except that a cutaway is a shot of items that are not included in the previous or following shots; for example, two people are sitting and talking in a railway station, and then a shot of the train arriving is shown. The characters do not refer to it (if they did, it would be a cover shot), and most important, they must be sitting in a position where they are not included in the shot of the train. But the audience realizes this train has something to do with the action. Generally, cutaway shots provide two important characteristics of a sequence. First, the shot gives the audience information that the main action does not reveal. Second, it can be used to cover an edit that would be a jump cut unless an intervening shot can be inserted.
A cut-in is a CU of some object that is visible in the preceding or following frame. If a woman’s purse is visible in a CU as two characters sit in the train station, then it is a cut-in shot if the purse is also visible in the WS.
These three types of shots afford the editor the chance to correct mistakes made in the shooting continuity; they can also be used as a way to speed up or slow down a sequence or to correct a continuity problem in the production.

Technology exists that allows you to produce a series of special effects simply by using the controls necessary for the normal operation of a camera. Depending on the quality and level of the recorder, some effects may be produced by its operation. As technology advances, newer cameras have digital special effects capabilities built into them.
Any professional analog camera and many consumer camcorders are capable of producing special effects such as iris fades, rack focus, swish pans/zooms, reverse polarity, and manipulation of pedestal and gain (including electronic pedestal).
Iris Fades
An iris fade-in or fade-out is created by placing the iris control on manual and setting the iris opening stopped all the way down. With the recorder rolling, the iris may be slowly opened up and brought to the proper setting, thus creating a fade-in. A fade-out is created by reversing the procedure: A scene is started with the recorder rolling and the iris set properly. At the right moment, the iris is stopped down until the picture fades to black. Neither of these effects works well unless the light level is low enough that the iris is almost completely wide open at the proper setting.
Rack Focus
To rack focus simply means to start a scene in focus and rapidly turn the focus control until the picture is totally out of focus. The shot to be edited next should start totally out of focus and, on cue, roll into proper focus. Again, this effect works well only when the light level is low enough that the depth of field is quite shallow, and the focus change should be rapid enough to appear intentional, not an error in shooting.
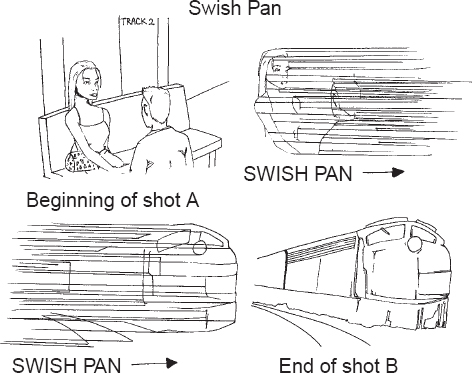
Swish Pans and Zooms
A swish pan is accomplished by starting on a scene, and then at the end of the shot, quickly panning the camera at a high enough rate to blur the image. The next shot starts with a fast pan and ends properly framed. The first of these tasks is easy to accomplish, but for the second, it is difficult to stop at the exact framing without jerking or missing the mark.
A swish zoom is a little easier to execute, especially if the zoom is motorized. The process is the same as a swish pan in that the shot starts at a normal focal length, but then, on cue, the zoom control is operated at its maximum speed, usually zooming in rather than out. The second shot starts with a zoom out and ends properly framed.
Digital In-Camera Effects
If the camera has built-in digital circuits, it may be possible to solarize, freeze, or pixilate the picture, among many other effects, depending on the individual camera. The solarization effect causes the image to appear as if it is melting or reversing in polarity. A freeze effect locks a single frame of the picture as if it were a still photo. Pixilation is the process of removing a certain number of frames of the picture so that objects and subjects appear to move about in an irregular, jerky fashion. Each of these effects requires a separate control on the camera to produce the indicated effect. Pixilation can also be accomplished if the tape deck can record a single frame at a time. A control, usually labeled intervalometer, sets the number of frames per second at which the recorder will operate. This compresses the action in any time elapsed required for the production.
Pedestal and Variable Gain Manipulation
Two other electronic controls, usually located internally on the camera, are the pedestal and variable gain controls. All cameras have a gain control easily located on the outside of the camera, but it is a step switch that gives the operator a choice of setting several different gain levels in the video amplifier. This switch allows the operator to compensate for low light levels by boosting the gain internally. Although the gain boost makes the picture brighter, it also increases the noise level in the picture.
The internal gain control is a potentiometer that allows continuous gain settings. The pedestal control changes the black level or contrast of the picture.
Use caution when manipulating either the pedestal or internal gain controls. Once either of these controls has been changed, it probably requires a test signal, oscilloscope, and a technician to return the camera to its normal operating condition. Therefore, changing these controls should be done only for extreme production needs.
Reversing Polarity
Reversing polarity is achieved by throwing a switch, internally or externally depending on the camera. This cannot be done while you are recording because there is a momentary loss of synchronization. The picture areas that were red become cyan, areas that were green become magenta, blue areas become yellow, and vice versa. Light areas become dark and dark areas become light. The effect is the same as looking at a color film negative.
All in-camera effects can be accomplished more effectively through the camera’s camera control unit or, in some cases, during postproduction.

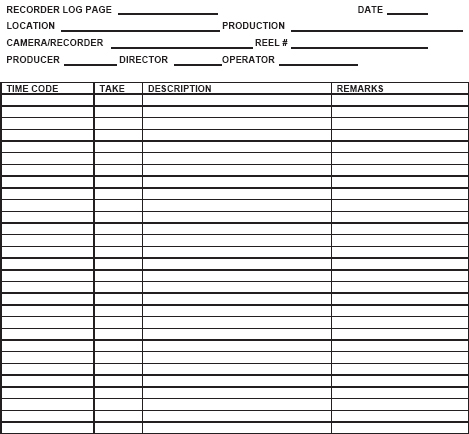
A manual operation often overlooked in the focus on electronic operations in a video production is the continuity record keeping or logging process. A written record of each shot is kept on a log sheet in a form that supplies the director and the editor with the information they need to accomplish their tasks. The log registers, in the order of shooting, the shot and take number and the location on the medium (that is, counter, SMPTE time code, or elapsed time). Comments on whether the audio, video, or both were good and why and any other comments the director wants noted also are listed.
The log is invaluable to the editor. If not accurately logged during the shoot, the cassettes, discs, or drives must be previewed and logged in real time during postproduction—a slow and painstaking procedure. One person, whose main responsibility is logging, should keep the logs; this person’s title in a large crew may be “continuity assistant” or “secretary.” In a smaller crew, the director or an assigned production assistant may be in charge of logging. The importance of this function cannot be ignored. The person keeping the log must be familiar with the critical aspects of continuity and well versed in that particular production.
The CA has a copy of the shot sheet, which indicates the order the shots will be set up and recorded, and a copy of the latest revision of the script. It is helpful to the log keeper to attend the preshoot production meetings to become intimately aware of all aspects of the production.
As each shot is set up and rehearsed, the logger notes positions of props, set pieces, lighting, or anything else that may be moved or changed. Because the production will be shot out of sequence, hours or days may separate the actual shooting of some shots in the same sequence, and every aspect of each shot must match to maintain continuity. As each shot is completed, the CA logs any deviations from the script and minute details, such as which hand an actor used to handle a prop. A digital still camera is invaluable to a CA; after each shot, the director, camera operator, and audio operator dictate comments to be added to the log. Each cassette, disc, or drive has a separate log page, and often each unit may have more than one log page. The pages should be labeled accurately to match the labels on the cassettes, discs, and drives. If copies are available, one copy goes in the box with the medium, another is kept with the assistant’s files, and a third is delivered to the director.
If the editing is done on a nonlinear digital editor, the logs become even more important. The tedious, time-consuming activity of real-time dubbing all the footage into a digital format before editing can be reduced by converting only those shots good enough for the final production. All other shots are left in original form to be dubbed later, if they are needed.
RECORDER LOG
After the excitement of the actual production has evaporated and the actors, directors, and producers have disappeared, the last stage of the production process beings. This stage is just as important as any other stage, but it occurs when everyone is tired and let down after the tension of the shoot has eased and everyone is thinking about tomorrow.
As soon as the order to strike (a term borrowed from the theater) has been given by the director, or the production manager on a larger crew, all power is killed, except for any work lights that are present. Then, all other cables are disconnected to prevent crew members from tripping over them and pulling equipment or lighting instruments down. Each crew person has striking equipment responsibility. Cables are properly coiled and stored in their cases. Once equipment has been cleaned and returned to the proper cases, a check is made to ensure that all equipment has been packed and is ready to be loaded.
The strike should be as organized as the setup. The next use of the equipment may come the following day. Note any damaged equipment in writing and notify maintenance immediately. The location has to be restored to its original condition. You should repair any damage or report it to the owners in writing and negotiate a satisfactory compensation before you leave the site.
Equipment is then moved to the vehicle, loaded, and returned to its storage locations. Each piece of equipment must be carefully checked with the person responsible, whether it is the production manager or a leasing company. Take the same precautionary measures during striking as you did during the setup. Never leave equipment or the equipment vehicle unattended until all equipment has been secured.
The “fun” part of the production has now ended. It consumed the shortest period, and, in many ways, the least amount of effort, at least mental and aesthetic effort. Once you have worked several EFPs, you will appreciate the physical effort required for the production process.
1. CAP CAMERA
2. TURN OFF ALL POWER SWITCHES EXCEPT WORK LIGHTS
3. DISMISS TALENT
4. DISCONNECT ALL CABLES, BOTH ENDS
5. LOWER ALL LIGHT STANDS, MOVE GENTLY OUT OF THE WAY TO COOL
6. PICK UP AND PACK ALL PROPS, SET PIECES LOAD SETS, LARGE SET PIECES
7. COIL CABLES PROPERLY, OVER-UNDER, NOT AROUND ELBOW
8. WIPE DOWN CABLES AND SECURELY FASTEN ENDS
9. REMOVE CAMERA FROM TRIPOD, PACK IN CASE WITH ACCESSORIES (TRIPOD PLATE, POWER PACK) THAT BELONG IN CASE
10. PACK ALL CABLES, BATTERIES
11. PACK ALL GAFFER EQUIPMENT
12. IF COOL, DISMANTLE LAMP HEADS AND STANDS THEN PACK
13. INVENTORY ALL EQUIPMENT CASES AND LOOSE EQUIPMENT
14. MOVE EQUIPMENT TO VEHICLE
** NEVER LEAVE ANY EQUIPMENT UNATTENDED **
15. LOAD EQUIPMENT INTO VEHICLE