When we started out in Chapter 2, every script that we looked at would be loaded by the browser and executed right away. Since then, we’ve learned how to wait until the HTML document has finished loading before unleashing the awesome power of JavaScript. In every case, however, the script will work its magic (for instance, making the rows of your tables stripy), then fizzle out, leaving behind an enhanced—but still very static—page.
You don’t need to suffer with scripts that peak too quickly! With the simple techniques we’ll explore in this chapter, you’ll learn to take control, write scripts that last longer, and become a superstar … well, in your favorite JavaScript chat room, anyway.
Don’t get me wrong—scripts that enhance web pages the instant they’re loaded (let’s call them “quickies”) have their place, but there are limits to how much they can improve the user experience of a site. JavaScript really gets interesting when you start to write scripts that are triggered by events that occur during the user’s interaction with the page, like clicking a hyperlink, scrolling the browser’s viewport, or typing a value into a form field.
Thanks to the wide adoption of the Document Object Model (DOM) standard, accessing HTML elements in your JavaScript code works very similarly in every browser. If only the same could be said for every aspect of JavaScript! As it happens, running JavaScript code in response to an event stands out as one of the few remaining features that are implemented in wildly varying ways in current browsers.
The news isn’t all bad. There is a certain amount of common ground. For as long as they’ve supported JavaScript, browsers have had a simple model for dealing with events—using event handlers—and all current browsers provide compatible support for these handlers, despite the fact that a complete standard was never written for them.[16] As we’ll see, these techniques come with limitations that you’ll want to avoid when you can, but they offer a good fallback option.
Note: DOM Level 0
The first version of the W3C DOM specification was called Document Object Model Level 1. Since event handlers (along with a number of other nonstandard JavaScript features) predate this specification, developers like to call them Document Object Model Level 0.
Stepping into the 21st century, the World Wide Web Consortium (W3C) has developed the DOM Level 2 Events standard, which provides a more powerful means of dealing with events, called event listeners. Almost all browsers now support this standard, the notable exception being Internet Explorer up to and including IE 7.0. Internet Explorer has its own way of doing things, and though its approach is almost as powerful, it’s also sufficiently different to force us to write extra code to cater for this popular browser.
It’s interesting to note that Microsoft participated in the development of the DOM Level 2 Events specification within the W3C, but when it came time to release IE 5.5, Microsoft chose not to support the specification in that browser. In the two major releases of Internet Explorer since then (IE 6.0 and 7.0), there has been no sign of Microsoft adding support for this standard.
Thankfully, we don’t have to wait for Microsoft. The benefits of
using event listeners, be they the W3C standard version or Internet
Explorer’s peculiar alternative, are so great that legions of dedicated
geeks have investigated the incompatibilities and come up with reasonable
solutions. With a little work, we can build these solutions into our
Core library so that we can use event listeners freely,
without encountering browser compatibility issues.
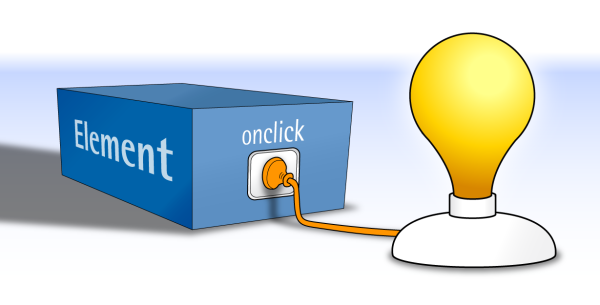
The simplest way to run JavaScript code in response to an event is to use an event handler. Event handlers have been around for as long as browsers have supported JavaScript, and predate the DOM standard. An event handler is a JavaScript function that’s “plugged into” a node in the DOM so that it’s called automatically when a particular event occurs in relation to that element. Figure 4.1 illustrates this concept.
Let’s start with an obvious example—the user clicking on a link like this:
<p>The first captain of the USS Enterprise NCC-1701 was
  <a id="wikipedia" href="http://en.wikipedia.org/…">Christopher
  Pike</a>.</p>
When a user clicks on a link like this one, the browser generates a
click event. By default, the browser will respond to that
click event by navigating to the URL specified by
the link. But before this happens, we can plug in our own event handler to
respond to the event.
Let’s say you want to display an alert to notify users that they’re leaving your site. An event handler is just a JavaScript function, so we can write a function to present the alert. As usual, we don’t want to interfere with other scripts, so we’ll wrap this function in an object with a unique name:
var WikipediaLink =
{
  clickHandler: function()
  {
    alert("Don't believe everything you read on Wikipedia!");
  }
};
Setting up a function as an event handler is easy. All you need is a reference to the DOM element for
which you want to handle events. Then, you set the element’s
onevent property, where
event is the type of event you want to
handle:
element.onevent = eventHandler;
To handle click events for the wikipedia link above with our
clickHandler function (which is a method of our WikipediaLink
object), we write this code:
var link = document.getElementById("wikipedia");
link.onclick = WikipediaLink.clickHandler;
But there’s a catch: we can’t assign an event handler to our element until the element has loaded. Thankfully, we already know how to write code that’s executed only after the entire document is loaded:
var WikipediaLink =
{
  init: function()
  {
    var link = document.getElementById("wikipedia");
    link.onclick = WikipediaLink.clickHandler;
  },

  clickHandler: function()
  {
    alert("Don't believe everything you read on Wikipedia!");
  }
};

Core.start(WikipediaLink);
The code for this example is deceptively simple. As Figure 4.2 reveals, our code is actually executed in three stages:

-
The browser encounters the
<script>tag in the HTML document’s header and loads the JavaScript file. Our code declares theWikipediaLinkobject, then callsCore.startto request that the object’sinitmethod be called when the whole document has loaded. -
The page finishes loading, and the
WikipediaLinkobject’sinitmethod is called. This method finds thewikipedialink and sets up theclickHandlermethod as itsclickevent handler. -
The user clicks the link, which generates a
clickevent. The browser callsclickHandler, the link’sclickevent handler, which displays the alert shown in Figure 4.3.

Once the user clicks the button to dismiss the alert, the browser follows the link as normal.
Warning: Event Handlers as HTML Attributes
If you go looking, you’ll find that a lot of sites set up JavaScript event handlers using HTML attributes, like this:
<a href="…" onclick="JavaScript code here">…</a>
As I mentioned in Chapter 1, this is the
JavaScript equivalent of assigning CSS properties to your elements using
the HTML style attribute. It’s messy, it violates the principle of keeping code for
dynamic behavior separate from your document content, and it’s
so 1998.
As we’ve just seen, event handlers let you respond to user actions by running any JavaScript code you like. But often, the browser still gets the last word. Take the example we just saw: no matter how creative and amazing the code in our event handler, when it’s done, the browser will take over and follow the link as normal. I don’t know about you, but I call that being a slave to the Man, and I won’t take it.
Browsers take all sorts of actions like this:
These are called default actions—things the browser normally does in response to events. In most cases you’ll want the browser to do these things, but sometimes you’ll want to prevent them from occurring.
The easiest way to stop the browser from performing a default
action in response to an event is to create for that event an event
handler that returns false. For example, we can
modify the link click event handler we created
above to ask the user for confirmation before the link is
followed:
clickHandler: function()
{
  if (!confirm("Are you sure you want to leave this site?"))
  {
    return false;
  }
}
The confirm function used in this code is
built into the browser, just like alert. And it
displays a message to the user just like alert
does, except that it offers the user two buttons to click:
and . If the user clicks , the
function returns true. If the user clicks
, the function returns
false. We then use the ! operator
introduced in Table 2.1 to
reverse that value so that the body of the if statement is
executed when the user clicks .
As shown in Figure 4.4, this new code
prompts the user with the message “Are you sure you want to leave this
site?” and causes our clickHandler method to
return false if the user clicks
. This, in turn, prevents the browser from
performing the default action for the click
event, so the browser does not follow the link.

Tip: Cutting Down on Code
If you’re feeling especially zen, you might have spotted the
fact that confirm returns
false when we want
clickHandler to return false. Since these values
match, you can simplify the code of
clickHandler if you want to:
clickHandler: function()
{
  return confirm(
      "Are you sure you want to leave this site?");
}
This version of the code simply returns whatever
confirm returns, which turns out to be exactly
what we want.
So far, we’ve created one event handler that handles one particular event occurring on one particular HTML element—pretty pathetic, if you ask me. The real fun is in writing an event handler that can handle events for many HTML elements!
Now, while assigning an event handler to many different elements
is relatively straightforward, making it do something
sensible for each element can be tricky, and that’s
where the this keyword comes into play.
A popular request from web development clients is for links to external sites to open in a new browser window or tab. However you feel about this in principle, the way a link opens is considered a part of the behavior of the page, and thus should be controlled by your JavaScript code (if at all).[17]
To open a URL in a new window or tab, simply use JavaScript’s
built-in open function:[18]
open(URL);
Writing a click event handler that opens a particular URL in a new window is therefore
trivial:
clickHandler: function()
{
  open("http://en.wikipedia.org/wiki/Christopher_Pike");
  return false;
}
But how do we do this for every external link
in the page? We definitely don’t want to write a separate
click handler for every external link.
The solution is to write a single handler that can retrieve the
URL of the link that has just been clicked, using the this
keyword:
this is a special JavaScript keyword that behaves
like a variable, except that you can’t assign it a value—its value is
the object upon which the currently-executing function was invoked as a
method. In other words, if you call
object.method(),
then within the code of
method, the
this keyword will refer to
object. When the code
currently being executed is not within a function, or when the function
was not called as a method of an object, then this points
to the global object that contains all global variables and
functions.
Since the browser calls an event handler as a method of the
element on which the event occurred, you can use this
within an event handler to get a reference to that element. In the above
code, we use this to get a reference to the link that the
user has clicked, then use its href
property to obtain the URL to which the link points.
By using this to retrieve from the element itself the
information we need in order to respond to an event, we have created an
event handler that can be assigned to all of the external links on the
page. We just need to identify them with a class in our HTML code, and
use that in our script’s init method:
Many JavaScript developers like event handlers because they’re simple to use, and they work in all browsers. Unfortunately, they come with one big, honking limitation: you can only assign one event handler to a given event on a given HTML element.
In simple terms, you can’t easily make more than one thing happen when an event occurs. Consider this code:
element.onclick = script1.clickHandler;
element.onclick = script2.clickHandler;
Only the clickHandler in
script2 will be executed
when a click occurs on
element, because assigning
the second event handler replaces the first.
You might wonder if we really need to assign
more than one event handler. After all, how often are you going to want
more than one script to respond to the click
event of a link? And as long as we were just talking about
click events, you’d be right to wonder.
But there are all sorts of events that you can respond to, and for
some of them it would be extremely useful to have multiple
handlers. As we’ll see in Chapter 6, for
example, a form’s submit event often requires
multiple scripts to check that the various form fields have been filled
out correctly.
The commonly used workaround to this problem is to assign as the event handler a function that calls multiple event handling functions:
element.onclick = function()
{
  script1.clickHandler();
  script2.clickHandler();
}
But all sorts of things are wrong with this approach:
-
thiswill no longer point to theelementwithin theclickHandlermethods. -
If either
clickHandlermethod returnsfalse, it will not cancel the default action for the event. -
Instead of assigning event handlers neatly inside a script’s
initmethod, you have to perform these assignments in a separate script, since you have to reference bothscript1andscript2.
There are solutions to all of these problems, of course, but they involve complicated and twisty code that you really shouldn’t have to deal with to accomplish something as basic as responding to events.
In addition to the simple event handlers we’ve just looked at, most browsers today have built-in support for a more advanced way of handling events: event listeners, which do not suffer from the one-handler-only restriction.
The good news is that event listeners are just like event handlers, except that you can assign as many event listeners as you like to a particular event on a particular element, and there is a W3C specification that explains how they should work.
The bad news is that Internet Explorer has its own completely different, and somewhat buggy version of event listeners that you also need to support if you want your scripts to work in that browser. Oh, and sometimes Safari likes to do things slightly differently, too.
Like an event handler, an event listener is just a JavaScript function that is “plugged into” a DOM node. Where you could only plug in one event handler at a time, however, you can plug multiple listeners in, as Figure 4.5 illustrates.

The code that sets up an event listener is quite different from that used to set up an event handler, but it’s still fairly easy:
element.addEventListener("event", eventListener, false);
In browsers that support W3C-standard event listeners, the
addEventListener method is available on every object that supports events. This
method takes three arguments: the name of the event to which you want to
assign the listener (e.g. "click"), the listener
function itself, and a Boolean value that you’ll usually want to set to
false (more on this last argument in the section called “Event Propagation”).
To set up an event listener in Internet Explorer, however, you need to use a method called
attachEvent. This method works a lot like
addEventListener, but it takes slightly different
arguments:
element.attachEvent("onevent", eventListener);
Spot the differences? The first argument—the name of the event
you’re interested in—must be prefixed with on (for
example, "onclick"), and there is no mysterious third
argument.
Any script that uses event listeners will need to use
addEventListener for all browsers that support it, and
attachEvent for Internet Explorer browsers that don’t. Ensuring that
your script uses the right method is a simple matter of using an
if-else statement that checks if the
addEventListener or
attachEvent methods exist in the current
browser:
if (typeof element.addEventListener != "undefined")
{
  element.addEventListener("event", eventListener, false);
}
else if (typeof element.attachEvent != "undefined")
{
  element.attachEvent("onevent", eventListener);
}
This is another example of the object detection technique that we first saw at work in Chapter 3.
Let’s employ this technique to display an alert in response to the
click event of a particular link, as we did using
event handlers earlier in this chapter:
var WikipediaLink =
{
  init: function()
  {
    var link = document.getElementById("wikipedia");

    if (typeof link.addEventListener != "undefined")
    {
      link.addEventListener(
          "click", WikipediaLink.clickListener, false);
    }
    else if (typeof link.attachEvent != "undefined")
    {
      link.attachEvent("onclick", WikipediaLink.clickListener);
    }
  },

  clickListener: function()
  {
    alert("Don't believe everything you read on Wikipedia!");
  }
};

Core.start(WikipediaLink);
It’s not as simple as setting up an event handler, of course, but
this code isn’t too complex, and it allows for another script to add its
own click event listener to the link without
dislodging the one we’ve set up here.
Although you’ll usually just add event listeners to your DOM nodes
and forget about them, you can “unplug” an event listener from a DOM node if you need to. In the W3C’s standard event
listener model, we use the removeEventListener
method to achieve this, whereas in Internet Explorer, we use detachEvent. In either case, we pass the method the same arguments we
passed when adding the listener:
if (typeof element.removeEventListener != "undefined")
{
  element.removeEventListener("event", eventListener, false);
}
else if (typeof element.detachEvent != "undefined")
{
  element.detachEvent("onevent", eventListener);
}
You’ll remember that you can simply return
false from an event handler in order to prevent the
browser from carrying out the default action for an event, such as
following a clicked hyperlink. Event listeners let you do this too, but
in a slightly different way.
In the W3C standard event listener model, the browser will always pass an event object to the event listener function. The event object’s properties contain information about the event (for instance, the position of the cursor when the event occurred), while its methods let us control how the event is processed by the browser.
In order to prevent the browser from performing the default action for an
event, we simply call the event object’s
preventDefault method:
clickListener: function(event)
{
  if (!confirm("Are you sure you want to leave this site?"))
  {
    event.preventDefault();
  }
}
If multiple listeners are associated with an event, any one of
those listeners calling preventDefault is
enough to stop the default action from occurring.
Internet Explorer’s event model is, of course, similar but
different. In Internet Explorer, the event object isn’t passed to the
event listener as an argument; it’s available as a global variable named
event. Also, the event object doesn’t have a
preventDefault method; instead, it has a
property named returnValue that we can set to false in order to
prevent the default action from taking place:
clickListener: function()
{
  if (!confirm("Are you sure you want to leave this site?"))
  {
    event.returnValue = false;
  }
}
Again, using the technique of object detection to figure out which event model the current browser supports, we can write an event listener that’s able to cancel the default action in either event model:
clickListener: function(event)
{
  if (typeof event == "undefined")
  {
    event = window.event;
  }

  if (!confirm("Are you sure you want to leave this site?"))
  {
    if (typeof event.preventDefault != "undefined")
    {
      event.preventDefault();
    }
    else
    {
      event.returnValue = false;
    }
  }
}
At the start of this listener, we check if we’ve actually been
passed an event object as an argument according to the W3C event model.
If we haven’t, we set our event variable to
window.event, which is Internet Explorer’s global
event object. We refer to it as window.event
instead of just event because our
function already has its own variable named
event.
Then, when it comes time to cancel the default action, we check to
see whether or not the event object has a
preventDefault method. If it does, we call it. If it doesn’t, we set the
object’s returnValue property to false instead. Either way, the
default action is prevented.
Warning: Preventing Default Actions in Safari 2.0.3 and Earlier
Although it did an admirable job of supporting the rest of the
DOM 2 Events standard, prior to version 2.0.4 the Safari browser could
not stop a default action from occurring in an event listener. The
preventDefault method was there; it just
didn’t do anything.
As I write this, a lot of Mac users are still using Safari 1.2,
which is affected by this issue. If you need to support Safari version
2.0.3 or earlier, the only way to cancel a default action is to use an
old-style event handler. If you’re lucky enough to be working on a
script that will always cancel the default event,
you can use an event listener in combination with an event handler
that simply returns false:
element.onevent = function()
{
  return false;
}
Obviously, if you stick a click event
listener on a hyperlink, then click on that link, the listener will be
executed. But if, instead, you assign the click
listener to the paragraph containing the link, or even the document node
at the top of the DOM tree, clicking the link will still trigger the
listener. That’s because events don’t just affect the target element
that generated the event—they travel through the tree structure of the
DOM. This is known as event propagation, and I
should warn you: it’s not sexy or exciting.
The W3C event model is very specific about how event propagation works. As illustrated in Figure 4.6, an event propagates in three phases:
-
In the capture phase, the event travels down through the DOM tree, visiting each of the target element’s ancestors on its way to the target element. For example, if the user clicked a hyperlink, that
clickevent would pass through the document node, thehtmlelement, thebodyelement, and the paragraph containing the link.At each stop along the way, the browser checks for capturing event listeners for that type of event, and runs them.
What’s that? You don’t know what a capturing event listener is? Remember when I mentioned the third argument of the
addEventListenermethod and I told you that you’d usually want to set it tofalse? Well, if you set it totrue, you’ll create a capturing event listener.You’ll also recall that Internet Explorer’s
attachEventmethod doesn’t support a third argument. That’s because Internet Explorer’s event model doesn’t have a capture phase. Consequently, most developers avoid using capturing event listeners. -
In the target phase, the browser looks for event listeners that have been assigned to the target of the event, and runs them. The target is the DOM node on which the event is focused. For example, if the user clicks a hyperlink, the target node is the hyperlink.[19]
-
In the bubbling phase, the event travels back up the DOM tree, again visiting the element’s ancestors one by one until it reaches the document node. At each stop along the way, the browser checks for event listeners that are not capturing event listeners, and runs them.
Note: Not All Events Bubble
All events go through the capture and target phases, but certain
events skip the bubbling phase. Specifically, focus and blur events, which occur when keyboard focus is given to and
removed from an element, respectively, do not bubble. In most cases,
this isn’t a detail you need to lose much sleep over, but as we’ll see
in the section called “Example: Accordion” later in this chapter, it’ll make
your life more difficult every once in a while.

So why am I boring you with all these details on event propagation? After all, you can assign an event listener to an element on which you expect an event to occur, and your listener will run when that event occurs. Does it have to be any more complicated than that? In most cases, no—it doesn’t. But sometimes you want to get a little more creative, and creativity inevitably breeds complexity. Stay with me, here.
Let’s say you were an especially helpful sort of person—I’m talking about the kind of helpful that most people find annoying. You might want to display a “helpful” message if a user were to accidentally click on a part of your page that wasn’t a hyperlink:
strayClickListener: function(event)
{
  alert("Did you mean to click a link? " +
      "It's that blue, underlined text.");
},
In order to catch clicks anywhere in the document, you can just assign this as a
click listener for the document node. The
listener will be triggered in the bubbling phase of every
click event, no matter where in the document the
target element is located.
But how do you keep the message from appearing when the user
does click a link? What you need to do is prevent
those click events from bubbling up to trigger your event listener. To do
this, you need to set up another event listener that stops the
propagation of those events.
To stop the propagation of an event in the W3C event model, you call the
stopPropagation method of the event object that’s passed to your event listener.
In Internet Explorer’s event model there’s no such method; instead, you
need to set the cancelBubble property of the event object to true. Here’s
what the resulting listener looks like:
linkClickListener: function(event)
{
  if (typeof event == "undefined")
  {
    event = window.event;
  }

  if (typeof event.stopPropagation != "undefined")
  {
    event.stopPropagation();
  }
  else
  {
    event.cancelBubble = true;
  }
}
Just assign this second listener function to every link in your
document, and it will stop the propagation of
click events when they reach a link. This prevents those clicks from
bubbling up to the document element to trigger the first event
listener.
Figure 4.7 shows what happens when you click on a part of the document that doesn’t link to anything. If you click on a link, however, the browser will follow it without complaint.

Here’s the complete, and very helpful/annoying script:
var StrayClickCatcher =
{
  init: function()
  {
    var links = document.getElementsByTagName("a");

    if (typeof document.addEventListener != "undefined")
    {
      document.addEventListener("click",
          StrayClickCatcher.strayClickListener, false);
      for (var i = 0; i < links.length; i++)
      {
        links[i].addEventListener("click",
            StrayClickCatcher.linkClickListener, false);
      }
    }
    else if (typeof document.attachEvent != "undefined")
    {
      document.attachEvent("onclick",
          StrayClickCatcher.strayClickListener);
      for (var i = 0; i < links.length; i++)
      {
        links[i].attachEvent("onclick",
            StrayClickCatcher.linkClickListener);
      }
    }
  },

  strayClickListener: function(event)
  {
    alert("Did you mean to click a link? " +
        "It's that blue, underlined text.");
  },

  linkClickListener: function(event)
  {
    if (typeof event == "undefined")
    {
      event = window.event;
    }

    if (typeof event.stopPropagation != "undefined")
    {
      event.stopPropagation();
    }
    else
    {
      event.cancelBubble = true;
    }
  }
};

Core.start(StrayClickCatcher);
Earlier in this chapter, we grappled with the problem of how to
write a single event handler that could be applied to many different
elements. We learned that we could use this to reference
the element to which the handler was assigned, and retrieve from it
information that we could use to control how the handler would respond.
It would be nice if we could do the same with our event listeners … so,
can we?
Keep in mind that the value of this within a JavaScript function is determined by the way in
which a function is called. If it’s called as a method of an object,
this refers to that object. If it’s called as a standalone
function, this refers to the global object that contains
all global variables and functions. The question is, how are event
listeners called by the browser?
Surprisingly, the W3C event model standard has nothing to say on
the subject, so it’s left up to each browser to decide which object
this refers to when it’s used within an event listener.
Thankfully, every browser that supports the W3C event model calls an
event listener as a method of the element to which it was assigned, so
this refers to that element, just like it does in an event
handler.
Less surprisingly, Internet Explorer went a different way with its
event listeners: Internet Explorer event listeners are called as standalone functions, so this points to the relatively useless
global object.
So far, we’ve been able to deal with every incompatibility between
the two event listener models by using simple object detection to run
the code required by each browser. When it comes to solving the issue
with this, however, things aren’t so simple. In case you’re
curious, here’s the solution:
if (typeof element.addEventListener != "undefined")
{
  element.addEventListener("event", eventListener, false);
}
else if (typeof element.attachEvent != "undefined")
{
  var thisListener = function()
  {
    var event = window.event;
    if (Function.prototype.call)
    {
      eventListener.call(element, event);
    }
    else
    {
      target._currentListener = eventListener;
      target._currentListener(event);
      target._currentListener = null;
    }
  };
  element.attachEvent("onevent", thisListener);
}
Now, leaving aside for the moment the details of how this code works, can you imagine having to type out that entire monstrosity every time you want to set up an event listener? I don’t mind telling you that I wouldn’t be sitting here writing this book if that’s how JavaScript made us do things.
There’s a way to make life easier for yourself, and I’ll show it to you in the section called “Putting it All Together.”
When it comes to making your life difficult, Internet Explorer has
one more trick up its sleeve. If the disaster surrounding the
this keyword wasn’t enough to make you want to give up on
Internet Explorer’s event model, this will.
In Internet Explorer, if you set up for an element an event listener that contains a reference to that element (or indeed, any other node in the DOM), the memory occupied by that listener and the associated DOM nodes will not be released when the user navigates to another page. I’ll grant you that this is pretty technical stuff, but what it comes down to is that certain types of event listeners can cause Internet Explorer to leak memory, thereby causing users’ computers to slow down until those users are forced to restart their browsers.
The solution to this issue is to set up a special event listener
for the unload event of the global window object, which represents the browser window containing the page.
When the user navigates to another page, the
unload event will occur and the special event
listener will be triggered. Within this event listener, you can take the
opportunity to remove all of the event listeners that you set up in your
document, thereby preventing them from causing memory leaks.
While this solution is quite elegant, the JavaScript code to make it happen is not. For the moment, I’ll spare you the details, because as we’ll see in the next section, you shouldn’t have to worry about them.
Have you been keeping track of all the cross-browser compatibility issues that we need to deal with when using event listeners? That’s okay—I have:
-
Internet Explorer uses
attachEvent/detachEventto add and remove event listeners, instead ofaddEventListener/removeEventListener. -
Internet Explorer uses an
"onevent"naming style for its events, instead of just"event". -
Internet Explorer uses a global
eventvariable instead of passing the event object to the listener as an argument. -
To prevent a default action from taking place, Internet Explorer requires you to set the event object’s
returnValueproperty, instead of calling itspreventDefaultmethod. -
Internet Explorer doesn’t support the capture phase of event propagation.
-
To stop an event from propagating, Internet Explorer requires you to set the event object’s
cancelBubbleproperty, instead of calling itsstopPropagationmethod. -
Internet Explorer calls event listeners as standalone functions, rather than as methods, requiring the developer to jump through hoops to get a reference to the target element, instead of just using
this. -
When using event listeners in a certain way, Internet Explorer leaks memory unless you go to great lengths to clean up all of your event listeners.
… and that’s without even getting into the differences when it comes to retrieving the details of keyboard and mouse events.[20]
These problems have led some developers to throw in the towel and just use event handlers. In fact, some experts have gone so far as to write their own event listener systems using event handlers as a foundation. While there is certainly a case to be made for such an approach, I believe in embracing the support for event listeners that’s built into most browsers, and saving the complex code for the browser that really needs it—Internet Explorer.
To that end, the core.js library that you’ll find in the code archive for this book includes four methods that enable you to use event listeners without worrying about any of the issues I listed above. Here’s how they work:
Core.addEventListener-
This method sets up an event listener function for a particular event type on a particular element. It works just like the standard
addEventListenermethod, except that we pass the element as the first argument of the method. It doesn’t support the creation of capturing event listeners, and therefore doesn’t take a final Boolean argument:Core.addEventListener(element, "event", eventListener);
In Internet Explorer, this method sets up the event listener so that the event object is passed to the listener function as an argument (just as it is in the standard event model), and so that the listener is called as a method of the element to which it is assigned (so that we can use
thisto refer to that element). It also takes care of automatically cleaning up the listener when the document is unloaded, so that it does not cause memory leaks in Internet Explorer. Core.removeEventListener-
This method removes an event listener that was previously added to an element. It works just like the standard
removeEventListenermethod, except that we pass the element as the first argument of the method, and likeCore.addEventListener, it takes no final Boolean argument:Core.removeEventListener(element, "event", eventListener);
Core.preventDefault-
This method prevents the default action associated with an event from occurring. It works just like the standard
preventDefaultmethod, except that we pass the event object as an argument of the method:Core.preventDefault(event);
Core.stopPropagation-
This method stops the event from propagating further, and potentially triggering event listeners assigned to ancestors of the element to which the current event listener is assigned:
Core.stopPropagation(event);
And just like that, all your event listener compatibility headaches vanish! Through the rest of this book, whenever we deal with event listeners, we’ll use these methods.
In fact, if you’ve been following along up until this point,
you’ll already have used one of these methods without knowing it! The
Core.start method that we used to start running a script only once the
document had finished loading relies on
Core.addEventListener. Take a look for yourself:
Core.start = function(runnable)
{
  Core.addEventListener(window, "load", runnable.init);
};
As you can see, Core.start simply sets up the
init method of the script you pass it as an event listener for the
load event of the window object, which represents the browser window that contains the
current page.
Now, you might be feeling a little uneasy about trusting those four methods to handle all of your event listening tasks without having seen how they work. If you aren’t, you should be! As you can imagine, a lot of developers have put their minds to solving these problems, and the solutions they’ve produced have not always been particularly good. How do you know that this solution is the one you should be using?
Before drinking the Kool-Aid,[21] you should take a look at Appendix A, in which the inner workings of the four methods are described in detail. Some of the code involved is rather advanced, and uses features of JavaScript that we won’t talk about until later in this book—if at all. But if nothing else, the discussion there should let you rest assured that we’ve done our homework.
Now that we have these shiny, new event listener methods in hand, let’s use them for something more exciting than displaying an alert box when the user clicks on the page.
In some browsers, when the user mouses over, or gives keyboard focus
to a link (for instance, when Tabbing to it), a tooltip will appear, displaying the value of the link’s
title attribute. In many browsers, however, this attribute is never
displayed to the user, or is limited to a brief, one-line description. In
any case, plain-text tooltips look fairly boring, and tend to be
overlooked by users even when they are displayed.
But, as shown in Figure 4.8, we can use
JavaScript—with a healthy dose of event listeners—to produce our own, more
eye-catching tooltips.

Let’s start by looking at the HTML code for this example. We want
the browser’s standard tooltips to display if the user has JavaScript
disabled for some reason, so we’ll code our hyperlinks with the tooltip
text in the title
attribute as usual:
<p><a class="federation" title="Read more …" href="…">James
  Tiberius Kirk</a> (2233 - 2293/2371), played by William Shatner,
  is the leading character in the original Star Trek TV series and
  the films based on it. Captain Kirk commanded the starship
  Enterprise (<a class="federation" title="Read more …"
      href="…">NCC-1701</a> and later <a class="federation"
      title="Read more …" href="…">NCC-1701-A</a>).</p>
With a finely-crafted static page all ready to go, we can look at setting up some event listeners to make the changes we want to occur in response to user events.
For each link that has a title attribute, we want to show a rich
tooltip in two situations: when the cursor hovers over the link (a
mouseover event), or the link receives keyboard focus (a
focus event). When the mouse is moved away (a
mouseout event), or keyboard focus is removed (a
blur event), we want to hide that tooltip. You
should be getting fairly good at belting out the
init method for a script like this:
var Tooltips =
{
  init: function()
  {
    var links = document.getElementsByTagName("a");

    for (var i = 0; i < links.length; i++)
    {
      var title = links[i].title;

      if (title && title.length > 0)
      {
        Core.addEventListener(links[i], "mouseover",
            Tooltips.showTipListener);
        Core.addEventListener(links[i], "focus",
            Tooltips.showTipListener);
        Core.addEventListener(links[i], "mouseout",
            Tooltips.hideTipListener);
        Core.addEventListener(links[i], "blur",
            Tooltips.hideTipListener);
      }
    }
  },
As you can see, this code uses
getElementsByTagName to obtain a list of all the a elements in the page, and get the value of
the title attribute for each one.
If the title attribute exists, and
has a value longer than zero characters (if (title &&
title.length > 0)), we set up event listeners for the four
different events that we’re interested in.
Although we’ve registered four event listeners on each of our
links, you can see that there are actually only two event listener
methods: showTipListener, which will display a tooltip in response to either a
mouseover or focus event,
and hideTipListener, which hides the
tooltip in response to a mouseout or a
blur.
Now, we could write the code that actually shows and hides tooltips directly inside these two methods, but I prefer to implement the “actions” in my scripts in separate methods, so that the code that controls what happens in response to an event is separate from the code that controls how it happens. Our event listener methods, therefore, tend to be relatively simple:
showTipListener: function(event)
{
Tooltips.showTip(this);
Core.preventDefault(event);
},
hideTipListener: function(event)
{
Tooltips.hideTip(this);
}
showTipListener calls
showTip, the method that will actually display the tooltip,
passing it a reference to the hyperlink that has been moused-over, or
given keyboard focus. It then calls
preventDefault to keep the browser from displaying a tooltip of its own
in response to the event.
hideTipListener is even simpler: it just calls
hideTip, which will do the work of hiding the
tooltip.
We’ve put it off as long as we can, but the time has come to write the code that will actually create our rich tooltips.
Until this point, every script we’ve written has either displayed a message box of some sort, or modified the style of an existing element in the page. To actually display something new, however—to dynamically add content to the page on the fly—is a very different trick.
There are two ways to modify the HTML content of a page using JavaScript:
-
via the DOM API
-
through the nonstandard
innerHTMLproperty
In this book, we’ll only use the first option. As we learned in
Chapter 3, the DOM API is a W3C standard that is
likely to be supported in all web browsers for the foreseeable future,
and its document modification features are up to almost any task. The
innerHTML property, by contrast, is not described in any standard, and
indeed browsers like Firefox have on occasion struggled to implement it
consistently in combination with new standards like XHTML. That said,
there is an argument to be made for innerHTML,
and if you’re curious you can read more about this alternative in The innerHTML Option, at the end of this section.
In Chapter 3, we concentrated on how to access and modify existing elements in an HTML document, but the DOM also lets us create and add new content to the page. Web developers who secretly wish they had the biceps of bricklayers call this DOM building.
To display a tooltip on the page, we’ll add a span
element that contains the text of the tooltip just inside the relevant
link. Here’s what the markup would look like if the tooltip were coded
right into the document:
<a href="…">Link text<span class="tooltip">Tooltip text</span></a>
To create this element via the DOM, we’ll use the
createElement method of the document node:
Once we’ve created the span, we can set its class
attribute:
Next, we need to put the tooltip text inside the span. In the DOM, this will be a text node,
which we can create with the document node’s
createTextNode method. We need to pass this
method the text that we want the node to contain; we can grab it using
the link’s title property:
To put our new text node inside our new span, we need to use the span’s appendChild
method:
Every element in the DOM tree supports the
appendChild method, which you can use to add any node as the last child of
the element upon which you are calling the method. It’s the DOM
builder’s best friend! To show you what I mean, we’ll use it again—to
add the tooltip to the document as a child of the link:
That’s our DOM building done, and with just a few finishing
touches, we have our showTip method:
showTip: function(link)
{
Tooltips.hideTip(link);
var tip = document.createElement("span");
tip.className = "tooltip";
var tipText = document.createTextNode(link.title);
tip.appendChild(tipText);
link.appendChild(tip);
link._tooltip = tip;
link.title = "";
// Fix for Safari2/Opera9 repaint issue
document.documentElement.style.position = "relative";
},
Before building a new tooltip, this method calls
hideTip to make sure that any existing tooltip has been
removed, so that we don’t end up with two (which might happen if
the user hovered the cursor over a link that already had keyboard
focus).
Once the new tooltip has been built and inserted, this method
stores a reference to the tooltip as a property of the link named
_tooltip.[22] This will make it easier for
hideTip to remove the tooltip later, using only
the reference to the link that it gets as an argument. Finally, the
method sets the link’s title property to an empty
string, so the document doesn’t contain the tooltip text twice.
Cleanliness is next to godliness, they say!
Finally, both Safari 2 and Opera 9 have difficulty with some
dynamically-inserted content like our tooltip, and won’t refresh the
page display fully. We can force these browsers to fully refresh the
page display by changing the value of the CSS
position property on the html element
(document.documentElement).
That takes care of the creation and inserting of new DOM nodes,
but to hide the tooltip you need to be able to
remove content from the page. Predictably, the DOM
provides a method to do this: removeChild. To
see how it works, take a look at the code for
hideTip:
hideTip: function(link)
{
if (link._tooltip)
{
link.title = link._tooltip.childNodes[0].nodeValue;
link.removeChild(link._tooltip);
link._tooltip = null;
// Fix for Safari2/Opera9 repaint issue
document.documentElement.style.position = "static";
}
},
Before removing the tooltip, this method needs to check if there
is actually a tooltip to remove. Since we stored a reference to the
currently displayed tooltip in the link’s _tooltip
property, we just have to check if the property has a value.
With the certain knowledge that a tooltip is currently displayed,
we need to retrieve from it the tooltip text and store it in the link’s
title property. You can get the text stored in a
text node using its nodeValue property, and since
the text node is the first child node of the tooltip element, we can
access this as link._tooltip.childNodes[0].nodeValue.
It’s a little long-winded, but it works.
With the tooltip text safely tucked away, we can remove the
tooltip using removeChild. Since the tooltip is
a child of the link, we call removeChild on the
link, and pass it a reference to the node that we want to remove from
the document—the tooltip.
And last of all, to indicate that there is no longer a
tooltip displayed for this link, we set its
_tooltip property to
null.
As with showTip, we need to cap this
method off with the fix for the repainting bugs in Safari 2 and Opera 9.
Since we set position to
relative when showing the tooltip, we can just set it
back to static when hiding the tooltip to force
another repaint.
Important: The innerHTML Option
Although it’s not a part of any W3C standard, every major
browser supports an innerHTML property on every DOM element node. The value of this
property is the HTML code of the content that it currently contains,
and by changing that value, you can change the content of that
element.
The biggest advantage offered by innerHTML
is performance. If you’re creating or modifying complex document
structures, it can be a lot quicker for the browser to make document
modifications in bulk using innerHTML than by
stepping through a series of separate DOM modifications. In some
cases, very complex JavaScript applications must
use innerHTML to achieve reasonable
performance.
Additionally, many developers quickly tire of writing the
verbose JavaScript code that DOM manipulation requires, and the “one
stop shop” that innerHTML offers is a tempting
alternative. As a result, most of the major JavaScript libraries
contain utilities for making DOM manipulation more convenient, and a
number of mini-libraries like Dan Webb’s
DOM Builder have even sprung up to tackle this issue
specifically.
Having written all the JavaScript code required to add and remove
tooltips on cue, all that’s left for us to do is to write the CSS code
that will make these ordinary spans
really grab users’ attention.
To begin with, we need to make sure our tooltips sit on top of the surrounding document content. Since our
tooltips are generated inside hyperlinks, we can apply the necessary
styles to our links. First, we set the positioning mode of all links to
relative:
This alone does nothing to the appearance of our links, but it
does enable us to modify the z-index
property of these links when we need to—specifically, when the
link is hovered or has keyboard focus:
That takes care of displaying the tooltips on top of the surrounding elements. Now let’s look at the tooltips themselves:
/* Tooltips (dynamic styles) */
.tooltip {
display: block;
font-size: smaller;
left: 0;
padding: 5px;
position: absolute;
text-decoration: none;
top: 1.7em;
width: 15em;
}
Here’s a breakdown of the various property declarations in this rule:
text-decoration: none;-
removes the underline from the text that is inherited from the link in some browsers
display: block;,width: 15em;-
displays the tooltip as a block 15 ems wide
position: absolute;,top: 1.7em;,left: 0;-
positions the box just below the link, in alignment with its left edge
font-size: smaller;,padding: 5px;-
tweaks the appearance of the tooltip to more clearly set it apart from the main document content
Those declarations look after the basic appearance of a tooltip. We can now play with details like text color, background, and border to get the effect we want. In this example, I’ve put together a couple of different tooltip styles, based on the class of the link to which the tooltip refers:
That’s all you need to produce great looking tooltips! Here’s the complete JavaScript code for easy reference:
var Tooltips =
{
init: function()
{
var links = document.getElementsByTagName("a");
for (var i = 0; i < links.length; i++)
{
var title = links[i].getAttribute("title");
if (title &&
      title.length > 0)
{
Core.addEventListener(
links[i], "mouseover", Tooltips.showTipListener);
Core.addEventListener(
links[i], "focus", Tooltips.showTipListener);
Core.addEventListener(
links[i], "mouseout", Tooltips.hideTipListener);
Core.addEventListener(
links[i], "blur", Tooltips.hideTipListener);
}
}
},
showTip: function(link)
{
Tooltips.hideTip(link);
var tip = document.createElement("span");
tip.className = "tooltip";
var tipText = document.createTextNode(link.title);
tip.appendChild(tipText);
link.appendChild(tip);
link._tooltip = tip;
link.title = "";
// Fix for Safari2/Opera9 repaint issue
document.documentElement.style.position = "relative";
},
hideTip: function(link)
{
if (link._tooltip)
{
link.title = link._tooltip.childNodes[0].nodeValue;
link.removeChild(link._tooltip);
link._tooltip = null;
// Fix for Safari2/Opera9 repaint issue
document.documentElement.style.position = "static";
}
},
showTipListener: function(event)
{
  Tooltips.showTip(this);
  Core.preventDefault(event);
},

hideTipListener: function(event)
{
  Tooltips.hideTip(this);
}
};
Core.start(Tooltips);
As shown in Figure 4.9, an accordion control collapses content to save space on the page, allowing the user to expand one “fold” of content at a time to read it.

This sort of interface enhancement is a great example of how JavaScript can improve the user experience on a page that works just fine without it. Making such enhancements work smoothly not just for mouse users, but for visitors who navigate using the keyboard (not to mention users of assistive technologies like screen readers), requires careful thought, and extensive use of event listeners.
As usual, we’ll start by creating a static page with clean HTML
and CSS code before we add any JavaScript. The accordion is essentially
a collapsible list, so we’ll use a ul element of
class accordion to represent
it:
<ul class="accordion">
  <li id="archer">
    <h2><a href="#archer">Jonathan Archer</a></h2>
    <p>Vessel registry: NX-01</p>
    <p>Assumed command: 2151</p>
    <div class="links">
      <h3>Profiles</h3>
      <ul>
        <li><a href="…">Memory Alpha</a></li>
        <li><a href="…">Wikipedia</a></li>
      </ul>
    </div>
  </li>
  <li id="pike">
    …
  </li>
  …
</ul>
Note that we’ve applied an ID to each list item, and linked to that ID from the heading just inside the item. Although we’re focused on creating a sensible HTML document at this stage, you can also look for opportunities to add meaningful structure that will help you to script the dynamic behaviour you want.
In this case, we can predict that we’ll want users to be able to
click on a heading in order to expand the corresponding fold of the
accordion. Although we could implement this functionality by adding a
click event listener directly to the heading,
using a link makes it easier to support keyboard users. Links can be
tabbed to and “clicked” using the browser’s built-in keyboard support,
whereas extra JavaScript code would be necessary to make a clickable
heading accessible from the keyboard.
The next step is to write the CSS code that will style the static version of the page, so that it looks nice even in browsers where JavaScript is not available. Since this isn’t a CSS book, I’ll spare you the code and just show you the result in Figure 4.10. You can always check out the code in the code archive if you’re curious.

With a perfectly good page in hand, we can now write a script to enhance it. We’ll start with our usual script skeleton:
This script will be concerned primarily with expanding and collapsing the folds of our accordion list, so let’s begin by writing the methods that will accomplish this task.
As we learned in Chapter 3, the best approach
for modifying the appearance of elements on the fly is to assign CSS
classes to them, and then define the actual appearance of each of those
classes in our style sheet. So let’s assign the expanded and collapsed
folds the class names expanded and
collapsed, respectively. With this
decision made, writing a method that collapses a given fold couldn’t be
simpler:
collapse: function(fold)
{
  Core.removeClass(fold, "expanded");
  Core.addClass(fold, "collapsed");
},
Now feel free to go a different way on this point, but personally, I want to allow only one fold of the accordion to be expanded at a time. Expanding a fold, therefore, should also collapse all the other folds on the page. Because collapsing all the folds on the page is a useful thing to be able to do in any case, we’ll write a separate method to accomplish this:
collapseAll: function(accordion)
{
  var folds = accordion.childNodes;
  for (var i = 0; i < folds.length; i++)
  {
    if (folds[i].nodeType == 1)
    {
      Accordion.collapse(folds[i]);
    }
  }
},
This method takes as an argument a reference to the accordion
element you want to collapse completely, so logically the very first
thing we want to do is get a list of the children of that element—the
li elements of the list that
represent the folds of the accordion.
This code uses a new trick in the DOM access department: the
if statement that checks the nodeType
property of each of those list items. We need to do this because
there’s no guarantee that all the child nodes of the list will be
element nodes (that is, list items). Depending on the browser in which
our accordion is being used,[23] the whitespace between the list items in our code may be
represented as text nodes, which will be listed as children of the
ul element as well. The
nodeType property of a node tells you whether
you’re dealing with an element node, a text node, or an attribute node.
Since we’re only interested in elements (the list items in the list), we
check for a nodeType value of
1.
Other than this new trick, the method is fairly straightforward.
It gets a list of all the folds in the accordion, then calls
Accordion.collapse to collapse each one.
Now that we have the methods responsible for changing the appearance of our accordion, let’s switch gears and write the CSS code that will control exactly what those appearance changes are.
The appearance changes that we need for an accordion are really
simple. With the exception of the heading of each fold, which should
always remain visible, we need to hide the contents of a collapsed fold
(an li element of class collapsed).
Now, we could naively achieve this by setting the
display property to none or block
where appropriate:
ul.accordion li.collapsed * {
display: none;
}
ul.accordion li.collapsed h2, ul.accordion li.expanded h2,
ul.accordion li.collapsed h2 a:link,
ul.accordion li.collapsed h2 a:visited,
ul.accordion li.expanded h2 a:link,
ul.accordion li.expanded h2 a:visited {
display: block;
}
… but doing it this way would effectively prevent users of screen
readers from accessing the contents of our accordion. Screen readers
don’t read content that's hidden with display: none, even
when it is later revealed. If there’s another way to show and hide
content dynamically in your JavaScript projects, you should use
it.
In this case, there is definitely another way to hide the contents of the accordion. It’s a technique called offleft positioning, which is just a fancy way of saying “hide stuff by positioning it off the left-hand side of the page:”
/* Accordion styles (dynamic) */
ul.accordion li.collapsed * {
position: absolute;
left: -10000px;
}
ul.accordion li.collapsed h2, ul.accordion li.expanded h2,
ul.accordion li.collapsed h2 a:link,
ul.accordion li.collapsed h2 a:visited,
ul.accordion li.expanded h2 a:link,
ul.accordion li.expanded h2 a:visited {
position: static;
}
Offleft positioning is a great boon to screen reader users, because the screen reader software will read the hidden content just as if it were visible on the page.
The inconvenient side-effect of this approach is that the content also remains a part of the page for keyboard users, who will be forced to Tab through any links or form elements within that hidden content, even though the content isn’t visible to them. In this particular example, however, we can make that work to our advantage, so offleft positioning is the best choice.
The work we’ve done so far takes care of the essentials, but for a little added spice, we can change the background color of the header of a fold that is either expanded, has the cursor over it, or has keyboard focus:
Back in the world of JavaScript, we can now write the code that
makes things happen, setting up the event listeners that will respond to
user actions. Since we want to set up our event listeners as soon as the
document has finished loading, we turn our attention to our script’s
init method.
Let’s break down the tasks we want to achieve in this method:
-
Find the accordion list(s) in the page.
-
For each accordion, collapse each of the folds it contains.
-
When the user clicks on the link in the title of an accordion fold, expand it, or collapse it if it’s already expanded.
That’s not a bad start, so let’s convert these plans into JavaScript code. If you’re feeling confident, try doing this yourself before looking at the following code—you can implement each of those steps using only the techniques and features of JavaScript that we have already seen in this book:
init: function()
{
var accordions = Core.getElementsByClass("accordion");
for (var i = 0; i < accordions.length; i++)
{
var folds = accordions[i].childNodes;
for (var j = 0; j < folds.length; j++)
{
if (folds[j].nodeType == 1)
{
Accordion.collapse(folds[j]);
var foldLinks = folds[j].getElementsByTagName("a");
var foldTitleLink = foldLinks[0];
Core.addEventListener(foldTitleLink, "click",
Accordion.clickListener);
This code gets a list of all elements with a class of accordion and uses a for loop to
process them one at a time. For each accordion list, it retrieves the
list of its child nodes (its folds) and again uses a for
loop to step through them one at time.
After confirming that each node in the list is in fact an element
node, it calls the collapse method to collapse
the fold.
It then obtains a reference to the first link in the fold (which will be the one inside the fold’s title), and adds to it an event listener that will respond to the user clicking on it. Here’s that event listener:
clickListener: function(event)
{
var fold = this.parentNode.parentNode;
if (Core.hasClass(fold, "collapsed"))
{
Accordion.expand(fold);
}
else
{
Accordion.collapse(fold);
}
Core.preventDefault(event);
},
Again, things here are relatively straightforward. The listener obtains a reference to the fold, which is the parent node of the parent node of the link that has just been clicked. It then checks the fold’s current CSS class to determine if the fold is collapsed or not. If it's collapsed, the code expands it. If it’s expanded, the code collapses it.
The listener ends with a call to
Core.preventDefault, which keeps the browser from attempting to follow the
link. Although it wouldn’t be disastrous if the browser
did follow the link (after all, it just links to
the fold itself), this could cause the page to scroll to the fold, when
what we’re after is a slick, seamless effect.
With the code we’ve seen so far, the accordion will work exactly the way we want it to for mouse and screen reader users, but we still have to solve the problem that offleft positioning causes for keyboard users. Remember, even though the contents of collapsed folds are hidden off the left of the screen, keyboard users will still find themselves Tabbing through the contents of those folds.
On the surface, this seems like a no-win situation, but let’s try a strategy in use at most major software companies: what if we think of this as feature and not a bug?
If we can’t keep keyboard users from Tabbing into hidden folds, why not make something useful happen when they do? Specifically, we can expand a fold when the user Tabs into it!
In an ideal world, an easy way to do this would be to add a
focus event listener to each fold and catch the
focus events as they bubbled up from the specific element within the
fold that has received focus, but as we learned earlier in this chapter,
focus events do not bubble.[24]
Instead, we need to attach a focus event
listener to every element within our accordion that we expect might
receive keyboard focus. For this example, we’ll limit ourselves to
hyperlinks, but if you were to add form elements to an accordion, you’d
want to set them up with this listener as well:[25]
init: function()
{
var accordions = Core.getElementsByClass("accordion");
for (var i = 0; i < accordions.length; i++)
{
var folds = accordions[i].childNodes;
for (var j = 0; j < folds.length; j++)
{
if (folds[j].nodeType == 1)
{
Accordion.collapse(folds[j]);
var foldLinks = folds[j].getElementsByTagName("a");
var foldTitleLink = foldLinks[0];
Core.addEventListener(foldTitleLink, "click",
Accordion.clickListener);
for (var k = 1; k < foldLinks.length; k++)
{
Core.addEventListener(foldLinks[k], "focus",
Accordion.focusListener);
}
}
}
Here’s the focus event listener:
focusListener: function(event)
{
var element = this;
while (element.parentNode)
{
if (Core.hasClass(element.parentNode, "accordion"))
{
Accordion.expand(element);
return;
}
element = element.parentNode;
}
}
This code showcases a common way of using the
parentNode property to reach up through the DOM tree. Since all we know is
that this is an element somewhere inside a fold of an
accordion, you need to use a while loop to climb up through
parent nodes of parent nodes until you find an element whose parent node
has a class of accordion. That tells
you that you’ve found the fold element, which you can promptly expand in
the usual way.
As a finishing touch to our menu, let’s add a bonus feature that takes advantage of the fact that, in the HTML code of the page, each of our folds has a unique ID:
<ul class="accordion"> <li id="archer"> … </li> <li id="pike"> … </li> … </ul>
If a link on another page points to a specific fold of our
accordion (e.g. <a href="accordion.html#pike">),
it would be nice to automatically expand that fold when the page is
loaded. All this effect takes is a brief addition to our
init method:
init: function()
{
var accordions = Core.getElementsByClass("accordion");
for (var i = 0; i < accordions.length; i++)
{
…
if (location.hash.length > 1)
{
var activeFold = document.getElementById(
location.hash.substring(1));
if (activeFold && activeFold.parentNode == accordions[i])
{
Accordion.expand(activeFold);
}
}
}
},
The global location variable is an object that
contains information about the URL of the current page. Its
hash property contains the fragment identifier
portion of that URL (e.g. "#pike"), which we can use
to identify and expand the requested fold.
First, we obtain a reference to the element with the specified ID.
Since the ID we’re after is the fragment identifier minus the leading
# character, we can use the
substring method that’s built into every
JavaScript string value to fetch a portion of the fragment identifier,
starting at the second character
(location.hash.substring(1)):
Before expanding the element, we need to check if that ID actually corresponds to an element in the page, and if the parent of that element is the accordion that we’re currently setting up:
if (activeFold && activeFold.parentNode == accordions[i])
{
Accordion.expand(activeFold);
}
And there you have it: a robust and accessible accordion control that you can easily plug into any web page you like. Load it up in your favorite browser and take it for a spin. Be sure to try using the keyboard to Tab through the accordion and its contents to see how a little extra code can go a long way toward making your site work well for a wider audience.
Here’s the complete JavaScript code:
var Accordion =
{
init: function()
{
var accordions = Core.getElementsByClass("accordion");
for (var i = 0; i < accordions.length; i++)
{
var folds = accordions[i].childNodes;
for (var j = 0; j < folds.length; j++)
{
if (folds[j].nodeType == 1)
{
Accordion.collapse(folds[j]);
var foldLinks = folds[j].getElementsByTagName("a");
var foldTitleLink = foldLinks[0];
Core.addEventListener(
foldTitleLink, "click", Accordion.clickListener);
for (var k = 1; k < foldLinks.length; k++)
{
Core.addEventListener(
foldLinks[k], "focus", Accordion.focusListener);
}
}
}
if (location.hash.length > 1)
{
var activeFold = document.getElementById(
location.hash.substring(1));
if (activeFold && activeFold.parentNode == accordions[i])
{
Accordion.expand(activeFold);
}
}
}
},
collapse: function(fold)
{
Core.removeClass(fold, "expanded");
Core.addClass(fold, "collapsed");
},
collapseAll: function(accordion)
{
var folds = accordion.childNodes;
for (var i = 0; i < folds.length; i++)
{
if (folds[i].nodeType == 1)
{
Accordion.collapse(folds[i]);
}
}
},
expand: function(fold)
{
  Accordion.collapseAll(fold.parentNode);
  Core.removeClass(fold, "collapsed");
  Core.addClass(fold, "expanded");
},
clickListener: function(event)
{
  var fold = this.parentNode.parentNode;
  if (Core.hasClass(fold, "collapsed"))
  {
    Accordion.expand(fold);
  }
  else
  {
    Accordion.collapse(fold);
  }
  Core.preventDefault(event);
},
focusListener: function(event)
{
  var element = this;
  while (element.parentNode)
  {
    if (Core.hasClass(element.parentNode, "accordion"))
    {
      Accordion.expand(element);
      return;
    }
    element = element.parentNode;
  }
}
};
Core.start(Accordion);
Most JavaScript libraries contain solutions to the browser compatibility issues surrounding event listeners that we tackled in this chapter. Although we believe the Core library that we have developed for this book to be well worth using, depending on your preferences, you may find these alternatives slightly more convenient, efficient, or confusing.
The Prototype library, for example, offers cross-browser alternatives for the
standard addEventListener and
removeEventListener methods, called Event.observe and Event.stopObserving, respectively:
Event.observe(element, "event", eventListener);
Event.stopObserving(element, "event", eventListener);
These methods work much like our own
Core.addEventListener and Core.removeEventListener methods, in that they transparently call the correct methods
to add and remove event listeners in the current browser, and ensure that
the necessary cleanup is done to avoid
listener-related memory leaks in Internet Explorer.
These methods leave a couple of issues unresolved, however—the
inconsistency surrounding the value of this within the
listener function, for example. Instead of automatically ensuring that
this refers to the element to which the event listener was
applied, Prototype lets you specify exactly which object you’d like
this to refer to by adding a
bindAsEventListener method to every function.
Therefore, the correct way to set up an event listener in Prototype is as follows:
Event.observe(element, "event",
    eventListener.bindAsEventListener(element));
I’ve assumed here that we want this to refer to the
element to which the listener was added, but we can pass any object we
like as an argument to bindAsEventListener, and
it will be used as the value of this when the event listener
function is called.
Calling bindAsEventListener also resolves
the remaining cross-browser compatibility issues, for example, ensuring
that the event object is passed to the listener function as an argument,
even in Internet Explorer.
Unfortunately, this approach complicates the process of
removing an event listener slightly. As we need to
pass the same arguments to Event.stopObserving in order for
it to work, we need to store the result of calling
bindAsEventListener:
var myEventListener = eventListener.bindAsEventListener(element);
Event.observe(element, "event", myEventListener);
…
Event.stopObserving(element, "event", myEventListener);
If Prototype makes registering event listeners a little complicated,
it simplifies the control of event propagation and default actions.
Instead of separate preventDefault and stopPropagation
methods, Prototype gives you a single method that does both:
Event.stop(event);
At the opposite end of the spectrum in terms of complexity is the
jQuery library, which makes the code for managing event listeners extremely
simple. It has extremely easy-to-use bind
and unbind methods that take care of all the cross-browser
compatibility headaches associated with adding and removing event
listeners:
$("#id").bind("event", eventListener);
$("#id").unbind("event", eventListener);
jQuery also provides for each event type a convenient method that
lets us set up an event listener for that event with even less code than
the above. For example, the click method lets us
set up a click event listener:
$("#id").click(clickListener);
Note that we can call any of these methods on a jQuery node list in
order to add the listener to every node in the list. For example, we can
add a click listener to every link in the document
with just one statement:
$("a[href]").click(clickListener);
Nestled halfway between Prototype and jQuery in terms of complexity
is the Yahoo! UI Library, which works almost exactly like our own
Core.addEventListener and Core.removeEventListener methods.
You’ve taken a huge step in this chapter! Instead of just running JavaScript code as the page is loaded, painting a pretty picture for the user to gaze at in vague disappointment, you can now attach your code to events, following the user’s lead like a practiced dance partner, adjusting and responding to his or her every whim.
But in some ways, this can still be quite limiting. After all, just because the user stops dancing doesn’t mean your code should have to!
In Chapter 5, we’ll finally set JavaScript free! We’ll explore the secrets of animation, and learn how to produce effects that take place over a period of time, independent of the user’s interaction with the page. We’ll also learn how this freedom can be used to further improve the examples we created in this chapter.
[16] The HTML 4 specification briefly discusses them under the heading Intrinsic Events.
[17] In past versions of the HTML standard, you could set the
target attribute of a link to
control how it would open. This attribute was deprecated in HTML 4
in favor of JavaScript alternatives.
[18] You’ll see this referred to as window.open in
many other books and online tutorials, because technically, all
built-in functions are actually methods of the global
window object. But you don’t see them talking
about window.alert, do you?
[19] This is the case except in Safari, where the target is actually the text node inside the hyperlink. The W3C events specification is ambiguous about which behavior is correct, but in practice it doesn’t make a big difference, since an event listener that’s assigned to the hyperlink itself will still be triggered in the bubbling phase.
[20] For complete coverage of these headaches, and some of the solutions that are available, pick up a copy of The JavaScript Anthology (Melbourne: SitePoint, 2006).
[21] The closest that many geeks will come to making a pop culture reference, “drinking the Kool-Aid” refers to the all-too-common practice of enthusiastically embracing a library or other programming aid without understanding how it works (or doesn’t work, as the case may be).
[22] The underscore (_) at the start of this
property name indicates that it’s a “private” property—a property
that isn’t meant to be used by other scripts. It doesn’t actually
prevent other scripts from accessing it, but
it’s a clear indication to other developers that it’s not a standard
DOM property, which will make them think twice about using
it.
[23] Safari is particularly prone to interpreting whitespace as a text node when you least expect it.
[24] If you want to get picky, they do bubble in Mozilla browsers like Firefox, but this behavior is in direct violation of the W3C standard for events, so I wouldn’t be surprised to see it changed in future versions of these browsers.
[25] If you wanted to be especially thorough, you could add this listener to every element within your accordion, but the sheer number of listeners this might entail could put a real drag on the browser’s performance, so I recommend the lighter—if riskier—approach we’ve used here.