
Without a document, JavaScript would have no way to make its presence felt. It’s HTML that creates the tangible interface through which JavaScript can reach its users.
This relationship makes it vital that JavaScript be able to access, create, and manipulate every part of the document. To this end, the W3C created the Document Object Model—a system through which scripts can influence the document. This system not only allows JavaScript to make changes to the structure of the document, but enables it to access a document’s styles and change the way it looks.
If you want to take control of your interfaces, you’ll first have to master the DOM.
When an HTML document is downloaded to your browser, that browser has to do the job of turning what is essentially one long string of characters into a web page. To do this, the browser decides which parts are paragraphs, which parts are headings, which parts are text, and so on. In order to save poor JavaScript programmers from having to do the exact same work, the browser stores its interpretation of the HTML code as a structure of objects, called the Document Object Model, or DOM.
Within this model, each element in the HTML document becomes an object, as do all the attributes and text. JavaScript can access each of these objects independently, using built-in functions that make it easy to find and change what we want on the fly.
As a result of the way in which HTML is written—as a hierarchy of nested elements marked with start and end tags—the DOM creates a different object for each element, but links each element object to its enclosing (or parent) element. This creates an explicit parent-child relationship between elements, and lends the visualization of the DOM most readily to a tree structure.
Take, for example, this HTML:
<!DOCTYPE html PUBLIC "-//W3C//DTD XHTML 1.0 Strict//EN"
    "http://www.w3.org/TR/xhtml1/DTD/xhtml1-strict.dtd">
<html xmlns="http://www.w3.org/1999/xhtml" lang="en-US">
  <head>
    <title>DOMinating JavaScript</title>
    <meta http-equiv="Content-Type"
        content="text/html; charset=utf-8" />
  </head>
  <body>
    <h1>
      DOMinating JavaScript
    </h1>
    <p>
      If you need some help with your JavaScript, you might like
      to read articles from <a href="http://www.danwebb.net/"
          rel="external">Dan Webb</a>,
      <a href="http://www.quirksmode.org/" rel="external">PPK</a>
      and <a href="http://adactio.com/" rel="external">Jeremy
      Keith</a>.
    </p>
  </body>
</html>
These elements, as mapped out in the DOM, can most easily be thought of as shown in Figure 3.1.

To create the DOM for a document, each element in the HTML is represented by what’s known as a node. A node’s position in the DOM tree is determined by its parent and child nodes.
An element node is distinguished by its element name (head, body,
h1, etc.), but this doesn’t have to be
unique. Unless you supply some identifying characteristic—like an id attribute—one paragraph node will appear
much the same as another.
Technically, there’s a special node that’s always contained in a document, no matter what that document’s content is. It always sits right at the top of the tree and it’s called the document node. With that in mind, Figure 3.2 would be a more accurate representation of the DOM.

Element nodes (that is, nodes that represent HTML elements) are one type of node, and they define most of the structure of the DOM, but the actual content of a document is contained in two other types of nodes: text nodes and attribute nodes.
In HTML code, anything that’s not contained between angled brackets will be interpreted as a text node in the DOM. Structurally, text nodes are treated almost exactly like element nodes: they sit in the same tree structure and can be reached just like element nodes; however, they cannot have children.
If we reconsider the HTML example we saw earlier, and include the text nodes in our visualization of the DOM, it becomes a lot bigger, as Figure 3.3 illustrates.

Although those text nodes all look fairly similar, each node has
its own value, which stores the actual text that the node represents. So
the value of the text node inside the title element in this example would be
“DOMinating JavaScript.”
Note: Whitespace May Produce Text Nodes
As well as visible characters, text nodes contain invisible characters such as new lines and tabs. If you indent your code to make it more readable (as we do in this book), each of the lines and tabs that you use to separate any tags or text will be included in a text node.
This means you may end up with text nodes in between adjacent elements, or with extra white space at the beginning or end of a text node. Browsers handle these whitespace nodes differently, and this variability in DOM parsing is the reason why you have to be very careful when relying upon the number or order of nodes in the DOM.
With tags and text covered by element and text nodes, the only pieces of information that remain to be accounted for in the DOM are attributes. At first glance, attributes would appear to be part of an element—and they are, in a way—but they still occupy their own type of nodes, handily called attribute nodes.
Any of the three anchor elements in the example DOM we saw earlier could be visualized as shown in Figure 3.4 with the element’s attribute nodes.
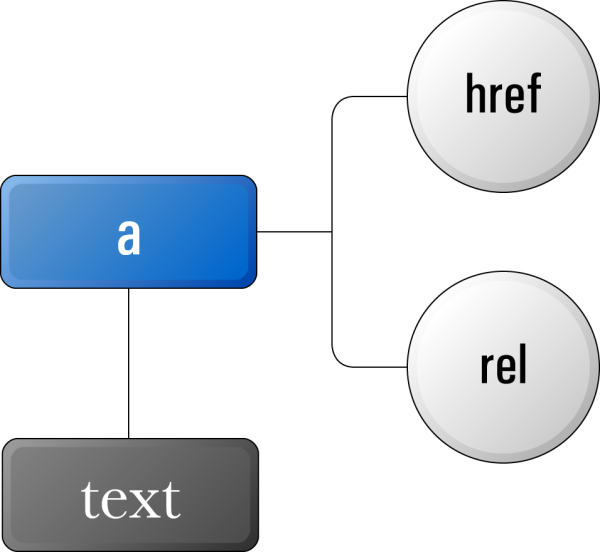
Attribute nodes are always attached to an element node, but they don’t fit into the structure of the DOM like element and text nodes do—they’re not counted as children of the element they’re attached to. Because of this, we use different functions to work with attribute nodes—we’ll discuss those functions later in the chapter.
As you can see from the diagrams presented here, the DOM quickly becomes complex—even with a simple document—so you’ll need some powerful ways to identify and manipulate the parts you want. That’s what we’ll be looking at next.
Now that we know how the DOM is structured, we’ve got a good idea of the sorts of things we’ll want to access. Each node—be it an element, text, or attribute node—contains information that we can use to identify it, but it’s a delicate matter to sort through all of the nodes in a document to find those we want.
In many ways, manipulating an element via the DOM is a lot like applying element styles via CSS. Both tasks take this general pattern:
-
Specify the element or group of elements that you want to affect.
-
Specify the effect you want to have on them.
Although the ways in which we manipulate elements vary greatly between the two technologies, the processes we use to find the elements we want to work on are strikingly similar.
The most direct path to an element is via its id attribute. id is an optional
HTML attribute that can be added to any element on the page, but each ID
you use has to be unique within that document:
<p id="uniqueElement">
  …
</p>
If you set out to find an element by ID, you’ll need to make one big assumption: that the element you want has an ID. Sometimes, this assumption will mean that you need to massage your HTML code ahead of time, to make sure that the required element has an ID; at other times, that ID will naturally appear in the HTML (as part of the document’s semantic structure). But once an element does have an ID, it becomes particularly easy for JavaScript to find.
If you wanted to reference a particular element by ID in
CSS, you’d use an ID selector beginning with
#:
#uniqueElement(1)
{
  color: blue;(2)
}
Roughly translated, that CSS says:
CSS is quite a succinct language. JavaScript is not. So, to
reference an element by ID in JavaScript, we use the
getElementById method, which is available only from the
document node. It takes a string as an argument, then finds the element
that has that string as its ID. I like to think of
getElementById as a sniper that can pick out
one element at a time—highly targeted. For instance, imagine that our
document included this HTML:
<h1>
  Sniper (1993)
</h1>
<p>
  In this cinema masterpiece,
  <a id="berenger" href="/name/nm0000297/">Tom Berenger</a> plays
  a US soldier working in the Panamanian jungle.
</p>
We can obtain a reference to the HTML element with the ID berenger, irrespective of what type of
element it is:
var target = document.getElementById("berenger");
The variable target will now reference the DOM
node for the anchor element around Tom Berenger’s name. But let’s
suppose that the ID was moved onto another element:
<h1 id="berenger">
  Sniper (1993)
</h1>
<p>
  In this cinema masterpiece,
  <a href="/name/nm0000297/">Tom Berenger</a> plays a US soldier
  working in the Panamanian jungle.
</p>
Now, if we execute the same JavaScript code, our
target would reference the h1 element.
Once you have a reference to an element node, you can use lots of native methods and properties on it to gain information about the element, or modify its contents. You’ll explore a lot of these methods and properties as you progress through this book.
If you’d like to try to get some information about the element we
just found, you can access one or more of the element node’s native
properties. One such property is
nodeName, which tells you the exact tag name of the node you’re
referencing. To display the tag name of the element captured by
getElementById, you could run this code:
var target = document.getElementById("berenger");
alert(target.nodeName);
An alert dialog will pop up displaying the tag name, as shown in Figure 3.5.

If an element with the particular ID you’re looking for doesn’t
exist, getElementById won’t return a reference to a node—instead, it will return
the value null. null is a special
value that usually indicates some type of error. Essentially, it
indicates the absence of an object when one might normally be
expected.
If you’re not sure that your document will contain an element with
the particular ID you’re looking for, it’s safest to check that
getElementById actually returns a node object,
because performing most operations on a null value
will cause your program to report an error and stop running. You can
perform this check easily using a conditional statement that verifies
that the reference returned from
getElementById isn’t null:
var target = document.getElementById("berenger");

if (target != null)
{
  alert(target.nodeName);
}
Using IDs to locate elements is excellent if you want to modify
one element at a time, but if you want to find a group of elements,
getElementsByTagName is the method for you.
Its equivalent in CSS would be the element type selector:
li
{
  color: blue;
}
Unlike getElementById,
getElementsByTagName can be executed as a
method of any element node, but it’s most commonly called on the
document node.
Take a look at this document:
<!DOCTYPE html PUBLIC "-//W3C//DTD XHTML 1.0 Strict//EN"
    "http://www.w3.org/TR/xhtml1/DTD/xhtml1-strict.dtd">
<html xmlns="http://www.w3.org/1999/xhtml" lang="en-US">
  <head>
    <title>Tag Name Locator</title>
    <meta http-equiv="Content-Type"
        content="text/html; charset=utf-8" />
  </head>
  <body>
    <p>
      There are 3 different types of element in this body:
    </p>
    <ul>
      <li>
        paragraph
      </li>
      <li>
        unordered list
      </li>
      <li>
        list item
      </li>
    </ul>
  </body>
</html>
We can retrieve all these list item elements using one line of JavaScript:
var listItems = document.getElementsByTagName("li");
By executing that code, you’re telling your program to search
through all of the descendants of the document node,
get all the nodes with a tag name of "li", and assign
that group to the listItems variable.
listItems ends up containing a collection of
nodes called a node list. A node list is a JavaScript object that contains a list
of node objects in source order. In the example we just saw, all the
nodes in the node list have a tag name of
"li".
Node lists behave a lot like arrays, which we saw in Chapter 2, although they lack some of the useful
methods that arrays provide. In general, however, you can treat them the
same way. Since getElementsByTagName always returns a node list in source order, we know that
the second node in the list will actually be the second node in the HTML
source, so to reference it you would use the index 1
(remember, the first index in an array is 0):
var listItems = document.getElementsByTagName("li");
var secondItem = listItems[1];
secondItem would now be a reference to the list
item containing the text “unordered list.”
Node lists also have a length property, so
you can retrieve the number of nodes in a collection by referencing its
length:
var listItems = document.getElementsByTagName("li");
var numItems = listItems.length;
Given that the document contained three list items,
numItems will be 3.
The fact that a node list is referenced similarly to an array
means that it’s easy to use a loop to perform the same task on each of
the nodes in the list. If we wanted to check that
getElementsByTagName only returned elements
with the same tag name, we could output the tag name of each of the
nodes using a for loop:
var listItems = document.getElementsByTagName("li");

for (var i = 0; i < listItems.length; i++)
{
  alert(listItems[i].nodeName);
}
Unlike getElementById,
getElementsByTagName will return
a node list even if no elements matched the supplied tag name. The
length of this node list will be 0. This means
it’s safe to use statements that check the length
of the node list, as in the loop above, but it’s
not safe to directly reference an index in the list
without first checking the length to make sure that
the index will be valid. Looping through the node list using its
length property as part of the loop condition is
usually the best way to do this.
At the start of this section, I mentioned that
getElementsByTagName can be executed from any element node, not just the document node. Calling
this method from an element node allows you to restrict the area of
the DOM from which you want to select nodes.
For instance, imagine that your document included multiple unordered lists, like this:
<!DOCTYPE html PUBLIC "-//W3C//DTD XHTML 1.0 Strict//EN"
    "http://www.w3.org/TR/xhtml1/DTD/xhtml1-strict.dtd">
<html xmlns="http://www.w3.org/1999/xhtml" lang="en-US">
  <head>
    <title>Tag Name Locator</title>
    <meta http-equiv="Content-Type"
        content="text/html; charset=utf-8" />
  </head>
  <body>
    <p>
      There are 3 different types of element in this body:
    </p>
    <ul>
      <li>
        paragraph
      </li>
      <li>
        unordered list
      </li>
      <li>
        list item
      </li>
    </ul>
    <p>
      There are 2 children of html:
    </p>
    <ul>
      <li>
        head
      </li>
      <li>
        body
      </li>
    </ul>
  </body>
</html>
Now, you might want to get the list items from the second list
only—not the first. If you were to call
document.getElementsByTagName("li"), you’d end up with a
collection that contained all five list items in the document, which,
obviously, is not what you want. But if you get a reference to the
second list and use that reference to call the
method, it’s possible to get the list items from that list
alone:
var lists = document.getElementsByTagName("ul");
var secondList = lists[1];
var secondListItems = secondList.getElementsByTagName("li");
secondListItems now contains just the two
list items from the second list.
Here, we’ve used two
getElementsByTagName calls to get the
elements we wanted, but there is an alternative. We could use a
getElementById call to get the required reference to the second list
(if the second list had an ID) before we called
getElementsByTagName, to get the list items
it contains. Combining multiple DOM method calls is something you should get a feel for fairly
quickly. The best approach will often depend upon the structure of the
HTML you’re dealing with.
It’s quite often very handy to find elements based on a class rather than a tag name. Although we’re stuck with the same 91 HTML elements wherever we go, we can readily customize our classes to create easily referenced groups of elements that suit our purposes.
Compared to searching by tag name, using a class as a selector can be a more granular way to find elements (as it lets you get a subset of a particular tag name group) as well as a broader way to find elements (as it lets you select a group of elements that have a range of tag names).
Unfortunately, no built-in DOM function lets you get elements by class, so I think it’s time we created our first real function! Once that’s done, we can add the function to our custom JavaScript library and call it whenever we want to get all elements with a particular class.
When you’re writing a function or a program, your first step should be to define clearly in plain English what you want it to do. If you’re tackling a relatively simple problem, you might be able to translate that description straight into JavaScript, but usually you’ll need to break the task down into simple steps.
The full description of what we want to do here could be something like, “find all elements with a particular class in the document.”
That sounds deceptively simple; let’s break it down into more logical steps:
-
Look at each element in the document.
-
For each element, perform a check that compares its class against the one we’re looking for.
-
If the classes match, add the element to our group of elements.
A couple of things should jump out at you immediately from those steps. Firstly, whenever you see the phrase “for each,” chances are that you’re going to need a loop. Secondly, whenever there’s a condition such as “if it matches,” you’re going to need a conditional statement. Lastly, when we talk about a “group,” that usually means an array or node list.
With those predictions in mind, let’s turn these three steps into code.
First of all, we’ll need to get all the elements in the
document. We do this using
getElementsByTagName, but we’re not going to look for a particular tag;
instead, we’re going to pass this method the special value
"*", which tells it to return all elements.
Unfortunately, Internet Explorer 5.x doesn’t understand that special value, so we have to
write some additional code in order to support that browser. In
Internet Explorer 5.x, Microsoft created a special object that
contains all the elements in the document, and called it
document.all. document.all is basically a node list containing all the elements, so it’s synonymous with
calling document.getElementsByTagName("*").
Most other browsers don’t have the document.all
object, but those that do implement it just like Internet
Explorer, so our code can simply test to see whether
document.all exists. If it does, we use the Internet
Explorer 5.x way of getting all the elements. If it doesn’t, we use
the normal approach:
var elementArray = [];

if (typeof document.all != "undefined")
{
  elementArray = document.all;
}
else
{
  elementArray = document.getElementsByTagName("*");
}
The conditional statement above uses the typeof
operator to check for the existence of
document.all. typeof checks the data type of the value
that follows it, and produces a string that describes the value’s type
(for instance, "number",
"string", "object", etc.). Even
if the value is null, it will still return a type
("object"), but if you supply typeof
with a variable or property name that hasn’t been assigned any value
whatsoever, it will return the string "undefined".
This technique, called object
detection, is the safest way of testing whether an object—such as
document.all—exists. If typeof returns
"undefined", we know that the browser doesn’t
implement that feature.
Whichever part of the conditional statement the browser decides
to execute, we end up correctly assigning to
elementArray a node list of every element in the document.
Now that we have a collection of elements to look at, we can check the class of each:
var pattern = new RegExp("(^| )" + theClass + "( |$)");

for (var i = 0; i < elementArray.length; i++)
{
  if (pattern.test(elementArray[i].className))
  {
    …
  }
}
The value that we assign to the variable
pattern on the first line will probably look rather alien to
you. In fact, this is a regular
expression, which we’ll explore more fully in Chapter 6. For now, what you need to know is that
regular expressions help us search strings for a particular pattern.
In this case, our regular expression uses the variable
theClass as the class we want to match against;
theClass will be passed into our function as an
argument.
Once we’ve set up our regular expression with that class name,
we use a for loop to step through each of the elements in
elementArray.
Every time we move through the for loop, we use the
pattern regular expression, testing the current
element’s class attribute against
it. We do this by passing the element’s className
property—a string value—to the regular expression’s
test method. Every element node has a
className property, which corresponds directly to
that element’s class attribute in
the HTML.
When pattern.test is run, it checks the string
argument that’s passed to it against the regular expression. If the
string matches the regular expression (that is, it contains the
specified class name), it will return true; if the
string doesn’t match the regular expression, it will return
false. In this way, we can use a regular expression
test as the condition for an if statement. In this
example, we use the conditional statement to tell us if the current
element has a class that matches the one we’re looking for.
But why can’t we just perform a direct string comparison on the class, like this?
if (elementArray[i].className == theClass) // this won't work
The thing about dealing with an element’s
className property is that it can actually
contain multiple classes, separated by spaces, like this:
<div class="article summary clicked">
For this reason, simply checking whether the class attribute’s value equals the class that we’re interested
in is not always sufficient. When checking to see whether class contains a particular class, we need
to use a more advanced method of searching within the attribute value,
which is why we used a regular expression.
Once we’ve decided that an element matches the criteria we’ve set, we need to add it to our group of elements. But where’s our group? Earlier, I said that a node list is a lot like an array. We can’t actually create our own node lists—the closest thing we can create is an array.
Outside the for loop, we create the array that’s going to hold the group of elements, then add
each matched element to the array as we find it:
var matchedArray = [];
var pattern = new RegExp("(^| )" + theClass + "( |$)");

for (var i = 0; i < elementArray.length; i++)
{
  if (pattern.test(elementArray[i].className))
  {
    matchedArray[matchedArray.length] = elementArray[i];
  }
}
Within the if statement we wrote in the previous
step, we add any newly matched elements to the end of
matchedArray, using its current length as the
index of the new element (remember that the
length of an array will always be one more than the index of the last
element).
Once the for loop has finished executing, all of
the elements in the document that have the required class will be
referenced inside matchedArray. We’re almost
done!
The guts of our function are now pretty much written. All we have to do is paste them together and put them inside a function:
Core.getElementsByClass = function(theClass)
{
  var elementArray = [];

  if (typeof document.all != "undefined")
  {
    elementArray = document.all;
  }
  else
  {
    elementArray = document.getElementsByTagName("*");
  }

  var matchedArray = [];
  var pattern = new RegExp("(^| )" + theClass + "( |$)");

  for (var i = 0; i < elementArray.length; i++)
  {
    if (pattern.test(elementArray[i].className))
    {
      matchedArray[matchedArray.length] = elementArray[i];
    }
  }

  return matchedArray;
};
We’ve called our new function
Core.getElementsByClass, and our function definition contains one
argument—theClass—which is the class we use to construct our regular
expression. As well as placing the code inside a function block, we
include a return statement that passes
matchedArray back to the statement that called
Core.getElementsByClass.
Now that it’s part of our Core library, we can use this function to find a group of elements
by class from anywhere in our JavaScript code:
var elementArray = Core.getElementsByClass("dataTable");
The methods for finding DOM elements that I’ve described so far have been fairly targeted—we’re jumping straight to a particular node in the tree without worrying about the connections in between.
This works fine when there’s some distinguishing feature about the
element in question that allows us to identify it: an ID, a tag name, or
a class. But what if you want to get an element on the basis of its
relationship with the nodes that surround it? For instance, if we have a
list item node and want to retrieve its parent ul, how do we do that? For that matter, how do
we get the next item in the list?
For each node in the tree, the DOM specifies a number of
properties, and it’s these properties that allow us to move around the
tree one step at a time. Where document.getElementById and
its ilk are like direct map references (“go to S37° 47.75’, E144°
59.01’”), these DOM properties are like giving directions: “turn left
onto the Bayshore Freeway and a right onto Amphitheater Parkway.” Some
people call this process walking the DOM.
Every element node—except for the document node—has a parent.
Consequently, each element node has a property called parentNode. When we use this
property, we receive a reference to the target element’s
parent.
Consider this HTML:
<p>
  <a id="oliver" href="/oliver/">Oliver Twist</a>
</p>
Once we have a reference to the anchor element, we can get a
reference to its parent paragraph using
parentNode like so:
var oliver = document.getElementById("oliver");
var paragraph = oliver.parentNode;
The parent-child relationship isn’t just one way. You can find
all of the children of an element using the childNodes property.
An element can only have one parent, but it can have many
children, so childNodes is actually a node list
that contains all of the element’s children, in source order.
Take, for instance, a list like this:
<ul id="baldwins">
  <li>
    Alec
  </li>
  <li>
    Daniel
  </li>
  <li>
    William
  </li>
  <li>
    Stephen
  </li>
</ul>
The unordered list node will have four child nodes,[12] each of which matches a list item. To get the third list
item (the one containing “William”) in the list above, we’d get the
third element in the childNodes list:
var baldwins = document.getElementById("baldwins");
var william = baldwins.childNodes[2];
Two shortcut properties are available to help us get the first
child or last child of an element: the firstChild and lastChild properties,
respectively.
To get the “Alec” list item, we could just use:
var alec = baldwins.firstChild;
And to get the “Stephen” list item, we can use:
var stephen = baldwins.lastChild;
I don’t think firstChild is all that much
easier than typing childNodes[0], but
lastChild is definitely shorter than
childNodes[childNodes.length – 1], so it’s a shortcut
that I use regularly.
As well as moving up and down the DOM tree, we can move from
side to side by getting the next or previous node on the same level.
The properties we use to do so are nextSibling
and previousSibling.
If we continued on from the example we saw a moment ago, we
could get to the “Stephen” list item from “William” using
nextSibling:
var stephen = william.nextSibling;
We could get to the “Daniel” list item using
previousSibling:
var daniel = william.previousSibling;
If we’re at the last node on a level, and try to get the
nextSibling, the property will be
null. Similarly, if we’re at the first node on a
level and try to get previousSibling, that
property will also be null. You should check to
make sure you have a valid node reference whenever you use either of
these properties.
Figure 3.6 provides a clear visualization of where each of these DOM-walking properties will get you to from a given node in the DOM tree.

As I mentioned when we discussed the structure of the DOM, attributes are localized to the elements they’re associated with—they don’t have much relevance in the larger scheme of things. Therefore, we don’t have DOM functions that will let you find a particular attribute node, or all attributes with a certain value.
Attributes are more focused on reading and modifying the data related to an element. As such, the DOM only offers two methods related to attributes, and both of them can only be used once you have an element reference.
With a reference to an element already in hand, you can get the
value of one of its attributes by calling the method getAttribute with the attribute
name as an argument.
Let’s get the href
attribute value for this link:
<a id="koko" href="http://www.koko.org/">Let's all hug Koko</a>
We need to create a reference to the anchor element, then use
getAttribute to retrieve the value:
var koko = document.getElementById("koko");
var kokoHref = koko.getAttribute("href");
The value of kokoHref will now be
"http://www.koko.org/".
This approach works for any of the attributes that have been set for an element:
var koko = document.getElementById("koko");
var kokoId = koko.getAttribute("id");
The value of kokoId will now be
"koko".
At least, that’s how it’s supposed to work,
according to the W3C. But in reality,
getAttribute is beset by problems in quite a few of the major
browsers.[13] Firefox returns null for unset values when
it’s supposed to return a string, as does Opera 9. Internet Explorer
returns a string for most unset attributes, but returns
null for non-string attributes like onclick. When it does return a value, Internet
Explorer subtly alters a number of the attribute values it
returns, making them different from those returned by other browsers.
For example, it converts href
attribute values to absolute URLs.
With all of these problems currently in play, at the moment it’s safer to use the old-style method of getting attributes, which we can do by accessing each attribute as a dot property of an element.
In using this approach to get the href on our anchor, we’d rewrite the code
as follows:
var koko = document.getElementById("koko");
var kokoHref = koko.href;
In most cases, fetching an attribute value is just a matter of
appending the attribute name to the end of the element, but in a
couple of cases the attribute name is a reserved word in JavaScript.
This is why we use
element.className for the
class attribute, and why, if you
ever need to get the for
attribute, you’ll need to use
element.htmlFor.
As well as being readable, all HTML attributes are writable via the DOM.
To write an attribute value, we use the
setAttribute method on an element, specifying both the attribute name we
want to set and the value we want to set it to:
var koko = document.getElementById("koko");
koko.setAttribute("href", "/koko/");
When we run those lines of code, the href for Koko’s link will change from
http://www.koko.org/ to /koko/.
Thankfully, there are no issues with
setAttribute across browsers, so we can
safely use it anywhere.
setAttribute can be used not only to
change preexisting attributes, but also to add new attributes. So if
we wanted to add a title that described the link in more detail, we
could use setAttribute to specify the value
of the new title attribute, which
would be added to the anchor element:
var koko = document.getElementById("koko");
koko.setAttribute("title", "Web site of the Gorilla Foundation");
If you were to take the browser’s internal representation of the document following this DOM change and convert it to HTML, here’s what you’d get:
<a id="koko" href="http://www.koko.org/"
    title="Web site of the Gorilla Foundation">Let's all hug
  Koko</a>
Almost every aspect of your web page is accessible via the DOM, including the way it looks.
Each element node has a property called style.
style is a deceptively expansive object that lets you change every
aspect of an element’s appearance, from the color of its text, to its line
height, to the type of border that’s drawn around it. For every CSS
property that’s applicable to an element, style has
an equivalent property that allows us to change that property’s
value.
To change the text color of an element, we’d use
style.color:
var scarlet = document.getElementById("scarlet");
scarlet.style.color = "#FF0000";
To change its background color, we’d use style.backgroundColor:
var indigo = document.getElementById("indigo");
indigo.style.backgroundColor = "#000066";
We don’t have enough space here to list every property you could
change, but there’s a good rule of thumb: if you wish to access a
particular CSS property, simply append it as a property of the
style object. Any properties that include
hyphens (like text-indent) should be converted
to camel case (textIndent). If you leave the hyphen
in there, JavaScript will try to subtract one word from the other, which
makes about as much sense as that sentence!
Any changes to the style object will take
immediate effect on the display of the page. Using
style, it’s possible to change a page like Figure 3.7 into a page like Figure 3.8 using just three lines of
code.

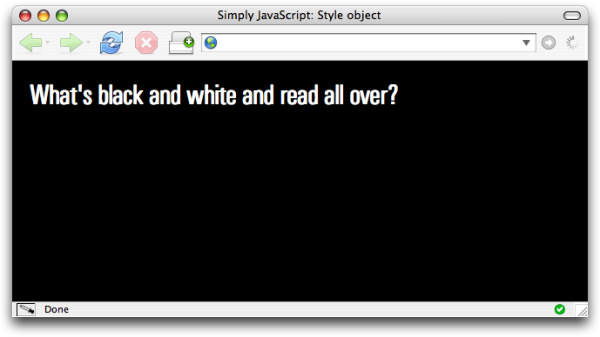
Here’s the code that makes all the difference:
var body = document.getElementsByTagName("body")[0];
body.style.backgroundColor = "#000000";
body.style.color = "#FFFFFF";
The color CSS property is inherited by child elements, so changing
style.color on the body element will
also affect every element inside the body to which a specific color is not assigned.
The style object directly accesses the HTML
style attribute, so the JavaScript code we just saw is literally equivalent
to this HTML:
<body style="background-color: #000000; color: #FFFFFF;">
As it is the inline style of an element, if you
make a change to an element’s style property, and
that change conflicts with any of the rules in your CSS files, the
style property will take precedence (except, of
course, for properties marked !important).
In the world of CSS, it’s considered bad practice to use inline
styles to style an element’s appearance. Equally, in JavaScript it’s
considered bad practice to use the style property
as a means of styling an element’s appearance.
As we discussed in Chapter 1, you want to keep the layers separated, so HTML shouldn’t include style information, and JavaScript shouldn’t include style information.
The best way to change an element’s appearance with JavaScript is to change its class. This approach has several advantages:
-
We don’t mix behavior with style.
-
We don’t have to hunt through a JavaScript file to change styles.
-
Style changes can be made by those who make the styles, not the JavaScript programmers.
-
It’s more succinct to write styles in CSS.
Most of the time, changes to an element’s appearance can be
defined as distinct changes to its state, as described in its class. It’s these state changes that you
should be controlling through JavaScript, not specific properties of its
appearance.
The only situation in which it’s okay to use the
style property arises when you need to calculate a
CSS value on the fly. This often occurs when you’re moving objects
around the screen (for instance, to follow the cursor), or when you
animate a particular property, such as in the “yellow fade” technique
(which changes an element’s background-color by
increments).
When we’re checking to see whether
className contains a particular class, we need to use a special
search, like the one we used to write
Core.getElementsByClass earlier in this chapter. In fact, we can use that same
regular expression to create a function that will tell us whether or
not an element has a particular class attached to it:
Core.hasClass = function(target, theClass)
{
  var pattern = new RegExp("(^| )" + theClass + "( |$)");

  if (pattern.test(target.className))
  {
    return true;
  }

  return false;
};
Core.hasClass takes two arguments: an element and a class. The class
is used inside the regular expression and compared with the
className of the element. If the
pattern.test method returns true, it means that the
element does have the specified class, and we can
return true from the function. If
pattern.test returns false,
Core.hasClass returns false by
default.
Now, we can very easily use this function inside a conditional statement to execute some code when an element has (or doesn’t have) a matching class:
var scarlet = document.getElementById("scarlet");

if (Core.hasClass(scarlet, "clicked"))
{
  …
}
When we’re adding a class, we have to take
the same amount of care as we did when comparing it. The main thing we
have to be careful about here is to not overwrite an element’s
existing classes. Also, to make it easy to remove a class, we
shouldn’t add a class to an element that already has that class. To
make sure we don’t, we’ll use Core.hasClass inside Core.addClass:
Core.addClass = function(target, theClass)
{
  if (!Core.hasClass(target, theClass))
  {
    if (target.className == "")
    {
      target.className = theClass;
    }
    else
    {
      target.className += " " + theClass;
    }
  }
};
The first conditional statement inside
Core.addClass uses Core.hasClass to check
whether or not the target element already has the
class we’re trying to add. If it does, there’s no need to add the
class again.
If the target doesn’t
have the class, we have to check whether that element has
any classes at all. If it has none (that is, the
className is an empty string), it’s safe to
assign theClass directly to
target.className. But if the element has some preexisting
classes, we have to follow the syntax for multiple classes, whereby
each class is separated by a space. Thus, we add a space to the end of
className, followed by
theClass. Then we’re done.
Now that Core.addClass performs all these checks
for us, it’s easy to use it whenever we want to add a new class to an
element:
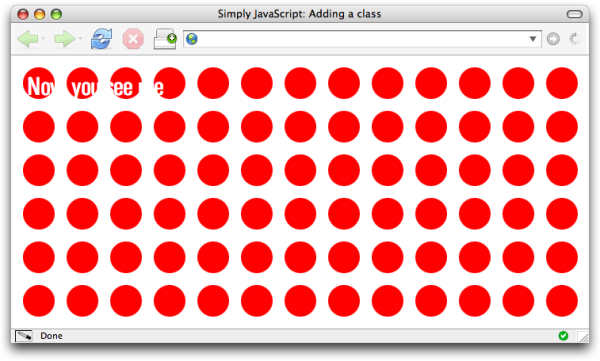
var body = document.getElementsByTagName("body")[0];
Core.addClass(body, "unreadable");
Then, we specify some CSS rules for that class in our CSS file:
.unreadable
{
  background-image: url(polka_dots.gif);
  background-position: 15px 15px;
  color: #FFFFFF;
}
The visuals for our page will swap from those shown in Figure 3.9 to those depicted in Figure 3.10.
When we want to remove a class from an element, we use that same regular expression (it’s a pretty handy one, huh?), but with a slightly different twist:
Core.removeClass = function(target, theClass)
{
  var pattern = new RegExp("(^| )" + theClass + "( |$)");

  target.className = target.className.replace(pattern, "$1");
  target.className = target.className.replace(/ $/, "");
};
In Core.removeClass, instead of using the regular expression to check whether
or not the target element has the class, we assume that it does have
the class, and instead use the regular expression to replace the class
with an empty string, effectively removing it from
className.
To do this, we use a built-in string method called
replace. This method takes a regular
expression and a replacement string, then replaces the occurrences
that match the regular expression with the replacement string. In this
case, we’re using an empty string as the replacement, so any matches
will be erased. If the class exists inside
className, it will disappear.

The second call to replace just tidies
up className, removing any extraneous spaces that might be hanging
around after the class was removed (some browsers will choke if any
spaces are present at the start of className).
Since we assign both these operations back to
className, the target
element’s class will be updated with the changes straight away, and we
can return from the function without fuss.
Earlier in this chapter, we made our first real
function,
Core.getElementsByClass, but now I think you’re ready to make your first real
program, and a useful one it is too!
In my days as an HTML jockey, there was one task I dreaded more than
any other, and that was making stripy tables. On static pages, you had to
hand code tables so that every odd row had a special class like alt, but I just knew that as soon as I finished
classing 45 different rows my manager was going to come along and tell me
he wanted to add one more row right at the top. Every odd row would become
even and every even row would become odd. Then I’d have to remove 45
classes and add them to 45 other rows. Argh!
Of course, that was before I knew about JavaScript. With JavaScript
and the magic of the for loop, you can include one JavaScript
file in your page, sit back, and change tables to your heart’s delight.
Obviously we’re going to be using JavaScript to add a class to every
second row in this example. But it might help to break down the desired
outcome into a series of simple steps again.
In order to achieve stripy tables, we’ll want to:
By now, glancing at that list should cause a few key ideas to spring
to mind. On the programming structure side of the equation, you should be
thinking about loops, and plenty of them. But on the DOM side you should
be thinking about getElementsByTagName, className, and maybe even our own
custom function, Core.getElementsByClass. If you found
yourself muttering any of those names under your breath while you read
through the steps in that list, give yourself a pat on the back.
This first step’s pretty simple, since we did most of the related
work mid-chapter. We don’t want to apply striping to every table in the
document (just in case someone’s been naughty and used one for layout),
so we’ll apply it only to the tables marked with a class of dataTable. To do this, all we have to do is
dust off Core.getElementsByClass—it will be able to go and
find all the dataTable
elements:
Done. You can’t beat your own custom library!
Note: Remember to Load your Library
Remember to add a <script> tag
to your HTML document to load the Core library of functions
(core.js) before the <script> tag that runs your program, as shown
in the code below. Otherwise, your program won’t be able to find
Core.getElementsByClass, and your browser will report a
JavaScript error.
There’s that phrase “for each” again. Inside the variable
tables we have the collection of tables waiting to be striped—we
just need to iterate through each of them using a for
loop.
Every time we move through the for loop, we’ll want
to get the rows for that particular table. This sounds okay, but it’s
not that simple. Let’s look at the markup for a nicely semantic and
accessible table:
<table class="dataTable">
  <thead>
    <tr>
      <th scope="col">
        Web Luminary
      </th>
      <th scope="col">
        Height
      </th>
      <th scope="col">
        Hobbies
      </th>
      <th scope="col">
        Digs microformats?
      </th>
    </tr>
  </thead>
  <tbody>
    <tr>
      <td>
        John Allsopp
      </td>
      <td class="number">
        6’1”
      </td>
      <td>
        Surf lifesaving, skateboarding, b-boying
      </td>
      <td class="yesno">
        <img src="tick.gif" alt="Yes" />
      </td>
    </tr>
    …
  </tbody>
</table>
There’s one row in there that we don’t want to be susceptible to
striping—the row inside the thead.
To avoid affecting this row through our row striping shenanigans,
we need to get only the rows that are inside a tbody. This means we must add a step to our code—we need to get
all of the tbody elements in the
table (HTML allows more than one to exist), then get all the rows inside
each tbody. This process will
actually require two for loops—one to
step through each of the table
elements in the document, and another inside that
to step through each of the tbody
elements—but that’s fine; it just means more work for the computer.
Since the variable name i is used for the counter in
the outer for loop, we’ll name the counter variable in our
inner for loop j:
for (var i = 0; i < tables.length; i++)
{
  var tbodys = tables[i].getElementsByTagName("tbody");

  for (var j = 0; j < tbodys.length; j++)
  {
    var rows = tbodys[j].getElementsByTagName("tr");
    …
  }
}
The results for both uses of
getElementsByTagName in the code above will be limited to the current table,
because we’re using it as a method of a particular element, not the
entire document. The variable rows now contains a
collection of all the tr
elements that exist inside a tbody element of the current table.
“For every” is equivalent to “for each” here, so we know that
we’re going to use yet another for loop. It will be a
slightly different for loop though, because we only want to
modify every second row.
To do this, we’ll start the counter on the second index of the collection and increment it by two, not one:
for (var i = 0; i < tables.length; i++)
{
  var tbodys = tables[i].getElementsByTagName("tbody");

  for (var j = 0; j < tbodys.length; j++)
  {
    var rows = tbodys[j].getElementsByTagName("tr");

    for (var k = 1; k < rows.length; k += 2)
    {
      Core.addClass(rows[k], "alt");
    }
  }
}
We’re already using the variables i and
j as the counters for the outer for
loops, and we don’t want to overwrite their values, so we create a new
counter variable called k. k
starts at 1 (the second index), and for every execution of this inner
loop we increase its value by 2.
The conditional code for this inner loop is just one line that
uses our pre-rolled Core.addClass function to add the class alt to the current row. Once the inner for loop
finishes, every second row will be marked with this class, and once the
outer for loops finish, every data table will be
stripy.
The main code for our function is now complete; we just have to wrap it inside a self-contained object:
var StripyTables =
{
  init: function()
  {
    var tables = Core.getElementsByClass("dataTable");

    for (var i = 0; i < tables.length; i++)
    {
      var tbodys = tables[i].getElementsByTagName("tbody");

      for (var j = 0; j < tbodys.length; j++)
      {
        var rows = tbodys[j].getElementsByTagName("tr");

        for (var k = 1; k < rows.length; k += 2)
        {
          Core.addClass(rows[k], "alt");
        }
      }
    }
  }
};
Kick-start it when the page loads, using
Core.start:
Now, whenever you include this script file (and the Core library)
on your page, StripyTables will go into action to automatically stripe all your
tables:

<!DOCTYPE html PUBLIC "-//W3C//DTD XHTML 1.0 Strict//EN"
    "http://www.w3.org/TR/xhtml1/DTD/xhtml1-strict.dtd">
<html xmlns="http://www.w3.org/1999/xhtml" lang="en-US">
  <head>
    <title>Stripy Tables</title>
    <meta http-equiv="Content-Type"
        content="text/html; charset=utf-8" />
    <link rel="stylesheet" type="text/css"
        href="stripy_tables.css" />
    <script type="text/javascript" src="core.js"></script>
    <script type="text/javascript"
        src="stripy_tables.js"></script>
You can style the alt
class however you want with a simple CSS rule:
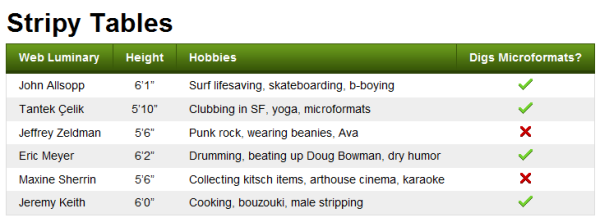
You can turn a plain, hard-to-follow table like the one in Figure 3.11 into something that’s much more usable—like that pictured in Figure 3.12—with very little effort.
This type of script is a great example of progressive enhancement. Users who browse with JavaScript disabled will still be able to access the table perfectly well; however, the script provides a nice improvement for those who can run it.
Most of the available JavaScript libraries have little helper functions that can help you expand the functionality of the DOM. These range from neat little shortcuts to entirely different ways of finding and manipulating elements.
Prototype was one of the first libraries to swap the
painful-to-type document.getElementById for the
ultra-compact $.
The $ function in Prototype not only acts as
a direct substitute for document.getElementById, it also expands upon it. You can get a reference to a
single element by ID, so this normal code:
var money = document.getElementById("money");
would become:
var money = $("money");
But you don’t have to stop at getting just one element; you can
specify a whole list of element IDs that you want, and
$ will return them all as part of an array. So this normal
code:
var elementArray = [];
elementArray[0] = document.getElementById("kroner");
elementArray[1] = document.getElementById("dollar");
elementArray[2] = document.getElementById("yen");
becomes considerably shorter:
var elementArray = $("kroner", "dollar", "yen");
Earlier in this chapter we created our own library function to get
elements by class. Prototype has a similar function, which is slightly
more powerful. It creates an extension to the document node, called
getElementsByClassName. Like our function
Core.getElementsByClass, this method allows us to retrieve an array of elements
that have a particular class:
var tables = document.getElementsByClassName("dataTable");
It also takes an optional second argument, which allows us to specify a parent element under which to search. Only elements that are descendants of the specified element, and have a particular class, will be included in the array:
var tables =
    document.getElementsByClassName("dataTable", $("content"));
The variable tables will now be an array containing elements that are
descendants of the element with ID content, and that have a class of dataTable.
Prototype also replicates all of the class functions that we
created for our own library. These functions take exactly the same
arguments that ours did, but the functions themselves are methods of
Prototype’s Element object. So Prototype offers Element.hasClassName, Element.addClassName, and Element.removeClassName:
var body = document.getElementsByTagName("body")[0];
Element.addClassName(body, "unreadable");

if (Element.hasClassName(body, "unreadable"))
{
  Element.removeClassName(body, "unreadable");
}
jQuery was one of the first libraries to support an entirely different way of finding elements with JavaScript: it allows us to find groups of elements using CSS selectors.
The main function in jQuery is also called $,
but because it uses CSS selectors, this function is much more powerful than Prototype’s
version, and manages to roll a number of Prototype’s functions into
one.[14]
If you wanted to use jQuery to get an element by ID, you’d type the following:
var money = $("#money");
# indicates an ID selector in CSS, so
$("#money") is the equivalent of typing
document.getElementById("money").
To get a group of elements by tag name, you’d pass $
a CSS element type selector:
var paragraphs = $("p");
And to get a group of elements by class, you’d use a class selector:
var tables = $(".dataTable");
And, as with CSS, you can combine all these simple selector types in, say, a descendant selector:
var tables = $("#content table.dataTable");
tables is now an array of table elements that are descendants of
the element with ID content, and
that have a class of dataTable.
The CSS rule parsing in jQuery is really quite spectacular, and it supports the majority of selectors from CSS1, CSS2, and CSS3, as well as XPath.[15] This makes it possible for us to use selectors like this:
var complex = $("form > fieldset:only-child input[@type=radio]");
Once you break it down, that query finds all radio button input elements inside fieldsets that are direct children of form
elements, but only where the fieldset is the only child of the form. Phew!
Dojo follows the previous two libraries closely in how they deal with the DOM.
It has its own shortcut to
document.getElementById, but it doesn’t expand upon the DOM’s native
functionality:
var money = dojo.byId("money");
It also has its own getElementsByClass
function inside the html module:
var tables = dojo.html.getElementsByClass("dataTable");
This function allows you to get elements by class under a particular parent:
var tables = dojo.html.getElementsByClass("dataTable",
    dojo.byId("content"));
For completeness, it has the usual class handling functions, which
take the same form as our own Core
functions:
var body = document.getElementsByTagName("body")[0];
dojo.html.addClass(body, "unreadable");

if (dojo.html.hasClass(body, "unreadable"))
{
  dojo.html.removeClass(body, "unreadable");
}
An understanding of the DOM is central to using JavaScript, which is why the use of JavaScript on the Web is sometimes referred to as “DOM scripting.”
As you delve further into this book, and we begin to look at more complex interfaces, our manipulation of the DOM will also become more complex, so your familiarity with the basics presented in this chapter is vital.
In the next chapter, we take a look at events, which allow your JavaScript programs to respond to users’ interactions with your web pages. Dynamic interfaces, here we come!
[12] As noted at the start of this chapter, the number of nodes may vary depending on whether the browser in question counts the whitespace between each of the list items.
[13] getAttribute is a bit of a mess
across all browsers, but most noticeably in Internet Explorer. For
a complete rundown of what’s going on, visit http://tobielangel.com/2007/1/11/attribute-nightmare-in-ie.
[14] In fact, based on the popularity of this feature in jQuery,
Prototype went on to include similar functionality in a function
named $$.
[15] XPath is a zany language for selecting nodes from XML documents (including XHTML documents). While XPath is extremely powerful, the process of learning it is likely to give you a facial tick.