
Chapter 5. The Computer Investigation Process
Introduction
The word forensics is derived from a Latin term meaning a forum in which legal disputes are settled, but no one in ancient Rome could have ever imagined how the term applies to today's legal system. As with other areas of forensics, computer forensics refers to an investigation process of gathering and examining evidence to establish facts so that accurate testimony and evidence can later be presented in court or other hearings. The key to this definition is that any work an investigator performs may be scrutinized and used as evidence in court.
Where computer forensics differs from other forensic sciences is that electronic evidence is collected and examined. Although fingerprints or other evidence may also be obtained from the devices collected at a crime scene, a computer forensic technician will use specialized methods, techniques, and tools to acquire data stored on hard disks, Universal Serial Bus (USB) flash drives, or other devices. Once the data is acquired from a device, he or she will then examine it to identify which files, folders, or information may be useful as evidence, and can provide facts about the case.
Although computer forensics is commonly used in criminal cases, it may also be used in civil disputes or corporate investigations, such as when internal policies have been violated. When an employee is suspected of using a computer to perform some action that violates policies, the files, e-mail, and other data on the computer may be inspected. Because it is possible that the violations could lead to criminal charges or civil actions against the employee, it is important that forensic procedures are followed.
Collecting such evidence requires following established procedures, and it can take a considerable amount of time to ensure that it is collected correctly. Because it may establish the identity of a culprit and may be used to establish the guilt or innocence of people, it is vital that the data isn't modified as it's acquired, or afterward when the data is examined. In addition to this, any actions and results are documented in case this information is required in court. By following such methodologies, you can investigate a computer crime effectively, and can collect and process evidence with a higher degree of success.
Demystifying Computer/Cybercrime
We often fear most what we don't understand. That could be said about computers and the investigation of computer crimes. In terms of policing, many investigators cringe at the mention of a computer and seek to offload any computer-related crime to the “computer crime guy” in their office. When you consider the number of technologies we discussed in the previous chapter, it is understandable why this occurs. Unlike new officers who grew up with computers, aspects of these technologies can seem overwhelming to veterans of the force. However, just as older officers had to make the transition from using a typewriter to using computers to fill out their reports, the same transition must be made in realizing that computers are yet another source of evidence—nothing more, nothing less.
Although computers have been readily available to the general public for a few decades, they've finally reached levels where it is feasible to expect that everyone has access to a computer. The computer is no longer a “nice to have,” it is a “must have.” Those who don't own their own computers can walk into a public library or cyber café to gain access to one. Similarly, access to the Internet is becoming ubiquitous through connections provided by libraries, coffee shops, computer stores, and even fast food restaurants. This explosion of computer technology and acceptance has opened a new world of opportunity to the criminal element that constantly looks for new ways to exploit people through time-proven scams and tactics. As computers become more deeply integrated within society, it is likely that a computer or similar device will play a greater role in criminal activity.
As we discussed in Chapter 1, computers start to play a role in crime in situations where the capabilities of the computer allow a person to commit that crime or store information related to the crime. An e-mail phishing scam is a common example where the bad guy generates a fictitious e-mail for the sole purpose of enticing people to a spoofed site where they are conned into entering sensitive personal information. That sensitive information is then available to the bad guy to perpetrate an identity theft. In another example, a suspect might use the computer to scan and generate fake bank checks, or create fake identification. In both of these cases, the crime required the inherent capabilities of the computer for its commission.
In many cases, the crimes that are being committed haven't changed; only the manner in which they're being committed has changed. Think about it. Before the Internet, the telephone, the telegraph, and the Pony Express, if a person wanted to threaten to kill someone, it was likely that he or she would have to physically place him- or herself in proximity to the person and speak that threat. As services and technologies developed, new ways emerged through which a person could commit that same threatening act. The person could send a letter, send a telegram, or even better, make a phone call. Now we can send an e-mail or instant message (IM). Same crime; same underlying elements and facts to be proven. They change only in the manner of delivery. The key to a successful investigation of a computer crime is the development and follow-up of case leads. Although many leads will dead-end, the lead that continues to develop into further leads can end up solving your case. Many investigators believe that investigations involving computers are above their capabilities, but that is often not the case. By learning and adapting some basic computer knowledge and skills, today's investigator can react to new technologies and still develop workable old-school leads.
Because computers are so pervasive, it is an absolute necessity that investigators learn how to investigate crimes that involve a computer. The basic design of computers—including vast amounts of storage and meticulous file timestamping—can make them a wealth of evidence as traces of the crime can often be retrieved by an experienced investigator. This does not mean that every investigator needs to become an expert in computer technology, but there are basic concepts and methods that must be learned to develop old-school leads. The key is to gain at least some basic computer knowledge and skills to put you ahead of the average computer user; skills that allow you to apply traditional policing skills and procedures to the case.
As we'll see in the sections that follow, computer investigations can involve a wide variety of people. This includes not only law enforcement, but also the complainant who may have in-depth knowledge of the systems involved, the managers of a company who are familiar with policies and procedures, and others (such as information technology [IT] staff members) who can assist in effectively investigating the crime. In many cases, investigations may not even involve police, but rather may be conducted by those who perform investigations on behalf of the company for which they work. From this, you can see that investigators require good old-fashioned people skills and policing skills. Not only must they know how to secure a computer crime scene, but they also must also know how to deal with all those who may be involved. Essentially, this is no different from any other investigation. The investigative qualities needed to battle crime haven't changed; just the battlefield has changed.
Investigating Computer Crime
Computer forensics may be used in any crime that involves a computer. Because computers are so commonly used in homes and businesses, they are increasingly a source of evidence. Files stored on computers are often used in place of other record systems, and may contain a significant amount of information that can be used to convict a suspect or prove his or her innocence. For example, in a homicide investigation, a suspect may have written about his or her plans in a diary on the computer, or in a blog on the Internet. Conversely, if a person was accused of sending e-mail threats, a simple check of the messages on his or her machine could establish whether the accusations were false. Almost any type of crime may result in some type of evidence being stored on a computer, but a number of cybercrimes commonly require a computer forensic examination. These include:
▪ Threatening e-mail
▪ Harassment
▪ Fraud
▪ Hacking and/or dissemination of viruses
▪ Theft of intellectual property
▪ Child pornography
When crimes are committed using computers, often the only evidence available to prosecute the person who committed the offence is in a digital format. Illegal images will be stored only on a hard disk or other medium, proof of an intruder's activities may be stored in logs, and documents containing evidence of the crime are available only by investigating computers used in the crime, or ones that were subjected to the crime. By examining the digital contents of these computers, an investigator can reach a successful conclusion; prosecuting the culprit, and using information acquired from the investigation to make existing systems more secure.
When Bad Situations Are Used to Improve Current Systems
When a computer system is hacked or used in the commission of a crime, the victim is often unaware of vulnerabilities in the system that left him or her open to attack. A person who had malicious software installed might not know of antivirus (AV) or antispyware software, or the need to update signature files regularly. Similarly, a company might not know that its current firewall failed to prevent certain kinds of intrusions, or was configured incorrectly. To prevent future intrusions or attacks, victims of computer crime can learn from the experience, and improve current systems.
An example of this is a crime that occurred against a major university in October 2006. Brock University experienced the embarrassing situation of its systems being hacked, and the personal information of upward of 70,000 alumni and other donators being stolen. The information of possibly every person who had ever donated to the university was accessed, including credit card and banking information. The university contacted police to investigate the incident, and contacted those people whose information may have been stolen. Within 24 hours, people were contacted via telephone and thousands of letters were sent to inform donators of this breach in security. The university followed by having the security of its systems reviewed and improvements made. Damage control also involved responding to the media, and informing the public that steps were being taken to repair vulnerabilities and improve security. Although the university was caught in a bad situation, its actions represent a textbook case of how to properly respond to an incident, and use the situation to review and revise current systems.
How an Investigation Starts
Investigations always start with a crime being committed, and someone noticing it. As insipid as this sounds, if these two factors aren't in place, an investigation will never occur. To illustrate this, let us look at a situation where a man has downloaded pornography to his computer. If the people posing in these images are of legal age, it is not illegal for this man to save the images to his hard disk and view them later, but if the images depict minors engaged in sex, the pictures are illegal and a crime has been committed. However, even though a crime has been committed, this doesn't mean this man will ever be investigated. For an investigation to occur, someone must notice that the crime has happened, and report it to the appropriate authorities. If no complaint is made, the person gets away with the crime.
The complainant plays a key role in any investigation. In addition to making authorities aware of the criminal activity, the complainant provides essential information about what he or she has discovered. The complainant may have seen a threatening e-mail or other illegal materials displayed on a coworker's computer, and can identify which computer contained the evidence. If the complainant was repairing a computer and found illegal files in a particular directory, he or she can hasten an investigation by indicating where the files are stored. The statements made by a complainant can also be used to acquire search warrants (as we'll discuss later in this chapter), and as the basis for further testimony in court. As the catalyst of an investigation, the role of a complainant is vital.
Who the complainant contacts often depends on the environment in which the crime has taken place, and the computer(s) involved. In a computer crime, the computer may play one of two roles:
▪ It may be the target of a crime.
▪ It may be used to commit crime.
If the complainant notices that his or her home computer has been involved in a criminal offense, chances are that the complainant is the victim and the computer was a target of a crime. After all, few people confess to their involvement, or would subject themselves to being suspected. In situations involving home computers, the police are generally called first. This is also the case when someone notices illegal content on another person's home computer, or in small-business environments that have a limited staff. In larger companies, a complainant may first contact his or her supervisor or the IT department. This is especially the case if the crime involves a person's ability to work, such as when a server is compromised or a workstation has been infected by a virus or hacked. If the organization's IT staff has someone who has been trained to properly respond to incidents, this person may take some actions him- or herself before eventually contacting police.
What Is Your Role?
In a corporate environment, a network administrator or members of an incident response team will generally be the first people to respond to the incident. An incident response team consists of members of the IT staff, and has the training and expertise to respond to various types of incidents. Members of this team may work with police investigators to provide access to systems and expertise, if needed. Senior staff members should be notified to deal with the effects of the incident, and any inability to conduct normal business. In some cases, the company's public information officer may be involved, if the incident becomes known to the media and is deemed newsworthy.
If police aren't called in and the matter is to be handled internally, the incident response team will deal with a much broader range of roles. Team members will not only deal with the initial response to the incident, but also will conduct the investigation and provide evidence to an internal authority. This authority may be senior staff members, or in the case of a law enforcement agency, an internal affairs department. Even though no police may be involved in the situation, the procedures used in the forensic examination should be the same.
When conducting the investigation, a person must be designated as being in charge of the scene. This person should be knowledgeable in forensics, and be directly involved in the investigation. In other words, just because the owner of the company is available, that person should not be in charge if he or she is computer-illiterate and/or is unfamiliar with procedures. The person in charge should have the authority to make final decisions on how the scene is secured, and how evidence is searched, handled, and processed.
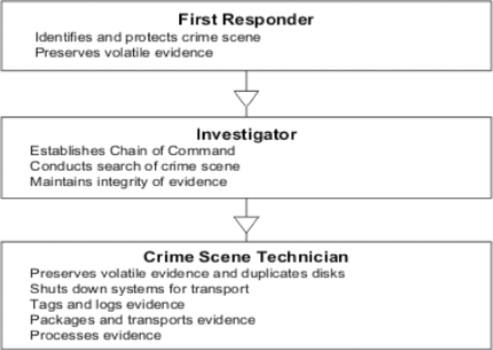
People may perform the following three major roles when conducting an investigation:
▪ First responder
▪ Investigator
▪ Crime scene technician
As we'll see in the paragraphs that follow, and as shown in Figure 5.1, each role has specific duties associated with it, which are vital to a successful investigation. In certain situations, such as those involving an internal investigation within a company, a person may perform more than one of these roles.
 |
| Figure 5.1 Primary Roles in an Investigation Involving Computer Forensics |
The Role of First Responder
First responders should follow the same edict to which aspiring physicians swear when they take the Hippocratic oath: First, do no harm. Unless specifically trained in computer forensics, people who are first on the scene should not attempt to do anything with or to the computers other than protect them from tampering or damage. It is very easy for technically astute criminals to plant Trojan horses or otherwise “rig” their computers to automatically destroy evidence when shut down or restarted by anyone other than themselves. The first responder should not attempt to shut down or unplug the computer or access it to look for evidence. The first responder should be concerned with the following tasks:
▪ Identifying the crime scene Officers or incident response team members who arrive first at a scene should identify the scope of the crime scene and establish a perimeter. This might include only one area of a room or it might include several rooms or even multiple buildings if the suspect is working with a complex setup of networked computers. First responders can begin to compile a list of systems that might have been involved in the criminal incident and from which evidence will be collected.
▪ Protecting the crime scene In a cybercrime case where digital evidence is sought, all computer systems—including those that appear to be powered off or nonfunctional—should be considered part of the crime scene, as should laptop, notebook, and other portable computers (including handheld computers and personal digital assistants [PDAs]). The items subject to seizure may be limited by the wording of the applicable search warrant, but first responders should cordon off and protect as much of the computer and electronic equipment as possible and wait for the investigator in charge of the case to determine what equipment, if any, will be excluded.
▪ Preserving temporary and fragile evidence In the case of evidence that could disappear before investigators arrive (such as information that is on the monitor and changing), first responders should take any possible steps to preserve or record it. If a camera is available, photos of the screen will preserve a record of what was there. If no camera is available, officers should take detailed notes and be prepared to testify in court as to what they saw.
Note
Protecting the crime scene could also involve disconnecting the computers from the network so as to remove a way for the suspect or an accomplice to deliberately alter the evidence or for someone else to unintentionally do so.
The Role of Investigators
The IT incident response team might have already begun to collect evidence in some cases. If so, the best practice is to have one person from the IT team coordinate the hand-over (and explanation, if necessary) of that evidence with one person from the police investigative team. The investigator (or the investigative team) is generally responsible for coordinating the activities of all others at the scene and will be responsible for the following:
▪ Establishing the chain of command The investigator in charge of the scene should ensure that everyone else is aware of the chain of command and that important decisions are filtered through him or her. Computers and related equipment should not be accessed, moved, or removed without explicit instructions from the senior investigator. The investigators shape and control the investigation. If the investigator in charge has to leave the scene, he or she should designate a person remaining on the scene to be in charge of the scene and stay in close contact with that person until all evidence has been collected and moved to secure storage.
▪ Conducting the crime scene search An investigator should direct the search of the crime scene, which may be carried out by investigators or by other officers. If the search warrant allows, officers should look for all computer hardware, software, manuals, written notes, and logs related to the operation of the computers. This includes printers, scanners, and all storage media: diskettes, optical discs (CDs, DVDs, and so on), tapes, any other removable disks, and any “extra” hard disks that might be lying around.
▪ Maintaining integrity of the evidence Investigators should continue to protect the evidence as preparations are made to preserve volatile evidence, duplicate the disks, and properly shut down the system. The investigator should oversee the actions of the crime scene technicians and convey any special considerations that should be taken based on the nature of the case and knowledge of the suspect(s).
The Role of Crime Scene Technicians
Crime scene technicians responding to a cybercrime case should, if at all possible, be specifically trained in computer forensics. Computer forensic specialists must have a strong background in computer technology with an understanding of how disks are structured, how file systems work, and how and where data is recorded. Generally, crime scene technicians will be responsible for the following tasks (although these may overlap with those of the investigators):
▪ Preserving volatile evidence and duplicating disks Volatile data is that which is in the computer's memory and consists of processes that are running. (See the “Preserving Volatile Data” section in Chapter 15 for instructions on how to deal with it.) Disks should be duplicated prior to shutdown, in case the system is rigged to wipe the disks on startup. We'll briefly discuss disk imaging later in this chapter, and more thoroughly in the next chapter when we discuss computer forensic hardware and software.
▪ Shutting down the systems for transport Proper shutdown is important to maintain the integrity of the original evidence. One school of thought says the computer should be shut down through the standard method (closing all programs and so on) to avoid corrupting files. Another says that after ensuring that no defragmentation or disk-checking program is running, you should shut down the computer by disconnecting the power cord, to prevent the running of self-destruct programs that are set to run on shutdown. UNIX computers usually should not be abruptly shut down this way while the root user is logged on because doing so can damage data.
Note
If the system is turned off, the investigative team generally should seize the computer and boot it in a controlled environment. When you do bring up the system, you should not boot from the computer's hard disk, but instead from a controlled boot disk to prevent the operating system from writing to the hard disk, so crucial data won't be overwritten.
▪ Tagging and logging the evidence All evidence should be tagged and/or marked with the initials of the officer or technician, time and date collected, case number, and identifying information. The evidence on the tag or mark should also be entered in the evidence log. We'll discuss documentation in great detail in Chapter 15.
▪ Packaging the evidence Computer evidence, especially any containing exposed circuit boards (such as hard disks), should be placed in antistatic bags for transport. Paper documentation such as manuals and books should be placed in plastic bags or otherwise protected from damage.
▪ Transporting the evidence All evidence should be transported as directly as possible to the secure evidence storage locker or room. During transport, the evidence should not be allowed to come into contact with any equipment that generates a magnetic field (including police radios and other electronic equipment in the squad car) nor left in the sun or in a vehicle or other place where the temperature rises above about 75°F. The chain of custody must be meticulously maintained during transport.
▪ Processing the evidence When the duplicate disk is brought back to the lab, the disk image can be reconstructed and the data analyzed using special forensic software.
Investigation Methodology
Investigation methodology is the practices, procedures, and techniques used to collect, store, analyze, and present information and evidence that is obtained through a computer forensic investigation. Although the individual steps to perform these tasks may vary from case to case and may depend on the types of software and equipment being used, many common practices will always be consistent. You can break down the methodology of a computer forensic investigation into three basic stages:
▪ Acquisition
▪ Authentication
▪ Analysis
Acquisition is the act or process of gathering information and evidence. As we've mentioned, the evidence pertains not only to a computer that's been seized, but also to the data stored on that computer. It is the data on a computer that will be used to provide insight into the details of a crime or other incident, and be used as evidence to convict a suspect. Computer forensic software can be used to acquire data from a machine, and make an exact copy of everything stored on the hard disks. Because the investigator is studying this image of the computer's data, the machine's original data is unaltered during later examination. The computer forensic technician can then study the suspect computer's contents through an image of the data, leaving the original data untouched.
To guarantee that the data acquired from a computer is a correct duplicate, it must be authenticated. Authentication is a process of ensuring that the acquired evidence is the same as the data that was originally seized. If the data that's been acquired from a computer was corrupted, modified, or missing from the imaging process, it would not only affect your ability to accurately examine the machine's contents, but also could make all of the evidence you find on the computer inadmissible in court. After all, if it was not a perfect duplicate, how would the court know that anything you found was really on the original machine? To authenticate the data that's acquired from a suspect computer, features included in forensic software can be used to compare the data that's duplicated in the imaging process to the original data on a suspect's computer.
Once these steps have been completed, the content of the computer can then be inspected for individual pieces of evidence that will later be used in court or other disciplinary processes. When a duplicate is made of a computer's data, an image is made of everything on the machine. This includes system and configuration files, executable programs, and other files that are installed with the operating system and other software. In addition to this, you'd find innocuous documents and pictures that the computer's users have saved, but wouldn't be useful to an investigation. Needless to say, most of what you'd find on any computer would not be evidence. The person examining the machine must sift through these files to find evidence related to his or her investigation, or evidence that is are illegal and may result in additional charges.
Analysis is the process of examining and evaluating information. When examining computer files, it is vital that they aren't modified in any way. This refers to not only changing the information in the file itself (such as by accidentally changing the values entered in a spreadsheet), but also modifying the properties of the file. For example, opening a JPEG or other picture could change the date and time property that shows when the file was last accessed. If you wanted to prove when a suspect last viewed this image, that information would be lost to you, and a suspect could then argue that he or she never saw the file. It is important to use tools that won't modify data in any way, and that analysis occurs after the data is acquired and authenticated by imaging the hard disk. If any data that was duplicated is damaged or modified, the original data on the suspect computer can still be used to create another duplicate.
Securing Evidence
If data and equipment are to be used as evidence, you will need to ensure that their integrity hasn't been compromised. Preservation of data involves practices that protect data and equipment from harm so that original evidence is preserved in a state as close as possible to when it was initially acquired. If data is lost, altered, or damaged, you may not be able to even mention it in court. This means inadmissible evidence might as well have never existed at all. Worse yet, the credibility of how evidence was collected and examined may be called into question, making other pieces of evidence inadmissible as well.
Evidence must be secure throughout the investigation. Securing evidence is a process that begins when a crime is first suspected, and continues after the examination has been completed. If a trial, civil suit, or disciplinary hearing has ended, the evidence must remain secure in case of an appeal or other legal processes. Because of this, a retention date should be set for all equipment and data that is retained as evidence. For example, the police may retain evidence files acquired from forensic software for many years after a person has been convicted. Similarly, a company may retain such files for a few years after firing an employee, in case the person attempts to sue for wrongful dismissal. The retention date provides a guideline as to how long a forensic technician should retain the data before deleting it, or allowing equipment to be released or destroyed. To determine specified dates, a company should consult legal counsel, and continue to be in contact with the investigator to determine whether the data acquired from an examination can be deleted or may still be needed.
Securing the Crime Scene
As mentioned earlier in this chapter, the first responder is responsible for establishing the scale of the crime scene, and then securing that area. In some situations, this may be as simple as securing a server closet or server room, whereas in other situations it may be as complex as dealing with computers and devices spread across a network. Once the suspected systems have been identified, it is important to prevent individuals from entering the area, and protecting systems so that equipment isn't touched and data isn't manipulated or lost.
At face value, it may seem difficult to prevent others from accessing systems. However, in many cases, people will respect the difficulty of the situation, or will not want to get involved for fear of having to testify later. The fact is that anyone who does have access to affected systems may be required to testify or at least explain his or her presence at the scene. In worst-case scenarios, they may even be considered suspects. As part of securing the crime scene, a list of anyone who has attempted to or has achieved access to the area should be developed. This should include the name of the person, the time he or she entered and left the area, and the purpose of his or her presence.
During the Investigation of a Machine
Disk imaging software will create an exact duplicate of a disk's contents, and can be used to make copies of hard disks, CDs, DVDs, floppies, and other media. Disk imaging creates a bitstream copy, whereby each physical sector of the original disk is duplicated. To make it easier to store and analyze, the image is compressed into an image file, which is also called an evidence file.
Once an image of the disk has been made, you should confirm that it's an exact duplicate. As we mentioned earlier in this chapter, authentication is vital to ensuring that the data that's been acquired is identical to that of the suspect's or victim's computer. Many computer forensic programs that create images of a disk have the built-in ability to perform integrity checks, whereas others will require you to perform checks using separate programs. Such software may use a cyclic redundancy check (CRC), using a checksum or hashing algorithm to verify the accuracy and reliability of the image.
When you're ready to perform an examination, copies of data should be made on media that's forensically sterile. This means that the disk has no other data on it, and has no viruses or defects. This will prevent mistakes involving data from one case mixing with other data, as can happen with cross-linked files or when copies of files are mixed with others on a disk. When providing copies of data to investigators, defense lawyers, or the prosecution, the media used to distribute copies of evidence should also be forensically sterile.
Although the situations in each case involving computer equipment will be different, there are a number of common steps you can follow to protect the integrity and prevent loss of evidence. These procedures assume that the computer has been shut down when you encounter it.
1 Photograph the computer screen(s) to capture the data displayed there at the time of seizure. Be aware that more than one monitor can be connected to a single computer; modern operating systems such as Windows XP support spreading the display across as many as 10 monitors. Monitors attached to the computer but turned off could still be displaying parts of the desktop and open applications.
2 Take steps to preserve volatile data.
3 Make an image of the disk(s) to work with so that the integrity of the original can be preserved. You should take this step before the system is shut down, in case the owner has installed a self-destruct program to activate on shutdown or startup.
4 Check the integrity of the image to confirm that it is an exact duplicate, using a CRC or other program that uses a checksum or hashing algorithm to verify that the image is accurate and reliable.
5 Shut down the system safely according to the procedures for the operating system that is running.
6 Photograph the system setup before moving anything, including the back and front of the computer showing cables and wires attached.
7 Unplug the system and all peripherals, marking/tagging each piece as it is collected.
8 Use an antistatic wrist strap or other grounding method before handling equipment, especially circuit cards, disks, and other similar items.
9 Place circuit cards, disks, and the like in antistatic bags for transport. Keep all equipment away from heat sources and magnetic fields.
When the Computer Is Not Being Examined
Anytime a computer is not being examined, it must be stored in a secure location. Once the computer has been transported from the original crime scene, it should be stored in a locked room or closet that has limited access. In police departments, this may be a property room or an area of the lab in which electronic evidence is acquired and examined. For internal investigations conducted in a corporate environment, it should be treated with the same level of respect, and also stored in a location with limited access.
Data acquired from a computer should be stored on a server or another computer that has limited access. Because any images of the computer that have been acquired using forensic software will be used to examine the computer's contents, and will be used in court as evidence, it is important that few people ever have access to these files. If an unintended individual were able to access the files, it could be argued that the files were tampered with, and this could result in the case being thrown out of court or could seriously undermine the case.
However, in any organization, there are those that will need to access a room that contains evidence. Lawyers, police investigators, and members of the IT staff fixing a computer, printer, or other device in the room may need to access the secure location from time to time. To keep track of those entering the room, you should maintain a log showing who entered the room or secure are a, the dates and times they were there, and any other information (such as their purpose for being there). By having people sign in and sign out, you can keep track of who had access should it ever come into question.
From the time an incident or crime has been identified, it is important that any evidence that may exist in an area be protected from tampering, accidents, or other potential damage. By keeping the crime scene, evidence, and any items transported to another location secure, you are preventing the validity of evidence from coming into question, and protecting any devices in your care from coming to harm.
Treating Every Investigation As Though It Were Going to Court
Every case must be treated as though it would eventually go to court, and be subject to the scrutiny of lawyers and others involved in the trial process. Although it may seem that a computer isn't part of a criminal case, examination of the computer may present materials that are illegal. In addition, those who are suspected of breaking the law or policies may eventually sue the company and others involved in the investigation. By following computer forensic procedures, keeping detailed documentation on what was done, and maintaining a log of who had access to the computer and its data, you can protect the integrity of the case and protect those involved in the investigation from civil litigation.
Before the Investigation
Contrary to what's seen in the movies and television, a significant amount of work goes into investigating computer crimes before they occur. The training and tools used in this type of investigation must be in place prior to examining any computer. Because it is so specialized, the person examining the computer must be knowledgeable in computer forensics and different areas of IT, and the equipment and software used to perform the examination of a machine must already be available to him or her.
When a crime does occur, certain actions must also be taken before attempting to acquire evidence from a machine. Interviews must be conducted and search warrants may need to be obtained. If this isn't done, time may be wasted searching for evidence that doesn't exist, or is located in other areas of a hard disk or even a different computer. Worse yet, if certain steps aren't followed, any evidence that is acquired may be inadmissible in court, making the entire process a waste of time.
Preparing for an Investigation
Preparation is one of the most important aspects of any investigation. Regardless of whether it is the police or part of an incident response team performing the investigation, it is important that a proactive approach is taken. It is important that those involved in investigations are properly trained, and that they have the necessary resources and tools available to them. The more that is done before an investigation, the fewer problems you'll have when conducting the investigation.
Training is crucial to every part of an investigation. Computer forensics requires knowledge of procedures, and expertise with forensic software and hardware that's being used to acquire and study the data. You can obtain this not only through courses, but also by studying under those with more experience in performing investigations. Additional experience with network components and technologies such as Transmission Control Protocol/Internet Protocol (TCP/IP) are also essential, as is knowledge of computer hardware, as it's common to remove hard disks or other devices before connecting them to the investigator's computer to duplicate the data. As you might expect, certification in these various areas is often useful, especially when providing testimony as an expert witness in court. The more training a person has in various aspects of computers, the better.
Because no one can know everything about computers, it is important to maintain reference materials that can be consulted as needed. A library of manuals and other books dealing with software and hardware that is commonly used can be useful in looking up infrequently used commands or features, but resources can also include maintaining hyperlinks and electronic documents. Links to the manufacturers of computers, cell phones, hard disks, and other devices will enable you to look up information on how to properly remove a hard disk from a particular make and model of computer, how to access the Basic Input Output System (BIOS) Setup, and how to bypass certain security features or access information stored in the device. These links will allow you to refer to manuals, knowledge bases, and other online resources quickly during an investigation.
Other resources that should be maintained are prepared documents that may be used during an investigation. As we'll discuss in Chapter 15, chain of custody forms may be used to keep track of who had possession of evidence at any given time, and property forms may also be used to maintain information on who is ultimately responsible for evidence that's stored in a secure location. Contact lists are also useful, providing a listing of individuals with specific skills (such as the hardware technician in the company where you work, or an expert in Linux or Macintosh machines that can be contacted as needed). Such lists should also contain information on how to contact certain legal departments or individuals in charge of abusing services at certain Web sites or companies. For example, if a case involved a free e-mail account at Hotmail, it would be useful to keep a request form that can be completed when requesting information on a particular account, and phone numbers to contact Hotmail during the investigation. In many cases, these documents can be stored on a computer or server that's used for forensic examinations so that the information is always handy in an electronic format.
It is also important to have a computer forensic lab set up prior to conducting an investigation. The lab should be of adequate size, and should have a server or media (such as CDs and DVDs) on which to store evidence files, with storage facilities that allow computers to be locked in a secure location when not being examined. In addition to this, you will need to outfit the lab with equipment that can be used in the facility or taken in the field to locations where the crime has taken place. This would include such items as:
▪ Laptop computer The laptop should have forensic software installed on it, and should include additional hardware that may be used to acquire data. We'll discuss different types of computer forensic hardware and software in Chapter 6.
▪ Boot disk and CD or USB flash drive or tools The boot disk is used to start a computer from a floppy disk or CD so that files aren't modified when the computer starts. A CD or other medium containing various utilities can also be useful to acquire data from a machine. Any tools that are included should not unknowingly modify data.
▪ Digital camera This can be used to photograph what's displayed on a computer screen, and to photograph the scene of the crime. Before taking the computer from the crime scene, the back of the computer should be photographed to show where cables were plugged into the machine so that it can be set up the same way once the investigation is over.
▪ Evidence and antistatic bags, tags, and stickers Evidence bags are tamperproof bags in which items can be stored to prevent unauthorized handling or contamination by fingerprints, DNA, or other taint evidence. Once sealed, the bag must be ripped open to access the contents. To safely transport hard disks and any circuit boards, they should also be stored in antistatic bags. Tags and stickers can also be used to identify the contents of the bag, showing the incident number or other information that associates items with a particular criminal case or incident.
▪ Pens, notepad, and masking tape It is important to document the actions taken in removing keyboards, monitors, and other peripherals attached to the computer prior to transporting it. You can use masking tape to mark which cables were attached to the suspect computer and where they were connected.
Conducting Interviews
It is important to always remember that a complainant can provide a wealth of information necessary to the successfully investigation of an incident. It is also important to identify and document who had access to affected systems, what they observed, and any other information they can provide. When interviewing people at a crime scene, it is important to record their names and contact information, in case they need to be contacted at a later time. Not only can their information be useful in identifying what the problem is and which systems were affected, but also their statements can be used to obtain search warrants and to provide testimony in court if criminal charges are laid on a suspect.
Obtaining Search Warrants
A search warrant is a legal document that permits members of law enforcement to search a specific location for evidence related to a criminal investigation, and seize that evidence so that it may be analyzed and possibly used in court. For the warrant to be legal, it must be signed by a judge or magistrate, such as a justice of the peace or another type of judicial officer. To obtain this signature, the police officer or government agent must present good reasons as to why a search warrant should be granted. This requires law enforcement officials to provide a sworn statement in which the location to be searched is identified, and may list the type of property being sought. The statement may also be accompanied by documentation on the complaint that initiated an investigation, and other written information that would validate the request. The key point of this process is to protect the rights of the individual, and to provide reasonable grounds for why permission should be given to invade a person's privacy and property.
Many countries use search warrants to protect the privacy of their citizens by requiring authorities to prove the necessity for the search and seizure of a person's property. An example of legislation that's used to prevent unreasonable searches and seizures of property is the Fourth Amendment of the U.S. Constitution, which states:
“The right of the people to be secure in their persons, houses, papers, and effects, against unreasonable searches and seizures, shall not be violated, and no Warrants shall issue, but upon probable cause, supported by Oath or affirmation, and particularly describing the place to be searched, and the persons or things to be seized.”
In looking at this quote, you will notice that probable cause is the primary basis for issuing a search warrant. Probable cause is a standard of proof that must be shown, in which a cautious person would find reasonable grounds for suspicion. This places the burden of proof on the government so that investigations aren't conducted in an authoritarian or oppressive manner. Without probable cause, the request for a search warrant is denied.
If the search warrant is issued, its use is limited. After all, it would go against the philosophy of protecting the individual's rights if a warrant allowed police to search a person's home indefinitely, as many times as they like. The warrant can be executed only within a set amount of time (generally three days), so if a search warrant wasn't used in that time, a new one would need to be obtained. Also, an officer may search only those areas that are outlined in the court order, and generally cannot seize items that aren't included in the document. For example, if the warrant specified that a person's home could be searched, the police could not search other properties (such as a cabin) also owned by the person. By being specific in what can be searched, the conditions of the warrant protect both the rights of the individual and the integrity of the investigation.
Searching without Warrants
Warrants are not necessary in every situation where evidence could be obtained. Despite appearances at times, legislation is often constructed from common sense needs and well-thought-out arguments, balancing the needs of society against the government's ability to manage its citizens. Requesting a search warrant to acquire every piece of evidence in every criminal and civil case would become an administrative nightmare, so exclusions to needing a warrant are provided in statutes that address investigative procedures and requirements.
For law enforcement, there are a number of exceptions to where a search warrant is needed, although few apply to computer forensics. For example, an officer can frisk a suspect, checking his or her clothes for weapons or contraband, but there is no way this search would include an examination of the person's computer. In terms of computer forensics, a primary reason why a search warrant could be excluded is when the evidence is in plain view, and an officer can see it from a reasonable vantage point. For example, if an officer approached a car and saw the passenger viewing child pornography on a laptop computer, the laptop would be seized for later analysis. Similarly, let's say an officer had a warrant to search the home of a suspect and seize computer equipment believed to contain child pornography. If the officer saw a collection of photographs displaying naked children in various acts, the officer could then seize the pictures as evidence even though they may not have been specifically mentioned in the warrant. When illegal items or other evidence is in plain view, it is often reasonable for the officer to seize the item immediately, rather than leave it and take the risk of it being hidden, altered, or destroyed.
The need for a search warrant is also excluded when consent is given by the owner, or by an authorized person who is in charge of the area or item being searched. In other words, if the victim of a cybercrime wanted to have his or her own computer searched for evidence, a search warrant wouldn't be necessary. Similarly, the senior staff members of a company or the manager of an IT department could give permission to have servers and workstations in a company examined. The key is whether the person owns the property or has proper authorization, which can sometimes be less than clear. For example, on a college campus, a student in residence might be able to give permission to search the room he or she occupies, but wouldn't be able to give permission to search his or her roommate's computer. Similarly, a parent would be able to give permission to search a family computer, but may not have the authority to permit a search of an adult child's PC. Because a search conducted on a computer without a warrant or proper permission could make any evidence that's collected inadmissible in court, it's vital to determine who can give permission before seizing or examining a computer.
Legal differences exist between how a private citizen and law enforcement can gather evidence. There are stricter guidelines and legislation controlling how agents of the government may obtain evidence. Because of this, evidence that is collected prior to involving law enforcement is less vulnerable to being excluded in court. If the IT staff of a company acquired files from a server or workstation before calling the police, the files would probably be admitted as evidence in a trial, even though the same actions taken by law enforcement without permission or a warrant could make those files inadmissible.
Constitutional protection against illegal search and seizure applies to government agents (such as the police), but may not apply to private citizens. Before a government agent can search and seize computers and other evidence, a search warrant, consent, or statutory authority (along with probable cause) must be obtained. This does not apply to private citizens, unless they are acting as an “agent of the government” and working under the direction or advice of law enforcement or other government parties. However, although fewer restrictions apply to private citizens, forensic procedures should still be followed. Failing to follow forensic procedures may result in lost or unusable evidence. The procedures outlined in this section will help to preserve evidence and ensure that it is considered admissible in court.
Preparing for Searches
Because search warrants aren't required in all situations, you should try to identify whether one is needed early in the investigation. In doing so, you should ask the following questions:
▪ Does the company or complainant own the computer? If so, permission can be given to search the machine.
▪ Does the company have a legitimate reason for searching the computer? If not, the employee using the computer could have reason for civil litigation.
If there are no legal grounds to search the computer without a warrant, statements and any documented evidence pertaining to the incident should be collected. Statements should include as many details as possible, providing a timeline of when events took place and what occurred. Statements should be gathered from anyone associated with the incident, and this should be done as soon as possible so that memories of the event aren't diluted over time. Gathering statements in this manner provides information that can be used to obtain a search warrant, and can be used as evidence later on if the case goes to trial.
Professional Conduct
At all times in an investigation, it is important to maintain professional conduct. Whether you are working as a member of the police force or as an employee of a company, you are acting as a representative of the organization, and the level of ethical behavior that's displayed will indicate how you're handling the case as a whole. By reflecting the ethics adopted by the organization, you are also showing that the investigation will be handled with integrity.
A balance of morality and objectivity must be maintained throughout the investigation. If potentially offensive materials are found on the computer, showing interest in the material is unprofessional and could be used to undermine the findings in court. In the same way, you should also display objectivity, and not make judgments on what is found during an examination of evidence, or when interviewing those involved in the investigation. You should avoid making any kinds of jokes or comments about what is found, and focus on the tasks involved in performing the investigation with professionalism.
In performing these tasks, it is important to remain somewhat detached from the incident. Although it is important to display a level of compassion toward any victims in the case, you should remain disconnected from anything but the tasks that must be performed. By showing disgust or other negative emotions toward what has occurred, you could be perceived as being judgmental, or as though you have a vendetta against the person who committed the crime. Professional detachment involves placing all of your attention on the work, rather than the emotional or psychological stress factors that may be involved.
Confidentiality is another important component of professional conduct. Throughout the investigation, it is important to keep information about the case private, and to not reveal information to those who aren't directly involved in investigating the incident. Information should not be shared with witnesses, coworkers, or others outside the case, especially if they show interest in what has occurred. This can be difficult, as friends or family may often ask about higher-profile cases that are being reported in the media. However, it is important that information is limited to those who need it. You don't want to accidentally reveal what's going on to someone who may later be a suspect, or who will pass information on even further.
The investigator may also work with public relations or a media representative in the company or police to determine what will be revealed to the public. In such situations, crime technicians and anyone else involved in the investigation should limit their comments to information that has been approved for public release, and keep any additional facts to themselves.
Investigating Company Policy Violations
Corporate investigations are often different from other types of investigations. When criminal activity occurs on a home computer, generally the police are called to conduct an investigation. In companies where an IT staff is available, policies may exist that designate a person or team of people with specialized skills to initially respond to the incident. The incident response team may contact police eventually, but this will often depend on the type of incident and what is found in their investigation.
Investigations in corporations can also be different from others involving computer forensics, as a crime might never have been committed even though an investigation is required. Anyone who has worked for a company knows that employers will impose certain rules and practices that must be followed by employees as conditions of their employment. A number of regulations may be implemented to address how computers and other equipment are to be used in the workplace, and breaking these rules could result in an investigation and in having computers and other devices used by the employee undergo a forensic examination.
Policy and Procedure Development
A policy is used to address concerns and identify risks to a company, whereas procedures are used to provide information on how to perform specific tasks and/or deal with a problem. For example, a policy may be created to deal with the potential threat of unauthorized access to restricted areas of a building, and procedures may be implemented that state how a visitor should be signed into a building and escorted to a particular department. Through the policy, an issue that is pertinent to the organization is explained and dealt with. Through the procedure, people are shown how to abide by policies by following specific instructions.
When you consider the sheer number of issues an organization may face, you can see that many different types of policies and procedures may be implemented. Regardless of the type, however, each should have the following features:
▪ It should be straightforward, stating points clearly and understandably. If areas of a policy can be interpreted in different ways, it can be disputed when attempting to enforce it.
▪ It must define what actions should be taken. Procedures must lay out the steps needed to complete a task, and policies must outline the actions that may be taken if the policy is violated.
▪ It cannot violate any applicable law. If a policy does violate any existing legislation, it cannot be adequately enforced. In addition, the company may face civil or criminal charges, because it implemented a policy that forced employees to break the law.
▪ It must be enforceable. If a policy isn't enforced each time it is violated, or if it can't be enforced for some reason (such as because it violates contractual agreements with individuals or unions), the policy becomes worthless to the company. A policy must be fairly and equally enforced whenever it is violated, or any disciplinary actions dictated in the policy can be disputed.
When implementing policies, companies should also devise methods to confirm that employees have read and agreed to comply with them. One method is to have employees read and sign copies of certain policies when they are hired. However, if there are changes to the policy, each person already hired must be approached, and must reread and sign the policy. Another method is to implement one policy that employees sign upon being hired, which states that part of their employment relies on reading and acknowledging compliance with all policies. The policies can then be posted on the corporate intranet, enabling employees to read them at their convenience. Still another method is to e-mail copies of policies to all of the employees' internal e-mail addresses, and requesting them to respond stating they have read and agree with the terms of the policies. Whatever method is implemented, it is important that some process is in place. If employees are unaware of the policies, they can't realistically be expected to comply with them.
Acceptable Use Policy
A policy that employees should be required to acknowledge as having read and one with which they should comply is an acceptable use policy. This type of policy establishes guidelines on the appropriate use of technology. It is used to outline what types of activities are permissible when using a computer or network, and what an organization considers proper behavior. Acceptable use policies not only protect an organization from liability, but also provide employees with an understanding of what they can and cannot do using company resources.
Acceptable use policies will restrict certain actions, including what types of Web sites or e-mail an employee is allowed to access on the Internet at work. You may have read news articles about employees who access pornography over the Internet. Not only does this use up bandwidth and fill hard disk space on nonwork-related activities, but others seeing the employee view the material can create an uncomfortable work environment. Worse yet, a company can be liable for creating or allowing a hostile work environment under the Civil Rights Act of 1964 or other legislation. For these reasons, businesses commonly include sections in their acceptable use policies that deal with these issues.
Acceptable use policies would also specify methods of how information can be distributed to the public, to avoid sensitive information from being “leaked.” Imposing rules on the dissemination of information might include:
▪ Specifications that prohibit classified information from being transmitted via the Internet (for example, via e-mail or File Transfer Protocol [FTP])
▪ Provisions on how content for the Web site is approved
▪ Rules on printing confidential materials
▪ Restrictions on who can create media releases, and so on
Through this, important information is protected, and employees have an understanding of what files they can or cannot e-mail, print, or distribute to other parties.
Incident Response Policy
Incident response policies are implemented to provide an understanding of how certain incidents are to be dealt with. The policy should identify an incident response team, who is to be notified of issues, and who has the knowledge and skills to deal with them effectively. Members of the team should be experienced in handling issues relating to unauthorized access, denial or disruptions of service, viruses, unauthorized changes to systems or data, critical system failures, or attempts to breach the policies and/or security of an organization. If the incident is of a criminal nature, the policy should specify at what point law enforcement should be contacted to take control of the investigation.
A good incident response policy will outline who is responsible for specific tasks when a crisis occurs. It will include such information as:
▪ Who will investigate or analyze incidents to determine how an incident occurred and what problems are faced because of it
▪ Which individuals or departments are to fix particular problems and restore the system to a secure state
▪ How certain incidents are to be handled, and references to other documentation
Incident response policies should also provide steps on what users are supposed to do when identifying a possible threat. These steps should be clearly defined so that there will be no confusion regarding how to deal with an incident. Upon realizing that an issue exists, an individual should notify his or her supervisor, a designated person, or a department that can then contact the incident response team. While awaiting the team's arrival, the scene of the incident should be vacated and any technologies involved should be left as they were. In other words, those on the scene shouldn't touch anything, as this could alter the evidence. The users should also document what they observed when the incident occurred, and list anyone who was in the area when the incident occurred.
To address how a company should handle intrusions and other incidents, it is important that the incident response policy includes a contingency plan. The contingency plan will address how the company will continue to function during the investigation, such as when critical servers are taken offline during forensic examinations. Backup equipment may be used to replace these servers or other devices so that employees can still perform their jobs and (in such cases as e-commerce sites) customers can still make purchases. By having such practices in place, any investigation can avoid (as much as possible) negatively impacting normal business practices.
Policy Violations
When policies are violated, it doesn't necessarily mean that a full police investigation is required. In many situations, the violation may require disciplinary actions against the employee, whether it is a reprimand, fine, demotion, or termination. The severity of the actions will often depend on the past performance and current conduct of the person. Despite the end result, computer forensics may still be incorporated. Using forensic procedures to investigate the incident creates a tighter case against the employee, thereby making it difficult for the employee to argue the facts.
In any investigation, it is important to treat the case as though it were going to court, as you never know what you'll find. For example, an employee may have violated a company's acceptable use policy by viewing questionable Web sites during work hours. However, if it was found that the person was downloading child pornography, the internal investigation becomes a criminal one. Any actions taken in the investigation would be scrutinized, and anything found could be evidence in a criminal trial.
Policy violations can also extend beyond the machines owned by a company. Many people have their own blogs or personal Web sites, or enjoy social networks such as Facebook (http://www.facebook.com), Friendster ((http://www.friendster.com), and others. On such sites, people can publish text and pictures to the Internet. If the person mentions where he or she works, and makes derogatory comments about coworkers or portrays the company in a negative manner, it may seem that little can be done. After all, the information isn't on a corporate computer, but on another server entirely. However, depending on policies implemented in the organization, this may not always be the case. In 2007, an eleventh grade student in Abbotsford, BC, named Amanda Bunn created a page on Facebook titled “If 200 people sign this, I'll kick (teacher Pat Mullaney) in the box.” Because the threat was made to her teacher, the student was suspended for three weeks before ultimately being expelled from the school. Other schools have taken similar actions against students in cases of cyberbullying. Because school policies exist in many schools that prohibit threatening teachers and students, the students are held accountable for their actions, even though the incidents never occurred on school property.
In the same way that schools are realizing that cyberbullying can escalate into more violent actions, fewer and fewer organizations are tolerating hostile working environments. Hostile working environments are workplaces where a person fears intimidation, harassment, physical threats, humiliation, or other experiences that create an offensive or oppressive atmosphere. One common example of a hostile working environment is sexual harassment. If a person had to view sexual images displayed on a computer, or received messages sent through e-mail, Short Message Service (SMS) or IM that had undertones or blatant sexual remarks, he or she could feel objectified and humiliated by the atmosphere. In such cases, internal disciplinary tribunals, criminal charges, or civil suits may be the only way to stop such actions. When these activities are received, transmitted, or displayed using technologies issued by the company, it is simple to acquire evidence by looking at information stored on the devices or on hard disks.
One of the most devastating types of policy violation is industrial espionage, which is also a criminal act. Industrial espionage is the selling of trade secrets, intellectual property, or other classified information to competitors. If the wrong person has access to such information, it could be detrimental to the organization, as releasing it to the public or competitors could undermine confidence in the organization, and even jeopardize its ability to remain solvent. Source code for programs, secret recipes, and other knowledge that is often limited to the most trusted insiders could be devastating if released. Information must be kept secure, and any suspected leaks must be dealt with swiftly.
The Cola Wars and Industrial Espionage
When you think of Coca-Cola and Pepsi, you probably think of staunch competitors in the Cola Wars, with each trying to get an advantage over the other in the marketplace. The last thing you'd imagine is the two of them working together to stop a Coke employee from selling secrets to Pepsi. However, because such companies rely on secret recipes and other trade secrets to remain in business, the threat of industrial espionage is one that can't be tolerated and is considered one of their greatest risks to security.
In May 2006, PepsiCo Inc. received a letter offering to sell them trade secrets of the Coca-Cola Co. Pepsi immediately contacted Coke, who in turn contacted the FBI. The FBI worked with both companies to create a sting operation that led to the arrest of Joya Williams, a secretary who worked at Coca-Cola, and two others working with her to sell the secrets. Williams had stolen not only confidential information, but also a sample of a new soft drink the company was developing, which she, Ibrahim Dimson, and Edmund Duhaney tried to sell to Pepsi for $1.5 million.
In 2007, Williams was convicted and received a prison sentence of eight years; Dimson entered a guilty plea and was sentenced to five years in prison. Both were also sentenced to an additional three years of supervised release, and each was ordered to pay $40,000 in restitution. Duhaney also entered a guilty plea, thereby closing the cap on this case.
Warning Banners
Warning banners are brief messages that are used to inform users of policies and legislation regarding the use of a system and the information it contains. They are generally displayed at the startup of programs and operating systems, or when accessing the default page of intranets and public Web sites. Because the warning banner advises a user about key elements of proper usage, and may even provide references to existing laws and policies, it serves as a legal notice to users of the system.
Warning banners can come in different formats, including splash screens or message boxes that pop up when software is started, or information appearing in graphics or other content on Web sites. As shown in Figure 5.2, the Goddard Space Flight Center (webmaster.gsfc.nasa.gov/warning.html) has a simple textual warning that outlines the purpose of the site, and stating that any attempts to modify the site may be punishable under the Computer Fraud and Abuse Act of 1986. It also informs the user that any activities on the site may be monitored to the degree that keystrokes may be recorded. By using the Web site, the user agrees to these actions, so anyone committing a criminal act has consented to having information gathered in logs, which could then be used against him or her as evidence.
 |
| Figure 5.2 Warning Banner on the Goddard Space Flight Center Web Site |
Warning banners should be implemented at any access point to a system in the event an organization seeks to discipline an employee or prosecute an unauthorized user. By providing a clear and strong message, the warning banner essentially dissolves any excuse of a user not knowing that what he or she did was wrong. The user is given a warning, so any violations of it can be proven as being intentional. The message should provide the following points of information, and should correspond with any security policies the user may have read and agreed to as part of his or her employment:
▪ A brief outline of what is considered proper usage of the system
▪ Expectations of privacy, and that the system may be monitored for illegal or improper activity
▪ Any penalties or possible punishment that may result from noncompliance
Adding such messages when users log on to an operating system is relatively simple, and should be implemented on any computers that are part of a corporate network. Computers running Windows can have information added to the Registry that will cause a message box to appear with a warning before the user logs on. This feature has been included in Windows operating systems since Windows 95 and Windows NT 3.1, and presents the warning banner after pressing Ctrl + Alt + Del and before being presented with a login dialog box. It requires the user to agree to the warning by clicking an OK button before he or she is able to use Windows.
Conducting a Computer Forensic Investigation
Although investigations will often vary in the type of incident or crime that has occurred, the evidence that's available, and the environment in which evidence is collected, many elements are common in any investigation. As we've seen throughout this chapter, it is important that you assume that any investigation will invariably wind up in court, where the evidence and process in which it was collected may be challenged. Because of this, it is important to always follow the procedures in the investigative process.
Once you've gone through the process of securing a crime scene and interviewing witnesses, you must collect, preserve, and transport the evidence. Each piece of evidence must then be assessed, with digital evidence acquired from hard disks and other media, before being examined. Throughout this process, documentation is essential, as any actions that are taken should be included in a statement and/or final report. As we'll see in the sections that follow, this can be a lengthy process with procedures that must be followed to prevent any evidence from becoming inadmissible, or important pieces of evidence being overlooked altogether.
The Investigation Process
The process of conducting a computer forensic investigation can be a hectic experience, especially in a business environment where it is essential that systems are online to maintain the business. For example, if the company used an e-commerce site to make sales, taking the system down to perform an examination could cost thousands upon thousands of dollars. During such instances, you want to ensure that you follow forensic procedures, but not waste time wondering which steps should be performed next.
Although we've primarily discussed the investigation process from law enforcement's side in this chapter, the subsections that follow will provide information related to the roles of the incident response team and IT staff in the investigation. To perform an investigation properly, it is important that sets of procedures are followed that detail the steps to be taken. Following these guidelines will help you to meet the goals of an incident investigation, and provide information that can be used to handle the incident so that it doesn't escalate into a more significant problem. In the investigation process, you need to follow these six steps:
▪ Preparation
▪ Detection
▪ Containment
▪ Eradication
▪ Recovery
▪ Follow-up
Preparation
As with anything dealing with security, it is important that threats are dealt with proactively, with safeguards and other measures in place before problems occur. If the necessary policies, procedures, and tools aren't available when responding to an incident, an incident response team can waste valuable time trying to get organized. Preparation is the key to handling and investigating incidents.
As we've stressed throughout this chapter, it is important that people are properly trained in how to identify and report problems, and that they have a thorough understanding of the tasks they're expected to perform. In addition, companies should develop communication plans. Part of this policy should include or reference a communication plan that provides contact information on who will need to be called when problems are first reported. This includes members of the incident response team, other IT staff members, third-party vendors and support personnel, senior management, department managers, public relations personnel, and anyone else who may need to be conferred with the incident. The contact list should include the names of anyone who may need to be called during an incident, and his or her phone number, pager number, address, and any other relevant information.
In an emergency, it is important that people aren't scrambling to find contact information, so such information should be left with a centralized source. Some options might be the company switchboard, dispatch, Help Desk, or other departments of the company. If an incident needed to be reported, employees could notify the switchboard operator or dispatcher, who in turn could contact incident response team members.
Passwords are another piece of information that should be available in emergencies. Members of the IT staff or the incident response team may have varying levels of security, and may be unable to get into certain areas of the network or certain systems. For example, they may not have passwords to access administrative functions in certain systems, or workstations and servers may be locked down and can't be accessed without an administrator password. To allow them entry in extreme situations, copies of passwords should be written down, sealed in an envelope, and stored in a locked container (such as a safe). Any encrypted keys needed to access critical data should also be stored with these passwords. In an emergency, if the person who knows the passwords is unavailable, a member of the team can access the passwords and keys.
A company will need to do business after an incident has occurred, but in some incidents data may be altered, corrupted, or deleted. When this happens, the data may be irrevocably lost, unless backups have been regularly performed beforehand. By performing regular backups, you can restore the data on a server or workstation as needed. This is especially important if a particular machine is seized as evidence or data prior to the investigation date needs to be reviewed. To make it easier for members of the team to restore the data, recovery procedures should be documented thoroughly, allowing members to follow the understandable steps to restore systems to their previous state.
To aid in the detection process of an incident investigation (which we'll discuss next), preparation also requires that logging is activated on systems. Logging information to a file is a feature that's commonly provided for operating systems, and for certain software and equipment. Logs can provide a great deal of information, revealing indicators that may show whether an incident has occurred. The more information that's provided in these logs, the more evidence you'll have for discovering incidents and dealing with them accordingly.
Baselines should also be created by recording data on how the system behaves normally. The metrics recorded in a baseline would include measurements of network traffic, memory usage, and other information that provides a clear understanding of how systems normally run. The incident response team can compare the baseline to measurements taken when a problem is suspected, and thereby detect whether an incident has occurred.
Detection
Determining whether an incident has actually occurred is the next step of the incident investigation process. After all, just because someone reported that something doesn't seem right doesn't mean that the company's at risk or that a crime has occurred. A user could report that files have been deleted, and although it could be indicative of hacking, it could just mean the user is too embarrassed to admit he or she deleted them by accident. The detection phase of incident investigation examines such reports, and determines what further actions (if any) are required.
Detection requires looking at the safeguards and auditing controls that have previously been set up, and determining whether anomalies exist. For example, logs may provide a great deal of information that can confirm or discard any notions of unwanted activity. Members of the IT staff or information security personnel should check logs on a regular basis, and determine whether indications of problems have been recorded. System logs may show errors related to security violations, impending hardware failure, or other potential problems. Firewall logs should also be analyzed to identify indications of attempted hacking from the Internet, policy breaches, or other damaging events. By not checking logs regularly, an incident may be avoided early, preventing more significant problems from occurring.
Software specifically designed to deal with certain incidents, or elements of an incident, can be used in the detection process. AV software packages can be used to detect viruses, and can be configured to automatically deal with them upon detection. Intrusion detection systems can also be used to identify whether system security has been violated, systems have been misused, or accounts have been used or modified. Implementation of such software not only aids in protecting the network, but also allows you to detect incidents early.
In addition to the logs created by systems on the network, the IT staff should also keep a manual logbook. This will provide a record of dates, times, observations, system names, error messages, actions taken, and other details that may be considered valuable. The name of the person who reported the incident and the names of people who had access to systems should also be recorded. Creating a log should be done as early as possible. Information recorded in the log may be vital to solving problems, and may be needed for reference purposes if you're later required to testify in court.
Another reason for maintaining a logbook is that it can reveal patterns. Hackers may make several attempts to hack into a network, and being able to reference information on these previous occurrences can be valuable in identifying vulnerabilities, finding who is making these attempts, and may be used in the prosecution of that person. It can also be useful in identifying training issues, such as when multiple mistakes by the same person result in damaged data, invalid data entry, or erroneous reporting of incidents. Without a log of previous incident investigations, such patterns may be unidentifiable.
When an incident is confirmed, it is important that an image of the affected system is made as soon as possible. As we'll discuss later in this chapter and again in Chapter 6, computer forensic software can be used to create an image of the data, creating an exact duplicate of a hard disk. This allows you to examine data on the disk, while leaving the original computer untouched. This is important, because examinations of the original computer's data could modify data on the disk. Even opening a file can alter information (such as the date/time of when it was last opened), and can negatively affect any further investigation or future prosecution. It is important to make an image of the system as soon as possible, because further intrusions into the system or malicious programs could delete evidence used to identify a suspect. Rather than giving the suspect a chance to cover his or her tracks, it is important to preserve that evidence quickly.
Containment
It is important to limit the extent and significance of an incident so that it doesn't spread to other systems and continue doing damage. It makes no sense to identify a hacker's entry into a server, and then allow him or her to continue entering other servers on the network. In the same light, allowing viruses to spread across the network increases the level of damage. Containment limits the scope of such incidents, preventing the damage from spreading.
How an incident is contained will depend on the type of incident that has occurred, what is affected, and the importance of systems to the business. If someone had hacked into a network file server, it might be prudent to remove that server from the network, such as by unplugging the network cable from the adapter. In doing so, the hacker would be unable to do further harm, and would be unable to modify or delete any evidence he or she left behind. In other situations, such as an employee sending threatening e-mails, it would be overkill to prevent everyone from using network resources. In this case, having a member of the incident response team stay with that person until the police arrive, so as to prevent them from using a computer, would probably suffice.
Eradication
Just as it's important to prevent further damage by containing an incident, it is equally important to remove its cause. Eradication removes the source of a threat so that further damage isn't caused or repeated. In doing so, the system is left more secure, and further incidents may be prevented.
Eradication may occur through a variety of methods. For example, if a virus were detected on systems, eradication would require removing the virus from all media and systems by using AV software. In situations involving violations of law or policy, the eradication phase of incident investigation might require disciplinary action (such as terminating the employee) or pressing criminal charges. As you can see by this, the appropriate method of eradicating an incident depends on what or who is being dealt with.
Recovery
Once an incident has been handled, the company's IT staff will need to ensure that any data, software, and other systems are back to normal. The recovery phase is where these are restored to a normal state. Here it is determined that the incident did not permanently affect elements of the network, and everything is as it was previous to the incident.
Recovery is important because data may be modified, deleted, or corrupted during incidents, and configurations of systems may be changed. Other problems that may result include malicious code that was planted on systems. Such code may be triggered by certain events, or may activate at a later date when everything is presumed to be okay. Because of the possibility of future threats, you need to determine whether any remnants of an attack exist, and what may have been damaged by the incident.
Systems may be restored in a variety of ways. Certain systems may need to be reconfigured to the way they were before the incident, data may need to be validated to verify that it is correct, or in other cases, the system may need to be completely restored from backups. If data has been modified or destroyed, and a backup is restored, any work that took place since the backup was performed will need to be redone.
Follow-up
The follow-up to an incident investigation is where you determine whether improvements can be made to incident handling procedures. At this point, you examine the previous phases of the investigation, and review what was done and why. The follow-up requires an analysis of such details as:
▪ Preparation for the investigation, and whether additional preparation is needed
▪ Whether communication was effective, or if information was not conveyed in a timely fashion
▪ Steps taken during the investigation, and problems identified
▪ Determining whether the incident was detected quickly and accurately
▪ Whether the incident was adequately contained or spread to different systems
▪ Evaluating tools used in the investigation and whether new tools would result in improvements
It is also important for companies to identify how much the incident cost, so changes to budgets can be made to effectively manage the risks associated with certain incidents. This includes the cost of downtime, personnel costs, the value of data that was lost, hardware that was damaged, and other costs related to the investigation. By determining the financial costs associated with an incident, insurance claims can then be filed to reimburse the company and cost/benefit analyses can be updated. This information may also be included in Victim Impact Statements provided to the police.
Assessing Evidence
Earlier in this chapter, we discussed how the crime scene technician is responsible for processing digital evidence that is collected during an investigation. Although this may involve the technician being called directly to a crime scene and forced to deal with the situation on the fly, often this will entail assisting in obtaining a search warrant and assisting in technical aspects of the case before any evidence is ready to be searched and seized. As we'll see in the sections that follow, processing evidence is a four-part set of procedures consisting of assessment, acquisition, examination, and documentation.
Evidence assessment is the first part of this process, and it involves evaluating issues related to the case and the digital evidence that's being sought. It requires reviewing the search warrant or details of legal authorization to obtain the evidence, the details of the case, hardware and software that may be involved, and the evidence you hope to acquire for later evaluation. After completing these steps, you should be able to determine the best course of action to take in obtaining the evidence, based on the scope of the case.
Case Assessment
When an incident occurs that requires a computer forensic investigation, the investigator for the case will request the services of the crime scene technician. The request for forensic services should not be taken at face value so that the technician simply walks blindly into the case. It is important that the technician reviews the request and identifies the legal authority for his for her participation. This request for assistance should be in writing, and it should include such information as:
▪ The incident or case number
▪ The name and other information regarding the suspect
▪ Who owns the machine
▪ Whether the data has been viewed or accessed by anyone prior to your examination
▪ What kind(s) of forensic services are being requested
A request for service form that allows an investigator to provide this information is useful for several reasons. First and foremost, it provides an easy reference that connects evidence to a particular case. The form will provide information on whether a search warrant is required (based on who owns the computer), and can be useful in identifying information to search for. For example, if you were interested in searching for documents containing the suspect's name, you could simply refer to the form to get the correct spelling. If you were unsure whether all of the services requested have been fulfilled, you could look at the list of services the investigator wanted you to perform. Also, if the request for services was illegitimate and the request was made for personal reasons, you have an official form that will protect you from disciplinary actions.
Because the computer may have been accessed prior to your acquiring the data and examining it, you should also request the complete chain of evidence documentation. This is especially important if a computer has already been seized and is being delivered to the forensic lab. If there are any questions regarding data, you can then contact any parties who previously had custody of the machine to determine whether they accessed any files or performed any actions with the machine.
Although an investigator may be adept at interviewing suspects, following leads, and performing other tasks necessary to an investigation, he or she may not fully understand what is involved with computer forensics. It is important to discuss what you can and cannot do in an investigation, and what may or may not be discovered. In addition to this, you should discuss whether other attempts to acquire evidence or certain avenues of investigation have already been acted upon, such as the following:
▪ Is there a need for the use of other types of forensics? Has the evidence been checked for fingerprints, DNA, trace evidence, or other forensic evidence? If there is a need for this, you should wait before touching the computer until this has been completed.
▪ Has an attempt been made to acquire evidence from noncomputer sources? Because evidence is so often found on computers, it is possible that other sources of evidence have been overlooked. For example, digital cameras and cell phones that take pictures can be useful in child pornography cases, whereas check paper, paper files, and other items may be useful in financial crimes.
▪ Is there a need to acquire evidence from other systems? In cases involving the Internet, you may wish to obtain logs and account information from Internet service providers (ISPs), who may have logged when the person connected to the Internet, what sites he or she visited, e-mails that were sent and received, remote storage locations, and other information.
You should also discuss specific details of the case that can be used to narrow your search for information on a computer. If you understand why a person is being investigated, and the type of evidence the investigator is searching for, it can decrease the amount of time required in finding that evidence. For example, fraud cases will often involve searching for spreadsheets and financial records, child pornography cases will require looking for photographs, and hacking cases will often require looking at source code and specific applications. In addition to this, certain information about the suspect should be available to you, such as the suspect's name, e-mail address, aliases, and user account information. By having this information beforehand, you will spend less time attempting to identify it when examining the computer.
In identifying aspects about the suspect who uses or owns a machine being examined, it can be useful to determine the person's computer skills. Different suspects will have varying levels of expertise with computers, with more advanced users possibly incorporating encryption or booby traps that will delete data if certain actions are performed. The more you know about a suspect and the case prior to dealing with the evidence, the better position you'll be in to successfully acquire and evaluate pertinent evidence.
Processing Location Assessment
Although the thought of where you'll collect or examine evidence may not be the first thought in an investigation, it is important to identify this early in the investigation. In many cases, the evidence will be examined in a forensic lab, where you'll be working with equipment in your own work area. In other situations, you'll have to visit the scene of the crime. Sometimes this will be an easily controlled environment, such as a server room that limits the number of people who can enter and have access to evidence. Other situations may require you to collect evidence from a kiosk, a computer in a public Internet café, or the scene of a homicide where other forensic professionals are still gathering their own evidence. By understanding where the evidence needs to be gathered, you'll be better prepared to determine the type of equipment you'll need to bring, or whether other personnel (such as police officers) will need to be present.
Computer Forensics in the Field
In most situations, computers that are seized as evidence are delivered to the person(s) who will perform a forensic examination of the digital evidence. This examination is then done in the (relative) comfort of a forensic lab setting. This isn't always the case, though, as situations may dictate a need for you to attend a crime scene to process and transport computers for later analysis.
One of my early forays into the field involved a multiple homicide, in which an entire family had been murdered (after which the killer committed suicide). Although everyone involved was deceased, there was a need to determine why the tragedy had occurred. The detective in charge of the case requested that I attend the crime scene so that I could seize the computer (properly package and transport it) and later perform a forensic examination of the data. While I was there, the Forensic Unit was still processing the crime scene. Afterward, I made a second trip to the family business, where another computer was seized. While I was there, the employees of the murdered family were grieving and were understandably distraught.
Although this was an unusual situation, it does illustrate the diverse locations one may visit in the field. Each location was also disturbing for different reasons. The first was a grisly crime scene, whereas the second was a business environment that was emotionally charged. It is also important that those planning to work in computer forensics are aware that the circumstances requiring your services can be unusual and disquieting.
When assessing the location, you should consider a number of factors. It may take considerably longer to collect evidence from some scenes compared to others, so an estimate should be provided to the investigator. If it will take awhile to collect the evidence, you should try to determine how your presence will impact the business. In some situations, it is better to remove a hard disk from a server, and to allow members of the company's IT staff to restore systems as swiftly as possible. However, even in the best of circumstances, a computer may be unavailable for some time, requiring personnel at the company to use other systems. If you will be on-site for some time, considerations may need to be made regarding who will perform other forensic examinations while you're unavailable.
Equipment and training may also be an issue in certain circumstances. In our previous example of a homicide scene, you may be exposed to blood spatters or other biological matter. In such cases, you may need to work in a suit that will protect you from biological hazards, or at the very least wear a mask and latex or vinyl gloves. The same could also apply if a computer is located in a marijuana grow operation, or a scene with chemicals or allergens present. By understanding the location in which an investigation will take place, you can better prepare for factors that will impact your ability to collect and examine evidence.
Evidence Assessment
The final step in evidence assessment specifically deals with the evidence itself. You should identify the stability of the evidence, and collect the most volatile evidence first before moving to nonvolatile evidence. In doing so, you should prioritize the collection and acquisition of evidence so that the evidence that is most likely to contain what you're searching for is examined first. For example, if a border guard discovered that someone had child pornography as the wallpaper on a laptop, you would obviously want to acquire evidence from the laptop and examine it first, before moving on to any CDs, DVDs, and other media that may also have been collected. Throughout this process, you should document any actions taken, and determine the best methods of relating that information. This may include taking notes, making diagrams, photographing items, or utilizing features available through forensic software.
When evidence needs to be transported, you should evaluate the condition and vulnerability of the items. Certain devices such as PDAs, cell phones, and laptops could simply be packaged in an evidence bag, whereas circuit boards and individual hard disks should first be stored in antistatic bags. In some cases, an investigator may also need to provide continuous electric power to battery-operated devices such as laptops that are low in power so that any volatile evidence isn't lost before it is delivered to you. Once the evidence has been acquired, you should then place the evidence in a secure location that is free of electromagnetic interference.
Acquiring Evidence
The next phase of processing evidence is acquisition. As we mentioned earlier in this chapter, acquiring evidence is the process of obtaining digital evidence from its original source. In doing so, it is vital that the original data isn't altered, damaged, or destroyed when making a copy from which the forensic technician can work.
The first step in acquiring evidence from a computer is to document as much information about the machine as possible. You should note the serial number and any identifying information on the computer so that you can prove that the computer that was taken from a crime scene was actually the one that evidence was acquired from at a later time. This is especially important when there is a backlog of cases, and the computer may have been stored until the examiner had time to work on the machine. In documenting information, you should also review information on any hardware and software configurations that were noted when the machine was seized, in case this needs to be duplicated on the examiner's machine.
If you are dealing with a hard disk that has already been removed from a computer, the tasks in acquiring evidence are considerably easier. You would simply attach the hard disk to the examiner's workstation in a forensic lab, or to a write protection device such as FastBloc (used with EnCase software that we'll discuss in Chapter 6), and then use forensic software to acquire its contents. However, generally you will be dealing with an entire computer or laptop, and not with individual components that have been seized. In such cases, you'll need to take steps to remove storage devices yourself. Disassembling the computer case will provide you with physical access to these devices, so you should ensure that you have taken precautions against static discharge and that you do not have the equipment close to any strong magnetic fields. Either of these can seriously damage computer components, so during the disassembly you should wear an antistatic wristband or stand on an antistatic mat.
Once the case has been opened, you can identify what hard disks and other components (for example, PC Card, network card, and so on) are installed, and you can begin to take steps to remove the storage devices. Before removing any storage devices, you should note how they are installed and configured so that they can later be reinstalled exactly as they were before. This could include taking a picture of the inside of the computer so that a visual reference is available for later. Once you've noted this, you should then remove the power connector or data cable from the back of the drive or motherboard. Doing so will prevent the destruction, damage, or modification of any data that is stored on the device in steps that follow. After disconnecting the storage device, you should make a note of the make, model, size, jumper settings, location, drive interface, and any other information you can see that will identify the hard disk and its settings.
Once you've removed the power connector or data cable from the hard disk, you can then take steps to retrieve information stored on the computer through a series of controlled boots. To perform a controlled boot and capture data stored in the CMOS/BIOS, you would start the computer and press the particular key on the keyboard that allows you to access the BIOS Setup for that particular machine. This is often displayed on the screen when the computer is first powered on, and is generally the Del or F10 key that accesses this program. However, you should check the manufacturer's Web site if it's not evident which key to press, as it can vary from system to system. Once you've entered the BIOS Setup, you can view the configuration information for that machine. You should note the date and time of the system, whether power on passwords has been set up, and the boot sequence of the machine. If the boot order of the machine isn't configured to first try and boot from a floppy disk or the CD-ROM, you may need to change this. However, before modifying these settings, document what the original settings were, and what you changed them to afterward.
After ensuring that the system is configured to first boot from a floppy or CD-ROM, you would then test your forensic boot disk to make sure the computer will boot from that drive properly. With the power connector or data cable still removed from the storage devices, you would insert the boot disk, and then boot the computer. If it boots from the floppy or CD-ROM, you would then reconnect the storage devices to prepare for a third boot. When the computer boots this time, document the drive configuration information, including the logical block addressing (LBA), large disk, cylinders, heads, and sectors (CHS), and whether the computer is configured to auto-detect any hard disks that are installed. Once this is documented, power the system down.
If possible, it is best to physically remove the hard disk from the computer that's been seized and connect it to a workstation in a forensic lab, or to a device such as FastBloc that prevents disk writes and works between the examiner's computer and the hard disk. If it is attached to the machine that will perform the acquisition, you can then use information acquired earlier from the CMOS/BIOS to properly configure the storage device so that it will be recognized. In some situations, such as those that follow, it may be easier or possible to read the hard disk only by leaving it installed on the suspect's machine:
▪ Laptop computers use different hard disks from desktop computers, although adapters can be purchased that will connect the hard disk to a desktop system. In some cases, removing the disk from the laptop may be difficult, and reading the disk may not be possible if the appropriate adapter to connect the drive to a ribbon cable is unavailable.
▪ Equipment requirements, such as when the disk is used for network storage and network equipment is needed to access the data, or when other equipment (such as the adapters mentioned previously) are not available to the technician performing the examination.
▪ Redundant Array of Inexpensive Disks (RAID) technology may need to be left in an array, as attempting to acquire data from such disks individually may not provide results that are usable.
▪ Legacy equipment. In some cases, older drives may not work with newer systems, making it impossible to read the data.
If the hard disk isn't going to be connected to the examiner's machine, you will need to leave it installed on the suspect's machine. Depending on the forensic software being used, the examiner could then attach a CD-RW or other storage device to the machine, or connect to the machine using a network cable, null modem cable, or other method of allowing communication between the two machines. Regardless of the method used to connect the machines, the data that's acquired and saved as image files should be stored on forensically clean media.
Write protection is an important part of acquiring data, as it will prevent any data from being written to the suspect hard disk. If hardware-based write protection is used, it should be installed prior to starting the computer, whereas software-based write protection should be activated immediately after booting the system with the examiner's operating system or boot disk. Once it is started, you should then attempt to capture and document any electronic identifiers the disk might have, such as its electronic serial number. Once these facts about the disk have been recorded, you are then ready to begin to acquire the data using methods that won't modify data on the disk, such as by using disk-imaging software to duplicate the data.
Disk Imaging
Disk imaging is accepted as standard practice in computer forensics to preserve the integrity of the original evidence. Disk imaging differs from creating a standard backup of a disk (for fault-tolerance purposes) in that ambient data is not copied to a backup; only active files are copied. Because a backup created with popular backup programs such as the Windows built-in backup utility is not an exact duplicate (in other words, a physical bitstream image), these programs should not be used for disk imaging. Programs such as Norton Ghost include switches that allow you to make a bitstream copy, but these programs were not originally designed for forensic use and do not include the features and analysis tools that are included with imaging programs and stand-alone imaging systems designed especially for forensic examination.
Bitstream Copies
Digital evidence is, by its nature, fragile. Some data is volatile—that is, it is transient in nature and, unlike data stored on disk, will be lost when the computer is shut down. Data on a computer disk can be easily damaged, destroyed, or changed either deliberately or accidentally. The first step in handling such digital evidence is to protect it from any sort of manipulation or accident. The best way to do this is to immediately make a complete bitstream image of the media on which the evidence is stored.
A bitstream image is a copy that records every data bit that was recorded to the original storage device, including all hidden files, temp files, corrupted files, file fragments, and erased files that have not yet been overwritten. In other words, every binary digit is duplicated exactly onto the copy media. Bitstream copies (sometimes called bitstream backups) use CRC computations to validate that the copy is the same as the original source data. The “mirror image” should be an exact duplicate of the original, and the original should then be stored in a safe place where its integrity can be maintained. The copy is made via a process called disk imaging. In some cases, evidence could be limited to a few data files that can be copied individually rather than creating a copy of the entire disk.
Using Disk Imaging to Create Duplicate Copies
Disk imaging refers to the process of making an exact copy of a disk. Imaging is sometimes also called disk cloning or ghosting, but the latter terms usually refer to images created for purposes other than evidence preservation. Disk imaging differs from just copying all the files on a disk in that the disk structure and relative location of data on the disk are preserved. When you copy all the data on a disk to another disk, that data will usually be stored on the new disk in contiguous clusters as there is room to store it. That way, all the data on the two disks will be identical, but the way that the data is distributed on the disks will not. When you create a disk image (a bitstream copy), each physical sector of the disk is copied so that the data is distributed in the same way, and then the image is compressed into a file called an image file. This image is exactly like the original, both physically and logically. There are a number of different ways to create a bit-level duplicate of a disk, including:
▪ Removing the hard disk from the suspect computer and attaching it to another computer (preferably a forensic workstation) to make the copy
▪ Using a stand-alone imaging device such as the DIBS Rapid Action Imaging Device
▪ Using a network connection (Ethernet connection, crossover cable, null modem cable, USB, or the like) to transfer the contents of the disk to another computer or forensic workstation
Which of these methods you choose will usually depend on the equipment that you have at hand. A portable forensic workstation or stand-alone imaging device is probably the best solution, but it's also the most expensive.
Examining Evidence
The examination of evidence occurs after it has been acquired using forensic software. Working from an image of the original machine, you can extract files and other data from the image to separate files, which the examiner can then review. For example, a Microsoft Word document found in the image of the suspect machine could be extracted, allowing it to be opened and viewed in Word without modifying the original data or that available through the disk image. In this example, the file is first extracted and then analyzed to determine what value it holds as evidence. Although every file may not be individually examined in this manner, the process of analyzing data does require a repeated process of extracting data stored in different areas of the machine, and then determining its value to the investigation.
Extracting data from the machine isn't limited only to files that are available to the operating system, file system, or other software that may have been installed on the machine. By viewing various areas of the disk, you can access and examine file fragments and data that has been corrupted or deleted. Extraction of evidence from a hard disk can occur at either of two levels:
▪ Logical extraction
▪ Physical extraction
A logical extraction is used to identify and recover files based on the operating system(s), file system(s), and application(s) installed on the computer. This type of extraction allows you to identify what data is stored in active files, deleted files, slack space, and unallocated file space. This type of examination would find information that is available to the operating system, and/or is visible to the file system on the suspect's computer. When this type of extraction occurs, any or all of the following actions might be performed:
▪ Extraction of file system information. This is done to identify the structure of folders, as well as the names, locations, sizes, attributes, dates, and timestamps of files.
▪ Extraction of files relevant to the investigation, which would be based on the name, extension, header/footer, content, and/or location of the file on the drive.
▪ Extraction of data that is encrypted, password-protected, and/or compressed.
▪ Extraction of data in the file slack. As we discussed in Chapter 4, a cluster is a group of disk sectors where data is stored, and to which the operating system assigned a unique number to keep track of files. Because the cluster is a fixed size in operating systems such as Windows, the entire cluster is reserved for a file even if the file doesn't fill that amount of space. This unused space is referred to as slack space.
▪ Extraction of data in unallocated space. Unallocated disk space is the part of a hard disk that is not part of any partition. For example, if you had a single 1GB partition that was assigned a drive letter (such as C:), this would be allocated space. However, if the drive was larger than 1GB, the remaining space on the drive would be unallocated space. Even though it hasn't been allocated to a partition, it may still contain damaged or deleted data.
▪ Recovery of deleted files. As we'll see in Chapter 6, you can use various techniques and tools to recover data that been deleted.
▪ Reduction of data, which would reduce the number of files returned by eliminating known files.
A physical extraction is used to identify and recover files and data across the entire physical hard drive. Because it occurs at the physical level, the file system used on the hard disk doesn't matter. A physical extraction may involve a number of different methods to find data that is stored on the computer, including:
▪ Keyword searching Extracting data in this way involves searching for specific data using specific keywords. Because the search occurs at a physical level, it can find data that is stored anywhere on the hard disk.
▪ File carving In this case, utilities will recover files or file fragments by looking for file headers/footers and other identifiers in the data. This is particularly useful when attempting to find data that has been damaged or deleted, was located in corrupt directories on the disk, or was stored on damaged media.
▪ Partition table and unused space examinations Examining the partition structure can help you to identify the file system being used and determine whether the physical size of the hard disk is accounted for.
Once the data has been extracted from the computer, it can then be analyzed. This involves looking at the data and determining whether it's relevant and significant to the case. Although an investigator may analyze data such as pictures that have been found on the machine, or may perform subsequent analysis on various files that have been recovered, the person examining the machine will perform a significant amount of this work to limit the amount of information that is later provided to the investigator of the case. Various types of analysis include:
▪ Time frame analysis
▪ Data hiding analysis
▪ Application and file analysis
▪ Ownership and possession analysis
Time Frame Analysis
Timeframe analysis is used to determine when files were downloaded, viewed, or modified on a machine. It can be useful in constructing a sequence of events, or associating a particular user to a time period. Using the date and timestamps on files, which show when a file was created, last accessed, or modified, a time frame can be established that shows when particular events occurred. In addition to this, dates and times stored in logs and other system files can show when a particular user logged on to a system or performed some action.
Data Hiding Analysis
Data hiding analysis involves looking for data that may be hidden on the hard disk. By concealing the information, the person who hid the information hopes it will avoid detection from casual or forensic detection. Although some techniques for hiding data may require special tools, others may be simple to detect if you're aware of the methods being used. In Chapter 7, we'll discuss a number of these tools and methods in great detail.
Steganography
Steganography (from the Greek word for covered writing) refers to a method of hiding data—not just concealing its contents as encryption does, but concealing its very existence. Steganography is usually used in conjunction with encryption for added protection of sensitive data. This method ameliorates one of the biggest problems of encrypting data—the fact that it is encrypted draws the attention of people who are looking for confidential or sensitive information. For more information on steganography, see Chapter 7.
Application and File Analysis
Application and file analysis is used to identify what kinds of programs the suspect is using, to identify common file types used for specific purposes relevant to the investigation, and to associate files that have been located on the drive with particular software. Often, people will use certain patterns to name files or directories, whether it is to be as specific and detailed as possible (for example, TaxReturn2007.q07) or to hide the contents by using a specific code (for example, cp13yf.jpg to indicate child pornography depicting a 13-year-old girl). By identifying these patterns and their relevance, you can expand your search to look for other files with these features.
Some files can be associated with specific applications, to identify what programs are commonly being used. For example, you could identify files in a Temporary Internet Files directory to those used with Internet Explorer, whereas other files could be associated with e-mail programs. In doing so, you can determine what programs are being used. Similarly, by reviewing the Internet history and messages in the e-mail software, you could correlate files that have been saved to those sent or received via e-mail, or downloaded from a particular Web site.
The most direct method of determining what's in a file is, of course, to examine the contents. To identify what is depicted in an image, or the data in a spreadsheet or document, you will need to view the contents and determine their relevance to the case. To reduce the number of files you'll need to review, you should perform other actions mentioned in previous sections to narrow down what needs to be viewed.
Ownership and Possession Analysis
Ownership and possession analysis is used to identify who created, modified, or accessed files on a computer. By identifying the individual who created, viewed, or downloaded a particular file, you can associate the existence of a file to the actions of a person. For example, if a person said that he or she hadn't seen a file, you could show that the file's ownership belonged to that person's user account, and by identifying the last time it was accessed, you could show that the person had reasonable knowledge of its existence. In this example, you can see that this type of analysis can easily be used with time frame analysis to show when a particular person used the computer and had access to a particular file.
Ownership of a file can be displayed through the properties of a file. In looking at the properties of a file, you can view who the current owner of a file is. If multiple users are on a machine, you can associate who owns the file with the person who uses that particular account. In knowing this, you can then peruse firewall logs or other resources to obtain additional information about the user's actions.
Documenting and Reporting Evidence
Because any evidence may be used in possible criminal proceedings, thorough documentation cannot be stressed enough. Documentation provides a clear understanding of what occurred to obtain the evidence, and what the evidence represents. No matter what role you play in an investigation, you must document any observations and actions that were made. Information should include the date, time, conversations pertinent to the investigation, tasks that were performed to obtain evidence, names of those present or who assisted, and anything else that was relevant to the forensic procedures that took place. We will discuss documentation in depth in Chapter 15.
Closing the Case
Regardless of what the investigation entails, there comes a time where every case must be closed. Once the analysis has been completed and a sufficient amount of time has passed, you will need to accept what has been found and move on to another case. If certain evidence has been found, it may even be decided that additional evidence on the computer isn't necessary for the case. For example, if you've found the smoking gun in the case (such as dozens of child pornography pictures), additional evidence may be unnecessary if enough has been found to pursue a conviction. Once you're satisfied that based on the search parameters you have, the analyses you've performed are complete and there's little to nothing else to find, it is usually time to stop. After all, no one makes a career of a single case.
After a final report has been prepared and submitted to the investigator and/or prosecutor, you should follow up to identify what actions (if any) are being taken regarding the case. In some situations, new information that can be used to search for evidence may become available, and you may be asked to revisit the machine or examine new sources of data (such as other machines, devices, or storage sites) and try to find more. Other times, you will find that the person has taken a plea bargain (ending your role in the process), or that a trial will be underway at some point in the future. By following up with investigators, you will be able to determine what will occur next in the case.
At some point, any evidence you've acquired and analyzed will no longer be needed. Policies dealing with the destruction and disposal of evidence should be in place, to provide a guideline for how long you should keep property that's been seized, and disk images that have been acquired from machines, media, and devices. When the date approaches, you should contact the investigator, as he or she will be able to inform you whether the evidence should be retained longer. In some situations, evidence will be retained in the event of an appeal or delays in hearing the case in court or other hearings.
Summary
Computer forensics is used to collect, examine, preserve, and present data that is stored or transmitted in an electronic format. This branch of forensics uses scientific methods to retrieve and document evidence located on computers and other electronic devices. Using specialized tools and techniques, digital evidence may be retrieved in a variety of ways. Such evidence may reside on hard disks and other devices, even if it has been deleted so that it's no longer visible through the normal functions of the computer, or hidden in other ways. Forensic software can reveal this data that is invisible through normal channels, and restore it to a previous state. Because the purpose of computer forensics is its possible use in court, strict procedures must be followed for evidence to be admissible.
For evidence to be used in court, numerous standards must be met to ensure that the evidence isn't compromised and that information has been obtained correctly. If you don't follow forensic procedures, judges may deem evidence inadmissible, defense lawyers may argue its validity, and the case may be damaged significantly. In many cases, the only evidence available is that which exists in a digital format. This could mean that the ability to punish an offender rests with the quality of the evidence you've acquired, authenticated, examined, and presented to the court through thorough documentation and testimony.
Frequently Asked Questions
A Before transporting evidence, you should ensure that it is protected from risks of being damaged. Hard disks and other components should be packed in antistatic bags, and other components should be packaged to reduce the risk of damage from being jostled. All evidence should be sealed in a bag and/or tagged to identify it as a particular piece of evidence, and information about the evidence should be included in an evidence log.
Q I'm new to cybercrime, but I really want to get involved. Should I jump right into doing forensics?
A Although a plethora of training is available in the field of digital forensics, you may want to consider getting acclimated to crimes with a cyber component before jumping into forensics with both feet. Much of what we discussed in this chapter reflects the belief that most cybercrime is just plain old crime. Whereas we may hold this belief to help those who dislike technology realize that they can still work computer crime cases without having a thorough knowledge of computers, we may suggest the same train of thought to you; there is plenty of crime to investigate that has a cyber component which does not require a forensic examination. Tracing e-mail harassments, responding to threats over chat, and investigating sexual solicitations over IM are but a few of the types of crimes that can be investigated without immediately requiring a forensic exam. Our recommendation is to find a training course that focuses on the investigation of Internet-related crime—the skills you learn in a class such as this won't be wasted if you choose to go the forensics route in the future. By the way, focusing on crimes that you can investigate without requiring a forensic examination will make your chief a lot happier than your request to purchase $20,000 of software equipment to start processing forensic cases.
Q I want to get involved with catching predators online. I've seen the TV shows and there doesn't appear to be anything to it. Why should I bother to learn all the technology junk if I don't need to?
A Little technical knowledge is required to “chat” with a potential suspect, and if everything goes according to plan, the suspect shows up at your door and you take him or her into custody. But what happens when things don't go according to plan? Are you aware of the underlying software or process that makes the chatting possible? Is your machine configured correctly and protected appropriately? (Naming the computer DetectiveDesk22 may show up during a scan of your computer and may blow your cover.) Are you knowledgeable about how the particular chatting software works? Does it use a proxy? Will it provide you with a direct connection during a file transfer or Webcam stream—and if so, do you have the skills to capture the bad guy's IP address during that exact moment of transfer? Do you have the skills to properly set up an online identity and protect it from discovery? Although the initial setup of the identity may be trivial, the long-term maintenance and believability of the profile may affect your investigations.
In principle, it sounds like a good idea to get a screen name together to begin enticing predators into the stationhouse, but obtaining basic computer investigative skills will go a long way toward conducting more successful and productive investigations. Further, these skills may prove critical one day when a predator shoots you a Webcam image of a child held hostage—that exact moment is not the time to begin learning about the underlying technology. You need to acquire and practice these skills before you're employed in active operations.
..................Content has been hidden....................
You can't read the all page of ebook, please click here login for view all page.