
Chapter 8. iPod, Cell Phone, PDA, and BlackBerry Forensics
Introduction
Consider any popular technology, and most likely it was introduced as an expensive status symbol, but within a few years became something so affordable that almost everyone had one…or at least wanted one. Today, portable music players, cell phones, and devices such as personal digital assistants (PDAs) have become commonplace. However, just as your friends, colleagues, and family may have one or more of these devices, criminals also use them for more illicit purposes. Increasingly, drug dealers and other criminals use these communication devices to store information about customers and associates. As we'll see, the iPod is becoming a medium to store much more than just music.
Because cell phones, PDAs, and BlackBerry devices also provide the ability to access the Internet, they are as much a source of evidence in cybercrime cases as a computer is. Although a laptop or desktop computer may not have any illicit e-mails or illegal files downloaded from the Internet, these other technologies may have been used to transmit or receive the evidence.
This chapter will demonstrate how iPods and other MP3 players can be used to store any type of data or information that can be stored on a regular personal computer. The data can be encrypted, hidden, and easily manipulated by the user. In this chapter, we will explore the ways to store, access, and find data stored on iPods, and the tricks people use to hide malicious data. We will also discuss the concept of conducting a forensic investigation on data that has been read, stored, or manipulated on some type of mobile device. The techniques for investigating a mobile device are similar to those we would use to investigate more traditional storage devices; however, there are some notable differences that we need to be aware of while collecting potential evidence.
iPod/MP3 Forensics
In the late 1990s, digital music began to gain in popularity. The MP3 music format was portable and the sound quality was closer to that of compact discs than the analog tapes that had been used for decades prior could ever be. The MP3 format used compression so that the files were small in size and you could easily store and listen to them on a personal computer.
Before the paint had even dried on MP3 technology, people had figured out ways to cheat the system. The new MP3 technology led to two of the first file-transferring networks: Napster and Gnutella, which allowed users to share and download music without purchasing it, leading to government and retail industry outrage and uproar. This was a gray area at first, because there were no laws on the books about file transferring or sharing from peer-to-peer (P2P) networks and individual users. Eventually Napster, Gnutella, and most other similar networks were shut down by government authority.
Soon after MP3 technology caught on, the first digital media players became available, but there was still not a commercially viable way to legally purchase and download MP3s until 2000–2001, when Apple released the iPod and its iTunes online retail download service. Suddenly consumers had a very good way to legally purchase music and transfer it to their iPods or other digital media players. The digital music industry boomed, and since then it has become a powerful segment of the music business as a whole.
Although there are many different brands and types of digital media devices, Apple's iPod accounts for more than 80 percent of the digital media market. Far be it to say that there aren't other MP3 players on the market. Many are available, holding the equivalent of a CD's worth of music to dozens of gigabytes of data. The storage capacities of these devices increase every year or so, with the price constantly dropping. An example of this is the MP3 player depicted in Figure 8.1, which holds 512 MB of data and was purchased at a toy store for $15.
 |
| Figure 8.1 The Nextar Digital MP3 Player |
As shown in Figure 8.2, when you plug the MP3 player into a computer's Universal Serial Bus (USB) port, you can view the data as any other type of removable media. Plus, you can store files on the MP3 player, even if they aren't music files. Saving such files on the MP3 player won't affect the ability for other music files to play on the device. The exception, of course, would be if you modified the names and extensions of the files, making them appear as MP3 files, even if they are documents or image files (as in the case of renaming a JPEG to MUSIC.MP3).
 |
| Figure 8.2 Files Stored on an MP3 Player |
Why Is an iPod Considered Alternative Media?
iPods have standard file systems of either Apple's HFS+ or Microsoft's FAT32, which we will explore in greater detail later. These file systems are static because they are not continually transferring data like other types of file systems, such as cell phones, for instance. Because of their static nature, performing forensics on MP3 players is not substantially different from performing forensics on a regular computer hard drive. The difference between the two that makes an MP3 player an alternative media device is that its primary function is that of a music player. Even though MP3 players have always been able to store files like USB flash drives have, only recently have iPods evolved into photo storage and video player devices. Because they are used for entertainment purposes, iPods might not be thought of as data repositories containing evidence.
Imaging and Hashing
The first step in iPod forensics is to create an image of a device and hash it to ensure integrity. As we've discussed in previous chapters, with digital evidence, we do not work on original evidence. Instead, we attempt to create a duplicate of the evidence. This duplicate can be an exact replica of all data contained on the device. There are two types of images: physical images and logical images. A physical image is a bit-for-bit copy of all data contained on a device, and a logical image is an image of the file system exactly as it appears on a device. For forensic purposes, a physical image is always the preferred type.
To preserve the integrity of the data, forensic examiners perform what is called a “hash” at every step of the way. A hash is a one-way mathematical algorithm that acts as a “fingerprint” of all data contained on a device. This ensures that the data has not been altered from its original state at any point during the imaging process. You can perform a hash by using a tool such as md5sum. First you apply the tool to a file, and it returns a number that corresponds to a particular algorithm. Then the imaging is performed and you rerun the md5sum tool. If any part of that file is altered after you rerun the md5sum tool, the number will change, signifying a potential loss of evidence integrity. This will ensure that the data you are working on has not been altered.
Another way to preserve the data is to use a write blocker. Write-blocking a device will protect the device from any manipulation. It will essentially guard your evidence from being written to during imaging. This way, if you happen to make an error, your evidence will be protected. A write blocker typically comprises visible external hardware, such as Logicube's Forensic Talon or Intelligent Computer Solutions' (ICS) Solo III. A hard drive is physically attached to one of these devices, which will ensure that no writes can be made to the evidence contained on that drive.
Because iPods do not have Integrated Drive Electronics (IDE) interfaces and they use FireWire or USB, they cannot be synced to standard IDE imaging devices such as the Solo III without a USB adapter. Similarly, an iPod should not be synced into a forensic tower and imaged using a Windows-based tool. When you plug any USB or FireWire device into a Windows machine, Windows will “touch” the device and change the files contained on the device. One of the most important rules that forensic examiners must follow is not to alter evidence, including date and time stamps on evidence.
Hardware versus Nonhardware Imaging
As we saw in Chapter 6, you can image data using hardware and software operating systems. It is highly recommended that if you have a hardware device that has a USB and/or FireWire interface, you should image the data using the hardware device. Hardware devices write-block very well and they leave little room for error. An excellent hardware device is the Tableau Forensic USB Bridge, but others like it are available on the market. They are relatively inexpensive and user-friendly. A nonhardware solution, such as an operating system like Linux or DOS, can be configured to not automatically mount a device when imaging. Linux is not a substitution for a write blocker, and it is susceptible to human error.
Removing the Hard Drive
It is possible to obtain an image by removing the hard drive from an iPod if the iPod does not use flash memory. See the section “Types of iPods,” later in this chapter, to see which ones contain hard drives. You can remove a hard drive from an iPod, but this is prohibitive because removing a hard drive could break the device.
Acquiring Data
Once you have write-protected the device, you can then use any number of tools to create an image. You also can use on the device EnCase and other software used to create a forensic image of hard disks. Another method you can use, but only if absolutely necessary, is to employ an operating system such as Linux for imaging. You can configure Linux to not automatically mount a USB device when the device is plugged into your forensic tower. This means that in theory, an iPod would remain untouched with files being unaffected when plugged in. This method allows for no write protection, however. If you make a mistake, you could destroy your evidence. We suggest that if you use this method, you employ the Linux command dd or the DCFL lab version, called DCFLDD, to image the device.
DD
The dd command is a common UNIX command that is also used in Linux, and is used to convert and copy data. A version of DD is also available for systems running Windows, which is available from either http://unxutils.sourceforge.net or www.cygwin.com. It allows you to copy a hard disk to another disk drive or to magnetic tape, or vice versa. In doing so, data is transferred byte for byte, creating an exact mirror image. The syntax for using this command is:
dd <options>
As you can see from this syntax, options are used with this command to specify different aspects of converting and copying data. For example, if you wanted to copy the contents of one disk to another, you would use the command with the if (input file) and of (output file) options:
dd if=/dev/hda of=/dev/hdy
Similarly, if you were going to back up the disk to an image on a hard disk, you could use the following example:
dd if=/dev/hda of=/path/to/image
You can use additional options with the dd command to specify the size of blocks to copy, whether data is to be converted when copying, and other options, as shown in Table 8.1.
Using DD to Create an Image
Using DD to create an image of an iPod or MP3 player involves several steps. The steps to perform this method follow.
The first thing that you see is the fdisk output of the device, with two partitions. In this case, the device /dev/sdd corresponds to the iPod device which is the target of the imaging process. The first entry in fdisk's output for /dev/hda corresponds to the hard drive of the host computer used in the imaging operation and can be safely ignored (see Figure 8.3).
 |
| Figure 8.3 fdisk Output |
It is important to remember that the whole point of imaging in this way is to not mount the device. You can do everything you need to image the device without mounting.
The next step is to collect the MD5 hash of the device. You can perform this step in multiple ways, such as using another hashing tool or outputting an MD5 file to another directory. Figure 8.4 shows the command syntax for running the MD5 checksum utility md5sum on the target device /dev/sdd and storing the result in the file /root/ipod.before.md5.
 |
| Figure 8.4 Collecting an MD5 Hash |
Next, you view the /root/ipod.md5 file to make sure the hash is valid (see Figure 8.5). In forensics, it is good to double-check your work at every point, especially when there is no hardware write protection.
 |
| Figure 8.5 The more Command Displaying the Contents of the File to the Screen |
The next step is to create an image file from the device. This example uses the Linux dd command to image the data (see Figure 8.6). The BS option stands for “block size.” Block size can change as desired, and has no impact on the data copied, except to optimize the throughput rate of the copy by copying that many bytes on each copy operation. The next two commands are the input file and the output file. It is important to double-check that an iPod device is the input file and not the output file. Putting the iPod device as the of parameter could alter the contents of the evidence drive!
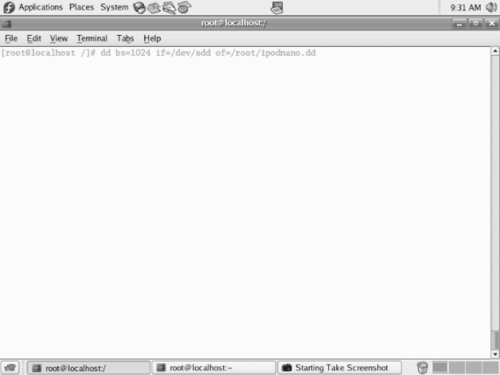 |
| Figure 8.6 Imaging a Device |
Figure 8.7 is an example of a completed dd function.
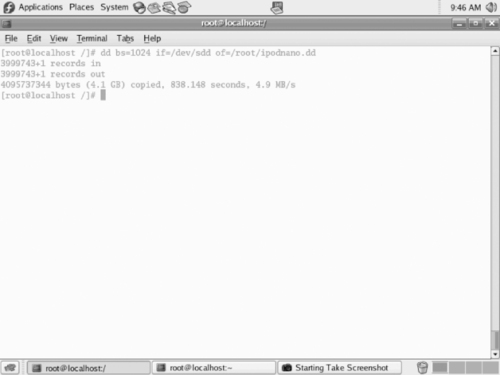 |
| Figure 8.7 A Completed dd Function |
After the image is complete, you would then perform another hash to ensure that the data has not been changed. As shown in Figure 8.8, by comparing the two hashes, you can then see that the data has not changed.
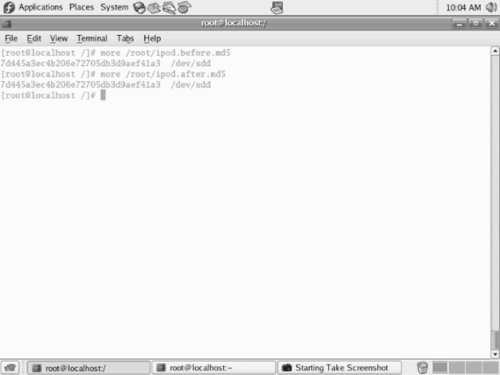 |
| Figure 8.8 Comparing the Two Hashes |
As the previous example shows, the before and after hashes of the iPod device are the same, which means nothing on the evidence drive was altered. Additionally, a hash of the forensic copy should be made to ensure that the hash of the image file is the same as that of the iPod. This proves that the image contains the exact same data as the iPod and that the “dd” of the drive worked correctly.
Registry Keys
If you are using a Windows-based imaging tool such as Guidance Software's EnCase, you can use a key in the Windows Registry to write-block a USB device that is plugged into a forensic tower. This will keep Windows from writing to evidence. Doing a Web search on “write-blocking USB device” will give further information on the steps necessary to carry out this procedure.
It is important to remember that using Linux or a Registry key edit for imaging is a last resort. It is always better to use a hardware write-blocking device. You can find many guides online that will detail the steps you need to follow if you choose to take this route. You can also go to www.windowsitpro.com/windowsstorage/Article/ArticleID/44380/44380.html.
Types of iPods
iPods come in many different physical and firmware versions. The first generation of iPods became available to consumers in October 2001. They had a storage capacity of up to 10 GB. Apple has introduced many subsequent generations of the iPod. With each new generation, features became enhanced, including the addition of color screens, and video storage and playback capability. The storage capacity increased as well. Newer iPods can have storage capacities of up to 80 GB, using a Toshiba 1.8 hard drive.
The iPod Mini debuted in January 2004. The Mini was the first iPod available in various colors and was substantially smaller than other models. Storage capacity for the Mini was up to 6 GB, using a 1-inch Hitachi Microdrive.
The iPod Nano was the new version of the Mini. It was even sleeker and smaller and came in either black or white. Current Nano models have a storage capacity of up to 8 GB, using flash memory. The Nano has the ability to store and show digital photographs and video via a color screen.
The iPod Shuffle appeared in January 2005. The Shuffle used flash memory instead of a hard drive. The first Shuffle was smaller than a pack of gum. Unlike the other iPod models, it had no LCD display. The second-generation Shuffle was even smaller than its predecessor.
File Types Supported
Currently, iPods support the following file types: Advanced Audio Coding (AAC), Protected AAC, MPEG Audio Layer III (MP#), Variable bit rate MP# (MP# VBR), Audible Audiobook, Apple Lossless, Audio Interchange File Format (AIFF), Windows Audio, and Compact Disc Digital Audio, JPG, JPEG, TIF, TIFF, GIF, PNG, BMP, PSD, SGI, MPEG-4, and H.264.
File Systems
A file system is what organizes the files that are accessed by a computer's operating system and other software installed on the machine. We discussed file systems at length in Chapter 4. Just as computers may use different file systems, devices such as MP3 players also use various file systems to access files. The file system used needs to be one that's supported by the computer that will be used to copy music and other files to the MP3 player.
The iPod uses two standard file systems: Microsoft's FAT32 and Apple's HFS+. The FAT32 file system is compatible with Apple Macintoshes and Windows PCs. HFS+ is writeable only with Macintoshes. If a user has an iPod formatted with FAT32 and both a Macintosh and a Windows-based PC, he can read and write to the iPod using both file systems. Such a user can also write and read to the iPod using Linux. The iPod is essentially a storage device and you can configure it to use almost any file system. I have used the extended 2 and 3, as well as FAT16 file systems on my iPods.
“Hacking Tools” and Encrypted Home Directories
Because an iPod or other MP3 players can be used to store data other than music files, it follows suit that they can also be loaded with hacking tools or malicious software. For example, by repartitioning an iPod Shuffle, you can create enough space to install a bootable Linux distribution that contains various “hacking tools,” including the popular Metasploit. The iPod control folder is left intact, along with all of the other folders needed for the iPod to function normally. By plugging the iPod into another machine, you can then boot it into Linux and use Metasploit or another hacking tool to break into another machine and access its data. Even if an iPod appears to act like it should, it may not in fact be what it seems.
Mojopac is another hacking tool for use with the Windows operating system. Mojopac allows a hacker to use an iPod as a virtual Windows desktop. Plugging an iPod into the USB port on a Windows computer copies the applications on that computer's desktop and allows the iPod to become a working virtual machine. For more information or to purchase this tool, go to www.mojopac.com.
Another hacking technique using iPods is called “slurping.” Slurping uses a tool called Slurp that captures documents, spreadsheets, and other files from the desktop of a computer using an iPod via the computer's USB port. This can be useful or malicious. For example, a malicious user could ask you whether she can use your computer to charge up her iPod using a USB port on your computer. Once the iPod is synced to the computer, Slurp captures all the documents and spreadsheets on your computer's desktop. You can find the original article and code at www.sharp-ideas.net/pod_slurping.php.
Evidence: Normal versus Not Normal
When conducting an exam, forensic examiners need to know the distinction between normal data files and evidence that is not normal. Depending on the firmware and version of a particular iPod, there may be some variance in this determination throughout an analysis. For example, on older iPods, the song-naming convention displays the entire name of a song plus the music file extension, whereas on newer iPods songs are displayed with a four-letter code in addition to the file extension.
In Figure 8.9, you see the main directory structure of an iPod Nano, which contains the iPod_Control, Device, iTunes, Music, and Artwork main directories. The New Folder icon is not typical.
 |
| Figure 8.9 An iPod Nano's Directory Structure |
The Device folder contains files with some important information about the iPod, such as the firmware version and serial number. One of the files that forensic examiners should note is the iTunes DB file, which provides information about music files, including their file type, their music category, and the location on the device. This file is controlled by the iTunes software (see Figure 8.10). If a user manually moved a file onto an iPod, it would not be listed in the iTunes DB file. The file is found in the iPod_Control/iTunes directory.
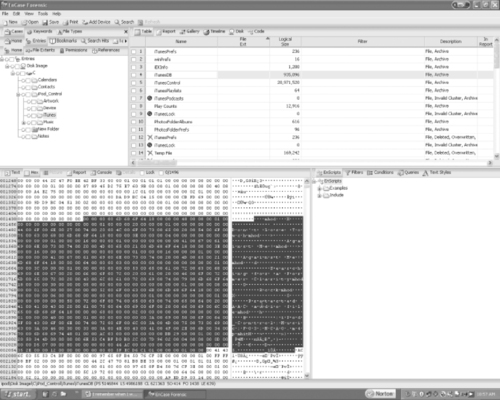 |
| Figure 8.10 An Example of the iTunes DB |
The iPod Shuffle has a file called iTunes SD, which provides MP3 location and song title information. The shuffle is the only iPod which contains this file. The iPod_Control directory is the control center of an iPod. It contains the Music and iTunes directories. This is where all music files are stored by default. All music files are dispersed into various directories, each named F##. Further investigation of the directories reveals the actual music files themselves. Newer versions of iTunes will condense MP3 or other digital-music-formatted songs into four-letter codes followed by an extension, as shown in Figure 8.11 and as discussed earlier.
 |
| Figure 8.11 An Example of an MP3 File on an iPod |
When you are looking at digital photos or video files on an iPod, it is important to understand that the photos or videos themselves may be important evidence. The evidence could reside in plain sight on the iPod, or it could be hidden inside folders. For example, in a child pornography case, photo or video evidence might be in the default photo and video directories. Further investigation might be necessary to uncover hidden evidence.
Other directories are the Contacts, Podcasts, and Notes directories. Different versions of iPods have slightly different directories. For example, the iPod Shuffle has the Shuffle DB but does not have a picture-viewing directory. If there are photos in a Shuffle directory, those photos were placed on the device manually, not using the iTunes software.
Uncovering What Should Not Be There
Just because an iPod has been manipulated or changed from its factory configuration does not necessarily mean that suspicious activity is occurring. Many people like to change or hack their iPods. Sometimes it can be innocent, but other times it can be a telltale sign of malicious activity.
Suspicious items to look for are things such as mismatched file extensions. An example is a .jpeg file with an .mp3 extension. Most forensic tools are able to detect such discrepancies by using signature analysis tools. These tools find files that have a header that is different from the extension. You can configure most forensic tools to add custom file signatures.
Other suspicious items are hidden or improperly named files, which include files named something innocuous—for example, a photo that is named to look like an MP3 file. Additionally, files that should arouse suspicion could include those with blatantly outrageous names, such as “hax0r.”
Too many partitions indicate that an iPod is not set to the factory default and should be looked at carefully. A file system other than the standard FAT32 or HFS+ installed on an iPod could indicate suspicious activity.
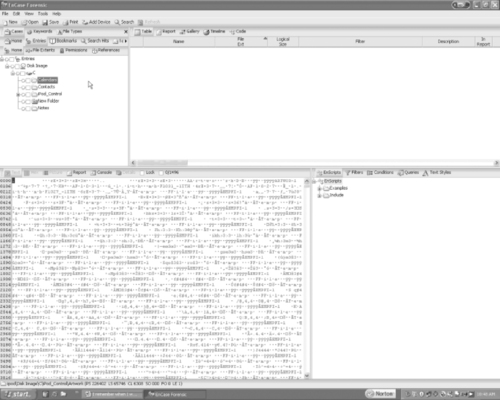
For example, the image in Figure 8.12 appears to contain a normal iPod directory structure. However, there are a few unusual items that bear notice, such as a Knoppix directory and the syslinux.cfg and ldlinux.sys files, which indicate that this iPod has some form of Linux on it. Also of note is the framework-2.5 directory. This directory contains the Metasploit hacking tool which you can find at www.metasploit.com. In this case, it happens to be Damn Small Linux (DSL), a very small, bootable version of the Linux operating system. There is also a slurp-audit directory, which is very suspicious.
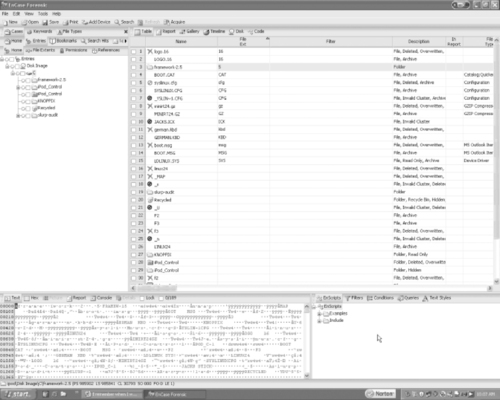 |
| Figure 8.12 A Suspicious iPod |
Another tactic that users employ to disguise files is to insert text within a music file. A hidden message such as “The cow jumps over the moon at noon” might be inserted into an MP3 file. The MP3 will still play normally, which makes it difficult to detect. In this case, the best way to detect text within an MP3 file is through keyword searches. It is also possible to get hashes of songs from Apple and compare them to the song hashes on the suspect device. This will not show up on signature analysis because the actual file header will still match its extension.
Yet another way to hide photos is to make them cover art. With the color iPods, users can match cover art to music files. Default cover art is often included in songs purchased from iTunes. There are also Web sites that have current cover art. Users have the option of changing the cover art to suit their preferences, making it a good place to hide bad photos.
iPods for Storing Illegal Material
At a conference, a colleague had a conversation with a federal agent about a child pornography case that he had worked on. He and his colleagues had raided the suspect's home as usual, but noticed that the suspect was strangely unalarmed and even smirking as the agents copied all the data from his computers. He continuously proclaimed his innocence. The agent remembered a presentation about iPods being used to store data and noticed that the suspect had an iPod on his desk. According to the warrant served on the suspect, the agents were permitted to seize all electronic equipment capable of storing data. The agent picked up the iPod, and suddenly the suspect's demeanor and attitude changed—he turned pale and became agitated. Before the raid was finished, the suspect had confessed that he routinely erased his computers' hard drives after transferring all of his child pornography photographs to his iPod. The evidence resulted in a conviction.
Analysis Tools
Forensic examiners can use almost any forensic tool that supports FAT32 or HFS+ for analyzing iPods, including Guidance Software's EnCase, AccessData's FTK, Brian Carrier's Sleuth Kit, and Paraben's P2. All of these tools utilize similar functionality to carry out analyses. All have a relatively intuitive user interface. The Sleuth Kit is primarily for more advanced users and runs only on the UNIX/Linux platform. All of these tools are commercially available; the Sleuth Kit is downloadable free of charge. Not all of these tools will support the HFS+ file system, so users may be limited by particular file system parameters. All of these tools are capable of rendering image files and text files, and they have keyword search capability. A forensic examiner would use these tools in the same manner as he or she would in performing a static hard-drive analysis.
Cell Phone Forensics
The terms mobile phones, cellular phones, and wireless phones are interchangeable terms for the portable handheld devices that allow for wireless communication, and that have become common household items in the twenty-first century. They are so common that according to a 2006 survey by Pew Research Center (http://pewsocialtrends.org/pubs/?chartid=203), 74 percent of people had a cell phone, with equal numbers (49 percent) considering them a necessity or a luxury. More people considered this a necessity than other technologies such as cable or satellite TV (33 percent) or high-speed Internet (29 percent), and slightly less (51 percent) than a home computer. In fact, according to this survey, the number of people who had a cell phone was 1 percent higher than those who had a home computer! When you consider these statistics, it makes sense that performing forensic services on cell phones is a must for modern computer forensic technicians.
In addition to the primary function of providing voice communication, cell phones can also provide a wide variety of other features, including:
▪ Video calling (communication with live video)
▪ E-mail
▪ Internet access
▪ Text messaging using Short Message Service (SMS)
▪ The ability to send photos and video using Multimedia Message Service (MMS)
▪ Built-in digital cameras and camcorders
▪ MP3 player features
How Cell Phones Work
Cell phones work by connecting to a cellular network, which people pay a subscription fee to join. The cellular network is a wireless digital/radio network that is made up of cells that are served by transceivers called base stations. These base stations are connected to the public switched telephone network (PSTN) the same as a normal landline phone, allowing the calls to and from your wireless phone to be sent to any phone, regardless of whether it's part of the cellular network.
Cell phones use Subscriber Identity Modules (SIM) or SIM cards, which are smart cards, to store information about the subscriber to the cellular network. Because the card stores information about the cell phone subscriber, it allows cell phone users to switch phones by removing the card and placing it in a new phone. The information in the card is used to authenticate the user to the network.
Cell phones may also use memory storage cards called flash media, which allow pictures, video, music, applications, and other data to be stored on the cell phone. Some of the most common cards are Compact Flash, Smart Media, and Memory Stick cards.
Acquiring Evidence from Cell Phones
You can acquire data from cell phones using a combination of software and hardware. Readers are used to access data from flash cards and SIM cards, and are relatively inexpensive. Forensic software such as EnCase can then be used to acquire evidence from the card as it would other types of media. In addition to this, other products are available that are specifically designed for cell phones and other mobile devices, such as PDAs and BlackBerry devices (which we'll discuss later in this chapter).
Readers, readers, readers!
Many of the card types inherent to cell phone technology (notably SIM) are proprietary—to decipher SIM contents, custom forensic software/hardware packages are usually required. For the more common data storage card types (common form factors for PDAs, cameras, cell phones, and so on) a high-quality 15-in-one card reader is a good tool to add to a forensic toolkit; forensically sound card media readers are distributed via forensic vendors such as Digital Intelligence.
Write Protect Card Reader
An example of one such card reader is the Write Protect Card Reader from ICS. It transfers data from digital cameras, digital camcorders, PDAs, MP3 players, and digital voice recorders to a laptop or desktop computer. It can read several types of flash memory while blocking any writes to it. It is a small, palm-size package with a simple USB 1.1/2.0 connection and requires no external power.
Forensic Software
Because of the increasing need to acquire data from cell phones and other mobile devices, a variety of different forensic software solutions are available. By accessing the data on the cell phone, you can acquire evidence for criminal cases, internal investigations, and civil litigations, or view information that may be useful for intelligence purposes. We discuss some of the more popular products used for obtaining such data from cell phones in the subsections that follow.
Device Seizure
Device Seizure is covert surveillance software developed by Paraben Corporation. It can aid in forensically analyzing and recovering mobile phone and PDA data including deleted text messages, photos, and call logs. It supports Palm, Windows CE, Windows Mobile, BlackBerry, and Psion devices as well as certain Nokia, Sony Ericsson, Motorola, iDen, Siemens, LG, Samsung, and Symbian-based phone models. It also supports GSM SIM card acquisition and deleted data recovery using SIMCon technology. Device Seizure is supported on Windows 98, XP, and Vista.
Oxygen Phone Manager
Oxygen Phone Manager II for Nokia phones provides a simple and convenient way to control mobile phones from a PC. Oxygen Phone Manager II offers management for the phonebook, the call register, the calendar, to-do lists, SMS and MMS messages, logos, tones, General Packet Radio Service (GPRS) and Wireless Application Protocol (WAP) settings, profiles, Dictaphones, FM stations, Java games, and applications.
SIM Card Seizure
Paraben acquired SIMCon and integrated it into SIM Card Seizure and Device Seizure. You can use SIM Card Seizure to recover deleted SMS messages and perform comprehensive analysis of SIM card data. It is a combination of the SIM card acquisition and analysis components in Paraben's Device Seizure utility and a specialized SIM card forensic acquisition and analysis tool. SIM Card Seizure includes the software and a forensic SIM card reader. Its features are included in Device Seizure and the Device Seizure Toolbox.
Cellebrite for Forensics and Law Enforcement
The Cellebrite Universal Forensic Extraction Device (UFED) system is a tool developed by Cellebrite Mobile Synchronization, and is available at www.cellebrite.com/cellebrite-for-forensics-law-enforcement.html. It is a stand-alone device that allows you to connect 95 percent of the cell phones on the market to the device using a cable, and then extract such data as the phonebook, pictures, videos, text messages, logs of calls, and other information from the handset. When used in the field, the data acquired from the cell phone can be stored on an SD card or USB flash drive, whereas in the forensic lab it can be transferred to a computer for analysis. You use Cellebrite with standard cell phones, as well as with smartphones and PDAs such as the Palm OS, BlackBerry, and Symbian.
Storage of Cell Phones and Other Wireless Devices
Wireless devices such as cell phones, PDAs, pagers, and so on require additional measures for storage, as they can receive unwanted signals that can corrupt or modify the evidence on these devices. Because they can accept incoming transmissions, it is possible for a suspect to access a device that's been seized from him or her remotely, and delete or modify any incriminating evidence. For example, many devices store a limited log of incoming calls, where the oldest phone numbers are purged to make room for new calls received by the device. By repeatedly calling the cell phone, a suspect could remove evidence of calls received by people.
Similarly, if pagers, cell phones, or other equipment that contains possible evidence and runs on battery is involved, they need to be preserved for immediate examination. Phone numbers, pages received by the person, and other evidence could be lost once the battery power runs out. As such, it's important to document anything that is visible through the display of a device, and to photograph it if possible.
To preserve the evidence on these devices, it's important to store them in special bags and boxes that prevent unwanted signals from reaching them. Some of these boxes even provide outlets to allow power to be provided to the devices while they are being stored. Examples of two such products are the StrongHold Bag and StrongHold Box developed by Paraben (www.paraben-forensics.com).
As shown in Figure 8.13, Paraben's Wireless StrongHold Bag is an evidence bag that is made of nickel, copper, and silver-plated nylon woven fabric. Because of this amalgam of materials, signals are prevented from penetrating the bag.
 |
| Figure 8.13 The Paraben Wireless StrongHold Bag |
As shown in Figure 8.14, Paraben's StrongHold Box is a portable faraday cage that allows you to store wireless devices inside, and work on them inside the box through signal blocking gloves. The box has shielded power, light, and data connections, and is constructed of materials that prevent signals from reaching any wireless devices stored inside.
Note
You can obtain additional information on cell phone forensics from the National Institute of Standards and Technology (NIST), which published the “Guidelines on Cell Phone Forensics.” You can obtain a copy of this document from the NIST Web site, at http://csrc.nist.gov/publications/nistpubs/800-101/SP800-101.pdf.
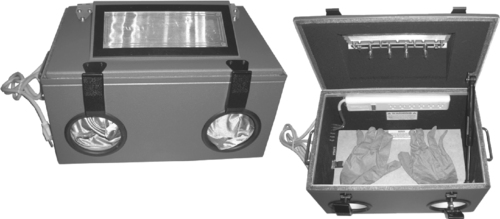 |
| Figure 8.14 The Paraben StrongHold Box |
PDA Forensics
A personal digital assistant (PDA) is a handheld computing device that combines a multitude of functions and features including computing, telephone, fax, and Internet. Additionally, the PDA can and most often contains some form of networking or other form of connectivity capabilities. Today, a PDA is a powerful device that can function as a cellular phone, a fax sender, a Web browser, and a personal organizer. These devices have reached such a level of power and functionality that they are in essence minicomputers.
Components of a PDA
The PDA device has several components. Our intent here is to discuss some of the more common ones. The first component of the PDA is the microprocessor, which is similar to any other microprocessor except that there is a restriction on its size. Another component of the PDA is some form of input device, such as a touch screen. In addition to these components, an essential component is the operating system that is running the software for the PDA device.
Investigative Methods
As discussed previously, the concept of PDA forensics is very similar to the procedures and methodologies that are used with any form of forensics. When we discuss PDA forensics, there are investigative methods that you should use when performing a forensic investigation of a PDA. The four main steps when it comes to performing a forensic investigation of a PDA are:
1 Examination
2 Identification
3 Collection
4 Documentation
We start off by securing the evidence. It is essential that you follow a process that has been approved by legal counsel to secure the PDA. When you seize the PDA you have to ensure that you take the PDA, the docking cradle, and the external memory cards. This is probably one of the most difficult things to control and requires that you conduct a thorough search for any and all memory cards. With the size of memory cards today, there is an extensive amount of evidence that you would be missing if you missed just one memory card. Once you secure the evidence, the next step is to create an exact image to preserve the crime scene. Once you have acquired the image it is time to examine the evidence. Once you have examined the evidence, you have to present it, which is usually done by compiling an extensive report based on the investigation thus far. It is also your responsibility as the examiner to maintain the evidence, which consists of keeping it in a secure location. You also have to ensure that the PDA remains charged so that the data and information are maintained in a constant state.
Step 1: Examination
In the examination step of PDA forensics, you first need to understand the potential sources of the evidence, which can be the device, the device cradle, the power supply, and any other peripherals or media that the device being examined has come into contact with. In addition to these sources, you should also investigate any device that has synchronized with the PDA you are examining.
Step 2: Identification
In the identification step of PDA forensics, you start the process by identifying the type of device you are investigating. Once you have identified the device, you then have to identify the operating system that the device is using. It is critical to the investigative process that you determine the operating system. Furthermore, once you have identified the operating system, it is important to note that it is possible that the device could be running two operating systems. During the identification process, there are several interfaces that can assist you, including the cradle interface, the manufacturer serial number, the cradle type, and the power supply itself.
Step 3: Collection
During this part of the forensic investigation, it is imperative that you collect data and potential evidence from the memory devices that are part of or are suspected to be part of the PDA you are investigating. There are a multitude of these types of devices, so we will limit our discussion to just a few, including the SD, the MMC semiconductor cards, the micro-drives, and the USB tokens. The SD cards range in size from a few megabytes to several gigabytes, and the USB tokens can range from a few megabytes to multiple gigabytes. In addition to seizing and collecting the memory devices, you also have to collect the power leads, cables, and any cradles that exist for the PDA. Extending the investigation process further, it is imperative that you collect all of the types of information consisting of both volatile and dynamic information. Consequently, it is imperative that you give the volatile information priority while you collect evidence. The reason for giving this information priority is because anything that is classified as volatile information will not survive if the machine is powered off or reset. Once you have captured the information, it is imperative that you place the PDA into an evidence bag and maintain it at stable power support throughout the investigation.
Step 4: Documentation
As with any component in the forensic process, it is critical that you maintain your documentation and “chain of custody.” As you collect information and potential evidence, you need to record all visible data. Your records must document the case number and the date and time it was collected. Additionally, the entire investigation area needs to be photographed, which includes any devices that can be connected to the PDA or currently are connected to the PDA. Another part of the documentation process is to generate a report that consists of the detailed information that describes the entire forensic process you are performing. Within this report you need to annotate the state and status of the device in question during your collection process. The final step of the collection process consists of accumulating all of the information and storing it in a secure and safe location.
PDA Investigative Tips
When it comes to the PDA device, you need to consider several things while carrying out an investigation. These devices can be managed and maintained at all times. Adding further complication is the fact that with PDA devices, a suspect can have immediate access 24 hours a day, seven days a week. Another thing that makes your job as an investigator more challenging is that PDAs are immediate boot cycle devices. Accordingly, it is important to remember that these devices typically contain a plethora of information and are a vault of evidence for the forensic examiner.
Device Switched On
When you are beginning your investigation process, and you discover that the PDA you want to process for evidence is in the “on” mode, it is imperative that you act immediately and get power to the PDA so that it will not lose the volatile information that could quite possibly be essential to your evidence collection process.
Device Switched Off
If the device is in the “off” state, you should leave the device in this state and then switch the device on and take a picture of it. Additionally, you need to note and record the current battery charge.
Device in Its Cradle
Avoid any further communication activities with the device and remove any connections from the PC device. It is important to note that there is a possibility that a sophisticated suspect might have a “tripwire” device, and once you disconnect the PC this could activate the device, which in turn could run a script that might erase potential evidence. Despite this possibility, you have to disconnect the device to continue the investigation.
Device Not in Its Cradle
If the device is not in the cradle, your investigative requirements are made much simpler, because there is no danger of a “tripwire” being triggered. With the device being out of its cradle, you simply seize the cradle and any cords associated with it.
Wireless Connection
Avoid any further communication activities if possible. Eliminate any wireless activity by placing the device into an envelope that can isolate it. This envelope also needs to provide antistatic protection so that the device is not damaged.
Expansion Card in Slot
Do not initiate any contact that requires taking components off the device, or that requires you to open the device in any way. This includes any and all peripheral devices and/or media types of cards.
Expansion Sleeve Removed
The first thing to accomplish is to seize the sleeve itself, and also seize any and all related peripherals and media cards.
Impact of Mishandling PDA Devices
While conducting an investigation of a potential crime scene, our team discovered a sticky note with a password written on it. The team member entered the password, but it did not work, so he continued to try to get access, but after the tenth attempt the BlackBerry did a complete data wipe, and whatever information was on that device was lost. This is because there is software that will log the attempts at entry and will do a complete wipe after a certain number of invalid login attempts.
Deploying PDA Forensic Tools
Whereas several tools are available for conducting a forensic investigation, fewer tools are available when investigating handheld or PDA devices.
PDA Secure
The first tool to discuss is the PDA Secure tool. This tool offers enhanced password protection, along with encryption, device locking, and data wiping. The PDA Secure tool allows administrators greater control over how handheld devices are used on networks. Additionally, it allows you to set a time and date range to monitor information such as network logon traffic, infrared transmissions, and any applications being used.
PDA Seizure
PDA Seizure is a comprehensive tool that assists in seizing the PDA. It allows the data to be acquired, viewed, and reported on. PDA Seizure works within a Windows environment and can extract the random access memory (RAM) and read only memory (ROM). It has an easy-to-use graphical user interface (GUI), and includes the tools that are needed to investigate the files that are contained within the PDA.
PDA Seizure provides multiplatform support, where the forensic examiner can acquire and examine information on PDAs for both the Pocket PC and Palm OS platforms. The PDA Seizure tool has a significant number of features, including forensic imaging tools, searches on data within acquired files, hashing for integrity protection of acquired files, and bookmarking capability to assist the examiner in the organization of information.
EnCase
EnCase is one of the most popular commercial forensic tools available, and you can use it to acquire information and evidence from a PDA. The EnCase tool can acquire images, and also consists of tools that allow you to conduct complex investigations efficiently and accurately.
BlackBerry Forensics
The BlackBerry is also known as a RIM device and is equipped with the RIM software implementation of proprietary wireless-oriented protocols. Furthermore, the device is supported by the RIM BlackBerry Message Center. The BlackBerry shares similarities with the PDA devices discussed earlier; however, it is always on and participating in some form of wireless push technology. As a result of this, the BlackBerry does not require some form of desktop synchronization like the PDA does. This unique component of the BlackBerry adds a different dimension to the process of forensic examination, and in essence this portability can be the examiner's greatest ally.
Operating System of the BlackBerry
The current version of the BlackBerry OS has numerous capabilities and features, including over-the-air activation, the ability to synchronize contacts and appointments with Microsoft Outlook, a password keeper program to store sensitive information, and the ability to customize your BlackBerry display data.
BlackBerry Operation and Security
The BlackBerry device has an integrated wireless modem, which allows it to communicate over the BellSouth Intelligent Wireless Network. The BlackBerry uses the BlackBerry Serial Protocol, which is used to back up, restore, and synchronize the data that is communicated between the BlackBerry handheld unit and the desktop software. This protocol comprises simple packets and single byte return codes. The device uses a strong encryption scheme that safeguards confidentiality and authenticity of data. It keeps data encrypted while in transit between the enterprise server and the device itself.
Wireless Security
The BlackBerry has a couple of transport encryption options, which are the Triple Data Encryption Standard (DES) and the Advanced Encryption Standard (AES). Those who want to implement the most secure method will elect to encrypt with the AES algorithm. The BlackBerry has another feature that is referred to as the Password Keeper, which offers the capability of securely storing password entries on the devices, which could consist of banking passwords, PINs, and so on. This important information is protected by AES encryption.
Security for Stored Data
Several capabilities are available on the BlackBerry when it comes to securing the data that is stored there. The first option we will discuss is the capability to make password authentication mandatory through the customizable information technology (IT) policies on the BlackBerry Enterprise Server. An additional method of protection from unauthorized parties is the fact that there is no staging of data between the server and the BlackBerry where data is decrypted.
Forensic Examination of a BlackBerry
Because the BlackBerry is an always-on, push messaging device, information can be pushed to it at any time. It is important to note that the information that is pushed has the potential of overwriting any data that was previously deleted. The problem is compounded by the fact that, without warning, a multitude of applications may receive information and make the attempts by the forensic investigator to recover information and an unaltered file system much more difficult. The first step in preserving the information is to eliminate the ability of the device to receive this data push. If possible, you can turn the radio off, or a better solution is to take the device to an area where the signal cannot be received, such as putting the device inside a filing cabinet drawer. One might think, “I'll just turn it off.” This would be a serious mistake! The BlackBerry is not really “off” unless power is removed for an extended period, or the unit is placed in storage mode. Furthermore, once the unit is powered back on, any items that were in the queue waiting to be pushed to the device could possibly be pushed before you could stop them. As mentioned previously, it is quite possible that a change to state such as a power-off of the BlackBerry could result in a program being run on the unit that will allow the device to accept remote commands via e-mail.
Acquisition of Information Considerations
The considerations for the BlackBerry are similar in some ways to the PDA devices, but there are some differences. Let's look at the considerations you have to make when acquiring evidence from the BlackBerry.
Device Is in the “Off” State
If the unit is off at the time of acquisition, the investigator needs to take it to a shielded location before attempting to switch it on. If a shielded location is not readily available, you might have success using a safe or other room that can block the signal well enough to prevent the data push. One thing to consider is having a unit available that you can use to walk the network and look for weak coverage areas to use.
Device Is in the “On” State
If the device you are examining is in the “on” state, then as outlined and detailed above, you need to take the device to a secure location and disable or turn off the radio before beginning the examination.
Password-Protected
One thing to consider when it comes to password protection is the fact that the password itself is not stored on the device. The only thing that is stored on the device is a hashing of the plain text password. This storage is similar to the storage used by the majority of operating systems.
Evidence Collection
To collect evidence from the BlackBerry you have to violate the traditional forensic methods by requiring the investigator to record logs kept on the unit that will be wiped after an image is taken. You want to collect evidence from several different log files, including:
▪ Radio Status This log lets you enumerate the state of the device's radio functions.
▪ Roam and Radio This log has a buffer of up to 16 entries, records information concerning the tower, channel, and so on, and will not survive a reset.
▪ Transmit/Receive This log records gateway information and the type and size of data transmitted.
▪ Profile String This log contains the negotiation with the last utilized radio tower.
Once the log information is extracted and enumerated, the image will be taken. If you do not require or need the log information, the image can be acquired immediately.
Unit Control Functions
You review the logs by using the unit control functions. The first function is the Mobitex2 Radio Status, which provides information on the Radio Status, Roam and Radio Transmit, or Receive and Profile String. The second control function is the Device Status, which provides information on memory allocation, port status, file system allocation, and central processing unit (CPU) WatchPuppy. The third control function is the Battery Status, which provides information on the battery type, load, status, and temperature. The last control function we will discuss is the Free Mem, which provides information on memory allocation, Common Port File System, WatchPuppy, OTA status, Halt, and Reset.
Imaging and Profiling
When you are conducting a forensic examination of a BlackBerry, you need to conduct imaging and profiling. You accomplish this by extracting the logs from a developed image and acquiring an image of a bit-by-bit backup using the BlackBerry Software Development Kit (SDK). The SDK is available from www.blackberry.com and is essential for the forensic examiner when investigating a BlackBerry. The SDK utility dumps the contents of the Flash RAM into a file. Once the Flash RAM is dumped, you can examine and review it using traditional methods with your favorite hex editor or other tool. In addition to reviewing the evidence with traditional methods, you can use the Simulator from the SDK to match the network and model of the investigated unit.
Attacking the BlackBerry
Several tools and methods are available that allow you to attack a BlackBerry. The first tool is the BlackBerry Attack Toolkit, which you can use along with the BBProxy software to exploit Web site vulnerabilities. The second tool is the Attack Vector, which links and tricks users by downloading malicious software to the BlackBerry. The last method we will discuss is the method of hijacks (or blackjacks). As the name implies, this allows someone to hijack a legal user's BlackBerry and replace him or her on the network with potentially harmful devices.
Securing the BlackBerry
You can do several things to secure the information on a BlackBerry. The first thing you can do is clean the BlackBerry memory, and protect stored messages on the messaging server. You can encrypt the application password as well as the storage of it on the BlackBerry. Furthermore, you can protect storage of user data on a locked BlackBerry by limiting the password authentication attempts. It is possible to set a maximum of 10 attempts to gain access to the device. Additionally, you can use AES technology to secure the storage of the password keeper and password entries on the BlackBerry.
Information Hiding in a BlackBerry
You can hide information in several places in a Blackberry. You can create hidden databases and hide information in partition gaps. You can also hide data in the gap between the OS/application and file partitions.
BlackBerry Signing Authority Tool
The Signing Authority tool helps developers protect data and intellectual property, and enables them to handle access to their sensitive application program interfaces (APIs). The tool provides this protection by using public and private signature keys. It does this by using asymmetric cryptography to validate the authenticity of the request. Furthermore, the signing tool allows developers to exchange API information in a secure manner and environment.
Summary
In this chapter, we discussed a number of technologies that an investigator may not immediately think of when conducting an investigation. We introduced you to iPods and MP3 players, and we saw how they can be used to store more than just music files. We explained the file structure of the iPod and showed how evidence can be hidden within the iPod. From a law enforcement standpoint, it is very important that search warrants specify that all data storage devices, including iPods and MP3 players, should be acquired as potential evidence. The iPod might be the sole source of evidence that makes or breaks a case.
We also looked at cell phones, and saw how modern cell phones allow for Internet access and other features that were previously available only with computers. As with any wireless device that can be connected to remotely, certain storage requirements must be considered to preserve possible evidence. By properly storing them, the possibility that evidence on the mobile phone will be damaged or destroyed by unwanted signals is dramatically decreased.
We then discussed the methods of investigating a PDA. We talked about securing the evidence, and how the PDA, docking cradle, and any external memory cards should be seized. The next method we discussed was acquiring the evidence. We covered how you have to create an exact image of the evidence, and once the evidence is secured and acquired, the need to go on and examine the evidence that was acquired.
We then talked about the forensic examination considerations when confronted with a BlackBerry (RIM) device. We concentrated on how the BlackBerry has similarities to the PDA, but one way that they differ is that the BlackBerry does not require synchronization to receive a significant amount of information. The BlackBerry is always on, and to make the task a little more difficult, it is in a state where it is susceptible to receiving push technology updates at any time. Therefore, we discussed how it is imperative that we take this into account when preparing to examine a BlackBerry. We also discussed the software that is available to assist us when we are examining a BlackBerry.
Frequently Asked Questions
A As with any forensic examination, the first step is to have permission to seize the evidence that is required for your investigation.
Q What sort of tools do I use to conduct a forensic examination of a PDA?
A Most of the forensic tools that work with images will create an image of a PDA file system. The commercial software product EnCase has this capability, as do many others.
Q If I am preparing to conduct an investigation of a PDA, why must I maintain the charge to the device?
A Similar to a regular PC, the PDA device has both volatile and nonvolatile information, and if the power is not maintained, there is a possibility you could lose information.
Q Aren't a PDA and a BlackBerry the same thing?
A It is not uncommon to make this assumption, and there are similarities, but there are also many differences. The BlackBerry is an always-on device that can have information pushed to it at any time, and unlike the PDA, the BlackBerry does not require synchronization with a PC.
Q How would I get access to log files on a BlackBerry?
A Some of the best tools for conducting an investigation of a BlackBerry come from the BlackBerry itself. There is an SDK that can access and collect log files and other information.
..................Content has been hidden....................
You can't read the all page of ebook, please click here login for view all page.