
Today, you work with Java classes that add graphics to a graphical user interface with Java2D, a set of classes that support high-quality, two-dimensional images, color, and text.
Java2D, which includes classes in the java.awt and javax.swing packages, can be used to draw text and shapes such as circles and polygons; use different fonts, colors, and line widths; and work with colors and patterns.
Everything in Java2D begins with the Graphics2D class in the java.awt package, which represents a graphics context, an environment in which something can be drawn. A Graphics2D object can represent a component on a graphical user interface, printer, or another display device.
Graphics2D is a subclass of the Graphics class that includes extended features required by Java2D.
Note
Early versions of Java included rudimentary support for graphics in the Graphics class. These methods have been supplanted by more sophisticated and efficient alternatives in Java2D.
Before you can start using the Graphics2D class, you need something on which to draw.
Several user interface components can act as a canvas for graphical operations such as panels and windows.
After you have an interface component to use as a canvas, you can draw text, lines, ovals, circles, arcs, rectangles, and other polygons on that object.
One component that’s suitable for this purpose is JPanel in the javax.swing package. This class represents panels in a graphical user interface that can be empty or contain other components.
The following example creates a frame and a panel and then adds the panel to the frame:
JFrame main = new JFrame("Main Menu");
JPanel pane = new JPanel();
Container content = main.getContentPane();
content.add(pane);
The frame’s getContentPane() method returns a Container object representing the portion of the frame that can contain other components. The container’s add() method is called to add the panel to the frame.
Like many other user interface components in Java, JPanel objects have a paintComponent(Graphics) method that is called automatically whenever the component needs to be redisplayed.
Several things could cause paintComponent() to be called, including the following:
The graphical user interface containing the component is displayed for the first time.
A window that was displayed on top of the component is closed.
The graphical user interface containing the component is resized.
By creating a subclass of JPanel, you can override the panel’s paintComponent() method and put all your graphical operations in this method.
As you might have noticed, a Graphics object is sent to an interface component’s paintComponent() method rather than a Graphics2D object. To create a Graphics2D object that represents the component’s drawing surface, you must use casting to convert it, as in the following example:
public void paintComponent(Graphics comp) {
    Graphics2D comp2D = (Graphics2D)comp;
    // ...
}
The comp2D object in this example was produced through the use of casting.
Java2D classes use the same x,y coordinate system you have used when setting the size of frames and other components.
Java’s coordinate system uses pixels as its unit of measure. The origin coordinate 0, 0 is in the upper-left corner of a component.
The value of x coordinates increases to the right of 0, 0, and y coordinates increase downward.
When you set the size of a frame by calling its setSize(int, int) method, the frame’s upper-left corner is at 0, 0, and its lower-right corner is at the two arguments sent to setSize().
For example, the following statement creates a frame 425 pixels wide by 130 pixels tall with its lower-right corner at 425, 130:
setSize(425, 130);
Caution
This differs from other drawing systems in which the 0, 0 origin is at the lower left and y values increase in an upward direction.
All pixel values are integers; you can’t use decimal numbers to display something at a position between two integer values.
Figure 13.1 depicts Java’s graphical coordinate system visually, with the origin at 0, 0. Two of the points of a rectangle are at 20, 20 and 60, 60.
Text is the easiest thing to draw on an interface component.
To draw text, call a Graphics2D object’s drawString() method with three arguments:
The
Stringto displayThe x coordinate where it should be displayed
The y coordinate where it should be displayed
The x,y coordinate used in the drawString() method represent the pixel at the lower-left corner of the string.
The following paintComponent() method draws the string “Free the bound periodicals” at the coordinate 22, 100:
public void paintComponent(Graphics comp) {
    Graphics2D comp2D = (Graphics2D)comp;
    comp2D.drawString("Free the bound periodicals", 22, 100);
}
The preceding example uses a default font. To use a different font, you must create an object of the Font class in the java.awt package.
Font objects represent the name, style, and point size of a font.
A Font object is created by sending three arguments to its constructor:
The font’s name
The font’s style
The font’s point size
The name of the font can be the logical name of a font, such as Arial, Courier New, Garamond, or Kaiser. If the font is present on the system on which the Java program is running, it will be used. If the font is not present, the default font will be used.
The name also can be one of five generic fonts: Dialog, DialogInput, Monospaced, SanSerif, or Serif. These fonts can be used to specify the kind of font to use without requiring a specific font. This is often a better choice because some font families might not be present on all implementations of Java.
Three Font styles can be selected by using static class variables: PLAIN, BOLD, and ITALIC. These constants are integers, and you can add them to combine effects.
The following statement creates a 24-point Dialog font that is bold and italicized:
Font f = new Font("Dialog", Font.BOLD + Font.ITALIC, 24);After you have created a font, you can use it by calling the setFont(Font) method of the Graphics2D class with the font as the method argument.
The setFont() method sets the font used for subsequent calls to the drawString() method on the same Graphics2D object. You can call it again later to change the font and draw more text.
The following paintComponent() method creates a new Font object, sets the current font to that object, and draws the string “I’m very font of you” at the coordinate 10, 100:
public void paintComponent(Graphics comp) {
    Graphics2D comp2D = (Graphics2D)comp;
    Font f = new Font("Arial Narrow", Font.PLAIN, 72);
    comp2D.setFont(f);
    comp2D.drawString("I'm very font of you", 10, 100);
}
Java programs can ensure that a font is available by including it with the program and loading it from a file. This technique requires the Font class method createFont(int, InputStream), which returns a Font object representing that font.
Input streams, which are covered on Day 15, “Working with Input and Output,” are objects that can load data from a source such as a disk file or web address. The following statements load a font from a file named Verdana.ttf in the same folder as the class file that uses it:
try {
    File ttf = new File("Verdana.ttf");
    FileInputStream fis = new FileInputStream(ttf);
    Font font = Font.createFont(Font.TRUETYPE_FONT, fis);
} catch (IOException ioe) {
    System.out.println("Error: " + ioe.getMessage());
    ioe.printStackTrace();
}
The try-catch block handles input/output errors, which must be considered when data is loaded from a file. The File, FileInputStream, and IOException classes are part of the java.io package and are discussed in depth on Day 15.
When a font is loaded with createFont(), the Font object will be 1 point and plain style. To change the size and style, call the font object’s deriveFont(int, int) method with two arguments: the desired style and size.
If you displayed text using the skills introduced up to this point, the appearance of the font would look crude compared to what you’ve come to expect from other software. Characters would be rendered with jagged edges, especially on curves and diagonal lines.
Java2D can draw fonts and graphics much more attractively using its support for antialiasing, a rendering technique that smooths out rough edges by altering the color of surrounding pixels.
This functionality is off by default. To turn it on, call a Graphics2D object’s setRenderingHint() method with two arguments:
A
RenderingHint.Keyobject that identifies the rendering hint being setA
RenderingHint.Keyobject that sets the value of that hint
The following code enables antialiasing on a Graphics2D object named comp2D:
comp2D.setRenderingHint(RenderingHints.KEY_ANTIALIASING,
    RenderingHints.VALUE_ANTIALIAS_ON);
By calling this method in the paintComponent() method of a component, you can cause all subsequent drawing operations to employ antialiasing.
To make text look good in a graphical user interface, you often must figure out how much space the text is taking up on an interface component.
The FontMetrics class in the java.awt package provides methods to determine the size of the characters being displayed with a specified font, which can be used for things such as formatting and centering text.
The FontMetrics class can be used for detailed information about the current font, such as the width or height of characters it can display.
To use this class’s methods, a FontMetrics object must be created using the getFontMetrics() method. The method takes a single argument: a Font object.
Table 13.1 shows some of the information you can find using font metrics. All these methods should be called on a FontMetrics object.
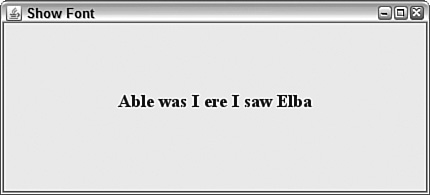
Listing 13.1 shows how the Font and FontMetrics classes can be used. The TextFrame application displays a string at the center of a frame, using font metrics to measure the string’s width using the selected font.
Example 13.1. The Full Text of TextFrame.java
 1: import java.awt.*;
 2: import java.awt.event.*;
 3: import javax.swing.*;
 4:
 5: public class TextFrame extends JFrame {
 6:     public TextFrame(String text, String fontName) {
 7:         super("Show Font");
 8:         setSize(425, 150);
 9:         setDefaultCloseOperation(JFrame.EXIT_ON_CLOSE);
10:         TextFramePanel sf = new TextFramePanel(text, fontName);
11:         add(sf);
12:         setVisible(true);
13:     }
14:
15:     public static void main(String[] arguments) {
16:         if (arguments.length < 1) {
17:             System.out.println("Usage: java TextFrame message font");
18:             System.exit(-1);
19:         }
20:         TextFrame frame = new TextFrame(arguments[0], arguments[1]);
21:     }
22:
23: }
24:
25: class TextFramePanel extends JPanel {
26:     String text;
27:     String fontName;
28:
29:     public TextFramePanel(String text, String fontName) {
30:         super();
31:         this.text = text;
32:         this.fontName = fontName;
33:     }
34:
35:     public void paintComponent(Graphics comp) {
36:         super.paintComponent(comp);
37:         Graphics2D comp2D = (Graphics2D)comp;
38:         comp2D.setRenderingHint(RenderingHints.KEY_ANTIALIASING,
39:             RenderingHints.VALUE_ANTIALIAS_ON);
40:         Font font = new Font(fontName, Font.BOLD, 18);
41:         FontMetrics metrics = getFontMetrics(font);
42:         comp2D.setFont(font);
43:         int x = (getSize().width - metrics.stringWidth(text)) / 2;
44:         int y = getSize().height / 2;
45:         comp2D.drawString(text, x, y);
46:     }
47: }
The TextFrame application takes two command-line arguments: the text to display and the name of the font to use. Here’s an example:
java TextFrame "Able was I ere I saw Elba" "Times New Roman"
Figure 13.2 shows how this looks on a system with the Times New Roman font installed. When you run the application, resize the frame window to see how the text moves so that it remains centered.
The TextFrame application consists of two classes: a frame and a panel subclass called TextFramePanel. The text is drawn on the panel by overriding the paintComponent(Graphics) method and calling drawing methods of the Graphics2D class inside the method.
The getSize() method calls in lines 43 and 44 use the width and height of the panel to determine where the text should be displayed. When the application is resized, the panel also is resized, and paintComponent() is called automatically.
The Color and ColorSpace classes of the java.awt package can be used to make a graphical user interface more colorful. With these classes, you can set the color for use in drawing operations, as well as the background color of an interface component and other windows. You also can translate a color from one color-description system into another.
By default, Java uses colors according to the sRGB color-description system. In this system, a color is described by the amounts of red, green, and blue it contains—that’s what the R, G, and B stand for. Each of the three components can be represented as an integer between 0 and 255. Black is 0, 0, 0—the complete absence of any red, green, or blue. White is 255, 255, 255—the maximum amount of all three. You also can represent sRGB values using three floating-point numbers ranging from 0 to 1.0. Java can represent millions of colors between the two extremes using sRGB.
A color-description system is called a color space, and sRGB is only one such space. There also is CMYK, a system used by printers that describes colors by the amount of cyan, magenta, yellow, and black they contain. Java supports the use of any color space desired as long as a ColorSpace object is used that defines the description system. You also can convert from any color space to sRGB, and vice versa.
Java’s internal representation of colors using sRGB is just one color space being used in a program. An output device such as a monitor or printer also has its own color space.
When you display or print something of a designated color, the output device might not support the designated color. In this circumstance, a different color is substituted or a dithering pattern is used to approximate the unavailable color.
The practical reality of color management is that the color you designate with sRGB will not be available on all output devices. If you need more precise control of the color, you can use ColorSpace and other classes in the java.awt.color package.
For most uses, the built-in use of sRGB to define colors should be sufficient.
Colors are represented by Color objects, which can be created with a constructor or by using one of the standard colors available from the Color class.
You can call the Color constructor to create a color in two ways:
Use three integers that represent the sRGB value of the desired color.
Use three floating-point numbers that represent the desired sRGB value.
You can specify a color’s sRGB value using either three int or three float values. The following statements show examples of each:
Color c1 = new Color(0.807F, 1F, 0F);

Color c2 = new Color(255, 204, 102);
The c1 object describes a neon green color, and c2 is butterscotch.
Note
It’s easy to confuse floating-point literals such as 0F and 1F with hexadecimal numbers, which were discussed on Day 2, “The ABCs of Programming.” Colors are often expressed in hexadecimal, such as when a background color is set for a web page using the HTML BODY tag. The Java classes and methods you work with don’t take hexadecimal arguments, so when you see a literal such as 1F or 0F, you’re dealing with floating-point numbers.
The current color for drawing is designated by using the setColor() method of the Graphics2D class. This method must be called on the Graphics2D object that represents the area to which something is being drawn.
Several of the most common colors are available as class variables in the Color class.
These colors use the following Color variables (with sRGB values indicated within parentheses):
    black (0, 0, 0)                         magenta (255, 0, 255)
    blue (0, 0, 255)                        orange (255, 200, 0)
    cyan (0, 255, 255)                      pink (255, 175, 175)
    darkGray (64, 64, 64)                   red (255, 0, 0)
    gray (128, 128, 128)                    white (255, 255, 255)
    green (0, 255, 0)                       yellow (255, 255, 0)
    lightGray (192, 192, 192)
The following statement sets the color for a Graphics2D object named comp2D by using one of the standard class variables:
comp2D.setColor(Color.pink);
If you have created a Color object, it can be set in a similar fashion:
Color brush = new Color(255, 204, 102);
comp2D.setColor(brush);
After you set the current color, subsequent methods to draw strings and other things will use that color.
You can set the background color for a component, such as a panel or frame, by calling the component’s setBackground(Color) and setForeground(Color) methods.
The setBackground() method sets the component’s background color, as in this example:
setBackground(Color.white);
The setForeground() method is called on user interface components, changing the color of a component such as a button or a window.
You can use setForeground() in the init() method to set the color for drawing operations. This color is used until another color is chosen with either setForeground() or setColor().
If you want to find out what the current color is, you can use the getColor() method on a Graphics2D object, or the getForeground() or getBackground() methods on the component.
The following statement sets the current color of comp2D—a Graphics2D object—to the same color as a component’s background:
comp2D.setColor(getBackground());
All the basic drawing commands covered today are Graphics2D methods called within a component’s paintComponent() method.
This is an ideal place for all drawing operations because paintComponent() is automatically called any time the component needs to be redisplayed.
If another program’s window overlaps the component and it needs to be redrawn, putting all the drawing operations in paintComponent() makes sure that no part of the drawing is left out.
Java2D features include the following:
The capability to draw empty polygons and polygons filled with a solid color
Special fill patterns, such as gradients and patterns
Strokes that define the width and style of a drawing stroke
Antialiasing to smooth edges of drawn objects
One concept introduced with Java2D is the difference between an output device’s coordinate space and the coordinate space you refer to when drawing an object.
Coordinate space is any 2D area that can be described using the x,y coordinate.
For all drawing operations prior to Java, the only coordinate space used was the device coordinate space. You specified the x,y coordinate of an output surface, such as a panel, and those coordinates were used to draw text and other elements.
Java2D requires a second coordinate space that you refer to when creating an object and actually drawing it. This is called the user coordinate space.
Before any 2D drawing has occurred in a program, the device space and user space have the 0, 0 coordinate in the same place—the upper-left corner of the drawing area.
The user space’s 0, 0 coordinate can move as a result of the 2D drawing operations being conducted. The x- and y-axes can even shift because of a 2D rotation. You learn more about the two coordinate systems as you work with Java2D.
The next step in 2D drawing is to specify how a drawn object is rendered. Drawings that are not 2D can select only one attribute: color.
Java2D offers a wide range of attributes for designating color, including line width, fill patterns, transparency, and many other features.
Fill patterns control how a drawn object will be filled in. With Java2D, you can use a solid color, gradient fill, texture, or pattern of your own devising.
A fill pattern is defined by using the setPaint(Paint) method of Graphics2D with a Paint object as its only argument. Any class that can be a fill pattern, including GradientPaint, TexturePaint, and Color, can implement the Paint interface. Using a Color object with setPaint() is the same thing as using a solid color as the pattern.
A gradient fill is a gradual shift from one color at one coordinate point to another color at a different coordinate point. The shift can occur once between the points—which is called an acyclic gradient—or it can happen repeatedly, which is a cyclic gradient.
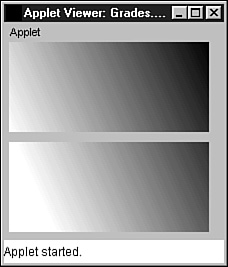
Figure 13.3 shows examples of acyclic and cyclic gradients between white and a darker color. The arrows indicate the points that the colors shift between.

The coordinate points in a gradient do not refer directly to points on the Graphics2D object being drawn onto. Instead, they refer to user space and can even be outside the object being filled with a gradient.
Figure 13.4 illustrates this. Both rectangles are filled using the same GradientPaint object as a guide. One way to think of a gradient pattern is as a piece of fabric that has been spread over a flat surface. The shapes being filled with a gradient are the patterns cut from the fabric, and more than one pattern can be cut from the same piece of cloth.
A call to the GradientPaint constructor method takes the following format:
GradientPaint gp = new GradientPaint(
    x1, y1, color1, x2, y2, color2);
The point x1, y1 is where the color represented by color1 begins, and x2, y2 is where the shift ends at color2.
If you want to use a cyclic gradient shift, an extra argument is added at the end:
GradientPaint gp = new GradientPaint(
    x1, y1, color1, x2, y2, color2, true);
The last argument is a Boolean value that is true for a cyclic shift. A false argument can be used for acyclic shifts, or you can omit this argument; acyclic shifts are the default behavior.
After you have created a GradientPaint object, set it as the current paint attribute by using the setPaint() method. The following statements create and select a gradient:
GradientPaint pat = new GradientPaint(0f,0f,Color.white,
    100f,45f,Color.blue);
comp2D.setPaint(pat);
All subsequent drawing operations to the comp2D object use this fill pattern until another one is chosen.
Java2D offers the capability to vary the width of drawn lines by using the setStroke() method with a BasicStroke.
A simple BasicStroke constructor takes three arguments:
A
floatvalue representing the line width, with1.0as the normAn
intvalue determining the style of cap decoration drawn at the end of a lineAn
intvalue determining the style of juncture between two line segments
The endcap- and juncture-style arguments use BasicStroke class variables. Endcap styles apply to the ends of lines that do not connect to other lines. Juncture styles apply to the ends of lines that join other lines.
Possible endcap styles are CAP_BUTT for no endpoints, CAP_ROUND for circles around each endpoint, and CAP_SQUARE for squares. Figure 13.5 shows each endcap style. As you can see, the only visible difference between the CAP_BUTT and CAP_SQUARE styles is that CAP_SQUARE is longer because of the added square endcap.

Possible juncture styles include JOIN_MITER, which joins segments by extending their outer edges, JOIN_ROUND, which rounds off a corner between two segments, and JOIN_BEVEL, which joins segments with a straight line. Figure 13.6 shows examples of each juncture style.

The following statements create a BasicStroke object and make it the current stroke:
BasicStroke pen = BasicStroke(2.0f,
    BasicStroke.CAP_BUTT,
    BasicStroke.JOIN_ROUND);
comp2D.setStroke(pen);
The stroke has a width of 2 pixels, plain endpoints, and rounded segment corners.
After you have created a Graphics2D object and specified the rendering attributes, the final two steps are to create the object and draw it.
A drawn object in Java2D is created by defining it as a geometric shape using a class in the java.awt.geom package. You can draw lines, rectangles, ellipses, arcs, and polygons.
The Graphics2D class does not have different methods for each of the shapes you can draw. Instead, you define the shape and use it as an argument to draw() or fill() methods.
Lines are created using the Line2D.Float class. This class takes four arguments: the x,y coordinate of one endpoint followed by the x,y coordinate of the other. Here’s an example:
Line2D.Float ln = new Line2D.Float(60F,5F,13F,28F);
This statement creates a line between 60, 5 and 13, 28. Note that an F is used with the literals sent as arguments. Otherwise, the Java compiler would assume that the values were integers.
Rectangles are created by using the Rectangle2D.Float class or Rectangle2D.Double class. The difference between the two is that one takes float arguments, and the other takes double arguments.
Rectangle2D.Float takes four arguments: x coordinate, y coordinate, width, and height. The following is an example:
Rectangle2D.Float rc = new Rectangle2D.Float(10F, 13F, 40F, 20F);
This creates a rectangle at 10, 13 that is 40 pixels wide by 20 pixels tall.
Ellipses, which were called ovals in early versions of Java, can be created with the Ellipse2D.Float class. It takes four arguments: x coordinate, y coordinate, width, and height.
The following statement creates an ellipse at 113, 25 with a width of 22 pixels and a height of 40 pixels:
Ellipse2D.Float ee = new Ellipse2D.Float(113, 25, 22, 40);
Of all the shapes you can draw in Java2D, arcs are the most complex to construct.
Arcs are created with the Arc2D.Float class, which takes seven arguments:
The x,y coordinate of an invisible ellipse that would include the arc if it was drawn
The width and height of the ellipse
The starting degree of the arc
The number of degrees it travels on the ellipse
An integer describing how the arc is closed
The number of degrees traveled by the arc is specified in a counterclockwise direction by using negative numbers.
Figure 13.7 shows where degree values are located when determining the starting degree of an arc. The arc’s starting angle ranges from 0 to 359 degrees counterclockwise. On a circular ellipse, 0 degrees is at the 3 o’clock position, 90 degrees is at 12 o’clock, 180 degrees is at 9 o’clock, and 270 degrees is at 6 o’clock.
The last argument to the Arc2D.Float constructor uses one of three class variables: Arc2D.OPEN for an unclosed arc, Arc2D.CHORD to connect the arc’s endpoints with a straight line, and Arc2D.PIE to connect the arc to the center of the ellipses like a pie slice. Figure 13.8 shows each of these styles.

Note
The Arc2D.OPEN closure style does not apply to filled arcs. A filled arc that has Arc2D.OPEN as its style will be closed using the same style as Arc2D.CHORD.
The following statement creates an Arc2D.Float object:
Arc2D.Float arc = new Arc2D.Float(
    27F, 22F, 42F, 30F, 33F, 90F, Arc2D.PIE);
This creates an arc for an oval at 27, 22 that is 42 pixels wide by 30 pixels tall. The arc begins at 33 degrees, extends 90 degrees clockwise, and is closed like a pie slice.
Polygons are created in Java2D by defining each movement from one point on the polygon to another. A polygon can be formed from straight lines, quadratic curves, or Bézier curves.
The movements to create a polygon are defined as a GeneralPath object, which also is part of the java.awt.geom package.
A GeneralPath object can be created without any arguments, as shown here:
GeneralPath polly = new GeneralPath();
The moveTo() method of GeneralPath is used to create the first point on the polygon. The following statement would be used if you wanted to start polly at the coordinate 5, 0:
polly.moveTo(5f, 0f);
After creating the first point, the lineTo() method is used to create lines that end at a new point. This method takes two arguments: the x,y coordinate of the new point.
The following statements add three lines to the polly object:
polly.lineTo(205f, 0f);
polly.lineTo(205f, 90f);
polly.lineTo(5f, 90f);
The lineTo() and moveTo() methods require float arguments to specify coordinate points.
If you want to close a polygon, the closePath() method is used without any arguments, as shown here:
polly.closePath();
This method closes a polygon by connecting the current point with the point specified by the most recent moveTo() method. You can close a polygon without this method by using a lineTo() method that connects to the original point.
After you have created an open or closed polygon, you can draw it like any other shape using the draw() and fill() methods. The polly object is a rectangle with points at 5, 0; 205, 0; 205, 90; and 5, 90.
After you have defined the rendering attributes, such as color and line width, and have created the object to be drawn, you’re ready to draw something in all its 2D glory.
All drawn objects use the same Graphics2D class’s methods: draw() for outlines and fill() for filled objects. These take an object as the only argument.
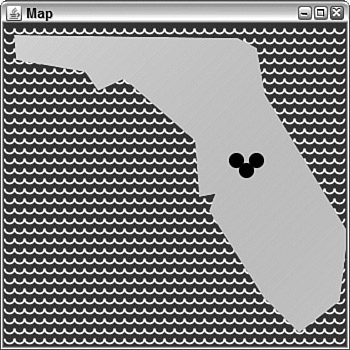
The next project you will create is an application that draws a simple map using 2D drawing techniques. Enter the text of Listing 13.2 using your editor and save the file as Map.java.
Example 13.2. The Full Text of Map.java
 1: import java.awt.*;
 2: import java.awt.geom.*;
 3: import javax.swing.*;
 4:
 5: public class Map extends JFrame {
 6:     public Map() {
 7:         super("Map");
 8:         setSize(350, 350);
 9:         setDefaultCloseOperation(JFrame.EXIT_ON_CLOSE);
10:         MapPane map = new MapPane();
11:         add(map);
12:         setVisible(true);
13:     }
14:
15:     public static void main(String[] arguments) {
16:         Map frame = new Map();
17:     }
18:
19: }
20:
21: class MapPane extends JPanel {
22:     public void paintComponent(Graphics comp) {
23:         Graphics2D comp2D = (Graphics2D)comp;
24:         comp2D.setColor(Color.blue);
25:         comp2D.setRenderingHint(RenderingHints.KEY_ANTIALIASING,
26:             RenderingHints.VALUE_ANTIALIAS_ON);
27:         Rectangle2D.Float background = new Rectangle2D.Float(
28:             0F, 0F, (float)getSize().width, (float)getSize().height);
29:         comp2D.fill(background);
30:         // Draw waves
31:         comp2D.setColor(Color.white);
32:         BasicStroke pen = new BasicStroke(2F,
33:         BasicStroke.CAP_BUTT, BasicStroke.JOIN_ROUND);
34:         comp2D.setStroke(pen);
35:         for (int ax = 0; ax < 340; ax += 10)
36:             for (int ay = 0; ay < 340 ; ay += 10) {
37:                 Arc2D.Float wave = new Arc2D.Float(ax, ay,
38:                     10, 10, 0, -180, Arc2D.OPEN);
39:                 comp2D.draw(wave);
40:             }
41:         // Draw Florida
42:         GradientPaint gp = new GradientPaint(0F, 0F, Color.green,
43:             350F,350F, Color.orange, true);
44:         comp2D.setPaint(gp);
45:         GeneralPath fl = new GeneralPath();
46:         fl.moveTo(10F, 12F);
47:         fl.lineTo(234F, 15F);
48:         fl.lineTo(253F, 25F);
49:         fl.lineTo(261F, 71F);
50:         fl.lineTo(344F, 209F);
51:         fl.lineTo(336F, 278F);
52:         fl.lineTo(295F, 310F);
53:         fl.lineTo(259F, 274F);
54:         fl.lineTo(205F, 188F);
55:         fl.lineTo(211F, 171F);
56:         fl.lineTo(195F, 174F);
57:         fl.lineTo(191F, 118F);
58:         fl.lineTo(120F, 56F);
59:         fl.lineTo(94F, 68F);
60:         fl.lineTo(81F, 49F);
61:         fl.lineTo(12F, 37F);
62:         fl.closePath();
63:         comp2D.fill(fl);
64:         // Draw ovals
65:         comp2D.setColor(Color.black);
66:         BasicStroke pen2 = new BasicStroke();
67:         comp2D.setStroke(pen2);
68:         Ellipse2D.Float e1 = new Ellipse2D.Float(235, 140, 15, 15);
69:         Ellipse2D.Float e2 = new Ellipse2D.Float(225, 130, 15, 15);
70:         Ellipse2D.Float e3 = new Ellipse2D.Float(245, 130, 15, 15);
71:         comp2D.fill(e1);
72:         comp2D.fill(e2);
73:         comp2D.fill(e3);
74:     }
75: }
Some observations about the Map application include the following:
Line 2 imports the classes in the
java.awt.geompackage. This statement is required becauseimport java.awt.*;in line 1 handles only classes, not packages, available underjava.awt.Line 23 creates the
comp2Dobject used for all 2D drawing operations. It’s a cast of theGraphicsobject that represents the panel’s visible surface.Lines 32–34 create a
BasicStrokeobject that represents a line width of 2 pixels and then makes this the current stroke with thesetStroke()method ofGraphics2D.Lines 35–40 use two nested
forloops to create waves from individual arcs.Lines 42–43 create a gradient fill pattern from the color green at 0, 0 to orange at 50, 50. The last argument to the constructor,
true, causes the fill pattern to repeat itself as many times as needed to fill an object.Line 44 sets the current gradient fill pattern using the
setPaint()method and thegpobject just created.Lines 45–63 create the polygon shaped like the state of Florida and draw it. This polygon is filled with a green-to-orange gradient pattern.
Line 65 sets the current color to black. This replaces the gradient fill pattern for the next drawing operation because colors are also fill patterns.
Line 66 creates a new
BasicStroke()object with no arguments, which defaults to a 1-pixel line width.Line 67 sets the current line width to the new
BasicStrokeobjectpen2.Lines 68–70 create three ellipses at 235, 140; 225, 130; and 245, 130. Each is 15 pixels wide by 15 pixels tall, making them circles.
Figure 13.9 shows the application running.
You now have some tools to improve the looks of a Java program. You can draw with lines, rectangles, ellipses, polygons, fonts, colors, and patterns onto a frame, a panel, and other user interface components using Java2D.
Java2D uses the same two methods for each drawing operation—draw() and fill(). Different objects are created using classes of the java.awt.geom package, and these are used as arguments for the drawing methods of Graphics2D.
Tomorrow on Day 14, “Developing Swing Applications,” you’ll learn how to create applications that are launched from a web page using Java Web Start technology.
Review today’s material by taking this three-question quiz.
The following question is the kind of thing you could expect to be asked on a Java programming certification test. Answer it without looking at today’s material or using the Java compiler to test the code.
Given:
import java.awt.*;
import javax.swing.*;

public class Result extends JFrame {
    public Result() {
        super("Result");
 JLabel width = new JLabel("This frame is " +
            getSize().width + " pixels wide.");
        add("North", width);
        setSize(220, 120);
    }

    public static void main(String[] arguments) {
        Result r = new Result();
        r.setVisible(true);
    }
}
What will be the reported width of the frame, in pixels, when the application runs?
|
The answer is available on the book’s website at http://www.java21days.com. Visit the Day 13 page and click the Certification Practice link.
To extend your knowledge of the subjects covered today, try the following exercises:
Create an application that draws a circle with its radius, x,y position, and color all determined by parameters.
Create an application that draws a pie graph.
Where applicable, exercise solutions are offered on the book’s website at http://www.java21days.com.