
The first exposure of many people to the Java programming language is in the form of applets, small and secure Java programs that run as part of a web page.
Java Web Start, a protocol for downloading and running Java programs, makes it possible to run applications from a web browser as if they were applets.
Today, you learn how to create these web-launched Java programs as you explore the following topics:
How to install and run Java applications in a web browser
How to publish your application’s files and run it
How Swing applications can run into performance slowdowns on time-consuming tasks
How to solve this problem by using
SwingWorker, a class that performs Swing work in its own thread
One of the issues you must deal with as a Java programmer is how to make your software available to your users.
Java applications require a Java interpreter, so one must either be included with the application or previously installed on the computer. Lacking either of those, users must install an interpreter themselves. The easiest solution (for you) is to require that users download and install the Java Runtime Environment from Sun’s website at http://www.java.com.
Regardless of how you deal with the requirement for an interpreter, you distribute an application like any other program, making it available on a CD, website, or some other means. A user must run an installation program to set it up, if one is available, or copy the files and folders manually.
Java applets are easier to make available because they can be run by web browsers. However, if your program is a Java applet, users must be running browsers equipped with the Java Plug-in. This too can be downloaded from Sun as part of the Java Runtime Environment.
There are several drawbacks to offering applets instead of applications. The biggest is the default security policy for applets, which makes it impossible for them to read and write data on a user’s computer, among other restrictions.
Java eases the challenges of software deployment with Java Web Start, a means of running Java applications presented on a web page and stored on a web server. Here’s how it works:
A programmer packages an application and all the files it needs into a JAR archive along with a file that uses the Java Network Launching Protocol (JNLP), part of Java Web Start.
The file is stored on a web server with a web page that links to that file.
A user loads the page with a browser and clicks the link.
If the user does not have the Java Runtime Environment, a dialog box opens asking whether it should be downloaded and installed. The full installation is more than 65M in size and could take 30–45 minutes to download on a 56K Internet connection (or 3–5 minutes on a high-speed connection).
The Java Runtime Environment installs and runs the program, opening new frames and other interface components like any other application. The program is saved in a cache, so it can be run again later without requiring installation.
To see it in action, visit Sun’s Java Web Start site at http://java.sun.com/javase/technologies/desktop/javawebstart/downloads/archive-download.html and click the Code Samples & Apps link, and then the “Demos” link. The Web Start Demos page contains pictures of several Java applications, each with a Launch button you can use to run the application, as shown in Figure 14.1.

Click the Launch button of one of the applications. If you don’t have the Java Runtime Environment yet, a dialog box opens asking whether you want to download and install it.
The runtime environment includes the Java Plug-in, a Java interpreter that adds support for the current version of the language to browsers such as Microsoft Internet Explorer and Mozilla. The environment also can be used to run applications, regardless of whether they use Java Web Start.
When an application is run using Java Web Start, a title screen displays on your computer briefly, and the application’s graphical user interface appears.
Note
If you have installed the JDK, you are likely to have the Java Runtime Environment on your computer already.
Figure 14.2 shows one of the demo applications offered by Sun, a military strategy game in which three black dots attempt to keep a red dot from moving into their territory.

As you can see in Figure 14.2, the application looks no different from any other application. Unlike applets, which are presented in conjunction with a web page, applications launched with Java Web Start run in their own windows, as if they were run from a command line.
One thing that’s different about a Java Web Start application is the security that can be offered to users. When an application attempts to do something, such as read or write files, the user can be asked for permission.
For example, another one of the demo programs is a text editor. When you try to save a file for the first time with this application, the Security Advisory dialog box opens (see Figure 14.3).
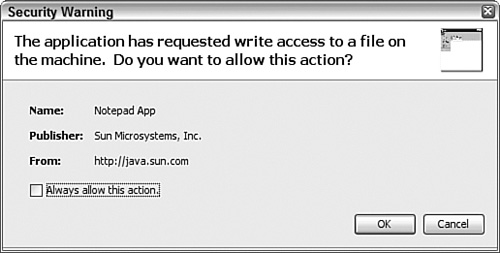
If the user does not permit something, the application cannot function fully. The kinds of things that trigger a security dialog box are the same things not allowed by default in applets: reading and writing files, loading network resources from servers other than the one hosting the program, and the like.
After an application has been run by Java Web Start, it is stored on a user’s computer in a cache, enabling it to be run again later without installation. The only exception is when a new version of the application becomes available. In this case, the new version is downloaded and installed automatically in place of the existing one.
A Java Web Start application viewer can be run directly to see the applications that have been cached, run them, and change some of their settings. The application is called javaws.exe and can be found in the same folder as java and the other command-line programs in the JDK. There also should be a menu item for Java Web Start that was added during installation.
Note
Although you run a Java Web Start application for the first time using a web browser, that’s not a requirement. To see this, run the Java Web Start application viewer, select a program, and choose Application, Install Shortcuts. A shortcut to run the application will be added to your desktop. You can use it to run the program without a browser.
The default security restrictions in place for a Java Web Start application can be overridden if it is stored in a digitally signed Java archive. The user will be presented with the signed security certificate, which documents the author of the program and the certificate granting authority vouching for its identity, and asked whether to accept it or reject it. The application won’t run unless the certificate has been accepted.
Any Java application can be run using Java Web Start as long as the web server that offers the application is configured to work with the technology and all the class files and other files it needs have been packaged together.
To prepare an application to use Java Web Start, you must save the application’s files in a Java archive file, create a special Java Web Start configuration file for the application, and upload the files to the web server.
The configuration file that must be created uses Java Network Launching Protocol (JNLP), an Extensible Markup Language (XML) file format that specifies the application’s main class file, its JAR archive, and other things about the program.
Note
XML is introduced during Day 20, “XML Web Services.” Because the format of JNLP files is relatively self-explanatory, you don’t need to know much about XML to create a JNLP file.
The next project you will undertake is to use Java Web Start to launch and run PageData, an application that displays information about web pages. The application requires the PageData.class file, which can be downloaded from the Day 14 page of the book’s website at http://www.java21days.com. (You also might want PageData.java in case you decide to make any changes to the application.)
To get ready, put a copy of that project’s class file in the folder you are using as a workspace for your Java programming.
The first thing you must do is package all of an application’s class files into a Java archive file along with any other files it needs. If you are using the JDK, you can create the JAR file with the following command:
jar -cf PageData.jar PageData.class
A JAR file called PageData.jar is created that holds the class file.
Next, you should create an icon graphic for the application, which will be displayed when it is loaded and used as its icon in menus and desktops. The icon can be in either GIF or JPEG format and should be 64 pixels wide by 64 pixels tall.
For this project, if you don’t want to create a new icon, you can download pagedataicon.gif from the book’s website. Go to http://www.java21days.com and open the Day 14 page. Right-click the pagedataicon.gif link and save the file to the same folder as your PageData.jar file.
The final thing you must do is create the JNLP file that describes the application. Listing 14.1 contains a JNLP file used to distribute the PageData application. Open your word processor and enter the text of this listing; then save the file as PageData.jnlp.
Example 14.1. The Full Text of PageData.jnlp
 1: <?xml version="1.0" encoding="utf-8"?>
 2: <!– JNLP File for the PageData Application –>
 3: <jnlp
 4:   codebase="http://www.cadenhead.org/book/java-21-days/java"
 5:   href="PageData.jnlp">
 6:   <information>
 7:     <title>PageData Application</title>
 8:     <vendor>Rogers Cadenhead</vendor>
 9:     <homepage href="http://www.java21days.com"/>
10:     <icon href="pagedataicon.gif"/>
11:     <offline-allowed/>
12:   </information>
13:   <resources>
14:     <j2se version="1.6"/>
15:     <jar href="PageData.jar"/>
16:   </resources>
17:   <security>
18:     <all-permissions/>
19:   </security>
20:   <application-desc main-class="PageData"/>
21: </jnlp>
The structure of a JNLP file is similar to the Hypertext Markup Language (HTML) required to put a Java applet on a web page. Everything within the < and > marks is a tag, and tags are placed around the information the tag describes. There’s an opening tag before the information and a closing tag after it.
For example, line 7 of Listing 14.1 contains the following text:
<title>PageData Application</title>
In order from left to right, this line contains the opening tag <title>, the text PageData Application, and the closing tag </title>. The text between the tags, “PageData Application,” is the title of the application. This title will be displayed by Java Web Start as the application is being loaded and used in menus and shortcuts.
The difference between opening tags and closing tags is that closing tags begin with a slash (/) character, and opening tags do not. In line 8, <vendor> is the opening tag, </vendor> is the closing tag, and these tags surround the name of the vendor who created the application. I’ve used my name here. Delete it and replace it with your own name, taking care not to alter the <vendor> or </vendor> tags around it.
Some tags have an opening tag only, such as line 11:
<offline-allowed/>
The offline-allowed tag indicates that the application can be run even if the user is not connected to the Internet. If it was omitted from the JNLP file, the opposite would be true, and the user would be forced to go online before running this application.
In XML, all tags that do not have a closing tag end with /> instead of >.
Tags also can have attributes, which are another way to define information in an XML file. An attribute is a name inside a tag that is followed by an equal sign and some text within quotes.
For example, consider line 9 of Listing 14.1:
<homepage href="http://www.java21days.com"/>
This is the homepage tag, and it has one attribute, href. The text between the quote marks is used to set the value of this attribute to http://www.java21days.com. This defines the home page of the application—the web page that users should visit if they want to read more information about the program and how it works.
The PageData JNLP file defines a simple Java Web Start application that runs with no security restrictions, as defined in lines 17–19:
<security>
  <all-permissions/>
</security>
In addition to the tags that have already been described, Listing 14.1 defines other information required by Java Web Start.
Line 1 designates that the file uses XML and the UTF-8 character set. This same line can be used on any of the JNLP files you create for applications.
Line 2 is a comment. Like other comments in Java, it’s placed in the file solely for the benefit of humans. Java Web Start ignores it.
The jnlp element, which begins on line 3 and ends on line 21, must surround all the other tags that configure Web Start.
This tag has two attributes, codebase and href, which indicate where the JNLP file for this application can be found. The codebase attribute is the uniform resource locator (URL) of the folder that contains the JNLP file. The href attribute is the name of the file or a relative URL that includes a folder and the name (such as "pub/PageData.jnlp").
In Listing 14.1, the attributes indicate that the application’s JNLP file is at the following web address:
http://www.cadenhead.org/book/java-21-days/java/PageData.jnlp
The information element (lines 6–12) defines information about the application. Elements can contain other elements in XML, and in Listing 14.1, the information element contains title, vendor, homepage, icon, and offline-allowed tags.
The title, vendor, homepage, and offline-allowed elements were described earlier.
The icon element (line 10) contains an href attribute that indicates the name (or folder location and name) of the program’s icon. Like all file references in a JNLP file, this element uses the codebase attribute to determine the full URL of the resource. In this example, the icon element’s href attribute is pagedataicon.gif, and the codebase is http://www.cadenhead.org/book/java21days/java, so the icon file is at the following web address:
http://www.cadenhead.org/book/java21days/java/pagedataicon.gif
The resources element (lines 13–16) defines resources used by the application when it runs.
The j2se element has a version attribute that indicates the version of the Java interpreter that should run the application. This attribute can specify a general version (such as "1.5", or "1.6"), a specific version (such as "1.6.1-beta"), or a reference to multiple versions—follow a general version number with a plus sign. The tag <j2se version="1.4+"> sets up an application to be run by any Java interpreter from version 1.4 upward.
Note
When you’re using the j2se element to specify multiple versions, Java Web Start will not use a beta version to run an application. The only way to run an application with a beta release is to indicate that release specifically.
The jar element has an href attribute that specifies the application’s JAR file. This attribute can be a filename or a reference to a folder and filename, and it uses codebase. In the PageData example, the JAR file is in http://www.cadenhead.org/book/java21days/java/PageData.jar.
The application-desc element indicates the application’s main class file and any arguments that should be used when that class is executed.
The main-class attribute identifies the name of the class file, which is specified without the .class file extension.
If the class should be run with one or more arguments, place argument elements within an opening <application-desc> tag and a closing </application-desc> tag.
The following XML specifies that the PageData class should be run with two arguments: http://java.sun.com and yes:
<application-desc main-class="PageData">
  <argument>http://java.sun.com</argument>
  <argument>yes</argument>
</application-desc>
After you have created the PageData.jnlp file, change line 5 of Listing 14.1 so that it refers to the folder on a web server where your application’s JAR file, icon file, and JNLP file will be stored.
Upload all three of the project’s files to this folder; then run your browser and load the JNLP file using its full web address. If your web server is configured to support Java Web Start, the application will be loaded and begin running, as in Figure 14.4.

For this application to be run without restriction, the PageData.jar file must be digitally signed. For real-world applications, this requires the services of a certificate-granting authority such as Thawte or VeriSign and can cost $1,000 or more per year.
For testing purposes, the keystore and jarsigner tools in the JDK can be used to create a key and use it to digitally sign a JAR file.
The first step is to use keytool to create a key and assign it an alias and password:
keytool -genkey -alias examplekey -keypass swordfish
The -genkey argument generates a new key—which in this example is named examplekey and has the password “swordfish”. If this is the first time keytool has been used, you’ll be prompted for a password that protects access to the key database, which is called a keystore.
After a key has been placed in the keystore, it can be used with the jarsigner tool to sign an archive file. This tool requires the keystore and key passwords and the alias of the key. Here’s how the PageData.jar archive could be signed with the examplekey key:
jarsigner -storepass secret -keypass swordfish PageData.jar examplekey
The keystore password in this example is “secret”. The security certificate used to sign the archive will last 90 days and will be described as an “untrusted source” when the Java Web Start application is run.
Note
There’s no easy way to avoid being described as “untrusted.” The only way to establish your trustworthiness is to go through one of the professional certificate-granting companies.
Java developer Roedy Green offers a guide to Java security certification that lists several companies and the prices that they charge. Visit the web page http://mindprod.com/jgloss/certificate.html.
If your server does not support Java Web Start, which is more likely than not because it is a relatively new technology, you might see the text of your JNLP file loaded in a page, and the application will not open.
A web server must be configured to recognize that JNLP files are a new type of data that should cause a Java application to run. This is usually accomplished by setting the MIME type associated with files of the extension JNLP.
MIME, which is an acronym for Multipurpose Internet Mail Extensions, is a protocol for defining Internet content such as email messages, attached files, and any file that can be delivered by a web server.
On an Apache web server, the server administrator can support JNLP by adding the following line to the server’s mime.types (or .mime.types) file:
application/x-java-jnlp-file JNLP
If you can’t get Java Web Start working on your server, you can test this project on the book’s official site. Load the web page http://www.cadenhead.org/book/java-21days/java/PageData.jnlp, or visit the web address http://www.java21days.com and open the Day 14 page.
Caution
Java Web Start applications should look exactly like the applications do when run by other means. However, there appear to be a few bugs in how much space is allocated to components on a graphical user interface. On a Windows system, you might need to add 50 pixels to the height of an application before employing it in Java Web Start. Otherwise, the text fields are not tall enough to display numbers.
The JNLP format has other elements that can affect the performance of Java Web Start.
It can be used to change the title graphic that appears when the application is launched, run signed applications that have different security privileges, run an application using different versions of the Java interpreter, and other options.
By default, all Java Web Start applications will not have access to some features of a user’s computer unless the user has given permission. This is similar to how the functionality of applets is limited.
If your application’s JAR file has been digitally signed to verify its authenticity, it can be run without these security restrictions by using the security element.
This element is placed inside the jnlp element, and it contains one element of its own: all-permissions. To remove security restrictions for an application, add this to a JNLP file:
<security>
  <all-permissions/>
</security>
If you want to provide more information about your application for users of Java Web Start, one or more description elements can be placed inside the information element.
Four kinds of descriptions can be provided using the kind attribute of the description element:
kind="one-line"—. A succinct one-line description, used in lists of Web Start applicationskind="short"—. A paragraph-long description, used when space is availablekind="tooltip"—. A ToolTip descriptionNo
kindattribute—. A default description, used for any other descriptions not specified
All these are optional. Here’s an example that provides descriptions for the PageData application:
<description>The PageData application.</description>
<description kind="one-line">An application to learn more about web
servers and pages.</description>
<description kind="tooltip">Learn about web servers and
pages.</description>
<description kind="short">PageData, a simple Java application that
takes a URL and displays information about the URL and the web
server that delivered it.</description>
The PageData JNLP file included a 64×64 icon, pagedataicon.gif, used in two different ways:
When the PageData application is being loaded by Java Web Start, the icon is displayed on a window next to the program’s name and author.
If a PageData icon is added to a user’s desktop, the icon will be used at a different size: 32×32.
When an application is loading, you can use a second icon element to specify a graphic that will be displayed in place of the icon, title, and author. This graphic is called the application’s splash screen, and it is specified with the kind="splash" attribute, as in this example:
<icon kind="splash" href="pagedatasplash.gif"/ width="300" height="200">
The width and height attributes, which also can be used with the other kind of icon graphic, specify the image’s display size in pixels.
This second icon element should be placed inside the information element.
The responsiveness of a Swing application depends largely on how well the software handles time-consuming tasks in response to user input.
Applications ordinarily execute tasks in one thread, so if something takes a long time to accomplish, such as loading a large file or parsing data from an XML document, the user might notice a lag in performance while this is taking place.
Swing programs also require all user-interface components to be running within the same thread.
The best way to take care of both requirements is to use SwingWorker, a new class in the javax.swing package that’s designed to run time-consuming tasks in their own worker thread and report the result.
SwingWorker is an abstract class that must be subclassed by applications that require a worker:
public class DiceWorker extends SwingWorker {
    // ...
}
The doInBackground() method should be overridden in the new class to perform the task, as in this example that rolls six-sided dice a large number of times and tracks the results:
doInBackground() {
    for (int i = 0; i < timesToRoll; i++) {
        int sum = 0;
        for (int j = 0; j < 3; j++) {
            sum += Math.floor(Math.random() * 6);
        }
        }
        result[sum] = result[sum] + 1;
        return result;
}
Today’s next project is a Swing application that rolls three 6-sided dice a user-selected number of times and tabulates the results. Sixteen text fields represent the possible values, which range from 3 to 18.
The application is developed as two classes: the DiceRoller frame that holds the graphical user interface and the DiceWorker Swing worker that handles the dice rolls.
Because the application allows the user to roll the dice thousands or even millions of times, putting this task in a worker keeps the Swing interface responsive to user input.
Listing 14.2 contains the worker class, DiceWorker.
Example 14.2. The Full Text of DiceWorker.java
 1: import javax.swing.*;
 2:
 3: public class DiceWorker extends SwingWorker {
 4:     int timesToRoll;
 5:
 6:     // set up the Swing worker
 7:     public DiceWorker(int timesToRoll) {
 8:         super();
 9:         this.timesToRoll = timesToRoll;
10:     }
11:
12:     // define the task the worker performs
13:     protected int[] doInBackground() {
14:         int[] result = new int[16];
15:         for (int i = 0; i < this.timesToRoll; i++) {
16:             int sum = 0;
17:             for (int j = 0; j < 3; j++) {
18:                 sum += Math.floor(Math.random() * 6);
19:             }
20:             result[sum] = result[sum] + 1;
21:         }
22:         // transmit the result
23:         return result;
24:      }
25: }
You can compile this class, but there’s no way to do anything with it until the next class, DiceRoller, has been created.
A Swing worker only needs one method, doInBackground(), which performs the task in the background. The method must use the protected level of access control and return a value produced by the work. DiceWorker creates a 16-element integer array that contains dice-roll results.
Another class can use this worker in three steps:
Call the worker’s
DiceWorker(int)constructor with the number of rolls as the argument.Call the worker’s
addPropertyChangeListener(Object)method to add a listener that will be notified when the task is complete.Call the worker’s
execute()method to begin the work.
The execute() method causes the worker’s doInBackground() method to be called.
A property change listener is an event listener borrowed from java.beans, the JavaBeans package that establishes ways in which components on a user interface can interact with each other.
In this case, a Swing worker wants to announce that its work has been finished, which could take place long after the worker began its work. Listeners are the best way to handle notifications of this kind because they free a graphical user interface to handle other things.
The property change listener interface has one method:
public void propertyChange(PropertyChangeEvent event) {
    // ...
}
The DiceRoller class shown in Listing 14.3 presents a graphical user interface that can display dice-roll results and begin a set of rolls.
Example 14.3. The Full Text of DiceRoller.java
 1: import java.awt.*;
 2: import java.awt.event.*;
 3: import java.beans.*;
 4: import javax.swing.*;
 5:
 6: public class DiceRoller extends JFrame implements ActionListener,
 7: PropertyChangeListener {
 8:
 9:     // the table for dice-roll results
10:     JTextField[] total = new JTextField[16];
11:     // the "Roll" button
12:     JButton roll;
13:     // the number of times to roll
14:     JTextField quantity;
15:     // the Swing worker
16:     DiceWorker worker;
17:
18:     public DiceRoller() {
19:         super("Dice Roller");
20:         setDefaultCloseOperation(JFrame.EXIT_ON_CLOSE);
21:         setSize(800, 125);
22:
23:         // set up top row
24:         JPanel topPane = new JPanel();
25:         GridLayout paneGrid = new GridLayout(1, 16);
26:         topPane.setLayout(paneGrid);
27:         for (int i = 0; i < 16; i++) {
28:             // create a textfield and label
29:             total[i] = new JTextField("0", 4);
30:             JLabel label = new JLabel((i + 3) + ": ");
31:             // create this cell in the grid
32:             JPanel cell = new JPanel();
33:             cell.add(label);
34:             cell.add(total[i]);
35:             // add the cell to the top row
36:             topPane.add(cell);
37:         }
38:
39:         // set up bottom row
40:         JPanel bottomPane = new JPanel();
41:         JLabel quantityLabel = new JLabel("Times to Roll: ");
42:         quantity = new JTextField("0", 5);
43:         roll = new JButton("Roll");
44:         roll.addActionListener(this);
45:         bottomPane.add(quantityLabel);
46:         bottomPane.add(quantity);
47:         bottomPane.add(roll);
48:
49:         // set up frame
50:         GridLayout frameGrid = new GridLayout(2, 1);
51:         setLayout(frameGrid);
52:         add(topPane);
53:         add(bottomPane);
54:
55:         setVisible(true);
56:     }
57:
58:     // respond when the "Roll" button is clicked
59:     public void actionPerformed(ActionEvent event) {
60:         int timesToRoll = 0;
61:         try {
62:             // turn off the button
63:             timesToRoll = Integer.parseInt(quantity.getText());
64:             roll.setEnabled(false);
65:             // set up the worker that will roll the dice
66:             worker = new DiceWorker(timesToRoll);
67:             // add a listener that monitors the worker
68:             worker.addPropertyChangeListener(this);
69:             // start the worker
70:             worker.execute();
71:         } catch (Exception exc) {
72:             System.out.println(exc.getMessage());
73:             exc.printStackTrace();
74:         }
75:      }
76:
77:     // respond when the worker's task is complete
78:     public void propertyChange(PropertyChangeEvent event) {
79:         try {
80:             // get the worker's dice-roll results
81:             int[] result = (int[]) worker.get();
82:             // store the results in text fields
83:             for (int i = 0; i < result.length; i++) {
84:                  total[i].setText("" + result[i]);
85:             }
86:         } catch (Exception exc) {
87:             System.out.println(exc.getMessage());
88:             exc.printStackTrace();
89:         }
90:      }
91:
92:      public static void main(String[] arguments) {
93:          new DiceRoller();
94:      }
95: }
Most of DiceRoller creates and lays out the user-interface components: 16 text fields, a Times to Roll text field, and a Roll button.
The actionPerformed() method responds to a click of the Roll button by creating a Swing worker that will roll the dice, adding a property change listener and starting work.
Calling worker.execute() in line 70 causes the worker’s doInBackground() method to be called.
When the worker’s finished rolling dice, the propertyChange() method of DiceRoller will receive a property change event.
This method receives the result of doInBackground() by calling the worker’s get() method (line 81), which must be cast to an integer array:
int[] result = (int[] worker.get();
The application is shown in Figure 14.5.

The topics covered today are two of many capabilities that make Java suitable for application development: browser-based program deployment and Swing performance improvements through the use of threads. Java Web Start blurs the distinction between applications and applets.
With Web Start, users no longer need to run an installation program to set up a Java application and the interpreter that executes the class. Web Start takes care of this automatically, after the user’s browser has been equipped to use the Java Runtime Environment.
Support for Web Start is offered through the Java Network Launching Protocol (JNLP), an XML file format used to define and set up Java Web Start.
The SwingWorker class improves Swing application performance by putting a time-consuming task in its own thread. All of the work required to start and stop the thread is handled by the class behind the scenes.
When you create a subclass of SwingWorker, you can focus on the task that must be performed.
Review today’s material by taking this three-question quiz.
The following question is the kind of thing you could expect to be asked on a Java programming certification test. Answer it without looking at today’s material or using the Java compiler to test the code.
Given the following,
import java.awt.*;
import javax.swing.*;

public class SliderFrame extends JFrame {
    public SliderFrame() {
        super();
        setDefaultCloseOperation(JFrame.EXIT_ON_CLOSE);
        Container pane = getContentPane();
        JSlider value = new JSlider(0, 255, 100);
        setContentPane(pane);
        setSize(325, 150);
        setVisible(true);
    }

    public static void main(String[] arguments) {
        new SliderFrame();
    }
}The answer is available on the book’s website at http://www.java21days.com. Visit the Day 14 page and click the Certification Practice link.
To extend your knowledge of the subjects covered today, try the following exercises:
Turn one of the applications created during the first two weeks into one that can be launched with Java Web Start.
Create a new JNLP file that runs the PageData application using version 1.3 of the Java interpreter and force users to be connected to the Internet when it is run.
Where applicable, exercise solutions are offered on the book’s website at http://www.java21days.com.