Chapter 7. Custom actions
- Demystifying controllers, actions, and routes
- Developing custom action implementation requirements from requests
- Transitioning blueprint actions into custom actions
- Using the req and res dictionaries in actions
- Completing a working user identity management system
Recall that our clients have asked us to build functionality that allows them to control access to Brushfire and, more specifically, to indirectly control the content of the site. In a nutshell, we’re attempting to enable 24/7 ubiquitous cat content! In chapter 6, you completed the first part of user identity management, which involved creating and configuring a user model that will hold attributes to identify a user. In this chapter, you’ll connect frontend mockup requests to custom controller actions that use model methods to allow a user to create, modify, and view their identity. Recall that the components of user identity management correlate to the frontend mockups outlined in table 7.1.
Table 7.1. User identity management components and mockup pages
|
Component |
Mockup |
Description |
|---|---|---|
| Creating a profile with a signup process | signup.html | The signup component allows a user to create an identity. Identity is based on one or more unique pieces of information. In our user identity management system, we’ll prompt the user for a unique email address and unique username. Either of these pieces of information can be used to identify a particular user. The signup process will also prompt the user to create a password. This password will later be used as proof of a claim to a particular identity. |
| Displaying a user profile | profile.html | The user profile component displays information about the user via the user record. The user also has the ability to edit, delete, and later restore their profile. |
| Editing a user profile | edit-profile.html | Editing a user profile allows the user to edit various aspects of their user record. |
| Restoring a user profile | restore-profile.html | After a user authenticates successfully, this component allows a user to restore their deleted user profile. |
| Administering a user profile | admin-users.html | This component allows a designated admin user to perform administrative duties such as add admin privileges to other users as well as ban users from accessing the system. |
To keep your eye on the big picture, remember that user identity management is part of the identity, authorization, personalization, and access control system you’re building over chapters 6–10 and illustrated in figure 7.1.
Figure 7.1. The four components of an identity, authentication, personalization, and access control system

In chapter 6, you installed the frontend assets of user identity management. These interactive mockups were created based on a set of requirements derived from the client’s initial demands. You then used the mockups to identify model requirements before implementing the actual user model.
In this chapter, we’ll again look to the frontend assets for guidance on the requirements of requests to our backend API. As you’ll see shortly, the requirements of the API will go beyond the functionality of the blueprint actions we used in chapter 4 for finding, creating, updating, and deleting records on the video model. We’ll introduce custom actions that open up infinite possibilities for fulfilling the needs of frontend requests. Before we look at the mockups and start identifying the requirements of each request, let’s make sure you have a firm understanding of routes, controllers, and actions.
7.1. Demystifying routes and actions
We introduced routes, controllers, and actions in chapter 1. Combined, they can represent an endpoint within an API. Recall that the route is implemented in JavaScript as a dictionary.
The key in the route dictionary is the request or route address, consisting of the HTTP method and path. The value is another dictionary called the target that consists of a controller and action; see figure 7.2. When a request is made, the router looks for a matching route address and then executes the corresponding controller action.
Figure 7.2. An explicit route contains a route address and a target.

The controller is a name you give the dictionary that aggregates actions under a common resource. Here, we named the controller user because the actions will all concern a user. You define custom actions in controller files located in the brushfire/api/controllers/ folder. In Sublime, open brushfire/api/controllers/UserController.js, which is similar to the following code.
Example 7.1. The UserController file
module.exports = {};
This is the controller that was generated when you created the user API in chapter 6 via sails generate api user. We’ve already demonstrated what you can do with an empty controller and empty model through blueprint routes and actions. Now, let’s add a custom action where you dictate what will occur instead of relying on the fixed set of features in a blueprint action. Head back to Sublime, and add a new custom action named hello to brushfire/api/controllers/UserController.js.
Example 7.2. A custom hello action in the user controller

Your new custom hello action will log “Hello World!” to the console. Let’s see this action.
Tip
If you’ve been following along from chapter 6, you’re good to go. If, however, you want to begin your Brushfire journey from here, head to section 7.2.1 for instructions on obtaining the necessary assets to begin this chapter.
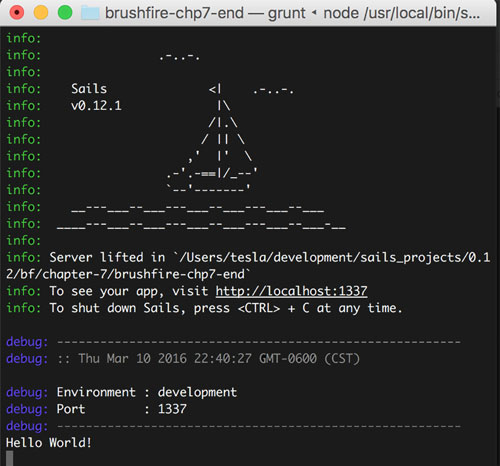
Restart the Sails server via sails lift. In Postman, make a GET request to /user/hello similar to figure 7.3.
Figure 7.3. You made a GET request  to /user/hello
  , but there’s something wrong with the action because the loading message
  displays and then times out.

Your “Hello World!” message is logged to the console in figure 7.4.
Figure 7.4. The message from the custom action is logged to the console.
But there’s an issue with the request. Postman continues to display a loading message until it gets tired of waiting and tells you that the request didn’t get a response. Recall from chapter 1 that web applications use the HTTP request/response protocol to communicate. You made a request, but your action didn’t complete the transaction with a response. Let’s fix that.
7.1.1. Introducing res.json()
You need a way to respond to a request in the hello action. As it turns out, there are many ways to respond to a request. You’ll use the .json() method of the res dictionary to respond to the request. The res.json() method responds with a 200 status code and whatever you provide as an argument to the method, formatted as JSON to the user-agent that made the request. In Sublime, add the following response to brushfire/api/controllers/UserController.js.
Example 7.3. Adding a response to the hello action in the user controller

Restart Sails using sails lift and make the same GET request to /user/hello in Postman, as shown in figure 7.5.
Figure 7.5. Again, you make a GET request to /user/hello . Now that you’ve added a response in the action, Postman receives the response and displays it .

Now, when the request triggers the hello action, a response is sent back with your Hello World! message completing the request/response transaction. Notice that you also added return before res.json. This makes res.json() a terminal method.
Definition
A terminal method is generally the last line of code an action will execute for a given request. You use return as an indicator that nothing else will execute with respect to the request after this line of code.
You might be wondering how you got the .json() method from the res argument in the first place. The req and res arguments in your hello action are JavaScript dictionaries provided by Sails. The details of how they’re created aren’t important. Instead, it’s important to understand that, like all JavaScript dictionaries, they can have methods (functions) and properties. These methods and properties are tied to the request and response. For example, not surprisingly, in a GET request to /user/hello, the req dictionary provides access to details about the request like the type of HTTP method used via req.method. In this case, the req.method property would return GET.
We have one more bit of unfinished business to cover. How was your custom hello action triggered without an explicit route? The answer lies in a third type of blueprint route called blueprint action routes.
7.1.2. Automatic routing for custom actions
Action blueprint routes, a.k.a. blueprint action routes, are shadow routes derived from custom actions found in controllers. When the server starts via sails lift, Sails examines each controller for custom actions. For each one it finds, Sails binds a shadow route, which it determines by combining the controller name and the action name. Like other blueprint routes, action blueprint routes are considered shadow routes because they don’t exist explicitly in the brushfire/config/routes.js file.
Definition
The naming here can be confusing. Just remember that blueprint actions are built-in controller actions that you don’t have to write yourself. And blueprint routes are built-in implicit routes that you don’t have to include in your routes.js file. Terms like action blueprints, shortcut blueprints, and RESTful blueprints just relate to different categories of blueprint routes that are enabled by default in Sails.
Instead, they’re available unless overridden using the same path in the routes.js file or disabled in brushfire/config/blueprints.js. So, for your hello action, the shadow routes in table 7.2 are created each time the Sails server starts.
Table 7.2. Action blueprint routes for the hello action
|
Method |
Path |
Action |
|---|---|---|
| GET | /user/hello/:id? | hello |
| POST | /user/hello/:id? | hello |
| PUT | /user/hello/:id? | hello |
| DELETE | /user/hello/:id? | hello |
These routes speed up initial development by deferring the need to create an explicit route for each action.
Tip
What’s up with the :id? at the end of each path? We’ll cover this extensively in chapter 8, but for now just remember that :id? lets Sails know that if there’s a value after /user/hello, treat it as a variable named id.
Ultimately, you’ll want to consolidate all routes explicitly in brushfire/config/routes.js. But for now, you can defer that task to chapter 8 and use the automation of blueprints instead.
Let’s review. You know an action is simply a handler function that’s bound to a particular request via a route. You also know that you have access to properties and methods of the request and response in an action through the req and res dictionary arguments. Finally, you know that each request needs a corresponding response. Now that you have a solid foundation of understanding how controller actions work, let’s start identifying the custom actions you’ll need to fulfill the frontend mockup requests and requirements for user identity management.
7.2. Identifying the requirements for your custom actions
We’ll again use frontend mockups to guide the design of your backend. Instead of simply looking for model requirements, we’ll examine the requests on each page to identify the custom actions necessary to satisfy the requirements of each frontend request. An overview of Brushfire’s mockup pages is displayed in figure 7.6.
Figure 7.6. You can use these mockups to identify the requests on each page as well as the requirements and expectations of each endpoint.

You can see the result of identifying the requirements by clicking the API Reference link on the chapter 7 hub here http://sailsinaction.github.io/chapter-7/ or directly at Error! Hyperlink reference not valid.//mng.bz/8uy9.
7.2.1. Obtaining the example materials for this chapter
You have two options with regard to setting up your Brushfire assets for this chapter. If you’ve completed chapter 6, you’re all set and can simply use your existing project here. If you haven’t completed chapter 6, you can clone the end of chapter 6 GitHub repo at https://github.com/sailsinaction/brushfire-ch6-end.git and start from there. Remember to use npm install in the terminal window from the root of the project after you clone the repo.
Warning
If you do choose the cloning option, don’t forget to add the brushfire/config/local.js file with your Google API key from chapter 5 (section 5.4.6) as well as start your local PostgreSQL brushfire database from chapter 6 (section 6.4.2).
7.3. Handling a signup form
The first page we’ll review is the signup page, which is responsible for creating a user’s initial identity. For each mockup, we’ll identify the following:
- All the requests on the page including the request that initiated the display of the page itself
- The inputs that will be sent with a request
- The requirements and expectations of the response to the frontend
Figure 7.7 shows three requests that are part of the signup page.
Figure 7.7. The signup page mockup contains three endpoints. The first request initiates the display of the signup page, which is handled by an asset route. The second request is a link to the restore-profile page that’s handled by an asset route, and the third is a POST request to /user/signup that will be handled by a custom controller action.

Let’s review the requests we’ve identified in the API Reference. The first request is for the delivery of the signup page
itself. Although not technically a request on the signup page, it makes sense to list the request and the backend component
that responds with the page. In this case, the Sails asset router responds to the Angular AJAX GET request to /templates/signup.html ![]() .
.
The second request starts as an Angular frontend request to /#/restore-profile that triggers a backend GET request to /templates/restore-profile.html ![]() . Sails handles this request with the asset router.
. Sails handles this request with the asset router.
The third request is a POST request to /user/signup ![]() . This will trigger a custom signup action. Let’s review the requirements for this action by heading back to the API Reference. The first tab consists of your model requirements. A new column has been added for backend validation and transformation
requirements. You’ll implement the validations and transformations in a new custom action: signup. The second tab contains your endpoint summary. We’ve altered the requirements of the Add a user endpoint. In chapter 6, you used the blueprint create action to create a user based on incoming form parameters. Your requirements, however, have expanded to include the following:
. This will trigger a custom signup action. Let’s review the requirements for this action by heading back to the API Reference. The first tab consists of your model requirements. A new column has been added for backend validation and transformation
requirements. You’ll implement the validations and transformations in a new custom action: signup. The second tab contains your endpoint summary. We’ve altered the requirements of the Add a user endpoint. In chapter 6, you used the blueprint create action to create a user based on incoming form parameters. Your requirements, however, have expanded to include the following:
- Backend validation of parameters with appropriate error responses
- Creating a Gravatar image
- Encrypting the user’s password
- Creating a user record that consists of the username, email, encryptedPassword, gravatarURL, deleted, admin, and banned attributes
- Responding with an appropriate error or 200 status code and username as JSON
In chapter 6, you used the blueprint create action via a blueprint RESTful route to create a new user record, as shown in figure 7.8.
Figure 7.8. The incoming POST request to /user matched a blueprint RESTful route that triggered a blueprint create action that ultimately created the user record  .
.

A simple CRUD action will no longer satisfy the requirements of the request and will necessitate a custom action.
7.3.1. Naming custom actions
Naming things is the most daunting recurring problem in programming. We have an almost unlimited number of choices when deciding on a name for the action. We could use the traditional CRUD operation labels, in this case naming the action create. This would, however, overwrite the blueprint create action. With all of that said, we think it’s more accurate to be descriptive in naming the action and will therefore use the name signup.
7.3.2. Creating an action
To create the signup action, open brushfire/api/controllers/UserController.js in Sublime and add the following code.
Example 7.4. The signup action
module.exports = {
  signup: function(req, res) {
    return res.json({
      email: req.param('email')
    });
  }
};
Note
What happened to the hello action we created previously? We deleted it, and so should you.
Let’s check out the new action. Make sure Sails is running via sails lift, and in Postman make a POST request to /user/signup configured similarly to figure 7.9.
Figure 7.9. Using Postman, create a new user with the custom signup action. This will be a POST request to localhost:1337/user/signup with an email parameter set to [email protected] . The signup action responds with the email address as JSON and a 200 status code .

The signup action responds with the email as JSON and a 200 status code. Next, let’s look at the backend validation requirements.
7.3.3. Introducing req.param()
Reviewing the API Reference, specifically the Model Requirements tab, you’ll find the backend validation requirements listed in table 7.3.
Table 7.3. Backend validation requirements for the user model
|
Attribute name |
Backend validation |
|---|---|
| username | Must be at least six characters. The attribute is required. Only Aa–Zz and 0–9. |
| Must be a valid email address. The attribute is required. | |
| password | Must be at least six characters. The attribute is required. |
Recall that even though you validate user input on the frontend, you must also validate on the backend to protect against requests made outside the browser. Head back to brushfire/api/controllers/UserController.js in Sublime and add the following validation code.
Example 7.5. Validating the existence of parameters in the signup action


You use the Lodash _.isUndefined() method to check for the existence of form fields, now parameters.
Note
Lodash describes itself as a modern JavaScript utility library. The library is accessible via the global underscore (_) symbol. As its name suggests, it checks to see if a value is undefined.
You also introduce another useful method, req.param().
Note
req.param() searches the URL path, query string, and body of the request for a specified parameter provided as an argument. For example, if a form field named username is sent in the request, req.param('username') will return the value of the username field.
Also, you may have noticed that if a value fails a validation test, you respond with res.badRequest().
Note
The res.badRequest() method is a default response that sends a 400 status code, which by convention means the request has some malformed syntax. You also pass a message that’s added to the error as an argument.
You also check the length of the username and password to assure they have a minimum number of characters. Finally, you use a JavaScript regular expression to ensure that the username contains only letters and numbers.
Next, you need to ensure the value for the email attribute has the proper syntax, and you’ll use the validate machine to check the value.
7.3.4. Validating email addresses
So far, you’ve been creating the necessary validations from scratch. Alternatively, you could search the npm registry for an existing Node module to check the validity of the email attribute and fulfill the requirement in your custom action. In chapter 5, we introduced a third alternative we call Node machines. Recall that a machine is a single, clear-purpose function that performs a particular task, and machines are aggregated in machinepacks. Navigate your browser to http://node-machine.org/machinepack-emailaddresses/validate, and you should see a page similar to figure 7.10.
Figure 7.10. The Emailaddresses.validate() machine page provides example usage.

The Emailaddresses.validate() machine takes a string as input and determines whether that string uses valid email address syntax. If it does, the machine will execute the success exit; if it’s invalid, the invalid exit will be executed; and if there’s an error, the error exit will be executed. Add the example code and then your own code to handle each exit. In Sublime, open brushfire/api/controllers/UserController.js and add the machine and custom handler code to the signup action of the user controller, similar to the following listing.
Example 7.6. Using a machine to validate email addresses in the signup action


Next, you need to add the machinepack to the project. Head over to the terminal window and type
~/brushfire $ npm install machinepack-emailaddresses --save
Let’s see this in action. Restart Sails via sails lift, and from within Postman make another POST request to /user/signup, similar to figure 7.11.
Figure 7.11. Using Postman, check the validity of the email attribute in the custom signup action. Generate a POST request to /user/signup with an invalid email parameter , with the username and password parameters also provided. The signup action executes the invalid exit and responds with a
400 code and message .

The validate machine recognized that the email parameter used improper syntax and responded with an error message. With the email validation requirement fulfilled, let’s look at a transformation requirement: encrypting the password (and yes, you have a machine for that).
7.3.5. Encrypting passwords
You don’t want to store passwords unencrypted. Therefore, you’ll use another machine from nodemachine.org to encrypt passwords for you. Navigate your browser to http://node-machine.org/machinepack-passwords/encrypt-password, which should display the machinepack-passwords.encryptPassword() page, similar to figure 7.12.
Figure 7.12. You’ll use the Passwords.encryptPassword() machine to encrypt a user’s password before it’s stored in the user record.

The Passwords.encryptPassword() machine takes a string as input and transforms it into an encrypted password. If successful, the machine will execute the success exit, or if there’s an error, the error exit will be executed. Add the example code with some custom handler code by opening brushfire/api/controllers/UserController.js in Sublime and adding the following.
Example 7.7. Adding the encryptPassword machine to the signup action

It’s important to realize that you’re nesting the encryptPassword machine with the validate machine. You do this because the machines are asynchronous. That is, if they’re executed independently, you have no way of knowing the order in which each machine will be executed. By nesting the machines, you know that the validate machine will complete execution before the encryptPassword() machine begins.
Note
In later chapters, we’ll demonstrate another way to ensure the sequence of asynchronous functions, using a module named async.
Before you can see this in action, you need to install machinepack-passwords. Head over to the terminal window and type
~/brushfire $ npm install machinepack-passwords --save
Restart Sails using sails lift and make a POST request to /user/signup, similar to figure 7.13.
Figure 7.13. Using Postman, make a POST request to /user/signup and pass the password parameter to the action , which will respond with the encrypted password .

Now that you’ve encrypted the password, you’ll use the email address to fulfill the next requirement for a nice profile picture using the Gravatar machine.
7.3.6. Profile images with Gravatar
A Gravatar is a globally recognized avatar maintained by the folks who produce WordPress. You can create an account using your email address, and then upload an image that will be associated with that email. Different sites can then use an API to generate a URL that points to the associated image. Navigate your browser to http://node-machine.org/machinepack-gravatar/get-image-url. You’ll use a Node machine to generate the URL. The Gravatar.getImageUrl() machine has a single input, the email address. Open brushfire/api/controllers/UserController.js in Sublime, and copy the usage example with some custom code, similar to listing 7.8.
Example 7.8. Adding the Gravatar.getImageUrl synchronous machine


You may have also noticed that the machine is using .execSync() as the last function in the machine. This gives you the option of using a synchronous usage pattern, so let’s take this opportunity to configure it to execute synchronously. The usage pattern has two distinct differences in the synchronous usage of a machine. The first is that there’s no callback that passes an error and any result of the machine—you need to provide a variable that will be assigned the value of a successfully returned result. The second difference is you’re wrapping the machine in a try/catch. This will handle any errors without crashing the application. Before you can see this in action, you need to install machinepack-gravatar. Head over to the terminal window and type
~/brushfire $ npm install machinepack-gravatar --save
Restart Sails using sails lift, and make a POST request to /user/signup, similar to figure 7.14.
Figure 7.14. Using Postman, make a POST request to /user/signup and pass the email parameter to the action , which will respond with the gravatarURL .

Let’s take a moment to reinforce why you used a try/catch. Go back into the UserController.js file and rename the Gravatar.getImageUrl to something like Grvatar.getImageUrl. In Postman, make a POST request to /user/signup. Take a look at the console, and you should see an error saying Gravatar is not defined, but you didn’t crash the server. Next, remove the try/catch, restart Sails, and make the same request. Without the try/catch, you’d not only have an error, but Brushfire would crash, bringing the server down. So, on those occasions when you use a synchronous function, it’s important to wrap it in a try/catch.
Now, you’ve validated your inputs, encrypted the password, and created a Gravatar URL. You’re ready to create a record for your user model.
7.3.7. Creating user records
It’s now time to take the work you’ve done validating and preparing your attributes and create a user record with the User.create() model method. The .create() method, shown in figure 7.15, uses the now-familiar asynchronous usage pattern.
Figure 7.15. This is an example of the .create() model method of the user model . The attributes of the record to be created are passed as an argument to the method as a dictionary {} or an array of dictionaries [{}]. The .exec() method is also referred to as a deferred function. Using .exec() will give you the flexibility to chain modifier methods together and to make the usage easier to read. For now, you'll use
.exec() with an anonymous function as the callback. Within this callback, you’ll pass any errors as the first argument  and the resulting data from the method
  . You can then use the body of the callback
  to respond, or continue with another task.

Add the options dictionary to the create method, as shown here.
Example 7.9. Using the create model method to generate a new user record

You passed the options dictionary into the User.create() method as an argument and responded to the request with the created record via res.json(createdUser). Let’s take a look at this in action. Restart Sails using sails lift and make a POST request to /user/signup, similar to figure 7.16.
Figure 7.16. The POST request to localhost:1337/user/signup passes in the email, username, and password parameters , and the action responds with the created record .

You’ve almost completed the signup portion of user identity management. The last issue to resolve is handling duplicate users.
7.3.8. Preventing duplicate accounts
When you started this chapter, the signup page assets made a POST request to /user whenever a user clicked the Create User Account button. This path triggered the blueprint RESTful create route. You now need to change that request’s path in the Angular controller to /user/signup to take advantage of your new custom controller action. In Sublime, open brushfire/assets/js/controllers/signupPageController.js and change the path in the Angular AJAX request to what’s shown in the following listing.
Example 7.10. Changing the AJAX path to use the new controller action

Let’s see this in action, now that you’ve attached your frontend signup page assets with the backend signup controller action. Restart Sails via sails lift and navigate your browser to localhost:1337/#/signup. From the signup page, create a user with an email attribute of [email protected], a username of sailsinaction, and a password of abc123. Click the back button on your browser and create a user with the same credentials you just created. Your browser should display an error message similar to figure 7.17.
Figure 7.17. The frontend displays an error dictionary returned by the User.create() model method that indicates that one of the unique validations has been violated.

The User.create() model method returned an error dictionary similar to the following.
Example 7.11. The duplicate error message from the signup action
{"email":
  [{
    "value":"[email protected]",
    "rule":"unique",
    "message":"A record with that `email` already exists (`[email protected]`)."
  }]
}
That dictionary gives you a great deal of information. You know the error has to do with the email attribute. You know its original value and that the error is a violation of the unique attribute validation, and you have a message explaining the error. If you look at brushfire/assets/js/controllers/signupPageController.js, you’ll see that your frontend expects a duplicate email address error dictionary to have a status property with a value of 409 and a data property with an appropriate error message string. In Sublime, open brushfire/api/controllers/UserController.js and add the following responses to the User.create() model method in the signup action.
Example 7.12. Handling duplicate email and username attribute errors
            ...
            var options = {
              email: req.param('email'),
              username: req.param('username'),
              encryptedPassword: result,
              gravatarURL: gravatarURL
            };

            User.create(options).exec(function(err, createdUser) {
              if (err) {

                if (err.invalidAttributes && err.invalidAttributes.email &&
                 err.invalidAttributes.email[0] &&
                 err.invalidAttributes.email[0].rule === 'unique') {

                  return res.send(409, 'Email address is already taken by
                   another user, please try again.');
                }

                if (err.invalidAttributes && err.invalidAttributes.username
                 && err.invalidAttributes.username[0] &&
                 err.invalidAttributes.username[0].rule === 'unique') {

                  return res.send(409, 'Username is already taken by another
                   user, please try again.');
                }

                return res.negotiate(err);
              }

              return res.json(createdUser);
            });
          }
        });
      }
    });
  }
};
err.invalidAttributes.email[0] &&
err.invalidAttributes.email[0].rule === 'unique') {
return res.send(409, 'Email address is already taken by
another user, please try again.');
}
if (err.invalidAttributes && err.invalidAttributes.username
&& err.invalidAttributes.username[0] &&
err.invalidAttributes.username[0].rule === 'unique') {
return res.send(409, 'Username is already taken by another
user, please try again.');
}
return res.negotiate(err);
}
return res.json(createdUser);
});
}
});
}
});
}
};
Now, if there’s a violation of the unique validation option, you’ll respond with res.send(), passing the status code and a message you want the frontend to display. Let’s comment out the uglier frontend message so the user will see only the toastr message. In Sublime, open brushfire/assets/js/controllers/signupPageController.js and comment out the following.
Example 7.13. Removing the general error message for unique violations

Let’s see this in action. Restart Sails via sails lift and navigate your browser to localhost:1337/#/signup. Create a user with the familiar credentials email of [email protected], a username of sailsinaction, and a password of abc123. Again, click the back button and create the same user. You should now see a toastr message similar to figure 7.18.
Figure 7.18. The signup page now reflects the appropriate error messages when a duplicate email or username attribute is attempted.

Let’s do one more bit of refactoring that will also introduce custom responses.
7.3.9. Understanding response methods
So far, you’ve used a few methods from res to respond to requests. Some of these response methods can’t be overridden or modified. You’ve already used two of these response methods:
- res.json()—The res.json() method encodes the provided data as JSON and sends it in the response. If a number is passed in as the first argument, it will be interpreted as the status code to send, and the second argument will be sent as data (if it is present.) Otherwise, Sails will interpret the first argument as data to encode and send in the response, and it will default to using a status code of 200.
- res.send()—The res.send() method is an all-purpose, low-level response method. It works almost exactly like res.json(), except that it only JSON-encodes dictionaries and arrays. If a string is provided, it’s sent verbatim in the response. This is useful for working with more-traditional data formats like XML or CSV.
There are also configurable responses. We say configurable because you can change their implementation by modifying the files in brushfire/api/responses/. You’ve already used a few of these response methods, too:
- res.badRequest()—The res.badRequest() method is used to send a 400 response to the frontend indicating that the request is invalid. This usually means it contained invalid parameters or tried to do something impossible based on your application logic.
- res.serverError()—The res.serverError() method sends a 500 response to the frontend indicating that some kind of server error occurred.
- res.negotiate()—The res.negotiate() method examines the incoming status message of an error and routes it to the appropriate response. So, instead of determining the status message yourself in a controller action and executing the appropriate response, res.negotiate() will do this for you. Note that if the error doesn’t contain a status property, res.negotiate() will default to res.serverError(). The remaining default responses can be found in table 7.4.
Table 7.4. Sails’ response methods
|
Response |
Description |
|---|---|
| res.forbidden() | This method is used to send a 403 response to the frontend indicating that the request isn’t allowed. This usually means the user-agent tried to do something it wasn’t allowed to do, like change the password of another user. |
| res.notFound() | This method is used to send a 404 response using either res.json() or res.view(). It’s called automatically when Sails receives a request that doesn't match any of its explicit routes or route blueprints. When called manually from your app code, this method is normally used to indicate that the user-agent tried to find, update, or delete something that doesn't exist. |
| res.ok() | This method is used to send a 200 response to the frontend. |
You can also create your own custom responses to refactor some of the code out of the signup controller action. Create a new file in Sublime named brushfire/api/responses/alreadyInUse.js and add the following code.
Example 7.14. Adding a new custom response

This new response will determine whether the invalid attribute is an email or a username attribute and send the 409 response your frontend requires. Let’s use this new response in the signup action. In Sublime, open brushfire/api/controllers/UserController.js and replace the existing responses in the User.create() method of the signup action with your new custom response (similar to the next listing).
Example 7.15. Using the new custom response in the signup action
...
User.create(options).exec(function(err, createdUser) {

  if (err) {

    if (err.invalidAttributes && err.invalidAttributes.email &&
     err.invalidAttributes.email[0] && err.invalidAttributes.email[0].rule
     === 'unique') {

      return res.alreadyInUse(err);
 }

 if (err.invalidAttributes && err.invalidAttributes.username &&
  err.invalidAttributes.username[0] &&
  err.invalidAttributes.username[0].rule === 'unique') {

      return res.alreadyInUse(err);
 }
...
Let’s take this new response for a spin via sails lift. Navigate your browser to localhost:1337/#/signup and create the infamous user with an email of [email protected], a username of sailsinaction, and a password of abc123. Again, click the back button and create the same user. Your browser should display the identical toastr message from figure 7.18.
That concludes the requirements for the signup page. You’re probably getting tired of creating a test user each time you restart the Sails server, so let’s add a test user in the bootstrap file.
7.3.10. Quick diversion: adding a dummy user in bootstrap.js
In chapter 5, you looked at using brushfire/config/bootstrap.js to set up the initial state of Brushfire. You’re currently seeding the video model with cat videos from YouTube. Let’s add a test user to the bootstrap. Head back to Sublime, and open brushfire/config/bootstrap.js. The source code for the bootstrap.js file can be found in Gist here: https://gist.github.com/sailsinaction/22601ba11f523acccd67. The create-TestUsers() function is almost identical to the signup action in the user controller. The main difference is we stripped out all the references to the res and req dictionaries because they’re not available when bootstrap.js is executed.
Recall that the bootstrap originally determined whether any records existed in the video model. If records existed, the bootstrap returned control to Sails via the callback cb function to complete the startup process. Now if records exist for the video model, instead of giving back control to Sails, you’ll execute the createTestUsers() function. And if no records exist in the video model, you’ll execute the createTest-Users() function after the video records are created. Once the user is created, control passes back to Sails. In either event, you have a test user! You can now move to building out the requirements for the profile page.
7.4. Providing data for a user profile page
After you add the profile action, the profile page displays the user’s email address, username, and Gravatar image, as shown in figure 7.19.
Figure 7.19. The profile page mockup contains four endpoints. The first request initiates the display of the profile page and is handled by an asset route. The second request is a GET request to /user/profile/:id for the initial profile information on the page. The third request is triggered by the Edit button to GET the edit-profile page and is handled by another asset route. The final request is a DELETE request to /user/:id and is handled by a custom controller.

Let’s review the requests we’ve identified in the API Reference. The first request is for the delivery of the profile page
itself. The Sails asset router responds to the Angular AJAX GET request to /templates/profile.html ![]() . The second request is triggered when the profile page initially loads and an Angular AJAX GET request is made to /user/profile/:id
. The second request is triggered when the profile page initially loads and an Angular AJAX GET request is made to /user/profile/:id ![]() . Sails handles this request with a custom profile action. The third request starts as an Angular frontend request to /#/profile, which triggers a GET request to /templates/edit-profile.html
. Sails handles this request with a custom profile action. The third request starts as an Angular frontend request to /#/profile, which triggers a GET request to /templates/edit-profile.html ![]() . Sails handles this request with the asset router. The fourth request is a DELETE request to /user/:id
. Sails handles this request with the asset router. The fourth request is a DELETE request to /user/:id ![]() . This will trigger a custom delete action that will remove the user record from the database. You’ll transition this request from a hard delete into a soft delete, where the user has the option
of later restoring the record. Let’s start the implementation with the get-profile endpoint.
. This will trigger a custom delete action that will remove the user record from the database. You’ll transition this request from a hard delete into a soft delete, where the user has the option
of later restoring the record. Let’s start the implementation with the get-profile endpoint.
7.4.1. Retrieving user profile information
To create the profile action, open brushfire/api/controllers/UserController.js in Sublime, and add the following code snippet.
Example 7.16. Adding the profile action


You use the User.findOne() model method to retrieve a single user record. This model uses criteria to find a particular user record, as illustrated in figure 7.20.
Figure 7.20. The findOne model method consists of the model name , the model method , criteria , the query method , the callback method with error , the callback body , and result arguments .

In this case, the criteria is the id of the record you want to find. Let’s give this new action a try. Restart Sails using sails lift. You know you have at least one test user generated on every sails lift that has an id of 1. Navigate your browser to http://localhost:1337/#/profile/1. This triggers an internal Angular route that loads the brushfire/assets/templates/profile.html page.
Note
Why use the # symbol in the path of your browser request? HTTP will ignore anything after the hash symbol (#). This allows other frameworks like Angular to come up with their own routing strategy. So the path #/profile/1 is actually being processed by Angular’s router.
Now that you have a proper profile page, you need to change the Angular signupPageController.js so that a user is redirected to the profile instead of the blueprint RESTful find route after signup. Open brushfire/assets/js/controllers/signupPageController.js in Sublime and make the change shown in the following listing.
Example 7.17. Changing the redirect to the profile page after signup

Next, we’ll look the remove-profile endpoint.
7.4.2. Permanently deleting a user
When it comes to deleting records, our experience shows that clients prefer soft deletes versus hard deletes of data. With a soft delete, you can restore the data within an app by toggling an attribute of a record in the database. With a hard delete, that data is gone forever.
Note
We’re relying on you to practice transparency in conveying to your users how their data is treated with respect to removal from your application.
We’ll illustrate both ways of performing a delete, but we’ll use soft deletes moving forward in Brushfire. You could use blueprint routes to do a permanent delete, but let’s see how to do this in a custom action. Open brushfire/api/controllers/UserController.js in Sublime, and add the following code.
Example 7.18. Adding a delete action to the user controller

The User.destroy() model method takes criteria, in this case the id of the user you want to delete. You’ve handled any errors as well, such as if the id isn’t found. The frontend assets are initially configured to trigger a DELETE request to /user/delete/:id via the function $scope.deleteProfile(). So restart Sails using sails lift and navigate your browser to localhost:1337/#profile/1. Next, click the Delete button. The user record is deleted and the browser redirects to the signup page. But what if the user wants to restore their user account? If you used a hard delete, they’re out of luck. But you’re going to implement a soft delete system that will allow a user to easily restore their user profile.
7.4.3. Soft-deleting a user record
Your goal is to provide a way for a user to delete their profile, removing access to it from Brushfire but not from the database. The user can then restore access if they provide an appropriate email/password combination. Implementing a soft delete system requires that an attribute exist in the model that can store the user’s deleted state. In chapter 6, you implemented this attribute as a boolean and named it deleted. To trigger this request, you need to make a small change to the frontend. Open assets/ templates/profile.html in Sublime, and change the ng-click directive value from deleteProfile() to removeProfile(), as shown in the following listing.
Example 7.19. Changing the frontend to initiate a soft delete

Next, you’ll create a removeProfile custom action that will toggle the deleted attribute to true when the Delete button is clicked on the profile page. Open brushfire/api/controllers/UserController.js in Sublime, and add the following code.
Example 7.20. Adding the removeProfile action to the user controller


The User.update() method accepts criteria, in this case the id of the record you want to update. The second argument of the method is the information you want to update—deleted: true. Now clicking the Delete button will invoke the soft delete method and the page will be redirected to the signup page.
Note
The profile page is already equipped to handle a user who has been deleted. The profile controller will issue an error if there’s an attempt to display a record with the deleted attribute set to true.
Now, what if a user wants to restore their deleted user profile? For that you’ll implement the restore-profile page.
7.5. Restoring user accounts
The restore-profile page displays a form for restoring a user profile, given a correct username and password, as displayed in figure 7.21.
Figure 7.21. The restore-profile page mockup contains two endpoints. The first request initiates the display of the restore-profile page and is handled by an asset route. The second request is a PUT request to /user/ restoreProfile and is handled by a custom action.

The restore-profile page is loaded when a user clicks the restore-account link from the signup page. In this case, the Sails
asset router responds to the Angular AJAX GET request to /templates/restore-profile.html ![]() . The second request is a PUT request to /user/restoreProfile
. The second request is a PUT request to /user/restoreProfile ![]() , passing the email and password parameters in an attempt to restore a user account.
, passing the email and password parameters in an attempt to restore a user account.
7.5.1. Building an action to restore a user profile
To create the restoreProfile action, open brushfire/api/controllers/UserController.js in Sublime, and add the following code.
Example 7.21. Adding the restoreProfile action to the user controller


The request passes email and password parameters for the profile to be restored. You first search for a user matching the email address with the User.findOne model method. If a matching email address is found, you pass the associated encrypted-Password and the password parameter to the .checkPassword() machine. The machine is part of machinepack-passwords, which you already installed and required in the user controller. This machine encrypts the provided password parameter and compares it to the encryptedPassword attribute found by your User.findOne() query. If it’s a successful match, you’ll update the user record, setting the deleted attribute to false using the User.update() model method, and respond with the updated record as JSON. The frontend will then redirect the user back to their profile. Known errors are handled by res.notFound(err), and unexpected errors are handled by res.negotiate(err).
7.6. Editing user profiles
The edit-profile page allows users to edit their Gravatar URL, restore their Gravatar URL, and change their password, as displayed in figure 7.22.
Figure 7.22. The edit-profile page mockup contains five endpoints. The first request initiates the display of the edit-profile page and is handled by an asset route. The second request is a GET request to /user/profile/:id for the initial profile information on the page. The third request is triggered by the Restore Gravatar URL With Current Email Address button and is a PUT request to /user/restoreGravatarURL, which is handled by a custom action. The fourth request is a PUT request to /user/updateProfile and is also handled by a custom action. The final request is a PUT request to /user/changePassword and is handled by a custom action.

Let’s review the requests we’ve identified in the API Reference. The first request is for the delivery of the edit-profile
page itself. The Sails asset router responds to the Angular AJAX GET request to /templates/edit-profile.html ![]() . The second request is triggered when the profile page initially loads and an Angular AJAX GET request is made to /user/profile/:id
. The second request is triggered when the profile page initially loads and an Angular AJAX GET request is made to /user/profile/:id ![]() . The third request occurs when the user wants to restore their Gravatar image to their current email address via a PUT request to /user/ restoreGravatarURL
. The third request occurs when the user wants to restore their Gravatar image to their current email address via a PUT request to /user/ restoreGravatarURL ![]() . The fourth request occurs when the user wants to update their profile information via a PUT request to /user/updateProfile/:id
. The fourth request occurs when the user wants to update their profile information via a PUT request to /user/updateProfile/:id ![]() , which updates the user’s gravatarURL attribute. The final request updates the user’s password via a PUT request to /user/changePassword
, which updates the user’s gravatarURL attribute. The final request updates the user’s password via a PUT request to /user/changePassword ![]() . Let’s implement the APIs that will satisfy each request.
. Let’s implement the APIs that will satisfy each request.
7.6.1. Retrieving the record for a particular user
The GET request to /user/findOne/:id expects a response of a particular user’s profile information formatted as JSON. You’ve already created the profile custom action for the initial loading information of the profile page—you’ll use the same endpoint for the edit-profile page.
7.6.2. Retrieving a user’s Gravatar URL
To create the restoreGravatarURL action, open brushfire/api/controllers/UserController.js in Sublime, and add the following code.
Example 7.22. Adding the restoreGravatarURL action to the user controller


The request passes the current user’s email address via the email parameter. You again use the .getImageUrl() machine to generate the Gravatar URL using the email parameter as the sole input. Because you’re using the synchronous version of the .getImageUrl() machine, you’ll wrap it in a try/catch to guard against Brushfire crashing if you get an error. Last, you’ll respond with res.json() returning the generated URL to the frontend.
7.6.3. Saving updated profile information
To create the updateProfile action, open brushfire/api/controllers/UserController.js in Sublime, and add the following code.
Example 7.23. Adding the updateProfile action to the user controller


The request passes the user’s id and gravatarURL as parameters. You use the User.update() model method to update the user record, passing the id parameter as criteria for the first argument and the gravatarURL parameter to update as the second argument. Finally, you respond with the updated user record to the frontend via res.json().
7.6.4. Updating a user’s password
To create the changePassword action, open brushfire/api/controllers/UserController.js in Sublime, and add the code in the next listing.
Example 7.24. Adding a changePassword action to the user controller


This action is similar to the signup action. First, you verify the existence and length of the password parameter. Then, you update the user record by encrypting the password using the .encryptPassword() machine and pass the results to the User.update() model method. Finally, you respond with updatedUser via res.json(). The last part of user identity management is implementing the administration page.
7.7. Administrative actions
The administration page allows administrators to grant other users administrator privileges, ban users, and soft-delete users from Brushfire, as displayed in figure 7.23.
Figure 7.23. The administration page mockup contains five endpoints. The first request initiates the display of the administration page and is handled by an asset route. The second request is a GET request to /user/ adminUsers for the profile information of all users. The third request is a toggle to the admin attribute that triggers a PUT request to /user/updateAdmin, which is handled by a custom action. The fourth request is a PUT request to /user/updateBanned and is also handled by a custom action. The final request is a PUT request to /user/updateDeleted and is handled by a custom action.

Let’s review the requests we’ve identified in the API Reference. The first request is for the delivery of the administration
page itself. The Sails asset router responds to the Angular AJAX GET request to /templates/administration.html ![]() . The second request is triggered when the administration page initially loads and an Angular AJAX GET request is made to /user/adminUsers
. The second request is triggered when the administration page initially loads and an Angular AJAX GET request is made to /user/adminUsers ![]() . The third request occurs when an administrator wants to change a user’s administrative state via a PUT request to /user/updateAdmin
. The third request occurs when an administrator wants to change a user’s administrative state via a PUT request to /user/updateAdmin ![]() . The fourth request happens when the user wants to update a user’s banned status via a PUT request to /user/updateBanned
. The fourth request happens when the user wants to update a user’s banned status via a PUT request to /user/updateBanned ![]() . The final request updates the user’s soft-delete status via a PUT request to /user/updateDeleted
. The final request updates the user’s soft-delete status via a PUT request to /user/updateDeleted ![]() . Let’s implement the APIs that will satisfy each request. Obviously, you’ll want to limit access to the administration page
to only those users who have the admin attribute set to true. That means controlling what’s displayed on the frontend based on the user’s authenticated or logged-in state as well as
controlling backend access to API endpoints based on the same authenticated state. We’ll address that in chapters 8, 9, and 10. For now, let’s create the APIs that will satisfy each of the remaining requests.
. Let’s implement the APIs that will satisfy each request. Obviously, you’ll want to limit access to the administration page
to only those users who have the admin attribute set to true. That means controlling what’s displayed on the frontend based on the user’s authenticated or logged-in state as well as
controlling backend access to API endpoints based on the same authenticated state. We’ll address that in chapters 8, 9, and 10. For now, let’s create the APIs that will satisfy each of the remaining requests.
7.7.1. Listing all the users in the database
The GET request to /user/adminUsers expects a response of an array of user record dictionaries. In Sublime, open brushfire/api/controllers/UserController.js, and add the adminUsers action shown here.
Example 7.25. Adding an adminUsers action to the user controller

You use the User.find() model method to retrieve all user records. Unlike the User.findOne() method, this method responds with an array of all user record dictionaries as JSON. This array is then displayed as a table in Angular on the frontend.
7.7.2. Updating administrative flags
There are three similar PUT requests to actions that update the state of the admin, banned, and deleted attributes. In Sublime, open brushfire/api/controllers/UserController.js, and add the updateAdmin, updateBanned, and updateDeleted actions shown here.
Example 7.26. Adding the updateAdmin, updateBanned, and updateDeleted actions


Each request passes the user’s id and attribute to the User.update() method as parameters. You respond with a 200 response if successful. The frontend then displays a message to the user notifying them of a successful update or an error.
7.8. Summary
- An API consists of a route, a controller, and an action that combine to fulfill the requirement of a request.
- Blueprint action routes automatically create routes for your custom actions.
- Blueprint routes and actions can be transitioned to custom actions to fulfill requests that go beyond basic CRUD operations.
- Frontend mockups can be used to identify the requirements of the request and fulfill the request with custom actions.