Chapter 3. Using static assets
- Transitioning from server-rendered views to a static asset SPA
- Examining the differences between server rendering and client-side rendering
- Exploring how Sails uses asset routes
- Understanding the static asset pipeline
- Setting up fake responses and loading states for frontend requests
Your development environment is installed, and you’ve taken Sails for a quick spin. You’re now ready to get down to the business of creating an application. You need to answer some initial questions:
- What types of user-agent will your application need to support?
- Will Sails be responsible for delivering frontend assets and, if so, how?
This chapter will help you answer those questions and explore in detail ways Sails can deliver frontend assets in a web application. Many great libraries and frameworks work well with Sails. We chose jQuery as a proxy for client-side DOM manipulation tools and Angular as a proxy for client-side frameworks. In this chapter, we’ll use both to demonstrate how to integrate DOM manipulation tools like jQuery and client-side JavaScript frameworks into the static asset pipeline. The remaining chapters will focus on Angular on the frontend.
We have limited information from our new client, Chad. He’s provided us with a name for our application, Brushfire, and the following specifics: “I want a homepage and a videos page where I can add highly viewed YouTube clips.” Not exactly a requirements document, but it’ll suffice during our initial design phase.
In chapter 1, we discussed a variety of different user-agents that can be used in web applications. Because Brushfire will support the browser as a user-agent, your next decision will be whether to implement the frontend as a single-page application (SPA) with Sails responding to requests as a standalone API, or as a hybrid application combining Sails server-rendered views, client-side JavaScript, and requests fulfilled by a Sails API.
Definition
Sails can supply a backend API separate from the frontend; hence, the phrase standalone API. As mentioned in chapter 1, standalone APIs are typically used with native mobile, native desktop, IoT, and SPA applications, where the frontend of the application comes from a source other than Sails.
Starting in this chapter, you’ll first build Brushfire using the SPA approach on the frontend and then integrate with the standalone Sails API you’ll also develop. The SPA will use client-side routing and rendering for chapters 3 through 7. Starting with chapter 8, you’ll transition Brushfire to use the hybrid web application approach that uses server-side routing and rendering for the frontend. That way, you’ll have experience with both approaches depending on your application’s requirements. You’ll also understand the pros and cons of each approach.
In chapter 1, we also examined the general mechanics of integrating an SPA into the Sails ecosystem, as depicted in figure 3.1.
Figure 3.1. Delivering assets and endpoints to a single-page application

Using this approach, Sails or a content delivery network (CDN) ![]() delivers the initial HTML view, JavaScript, and CSS
delivers the initial HTML view, JavaScript, and CSS ![]() as static assets in response to a GET request to the root route. (The root route, or web root route, is simply / with nothing following it.) Then, the JavaScript
on the frontend is responsible for making intermediate changes to the view
as static assets in response to a GET request to the root route. (The root route, or web root route, is simply / with nothing following it.) Then, the JavaScript
on the frontend is responsible for making intermediate changes to the view ![]() while also handling page navigation
while also handling page navigation ![]() . Separate AJAX requests can be used to access the Sails backend API
. Separate AJAX requests can be used to access the Sails backend API ![]() . The second approach involves server-side rendering and routing, where Sails renders all the application views on the backend
and then delivers them to the browser user-agent to be displayed. With this approach, page navigation requires a refresh of
the entire page.
. The second approach involves server-side rendering and routing, where Sails renders all the application views on the backend
and then delivers them to the browser user-agent to be displayed. With this approach, page navigation requires a refresh of
the entire page.
In this chapter, we’ll focus on how to deliver HTML, CSS, and JavaScript assets, as well as the initial entry point of an SPA using the Sails static-asset pipeline. Before we get too far, let’s make sure we’re on the same page (pun unintended) where we use the term static assets. What are static assets? You’re already familiar with accessing web pages (.html), images (.png, .jpg, and so on), JavaScript (.js), and stylesheets (.css) as static assets from a browser. What makes something a static asset is not its file extension but rather the fact that the content of the file doesn’t change between the request from the user-agent and the response from the Sails server. Instead of jabbering on about this in a theoretical way, we’ll let you get your hands dirty with a real use case. To begin, you’ll create your initial Brushfire project in Sails.
3.1. Introduction to static routing
In this section, you’ll generate a new Sails project. This process will create the necessary files and folders of a default Sails project and will also install Sails itself. This makes the project a self-contained, independent unit. It will be your blank canvas on which to develop Brushfire. Create or move to the folder where Brushfire will live, and from the terminal window type
~ $ sails new brushfire
Now move into the root of the project by typing
~ $ cd brushfire
~/brushfire $
Finally, start the Sails server by typing
~/brushfire $ sails lift
To access the default homepage generated with each new Sails project, navigate your browser to localhost:1337. Your browser window should look similar to figure 3.2.
Figure 3.2. After starting the Sails server and navigating to the root route of the project, Sails responds with the default homepage.

The request triggered a response that contained the necessary assets to display your homepage. Where are your static assets located in the project? It’s easy to find them in a Sails project because they’re in a folder named brushfire/assets/. By default in a new project, Sails creates a few subfolders of assets/ for convenience, including images/, js/, and styles/ as well as a favicon.ico file and a boilerplate robots.txt file.
Definition
The favicon.ico file is the icon that can be displayed on a browser tab in Chrome and in other browsers in the address bar and task bar. The robots.txt file is used to control how search engines index your live URLs.
Your current homepage isn’t in the assets folder. Instead, by default, Sails created an explicit root route and a server-rendered homepage view when you created the project. We’ll explore both in the next section.
3.1.1. The default homepage
Let’s explore the default behavior of the root route generated in a new Sails project. You learned in chapter 1 that Sails uses explicit routes and shadow routes to manage incoming requests. When Sails generates a new project, by default it sets up an explicit route to handle GET requests to the root path (/) of a project. In Sublime, open brushfire/config/routes.js to see this default explicit route, which is similar to the following listing.
Example 3.1. The Sails default root route
module.exports.routes = {
  '/': {
    view: 'homepage'
  }
};
A GET request to the root path triggers a response that contains a server-rendered view of the homepage, as shown in the route in figure 3.3.
Figure 3.3. In addition to an action, an explicit route  can have a view
  as its target
  . When a request matches the root address
  of this route, the Sails server responds with a view . In this case, the view is the homepage
  .
.

This is new. In chapter 1, you observed explicit routes that triggered actions as their target. Explicit routes can also contain server-rendered views as the target. You’ll learn more about these later, but for now you’ll use the SPA approach for your frontend. Therefore, you need to change the default behavior of your Brushfire project from using explicit routes and server-rendered views to using asset routes and client-side rendering.
3.1.2. Replacing the default homepage
You’ll use a generator to modify your existing Sails project files, changing Brushfire’s default behavior to use asset routes as the entry point for your application.
Definition
The entry point of an application means the response to a GET request to the root route of a project.
You need to change a number of files to set this up. You could manually change those files, or you can use a Sails generator to modify the files automatically. You’ve already used a generator without knowing it: sails new, the command you used to create the initial Sails project, is a generator. The sails new command generated the files and folders necessary to create a default project. Although it’s beyond the scope of the book, you can create your own custom generators and then execute them via the sails generate command. For a complete list of available generators, visit http://mng.bz/Aoxs. In this section, you’ll install an existing generator.
In chapter 2, you learned that npm enables developers to easily share reusable JavaScript code via packages. Because this generator is implemented as an npm package, you’ll use the npm command-line application in the terminal window to install it from the npmjs.org registry. If the Sails server is running, press Ctrl-C to stop the server, and then type
~/brushfire $ npm install sails-generate-static -save
Note
Earlier, when you installed Sails, you used the -g or global argument to install Sails globally on the machine. That made Sails available from anywhere on your machine. Here, you install the sails-generate-static module locally.
Executing this npm command installs the generator into brushfire/node_modules/.
Definition
The brushfire/node_modules/folder is where all Brushfire dependency files are installed. This makes each project self-contained and very portable.
When you used the --save parameter, npm also added the generator as a dependency in your brushfire/package.json file.
Note
The brushfire/package.json file has a section that contains the names and versions of all your Brushfire module dependencies. Inevitably modules are upgraded with breaking changes. Having a file that tracks the working versions of the modules you use in your application is a lifesaver when it comes to debugging.
Now that the module is installed, you can use the generator by typing
~/brushfire $ sails generate static
The generator removes the explicit route in brushfire/config/routes.js and copies most of the contents of the current homepage located in brushfire/views/homepage.ejs to a file located in brushfire/assets/index.html.
Note
We say most of the contents of the current homepage are copied because some of the tags used in server-rendered views are not used in plain HTML. We’ll take a detailed look at these special tags in chapter 8.
Head back to the terminal window and restart the Sails server by typing
~/brushfire $ sails lift
Refresh your browser, which should have localhost:1337 in the URL navigation bar. Figure 3.4 illustrates the homepage before and after using the static generator.
Figure 3.4. The homepage before and after running the static generator

Although the pages look similar, there are three subtle but important differences. The first difference isn’t apparent from viewing each page. When your browser made a GET request to the root route, Sails tried to match it to an explicit route that contains the route address 'GET /'. Since that explicit route no longer exists, Sails used another type of route, an asset route, to deliver the homepage located at brushfire/assets/index.html. Moving the contents of the homepage view to brushfire/assets/index.html automatically created an asset route. Therefore, a GET request to / now responds with the contents of brushfire/assets/index.html, a.k.a. the homepage.
The second difference is that the path to the homepage isn’t displayed as it was for the default server-rendered homepage. When Sails used the explicit route, the path was added to brushfire/views/homepage.ejs before the server responded with the view, as shown in figure 3.5.
Figure 3.5. Using a server-rendered view, the path is added before the response is sent to the requesting user-agent. Using a static asset, the index.html page isn’t changed between the request and response.

Because you’re now using an asset route to deliver the entry point to Brushfire, the contents of brushfire/assets/index.html didn’t change between the request and the response. That is, the path wasn’t added to index.html and therefore wasn’t displayed on the homepage like in the server-rendered view.
The final difference is that with the server-rendered approach, the homepage was initially an EJS file before being rendered as brushfire/views/homepage.html. We’ll cover EJS and its use of tags to add data in chapter 8, which is on server-rendered views. For now, let’s take a closer look at the asset pipeline.
3.2. The asset pipeline
In addition to responding to asset routes with static assets, the Sails server may also be called on to perform some preprocessing tasks on these assets. These tasks are contained in the static-asset pipeline, as illustrated in figure 3.6.
Figure 3.6. The static-asset pipeline aggregates preprocessing tasks to assets.

Tip
“I thought you said static assets don’t change!” They don’t change between the request and the response, but some performance and utility tasks can occur before a request/response transaction is initiated.
The asset pipeline bundled in Sails is a set of tasks configured with conventional defaults designed to make your project more consistent and productive. The entire frontend asset workflow is completely customizable but also provides some default tasks right out of the box. Sails also makes it easy to configure new tasks to fit your needs. A full list of default tasks can be found at http://mng.bz/X2rL. We’ll examine tasks in the order in which they come up in Brushfire, including these:
- How Sails uses a .tmp/ folder as an equivalent to the public folder on a typical web server
- How the Sails asset pipeline uses Grunt to execute necessary pipeline tasks
- Adding Brushfire frontend assets from a GitHub repository
- Integrating a content delivery network into the asset pipeline
- How naming a file index.html impacts how it’s accessed
- Adding images to the asset pipeline
- Understanding relative paths
First, we’ll look at where the asset files are actually served from with a Sails project.
3.2.1. A quick look at the .tmp/ folder
With all of this talk of the assets folder, you might think Sails was serving up brushfire/assets/index.html from the brushfire/assets/ folder. Out of the box, the Sails asset pipeline pulls files from brushfire/assets/, does transformations in the brushfire/.tmp/ folder, and then dumps the result into the brushfire/.tmp/public/ folder.
Note
The .tmp folder is a hidden file in the operating system. This means that if you search a folder using the ls command, the file won’t be returned. To list all files and folders, including hidden folders, you can use ls –a.
Separating /assets from .tmp/public enables Sails to perform different pipeline transformations that do handy things like compile LESS stylesheets.
Compare the brushfire/assets/ folder and the brushfire/.tmp/public/ folder in figure 3.7.
Figure 3.7. The brushfire/assets/ folder synced with the brushfire/.tmp/ public/ folder

Talking about this can take us only so far. To see how the files are automatically copied in action, make sure Sails is running via sails lift and that both the brushfire/assets/ and the brushfire/.tmp/public/ folders are open in Sublime. Within Sublime, create an empty file named brushfire/assets/videos.html. You should see videos.html magically appear in the brushfire/.tmp/public/ folder, similar to figure 3.8.
Figure 3.8. The videos.html file synced in both the assets/ and .tmp/public/ folders

How did videos.html suddenly appear in the brushfire/.tmp/public/ folder? The short answer is Grunt copied it for you.
Note
The ability to view the brushfire/.tmp/ folder in Sublime was great for this example, but there’s a dark side. It’s easy to confuse the two folders when editing your project. Irl has probably taken several years off Mike’s life asking him why a file hasn’t updated, only to find out that he was editing it in the brushfire/.tmp/ folder, and the file was getting overwritten each time he restarted Sails. Bottom line: do yourself a favor, and configure Sublime to ignore the .tmp/ folder.
Okay, Grunt copied it for you. So what is Grunt?
3.2.2. Grunt: the other white meat
Grunt calls itself a “JavaScript task runner.” We think that’s pretty accurate. It allows Sails to set up repetitive asset pipeline management tasks, which are then executed automatically or manually, depending on the task. You saw earlier that there’s a Grunt task that looks for changes in brushfire/assets/ and syncs them to brushfire/.tmp/public/.
Note
Grunt is also optional. If for some reason you enjoy doing manual repetitive tasks, simply delete brushfire/Gruntfile.js from the root of your project. No more Grunt. When you restart Sails via sails lift, warnings saying “Gruntfile could not be found” and “No Grunt tasks will be run” are displayed in the terminal window.
3.2.3. Putting it all together: Chad’s sweet homepage
Using the default project-generated files is a good first step, but it’s time to get to the real work. Chad has a specific vision laid out for the sweet homepage. Let’s create custom assets that match the design mockups. In keeping with our frontend-first approach to design, let’s take a look at the mockups of Brushfire’s homepage and video page for chapter 3. Because Brushfire currently has relatively few pages, we’ll display the mockups in the book as well as online.
Note
As the application grows over the next few chapters, the mockups will be available online only to minimize their impact on the page count of the book.
Navigate to http://sailsinaction.github.io/chapter-3/mockups.html to access the mockups for chapter 3. As shown in figure 3.9, the mockup page contains thumbnails for each Brushfire page with a larger modal view that can be accessed by clicking the thumbnail.
Figure 3.9. Interactive mockups are an essential part of the frontend-first approach to development. Each chapter has an online hub that contains mockups. The homepage mockup from the chapter 3 hub is pictured here.

Based on Chad’s mockups, add your own markup to the generated homepage in brushfire/assets/index.html. Open brushfire/assets/index.html in Sublime and replace the current markup after the <body> tag with the HTML shown here.
Example 3.2. Adding markup to the homepage
...
  <body>
    <div class="container-fluid">
      <!-- Creates the navbar -->
      <nav class="navbar navbar-default navbar-inverse">
        <!-- This creates the mechanism for collapse button -->
        <button type="button" class="navbar-toggle" data-toggle="collapse"
         data-target=".navbar-collapse">
        <!-- This controls the number of lines in the image when the nav
         collapse -->
        <span class="icon-bar"></span>
        <span class="icon-bar"></span>
        <span class="icon-bar"></span>
        </button>
        <!-- This is the brandon the left-hand side. -->
        <a class="navbar-brand" href="/#"> Brushfire</a>
        <div class="collapse navbar-collapse">
          <ul class="nav navbar-nav">
            <li><a href="/videos">Videos</a></li>
          </ul>
        </div>
      </nav>
      <div class=" col-md-8 col-md-offset-2">
        <div class="jumbotron">
          <h1>Chad's Viral Videos Emporium</h1>
          <h2>Viral Videos since 2015</h2>
        </div>
      </div>
    </div>
  ...
data-target=".navbar-collapse">
<!-- This controls the number of lines in the image when the nav
collapse -->
<span class="icon-bar"></span>
<span class="icon-bar"></span>
<span class="icon-bar"></span>
</button>
<!-- This is the brandon the left-hand side. -->
<a class="navbar-brand" href="/#"> Brushfire</a>
<div class="collapse navbar-collapse">
<ul class="nav navbar-nav">
<li><a href="/videos">Videos</a></li>
</ul>
</div>
</nav>
<div class=" col-md-8 col-md-offset-2">
<div class="jumbotron">
<h1>Chad's Viral Videos Emporium</h1>
<h2>Viral Videos since 2015</h2>
</div>
</div>
</div>
...
This markup uses classes from the popular Bootstrap styling framework, which you’ll include in your project using a content delivery network to deliver the dependencies.
3.2.4. Using a CDN
It can be advantageous to host static assets on a CDN, where distributed servers put the assets closer to the end user. The goal of a CDN is to deliver web assets as fast and reliably as possible. In this section, we use a CDN to host dependencies like jQuery, Angular, and Bootstrap. First, head over to http://getbootstrap.com/getting-started/#download and grab the link from the Bootstrap CDN section.
As a sanity check, copy and paste the CDN link (in the href) in your browser’s URL bar to confirm that this is simply pointing to the minified Bootstrap CSS file. Next, manually add the bootstrap CDN reference to the homepage markup so that it can benefit from Bootstrap styles. In Sublime, open brushfire/assets/index.html and place the link reference above the STYLES tags as follows.
Example 3.3. Adding a manual reference to the Bootstrap CDN
... <link rel="stylesheet" href="https://maxcdn.bootstrapcdn.com/bootstrap/3.3.6/css/bootstrap.min.css"
Make sure Sails is running via sails lift and navigate to localhost:1337. With Bootstrap added as a dependency, the page should look similar to figure 3.10.
Figure 3.10. The homepage with Bootstrap styling added as a CDN dependency

3.2.5. Why index.html?
Sometimes, you may want to link to a folder instead of directly to a file. As a convenience, files named index.html have a special status within the brushfire/assets/ folder. If a request is made to a subfolder of brushfire/assets, the Sails server will look for and display a file named index.html in that subfolder. If index.html doesn’t exist, the server will respond with a 404 Not Found status.
Let’s set up the videos page to see how this special status works. First, head back to the mockups section of chapter 3, and take a look at the videos page mockup depicted in figure 3.11.
Figure 3.11. The videos page mockup from the Sails.js in Action hub

Now, return to the terminal window and create a new tab using the shortcut Cmd-T (on OS X). Next, move into the brushfire/assets/ folder:
~/brushfire $ cd assets
Create a new subfolder named videos/ within brushfire/assets:
~/brushfire/assets $ mkdir videos
In Sublime, create a new file named index.html for your videos page and save it in brushfire/assets/videos/. You can access the HTML for the page from the following gist: https://gist.github.com/sailsinaction/b77772769f28112247bc. Copy the source from the gist into brushfire/assets/videos/index.html. Now, let’s see the videos page in action, which will also demonstrate the special status of index.html. Ensure that Sails is running, and then navigate to localhost:1337/videos in the browser, and you should see the videos page displayed, as shown in figure 3.12.
Figure 3.12. A GET request to /videos triggers a matching asset route, which displays index.html from brushfire/assets/videos/index.html.

When the browser made a GET request to /videos on your behalf, Sails first looked for an explicit route that contained the route address 'GET /videos'. Finding no matching explicit route, Sails then looked for an index.html file in the brushfire/assets/videos/ folder. Because one exists, Sails displayed the videos page. Next, we’ll explore how Sails delivers images in the asset pipeline.
3.2.6. An <img> is worth a thousand words
Based on the mockup, you need to add an image to the left of the logo in the navbar. You’ll use an image from the Sails website. Navigate your browser to https://placekitten.com/g/250/250. Right-click the image, save it in the brushfire/assets/images/ folder, and name it logo.png. In Sublime, open brushfire/assets/index.html and add the following tags, similar to listing 3.4.
Note
Each partial code listing is shown in context through a GitHub gist. For example, listing 3.4 can be found at https://gist.github.com/sailsinaction/628731cc9683256f8cc9. Each chapter has its own gist with a link on the chapter hub page similar to http://sailsinaction.github.io/chapter-3/.
Example 3.4. Adding an image tag using a relative path in the homepage

With the Sails server running via sails lift, navigate your browser to localhost:1337, and you should see something similar to figure 3.13.
Figure 3.13. The homepage with an image in the navbar using a relative path

3.2.7. Relative paths
The logic behind relative paths isn’t very intuitive, so let’s dig a bit deeper. Earlier, you used images/logo.png as the source path for the img tag in the navigation bar. This is a relative path. That is, images/logo.png will be appended to the location of the page that contains the img tag, brushfire/assets/index.html. So in this case, images/logo.png will be appended to brushfire/assets/, resolving to brushfire/assets/images/logo.png.
Note
Those of you who are really paying attention might be asking, “Because we’re syncing these files to brushfire/.tmp/public, doesn’t the path ultimately resolve to brushfire/.tmp/public/images/logo.png?” And the answer is yes. But because we’re hiding the .tmp folder, we’re looking at this from the perspective of brushfire/assets being the asset root route.
But using a relative path can be problematic. Let’s look at another example to see why. In Sublime, open brushfire/assets/videos/index.html and add the same img tag to the videos page, similar to the next listing.
Example 3.5. Adding an image tag using a relative path in the videos page

Make sure Sails is running via sails lift and navigate your browser to localhost:1337/videos. You should see a broken image link in your browser similar to figure 3.14.
Figure 3.14. The source path within the image tag used a relative path that didn’t exist and resulted in a broken link.

Why did the image tag break? This time the img tag is located in brushfire/assets/videos/index.html. The source path images/logo.png gets appended to brushfire/assets/videos/, resolving ultimately to brushfire/assets/videos/images/logo.png. Because that path doesn’t exist, you get the broken link.
The solution is to add a leading / (slash) in front of the source path. Placing a leading / before the folder name changes the relative path to an absolute path. That is, the source path /images/logo.png will now be appended to the asset root or web root folder. Because the web root folder is brushfire/assets/, this will resolve to brushfire/assets/images/logo.png, which will display the image properly. Let’s propagate this change to the videos page in brushfire/assets/videos/index.html, similar to the next listing.
Example 3.6. Adding an image tag using an absolute path to the videos page

3.3. Managing scripts and stylesheets
It’s often better to have all your dependencies available locally while developing an application. That, for example, allows you to develop without the dependence of an internet connection. You also get to take advantage of another aspect of the Sails asset pipeline called the sails-linker task. The linker will automatically add CSS and JavaScript file links to the asset folder, which can save considerable time compared to manually adding them. To illustrate how sails-linker works, you’ll trade out your Bootstrap CDN link for a local copy of the Bootstrap library.
To do this, first remove the CDN links from brushfire/assets/index.html and brushfire/assets/videos/index.html. Next, go back to http://getbootstrap.com/getting-started/#download and download the Bootstrap distribution zip file. Uncompress the zip file and copy the bootstrap.min.css and bootstrap.css.map files into the brushfire/assets/styles/ folder. Make sure Sails is running via sails lift and navigate to localhost:1337. The homepage doesn’t seem to have changed, but take a closer look at the page source, shown in figure 3.15.
Figure 3.15. The page source reveals the reference links to the Bootstrap and importer.css files.

In the page source, you can now see the links to brushfire/assets/styles/bootstrap.min.css and brushfire/assets/styles/importer.css. But how did these files get linked to the home page? (Hint: insert grunting sound.) That’s correct, another Grunt task to the rescue. In fact, we’ve grouped a special collection of Grunt tasks introduced earlier as the sails-linker into the asset pipeline.
3.3.1. Automatically injecting <script> and <link> tags
The sails-linker task is one of the most powerful utilities in the built-in asset pipeline. It’s one of the Grunt tasks: brushfire/tasks/config/sails-linker.js. Instead of having to manually insert <script> or <link> tags for file dependencies like in jQuery or Bootstrap, sails-linker automatically injects them for you. All you have to do is add some special sails-linker tags in the files where you want the dependencies added. For example, any files with a .css extension placed in brushfire/assets/styles will automatically be linked to any page that contains the special sails-linker tags:
<!--STYLES-->
<!--STYLES END-->
Note
As long as the Sails server is running, the injection takes place automatically via a watch Grunt task that monitors any changes to the brushfire/assets folder and updates any link as needed.
The same is true for files with a .js extension placed in the brushfire/assets/js/ folder. The script tags for those JavaScript files will be automatically included on any page with the sails-linker tags:
<!--SCRIPTS-->
<!--SCRIPTS END-->
Note
The Sails linker also takes HTML files from the /assets/templates folder and precompiles underscore templates into a JST file. These precompiled templates are placed in /.tmp/public/jst.js. We won’t be using precompiled templates in Brushfire.
This is another concept that’s better understood via an illustration. Figure 3.16 illustrates what happened when you added the bootstrap.min.css file to brushfire/ assets/styles.
Figure 3.16. By default, an importer.less file is generated for each new Sails project. You’ll see later how importer.less is compiled into importer.css. What’s important
here is that the compiled importer.css file was injected into brushfire/assets/index.html because it contains the special Sails linker tags. After adding bootstrap.min.css
to the brushfire/assets/styles folder, a link was also automatically added to brushfire/assets/index.html for the bootstrap.min.css file.

When you added bootstrap.min.css to the brushfire/assets/styles/ folder, Sails linker inserted a reference to it in brushfire/assets/index.html. This makes it much easier to maintain dependencies on the frontend, because you don’t have to remember to manually add them. A quick look at the homepage reveals that a script has also been added to the page, as shown in figure 3.17.
Figure 3.17. The page source reveals the reference script tag to the sails.io.js file.

By default, sails.io.js is generated by each project.
Tip
You’ll explore sails.io.js in chapter 14 when you learn about WebSockets. For now, just know that any file added to brushfire/assets/js/ will be linked to in HTML files that contain the special <!—SCRIPTS--> tags.
Figure 3.18 illustrates how <script> tags were added to the homepage in the same way <link> tags were added earlier by sails-linker.
Figure 3.18. By default, a sails.io.js file is generated by each project and placed in the brushfire/assets/js folder. sails-linker inserts a reference to it in brushfire/assets/index.html .

sails.io.js located in the brushfire/assets/js/ was automatically added as a dependency via the <script> tag by sails-linker.
3.3.2. Built-in LESS support
The following may disturb those of you who are CSS experts. We recommend averting your eyes when viewing Irl’s styles—or rather his lack of style. We could use plain-ol’ CSS for our styles, but we’re fans of LESS. We like the way we get benefits from LESS without having to change much of how we use CSS. By default, a file named importer.less was created in the brushfire/assets/styles/ folder. In order for LESS files to be compiled and included automatically in the markup, you must first import them via importer.less. The imported LESS files are then compiled and included in the order in which they’re listed each time the Sails server is started. So mixins, variables, and the like should be imported first so that they can be accessed by subsequent LESS stylesheets.
Tip
If mixins and variables are foreign to you, we’ll explain what you need to know to use them as they come up in the project.
Let’s add some styles to a .less file and then import that file into LESS. In Sublime, create a new file named brushfire/assets/styles/custom.less and add the styles shown in the following listing.
Example 3.7. Adding an external LESS file to brushfire/assets/styles
/* Center the logo*/
img {
  width: 100px;
  margin: 30px auto 0px auto;
  display: block;
}

/* Center the heading */
.jumboHeading {
  text-align: center;
  padding: 20px 0;
  font-size: 2.5em;
}

/* Center the heading */
.jumboSubHeading {
  text-align: center;
}

/* Don't display bullet points in list */
.the-list-of-videos {
  li {
    list-style-type: none;
  }
}
Next, open brushfire/assets/importer.less in Sublime and add
@import 'custom.less';
Make sure Sails is running via sails lift and navigate your browser to localhost:1337. The homepage should look similar to figure 3.19.
Figure 3.19. The homepage with the new styles in custom.less

If you look at the page source, you’ll see that importer.less has been compiled into importer.css. As a sanity check, click the path to importer.css, and, as expected, you’ll find the styles you just added as plain-ol’ CSS.
3.4. Frontend-first API design
You’re now ready to start preparing and designing the backend. In chapter 1, we emphasized the importance of identifying the requests made by each page in your application to guide backend development. Traditionally, requests can be faked on the frontend using a combination of techniques. It’s useful to explore this traditional approach before we demonstrate, in chapter 4, how you can start with prototyping an actual backend at this phase of development using blueprints. First, we’ll identify the requests for each page of Brushfire. Then, we’ll use an array of dictionaries to simulate backend responses to each request.
3.4.1. Identifying backend requirements
Navigate back to the chapter 3 mockups, http://sailsinaction.github.io/chapter-3/mockups.html, and check out both the homepage with requests and the videos page with requests mockups. The homepage has two endpoints, which both make requests using anchor tags that are satisfied by asset routes. Therefore, the homepage doesn’t have any additional requirements for your backend.
As shown in figure 3.20, however, the videos page has two requests that require you to simulate backend responses—one for video submissions and the other to load the initial video list.
Figure 3.20. The videos page has two requests, one for new video submissions and the other for the initial videos of the page.

Each request requires a visual mechanism for a loading state and a means for adding a new video to the page after a submission.
Note
Because we’re faking the response, we won’t implement the error states until we start making AJAX requests in the next chapter.
3.5. Using Sails with jQuery
Integrating jQuery as a dependency is easy. Head over to http://jquery.com/ and download the latest production/compressed version of jQuery. Copy that file into the brushfire/assets/js/dependencies/ folder, name it jquery.min.js, and you’re finished. The jQuery library will now be added automatically to brushfire/assets/index.html and brushfire/assets/videos/index.html. You’ll also use a popular JavaScript utility library called lodash.js. Navigate to https://raw.githubusercontent.com/lodash/lodash/4.5.0/dist/lodash.core.min.js and copy the contents of the page to a new file in brushfire/assets/js/dependencies/lodash.js.
3.5.1. Example: listing data with jQuery
Currently, the initial videos are hardcoded in the markup. Instead, you’ll load them from an array using jQuery. Let’s first alter the markup a bit to account for the classes you’ll need to select elements with jQuery. In Sublime, open brushfire/assets/videos/index.html and alter the list-of-videos section to reflect the code that follows.
Example 3.8. Adding classes to make selecting elements easier in jQuery
...
<!-- LIST OF VIDEOS -->
<section class="the-list-of-videos col-md-12">
  <div class="loading">Loading videos...</div>
  <ul>
    <!-- VIDEO DATA INSERTED HERE AS HTML -->
  </ul>
</section>
...
Notice that you add an element for your loading state. You also remove the static YouTube video iframes, which will be replaced by dynamic-loading iframes via jQuery.
Next, create a new file for the jQuery code that will load the video list. In Sublime, create a new file named brushfire/assets/js/videos-page.js and add the jQuery shown in the next listing.
Example 3.9. Adding jQuery to load the video list


The intent is to add a loading state and to simulate a response from the backend when the page loads. To accomplish this,
when the page loads you first display the loading spinner ![]() . You then simulate a delay
. You then simulate a delay ![]() in fetching the fake data so you can see the loading spinner in action. After receiving a simulated response from the backend,
you hide
in fetching the fake data so you can see the loading spinner in action. After receiving a simulated response from the backend,
you hide ![]() the loading spinner. Next, you merge
the loading spinner. Next, you merge ![]() your simulated data with an inline template using the Lodash library. Finally, you insert
your simulated data with an inline template using the Lodash library. Finally, you insert ![]() the videos into the DOM.
the videos into the DOM.
Tip
The _.reduce() method is handy for iterating through an array. It reduces the array of dictionaries to a value (merging your markup with the fake data), with the accumulated result being your list of videos.
This approach is just as an example—you should be HTML-escaping user input to prevent a possible script injection attack. Even better would be using a more structured frontend framework on top of (or in lieu of) jQuery. You’ll be using Angular for Brushfire. We’ll discuss XSS attacks and their prevention in chapters 9 and 15.
3.5.2. Example: jQuery form
For the videos list page, you needed to add a couple of classes to select elements via jQuery. The submit video form doesn’t require any additional classes, but you do want it to perform the following tasks:
- Enable the loading state and disable the Submit button to prevent double submissions
- Harvest the title and src of the YouTube video from the form
- Extract the YouTube ID of the video
- Add the new video title and iframe to the DOM
- Disable the loading state and enable the Submit button
Head back to Sublime, open brushfire/assets/js/videos-page.js, and replace the current source with the following code.
Example 3.10. Adding jQuery to process the submit video form


First, you bind a submit event ![]() on your submit-video-form and prevent the default browser from handling—this is 2016, after all. Next, you harvest the data from the form in the DOM
on your submit-video-form and prevent the default browser from handling—this is 2016, after all. Next, you harvest the data from the form in the DOM
![]() . Now that you have the data from the input fields, you can clear them out and display the loading state
. Now that you have the data from the input fields, you can clear them out and display the loading state ![]() . You also want to disable the Submit button to prevent double posting while loading. Because you need only the YouTube ID, you need to parse the URL provided for the ID. As you did for the video list, you can simulate the delay
. You also want to disable the Submit button to prevent double posting while loading. Because you need only the YouTube ID, you need to parse the URL provided for the ID. As you did for the video list, you can simulate the delay ![]() your eventual request will cause, which gives you a chance to see the loading state. Next, insert the HTML
your eventual request will cause, which gives you a chance to see the loading state. Next, insert the HTML ![]() for the newly added video into the DOM. Then hide the loading state and reenable the Submit button.
for the newly added video into the DOM. Then hide the loading state and reenable the Submit button.
Although it’s not completely bulletproof, you have enough here for a user to submit a YouTube URL to Brushfire and for Brushfire to display the submission. The videos page is also backend ready with loading states and simulated delays to aid in testing those states. You’ll postpone the creation of the error state until you actually make a request. With the Sails server running via sails lift, navigate to localhost:1337/videos. The videos page is rendered with the video list. Open a second browser tab and navigate to http://youtube.com. Search for a video, and then select and copy the URL of that video into the form on the submit videos page. Add a title and click Submit Video. The new video will be added before the first video on the page, similar to figure 3.21.
Figure 3.21. The added video from the video-submit-form using jQuery

Now that you know how to do this using jQuery, you’ll transition your frontend to use Angular to do the same thing.
3.6. Using Sails with Angular
Adding Angular as a dependency is as easy as it was with jQuery. Head over to https://angularjs.org/ and download the latest stable uncompressed version of Angular. Copy that file into brushfire/assets/js/dependencies/, and you’re finished. Angular will now be added as a dependency to any page that contains the sails-linker tags.
3.6.1. Example: listing data with Angular
You’ll continue to load the video list from an array. First, you’ll change the markup and add the necessary Angular files to display the list of videos. Open brushfire/assets/videos/index.html in Sublime and replace the markup in the list-of-videos section, similar to what’s shown in the following listing.
Example 3.11. Adding Angular markup to load the video list

First, add the standard Angular ng-app and ng-controller directives to the body tag ![]() . Next, add an ng-if directive
. Next, add an ng-if directive ![]() to toggle the Loading videos... indicator. The Boolean value of this directive toggles whether the loading indicator is displayed.
Last, add another ng-if directive
to toggle the Loading videos... indicator. The Boolean value of this directive toggles whether the loading indicator is displayed.
Last, add another ng-if directive ![]() that toggles whether the video list is displayed.
that toggles whether the video list is displayed.
Tip
You display the video list via the ng-repeat directive, which iterates through a $scope variable named videos.
Next, you’ll create the necessary Angular code to simulate a request that fetches the initial list of videos.
Note
Because this book is primarily about the backend, we won’t be teaching you Angular, but we want to show a few examples to get you comfortable with integrating it with Sails.
In Sublime, open brushfire/assets/js/videos-page.js and replace the jQuery code with the following Angular code.
Example 3.12. Adding the Angular code to list videos in the videos page


When the module first loads, it’s necessary to whitelist www.youtube.com in the .config function ![]() or errors will occur.
or errors will occur.
Note
The need for whitelisting is an issue with the use of an iframe in Angular; see https://docs.angularjs.org/api/ng/provider/$sceDelegateProvider.
Create a controller ![]() and pass in two dictionaries: $scope and $timeout. You’ll use Angular’s $timeout
and pass in two dictionaries: $scope and $timeout. You’ll use Angular’s $timeout ![]() to simulate the delay you can get from a request to the backend. Adjusting the amount of this timeout is useful for being
able to see the loading states in action. Next, display
to simulate the delay you can get from a request to the backend. Adjusting the amount of this timeout is useful for being
able to see the loading states in action. Next, display ![]() a loading spinner by setting the value of the videos-Loading parameter to true, which connects to the ng-if directive in assets/videos/index.html. Then, simulate a delay
a loading spinner by setting the value of the videos-Loading parameter to true, which connects to the ng-if directive in assets/videos/index.html. Then, simulate a delay ![]() in the backend request while declaring an array that will contain your fake video titles and URLs. After the simulated response
delay, hide the loading spinner
in the backend request while declaring an array that will contain your fake video titles and URLs. After the simulated response
delay, hide the loading spinner ![]() . Finally, add the returned videos to the DOM
. Finally, add the returned videos to the DOM ![]() through the magic of two-way data binding. You can also increase the delay in $timeout
through the magic of two-way data binding. You can also increase the delay in $timeout ![]() . Let’s see this in action. Make sure Sails is running via sails lift and navigate to localhost:1337/videos.
. Let’s see this in action. Make sure Sails is running via sails lift and navigate to localhost:1337/videos.
When the page loads, the video list is displayed, but the string interpolation {{video.title}} can flash briefly on some browsers before the actual titles are displayed. This is easy to fix with yet another Angular directive: ng-cloak. This directive ensures that an Angular HTML template isn’t in its raw (uncompiled) form until the page loads. In Sublime, open brushfire/assets/videos/index.html and add ng-cloak to the body tag as follows.
Example 3.13. Adding ng-cloak to the body tag in the videos page
...
    <!--STYLES-->
    <!--STYLES END-->
  </head>
  <body ng-app="brushfire_videosPage" ng-controller="PageCtrl" ng-cloak>
    <div class="container-fluid">
      ...
The directive has a corresponding bit of styling, so open brushfire/assets/styles/custom.less and add the styles shown here.
Example 3.14. Adding ng-cloak styles to custom.less
...
[ng:cloak], [ng-cloak], [data-ng-cloak], [x-ng-cloak], .ng-cloak, .x-ng-cloak {
  display: none !important;
}
...
3.6.2. Example: Angular form
To process the submit video form and display the videos list, you need to add some markup to the video page. In Sublime, open brushfire/assets/videos/index.html and replace the current markup under <!-- SUBMIT NEW VIDEO --> with this new markup.
Example 3.15. Adding Angular markup to process the submit video form
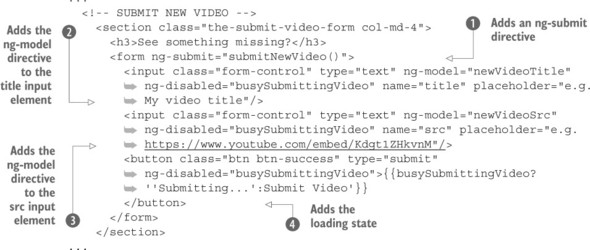
Add an ng-submit directive to the form ![]() to submit it the Angular way. Next, add the ng-model directive to the title input element
to submit it the Angular way. Next, add the ng-model directive to the title input element ![]() , which connects the values to your $scope. You also add the ng-disabled directive to prevent changing the field while it’s being submitted. Similarly, add the ng-model directive to the src input element
, which connects the values to your $scope. You also add the ng-disabled directive to prevent changing the field while it’s being submitted. Similarly, add the ng-model directive to the src input element ![]() , which connects the values to your $scope. Also add the ng-disabled directive to prevent changes to the field while it’s being submitted. Finally, add the loading state to the button element
, which connects the values to your $scope. Also add the ng-disabled directive to prevent changes to the field while it’s being submitted. Finally, add the loading state to the button element
![]() when busySubmittingVideo is set to true, and add the ng-disabled directive to prevent multiple submissions while the form is being processed.
when busySubmittingVideo is set to true, and add the ng-disabled directive to prevent multiple submissions while the form is being processed.
Now that the submission form markup is prepared for Angular, you need to update the Angular controller to reflect the new submit video form. Head back to Sublime, open brushfire/assets/js/video-pages.js, and add the following code.
Example 3.16. Adding the Angular code for submitting a new video


When new video is submitted, your form’s submit event is bound to this function via ng-submit="submitNewVideo($event) ![]() in the HTML. You also add a little spin lock to prevent double submission
in the HTML. You also add a little spin lock to prevent double submission ![]() because disabling the Submit button still allows a double post if a user submits using the Enter key. Harvest the data from
the form
because disabling the Submit button still allows a double post if a user submits using the Enter key. Harvest the data from
the form ![]() , and, thanks to ng-model, it’s already in the $scope object. Because you need only the YouTube ID, you need to parse the URL provided for the ID. To do this, first create a placeholder anchor element
, and, thanks to ng-model, it’s already in the $scope object. Because you need only the YouTube ID, you need to parse the URL provided for the ID. To do this, first create a placeholder anchor element ![]() and assign the entered URL to the attribute parser.href. Next, parse the URL using some string methods until only the YouTube ID remains. Update the src attribute of the _newVideo dictionary with the correct embed Path. Next, set busySubmittingVideo to true
and assign the entered URL to the attribute parser.href. Next, parse the URL using some string methods until only the YouTube ID remains. Update the src attribute of the _newVideo dictionary with the correct embed Path. Next, set busySubmittingVideo to true ![]() so you display a loading state and also disable form submission. Simulate a delay
so you display a loading state and also disable form submission. Simulate a delay ![]() , and then insert HTML for the newly added video
, and then insert HTML for the newly added video ![]() on the videos array of the $scope. This will update the new values in the DOM. Next, hide the loading state
on the videos array of the $scope. This will update the new values in the DOM. Next, hide the loading state ![]() and reenable form submission. Finally, clear out form inputs
and reenable form submission. Finally, clear out form inputs ![]() .
.
With the Sails server running via sails lift, navigate your browser to localhost:1337/videos. The video list should be displayed. Open a second browser tab and navigate to http://youtube.com. Copy another YouTube video URL and use it to submit your updated form on the videos page. The new video is added before the first video.
3.7. Summary
- Server-rendered views combine backend data with EJS before being sent via a response to a requesting user-agent.
- Sails uses asset routes to respond to requests for static assets.
- The asset pipeline allows you to perform tasks for file concatenation, minification, dynamic linking, and it speeds up development by automating what would otherwise be manual tasks.
- It’s important to set up loading states via a framework like jQuery and Angular to simulate requests.