
Chapter 10
Creating Views
Introduction
In this chapter, you will learn the definition of a view and how views are used in Microsoft Access’s SQL view. You will learn how to create a view, filter a view, update data in tables through a view, and delete a view.
Definitions
CREATE VIEW — Used to instruct the DBMS to create a new view.
DROP VIEW — Used to delete a view.
A view is a saved query that queries one or more tables. Views are commonly used to restrict data from users for security purposes, shorten complex queries, and combine data from multiple tables. A view is also commonly referred to as a virtual table because a view can be referenced in much the same way as a table. Keep in mind, though, that views are not tables at all. The main distinction between a view and a table is that a view does not store data. Views store SQL statements but they do not store any data stored in the database. They are used to return and update data stored in actual tables. From an Access standpoint, a view can be considered a query. The only time the two can be considered as different entities is when you are using a true SQL back end. Queries kept and maintained on the SQL side would be views; if calculated on the Access side, queries.
Creating a View
To create a view in Microsoft Access’s SQL view, create a query on one or more tables and save the query under a specified name. Look at Example 1, which shows the steps to follow to create and save a view.
Example 1

Figure 10-1. Computers table
Suppose you want to create a view that stores information from the Computers table in Figure 10-1. You want the view to include the following columns from the Computers table: SerialNum, Brand, and OfficeNumber. The following script creates a view:
SELECT SerialNum, Brand, OfficeNumber
FROM Computers;
This script displays three columns (SerialNum, Brand, and OfficeNumber) from the Computers table. To save the view, follow these steps:

Figure 10-2. Saving the view
2. When the Save As dialog box appears, type ComputerBrandLoc and click OK.
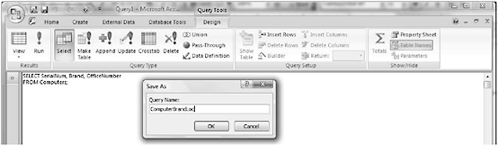
Figure 10-3. Naming the view
3. Next, close SQL view and return to the main Access window. Click Queries from the drop-down menu on the left to display your new view named ComputerBrandLoc (see Figure 10-4).

Figure 10-4. Naming the view
You have now successfully created your first view.
Creating a View Using the CREATE VIEW Keywords in SQL-92
In Chapter 2, we discussed SQL versions SQL-89 and SQL-92. Recall that SQL-92 is the latest version of SQL and functions at a more advanced level than SQL-89 because it contains more features.
Most versions of Microsoft Access come with version SQL-89 installed. In Microsoft Access 2002 and higher you have the option to set the SQL version to SQL-92 for the current database and as the default setting for new databases. (Refer to Chapter 2 for specific instructions.)
In version SQL-92, the CREATE VIEW keywords can be used to create a view. When you use the CREATE VIEW keywords you do not name and save your view using the method described in Example 1. Look at the following script, which implements the CREATE VIEW keywords in the creation of a view in version SQL-92.
CREATE VIEW ComputerBrandLoc (SerialNum, Brand, OfficeNumber)
AS SELECT SerialNum, Brand, OfficeNumber
FROM Computers;
This script creates a query that is equivalent to the query in Example 1. It implements the CREATE VIEW keywords to create a new view named ComputerBrandLoc. Notice that the name (ComputerBrandLoc) of the view follows the CREATE VIEW keywords. When you create a view using this method, the view name cannot have the same name as an existing table, just as a query cannot duplicate a table name.
After the name of the view, the names of the columns that are used in the SELECT statement are defined. The columns are enclosed in parentheses. Note that the definition of column names after the name of the view is optional. The AS keyword is used to define the SELECT statement.
Create a View that Contains a Complex Join
Example 2

Figure 10-5. Customers table
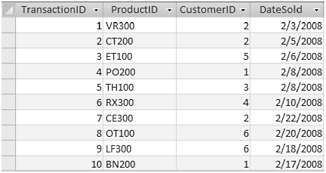
Figure 10-6. Transactions table
Suppose you want to create a view (version SQL-92) containing one of the complex joins created in Chapter 8. Take a look at the following query:
CREATE VIEW CustomersTotalTransactions AS
SELECT FirstName, LastName, COUNT (Transactions.CustomerID) AS
TotalTransactions
FROM Customers, Transactions
WHERE Transactions.CustomerID = Customers.CustomerID
GROUP BY FirstName, LastName;
This script uses the CREATE VIEW keywords to create a view named CustomersTotalTransactions. The AS keyword is used to define a SELECT statement that contains an inner join. The SELECT statement retrieves customer names and the total number of transactions per customer.
Be sure to save your CREATE VIEW query.
Query the CustomersTotalTransactions View
Example 3
Now that the CustomersTotalTransactions view (Example 2) is created, you can query the view much like a table. Look at the following script:
SELECT FirstName, LastName, TotalTransactions
FROM CustomersTotalTransactions
WHERE Lastname IN ('Allison', 'Penn', 'Spencer'),
This script retrieves the first name, last name, and total transactions of the following customers: Allison, Penn, Spencer.
Take a look at Figure 10-7.

Figure 10-7. Results (output)
Note: So, the big question is, “what is the difference between a view and a query?” The answer is “in Access, very little.” In most implementations of SQL, however, there is a big difference. A query is generally not used as a source itself to get data; rather it is the result. So every time you build a query to pull data from another query, just think of it as a view.
Filtering a Record through a View
Once you create a view you can query it like a table. Don’t forget that when you query a view, the data is retrieved from the tables specified in the view. The view itself does not contain data. Look at Example 4, which creates a query that queries the ComputerBrandLoc view.
Example 4
Suppose you want to create a query that displays every record from the ComputerBrandLoc view.
Look at the following script:
SELECT *
FROM ComputerBrandLoc;
The preceding script implements a simple SELECT statement that displays every record from the ComputerBrandLoc view. Figure 10-8 shows the results from this query.

Figure 10-8. Results (output)
Example 5 shows another query on the ComputerBrandLoc view.
Example 5
Suppose you want to query the ComputerBrandLoc view to return serial numbers, brand names, and an alias column named OfficeLocation. Additionally, you want to add WHERE and ORDER BY clauses to your query. Take a look at the following script:
SELECT SerialNum, Brand, OfficeNumber AS OfficeLocation
FROM ComputerBrandLoc
WHERE Brand = 'Dell'
ORDER BY SerialNum;
As you can see, the preceding script implements the AS, WHERE, and ORDER BY keywords. The AS keyword specifies an alias (OfficeLocation), the WHERE clause specifies to only retrieve the Dell brand, and the ORDER BY clause sorts the results by the SerialNum column. Look at the results in Figure 10-9.

Figure 10-9. Results (output)
Updating a Record through a View
Views can also be used to update data stored in tables. When you update a view it automatically updates the tables where the data is actually stored. Take a look at Example 6, which demonstrates this.
Example 6

Figure 10-10. ComputerBrandLoc view
Suppose you want to update data in the Computers table through the ComputerBrandLoc view. You want to update the serial number for the computer located in office 122. The update will change the serial number from G9277288282 to D8828292772. Look at the following script:
UPDATE ComputerBrandLoc
SET SerialNum = 'D8828292772'
WHERE SerialNum = 'G9277288282'
AND OfficeNumber = 122;
This script implements an UPDATE statement to update the Computers table through the ComputerBrandLoc view. Figure 10-11 shows the updated serial number in the Computers table.

Figure 10-11. Computers table
Deleting a View
To delete a view you must use the DROP VIEW keywords. Take a look at Example 7.
Example 7
Suppose you want to delete the ComputerBrandLoc view. Look at the following script:
DROP VIEW ComputerBrandLoc;
This script uses the DROP VIEW keywords to delete the view named ComputerBrandLoc.
Note: When you delete a view, the tables in the view are not affected. On the other hand, if you delete a table on which a view is dependent, the view becomes invalid.
Summary
In this chapter you learned how to create and filter views and how to update table data through a view. You also learned how to delete a view and query a view.
Quiz 10
1. True or False. Updating data in views does not affect data stored in tables.
2. Views are commonly referred to as what?
3. True or False. Views are deleted using the DELETE keyword.
4. True or False. Views are created in SQL-92 using the CREATE VIEW keywords.
5. True or False. Deleting a table on which a view is dependent does not affect the view.
Project 10
Use the ComputerBrandLoc view in Figure 10-7 to update the Computers table in Figure 10-1. Update the office number for serial number X8276538101 from 311 to 136.