


Hands-on management tasks
In this chapter, we provide some useful examples of HMC functionality, which ease the operations of virtualized SAP landscapes on PowerVM. If you are interested in further HMC capabilities, refer to:
IBM PowerVM Virtualization Managing and Monitoring, SG24-7590
4.1 Ease of moving from dedicated to shared
The change from dedicated to shared resources is simple. It requires that you make a slight change in the existing profile and restart the LPAR. Prior to doing this, of course, you must have a policy for sharing the physical server (CEC = Central Electronic Complex) resources that supports the processing requirements of the combined load, according to the business need. This policy determines the relative weights, the guaranteed entitlements, and the virtual processor (VCPU) distribution.
Set VCPU requirements to a value that reflects the expected peak workload requirements. The entitlement depends on how much capacity you want to guarantee, how many partitions are set up, and how many physical processors are available in the shared processor pool. The weight determines your relative processing priorities: online over batch, production over non-production, and so on. Using the dynamic tools that we discuss in this chapter, you can also fine-tune this policy during the operation to address a different load. You can get an understanding of the LPAR requirements for each SAP system from the SAP Computer Center Management System (CCMS), Insight reports (9.6, “IBM Insight for SAP” on page 157), and other monitoring tools.
To change an LPAR from a dedicated to a SPLPAR, you must create a new profile or change the existing profile. In our example, we alter the existing profile, save it, and restart the partition:
1. Login on the HMC, and access the Manage Profiles panel by selecting Systems management → Custom Groups → All partitions. Choose the partition to be changed.
2. To open the panel for managing profiles, select Configuration → Manage Profiles, as shown in Figure 4-1.
3. Select the profile to be changed, and choose Actions → Edit. Alternatively, create a copy, and then change the new profile, as shown in Figure 4-1.

Figure 4-1 Select a profile to edit
4. The profile opens, as shown in Figure 4-2. Select the Processor tab, select the Shared option, and change the resources accordingly to your requirements. Figure 4-3 on page 32 is an example of assigning resources.
The shown LPAR can later use up to one physical processor if enough resources in the shared pool are available with what corresponds to the setting in the dedicated setup before. In addition, we allow an increase to the amount of processor without a restart, for example when using scheduled DLPAR operations or adding new hardware (Maximum processing units and Maximum virtual processors). To later benefit from the implicit capping, which we introduce in 4.3, “Assigning implicit capping to LPARs” on page 33, we create it as uncapped, which is the recommended partition mode and type used for SAP environments with PowerVM.
5. Shut down the LPAR, and start it up again by activating the new or altered profile.

Figure 4-2 One click plus adjusting the settings to change a dedicated LPAR into a SPLPAR
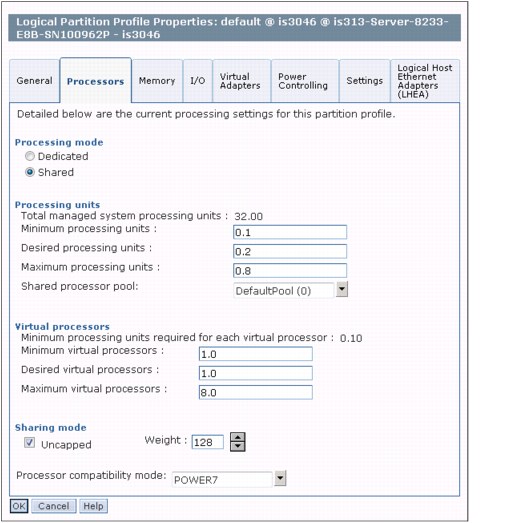
Figure 4-3 One click plus adjusting the settings to change a dedicated LPAR into a SPLPAR
4.2 Micropartition design option
The shared processor LPARs have two main flavors: those with strict resource definitions and those with flexible limits.
Strict resource definitions are achieved by defining the entitlement of the LPAR and capping the LPAR. The entitlement is the resource capacity that is guaranteed to the LPAR and is always available to it. Capping the LPAR restricts it from using any resources beyond this entitlement, and therefore the entitlement must be large enough to fulfill the processing requirements of the peak workload.
A shared LPAR that you define in this manner resembles a dedicated LPAR, with two exceptions: Other LPARs can use its resources when not used by their owner (more flexible than with dedicated shared partitions), and a fraction of processors can be assigned whereas Dedicated LPARS always require whole processors.
LPAR entitlements are in a sense reserved capacity: The sum of the entitlements of all of the SPLPARs sharing the pool cannot exceed the number of physical processors in the pool, which is the only way that the entitlements are guaranteed. Therefore, large LPAR entitlements limit the number of LPARs that can be active in the shared processor pool.
To achieve the best processor sharing, keep the entitlements small and the partitions uncapped. Uncapped partitions can utilize resources in the shared pool well beyond their guaranteed entitlement, which is the most common approach for combined SAP landscapes because the LPARs can adapt to the workload requirements, and the resource distribution can adapt to the various workload peaks in multiple LPARs. Of course this also leads to contention in the shared processor pool if workloads are heavily competing for resources. You have several options to enforce a priority policy and relative behavior of the LPARs, which are referred to as implicit capping. They provide a means to control the resource allocation, while still providing the flexibility and efficiency of resource sharing.
4.3 Assigning implicit capping to LPARs
Most LPAR settings can be dynamically altered during runtime by DLPAR (dynamic LPAR) operations using the HMC. Using this functionality, you can manually change the behavior of the LPARs or schedule DLPAR operations using the HMC directly or by external tools.
The number of VCPUs that are available to a partition limits the number of whole physical processors that this LPAR can address, because one virtual processor represents at maximum one physical processor. The LPAR is therefore effectively capped at a maximum physical processor utilization that is equal to its number of configured VCPUs.
By reducing the LPAR weight, you do not actually cap the LPAR; instead, you reduce its ability to compete for additional resources above its actual entitlement. If there is no competition for these resources, the LPAR is only restricted by its number of configured VCPUs, which allows it to be both flexible and harmless to other workloads of higher priority (with greater weights).
The advantage of implicit capping versus explicit capping is:
•The flexibility that is gained by low reserved entitlement, which allows more SPLPARs to be defined on the same number of physical processors on the one hand and on the other hand a second “implicit entitlement” can be guaranteed.
•The protection of SPLPARs with low weights from being completely cannibalized by uncapped SPLPAR with higher weights.
•Limit the maximum processors in hosting environments.
•Can be scheduled as described in “Scheduling dynamic LPAR operations” on page 34, which is not possible with the weight.
Figure 4-4 on page 34 shows how to access the HMC panel to dynamically change the resources.

Figure 4-4 Change amount of virtual processors
|
Note: A partition that is capped and a partition that is uncapped with a weight of 0 are functionally identical. In terms of performance, you get exactly the same result (utilization can only go up to the partition's entitled capacity, not higher). In an SAP system, this has an impact in the monitoring because a partition is visible as uncapped, yet behaves as a capped partition. See: http://www.redbooks.ibm.com/abstracts/tips0538.html
|
4.4 Scheduling dynamic LPAR operations
The HMC provides the possibility to schedule dynamic LPAR operations to add or remove processor and memory, and assign or unassign I/O devices at a defined period in time. You can use this scheduling to change the LPAR resource allocation, for example, to support an SAP mode change.
Earlier in this book, we discussed the advantages provided by the dynamic reconfiguration feature. In this example, we focus on dynamically changing resource allocation of the processor. To use this functionality for a specific LPAR:
1. In the left frame of the HMC, select Systems Management → Servers, and choose the server that the LPAR belongs to.
2. Choose the LPAR to which you want to apply the operation. Select Operations → Schedule operations to get to Figure 4-5.

Figure 4-5 HMC menu selection

Figure 4-6 HMC menu selection
4. To add virtual processors on top of the already assigned ones, select the Options tab as shown in Figure 4-7.

Figure 4-7 HMC menu selection
5. Perform the scheduling by clicking the Date and Time tab, which was already visible in Figure 4-7. To repeat this task, select the Repeat tab to define how often you want the event to repeat. Save and exit the configuration.
This scheduling allows the LPARs to react on predictable load peaks. To give a small processor-based example, we look into a machine with an LPAR per time zone having predictable peaks during the day and low utilization during the night. Hence they have different load peaks moving from partition to partition. By changing the amount of virtual processors, we can ensure that batch processes during the night shift of an LPAR do not impact the performance of a partition running in day shift and better utilize the processor resources of the shared pool.
4.5 Managing multiple shared processor pools
Multiple shared processor pools (MSPP) are useful in SAP landscapes in several ways, including the ability to segregate workloads and the ability to create subpools, which you can use to limit software license costs that are based on the number of available processors.
There are several IBM Redbooks publications available that describe in detail how you manage multiple shared processor pools. This section is an extract of the IBM Redpaper:
IBM System p Advanced POWER Virtualization (PowerVM) Best Practices, REDP-4194
Starting with the POWER6 technology-based systems, you can define multiple shared processor pools and assign the shared partitions to any of the MSPPs. Setting up this feature is rather simple because you only set the properties of a processor pool.
To set up a shared processor pool (SPP):
1. Select the system on the HMC, and select Configuration → Shared Processor Pool Management. Set up the shared processor pool.
2. Assign a partition to the pool that you just set up using the same interface. Click the Partitions tab, and select the partition name, as shown in Figure 4-8.

Figure 4-8 Partition assignment to multiple shared processor pools
3. Select the SPP that you want to assign this partition to, as shown in Figure 4-9.

Figure 4-9 Assign a partition to a shared processor pool
4.6 Enable Pool Utilization Authority
In a shared pool environment the Pool Utilization Authority (PUA) can be used to restrict the data, which can be monitored within an LPAR. This can be necessary for example in hosted environments, where customers should not be able to get information about the hosting system. On the other side monitoring of processor usage in SAP may require additional metrics from the processor pool. The table in 9.3, “Other monitoring tools” on page 117 shows which metrics are affected.
Unfortunately the HMC does not provide on any screen a setting explicitly named PUA or Pool Utilization Authority. Therefore we show in this short section how to change this setting.
Select in the HMC an LPAR and open the properties as in Figure 4-10:

Figure 4-10 HMC LPAR Properties
On the Hardware Tab chose the page for Processors. PUA is enabled by setting the checkbox for "Allow performance information collection".
4.7 Activate and modify memory compression
Starting with POWER7 technology-based systems and AIX 6.1 memory compression can be used and is named Active Memory Expansion (AME).
More details can be found in 8.5, “Active Memory Expansion for SAP systems” on page 84. AME can be enabled and configured on the HMC by setting the checkbox for Active Memory Expansion in the profile for an LPAR on the memory tab (see Figure 4-11 below):
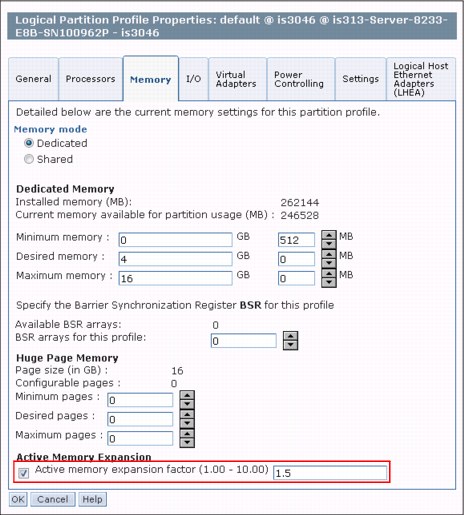
Figure 4-11 HMC LPAR Properties
On this tab you can set also the expansion factor. As you see in the example above the expansion factor of 1.5 leads to 6GB of expanded and 4GB of physical memory when the LPAR is started with this profile.
Switching AME On or Off requires a restart of the LPAR. On the other side the expansion factor can be modified without rebooting the LPAR by using DLPAR operations. On the HMC select in the LPAR list, Dynamic Logical Partinioning 'Memory' Add or Remove and change the value for the memory expansion factor (see Figure 4-12).

Figure 4-12 HMC: Add / Remove memory resources
When AME is enabled, the operating system is switching off the support for 64K pages. If necessary you can turn on 64K memory pages again by changing the restricted vmo setting vmm_mpsize_support to 1. You can do this with the following command:
# vmo -F -r -o vmm_mpsize_support=1
|
Note: Currently it is not recommended to use 64K memory pages with AME since performance impacts may be observed, when higher decompression rates are expected.
|
4.8 Simultaneous Multithreading and compatibility modes
Simultaneous Multithreading (SMT) was introduced with POWER5 processors and started as two-way multithreading (SMT-2). With the POWER7 processor, four-way multithreading (SMT-4) was introduced. In addition to the POWER7 technology-based hardware, one of the following software levels is required as the minimum level to support SMT-4:
• AIX 6.1 TL4
• IBM i 6.1.1
• Linux SLES 11 or RHEL6
With operating system commands, you can switch Simultaneous Multithreading on or off, or you can select SMT-1 (= off), SMT-2, or SMT-4 directly. Changes to the SMT mode affect the whole partition. On AIX and Linux, changes to the SMT mode take effect immediately, on IBM i, the changes will take effect after an IPL of the partition. The following commands are used in the supported operating systems:
AIX
You can control the SMT mode with the smtctl command. To switch on SMT, execute the following command:
# smtctl -m on
To switch off SMT, use the command:
# smtctl -m off
In order to switch between the three SMT modes on a POWER7 technology-based machine, the command smtctl has been enhanced with another parameter to change the number of SMT threads. For example, in order to run the LPAR with four SMT threads you execute the following command:
# smtctl -t 4
IBM i
You can control the SMT mode through system value QPRCMLTTSK. There are three possible values for that system value: Value 0 to turn SMT off, value 1 to turn SMT on to the highest available degree (SMT-2 on POWER6, SMT-4 on POWER7), and value 2 to let the operating system decide and dynamically change what level of SMT to use. Selecting SMT-2 explicitly on POWER7 technology-based systems is currently not supported on IBM i. To switch on SMT, enter the command:
CHGSYSVAL SYSVAL(QPRCMLTTSK) VALUE('1')
To switch off SMT, enter the command:
CHGSYSVAL SYSVAL(QPRCMLTTSK) VALUE('0')
Linux
You can control the SMT mode with the ppc64_cpu command with parameter --smt. You can select either on or off, or you can select the SMT mode directly. To switch on SMT, execute the command:
ppc64_cpu --smt=on
or:
ppc64_cpu --smt=4
To switch off SMT, execute the command:
ppc64_cpu --smt=off
or:
ppc64_cpu --smt=1
To select SMT-2 explicitly, execute the command:
ppc64_cpu --smt=2
To display the current SMT status, execute the command:
ppc64_cpu --smt
With the Hardware Management Console (HMC), you can define a compatibility mode in the LPAR profile. The compatibility mode allows LPAR migration between Power Servers running with different versions of POWER processors. Currently supported are the compatibility modes POWER6, POWER6+™, and POWER7. If you are running on POWER7 technology-based systems and switch the compatibility mode in the profile to POWER6 or POWER6+, you implicitly turn off the capability to run with four SMT threads. The following Figure 4-13 is showing where to change the compatibility mode in an LPAR profile on the HMC:

Figure 4-13 Selecting Processor compatibility mode in the HMC
|
Note: The purpose of the compatibility mode is to allow LPAR migration. You should not use the compatibility mode when your only intention is to force SMT-2 on POWER7 technology-based hardware. To switch between SMT-2 and SMT-4, use the previously described operating system commands.
|
..................Content has been hidden....................
You can't read the all page of ebook, please click here login for view all page.