Chapter 9. Simplifying Conditional Expressions
Conditional logic has a way of getting tricky, so here are a number of refactorings you can use to simplify it. The core refactoring here is Decompose Conditional, which entails breaking a conditional into pieces. It is important because it separates the switching logic from the details of what happens.
The other refactorings in this chapter involve other important cases. Use Recompose Conditional to use more readable, idiomatic Ruby. Use Consolidate Conditional Expression when you have several tests and all have the same effect. Use Consolidate Duplicate Conditional Fragments to remove any duplication within the conditional code.
If you are working with code developed in a one exit point mentality, you often find control flags that allow the conditions to work with this rule. I don’t follow the rule about one exit point from a method. Hence I use Replace Nested Conditional with Guard Clauses to clarify special case conditionals and Remove Control Flag to get rid of the awkward control flags.
Object-Oriented programs often have less conditional behavior than procedural programs because much of the conditional behavior is handled by polymorphism. Polymorphism is better because the caller does not need to know about the conditional behavior, and it is thus easier to extend the conditions. As a result, Object-Oriented programs rarely have case statements. Any that show up are prime candidates for Replace Conditional with Polymorphism.
One of the most useful, but less obvious, uses of polymorphism is to use Introduce Null Object to remove checks for a null value.
Decompose Conditional
You have a complicated conditional (if-then-else) statement.
Extract methods from the condition, “then” part, and “else” parts.

Motivation
One of the most common areas of complexity in a program lies in complex conditional logic. As you write code to test conditions and to do various things depending on various conditions, you quickly end up with a pretty long method. Length of a method is in itself a factor that makes it harder to read, but conditions increase the difficulty. The problem usually lies in the fact that the code, both in the condition checks and in the actions, tells you what happens but can easily obscure why it happens.
As with any large block of code, you can make your intention clearer by decomposing it and replacing chunks of code with a method call named after the intention of that block of code. With conditions you can receive further benefit by doing this for the conditional part and each of the alternatives. This way you highlight the condition and make it clear the logic on which you are branching. You also highlight the reason for the branching.
Mechanics
1. Extract the condition into its own method.
2. Extract the “then” part and the “else” part into their own methods.
If I find a nested conditional, I usually first look to see whether I should use Replace Nested Conditional with Guard Clauses. If that does not make sense, I decompose each of the conditionals.
Example
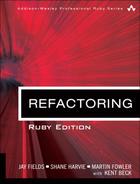
Suppose I’m calculating the charge for something that has separate rates for winter and summer:
I extract the conditional and each leg as follows:

Here I show the result of the complete refactoring for clarity. In practice, however, I do each extraction separately and test after each one.
Many programmers don’t extract the condition parts in situations such as this. The conditions often are short, so it hardly seems worth it. Although the condition is often short, there often is a big gap between the intention of the code and its body. Even in this little case, reading “not_summer date” conveys a clearer message to me than does the original code. With the original I have to look at the code and figure out what it is doing. It’s not difficult to do that here, but even so the extracted method reads more like a comment.
Recompose Conditional
You have conditional code that is unnecessarily verbose and does not use the most readable Ruby construct.
Replace the conditional code with the more idiomatic Ruby construct.

Motivation
Ruby has some expressive constructs for forming conditional logic with which newcomers to the language aren’t necessarily familiar. Throughout this book we have been on a constant quest to improve the expressiveness of our code, and choosing the best construct from the Ruby language is a great place to start.
Example: Replace Ternary Assignment with “Or” Assignment
In this example, we want to default our parameters variable to an empty array, if the params method returns nil.
![]()
We can use the “Or” operator to make the assignment more expressive:
![]()
Example: Replace Conditional with Explicit Return
In this method we check the result of days_rented to determine how many reward points to return:
![]()
We can make our code more English-like if we use the “return if” syntax:

Consolidate Conditional Expression
You have a sequence of conditional tests with the same result.
Combine them into a single conditional expression and extract it.
Motivation
Sometimes you see a series of conditional checks in which each check is different yet the resulting action is the same. When you see this, you should use ands and ors to consolidate them into a single conditional check with a single result.
Consolidating the conditional code is important for two reasons. First, it makes the check clearer by showing that you are really making a single check that’s or-ing the other checks together. The sequence has the same effect, but it communicates carrying out a sequence of separate checks that just happen to be done together. The second reason for this refactoring is that it often sets you up for Extract Method. Extracting a condition is one of the most useful things you can do to clarify your code. It replaces a statement of what you are doing with why you are doing it.
The reasons in favor of consolidating conditionals also point to reasons for not doing it. If you think the checks are really independent and shouldn’t be thought of as a single check, don’t do the refactoring. Your code already communicates your intention.
Mechanics
1. Check that none of the conditionals has side effects.
![]() If there are side effects, you won’t be able to do this refactoring.
If there are side effects, you won’t be able to do this refactoring.
2. Replace the string of conditionals with a single conditional statement using logical operators.
3. Test.
4. Consider using Extract Method on the condition.
Example: Ors
The state of the code is along the lines of the following:
Here we see a sequence of conditional checks that all result in the same thing. With sequential code like this, the checks are the equivalent of an or statement:

Now I can look at the condition and use Extract Method to communicate what the condition is looking for:

Example: Ands
That example showed ors, but I can do the same with ands. Here the setup is something like the following:

This would be changed to

You may well find you get a combination of these that yields an expression with ands, ors, and nots. In these cases the conditions may be messy, so I try to use Extract Method on parts of the expression to make it simpler.
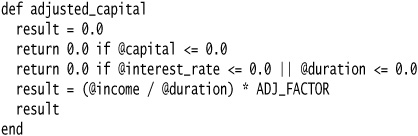
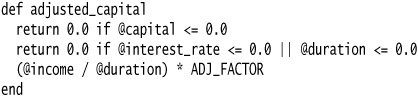
If the routine I’m looking at tests only the condition and returns a value, I can increase fluency by moving the conditional onto the same line as the return statement:
becomes
![]()
Consolidate Duplicate Conditional Fragments
The same fragment of code is in all branches of a conditional expression.
Move it outside the expression.
Motivation
Sometimes you find the same code executed in all legs of a conditional. In that case you should move the code to outside the conditional. This makes clearer what varies and what stays the same.
Mechanics
1. Identify code that is executed the same way regardless of the condition.
2. If the common code is at the beginning, move it to before the conditional.
3. If the common code is at the end, move it to after the conditional.
4. If the common code is in the middle, look to see whether the code before or after it changes anything. If it does, you can move the common code forward or backward to the ends. You can then move it as described for code at the end or the beginning.
5. If there is more than a single statement, you should extract that code into a method.
Example
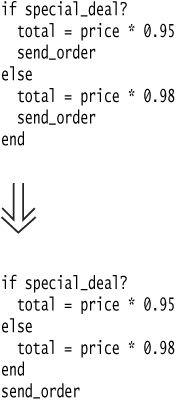
You find this situation with code such as the following:

Because the send_order method is executed in either case, I should move it out of the conditional:

The same situation can apply to exceptions. If code is repeated after an exception-causing statement in the begin block and all the rescue blocks, I can move it to the ensure block.
Remove Control Flag
You have a variable that is acting as a control flag for a series of boolean expressions.
Use a break or return instead.
Motivation
When you have a series of conditional expressions, you often see a control flag used to determine when to stop looking, as in the following code:

Such control flags are more trouble than they are worth. They come from rules of structured programming that call for routines with one entry and one exit point. I agree with (and modern languages enforce) one entry point, but the one exit point rule leads you to convoluted conditionals with these awkward flags in the code. This is why languages have break and next (or continue) statements to get out of a complex conditional. It is often surprising what you can do when you get rid of a control flag. The real purpose of the conditional becomes so much clearer.
Mechanics
The obvious way to deal with control flags is to use the break or next statements present in Ruby.
1. Find the value of the control flag that gets you out of the logic statement.
2. Replace assignments of the break-out value with a break or next statement.
3. Test after each replacement.
Another approach, also usable in languages without break and next, is as follows:
1. Extract the logic into a method.
2. Find the value of the control flag that gets you out of the logic statement.
3. Replace assignments of the break-out value with a return.
4. Test after each replacement.
Even in languages with a break or next, I usually prefer to use an extraction and return. The return clearly signals that no more code in the method is executed. If you have that kind of code, you often need to extract that piece anyway.
Keep an eye on whether the control flag also indicates result information. If it does, you still need the control flag if you use the break, or you can return the value if you have extracted a method.
Example: Simple Control Flag Replaced with Break
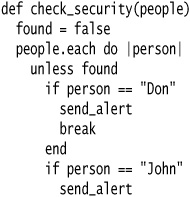
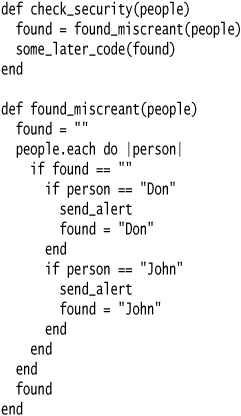
The following function checks to see whether a list of people contains a couple of hard-coded suspicious characters:

In a case like this, it is easy to see the control flag. It’s the piece that sets the found variable to true. I can introduce the breaks one at a time:
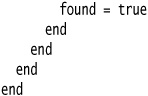
until I have them all:
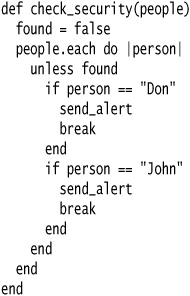
Then I can remove all references to the control flag:

Example: Using Return with a Control Flag Result
The other style of this refactoring uses a return. I illustrate this with a variant that uses the control flag as a result value:

Here found does two things. It indicates a result and acts as a control flag. When I see this, I like to extract the code that is determining found into its own method:
Then I can replace the control flag with a return:
![]()

until I have removed the control flag:

You can also use the return style when you’re not returning a value. Just use return without the argument.
Our refactoring is not yet finished—the found_miscreant method is a function with side effects. To fix it, we need to use Separate Query from Modifier. You’ll find this example continued there.
Replace Nested Conditional with Guard Clauses
A method has conditional behavior that does not make clear the normal path of execution.
Use guard clauses for all the special cases.
Motivation
I often find that conditional expressions come in two forms. The first form is a check where either course is part of the normal behavior. The second form is a situation in which one answer from the conditional indicates normal behavior and the other indicates an unusual condition.
These kinds of conditionals have different intentions, and these intentions should come through in the code. If both are part of normal behavior, use a condition with an if and an else leg. If the condition is an unusual condition, check the condition and return if the condition is true. This kind of check is often called a guard clause [Beck].
The key point about Replace Nested Conditional with Guard Clauses is one of emphasis. If you are using an if-then-else construct you are giving equal weight to the if leg and the else leg. This communicates to the reader that the legs are equally likely and important. Instead the guard clause says, “This is rare, and if it happens, do something and get out.”
I often find I use Replace Nested Conditional with Guard Clauses when I’m working with a programmer who has been taught to have only one entry point and one exit point from a method. One entry point is enforced by modern languages, and one exit point is really not a useful rule. Clarity is the key principle: If the method is clearer with one exit point, use one exit point; otherwise don’t.
Mechanics
1. For each check put in the guard clause.
![]() The guard clause either returns, or throws an exception.
The guard clause either returns, or throws an exception.
2. Test after each check is replaced with a guard clause.
![]() If all guard clauses yield the same result, use Consolidate Conditional Expressions.
If all guard clauses yield the same result, use Consolidate Conditional Expressions.
Example
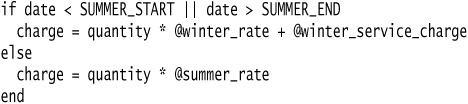
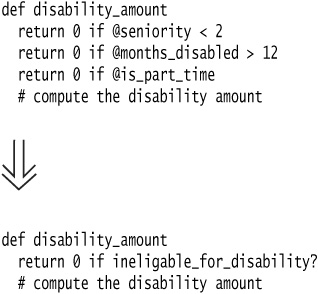
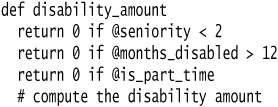
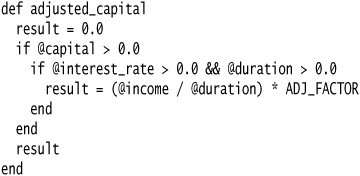
Imagine a run of a payroll system in which you have special rules for dead, separated, and retired employees. Such cases are unusual, but they do happen from time to time.
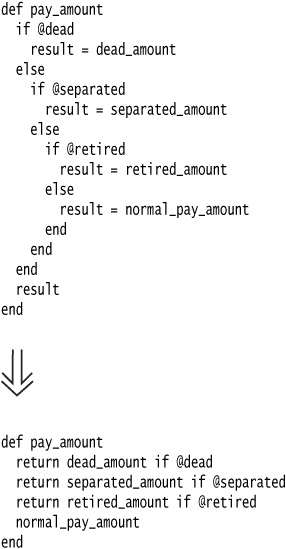
If I see the code like this:
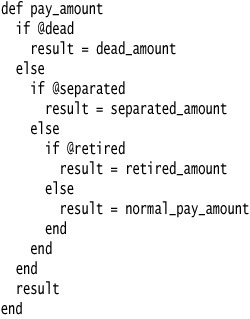
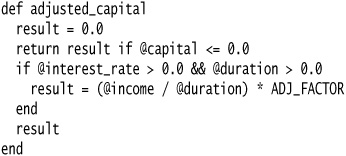
Then the checking is masking the normal course of action behind the checking. So instead it is clearer to use guard clauses. I can introduce these one at a time. I like to start at the top:

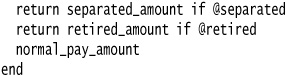
I continue one at a time:

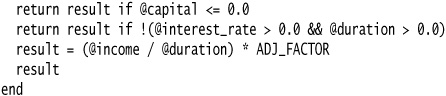
and then:

By this point the result temp isn’t pulling its weight so I nuke it:
![]()
Nested conditional code often is written by programmers who are taught to have one exit point from a method. I’ve found that is a too simplistic rule. When I have no further interest in a method, I signal my lack of interest by getting out. Directing the reader to look at an empty else block only gets in the way of comprehension.
Example: Reversing the Conditions
In reviewing the manuscript of this book, Joshua Kerievsky pointed out that you often do Replace Nested Conditional with Guard Clauses by reversing the conditional expressions. He kindly came up with an example to save further taxing of my imagination:
Again I make the replacements one at a time, but this time I reverse the conditional as I put in the guard clause:
Because the next conditional is a bit more complicated, I can reverse it in two steps. First I add a not:
![]()
Leaving nots in a conditional like that twists my mind around at a painful angle, so I simplify it as follows:
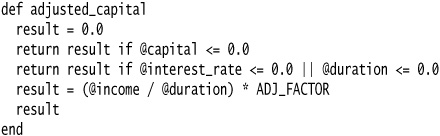
In these situations I prefer to put an explicit value on the returns from the guards. That way you can easily see the result of the guard’s failing. (I would also consider Replace Magic Number with Symbolic Constant here.)
With that done I can also remove the temp:
Replace Conditional with Polymorphism
You have a conditional that chooses different behavior depending on the type of an object.
Move each leg of the conditional to a method in an object that can be called polymorphically.

Motivation
One of the grandest sounding words in object jargon is polymorphism. The essence of polymorphsim is that it allows you to avoid writing an explicit conditional when you have objects whose behavior varies depending on their types.
As a result you find that case statements or if-then-else statements that switch on type codes are much less common in an Object-Oriented program.
Polymorphism gives you many advantages. The biggest gain occurs when this same set of conditions appears in many places in the program. If you want to add a new type, you have to find and update all the conditionals. But with polymorphism you just create a new class and provide the appropriate methods. Clients of the class don’t need to know about the polymorphism, which reduces the dependencies in your system and makes it easier to update.
Ruby’s duck typing makes it easy to introduce polymorphism. In a statically typed language like Java, you need inheritance or implementation of an interface to be able to call a method polymorphically. But in Ruby, an object’s current set of methods—not its inheritance from a particular class—determines its valid semantics. So long as objects A and B have the same method, you can call them in the same way.
Mechanics
Polymorphism in Ruby can be achieved in a couple of ways. In its simplest form, you can implement the same method signature on multiple objects and call these methods polymorphically. You can introduce a module hierarchy and have the method that is to be called polymorphically on the module. Or you can introduce an inheritance hierarchy and have the method that is to be called polymorphically on the subclasses. In each case, the mechanics are the same.
The code you target may be a case statement or an if statement.
1. If the conditional statement is one part of a larger method, take apart the conditional statement and use Extract Method.
2. If necessary use Move Method to place the conditional at the appropriate place in the object structure.
3. Pick one of the polymorphic objects. Create a method on the polymorphic object that will override the conditional statement method. Copy the body of that leg of the conditional statement into the polymorphic method and adjust it to fit.
4. Test.
5. Remove the copied leg of the conditional statement.
6. Test.
7. Repeat with each leg of the conditional statement until all legs are turned into polymorphic methods.
Example
This is the same example we used in Replace Type Code with Polymorphism. The important thing to note is that to do this refactoring you need to have the polymorphic objects in place—either objects that you are calling polymorphically (as in this case), or a module or inheritance hierarchy. For an example using a module hierarchy see Replace Type Code with Module Extension. For an example using inheritance, see Extract Subclass.
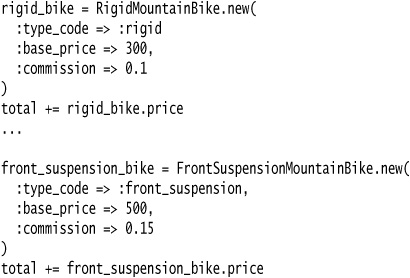
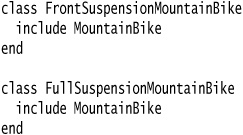
We already have our clients creating specific mountain bike objects, and calling them polymorphically:
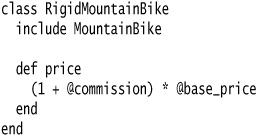
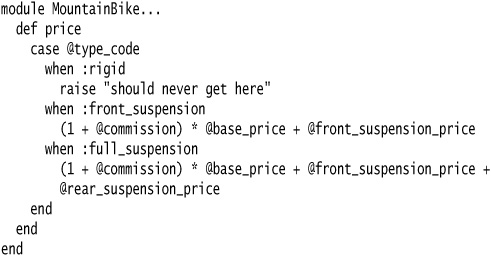
Each mountain bike class includes a common module that has the conditional logic:
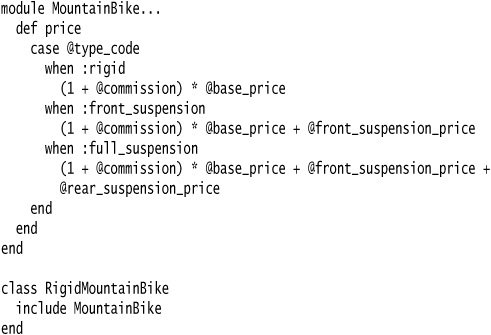
The case statement is already nicely extracted and placed on our polymorphic objects via the module, so there is nothing to do there. For an example that isn’t so nicely factored, see “Replacing the Conditional Logic on Price Code with Polymorphism” in Chapter 1, “Refactoring, a First Example.”
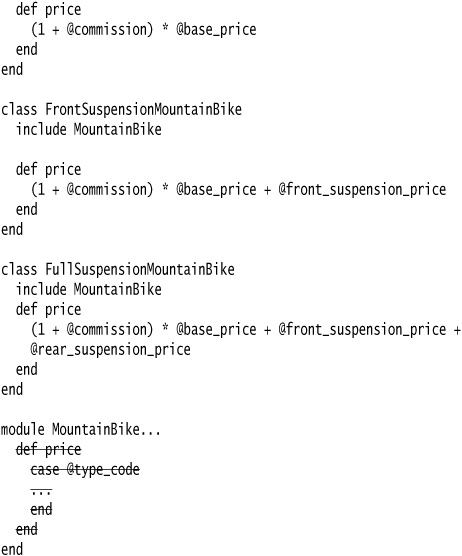
I can go to work immediately on the case statement. It’s rather like the way small boys kill insects: I remove one leg at a time. First I copy the RigidMountainBike leg of the case statement onto the RigidMountainBike class.
This new method overrides the whole case statement for rigid mountain bikes. Because I’m paranoid, I sometimes put a trap in the case statement:
I carry on until all the legs are removed. I can delete the price method on the MountainBike module when I’m done. If this is the only method left, I can remove the module too.
![]()
Introduce Null Object
You have repeated checks for a nil value.
Replace the nil value with a null object.
Motivation
The essence of polymorphism is that instead of asking an object what type it is and then invoking some behavior based on the answer, you just invoke the behavior. The object, depending on its type, does the right thing. One of the less intuitive places to do this is where you have a null value in a field. I’ll let Ron Jeffries, one of the original implementers of eXtreme Programming, tell the story:
You can find more details about the null object pattern in Woolf [Woolf]. It is an example of a Special Case, outlined in Fowler [Fowler].
Ruby allows us two main options for implementing the null object. The traditional route (and the only one available in statically typed languages without extracting an interface on the original class) is to create a subclass of the source class. This way the null object will respond to all the messages that the source class responds to. This is convenient but may lead to bugs if the null object lands in a spot where the default behavior of the source class is undesirable. The other option is to create a new class that does not inherit from the source class, only defining the methods that you want to be able to handle from the null object. This may be more work but is less likely to introduce subtle misbehavior.
When not subclassing the source class, there’s another option to consider: whether to implement a message-eating null object. A message-eating null will accept any message sent to it and return another message-eating null object. Ruby’s nil, the single instance of NilClass, is not a message-eating null, but in some languages, including Objective-C, nil will accept any message. This provides an interesting halfway point between the levels of effort and risk undertaken with either of the options discussed previously. By making your null object eat all messages, you avoid any strange default behavior in the source class, but you also avoid having to implement every method that might be called on the null object.
There’s a third option for Introduce Null Object in Ruby: You could add methods to NilClass itself. While this option might be valid in certain specific cases, muddying the interface of NilClass or changing the behavior of such a low-level object should not be undertaken lightly.
When deciding on a name for your Null Object, it is better to use a more meaningful and specific name (a la “UnknownCustomer” or even “MissingPerson”) and avoid the confusion or overloading of “null” or “nil,” respectively.
Mechanics
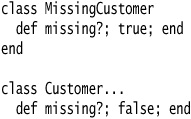
1. Create your null object class, optionally as a subclass of the source class. Create a missing? method on the source class and the null class to test for nullity. For the source class it should return false, for the null class it should return true.
![]() You may find it useful to create a mixin module for the test method so that “nullability” is declared clearly.
You may find it useful to create a mixin module for the test method so that “nullability” is declared clearly.
![]() As an alternative you can use a testing interface to test for nullness.
As an alternative you can use a testing interface to test for nullness.
2. Find all places that can give out nil when asked for a source object. Replace them to give out the null object instead.
3. Find all places that compare a variable of the source type with null and replace them with a call to missing?.
![]() You may be able to do this by replacing one source and its clients at a time and testing between working on sources.
You may be able to do this by replacing one source and its clients at a time and testing between working on sources.
![]() A few assertions that check for null in places where you should no longer see it can be useful.
A few assertions that check for null in places where you should no longer see it can be useful.
4. Test.
5. Look for cases in which clients invoke an operation if not null and do some alternative behavior if null.
6. For each of these cases define the method in the null class with the alternative behavior.
7. Remove the condition check for those that use the overridden behavior and test.
Example
A utility company knows about sites: the houses and apartments that use the utility’s services. At any time a site has a customer.
![]()
There are various features of a customer. I look at three of them.
![]()
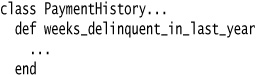
The payment history has its own features:
The attribute readers I show allow clients to get at this data. However, sometimes I don’t have a customer for a site. Someone may have moved out and I don’t yet know who has moved in. Because this can happen we have to ensure that any code that uses the customer can handle nils. Here are a few example fragments:
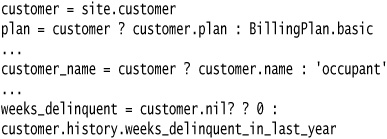
In these situations I may have many clients of Site and Customer, all of which have to check for nils and all of which do the same thing when they find one. Sounds like it’s time for a null object.
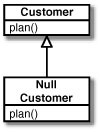
The first step is to create the null customer class and modify the Customer class to support a query for a null test:
If you like, you can signal the use of a null object by means of a module:

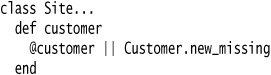
I like to add a factory method to create null customers. That way clients don’t have to know about the null class:

Now comes the difficult bit. Now I have to return this new null object whenever I expect a nil and replace the tests for nil with tests of the form foo.missing?. I find it useful to look for all the places where I ask for a customer and modify them so that they return a null customer rather than nil.
I also have to alter all uses of this value so that they test with missing? rather than nil? or evaluation as a boolean.


There’s no doubt that this is the trickiest part of this refactoring. For each source of a null I replace, I have to find all the times it is tested for nullness and replace them. If the object is widely passed around, these can be hard to track. I have to find every variable of type Customer and find everywhere it is used. It is hard to break this process into small steps. Sometimes I find one source that is used in only a few places, and I can replace that source only. But most of the time, however, I have to make many widespread changes. The changes aren’t too difficult to back out of, because I can find calls of missing? without too much difficulty, but this is still a messy step.
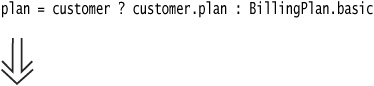
Once this step is done and tested, I can smile. Now the fun begins. As it stands I gain nothing from using missing? rather than nil?. The gain comes as I move behavior to the null customer and remove conditionals. I can make these moves one at a time. I begin with the name. Currently I have client code that says:
![]()
I add a suitable name method to the null customer:

Now I can make the conditional code go away:
![]()
I can do the same for any other method in which there is a sensible general response to a query. I can also do appropriate actions for modifiers. So client code such as:
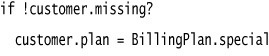
can be replaced with

Remember that this movement of behavior makes sense only when most clients want the same response. Notice that I said most, not all. Any clients who want a different response to the standard one can still test using missing?. You benefit when many clients want to do the same thing; they can simply rely on the default null object behavior.
The example contains a slightly different case—client code that uses the result of a call to customer:
![]()
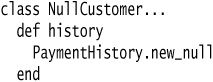
I can handle this by creating a null payment history:
![]()
I modify the null customer to return it when asked:
Again I can remove the conditional code:
![]()
You often find that null objects return other null objects.
Example: Testing Interface
The testing interface is an alternative to defining a method to test whether you have a null object. In this approach I create a null mixin module with no methods defined:
![]()
I then include this module in my null objects:
![]()
I then test for nullness with the is_a? method:
![]()
I normally run away screaming from queries on the type of an object, but in this case it is okay to use it. It has the particular advantage that I don’t need to change the customer class to introduce the null object.
Other Special Cases
When carrying out this refactoring, you can have several kinds of null. Often there is a difference between having no customer (new building and not yet moved in) and having an unknown customer (we think there is someone there, but we don’t know who it is). If that is the case, you can build separate classes for the different null cases. Sometimes null objects actually can carry data, such as usage records for the unknown customer, so that we can bill the customers when we find out who they are.
In essence there is a bigger pattern here, called special case. A special case class is a particular instance of a class with special behavior. So UnknownCustomer and NoCustomer would both be special cases of Customer. You often see special cases with numbers. Floating points in Java have special cases for positive and negative infinity and for not a number (NaN). The value of special cases is that they help reduce dealing with errors. Floating point operations don’t throw exceptions. Doing any operation with NaN yields another NaN in the same way that accessors on null objects usually result in other null objects.
Introduce Assertion
A section of code assumes something about the state of the program.
Make the assumption explicit with an assertion.
Motivation
Often sections of code work only if certain conditions are true. This may be as simple as a square root calculation’s working only on a positive input value. With an object it may be assumed that at least one of a group of fields has a value in it.
Such assumptions often are not stated but can only be decoded by looking through an algorithm. Sometimes the assumptions are stated with a comment. A better technique is to make the assumption explicit by writing an assertion.
An assertion is a conditional statement that is assumed to be always true. Failure of an assertion indicates programmer error. As such, assertion failures should always result in an exception. Assertions should never be used by other parts of the system. Indeed assertions usually are removed for production code. It is therefore important to signal something is an assertion.
Assertions act as communication and debugging aids. In communication they help the reader understand the assumptions the code is making. In debugging, assertions can help catch bugs closer to their origin. I’ve noticed the debugging help is less important when I write self-testing code, but I still appreciate the value of assertions in communication.
Mechanics
Because assertions should not affect the running of a system, adding one is always behavior preserving.
1. When you see that a condition is assumed to be true, add an assertion to state it.
![]() Have an
Have an Assertions module that you can include for assertion behavior.
Beware of overusing assertions. Don’t use assertions to check everything that you think is true for a section of code. Use assertions only to check things that need to be true. Overusing assertions can lead to duplicate logic that is awkward to maintain. Logic that covers an assumption is good because it forces you to rethink the section of the code. If the code works without the assertion, the assertion is confusing rather than helpful and may hinder modification in the future.
Always ask whether the code still works if an assertion fails. If the code does work, remove the assertion.
Beware of duplicate code in assertions. Duplicate code smells just as bad in assertion checks as it does anywhere else. Use Extract Method liberally to get rid of the duplication.
Example
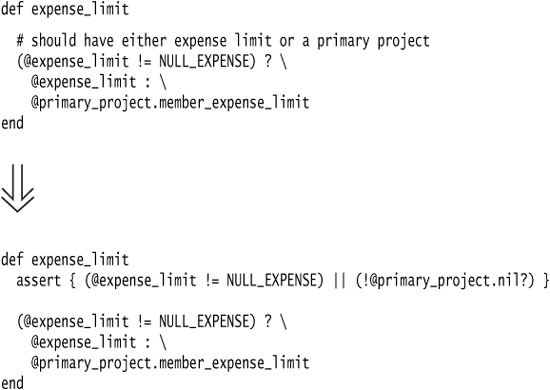
Here’s a simple tale of expense limits. Employees can be given an individual expense limit. If they are assigned a primary project, they can use the expense limit of that primary project. They don’t have to have an expense limit or a primary project, but they must have one or the other. This assumption is taken for granted in the code that uses expense limits:

This code contains an implicit assumption that the employee has either a project or a personal expense limit. Such an assertion should be clearly stated in the code:
This assertion does not change any aspect of the behavior of the program. Either way, if the condition is not true, I get an exception: either an ArgumentError in within_limit or a custom error inside Assertions#assert. In some circumstances the assertion helps find the bug, because it is closer to where things went wrong. Mostly, however, the assertion helps to communicate how the code works and what it assumes.
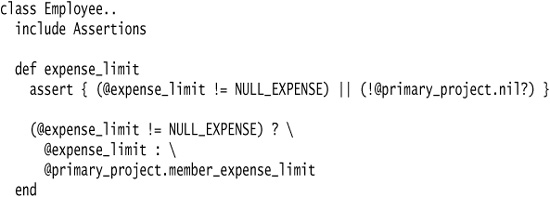
I often find I use Extract Method on the conditional inside the assertion. I either use it in several places and eliminate duplicate code or use it simply to clarify the intention of the condition.
One of the complications of assertions is that there is often no simple mechanism to putting them in. Assertions should be easily removable, so they don’t affect performance in production code. Having a utility module, such as Assertions, certainly helps. But with the flexibility of dynamic languages such as Ruby, we can go even further. By using a block as a parameter to our assert method, we can easily prevent the expression inside the block from being evaluated in production. If our Assertions module is implemented like this:
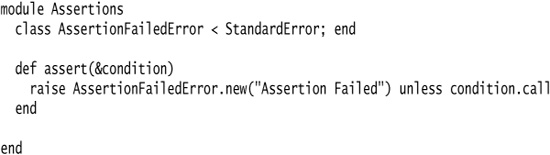
then we can easily overwrite the method with a no-op method during deployment to production:

The Assertion module should have various methods that are named helpfully. In addition to assert, you can have equals, and should_never_reach_here.